Working with libraries
- What is a library?
- Library levels
- Application server libraries
- Excluded library items
- Where do I manage my libraries?
- About downloading libraries from Maven
- Creating a library
- Creating a library in the Project tool window
- Adding a global or project library to module dependencies
- Moving a library onto a higher level
- When would I want to move a library onto a higher level?
- Creating a copy of a library at a lower level
- When would I want a copy of a library at a lower level?
- Finding usages of a project or global library
- Adding classes, sources and documentation to a library
- Making online documentation accessible in IntelliJ IDEA
- Making library items excluded. Cancelling the excluded status
- Switching from dependencies to library configuration
What is a library?
A library is a collection of compiled code that you use as is. A Java library, for example, can include class files, archives and directories with class files as well as directories with Java native libraries (.dll, .so or .jnilib).
Libraries may optionally include the source code for the library classes as well as corresponding API documentation. Including the source files and documentation is optional. It adds the ability to use inline documentation extracted from the source code ( or Ctrl+Q), and also to view the API documentation right from the IDE ( or Shift+F1).
Libraries let you reuse the code developed by others instead of implementing corresponding functionality yourself.
Library levels
You can define the libraries at the global (IDE), project, and module levels. The level of a library defines the scope of its potential or actual use:
- Global libraries can be used in any of your projects . That is, they can be added to dependencies of any module in any project.
- Project libraries can be used in any of the modules within the corresponding project. However, they are not available outside of the project in which they are defined.
- Module libraries exist only as dependencies of the corresponding module.
Note that a global or project library is actually unused unless added to dependencies of a module.
IntelliJ IDEA lets you move the libraries to a higher level (e.g. from project to global), create library copies at a lower level (e.g. you can create a copy of a global library at the project level), etc.
Application server libraries
Application server libraries let you use the classes available in corresponding server distributions.
When you add a definition of an application server (see e.g. Defining Application Servers in IntelliJ IDEA ), an associated application server library is created.
In terms of the library levels, the application server libraries are global libraries. They can be added to dependencies of any module in any of your projects.
Excluded library items
You can make library items "excluded". IntelliJ IDEA will ignore such items when you write your code. As a result, the classes from excluded packages won't be present in code completion suggestion lists, references to such classes will be shown in the editor as unresolved, etc. However, when you compile or run your code, a library is still used as a whole, irrespective of whether there are excluded items in that library or not.
You can exclude folders, archives (e.g. JARs) and folders within the archives.
When your code references only a small portion of a big library, making the "unnecessary" items excluded may considerably increase the IDE performance.
Where do I manage my libraries?
Most of the tasks related to working with libraries are performed in the Project Structure dialog ().
The exceptions are the application server libraries and JavaScript libraries. Those are managed in the Settings / Preferences dialog:
- The application server libraries: Ctrl+Alt+S . For more info, see the Application Servers page description.
- The JavaScript libraries: Ctrl+Alt+S . For more info, see Configuring JavaScript Libraries.
In the Project Structure dialog, depending on the library level:
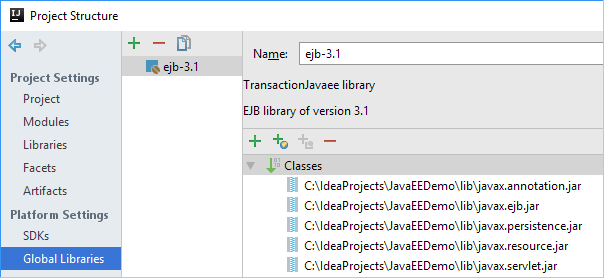
Global (IDE). To see you global libraries, select Global Libraries.

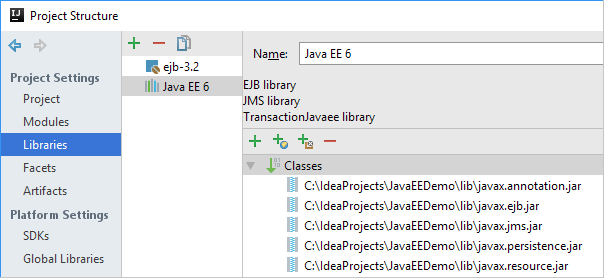
Project. To see your project libraries, select Libraries.

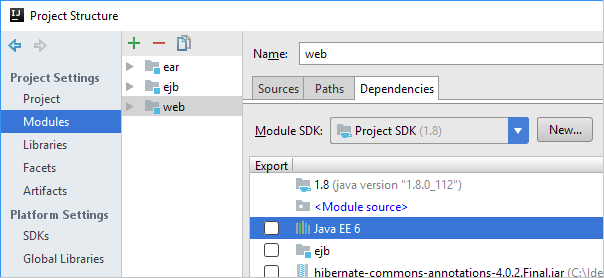
Module. To see the libraries included in the dependencies of a module, select Modules, select the module of interest, and then select Dependencies.

What's not an SDK or module in the list of dependencies, is a library.
The libraries here are not necessarily all module libraries. There may be global and project libraries as well.
If you want to know the library level, select the library of interest and click ![]() . The library level will be reflected in the name of the dialog that will open, e.g. Configure Module Library.
. The library level will be reflected in the name of the dialog that will open, e.g. Configure Module Library.
About downloading libraries from Maven
When creating a library (![]() ), you have an option of downloading a library from a public Maven repository (
), you have an option of downloading a library from a public Maven repository (![]() ). For corresponding instructions, see e.g. Downloading Libraries from Maven Repositories.
). For corresponding instructions, see e.g. Downloading Libraries from Maven Repositories.
In all other cases, you compose a library by specifying the files and folders already available on your computer.
Creating a library
Depending on the level you are currently on:
Global or project. Above the list of libraries, click ![]() and select the library type (e.g. Java). Select the files and folders you want to include in your library. Select the modules to whose dependencies you want to add the library.
and select the library type (e.g. Java). Select the files and folders you want to include in your library. Select the modules to whose dependencies you want to add the library.
Module. Next to the list of dependencies, click ![]() . Now, your can select one of the following routes, both leading to about the same result:
. Now, your can select one of the following routes, both leading to about the same result:
- JARs or directories. In the dialog that opens, select the files and folders to be included in your library. As a result, an unnamed module library is created and added to the dependencies of the module.
- Library. In the dialog that opens, click New Library and select the library type (e.g. Java). Then select the files and folders to be included in the library. In the Configure Library dialog, specify the library name and level. To add the new library to the dependencies of the module, click Add Selected.
Creating a library in the Project tool window
If the .jar files that you want to use as a library are within your project content roots, you can start creating your library in the Project tool window ().
- Select the .jar file or files to be included in the library, or a directory that contains the .jar files of interest.
- Select Add as Library from the context menu.
- In the dialog that opens, specify the library name, level and the module in which this library will be used.
Adding a global or project library to module dependencies
Depending on the level you are currently on:
Global or project. Right-click the library of interest and select Add to Modules. Select the modules to whose dependencies you want to add the library.
Module. Next to the list of dependencies, click ![]() and select Library. In the dialog that opens, select one or more libraries and click Add Selected.
and select Library. In the dialog that opens, select one or more libraries and click Add Selected.
Moving a library onto a higher level
You can move a module library to the project or global level. Also, you can move a project library onto the global level.
- Right-click the library and select Move to Project Libraries or Move to Global Libraries.
- In the dialog that opens, specify if and where you want to move the library contents.
When would I want to move a library onto a higher level?
Say, there's a module library which you want in another module. In that case, you'd:
- Move the library onto the project level.
- Add the library to the dependencies of the corresponding module.
Creating a copy of a library at a lower level
You can create a copy of a global library at the project level: right-click the library and select Copy to Project Libraries. Then, in the dialog that opens, specify if you also want a copy of the library files and where that copy should be created.
For a global or project library included in the dependencies of a module, to start creating a copy at the module level, right-click the corresponding library and select Copy to Module Libraries.
When would I want a copy of a library at a lower level?
Say, there's a project library that is used in a number of modules. And you want more classes in that library but only in one of the modules. In that case, you'd:
- Create a copy of the library in the dependencies of the corresponding module. (As a result, a new module library is created.)
- Add the classes to your new module library.
Finding usages of a project or global library
You can find out in which modules a project or global library is used: right-click the library and select Find Usages (Alt+F7).
Adding classes, sources and documentation to a library
Depending on the level you are currently on:
Global or project. In the right-hand part of the dialog, where the library name and contents are shown, click ![]() (Alt+Insert), and then select the files and folders that contain the classes, sources and documentation you want to add.
(Alt+Insert), and then select the files and folders that contain the classes, sources and documentation you want to add.
Module. Select the library of interest and click ![]() . In the dialog that opens, click
. In the dialog that opens, click ![]() (Alt+Insert). Then select the files and folders that contain the classes, sources and documentation you want to add.
(Alt+Insert). Then select the files and folders that contain the classes, sources and documentation you want to add.
Making online documentation accessible in IntelliJ IDEA
If online documentation is available for the library that you are using, you can make that documentation accessible when coding. To do that, you should specify the documentation URL. (At a later time, to view the online documentation, use or Shift+F1.)
Depending on the level you are currently on:
Global or project. In the right-hand part of the dialog, where the library name and contents are shown, click ![]() and then specify the documentation URL.
and then specify the documentation URL.
Module. Select the library of interest and click ![]() . In the dialog that opens, click
. In the dialog that opens, click ![]() and then specify the documentation URL.
and then specify the documentation URL.
Making library items excluded. Cancelling the excluded status
To make library items excluded, depending on the level you are currently on:
Global or project. In the right-hand part of the dialog, where the library name and contents are shown, click ![]() . In the dialog that opens, select the items you want to make excluded. (You can exclude folders, archives (e.g. JARs) and folders within the archives.)
. In the dialog that opens, select the items you want to make excluded. (You can exclude folders, archives (e.g. JARs) and folders within the archives.)
As a result, the items with the excluded status appear. They are shown as ![]() .
.
Module. Select the library of interest and click ![]() . In the dialog that opens, click
. In the dialog that opens, click ![]() and then select the items you want to make excluded.
and then select the items you want to make excluded.
To cancel the excluded status of the library items:
On the global or project level: select the items whose excluded status you want to cancel (![]() ), and then click
), and then click ![]() (Delete).
(Delete).
On the module level: select the library of interest and click ![]() . In the dialog that opens, select the items whose excluded status you want to cancel (
. In the dialog that opens, select the items whose excluded status you want to cancel (![]() ), and then click
), and then click ![]() (Delete).
(Delete).
Switching from dependencies to library configuration
To see the library configuration (settings and contents) for a library included in module dependencies, right-click the library and select Navigate (F4).