Quick CMake Tutorial
Basics
CMake is a build system that uses a single script (defined in a CMakeLists.txt file) to generate appropriate platform-specific build scripts. For example, on Windows, CMake can generate files targeting Microsoft Visual Studio and the MSBuild system, whereas on other operating system it can target various MAKE variants.
The first command you typically encounter in the root CMakeLists.txt file is the specification of the minimum required CMake version, cmake_minimum_required(VERSION x.x.x). This command specifies the necessary minimum for the project to build. When you create a new project in CLion, the IDE automatically generates the CMakeLists.txt file and inserts the current version of CMake (taking the value from the version of CMake that’s set to be used in CLion), so you don’t need to explicitly specify it yourself.
By default, CLion expects a CMakeLists.txt file to be provided in the root directory of all project-related files. This can be customized, though, by moving CMakeLists.txt and changing the project root accordingly.
Following the minimum required version, we have the project() directive which defines the name of the project. A project is simply a collection of files that are all somehow related. You declare the name of the project like so
project(MyProject) CMake lets you create text variables. For this purpose, the set() command is used. For instance, to create a variable MY_VAR with the value "hello", we write:
set (MY_VAR "hello")set (OTHER_VAR "${MY_VAR} world!")To open an existing and generated CMake project on your system, you can use each of the following simple procedures:
Open the top-level CMakeLists.txt file;
Open the
CMakeCache.txtfile;Locate a directory with generated CMake files and open it as a project.
Project file reloading
It’s important to understand that, when you change the project file (CMakeLists.txt), CLion needs to reload this file in order to have an updated understanding of the project structure.
The first time you change CMakeLists.txt, you will see a popup where CLion is asking you how you want to reload the file. The options are:
To simply reload the file. You will have to keep doing this every time you change the file. Not very convenient!
Enable auto-reload. This means CLion will monitor changes in CMakeLists.txt and will reload the project on any change.
The option for enabling or disabling auto-reload is also available in CLion’s options under (or for macOS users).
Specifying header search paths
Header search paths are important not only for the compiler (so that it knows where to search for headers) but also for CLion, since the IDE needs to index the relevant directories and provide code completion and navigation facilities on #include statements.
The compiler searches the headers in several predefined locations that are specific to the operating system being used. In addition, you can specify further directories with header files using CMake’s include_directories() command:
include_directories( ${MY_SOURCE_DIR}/src )You can control the order of inclusion of the directories with additional BEFORE and AFTER keywords. The default behavior is to append the include directory with the current item:
include_directories( BEFORE ${MY_SOURCE_DIR}/src )Setting language standard
To enable a particular language standard, specify the desired standard in CMAKE_CXX_VARIABLE, as follows:
set(CMAKE_CXX_STANDARD 11) # enable C++11 standardCMAKE_CXX_FLAGS: set (CMAKE_CXX_FLAGS "${CMAKE_CXX_FLAGS} -std=c++1y -Wall")-std=c++1y, -std=c++1z and so on. Adding build targets
A build target defines an executable or a library that the CMake script helps you build. A script can have more than one build target. To create an executable binary, you use the add_executable() command, i.e.,
add_executable (my_executable my_source1.cpp my_source2.cpp)my_executable is the target name and *.cpp files are the source files needed to construct the final executable. If you want to build a library instead, you can use the add_library() command:
add_library (my_library STATIC|SHARED|MODULE my_source.cpp)STATIC builds a static library, i.e. a library that gets embedded into whichever executable decides to use it.
SHARED builds a shared library (
.soon Linux,.dllon Windows).MODULE builds a plugin library — something that you do not link against, but can load dynamically at runtime.
Build targets and CLion’s configurations
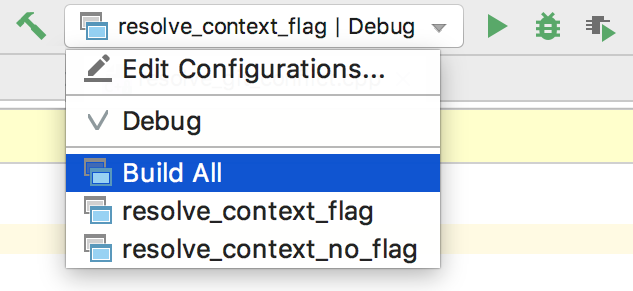
When you run or debug a target in CLion, you do so based on a configuration. A configuration is a collection of settings that defines what you are building and how. Please note that configurations are not the same as targets, however, it’s worth noting also that CLion automatically creates configurations for each target you have in your project. By default, when you create a new project in CLion, you get two configurations:
<projectname> is the configuration which matches the name of both your project and the default target.
Build All is a configuration which builds all targets.
When it comes to running/debugging, you need to specify the target you actually want to run/debug. You specify the configuration either by going into or by using CLion’s drop-down menu: 
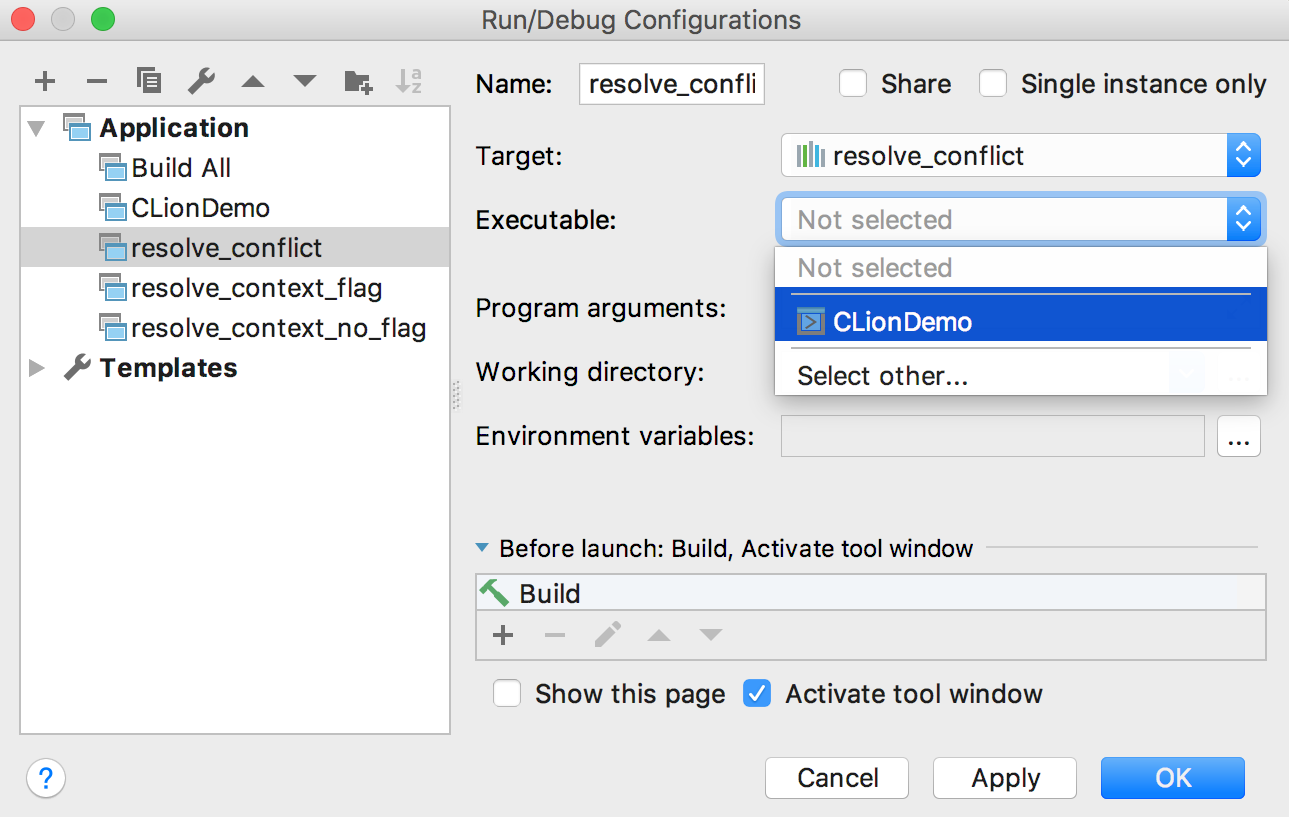
In the configuration editor, you can add and remove new configurations. Removing is important because renaming a target will result in a stale configuration that will no longer run, and CLion will tell you about it by putting a red cross on top of its icon.
Here’s what the configuration editor looks like. Note that the name of the target and the name of an executable file (in case the target is the executable) are taken directly from the CMakeLists.txt target's description. 
Please note that since version 2016.3 CLion generates only one configuration type defined by the Configuration setting of the CMake settings dialog.
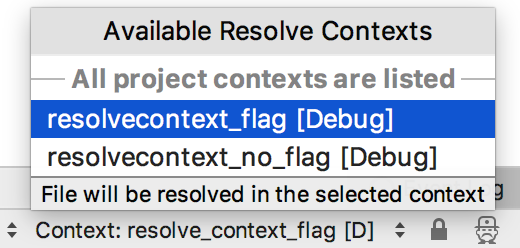
When analyzing your code, you can instruct CLion to use not only CMakeLists.txt but also information from the build configuration by setting the so-called resolve context. You can access it by clicking the Context field of the Status bar: 

Including libraries
Here’s how you actually make use of a library. As the first step, you need to instruct the compiler to find a desired library and its components:
find_package (my_library COMPONENTS REQUIRED component1 component2 OPTIONAL_COMPONENTS opt_component)REQUIRED determines component1 and component2 as the mandatory components for a project. The component opt_component is qualified as an optional one; this means, that compilation can proceeded regardless of whether the optional component is actually available. Next up, you need to link an executable to the located library:
target_link_libraries (my_target my_library another_library)target_link_libraries() shall be placed after add_executable() command. Using Boost
The Boost libraries are the most popular C++ library set. While many libraries are header-only (meaning you don’t need to perform any linking, just include a few files), some libraries do, in fact, require compilation and linking.
So let’s get started by including the files. For this, you can use CLion’s incboost live template, which will generate the following:
find_package(Boost)
IF (Boost_FOUND)
include_directories(${Boost_INCLUDE_DIR})
endif()
Now, when it comes to libraries, Boost offers you options for both static and dynamic linking. There are also additional options, such as whether or not you want to enable multithreading (feel free to read up on this option, since it doesn’t actually make code parallel). Also, you can cherry-pick which Boost components you want:
set (Boost_USE_STATIC_LIBS OFF) # enable dynamic linking
set (Boost_USE_MULTITHREAD ON)  # enable multithreading
find_package (Boost COMPONENTS REQUIRED chrono filesystem)target_link_libraries() command: target_link_libraries (my_target my_library another_library)An alternative approach to using libraries is to use an external dependencies manager that can use CMake to configure and build projects.
Including sub-projects
Projects can have dependencies to other projects. CMake does not have the notion of a ‘solution’ — instead, it allows you to define dependencies between projects. Typically, you want to organize your multi-project workspace such that:
When opening the main project, the IDE shall open all the dependant projects as well.
All the settings of the main project shall be applied to the dependant projects automatically.
All the smart features (e.g refactoring, code completion, etc) shall take effect in all the projects.
The above points can be achieved with proper configuration of the CMakeLists file. Essentially, you need to organize your projects as a tree of subdirectories with the top-level CMakeLists.txt file in the root directory. Then, each subdirectory of that tree shall represent a single sub-project and contain its own CMakeLists.txt file, which is then included to the main project in the top-level CMakeLists.txt file, as follows:
add_subdirectory (project1) # including project1 into the main project
add_subdirectory (project2) # including project2 into the main project
CMake Cache
When you run CMake for the first time, what it will do is assemble the so-called CMake cache, collecting the variables and settings found in the system and storing them so it doesn’t have to regenerate them later on. In most cases, you should not worry about this cache, but if you want to fine-tune it, you can. Locate the CMakeCache.txt file and open it in the Editor.
If you’ve changed values, be sure to reset the CMake cache and reload your project so that your changes are actually internalized by CLion.