Files tool window
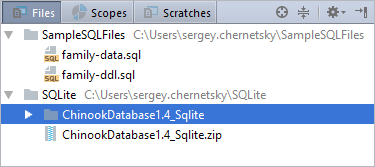
The Files tool window lets you manage files and folders associated with your project, and your database consoles.
Most of the functions in this tool window are accessed as context menu commands in the content pane and associated shortcuts.
Views
There are two main views in the tool window:
- Files view. For files and folders associated with your project, this view provides the functions similar to those of a file manager. It lets you create files and folders, open files in the editor and perform other useful tasks.

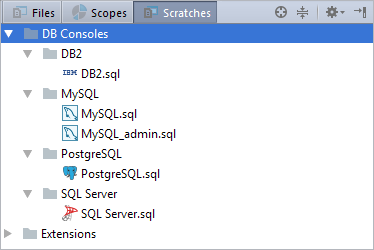
- Scratches view. This view lets you manage your database consoles and extension scripts. See Managing database consoles and Extending the DataGrip functionality.

The necessary view is selected from the list in the left-hand part of the title bar or, if the views are represented by tabs, by clicking the corresponding tab.

To configure a view, use the corresponding options in the title bar context menu. The necessary options can also be accessed by clicking ![]() on the title bar.
on the title bar.
Title bar context menu
| Item | Shortcut | Description |
|---|---|---|
| Select Next View or Tab Select Previous View or Tab Show List of Views or Tabs | Alt+Right Alt+Left Alt+Down | These are the commands for switching between different views. |
| Autoscroll to Source | If this option is on, DataGrip will automatically open the selected item in the editor. | |
| Autoscroll from Source | If this option is on, DataGrip automatically locates documents that you open in the editor in the Files tool window. | |
| Sort by Type | If the option is off, the files are sorted alphabetically by their names. If the option is on, the files are sorted by their extensions. The option doesn't affect the order of the folders. The folders are always sorted alphabetically. | |
| Folders Always on Top | If the option is on, all the folders are shown before the files. Otherwise, all the items are sorted alphabetically, and the files and folders appear intermixed. | |
| Pinned, Docked, Floating, Windowed, Split Mode | These options let you control general appearance and behavior of the tool window. | |
| Remove from Sidebar | This command hides the tool window, removes the button for showing and hiding the tool window and removes the tool window from the quick access menu ( To open the tool window again (and restore the associated features), use the main menu: . | |
| Group Tabs | If this option is on, there is a list in the left-hand part of the title bar from which you can select the necessary view. If this option is off, the views are represented by tabs which appear in the left-hand part of the title bar. | |
| Move to | To associate the tool window with a different tool window bar, select this command, and then select the destination tool window bar (Top, Left, Bottom or Right). | |
| Resize | To resize the tool window by moving one of its borders, select this command, and then select the necessary Stretch to option. Note that this command is not available for the floating mode. | |
| Hide | Shift+Escape | Use this command to hide the tool window. |
Title bar buttons
| Item | Shortcut | Description |
|---|---|---|
| | When you click this icon, the file or console which is open on the current editor tab is highlighted in the current view of the Files tool window. This icon is not available if the Autoscroll from Source option is currently on. | |
| | Ctrl+NumPad - | Use this icon or shortcut to collapse all the nodes. |
| | Use this button to open a menu whose options are a subset of the title bar context menu. | |
| | Shift+Escape | Use this icon or shortcut to hide the tool window. When used in combination with the Alt key, clicking this icon hides all the tool windows attached to the same tool window bar. |
Content pane
The content pane shows the folders associated with your project and their contents, or your database consoles grouped by DB data sources.
Context menu commands for the content pane items
When you right-click an item in the content pane, the context menu for this item is shown. This menu provides access to all the functions available for the selected item:
| Item | Shortcut | Description |
|---|---|---|
| Attach Directory | Use this command to associate a directory with the project. Select the directory of interest in the dialog that opens. The selected directory along with all its contents, effectively, becomes part of your project. | |
| New | Alt+Insert | Use this command or shortcut to create a new directory or file in the current directory. In the Scratches view, this command also lets you create a database console. |
| Cut | Ctrl+X | Use this command to move the selected item or items from the current location to the clipboard. |
| Copy | Ctrl+C | Use this command to copy the selected item or items to the clipboard. |
| Copy Path(s) | Ctrl+Shift+C | Use this command to copy the full path(s) of the selected item or items to the clipboard. |
| Copy Relative Path | Ctrl+Shift+Alt+C | Use this command to copy a relative path to the selected item to the clipboard. |
| Paste | Ctrl+V | Use this command to insert the contents of the clipboard into the selected location. |
| Jump to Source | F4 | Use this command to open the selected file in the editor. If the file is already open, the corresponding editor tab will become active. |
| Find Usages | Alt+F7 | Use this command to find the usages of the selected item. (The Find Usages dialog will open.) |
| Refactor | Use this command to perform one of the refactorings available for the selected item. For example, you can rename (), move and copy files and directories. | |
| Show Thumbnails | Ctrl+Shift+T | Use this command to view thumbnails for image files located in the selected directory. (The Thumbnails tool window will open.) |
| Delete | Delete | Use this command to delete the selected item. Use with care! For top-level directories in the Files view, you can select to physically delete the directory or to remove the association of the directory with the project (the Detach option). |
| Change Dialect (<CurrentDialect>) | For SQL files and database consoles: change the SQL dialect associated with the file or console. | |
| Run '<item_name>' | Ctrl+Shift+F10 | For an SQL file or database console: execute all the statements contained in the selected file or console. |
| Local History | Use this command to view local history for the selected file or directory, or to create a label for the current version of your project. | |
| Synchronize '<item_name>' | Use this command to synchronize the selected item with its version saved in the file system. (If you change a file or directory contents externally, DataGrip, under certain circumstances, may not be aware of the corresponding changes unless you use this command.) | |
| Show in Explorer | Use this command to open a file browser (e.g. Windows Explorer or Finder) and show the selected item there. | |
| File Path | Ctrl+Alt+F12 | Use this command to open the File Path menu. This menu shows the path from the file system root to the selected element with individual directories as the menu items. When you select an item in this menu (e.g. a directory), a file browser (e.g. Windows Explorer or Finder) opens, and the selected item is shown there. |
| Compare With | Ctrl+D | Use this command to compare the selected file or directory with another file or directory. Select the other file or directory the dialog that opens. See Differences viewer for files and Differences viewer for folders. |
| Compare File with Editor | Use this command to compare the selected file with the file open on an active editor tab. SeeDifferences viewer for files. | |
| Mark Directory As Excluded | Use this command to make DataGrip ignore the selected directory. As a result, the directory won't be shown in the Files tool window and you won't be able to work with that directory in DataGrip. |
