DataGrip 2018.2 Help

Connecting to a database

To be able to work with your database, define it as a data source. This page provides how tos for popular database management systems and typical situations.

PostgreSQL

  1. Open the Data Sources and Drivers dialog: File | Data Sources or Ctrl+Shift+Alt+S.
  2. Click icons general add svg and select PostgreSQL.
    DBPlusPostgreSQL
  3. In the lower part of the dialog, within Download missing driver files, click the Download link.
    DBDownloadMissingDriverFiles
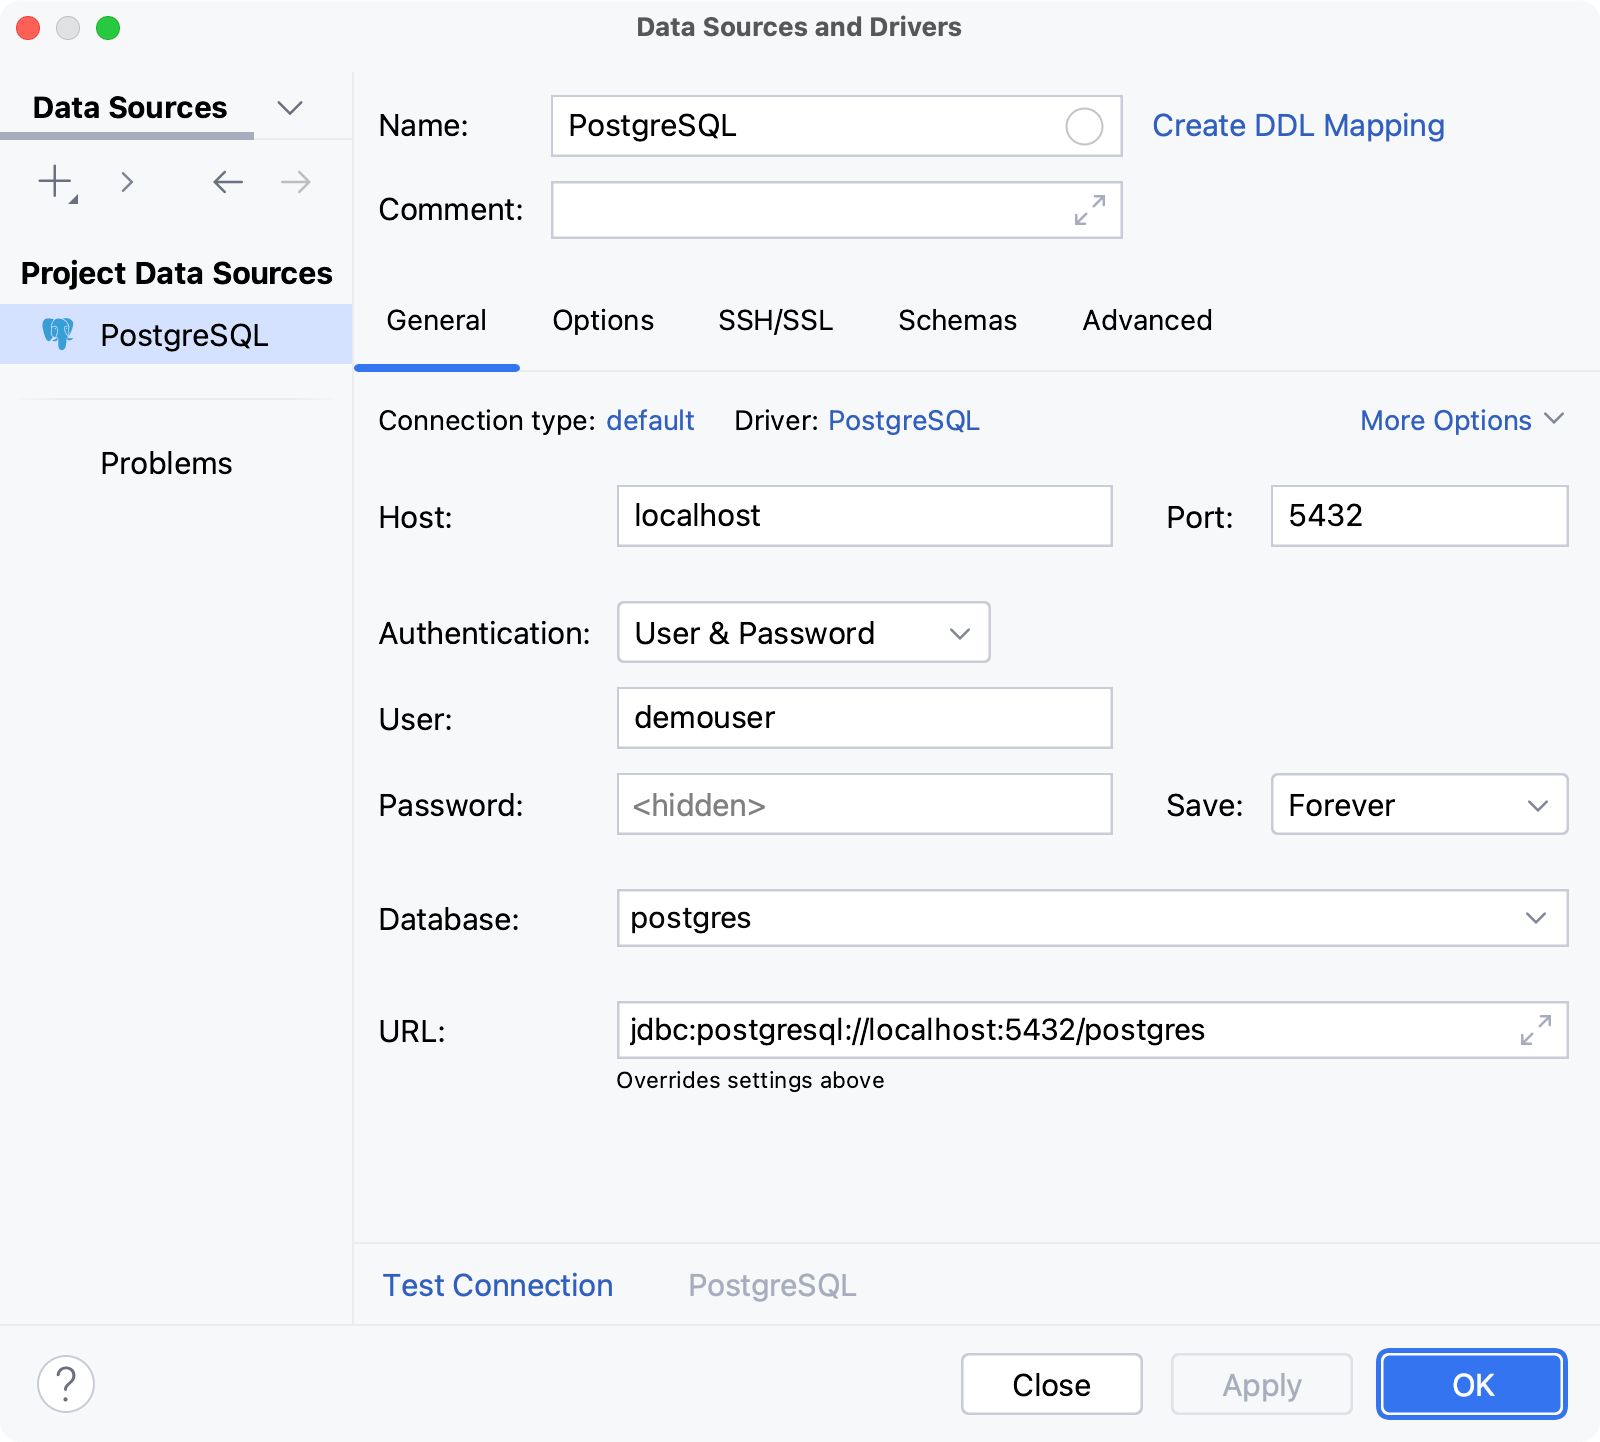
  4. Specify the database connection settings and your user account info:
    • Host. If you database server is on a different computer, replace localhost with the FQDN or IP address of the server host, e.g. mydbserver.example.com or 172.20.240.163.
    • Port. The default PostgreSQL server port is 5432. If your server uses a different port, specify that port.
    • Database. The name of the database that you are going to work with.
    • User and Password. These are your database user name and password.
  5. If necessary, edit the data source name.
  6. To connect via SSH, specify the SSH proxy settings.
  7. To make sure that the settings are OK, click Test Connection.
    DBPostgreSQLConnectionSuccessful

    Click OK.

    Now, as a final check, execute a couple of queries.

  8. If necessary, form the schema search path using the popup in the upper-right part of the console. For instructions, see Controlling the schema search path for PostgreSQL and Redshift.
    DBPostgreSQLSchemaSearchPath
  9. Type your query, e.g.
    CREATE TABLE mytesttable ( myfield INT );
  10. Execute the query: icons toolwindows toolWindowRun svg or Ctrl+Enter.
  11. If necessary, execute another query, e.g.
    DROP TABLE mytesttable
    DBPostgreSQLQueriesExecuted

PostgreSQL on Heroku

  1. Open the Data Sources and Drivers dialog: File | Data Sources or Ctrl+Shift+Alt+S.
  2. Click icons general add svg and select PostgreSQL.
    DBPlusPostgreSQL
  3. In the lower part of the dialog, within Download missing driver files, click the Download link.
    DBDownloadMissingDriverFiles
  4. Select the Advanced tab and specify the following properties:
    • ssl: true
    • sslfactory: org.postgresql.ssl.NonValidatingFactory
    DBPostgresHerokuSSLFactory

    These will turn SSL on and the certificate validation off.

  5. Click Apply and select the General tab.
  6. Go to your Heroku dashboard and display your database settings: e.g. click your app, under Installed add-ons, click Heroku Postgres, and then, in the ADMINISTRATION section, click View Credentials.
    DBPostgresHerokuDashboard
  7. Copy the settings from the dashboard onto the General tab.
  8. If necessary, edit the data source name.
  9. To make sure that the settings are OK, click Test Connection.
    DBPostgresHerokuConnectionSuccessful

    Click OK.

    Now, as a final check, execute a couple of queries.

  10. If necessary, form the schema search path using the popup in the upper-right part of the console. For instructions, see Controlling the schema search path for PostgreSQL and Redshift.
  11. Type your query, e.g.
    CREATE TABLE mytesttable ( myfield INT );
  12. Execute the query: icons toolwindows toolWindowRun svg or Ctrl+Enter.
  13. If necessary, execute another query, e.g.
    DROP TABLE mytesttable
    DBPostgresHerokuQueriesExecuted

Microsoft SQL Server

  1. Open the Data Sources and Drivers dialog: File | Data Sources or Ctrl+Shift+Alt+S.
  2. Click icons general add svg and select SQL Server (jTds) or SQL Server (Microsoft). These options differ only in the database driver that is used: jTDS or Microsoft.
    DBPlusSQLServer
  3. In the lower part of the dialog, within Download missing driver files, click the Download link.
    DBDownloadMissingDriverFiles
  4. Specify the database connection settings and authentication options:
    • Host. If you database server is on a different computer, replace localhost with the FQDN or IP address of the server host, e.g. mydbserver.example.com or 172.20.240.163.
    • Port. Specify the server port; the default port for SQL Server is 1433.
    • Instance. If you are connecting to a default server instance, don't specify anything. Otherwise, specify the instance name.
    • Database. Specify the name of the database that you are going to work with.
    • Use Windows domain authentication. To use Windows Authentication, leave the checkbox selected. To use SQL Server Authentication, clear the checkbox, and specify your user name and password.
  5. If necessary, edit the data source name.
  6. To connect via SSH, specify the SSH proxy settings.
  7. To make sure that the settings are OK, click Test Connection.
    DBSQLServerConnectionSuccessful

    Click OK.

    Now, as a final check, execute a couple of queries.

  8. Type your query, e.g.
    CREATE TABLE mytesttable ( myfield INT );
  9. Execute the query: icons toolwindows toolWindowRun svg or Ctrl+Enter.
  10. If necessary, execute another query, e.g.
    DROP TABLE mytesttable
    DBSQLServerQueriesExecuted

Microsoft Azure

  1. Open the Data Sources and Drivers dialog: File | Data Sources or Ctrl+Shift+Alt+S.
  2. Click icons general add svg and select Azure (Microsoft).
    DBPlusAzure
  3. In the lower part of the dialog, within Download missing driver files, click the Download link.
    DBDownloadMissingDriverFiles
  4. Specify the database connection settings and authentication options:
    • Host. This is the FQDN of your server. Within the default server.database.windows.net you, most likely, only need to replace the server part with the name of your server.
    • Port. The default Azure server port is 1433.
    • Database. The name of the database that you are going to work with.
    • Use Windows domain authentication. To use Azure Active Directory Authentication, leave the checkbox selected. To use SQL Authentication, clear the checkbox, and specify your user name and password.
  5. If necessary, edit the data source name.
  6. To connect via SSH, specify the SSH proxy settings.
  7. To make sure that the settings are OK, click Test Connection.
    DBAzureConnectionSuccessful

    Click OK.

    Now, as a final check, execute a couple of queries.

  8. Type your query, e.g.
    CREATE TABLE mytesttable ( myfield INT );
  9. Execute the query: icons toolwindows toolWindowRun svg or Ctrl+Enter.
  10. If necessary, execute another query, e.g.
    DROP TABLE mytesttable
    DBAzureQueriesExecuted

MySQL

  1. Open the Data Sources and Drivers dialog: File | Data Sources or Ctrl+Shift+Alt+S.
  2. Click icons general add svg and select MySQL.
    DBPlusMySQL
  3. In the lower part of the dialog, within Download missing driver files, click the Download link.
    DBDownloadMissingDriverFiles
  4. Specify the database connection settings and your user account info:
    • Host. If you database server is on a different computer, replace localhost with the FQDN or IP address of the server host, e.g. mydbserver.example.com or 172.20.240.163.
    • Port. The default MySQL server port is 3306. If your server uses a different port, specify that port.
    • User and Password. These are your database user name and password.
  5. If necessary, edit the data source name.
  6. To connect via SSH, specify the SSH proxy settings.
  7. To make sure that the settings are OK, click Test Connection.
    DBMySQLConnectionSuccessful

    Click OK.

    Now, as a final check, execute a couple of queries.

  8. Select your default schema from the list in the upper-right part of the console.
    DBMySQLSelectDefaultSchema
  9. Type your query, e.g.
    CREATE TABLE mytesttable ( myfield INT );
  10. Execute the query: icons toolwindows toolWindowRun svg or Ctrl+Enter.
  11. If necessary, execute another query, e.g.
    DROP TABLE mytesttable
    DBMySQLQueriesExecuted

Oracle

  1. Open the Data Sources and Drivers dialog: File | Data Sources or Ctrl+Shift+Alt+S.
  2. Click icons general add svg and select Oracle.
    DBPlusOracle
  3. In the lower part of the dialog, within Download missing driver files, click the Download link.
    DBDownloadMissingDriverFiles
  4. Specify the database connection settings and your user account info:

    From the list to the right of URL, select SID or Service Name, or TNS.

    • If SID or Service Name is selected, the settings are:
      • Host. If you database server is on a different computer, replace localhost with the FQDN or IP address of the server host, e.g. mydbserver.example.com or 172.20.240.163.
      • Port. The default Oracle server port is 1521. If your server uses a different port, specify that port.
      • SID or Service. The Oracle system ID or service name for your database. The typical values are XE or ORCL.

        To find out what the value should be, check the environment variable ORACLE_SID on the server host, or contact your database administrator.

    • If TNS is selected, the connection settings are read from a tnsnames.ora configuration file. So you should specify:
      • TNSADMIN. The path to the directory in which your tnsnames.ora file is located.
      • TNS name. If in your tnsnames.ora file, there is more than one net_service_name, specify the one that should be used.

    The rest of the settings are:

    • Driver. The default Thin driver will do in most of the cases. For more info, see Oracle JDBC FAQ.
    • User and Password. These are your database user name and password.
  5. If necessary, edit the data source name.
  6. To connect via SSH, specify the SSH proxy settings.
  7. To make sure that the settings are OK, click Test Connection.
    DBOracleConnectionSuccessful

    Click OK.

    Now, as a final check, execute a couple of queries.

  8. Type your query, e.g.
    CREATE TABLE MYTESTTABLE ( MYFIELD INT );
  9. Execute the query: icons toolwindows toolWindowRun svg or Ctrl+Enter.
  10. If necessary, execute another query, e.g.
    DROP TABLE MYTESTTABLE
    DBOracleQueriesExecuted

Amazon Redshift

  1. Open the Data Sources and Drivers dialog: File | Data Sources or Ctrl+Shift+Alt+S.
  2. Click icons general add svg and select Amazon Redshift.
    DBPlusAmazonRedshift
  3. In the lower part of the dialog, within Download missing driver files, click the Download link.
    DBDownloadMissingDriverFiles
  4. To the right of the URL field, select URL only.
  5. Go to your Redshift Dashboard, select Clusters, select the cluster you want to connect to, and copy the JDBC URL listed under Cluster Database Properties onto the clipboard.
  6. Paste the URL into the URL field.
  7. Specify your user name and password.
  8. If necessary, edit the data source name.
  9. To connect via SSH, specify the SSH proxy settings.
  10. To make sure that the settings are OK, click Test Connection.
    DBAmazonRedshiftConnectionSuccessful

    Click OK.

    Now, as a final check, execute a couple of queries.

  11. If necessary, form the schema search path using the popup in the upper-right part of the console. For instructions, see Controlling the schema search path for PostgreSQL and Redshift.
    DBAmazonRedshiftSchemaSearchPath
  12. Type your query, e.g.
    CREATE TABLE mytesttable ( myfield INT );
  13. Execute the query: icons toolwindows toolWindowRun svg or Ctrl+Enter.
  14. If necessary, execute another query, e.g.
    DROP TABLE mytesttable
    DBAmazonRedshiftQueriesExecuted

SQLite

  1. Open the Data Sources and Drivers dialog: File | Data Sources or Ctrl+Shift+Alt+S.
  2. Click icons general add svg and select Sqlite.
    DBPlusSQLite
  3. In the lower part of the dialog, within Download missing driver files, click the Download link.
    DBDownloadMissingDriverFiles
  4. To create a new database, specify its name in the File field (e.g. mynewdb.sqlite) and click icons general add.
    DBPlusSQLiteNewDB

    To use an existing database, click icons general ellipsis and select the database file in the dialog that opens.

    DBPlusSQLiteExistingDB
  5. To make sure that the settings are OK, click Test Connection.
    DBSQLiteConnectionSuccessful

    Click OK.

    Now, as a final check, execute a couple of queries.

  6. Type your query, e.g.
    CREATE TABLE mytesttable ( myfield PRIMARY KEY );
  7. Execute the query: icons toolwindows toolWindowRun svg or Ctrl+Enter.
  8. If necessary, execute another query, e.g.
    DROP TABLE mytesttable
    DBSQLiteQueriesExecuted

Vertica as an example of 'unsupported' DBMS

An "unsupported" DBMS is one that is not present in the list of database management systems, when you click icons general add in the Data Sources and Drivers dialog. You can still connect to such a database if there is a JDBC driver for it.

In this section, we provide corresponding how-to instructions using Vertica as an example.

  1. Download a JDBC driver for the DBMS that you are going to connect to. A driver, usually, is one or more .jar files.
  2. Open the Data Sources and Drivers dialog: File | Data Sources or Ctrl+Shift+Alt+S.
  3. Click icons general add svg and select Driver and Data Source.
    DBPlusDriverAndDataSource

    Your data source settings, initially, look something like this:

    DBDataSourceAndDriverCreated
  4. To the right of Driver, click the Database Driver link.

    Now we are going to specify the driver.

    DBDriverInitial
  5. In the JDBC drivers section, click icons general add and select your driver file or files in the dialog that opens.
    DBDriverSelectDriverFile
  6. Specify:
    • Name. Change the default name, for example, to the name of your DBMS.
    • Class. Usually, this is something like
      com.<company_name>.jdbc.Driver e.g.
      com.vertica.jdbc.Driver
    • Dialect. Select the dialect which is the closest to your DBMS SQL dialect.
    DBDriverDefined
  7. Click Apply, and select your data source under Project Data Sources.
  8. Specify:
    • URL. Your database connection URL. For corresponding info, refer to your DBMS documentation. Usually, this is something like
      jdbc:<dbms_name>://<host>:<port>/<db_name> e.g.
      jdbc:vertica://localhost:5433/docker
    • User and Password. These are your database user name and password.

    If necessary, edit the data source name.

  9. To connect via SSH, specify the SSH proxy settings.
  10. To make sure that the settings are OK, click Test Connection.
    DBDataSourceConnectionSuccessful

    Click OK.

    Now, as a final check, execute a couple of queries.

  11. Type your query, e.g.
    CREATE SCHEMA myschema;
  12. Execute the query: icons toolwindows toolWindowRun svg or Ctrl+Enter.
  13. If necessary, execute another query, e.g.
    DROP SCHEMA myschema
    DBDataSourceQueriesExecuted

Connecting via SSH

To access your database via SSH, specify the settings for your SSH proxy server on the SSH/SSL tab.

  1. Select the Use SSH tunnel checkbox.
  2. Specify the settings:
    • Proxy host. localhost if the server is on the same computer. Otherwise, the FQDN or IP address of the server host, e.g. mysshproxy.example.com or 172.20.241.34. The server host must be accessible by the specified name or IP address from your local computer.
    • Port. The SSH port; the default port is 22.
    • Proxy user. Your SSH server user name.
    • Auth type. The authentication type used by your server:
      • Password. Password-based authentication. If this authentication type is used, you should specify your password.
      • Key pair (OpenSSH). Key-based authentication. If this authentication type is used, you should specify:
        • The location of your private key file.
        • The passphrase for the private key - if the key is locked with the passphrase.
  3. To make sure that the settings - ones for the database and the proxy server - are all OK, click Test Connection.
    DBSSHConnectionSuccessful
Last modified: 17 August 2018