Use Git worktrees
A standard Git repository typically uses a single worktree. To switch branches in this setup, you have to either commit or stash unfinished work. Git worktrees allow you to have multiple branches checked out simultaneously in separate directories, all linked to a single .git directory.
What is a Git worktree?
A Git worktree allows you to have multiple branches of the same repository checked out simultaneously in separate directories. Common use cases for using Git worktrees include:
AI-driven development: run AI agents in separate worktrees to prevent them from overwriting local unsaved changes.
Emergency bug fixes: address critical issues in a separate directory without interrupting your current progress.
Parallel code reviews: check out and test pull and merge requests locally without disrupting your current state.
Multi-branch context switching: manage several long-running branches without stashing changes or waiting for the reindexing of a large volume of files after a branch switch.
A Git worktree is another working directory that shares the same Git repository but has its own checked-out branch. Unlike git clone, which creates a full duplicate of the repository, all worktrees share the same central .git history.
When you create a worktree, Git generates a new directory for your files. Instead of a full .git folder, this directory contains a .git file with a plain-text path pointing back to the original repository. This ensures all worktrees remain in sync while maintaining independent working environments.
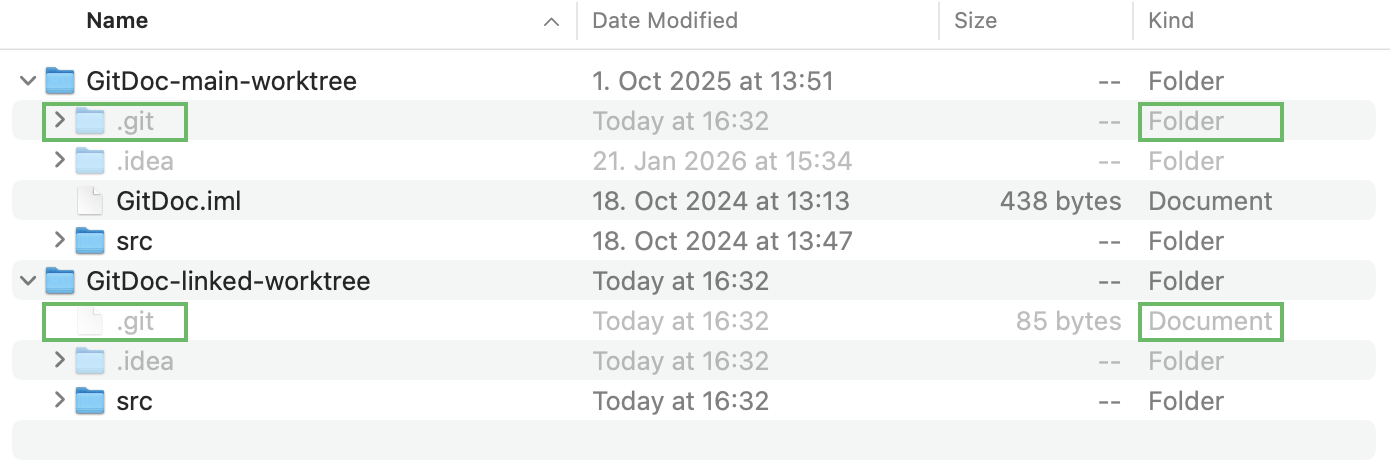
For more information about Git worktrees, refer to the official Git documentation.
Create and manage Git worktrees
If at least one repository in your project has more than one Git worktree, the Worktrees tab is available by default. Otherwise, open it in one of the following ways:
In the main menu, select .
In the Git tool window Alt+9, click
 and select Worktrees.
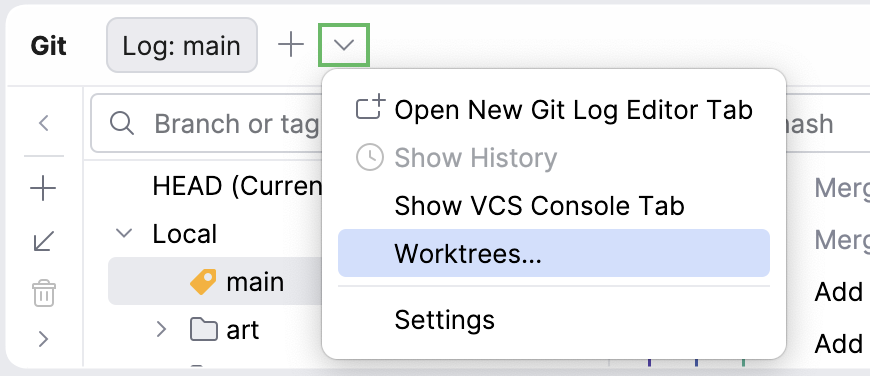
If your project contains several Git repositories, each worktree belongs to one of them. The Worktrees tab lists the worktrees of all repositories, and a colored stripe next to each worktree indicates the repository that it belongs to.
Worktrees tab
Each row in the Worktrees tab shows the name of the worktree directory and the branch that is checked out in it:
The main worktree is shown in bold.
The worktree that is open in the current window is marked with
 .
If the branch has an open pull request or merge request, its title is shown next to the branch name.
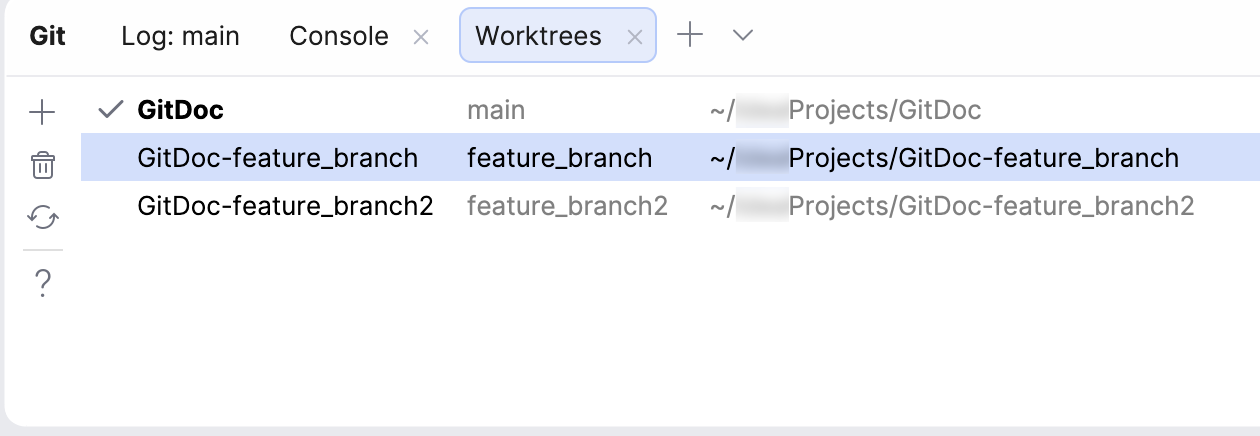
To view the location of a worktree, hover over it. The tooltip also shows whether the worktree is main or linked and whether it is in one of the following states:
Locked: the worktree was locked to prevent it from being moved, deleted, or pruned. Locked worktrees are marked with
 in the list.
Prunable: the worktree directory was removed manually from the file system. Prunable worktrees are dimmed in the list. These records can be safely pruned to clean up your repository.
To find a worktree, start typing its name or the name of its branch while the list is in focus.
Create a Git worktree
Do one of the following:
In the Git tool window Alt+9, open the Worktrees tab and click
 New Worktree.
Click the VCS widget in the window header and select New Worktree.
In the main menu, select .
To create a worktree from a specific branch, in the VCS widget or in the Branches pane of the Log tab, select the branch and choose New Worktree from '<branch_name>'.
This opens the New Worktree dialog.
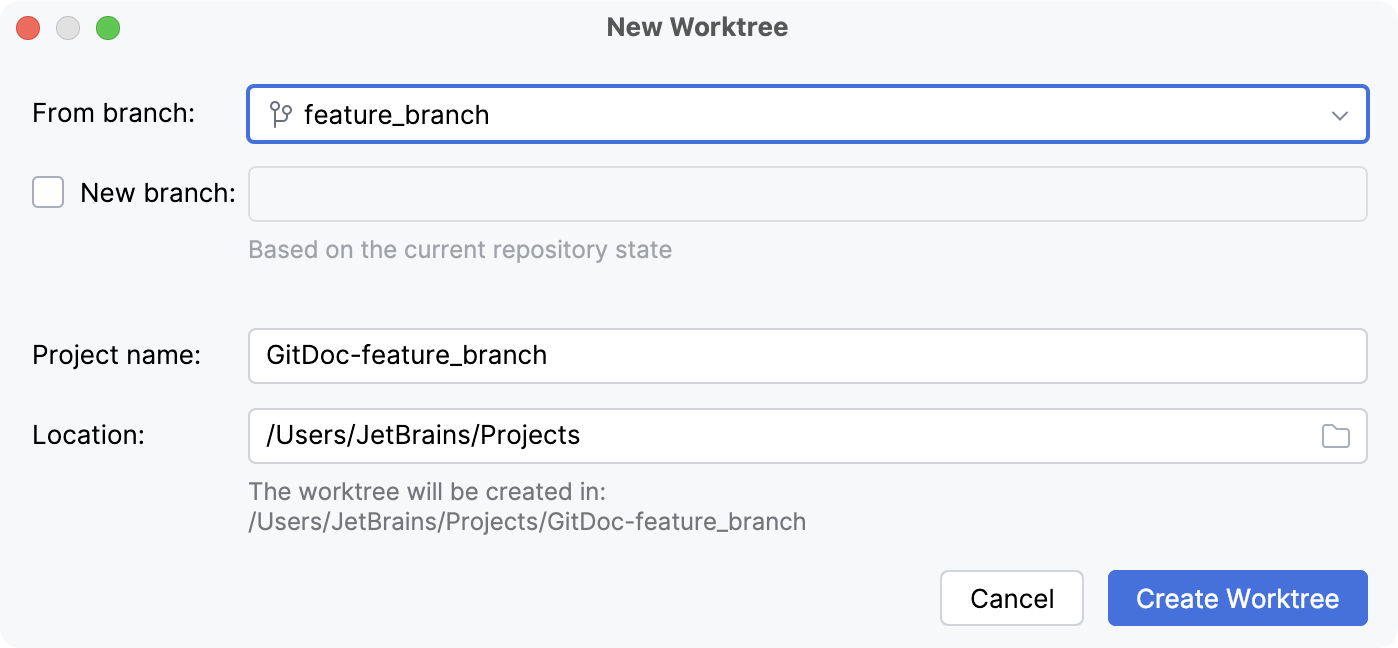
In the New Worktree dialog, specify the following:
Repository: the repository for which you want to create the worktree.
This field is available only if your project contains several Git repositories.
From branch: select the local branch, remote branch, or tag to check out in the new worktree.
Note that you cannot check out the same branch in two worktrees simultaneously. If you want to use the currently checked-out branch as a source for the new worktree, create another local branch from it: select the New branch checkbox and enter the name of the branch.
Project name: the name of the new worktree. By default, the name consists of the repository directory name and the branch name.
Location: the parent directory in which the worktree directory will be created. The full path to the new worktree is shown below the field.
By default, DataGrip suggests the location that you used last time, or a directory outside your current project. Avoid nesting worktrees: it is not recommended to create a worktree inside the directory of your current project (for example,
Projects/mainProject/linkedWorktree).
Click Create and Open Worktree.
DataGrip creates the worktree and opens it as a separate project. In a project with several Git repositories, the new project contains only the worktree of the selected repository.
Switch between different worktrees
Once a worktree has been opened for the first time, it behaves like any other project. You can find it in Recent Projects in the main menu or in the project widget in the toolbar in the window header.
To switch to a worktree, including the ones created outside of DataGrip, do the following:
In the Git tool window Alt+9, open the Worktrees tab.
Alternatively, in the main menu, select .
Double-click the target worktree or select it and press Enter.
Alternatively, right-click the worktree and select
 Open Worktree.
The worktree will open in a new or existing window depending on your system settings.
Review a pull or merge request in a worktree
You can open the branch of a pull request or a merge request in a separate worktree to review and test the changes without switching branches in your current project. For that, select Open in Worktree for the pull request or merge request.
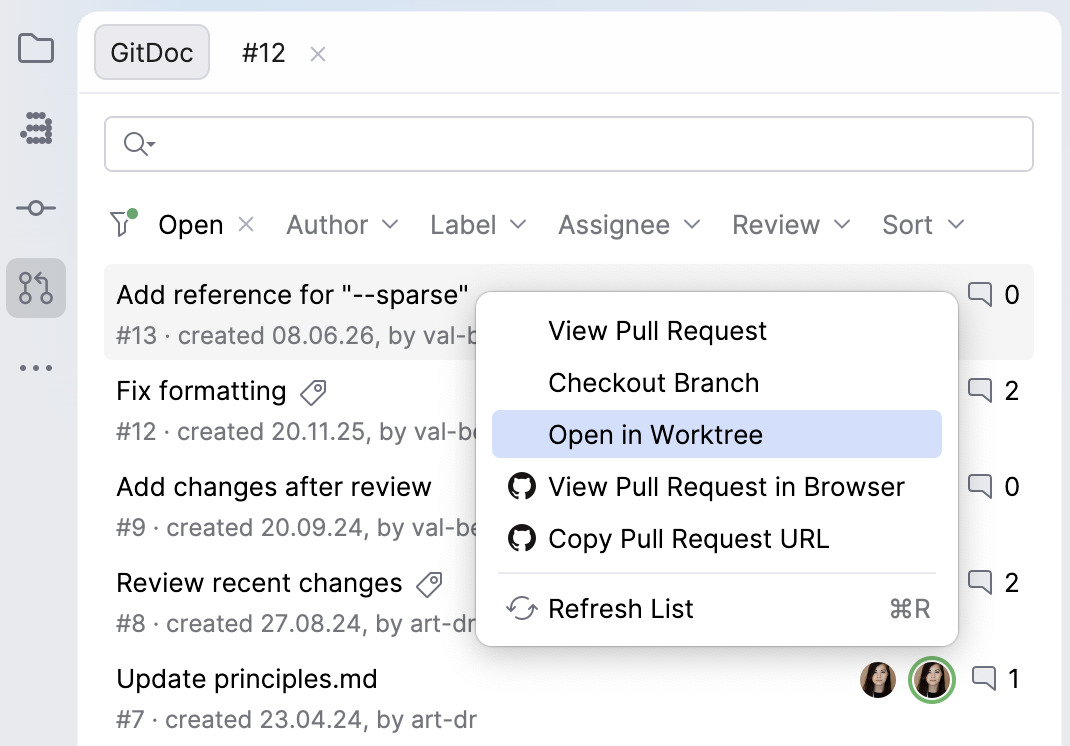
For more information, refer to GitHub pull requests and GitLab merge requests.
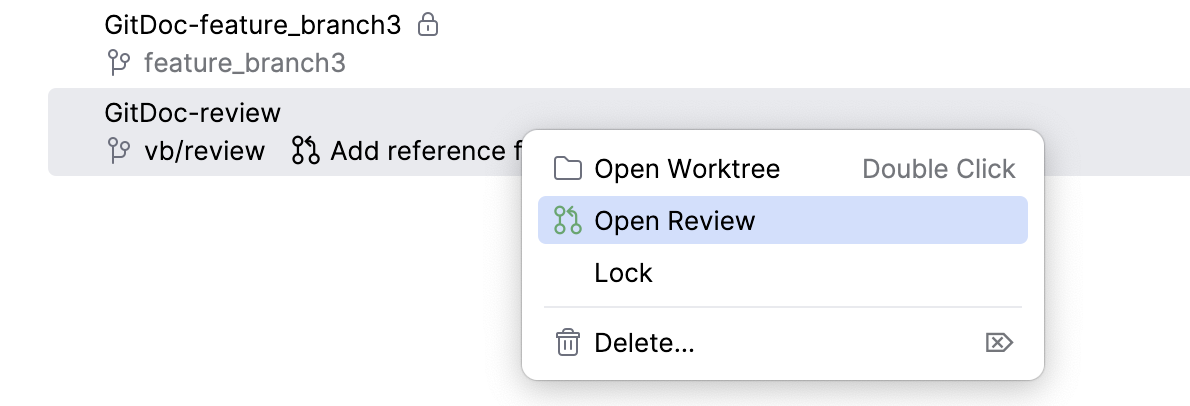
If the branch of a worktree has an open pull request or merge request, you can open its review from the Worktrees tab:
In the Git tool window Alt+9, open the Worktrees tab.
Alternatively, in the main menu, select .
Right-click the worktree and select Open Review.
Lock and unlock worktrees
Lock a worktree to protect it from being moved, deleted, or pruned.
In the Git tool window Alt+9, open the Worktrees tab.
Alternatively, in the main menu, select .
Right-click the worktree and select Lock.
To unlock the worktree, right-click it and select Unlock.
Delete a worktree
Before deleting a worktree, make sure you have committed all changes.
In the Git tool window Alt+9, open the Worktrees tab.
Alternatively, in the main menu, select .
Select one or several worktrees and click
 Delete.
In a project with several Git repositories, you can delete several worktrees at once only if they belong to the same repository.
Prune worktrees
If you delete a worktree directory manually rather than deleting a worktree in the IDE, Git will detect that the files are missing and mark the worktree as Prunable. Pruning removes the internal Git records for the missing worktrees and frees up their associated branches.
In the Git tool window Alt+9, open the Worktrees tab.
Alternatively, in the main menu, select .
Click
 Prune.
Troubleshooting
- DataGrip treats separate worktrees as the same project
This could happen if the file was committed to your repository. As this file contains a unique
ProjectId, creating a new Git worktree duplicates that ID. As a result, the IDE becomes confused by the identical IDs and incorrectly treats both directories as a single project.How to fix it:
Close your project in DataGrip.
Navigate to your Git worktree directory and delete the
workspace.xmlfile (alternatively, you can open the file and just delete theProjectIdline).Reopen the project in the IDE so it can generate a fresh, unique ID.
To prevent this from happening again, ensure is added to your repository's
.gitignorefile.- The Open in Worktree action is not available for a pull or merge request
Opening pull requests and merge requests in a worktree is available only for projects that contain a single Git repository. The action is also not available if the branch of the pull request or merge request is already checked out in the current project.