Cannot connect to Oracle with OCI
If the connection to Oracle database with OCI cannot be established, try the following to resolve the problem:
Check the compatibility of versions
Installation on separate machines
When the Oracle Instant Client is installed on a separate machine, versions of the Oracle Instant Client and Oracle Server may differ. For example, Oracle Client 19.x can successfully connect to Oracle server 11.2. But the JDBC driver must have the same version as the Oracle Instant Client. Otherwise, you will see errors like Native library cannot be loaded or Incompatible version of libocijdbc.
For example, consider the following Oracle setup:
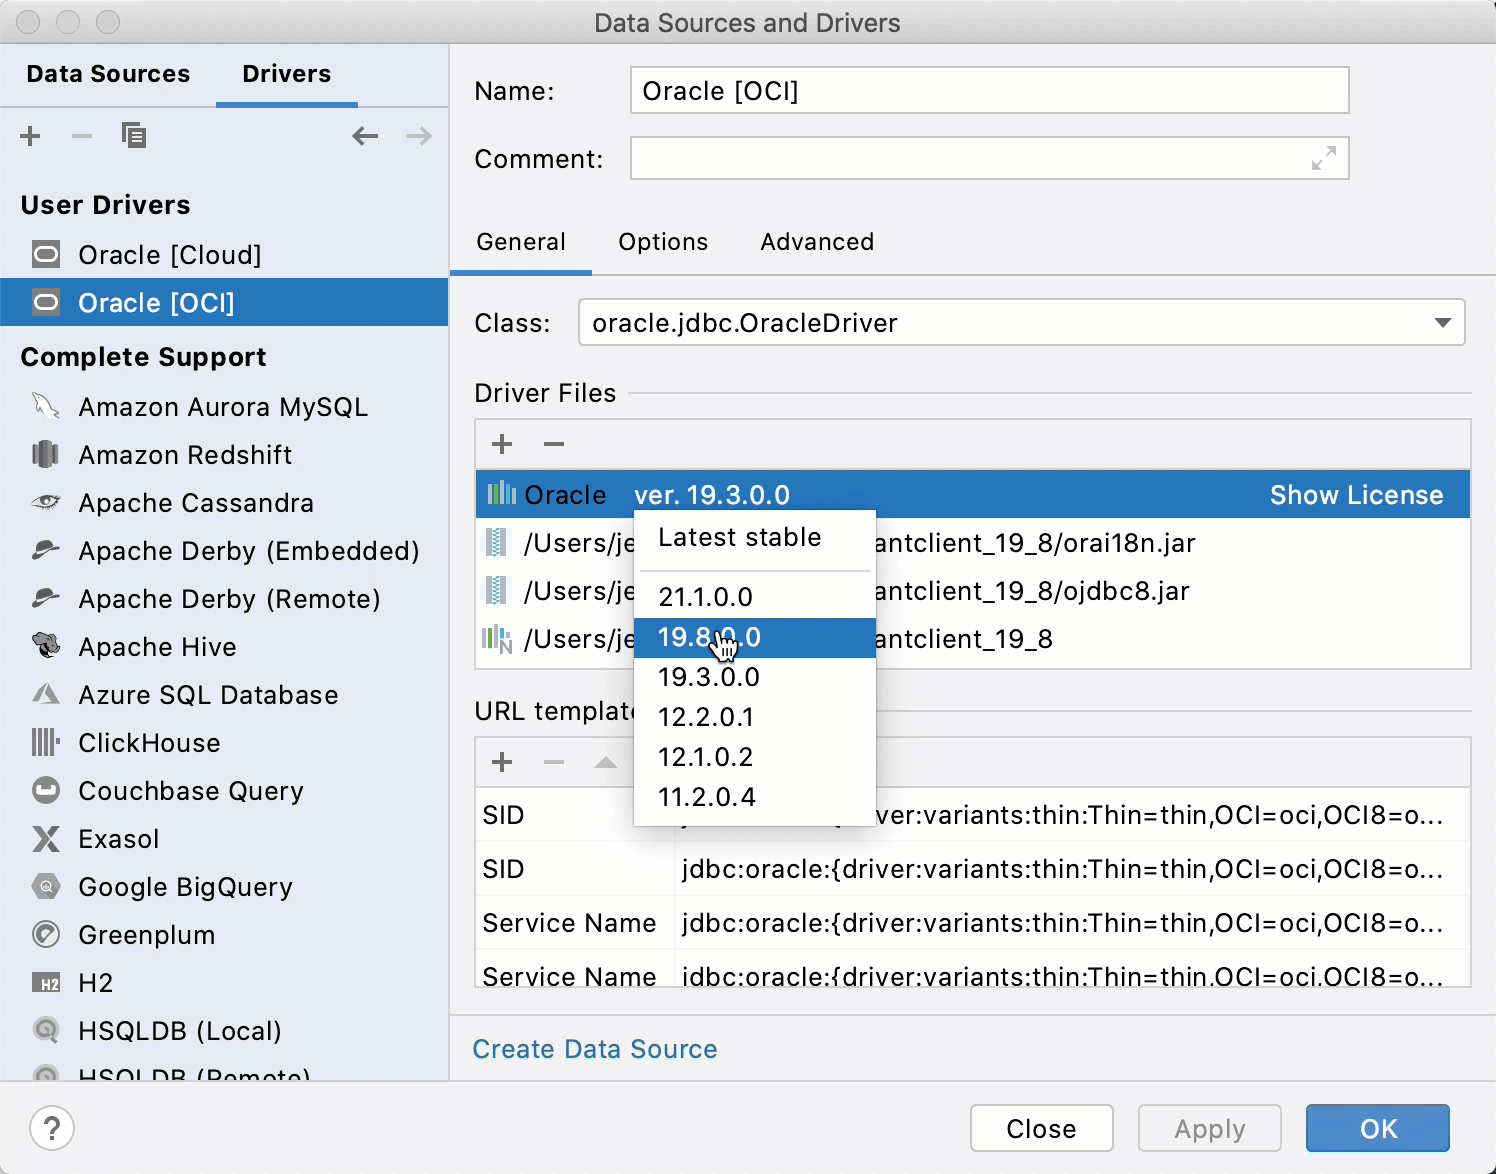
Oracle Database 12c Enterprise Edition Release 12.2.0.1.0 - 64bit Production
Oracle Instant Client 19.8.0.0
If we use the Oracle driver 19.3.0.0, we are going to get Incompatible version of libocijdbc. But if we switch to Oracle driver 19.8.0.0, the connection will be successful. Consider the following animation.
Installation on the same machine
When the Oracle Instant Client is installed on the machine with the Oracle server, the JDBC driver uses the native library to connect to the Oracle server. And this native library is a part of Oracle server software. So, the JDBC driver must have the same version as the Oracle server.
Summary table
Separate machines | Same machine | |
|---|---|---|
Versions of Oracle Instant client and Server | May differ | Will be the same (as the Oracle Instant Client is a part of Oracle server software) |
Version of the JDBC driver | Same as the Oracle Instant client | Same version as the Oracle server |
Check the versions
To find the JDBC driver version in DataGrip, do the following:
In the Data Sources and Drivers dialog (Ctrl+Alt+Shift+S) , select the data source and click the Driver list and select Go to Driver to access the Drivers tab of the dialog.
In the Drivers tab, find the JDBC driver version in the Driver Files pane.
For more information about configuring the driver, refer to Configure a JDBC driver for an existing data source.
Check the versions of Oracle Instant client and Server.
Files and environment variables
Requirements
The following OCI packages are required:
Basic Package
SQL*Plus Package
JDBC Supplement Package
Packages for your operating system can be downloaded from the Oracle Instant Client Downloads page at oracle.com.
The following OCI packages are required:
Basic Package
SQL*Plus Package
JDBC Supplement Package
Packages for your operating system can be downloaded from the Oracle Instant Client Downloads page at oracle.com.
Also, the oraclepki.jar file is required. You can download it from Oracle Database JDBC Driver & UCP Downloads page at oracle.com.
ZIP archive with wallet files. For more information about downloading a wallet, refer to Download Client Credentials (Wallets) at docs.oracle.com.
Step 1. Check the extracted files
All the files from downloaded packages must be extracted in the same directory.
Find the directory with extracted Instant Client files (for example, ~/Oracle/instantclient_19_8/) and make sure that none of them are missing.
Find the directory with Instant Client files (for example, ~/Oracle/instantclient_19_8/).
Make sure that none of the files are missing.
Make sure that the oraclepki.jar is in that directory.
Make sure that the wallet files are in the wallet directory inside the network directory. The path to wallet files might look as follows: ~/Oracle/instantclient_19_8/network/wallet.

Step 2. (Optional) Check environment variables
This is optional. With the environment variables being set, you can connect to your Oracle instance with the sqlplus tool. Note that these settings work only for the current session of the command prompt.
Check the following environment variables:
export ORACLE_HOME=~/Oracle/instantclient_19_8export TNS_ADMIN=$ORACLE_HOME/network/adminexport NLS_LANG=English_America.UTF8export PATH=$PATH:$ORACLE_HOMEset ORACLE_HOME=C:\Oracle\instantclient_19_8set TNS_ADMIN=%ORACLE_HOME%\network\adminset NLS_LANG=English_America.UTF8set PATH=%PATH%:%ORACLE_HOME%
Step 3. Verify the ORA files configuration
Make sure that the tnsnames.ora file is composed by using the following approach:
The file's location should look as follows: <directory_with_extracted_files>/network/admin, the
directory_with_extracted_filesis checked on Step 1.For example, ~/Oracle/instantclient_19_8/network/admin.
The tnsnames.ora file should have the following structure:
MyTNSAlias = (DESCRIPTION = (ADDRESS = (PROTOCOL = TCP)(HOST = db.my.domain.com)(PORT = 1521)) (CONNECT_DATA = (SERVER = DEDICATED) (SERVICE_NAME = my_service.my.domain.com) ) )Consider the following example of the file:
# tnsnames.ora Network Configuration File: /Users/jetbrains/Oracle/instantclient_19_8/network/admin/tnsnames.ora # Generated by Oracle configuration tools. MyTNSAlias = (DESCRIPTION = (ADDRESS = (PROTOCOL = TCP) HOST = my_host.jetbrains.com) (PORT = 1521)) (CONNECT_DATA = (SERVER = DEDICATED) (SERVICE_NAME = datagrip.jetbrains.com) ) ) AnotherAlias = (DESCRIPTION = (ADDRESS = (PROTOCOL = TCP) (HOST = another_host.jetbrains.com) (PORT = 1521))
The tnsnames.ora and sqlnet.ora files are included in a ZIP archive with wallet files. For more information about downloading a wallet, refer to Download Client Credentials (Wallets) at docs.oracle.com.
The files location should look as follows ~/Oracle/instantclient_19_8/network/admin.
Open the sqlnet.ora file from the admin directory in the text editor, and make sure that the value of the
DIRECTORYattribute is the path to your wallet. In our case, the path looks as follows:WALLET_LOCATION = (SOURCE = (METHOD = file) (METHOD_DATA = (DIRECTORY="/Users/jetbrains/Oracle/instantclient_19_8/network/wallet"))) SSL_SERVER_DN_MATCH=yesConsider the following screenshot of the admin directory and configuration files.
