Connect to Google Cloud SQL instances
Within the framework of this topic, we are going to use a PostgreSQL instance on the Google Cloud Platform. But you can use the same instructions to connect to MySQL and Microsoft SQL Server instances of Google Cloud SQL.
If you have not created the instance yet, refer to Creating instances at cloud.google.com.
From DataGrip, you can connect to your instances by using the following options.
Cloud SQL Proxy client: a command-line tool that establishes the proxy connection and provides secure access to your instances. When the Cloud SQL Proxy client runs, you do not need to add your IP to authorized networks or configure SSL. You can read more about the Cloud SQL Proxy in this article at cloud.google.com.
The connection is secured. To connect to your instance, you need Google Cloud SDK and the Cloud SQL Proxy client.
Cloud SQL Connector for Java: libraries for JDBC drivers by using which you can connect securely to Cloud SQL databases. These libraries are available on the Release page of the cloud-sql-jdbc-socket-factory repository at github.com.
The connection is secured. To connect to your instance, you need Google Cloud SDK and the JAR library file of the Cloud SQL Connector for Java.
Adding your network to authorized networks: adding your network to the list of authorized sources in the Google Cloud Console. After this procedure, you can connect to the PostgreSQL instance from your network by using the IP address of your instance.
The connection is not secured (no encryption). To connect to your instance, you need to add your IP address or a range of IP addresses to authorized networks.
Configuring Google Cloud SDK
This configuration procedure is common for the Cloud SQL Proxy client and the Cloud SQL Connector for Java. If you plan to add your network to the list of authorized networks, you can skip this part.
To complete the connection's configuration, you need Google Cloud SDK.
Google Cloud SDK includes the gcloud utility that manages authentication and interactions with the Google Cloud Platform API. For more information about gcloud, refer to the gcloud reference at cloud.google.com.
Step 1. Installing Google Cloud SDK
For more information about the installation process, refer to the Installing Google Cloud SDK guide at cloud.google.com. This procedure provides a summary of steps from the guide.
Download and extract the Google Cloud SDK archive.
Run the
gcloud initcommand to initialize the SDK. Follow the installation wizard in the command prompt../google-cloud-sdk/bin/gcloud init
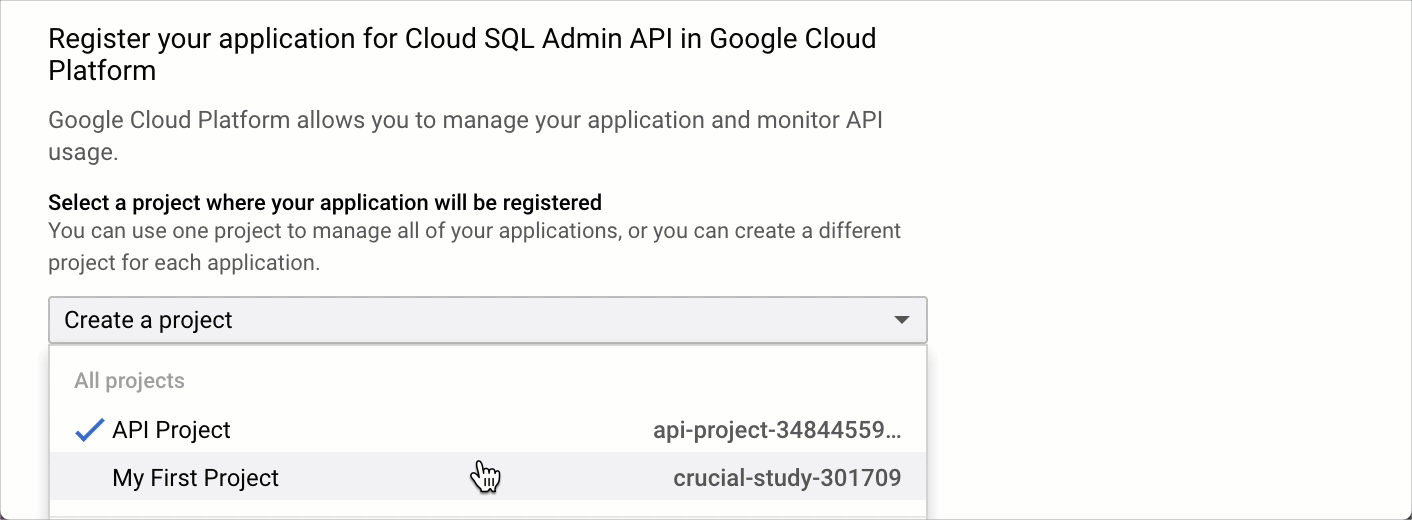
Step 2. Register your application for the Cloud SQL Admin API
Click the Enable the API button in the Enable the Cloud SQL Admin API section.
Select your project in the dropdown and click Continue.
You have to enable the Cloud SQL Admin API for each database project if you want to connect to the database in this project. For example, one project uses PostgreSQL, another project uses MySQL. You need to enable the API for both projects.
Step 3. Configure authentication
Run the following command to authenticate the
gcloudtool.gcloud auth loginThis command obtains your credentials and stores them in ~/.config/gcloud/. Now you can run
gcloudcommands from your terminal, and it will find your credentials automatically.
Run the following command to obtain credentials for the Application Default Credentials (ADC) library.
gcloud auth application-default loginThis command obtains your credentials for the ADC library. Now, any code or SDK that is running on your computer will be able to find the credentials automatically.

Configuring connections with the Cloud SQL Proxy client
The Cloud SQL Proxy client communicates with your database through a secure tunnel. Read more about the client in About the Cloud SQL Proxy at cloud.google.com.
Step 1. Run the Cloud SQL Proxy client
Download the Cloud SQL Proxy client. See installation instructions in Install the Cloud SQL Proxy client on your local machine at cloud.google.com.
Start the proxy in the command prompt.
./cloud-sql-proxy --port 3306 <INSTANCE_CONNECTION_NAME>Replace the
connection_namewith the connection name of your instance. You can find this information on the Overview page of your instance. If the3306port is already in use, change it to another port (for example, 5435).
Step 2. Create a data source
Ensure that the Cloud SQL Proxy client is running (see Step 1).
Open data source properties by doing one of the following:
Navigate to .
On the Database Explorer (⌘ 1) toolbar, click
 Data Sources.
Press Ctrl+Alt+Shift+S.

In the Data Sources and Drivers dialog, click the Add icon (
 ) and select your database vendor (in our case, PostgreSQL).
Check if there is a Download missing driver files link at the bottom of the connection settings area. Click this link to download drivers that are required to interact with a database. For a direct download link, refer to the JetBrains JDBC drivers page.

Location for the downloaded JDBC drivers is the DataGrip configuration directory.
You can also use your drivers for the database instead of the provided ones. For more information about connecting to a database with your driver, refer to Add a user driver to an existing connection.
If there is no Download missing driver files link, then you already have the required drivers.
From the Authentication list, select User & Password.
Specify connection details.
Host:
127.0.0.1. You are connecting to a local machine because you use the Cloud SQL Proxy client.Port:
3306, or any other port that you selected for the proxy (for example,5435).User: a user who has permission to access the database.
Password: password of a user.
Database: a database to which you want to connect.
Ensure that the database connection can be established using the provided details. To do this, click the Test Connection link at the bottom of the connection details section.

If you encounter any connection issues, refer to the Cannot connect to a database page.
(Optional) By default, only the default database and schema are project and dataset are database is schema is keyspace is namespace is introspected and available to work with. If you also want to work with other databases and schemas projects and datasets databases, schemas, and shared databases databases schemas keyspaces namespaces, in the Schemas tab, select them for the introspection.

Click OK to create the data source.
Find your new data source in Database Explorer (⌘ 1) .
For more information about Database Explorer, see the corresponding reference topic.
For more information about working with database objects in DataGrip, refer to Database objects.
To write and run queries, open the default query console by clicking the data source and pressing F4.
To view and edit data of a database object, open Data editor and viewer by double-clicking the object.

Configuring connections with the Cloud SQL Connector for Java
Create a data source
Open data source properties by doing one of the following:
Navigate to .
On the Database Explorer (⌘ 1) toolbar, click
Data Sources.Press Ctrl+Alt+Shift+S.
In the Database Explorer (⌘ 1) , click
New on the toolbar and select the database you want to create a data source for.
In the Connection type list, select URL only.
In the Driver list, select the driver:
PostgreSQL: PostgreSQL (CloudSQL Proxy)
MySQL: MySQL (CloudSQL Proxy)
Microsoft SQL Server: Microsoft SQL Server (CloudSQL Proxy)
Check if there is a Download missing driver files link at the bottom of the connection settings area. Click this link to download drivers that are required to interact with a database.
In the URL field, paste the URL in the following format:
PostgreSQL:
jdbc:postgresql:///<DATABASE_NAME>?cloudSqlInstance=<INSTANCE_CONNECTION_NAME>&user=<USER_NAME>&password=<USER_PASSWORD>MySQL:
jdbc:mysql:///<DATABASE_NAME>?cloudSqlInstance=<INSTANCE_CONNECTION_NAME>&user=<USER_NAME>&password=<USER_PASSWORD>Microsoft SQL Server:
jdbc:sqlserver://;databaseName=<DATABASE_NAME>;user=<USER_NAME>;password=<USER_PASSWORD>
, where
DATABASE_NAME: the database name to which you want to connect.
INSTANCE_CONNECTION_NAME: the instance connection name. You can find this information on the Overview page of your instance.
USER_NAME: a user name that has access to the database.
USER_PASSWORD: a user's password.
Note that you do not need to specify the host. Due to the properties that you set for the driver, the IP address of your instance will be detected automatically.
Your URL might look something like this:
PostgreSQL:
jdbc:postgresql:///guest?cloudSqlInstance=crucial-study-301709:us-central1:postgres&user=guest&password=guestMySQL:
jdbc:mysql:///guest?cloudSqlInstance=mysql-304410:europe-west3:mysql&user=guest&password=guestMicrosoft SQL Server:
jdbc:sqlserver://;databaseName=guest;user=sqlserver;password=guest
Alternatively, in the Connection type list, select Default and enter your connection details in the available fields.
Click the Test Connection link at the bottom of the connection details area to initiate a test connection to your database.
Click OK to save your new data source.

Adding your network to authorized networks
To complete this part of the guide, you need to know your external IP address or a range of IP addresses. Use the CIDR notation (for example, 192.168.100.14/24).
Step 1. Add your network to authorized networks
Open a page of your Cloud SQL Instance.
Select the Connections tab and click Add network.
In the Network field, type your external IP address or a range of IP addresses in the CIDR notation.
Click Done and then Save.
Wait until your instance is updated.

Step 2. Create a data source
Open data source properties by doing one of the following:
Navigate to .
On the Database Explorer (⌘ 1) toolbar, click
Data Sources.Press Ctrl+Alt+Shift+S.
In the Data Sources and Drivers dialog, click the Add icon (
) and select your database vendor (for example, PostgreSQL).Check if there is a Download missing driver files link at the bottom of the connection settings area. Click this link to download drivers that are required to interact with a database. For a direct download link, refer to the JetBrains JDBC drivers page.
Location for the downloaded JDBC drivers is the DataGrip configuration directory.
You can also use your drivers for the database instead of the provided ones. For more information about connecting to a database with your driver, refer to Add a user driver to an existing connection.
If there is no Download missing driver files link, then you already have the required drivers.
In the Host field, type the IP address of your PostgreSQL instance. You can find this IP address on the overview page of your instance.

From the Authentication list, select User & Password.
In the User field, type the user name that has access to the database.
In the Password field, type the user's password.
In the Database field, type the database name to which you want to connect.
Ensure that the database connection can be established using the provided details. To do this, click the Test Connection link at the bottom of the connection details section.
If you encounter any connection issues, refer to the Cannot connect to a database page.
(Optional) By default, only the default database and schema are project and dataset are database is schema is keyspace is namespace is introspected and available to work with. If you also want to work with other databases and schemas projects and datasets databases, schemas, and shared databases databases schemas keyspaces namespaces, in the Schemas tab, select them for the introspection.
Click OK to create the data source.
Find your new data source in Database Explorer (⌘ 1) .
For more information about Database Explorer, see the corresponding reference topic.
For more information about working with database objects in DataGrip, refer to Database objects.
To write and run queries, open the default query console by clicking the data source and pressing F4.
To view and edit data of a database object, open Data editor and viewer by double-clicking the object.
