Use AI Assistant
Install the AI Assistant plugin
This functionality relies on the AI Assistant plugin, which you need to install and enable.
Press Ctrl+Alt+S to open settings and then select .
Open the Marketplace tab, find the AI Assistant plugin, and click Install (restart the IDE if prompted).
AI Assistant provides AI-powered features for software development. For more information about AI Assistant, refer to the AI Assistant topic.
In this tutorial, we will learn how to use AI Assistant for the following tasks:
Create data aggregators and extractors
If you need a custom data aggregator or extractor, you can ask AI Assistant to create one for your task, and then add the created script to the aggregators or extractors directory.
Providing the LLM with an example of a working script might shorten the number of prompts and corrections. In DataGrip, you can find bundled scipts in the Files tool window (Alt+2) under Scratches and Consoles | Extensions | Database Tools and SQL | data.
For more information about aggregators and extractors, refer to Aggregate view and Data extractors.
In this tutorial, we will create an aggregator and use the following AVG.groovy aggregator as an example:
In DataGrip, you can find this script in the Files tool window under Scratches and Consoles | Extensions | Database Tools and SQL | data | aggregators.
Step 1. Request a script
On the toolbar, click
More tool windows and select
AI Assistant to open the AI Assistant tool window.
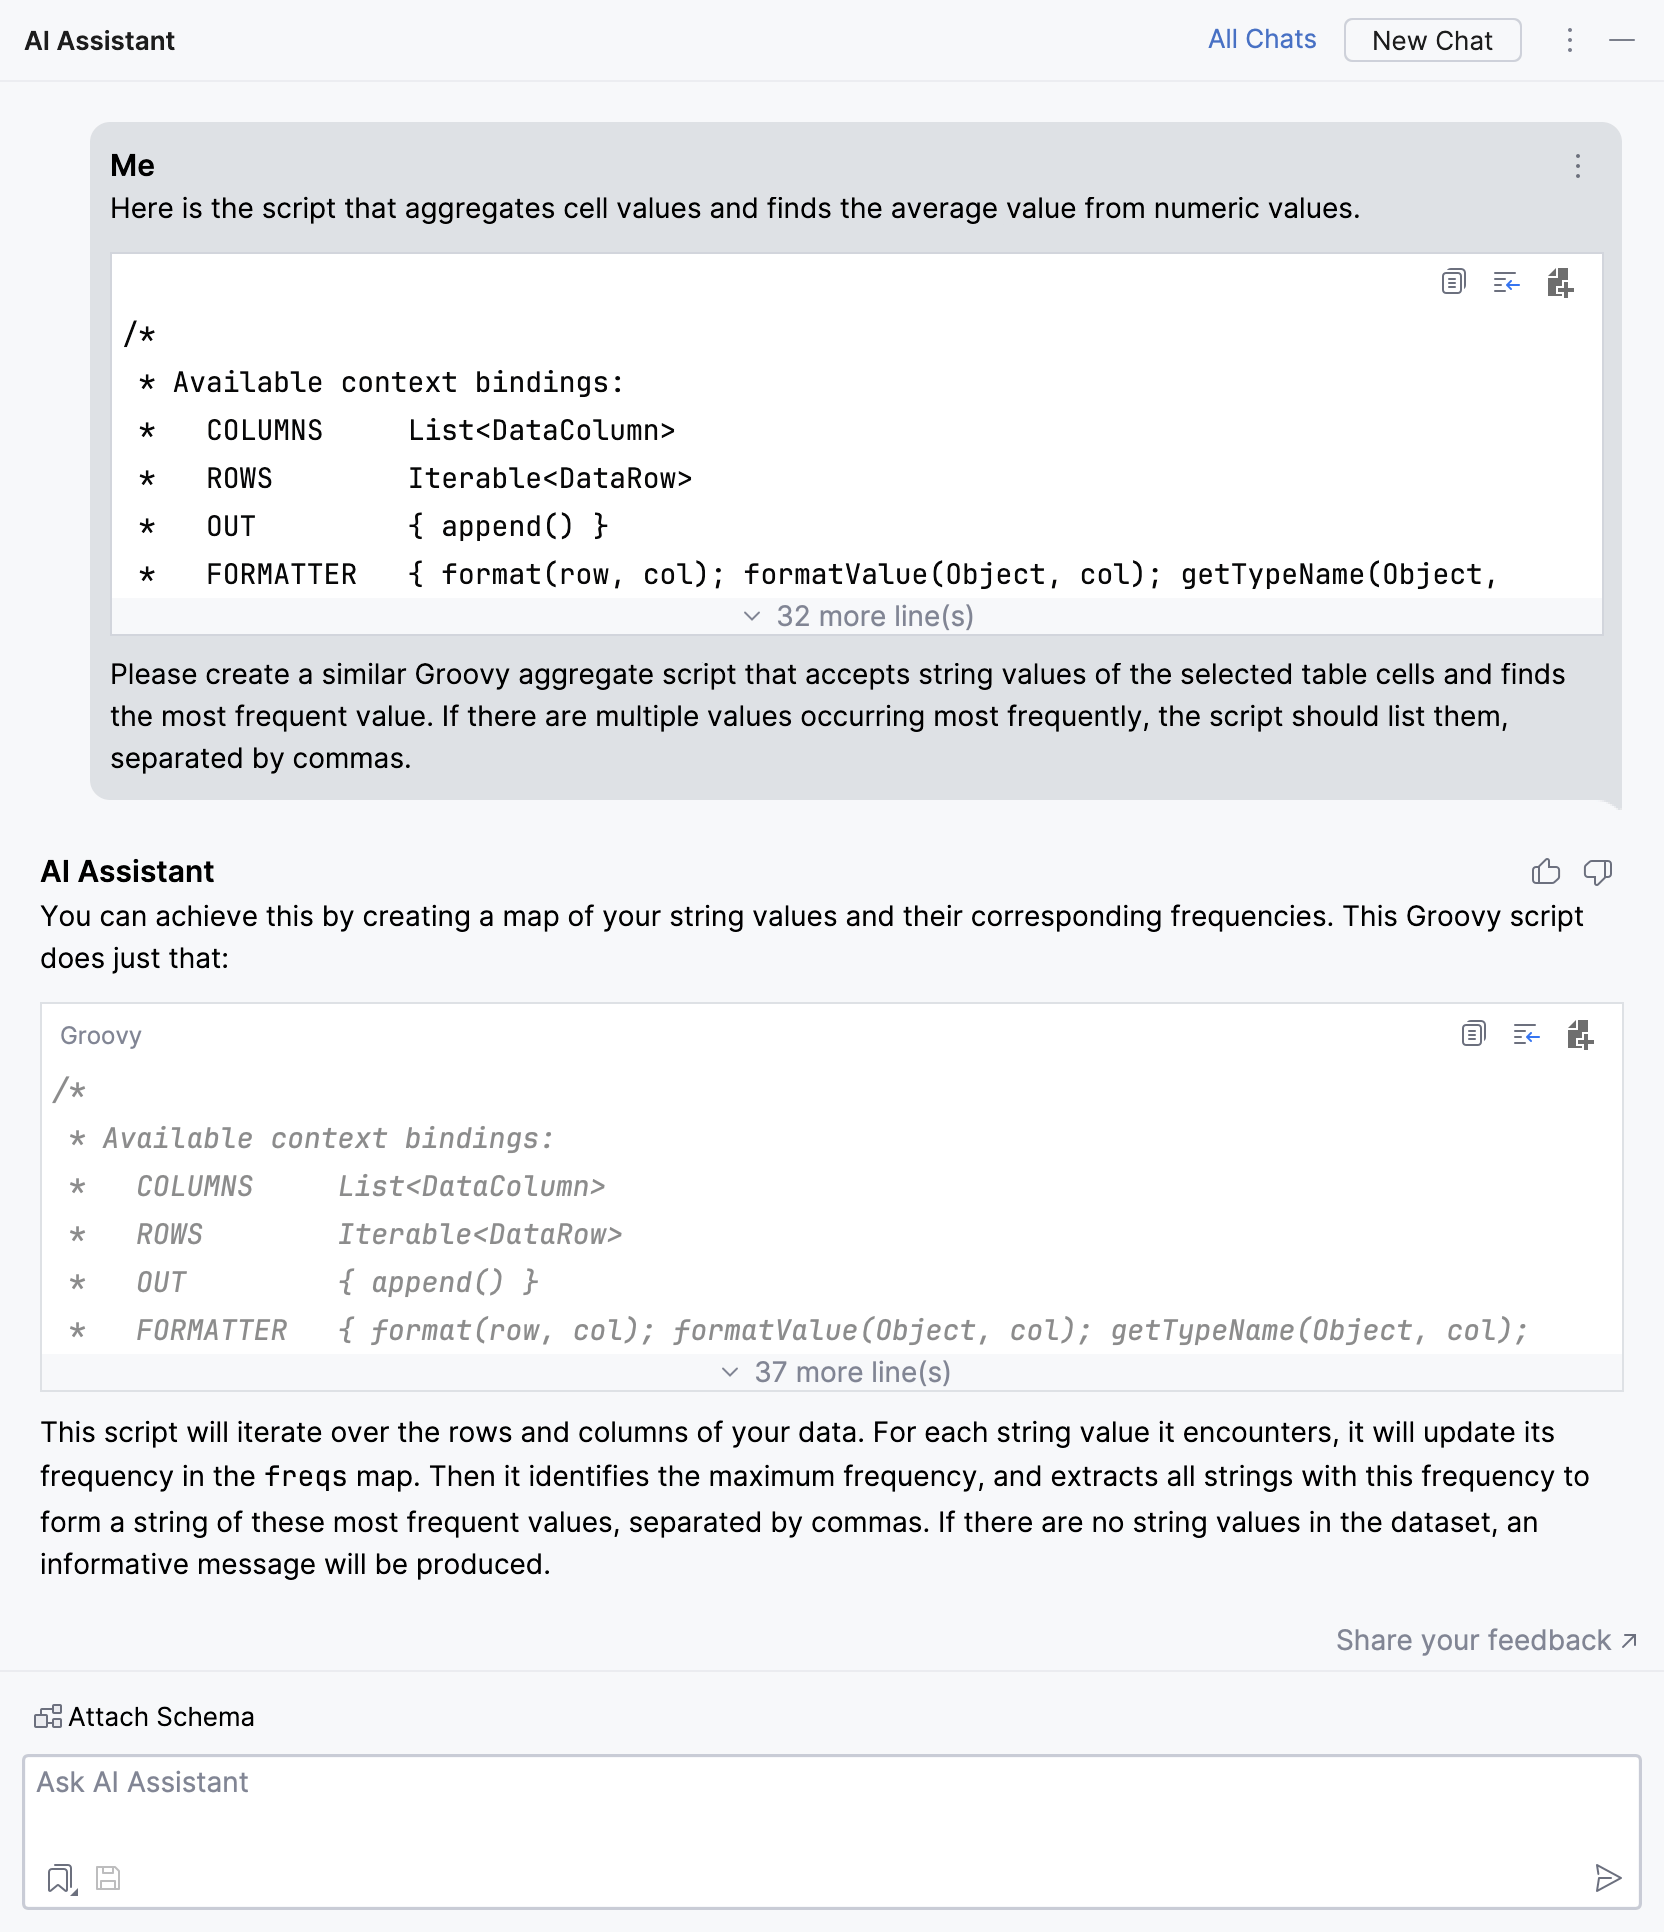
In the input field, type your prompt. Describe the required script and provide the LLM with an example of a working script.
In the upper-right corner of the field with the generated script, click
Copy to Clipboard to copy the code to clipboard.
The generated script:
Step 2. Save the script as a file
Open the Files tool window by doing one of the following:
In the main menu, go to in the menu.
Click
Files on the main toolbar.
Press Alt+2.
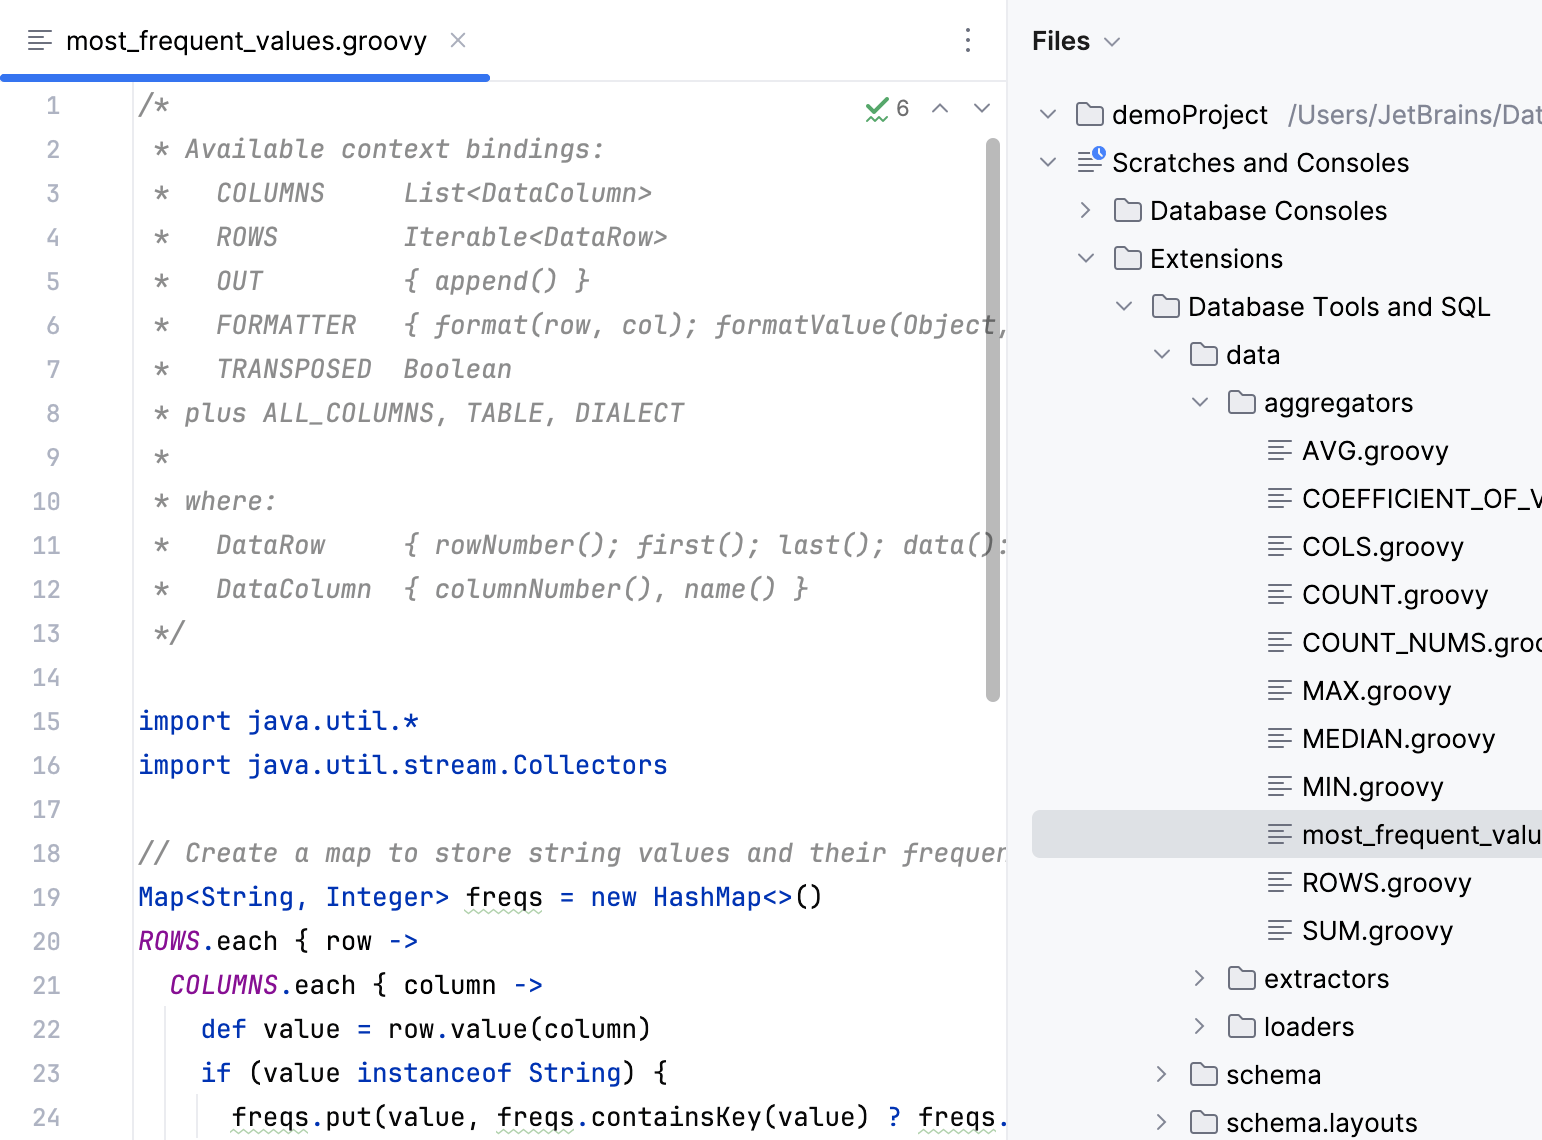
In the Files tool window , navigate to Scratches and Consoles | Extensions | Database Tools and SQL | data | aggregators.
In the New File popup, type the new file name. For example,
most_frequent_values.groovy.
Paste your new data aggregator script into the file.
(Optional) If the Convert Pasted Code dialog appears, press Cancel. In this tutorial, we save the generated script itself.
New data aggregator appears on the aggregators list in status bar for data editor and can be used with your data.
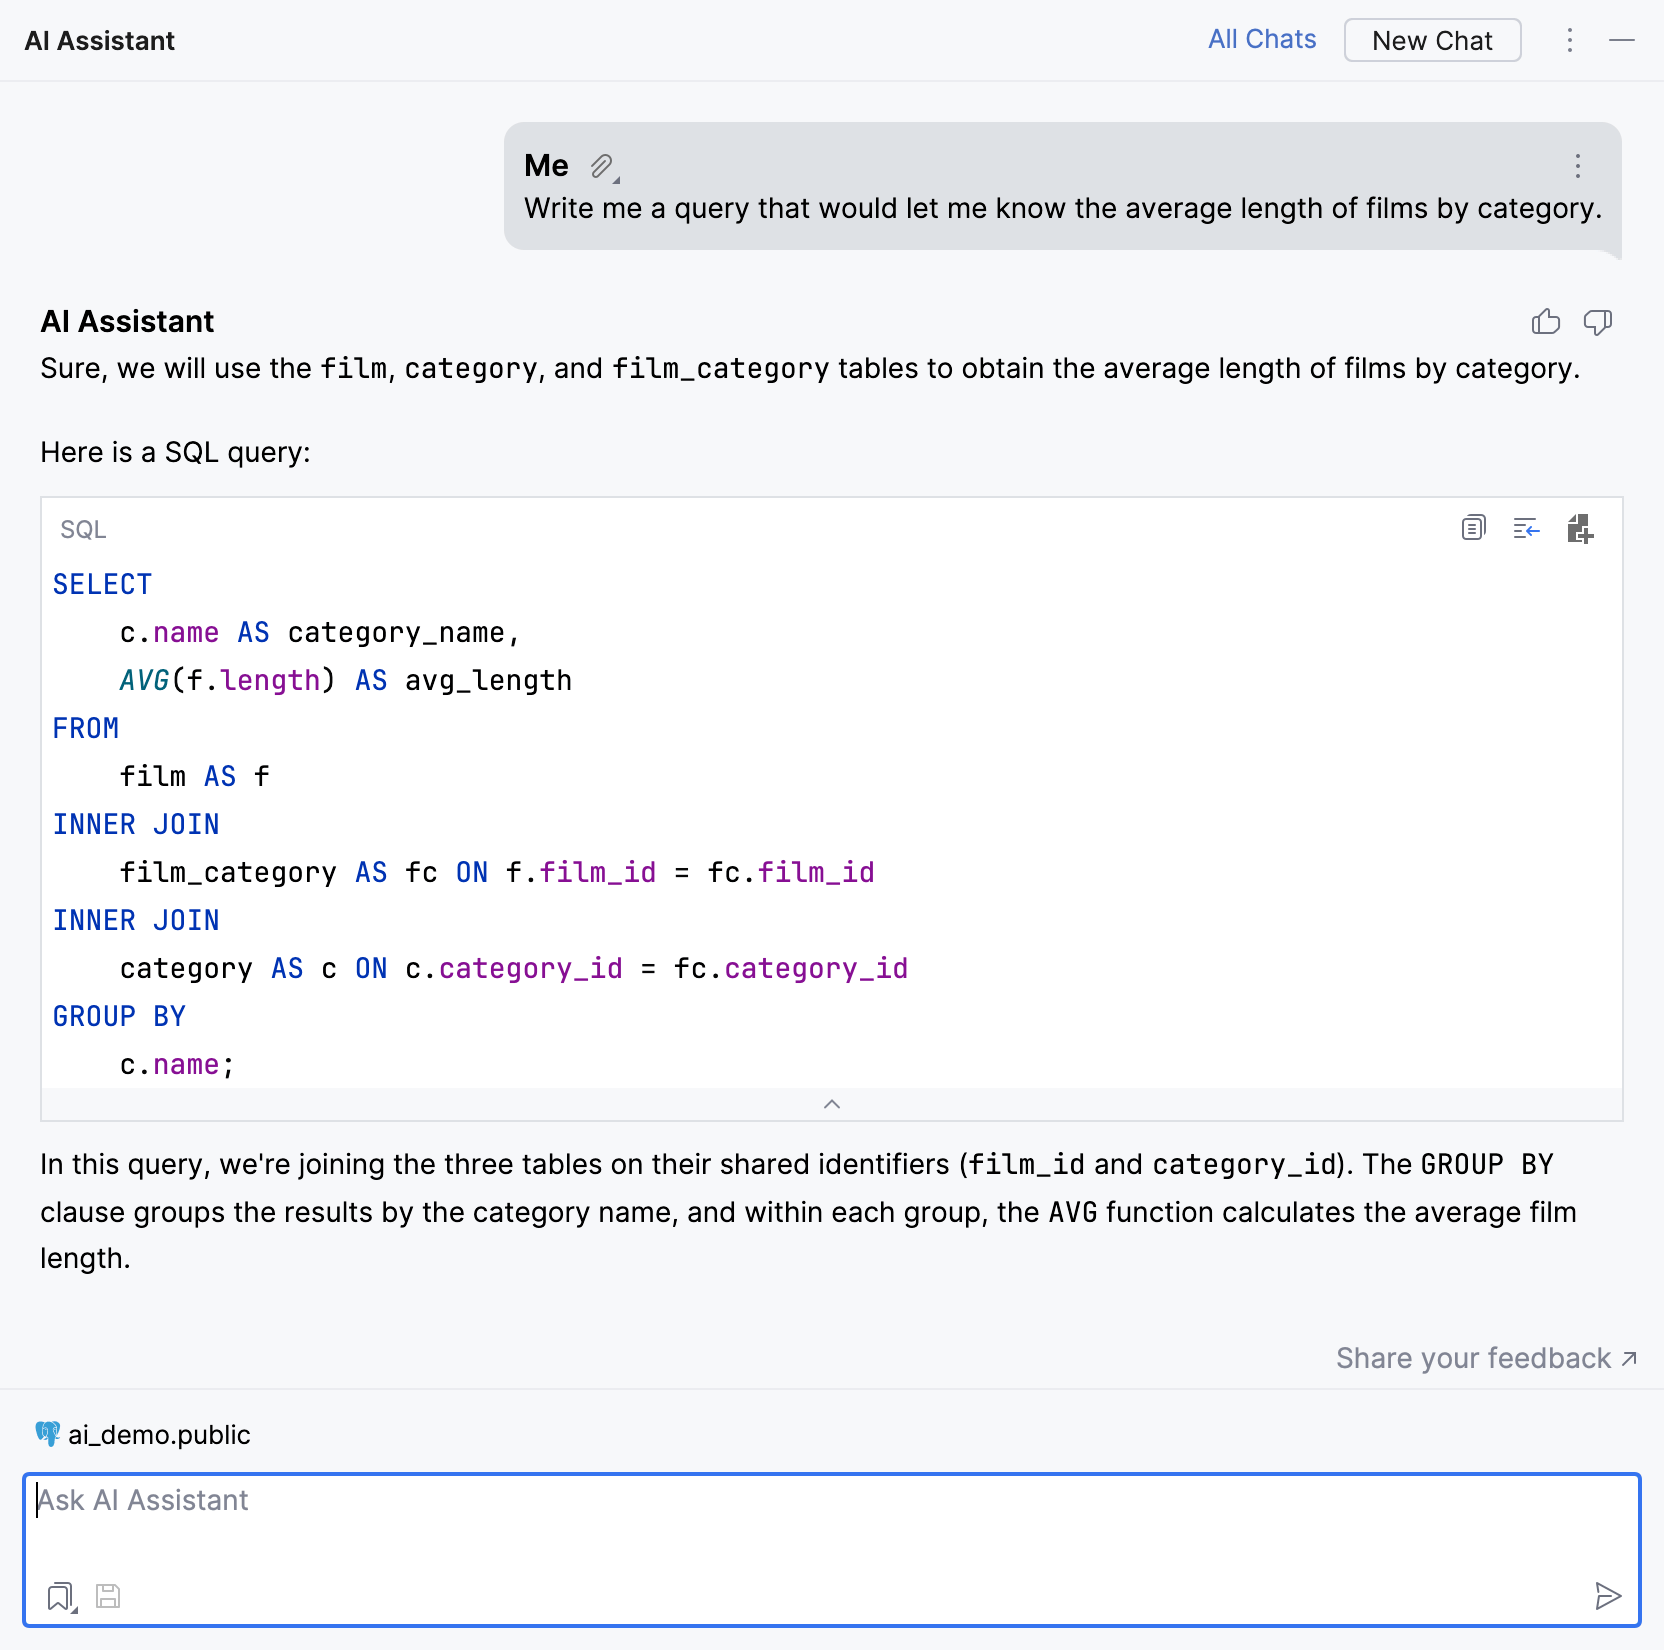
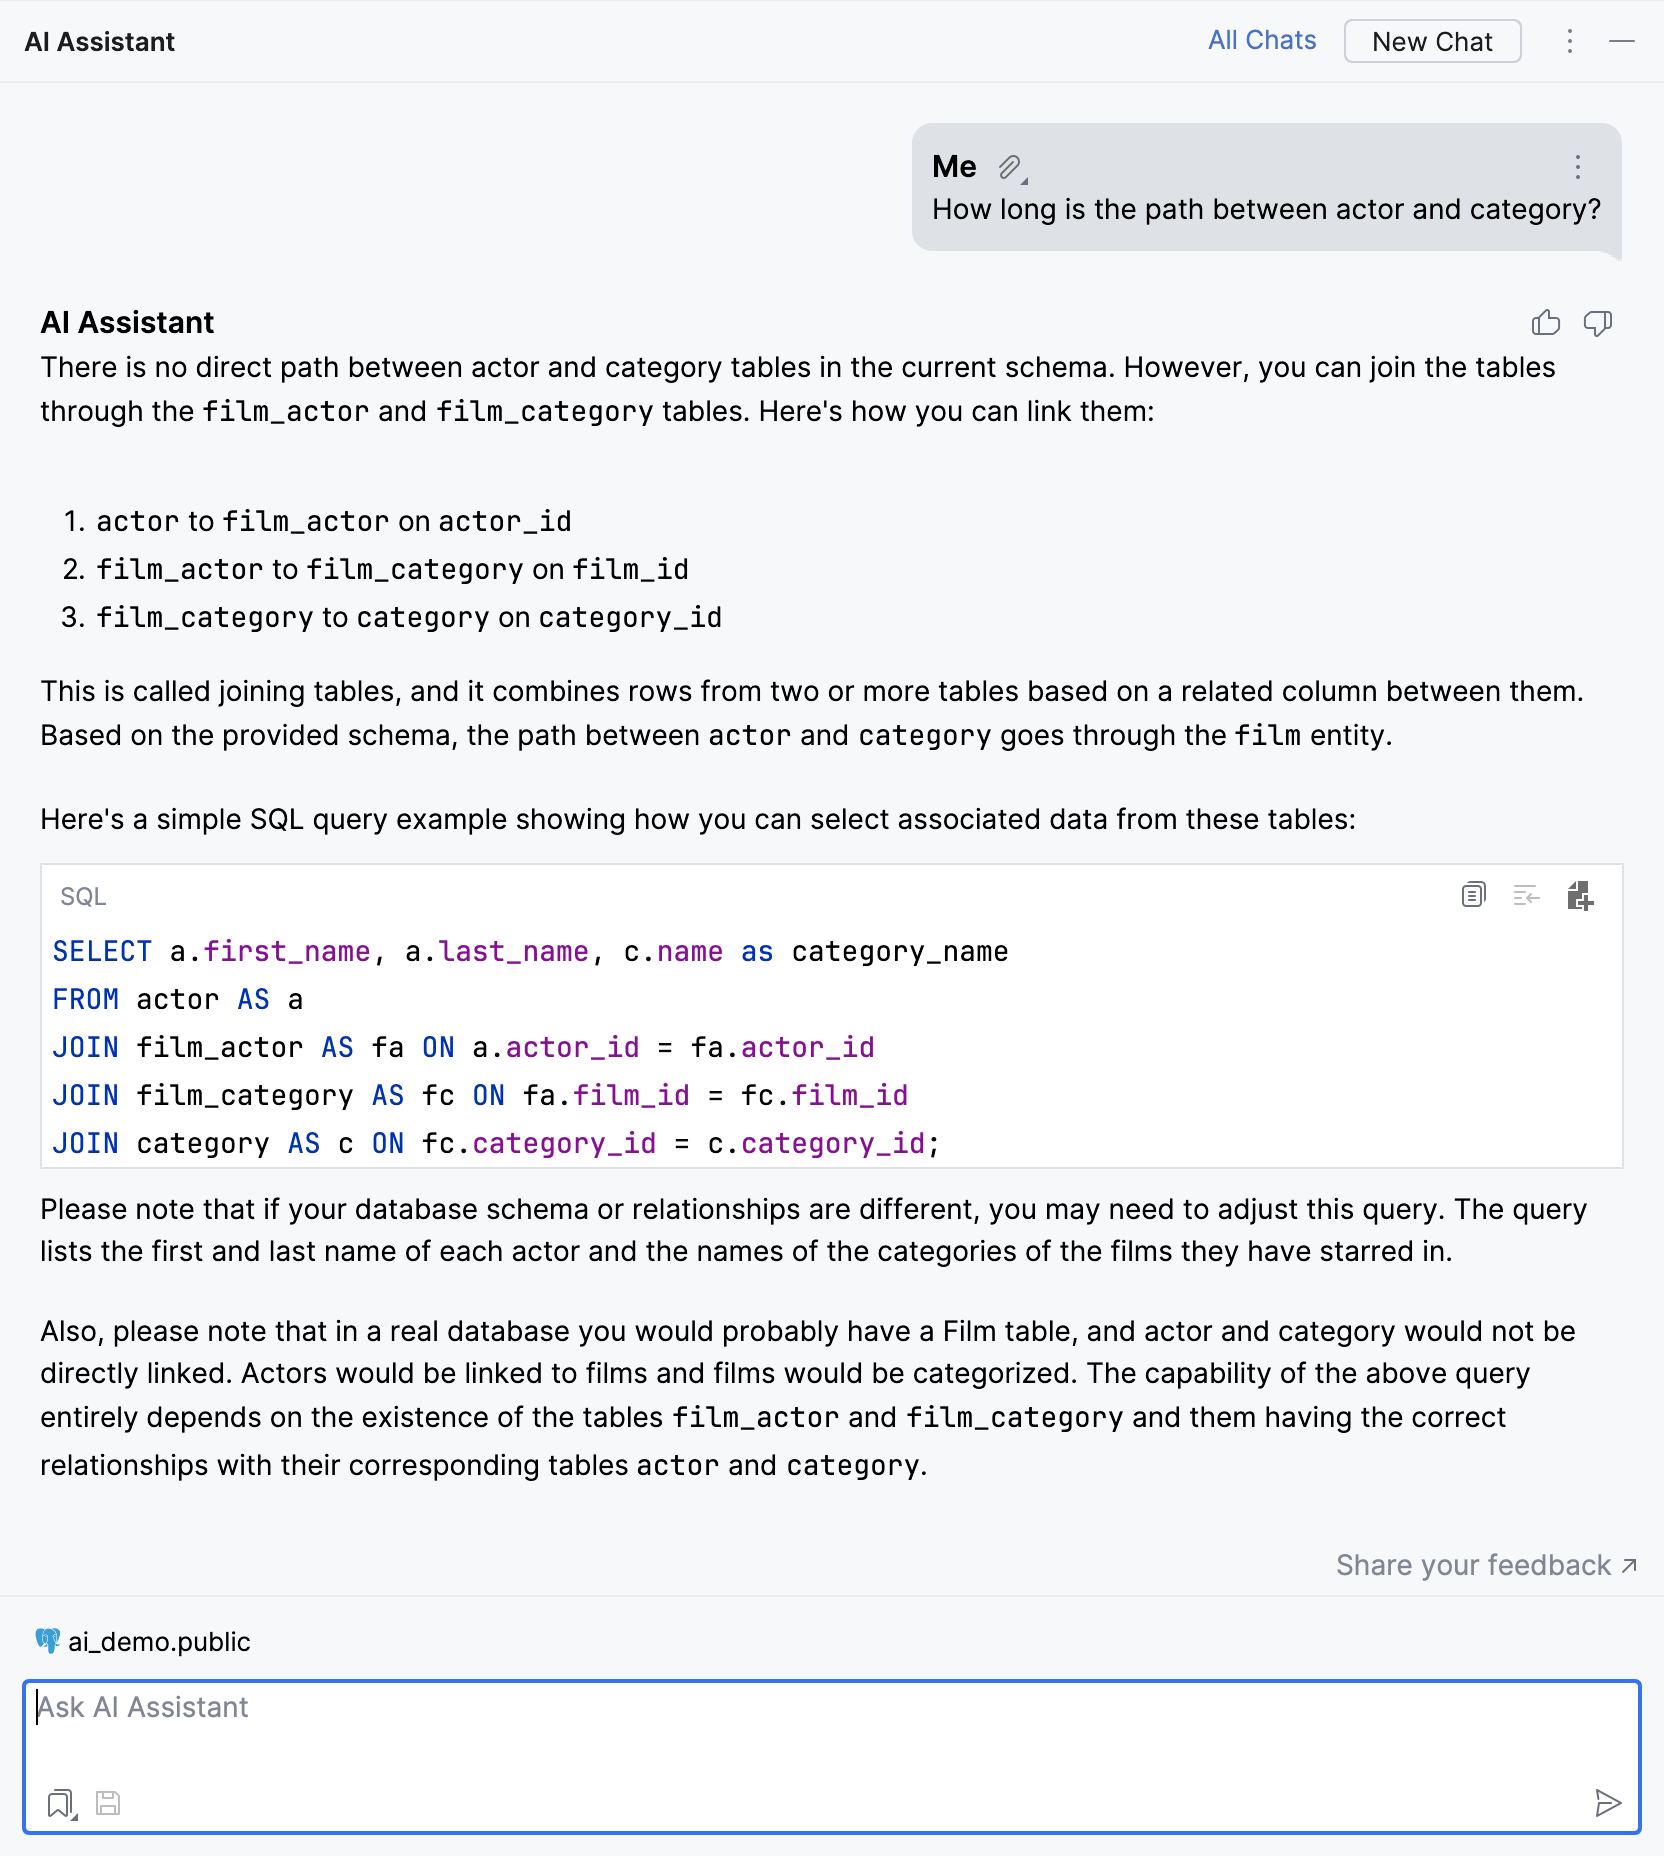
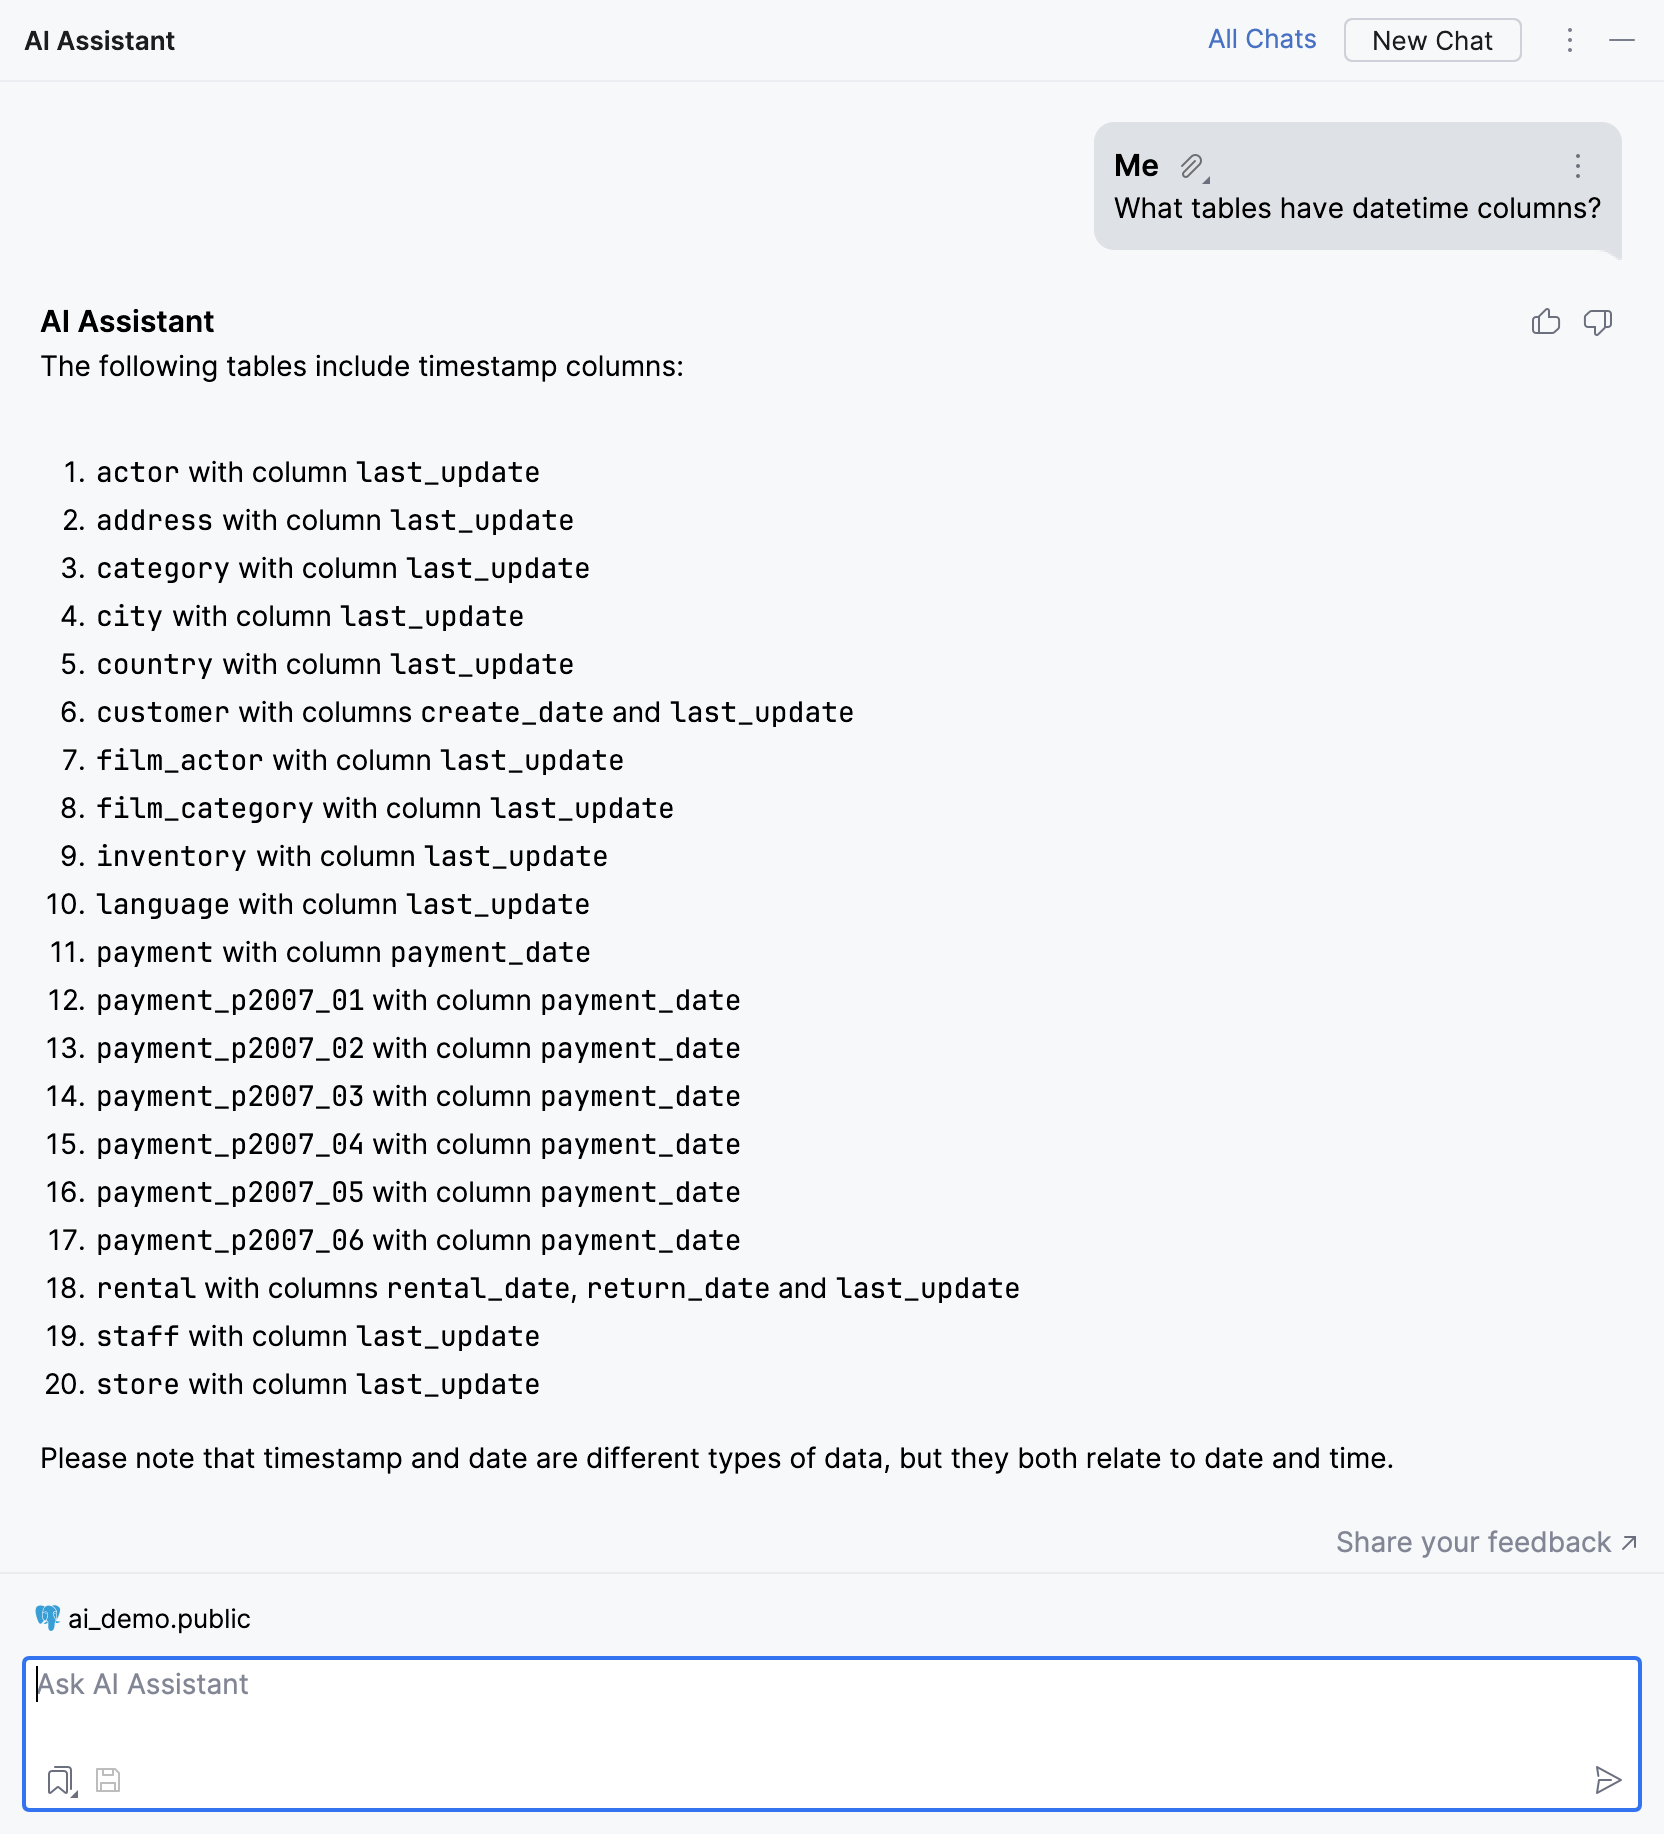
Request queries and information using a natural language
AI Assistant can give you insights about your schema, and it can also generate SQL queries for the schema based on a natural language request. Having access to your schema, it will analyze the structure and provide you with the requesetd query or information.
For illustration purposes, we will use the PostgreSQL Sakila schema imported to the ai_demo database. You can get the dump files by cloning the dumps repository.
For more information about cloning repositories, refer to Set up a Git repository. For more information about running dump files in DataGrip, refer to Import SQL dump files.
Step 1. Attach your schema
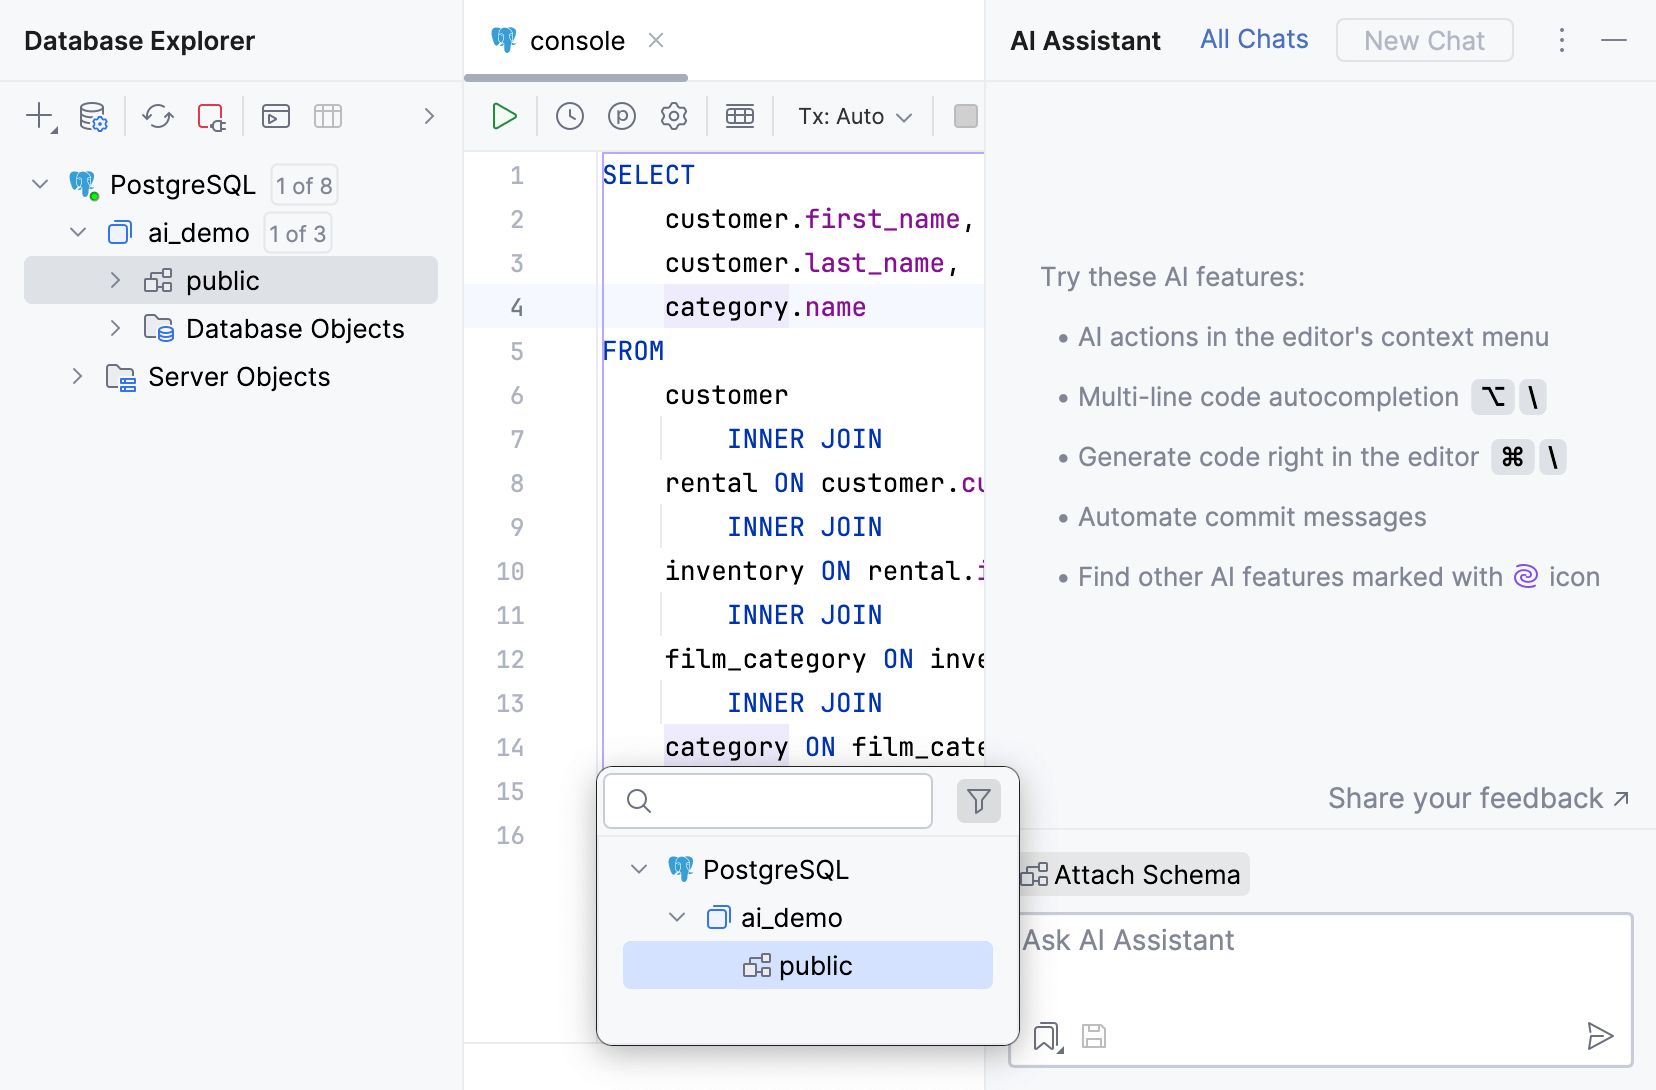
To grant the LLM access to your database schema, attach the schema to chat in the AI Assistant tool window.
On the toolbar, click
More tool windows and select
AI Assistant to open the AI Assistant tool window.
In the AI Assistant tool window, click
Attach Schema above input field and select the schema that you want to attach. In our case, it is
ai_demo.public.If the Attach Schema dialog appears, click Attach to attach the schema.
For more information about attaching schemas to the chat, refer to Attach database schema.
Step 2. Ask in the chat
Optimize your schema and queries using EXPLAIN PLAN
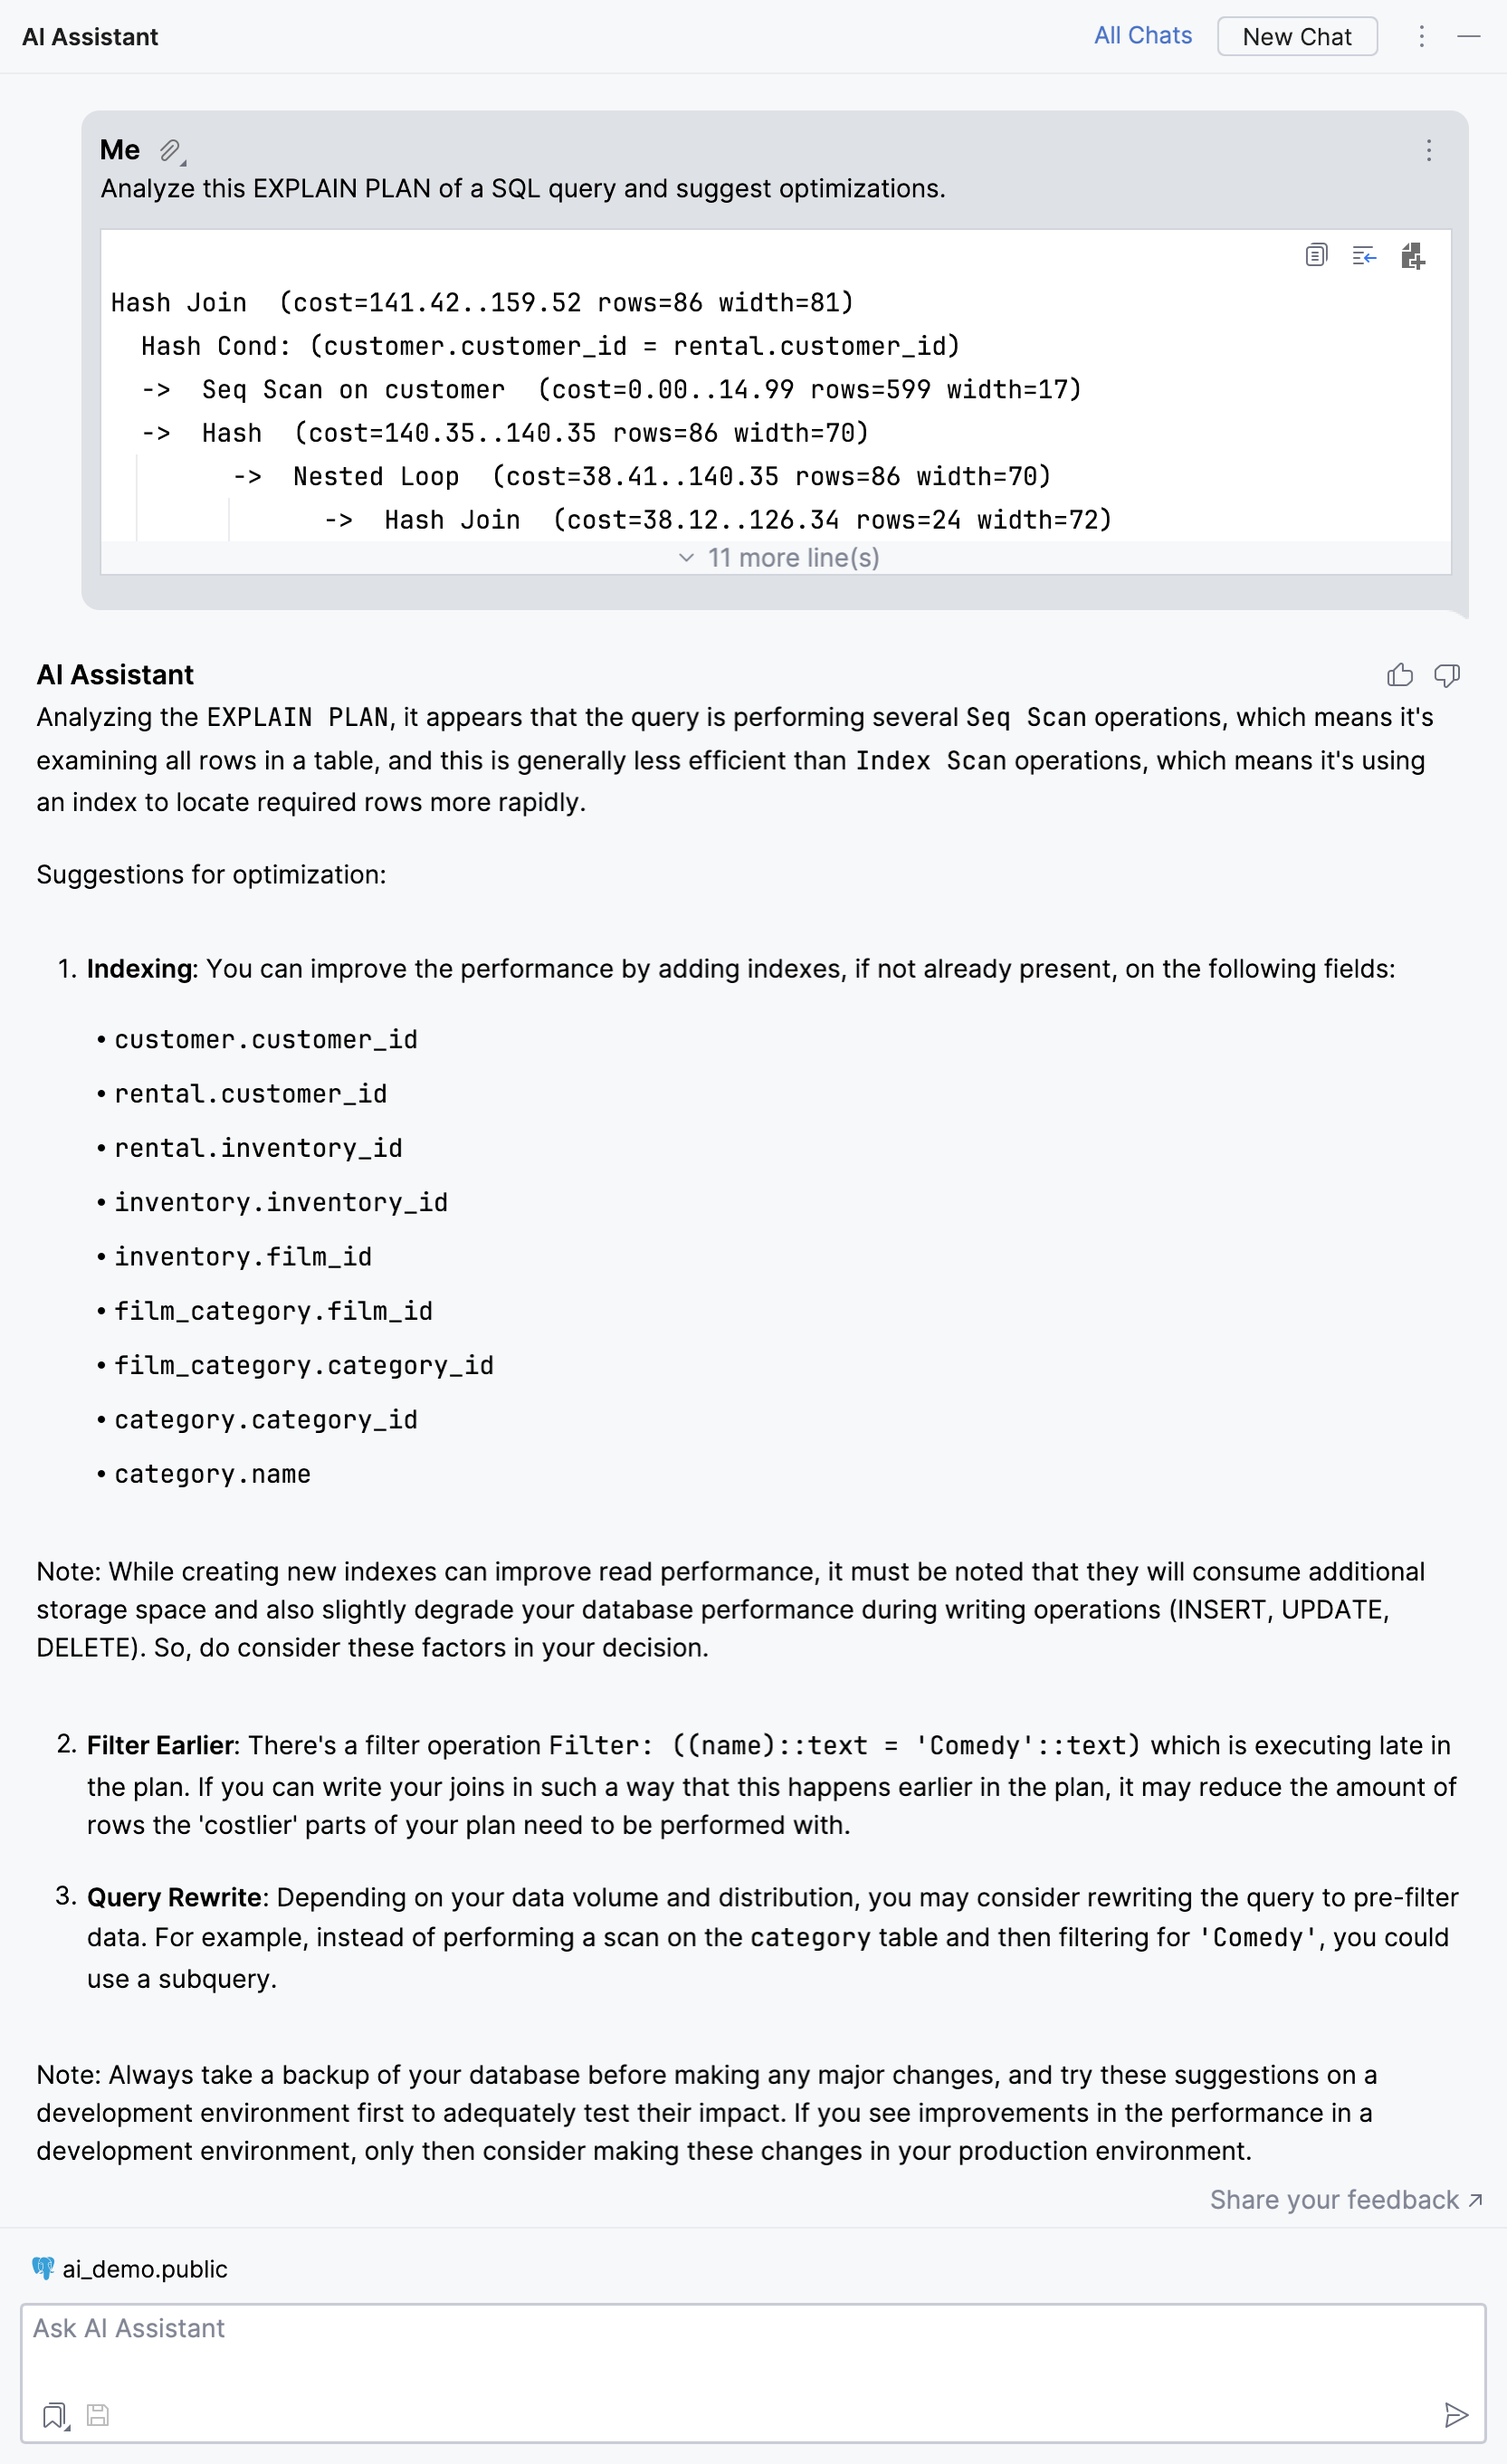
AI Assistant can help you with optimizing your schema and queries using the EXPLAIN PLAN command. Having access to your schema, it can analyze the plan and suggest optimizations.
For illustration purposes, we will use the PostgreSQL Sakila schema imported to the ai_demo database. You can get the dump files by cloning the dumps repository.
For more information about cloning repositories, refer to Set up a Git repository. For more information about running dump files in DataGrip, refer to Import SQL dump files.
In this tutorial, we will use the following query:
Step 1. Run the EXPLAIN PLAN command
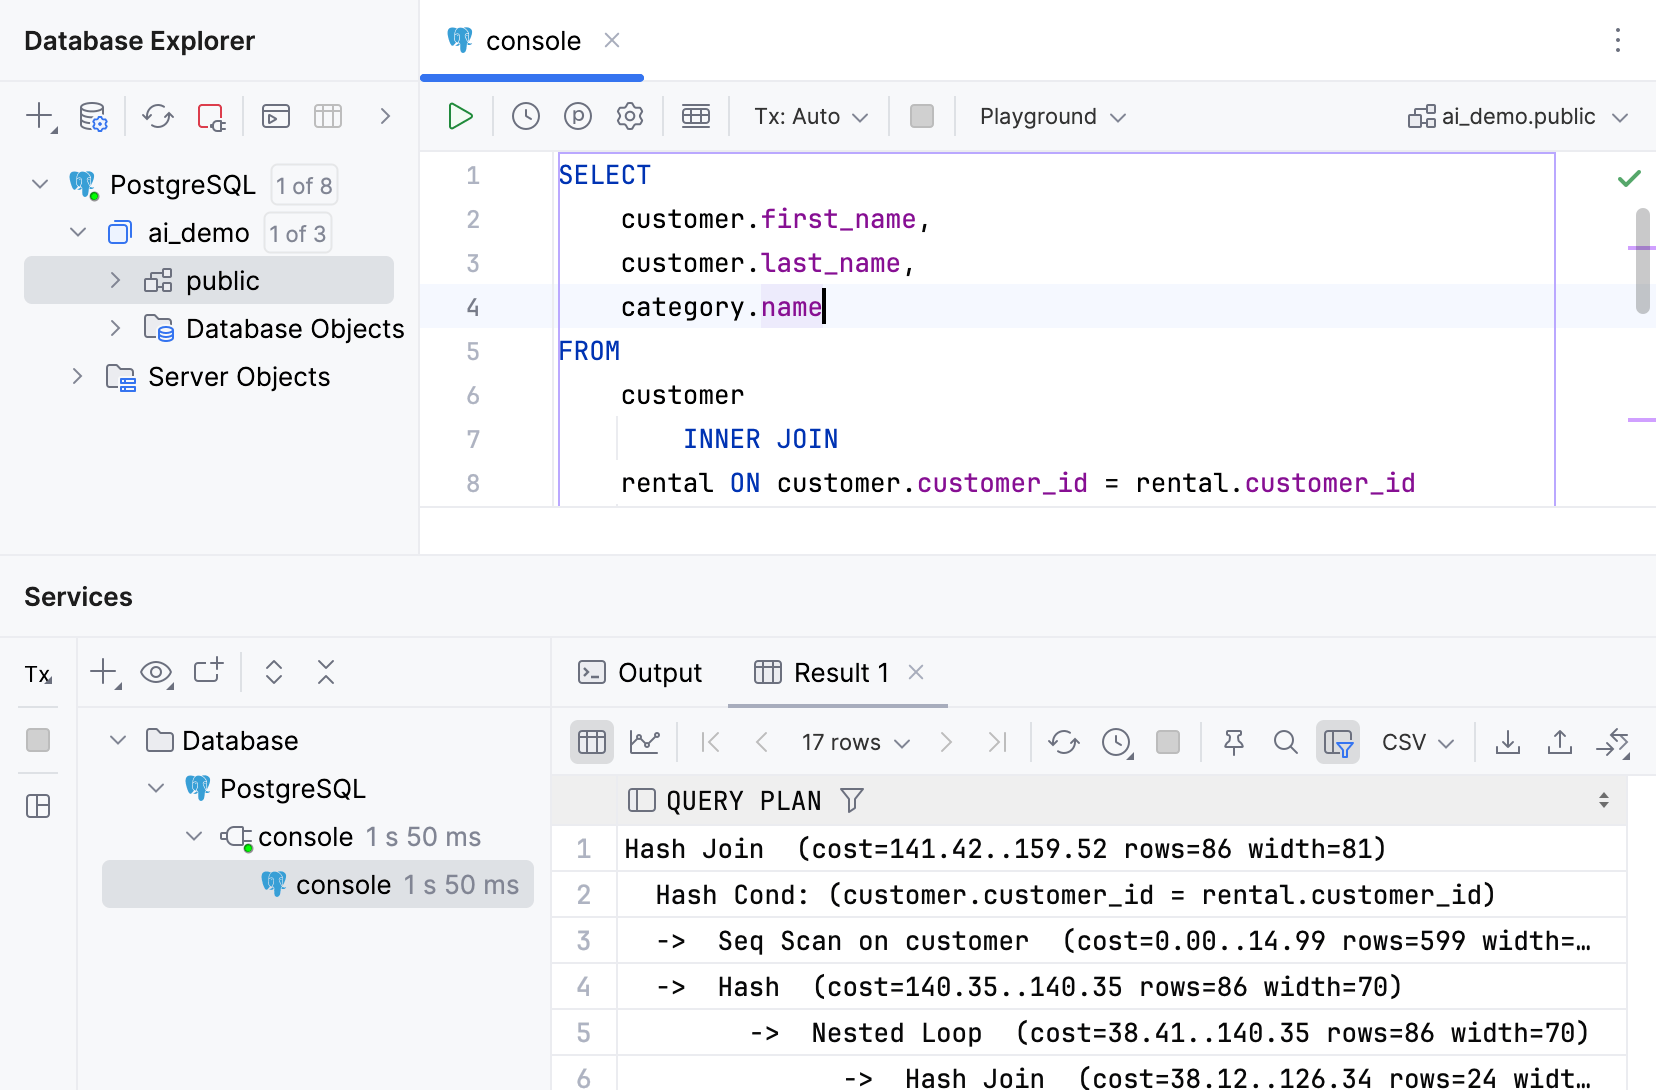
Obtain and copy the EXPLAIN PLAN that you want AI Assistant to analyze.
In the query console, right-click your query and navigate to .
In the result tab, press Ctrl+A and Ctrl+C to copy the result to clipboard.
For more information about EXPLAIN PLAN commands, refer to Query execution plan.
EXPLAIN PLAN for the original query:
Step 2. Attach your schema
To grant the LLM access to your database schema, attach the schema to chat in the AI Assistant tool window.
On the toolbar, click
More tool windows and select
AI Assistant to open the AI Assistant tool window.
In the AI Assistant tool window, click
Attach Schema above input field and select the schema that you want to attach. In our case, it is
ai_demo.public.If the Attach Schema dialog appears, click Attach to attach the schema.
For more information about attaching schemas to the chat, refer to Attach database schema.

Step 3. Request optimization suggestions and commands
Ask AI Assistant to analyze the EXPLAIN PLAN of your query, and to suggest the possible optimizations.
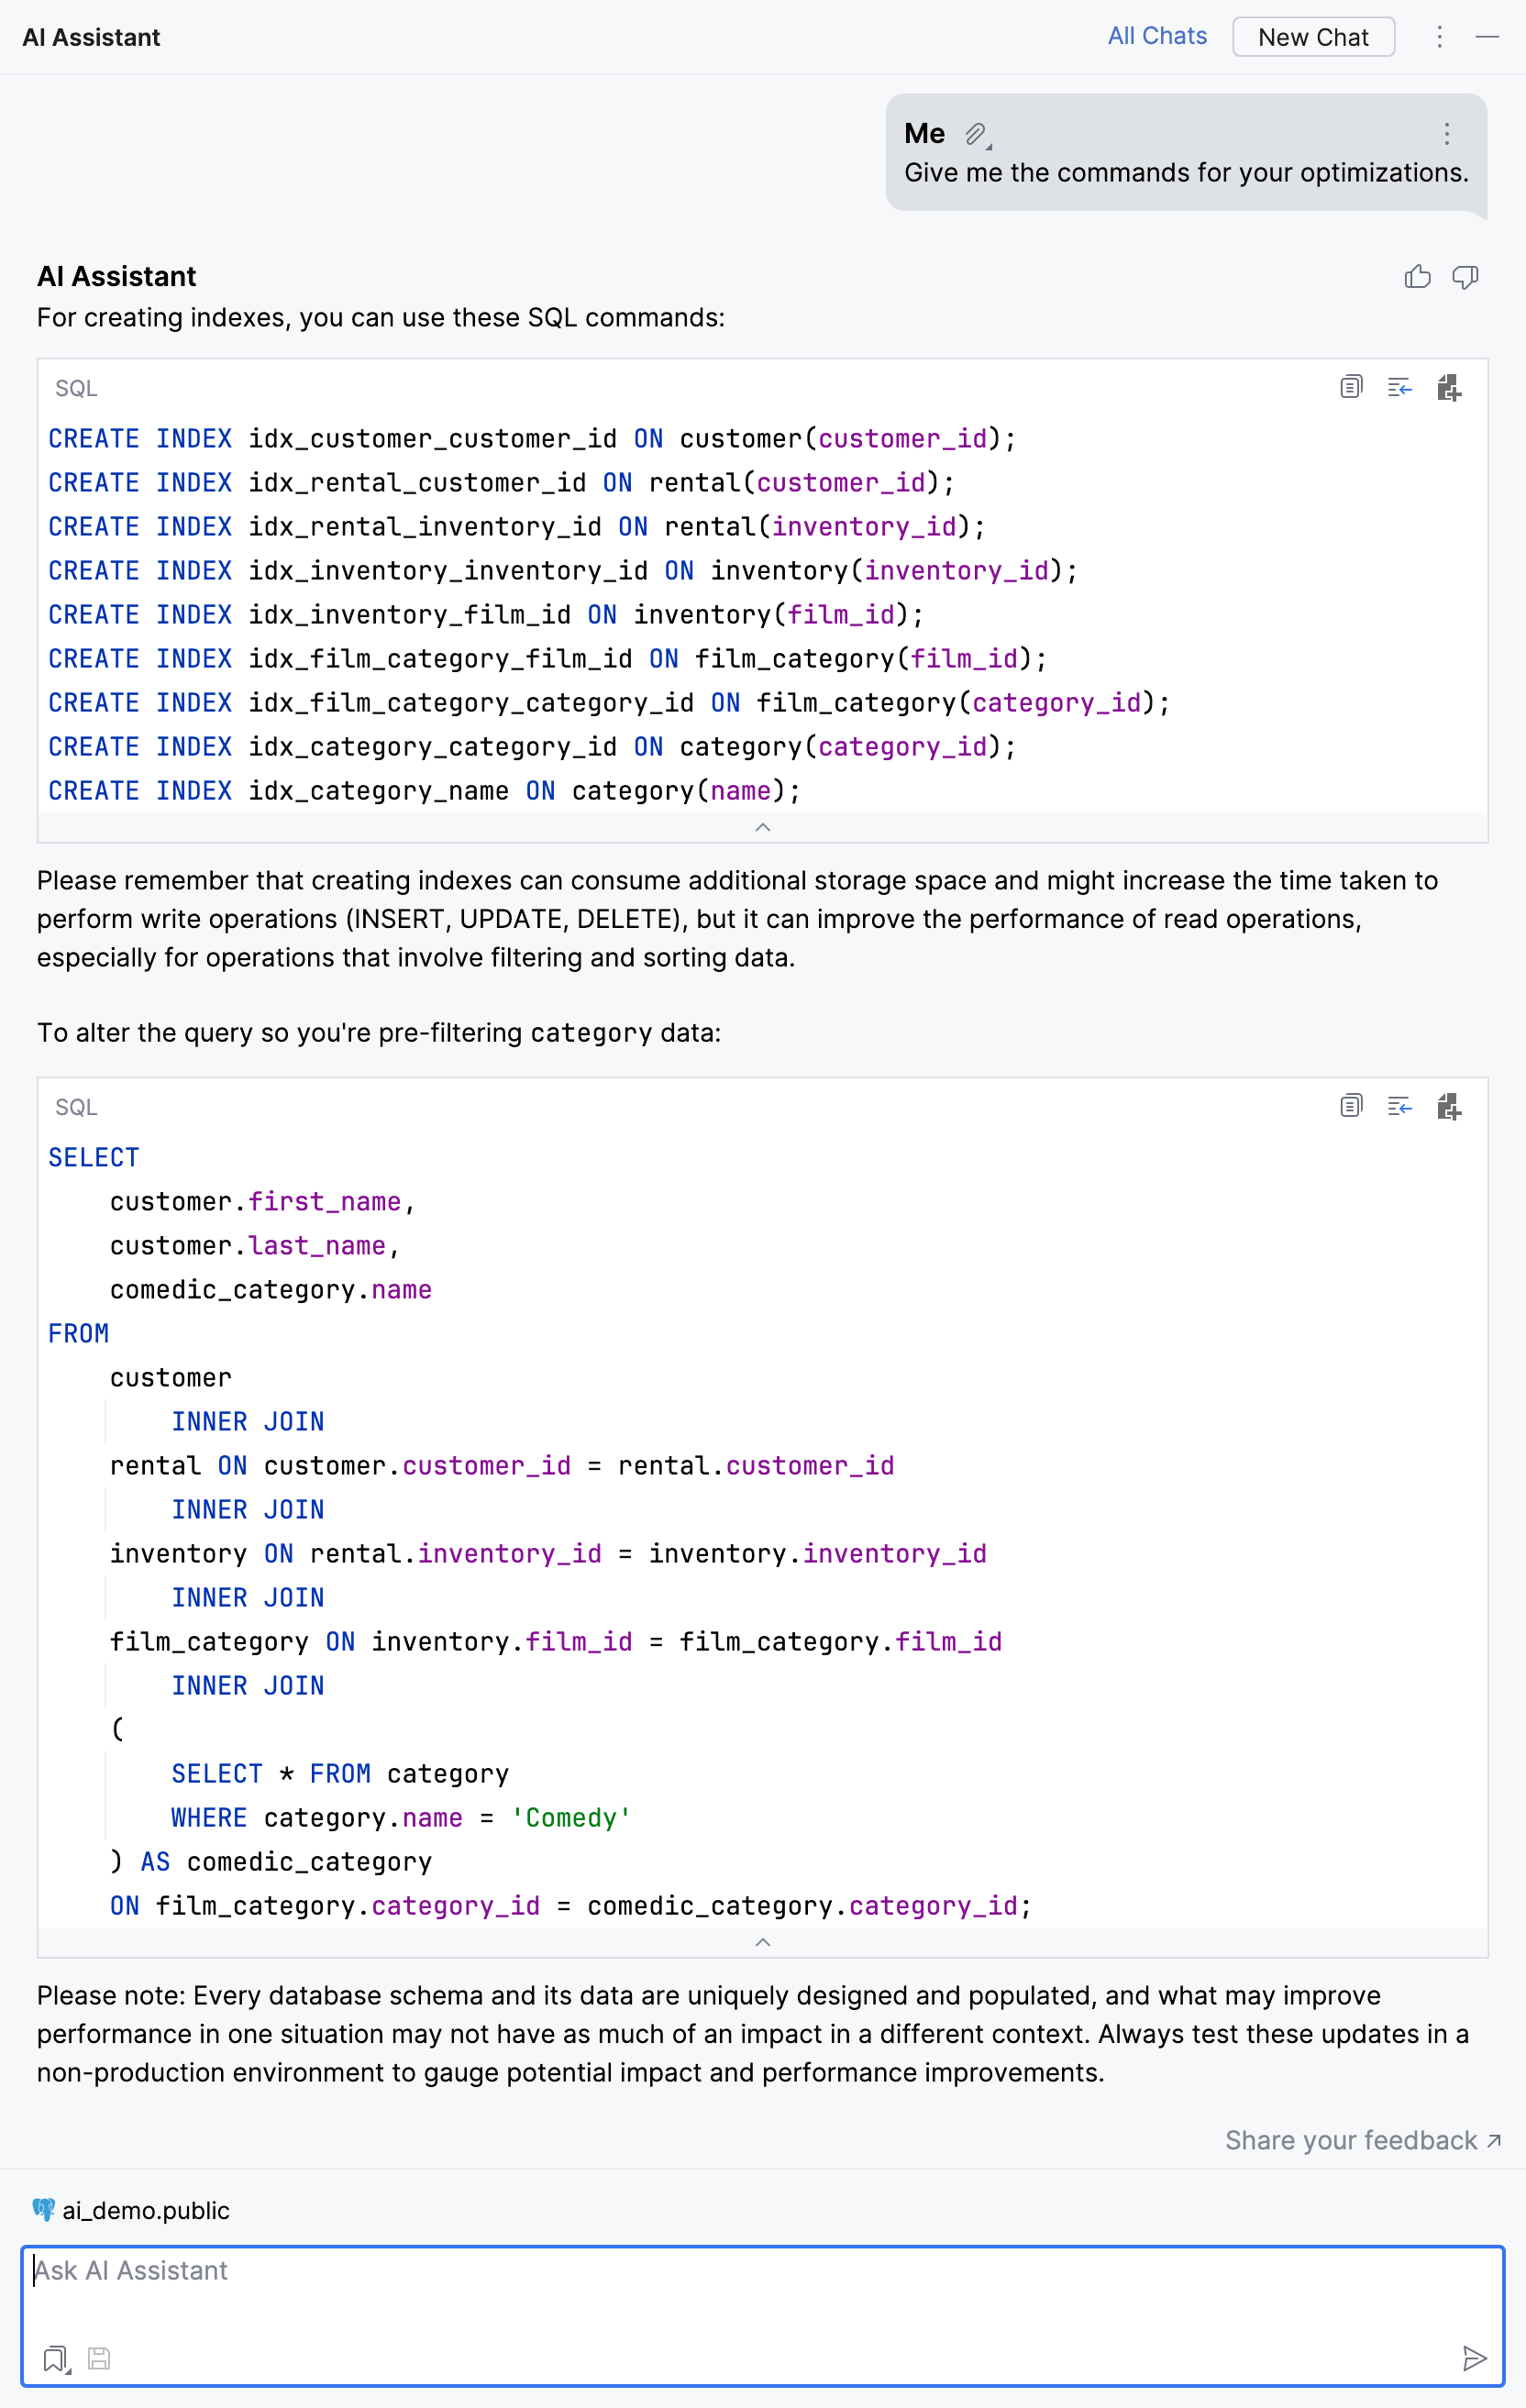
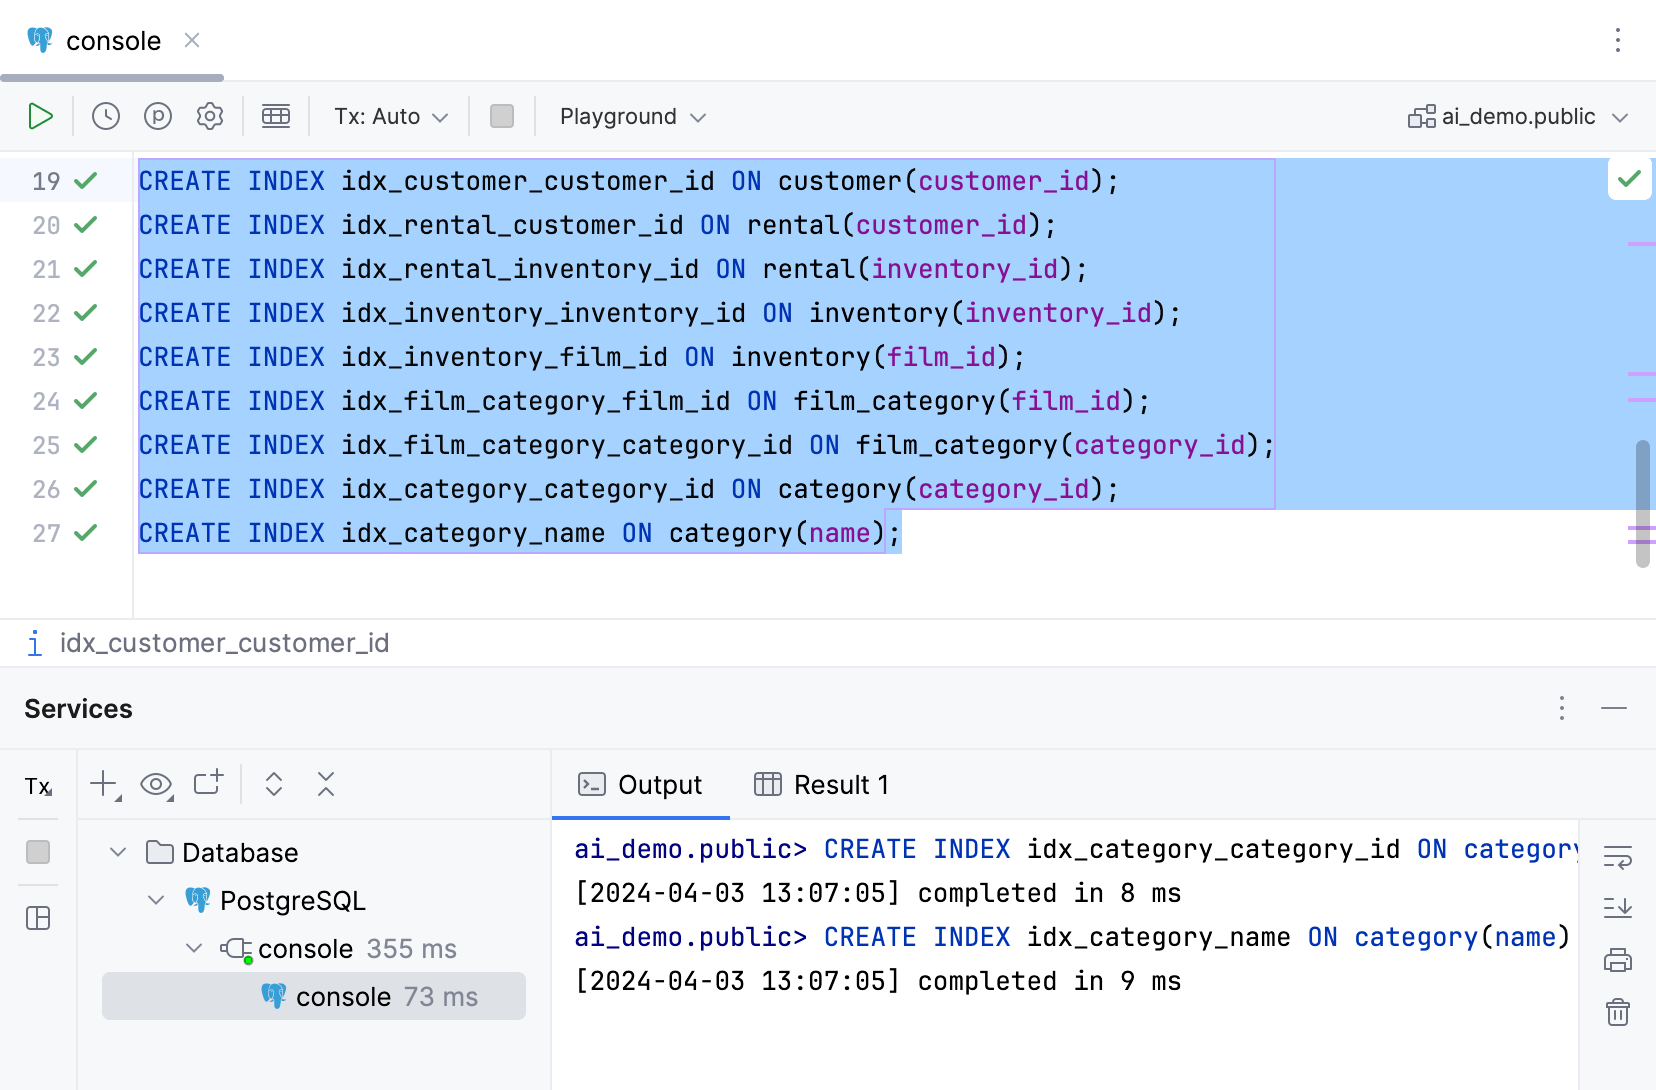
Step 4. Run the suggested CREATE INDEX commands
Select the commands and run them by clicking
Execute on the toolbar, or by pressing Ctrl+Enter.
The suggested commands:
IDE will create the defined database object, you can view output in the Output tab of Services tool window.
Step 5. Run the EXPLAIN PLAN for optimized schema and query
In the upper-right corner of the field with the generated
CREATE INDEXcommands, clickInsert Snippet at Caret to insert the code to query console.
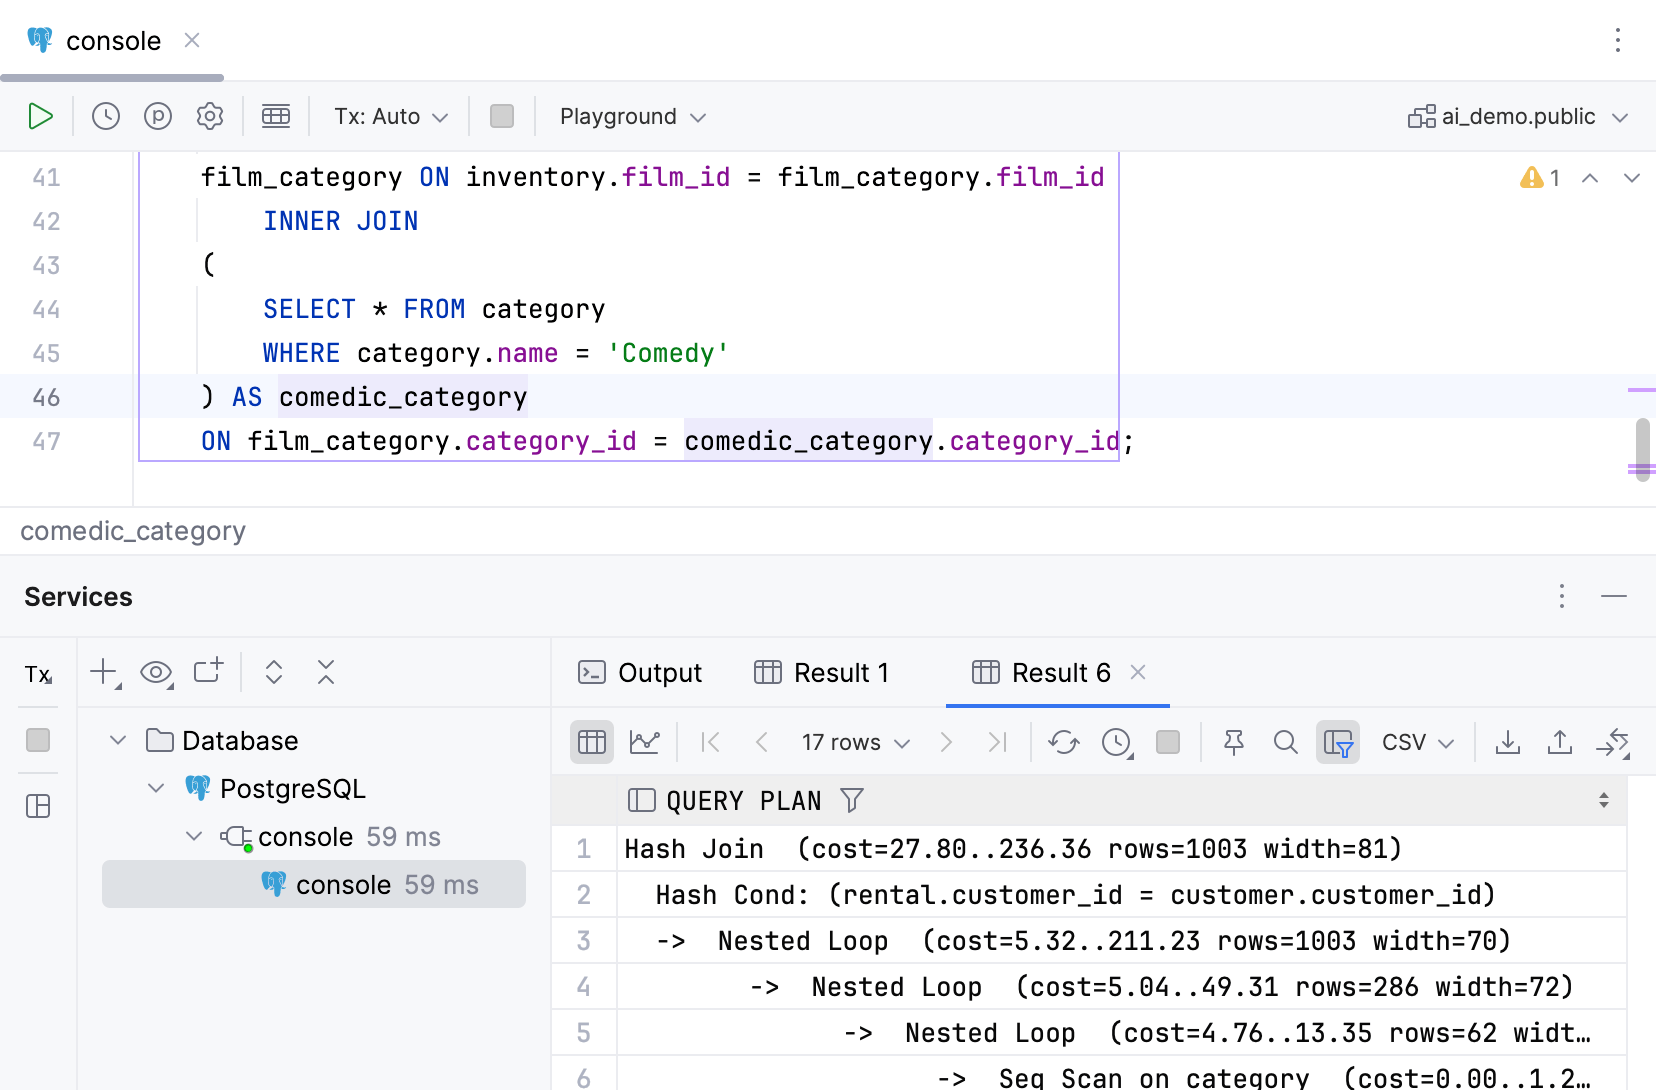
The suggested optimized query:
SELECT customer.first_name, customer.last_name, comedic_category.name FROM customer INNER JOIN rental ON customer.customer_id = rental.customer_id INNER JOIN inventory ON rental.inventory_id = inventory.inventory_id INNER JOIN film_category ON inventory.film_id = film_category.film_id INNER JOIN ( SELECT * FROM category WHERE category.name = 'Comedy' ) AS comedic_category ON film_category.category_id = comedic_category.category_id;EXPLAIN PLAN for the optimized query:
Hash Join (cost=27.80..236.36 rows=1003 width=81) Hash Cond: (rental.customer_id = customer.customer_id) -> Nested Loop (cost=5.32..211.23 rows=1003 width=70) -> Nested Loop (cost=5.04..49.31 rows=286 width=72) -> Nested Loop (cost=4.76..13.35 rows=62 width=70) -> Seq Scan on category (cost=0.00..1.20 rows=1 width=72) Filter: ((name)::text = 'Comedy'::text) -> Bitmap Heap Scan on film_category (cost=4.76..11.53 rows=62 width=4) Recheck Cond: (category_id = category.category_id) -> Bitmap Index Scan on idx_film_category_category_id (cost=0.00..4.74 rows=62 width=0) Index Cond: (category_id = category.category_id) -> Index Scan using idx_inventory_film_id on inventory (cost=0.28..0.53 rows=5 width=6) Index Cond: (film_id = film_category.film_id) -> Index Scan using idx_rental_inventory_id on rental (cost=0.29..0.53 rows=4 width=6) Index Cond: (inventory_id = inventory.inventory_id) -> Hash (cost=14.99..14.99 rows=599 width=17) -> Seq Scan on customer (cost=0.00..14.99 rows=599 width=17)
Compare the DDL of two database objects
Once provided with an access to your database schema, AI Assistant can analyze it and compare DDL of the database objects.
Let's compare the actor and actor_test tables of the testing.public schema.
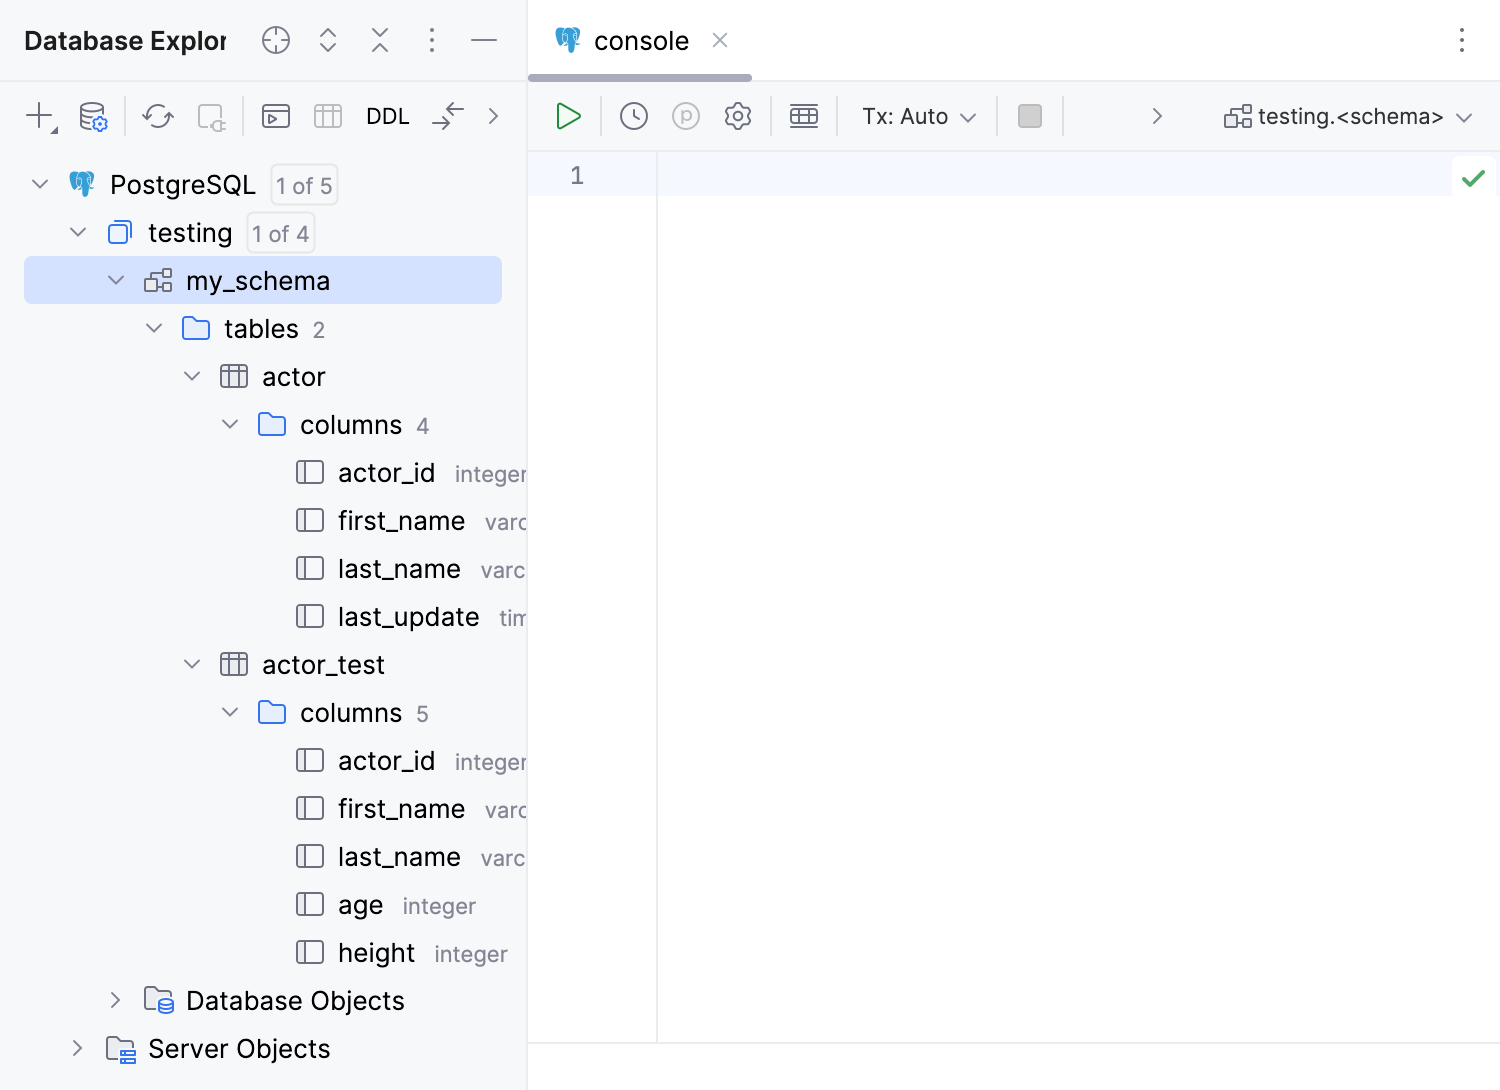
Step 1. Attach your schema
To grant the LLM access to your database schema, attach the schema to chat in the AI Assistant tool window.
On the toolbar, click
More tool windows and select
AI Assistant to open the AI Assistant tool window.
In the AI Assistant tool window, click
Attach Schema above input field and select the schema that you want to attach. In our case, it is
ai_demo.public.If the Attach Schema dialog appears, click Attach to attach the schema.
For more information about attaching schemas to the chat, refer to Attach database schema.
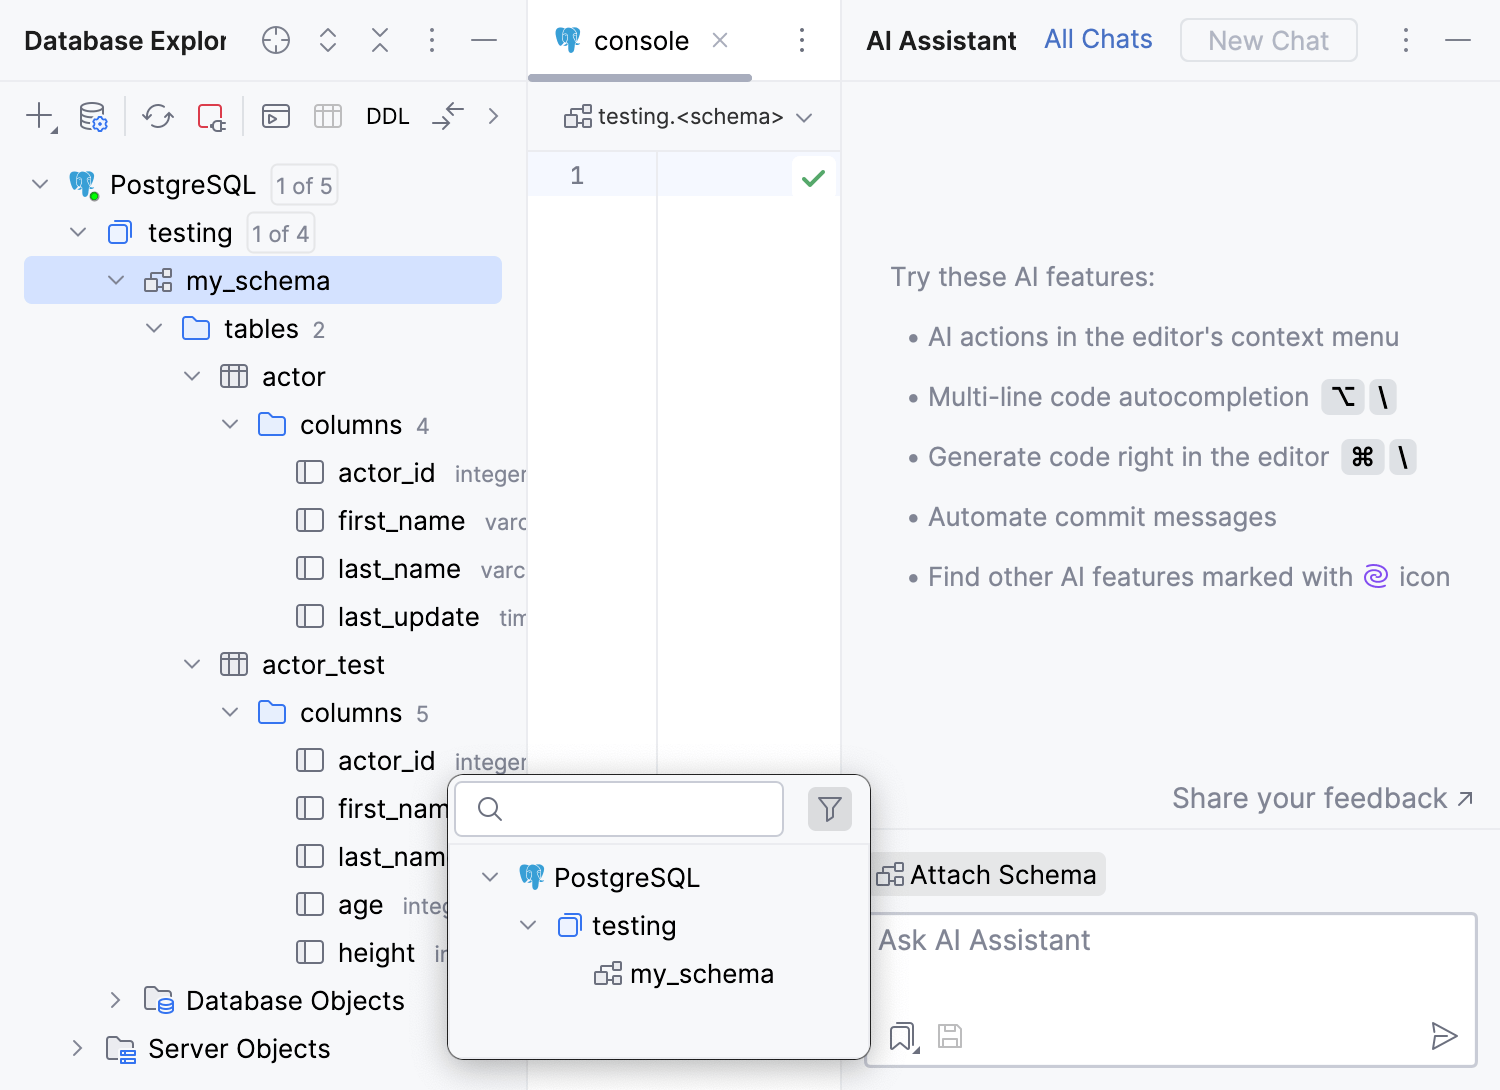
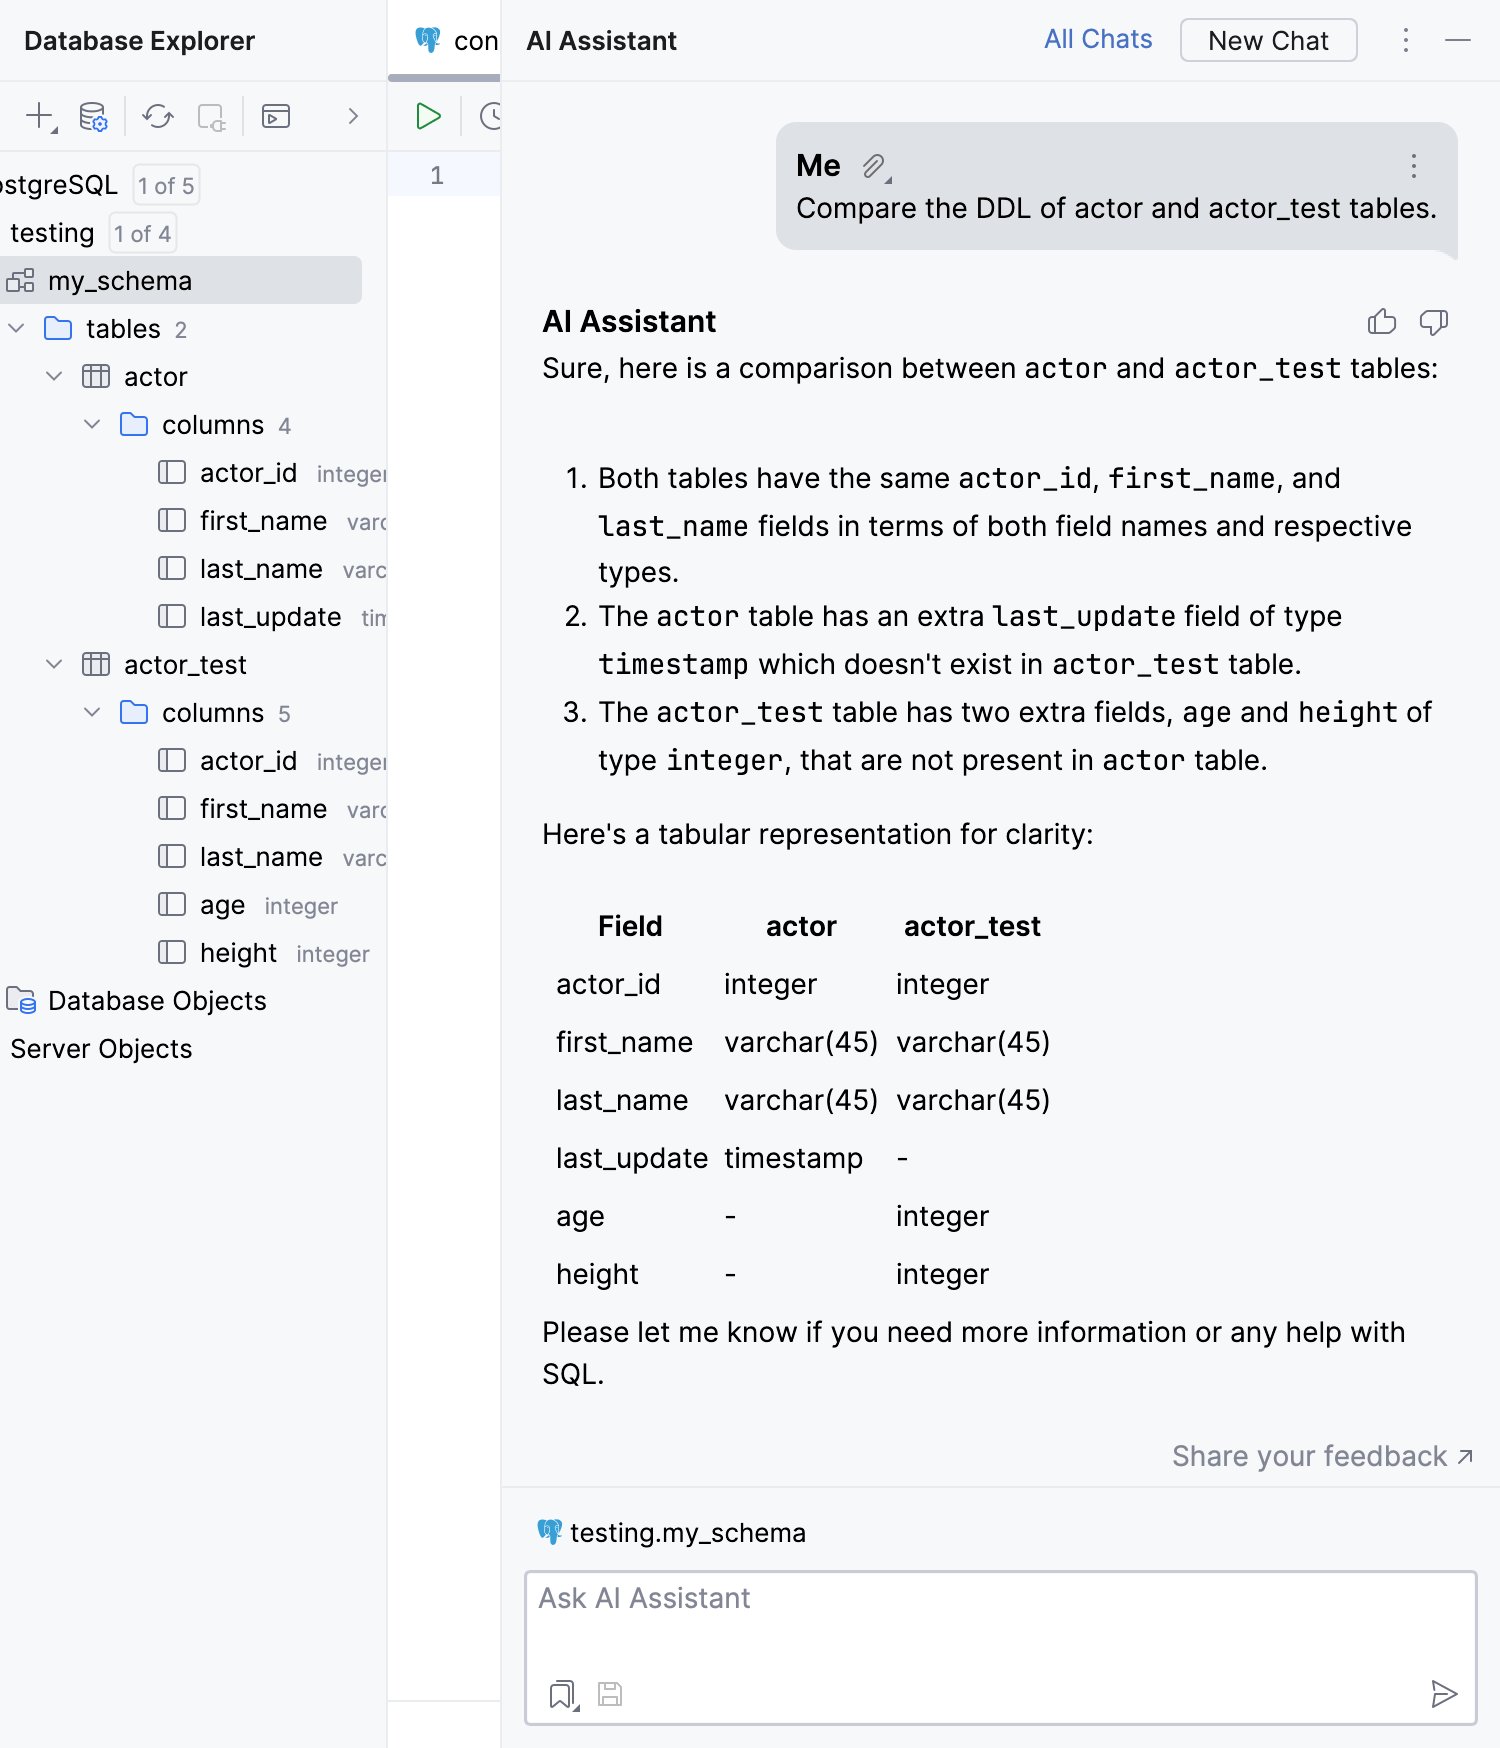
Step 2. Compare the DDL of your tables
On the toolbar, click
More tool windows and select
AI Assistant to open the AI Assistant tool window.
In the input field, type your prompt and press Enter.
AI Assistant will compare the DDL and explain you the differences.
Fix code mistakes
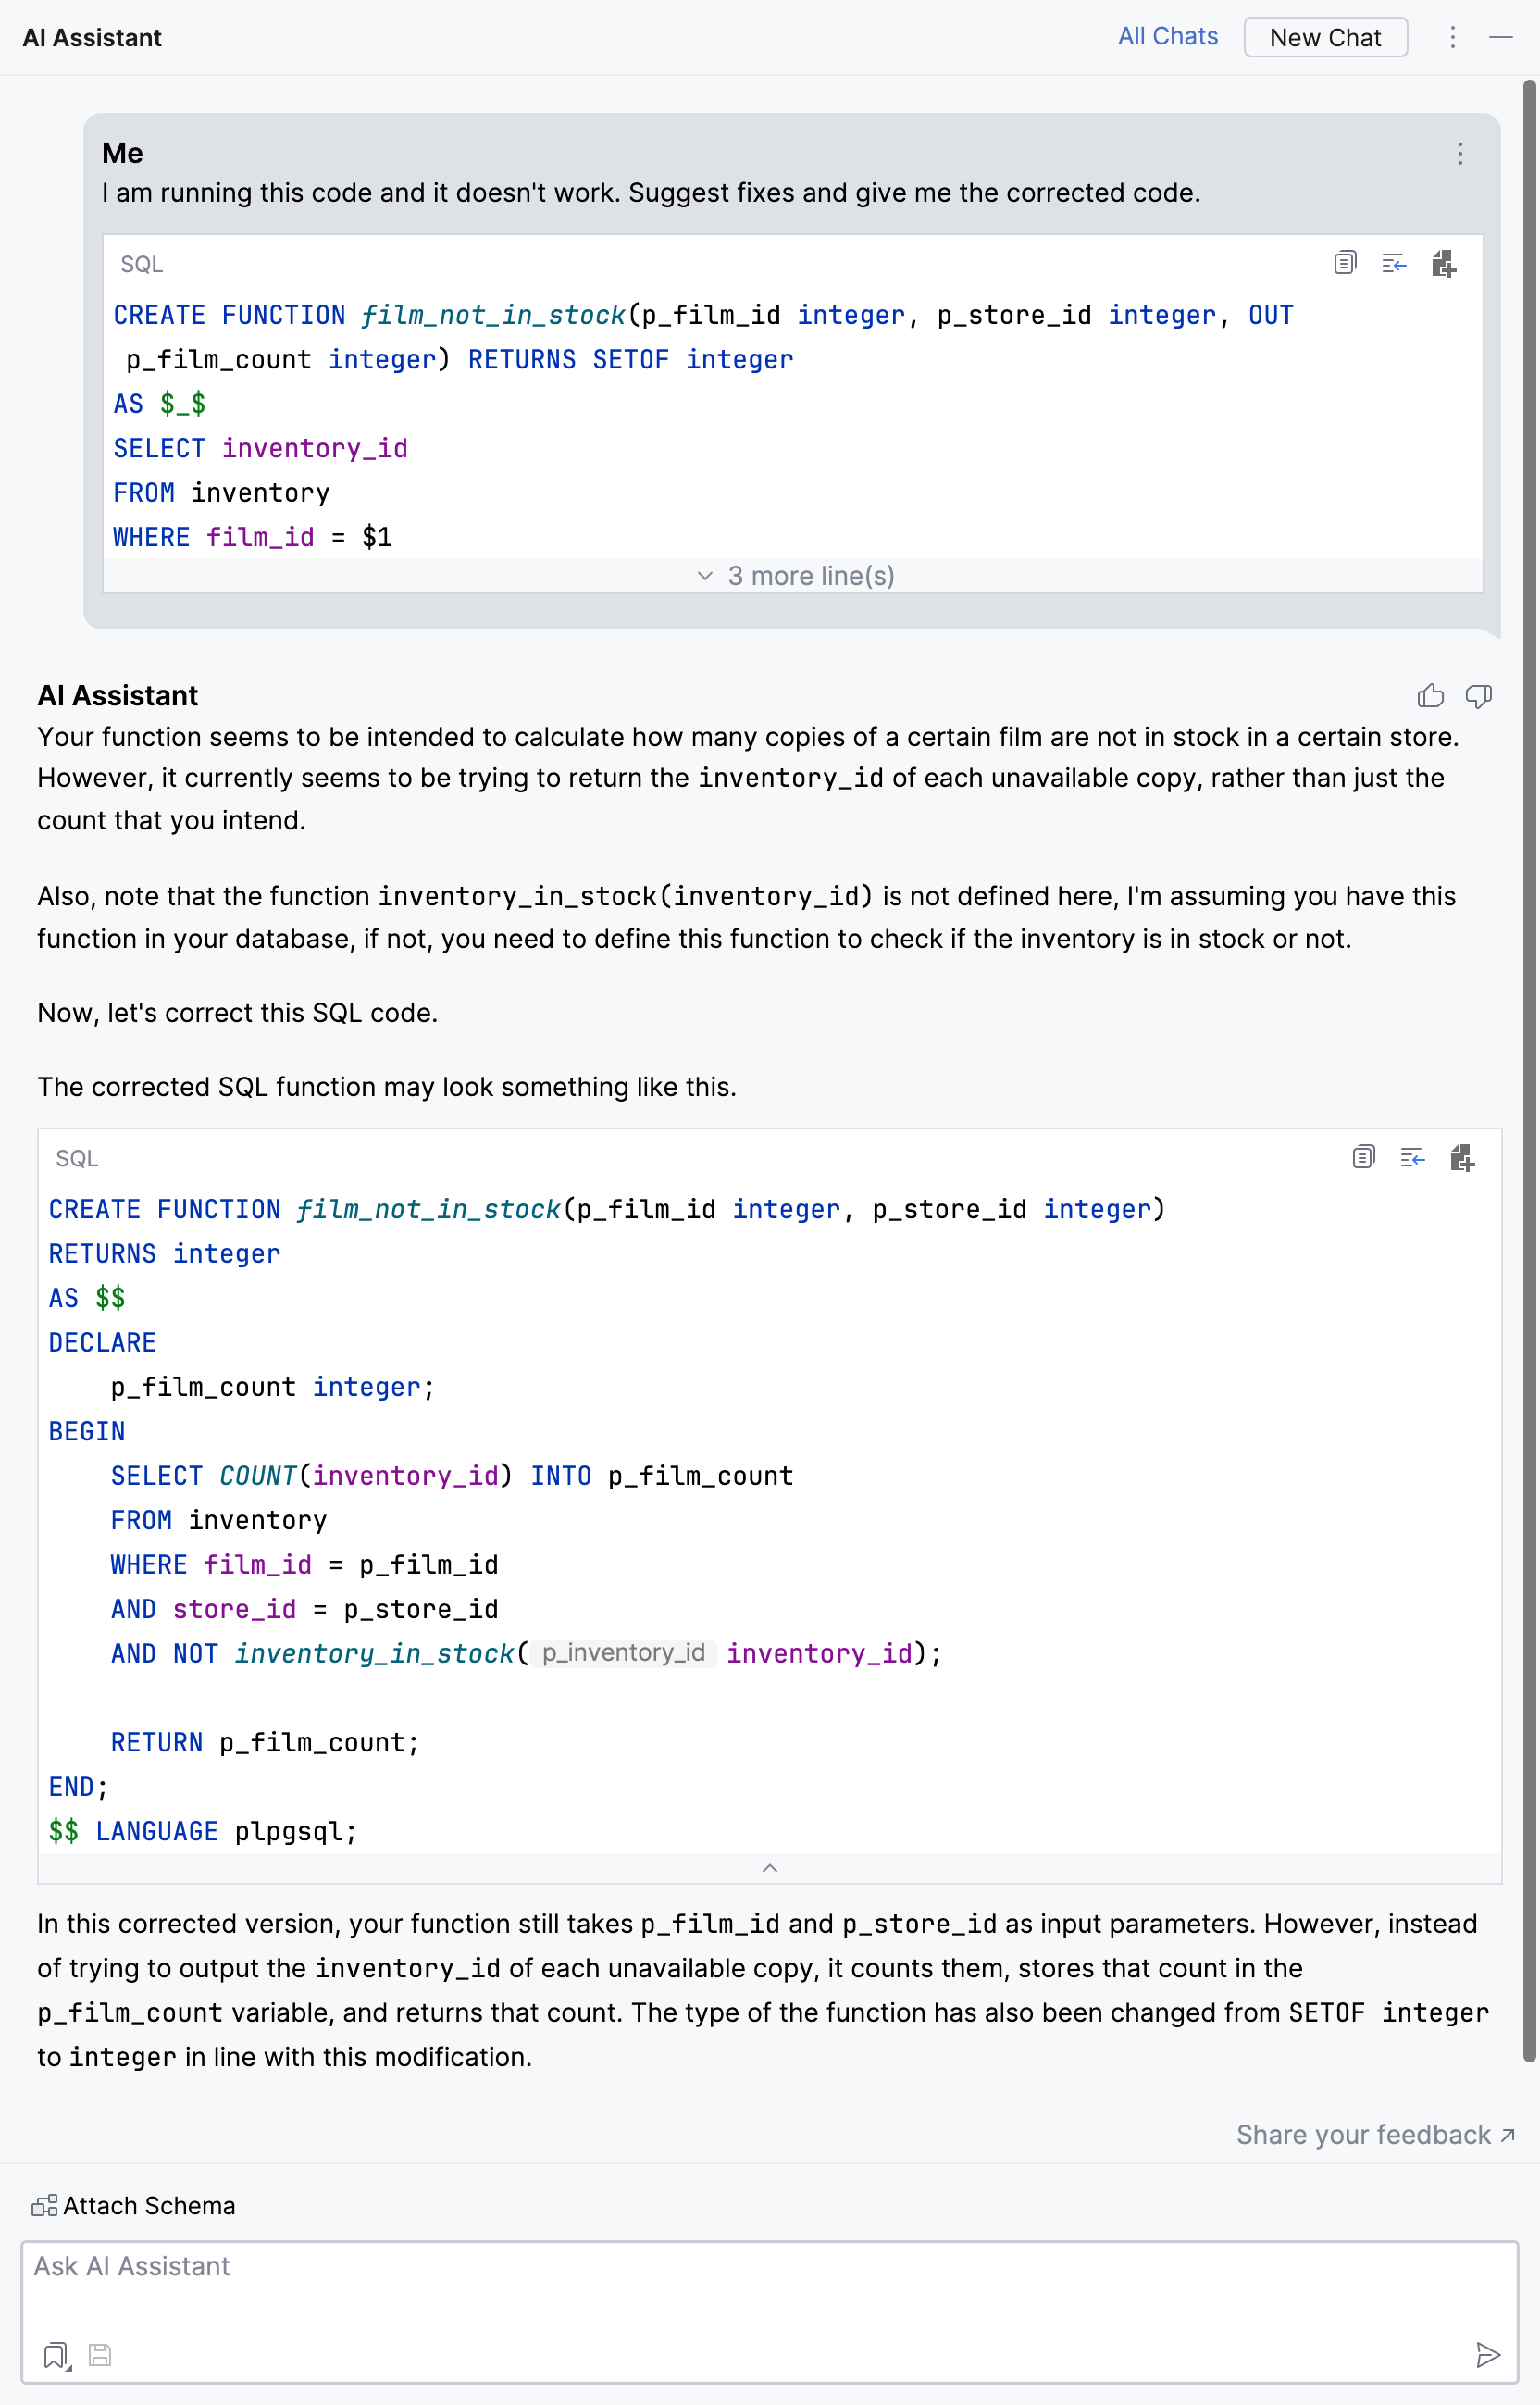
If some code is not working, you can ask AI Assistant to check if there are any mistakes in it and to correct them.
Let's use the following code with a mistake in it as an example:
The mistake here is that the declared function has an output parameter p_film_count, but the SQL body does not calculate or return it. Additionally, the function is declared as returning SETOF integer, but only returns result from a SELECT statement.
On the toolbar, click
More tool windows and select
AI Assistant to open the AI Assistant tool window.
In the input field, enter your prompt, paste the code, request code correction, and press Enter.
If required, make corrections by adding them to your next prompts.
The corrected code:
Migrate your code from one DBMS to another
Migrating database objects from one DBMS to another is a complex task that involves steps such as data migration, schema conversion, and so on. You can ask AI Assistant to generate migration scripts for the source code of your database objects.
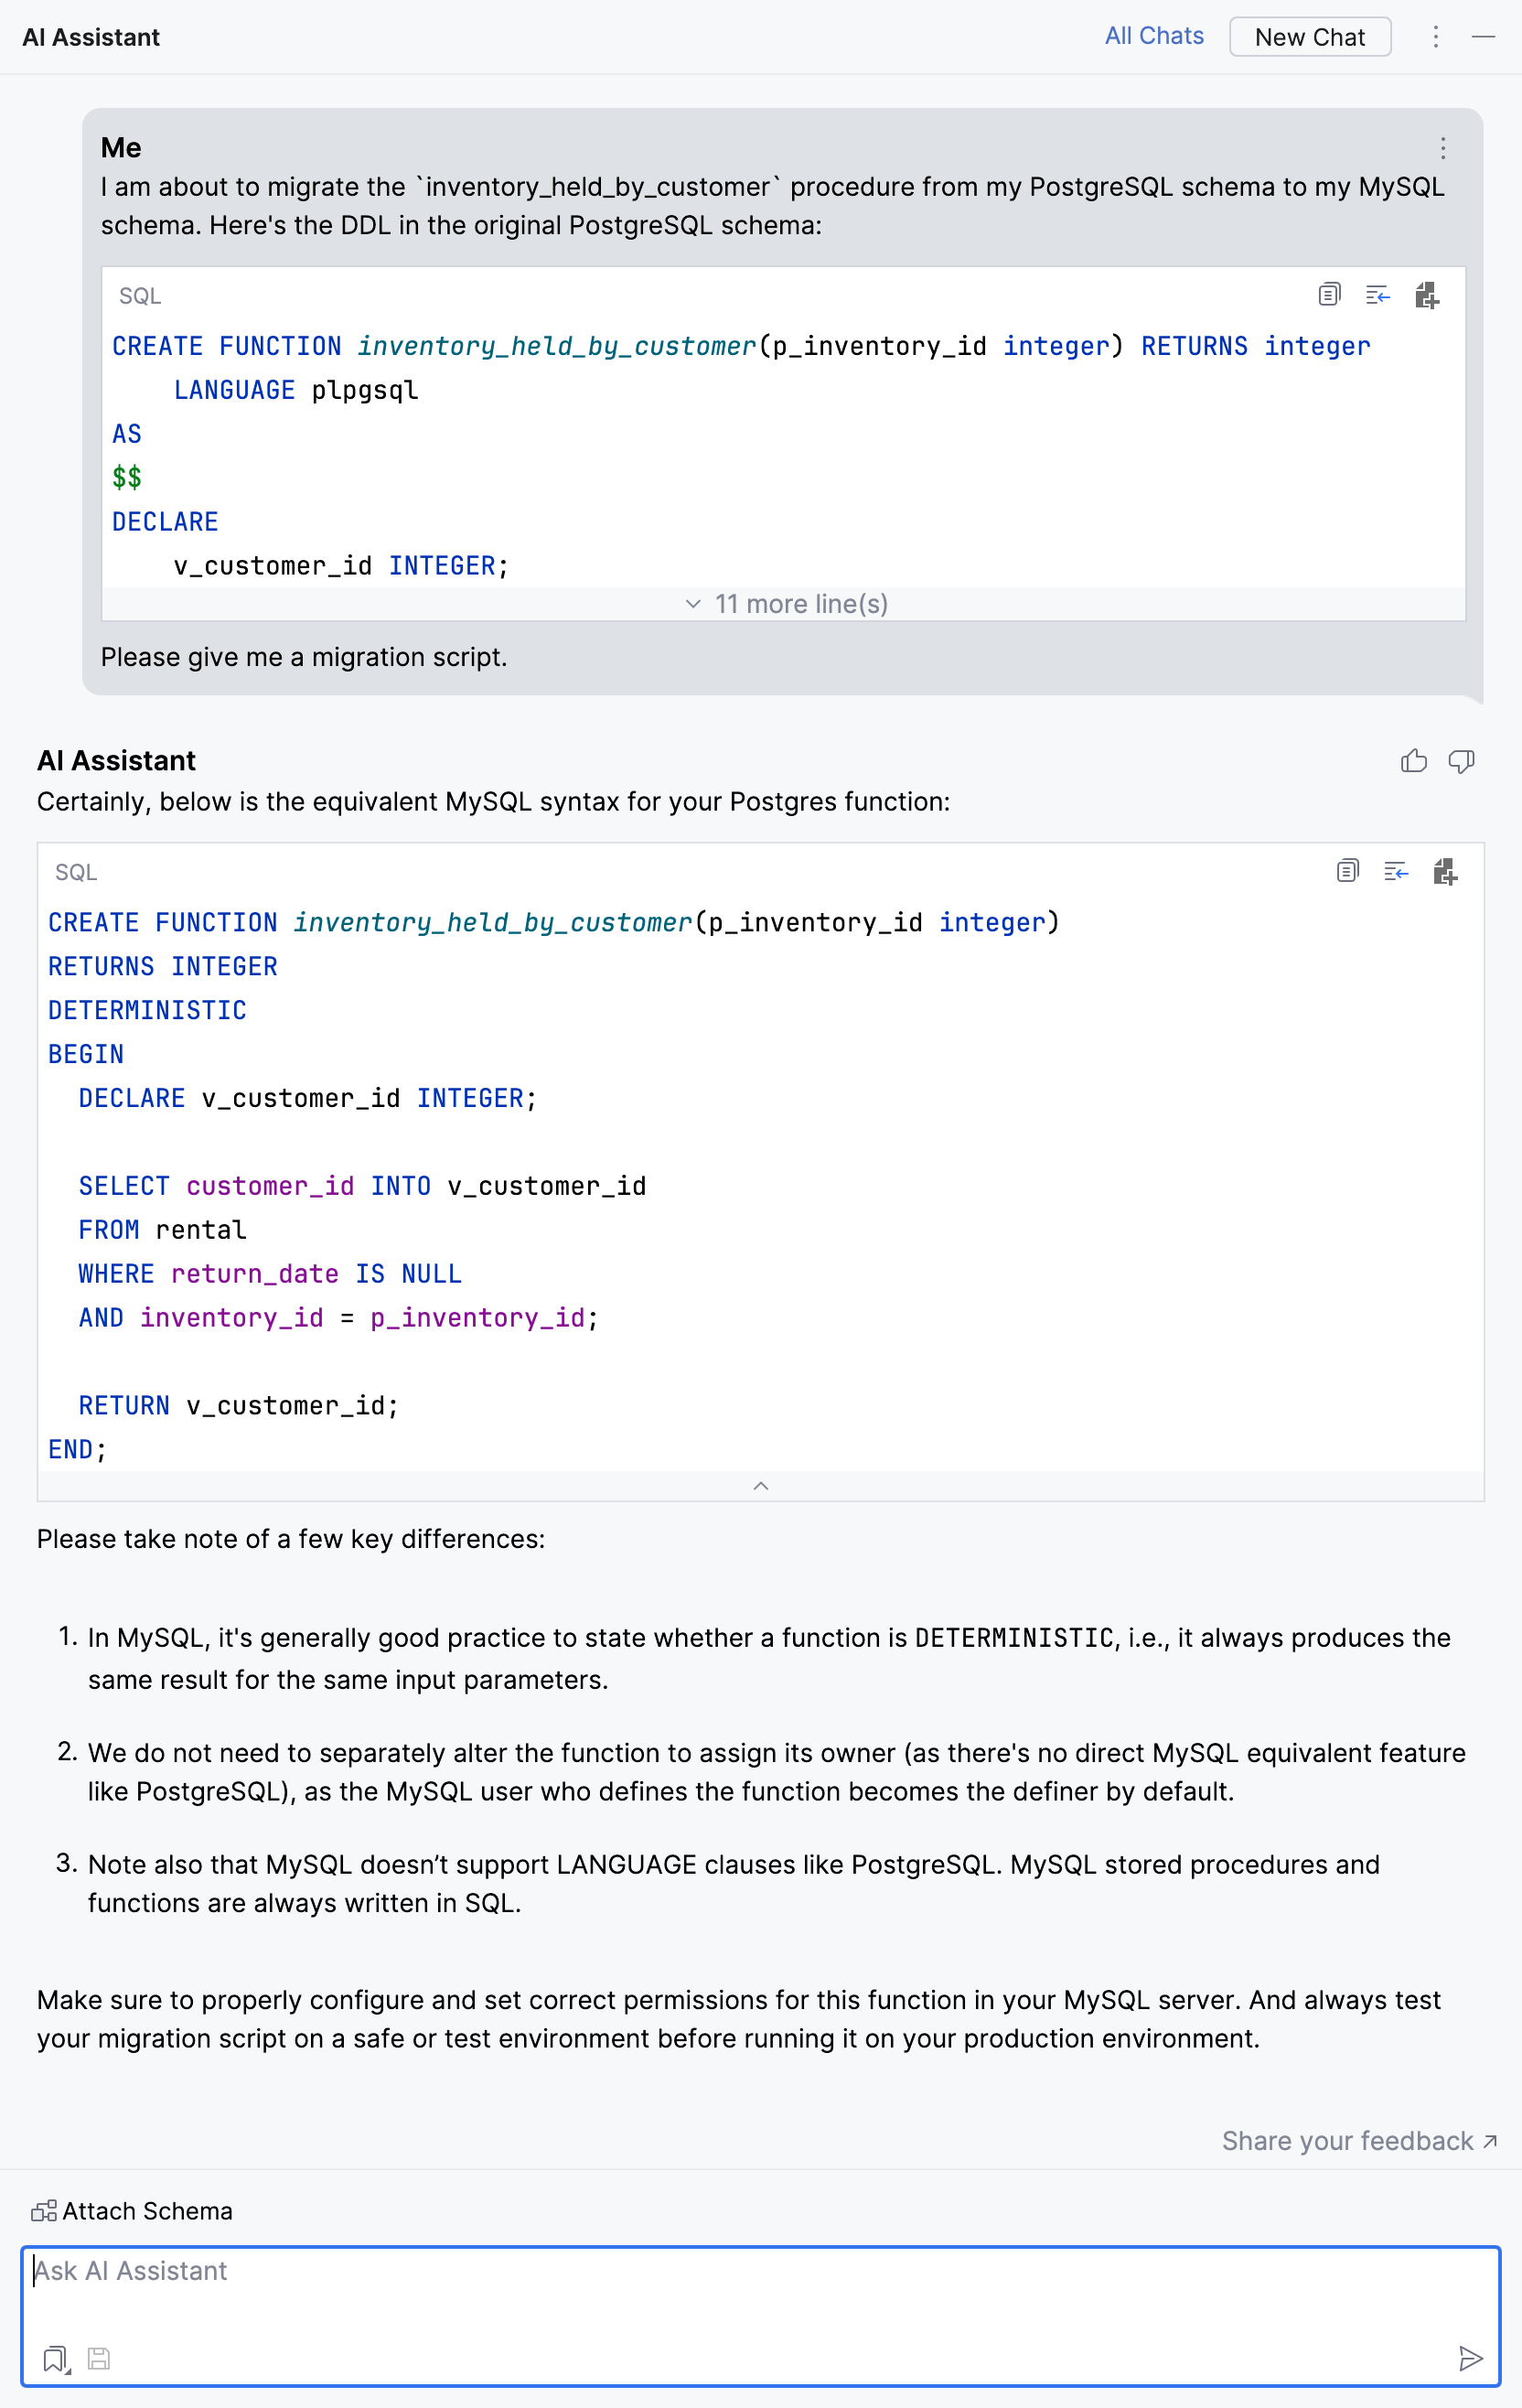
Let's use the following inventory_held_by_customer procedure of a PostgreSQL Sakila schema as an example:
For AI Assistant to migrate your code, provide the migration details in your prompt.
On the toolbar, click
More tool windows and select
AI Assistant to open the AI Assistant tool window.
In the input field, type your prompt. Define the original DBMS and the target DMBS, paste the DDL of database object that you want to migrate, and press Enter.
If required, make corrections by adding them to your next prompts.
The generated migration script:
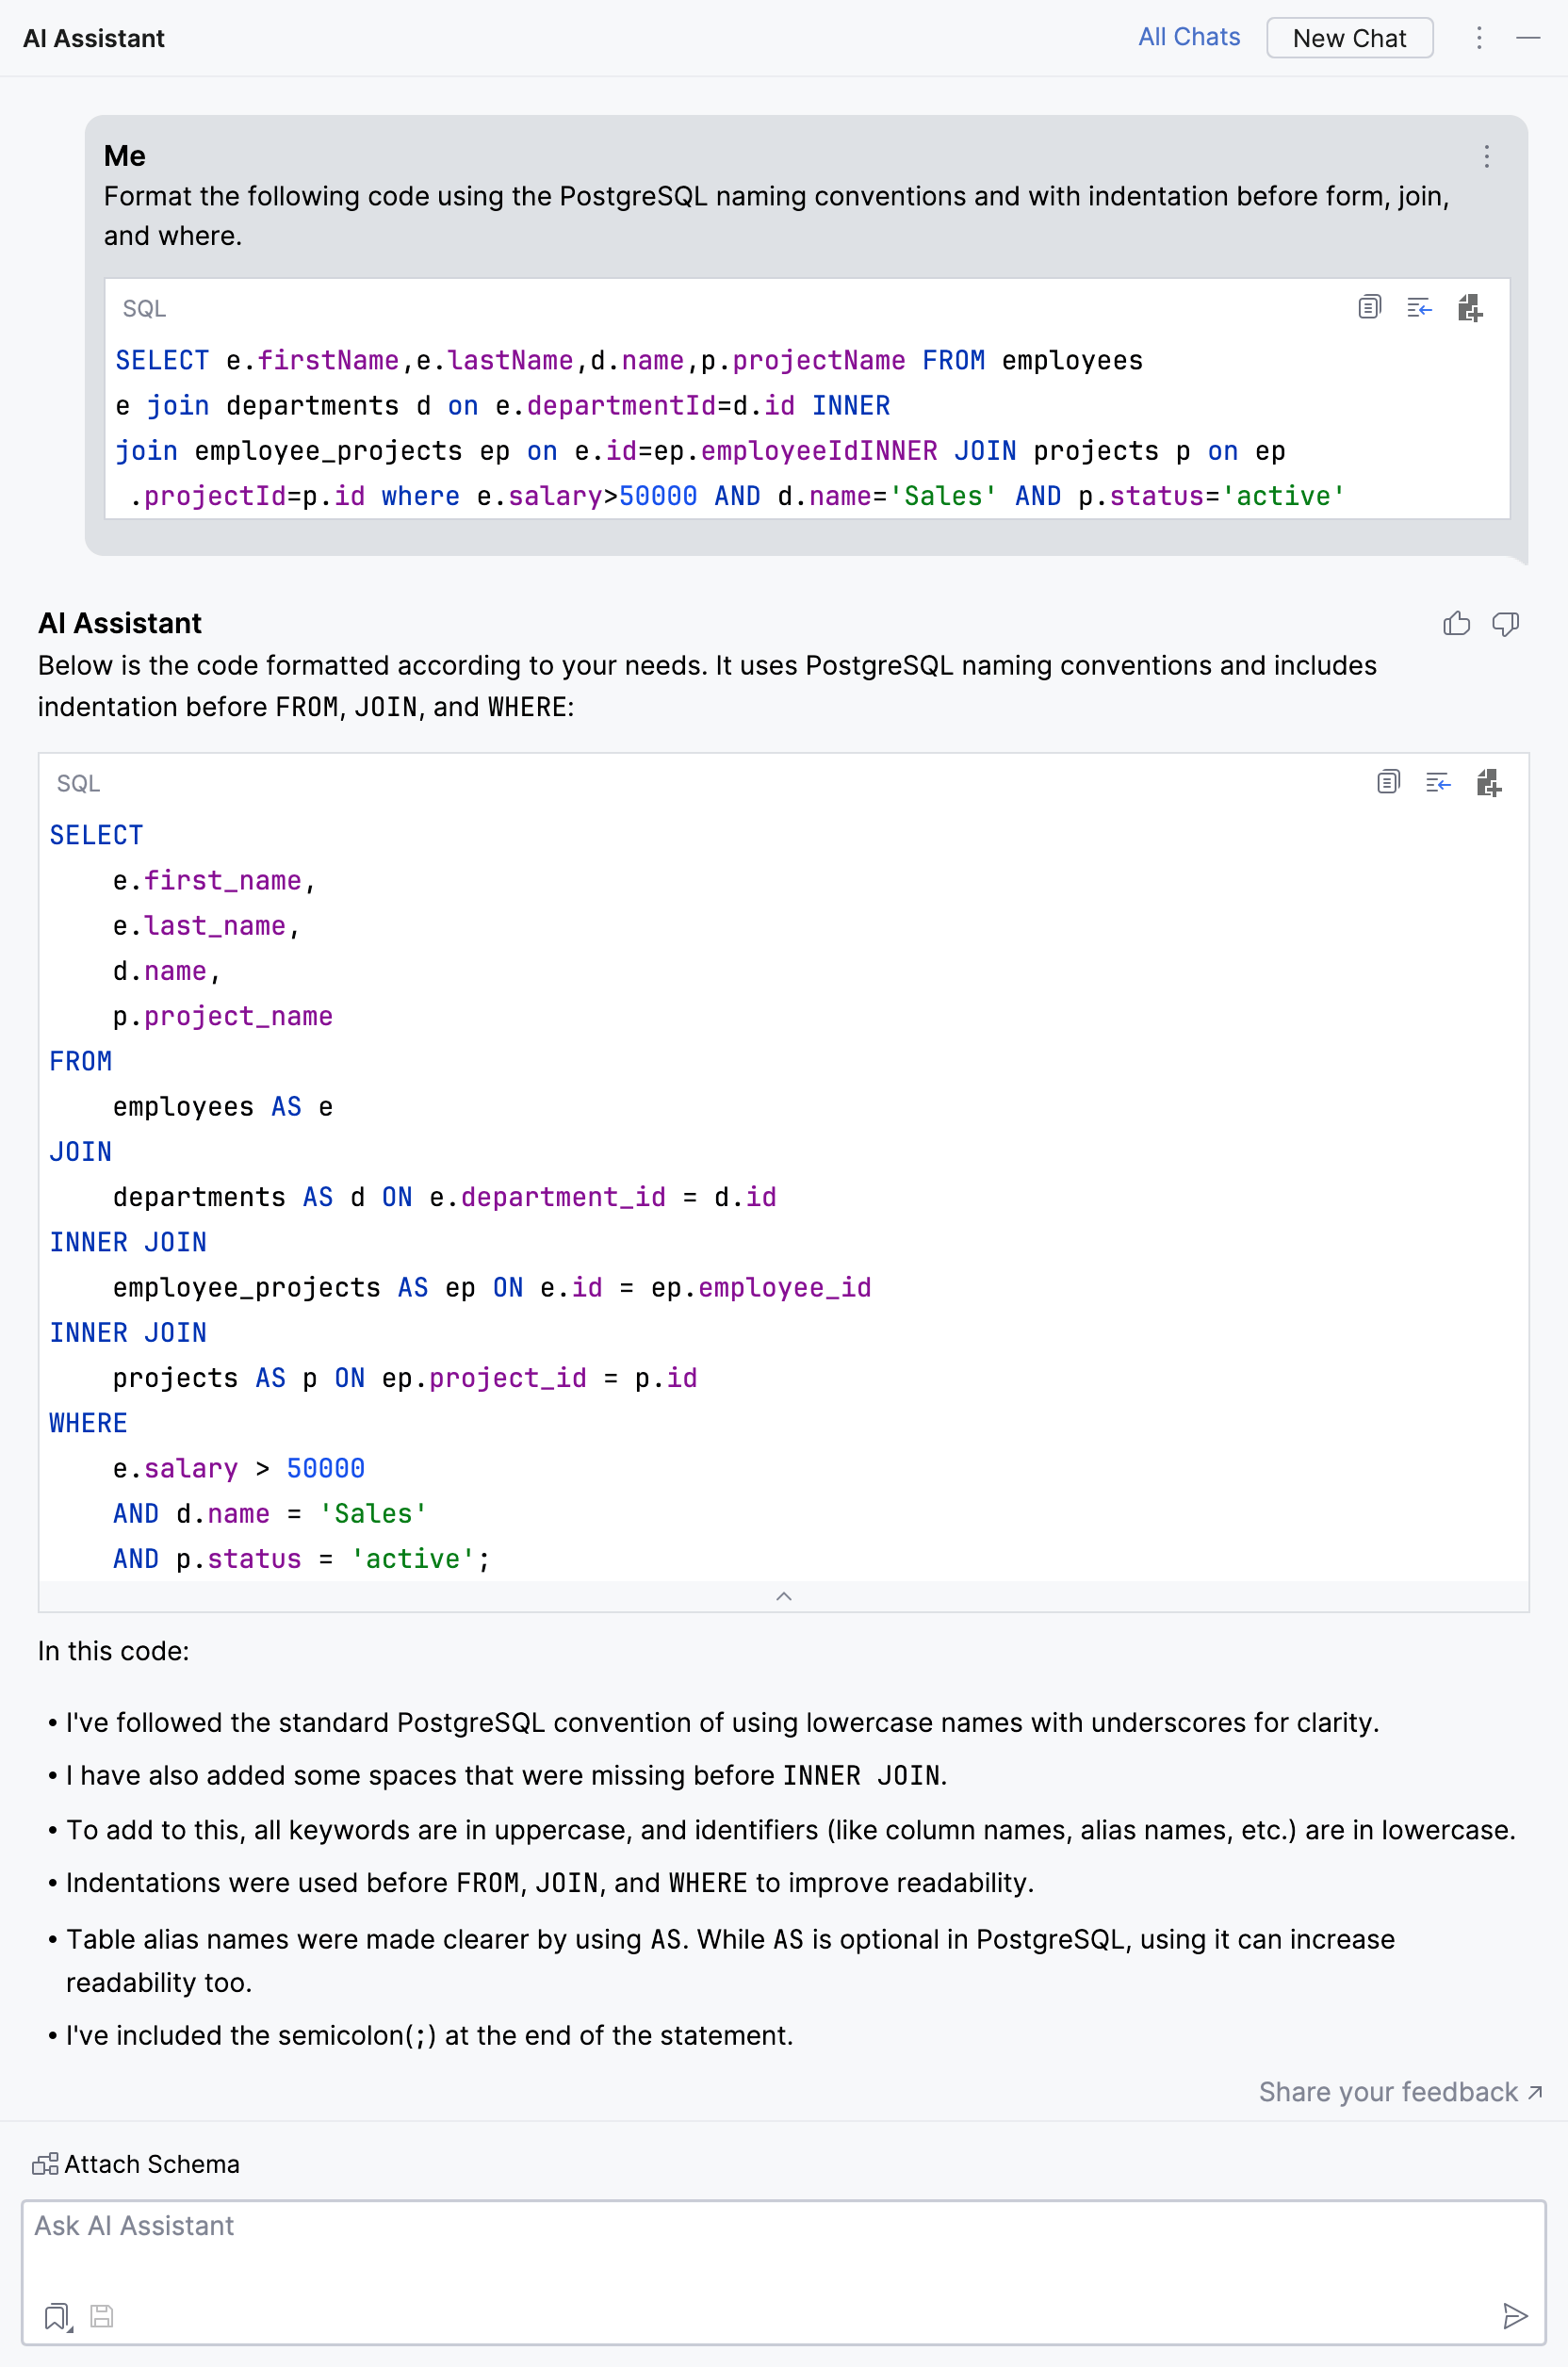
Format your code
It can be difficult to read the code that has no indentation, line breaks, consistent capitalization, and so on. To make such code easier to read, use AI Assistant to format it in accordance with your preferred code style.
We will use the following poorly-formatted SQL code as an example:
For AI Assistant to format your code, describe your preferred code formatting rules in the prompt.
On the toolbar, click
More tool windows and select
AI Assistant to open the AI Assistant tool window.
In the input field, type your prompt with the formatting rules, paste the code that you want to format, and press Enter.
If required, make corrections by adding them to your next prompts.
The formatted code:
