Getting started with JavaScript and TypeScript
This tutorial helps you get started with JavaScript development in JetBrains Fleet. It covers installation, project setup, and working with JavaScript code.
Prerequisites
Download and install JetBrains Toolbox
Download and install JetBrains Toolbox.
For macOS, you can also download the installer that matches your processor type: Apple Silicon or Intel. Ensure you select the correct option based on your system's processor.
Download and install JetBrains Fleet
In JetBrains Toolbox, click Install next to the JetBrains Fleet icon.

JavaScript environment
The steps demonstrate how to use plain JavaScript and Node.js, but they also apply to TypeScript.
Make sure Node.js is installed on your computer.
Set up a workspace
A workspace is the directory that contains your project. It includes both project files and settings. You can either open an existing project or start a new one by opening an empty directory.
Open a workspace
Press ⌘ O or select File | Open from the main menu.
In the file browser, navigate to an empty folder where you want to store your code, then click Open.
When you open a directory, it becomes the root of a workspace. You can view its contents in the Files view.

Configure a Node.js interpreter
Press ⌘ , and switch to the tab with the project settings. The tab is usually named after the folder where the project is located.
In the section, click the drop-down list, and do one of the following:
Select one of the detected Node.js interpreters
Click Add Node.js Interpreter, and then specify the path to the Go SDK directory.

Create project files
In the Files view, right-click the root folder, then select New File. Name the new file
app.js.Paste the following code into the editor:
const http = require('http'); const hostname = '127.0.0.1'; const port = 3000; const server = http.createServer((req, res) => { res.statusCode = 200; res.setHeader('Content-Type', 'text/plain'); res.end('Hello World'); }); server.listen(port, hostname, () => { console.log(`Server running at http://${hostname}:${port}/`); });In the Files view, right-click the root folder, then select New File. Name the file
package.json.Paste the following code into the editor:
{ "name": "server", "version": "1.0.0", "scripts": { "start": "node app.js" } }
Smart Mode
You can use JetBrains Fleet as a smart text editor, rather than a full-fledged code editor. However, if you need code intelligence features, you can enable them by turning Smart Mode on.
Enable Smart Mode
In the top-right corner of the window, click Smart Mode, then Enable.
After you click the Enable button, you may have to wait for some time, while the backend is being prepared.

JetBrains Fleet provides a variety of coding assistance features. Below are a few examples to help you get a sense of how they work in practice. This is not a complete list, but a good starting point for exploring what JetBrains Fleet can do.
Use quick-fixes and intention actions
Press ⌥ ⏎ to access actions that Fleet suggests in the current context.
Solve problems using quick-fixes:

Improve your code using intention actions:

Refactor code
Place the caret at a symbol you want to rename. Press ⌃ R and give it a new name.

The symbol gets the new name and all its usages are updated.
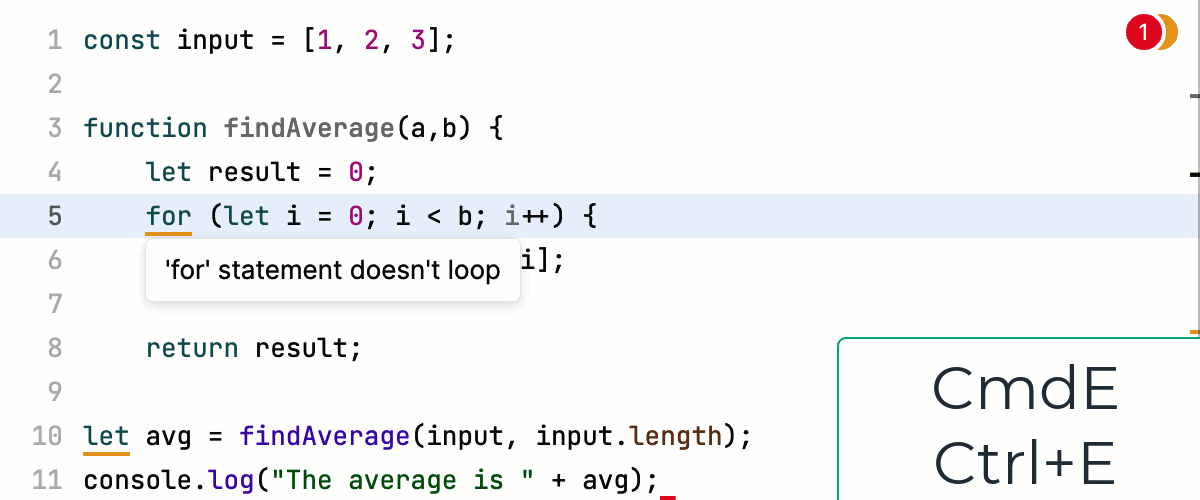
Navigate the codebase
Navigate to a symbol’s declaration by pressing ⌘ B.
Use code interlines to navigate to usages.

Navigate between errors using ⌘ E and ⌘ ⇧ E.
Run code
You can run server-side JavaScript code right from JetBrains Fleet provided that you have installed and configured Node.js on your computer as described in Configure a Node.js interpreter. For more information, refer to Run JavaScript code.
Navigate to your package.json file and click the Run icon in the gutter next to the
startscript and select Run 'start'.The application output will be shown in the console:

Reformat code with Prettier
Prettier is a formatting tool for .js, .ts, .css, .less, .scss, .vue, and .json files. In JetBrains Fleet, you can use Prettier to format selected code fragments or entire files.
To install Prettier, open the built-in Terminal () and run one of the following commands:
npm install --save-dev --save-exact prettiernpm install --global prettierFor more information about installation options, visit the official Prettier website.
You can use Prettier to reformat either an entire file or a selected code fragment:
To reformat an entire file, right-click the file and select from the context menu.
To reformat a code fragment, select it and then choose from the context menu.