Query results
Usually, when you run a query, you receive results in a table format. Each statement appears in a separate tab in the Services tool window. For example, if you have two SELECT statements in the query, you will see two tabs in the tool window.
The Services tool window includes a list of consoles that are grouped according to a connection session to a data source.
Open a new tab for each query
By default, GoLand updates the same tab with results each time you run a query. You can change this behavior and create a tab each time you run a query.
In the IDE settings Ctrl+Alt+S, go to .
Select the Open results in new tab checkbox and click OK.
View two result sets in the editor
Click the In-Editor Results button to view result sets one above another.
Use custom titles for tabs with results
You can define a tab title in the comment section before the query. In the Treat text as title after field, you can reserve a combination of symbols or characters after which any text will be treated as a tab title. By default, no combination is used, so any text after -- or /* is treated as a tab title.
Open settings by pressing Ctrl+Alt+S, navigate to .
In the Treat text as title after field, define a combination for tab titles.
To disable this feature, open settings Ctrl+Alt+S, navigate to , and clear the Create title for results from comment before query checkbox.
For more examples of custom titles for tabs, see Name the result tabs at youtube.com.

Edit values in the result set
In the result set, click a cell value that you want to edit.
Specify a new value and press Enter.
To submit changes to a database, click the Submit icon (
 ), or press Ctrl+Enter.
Export to a file
To export data to a file, perform one of the following actions:
Right-click a result set, a table, or a view, select Export Data.
Right-click a query and select Export Data to File.
On the toolbar, click the Export Data icon (
 ) and select Export to File.
In the Export Data dialog, click Export to File.
Export to a clipboard
Select data in the result set or in the editor and press Ctrl+C.
On the toolbar, click the Export Data icon (
) and select Copy To Clipboard.
Compare two result sets
Run queries to tables that you want to compare.
In the Services tool window, click the Compare with icon (
 ), and select the result set that you want to add to diff.
If needed, change a value of the Tolerance parameter in the comparison dialog. The Tolerance parameter defines a maximum number of differences that are allowed between two result sets. For example, if you want to consider two rows as equal if their data differs in a single column, enter
1in the Tolerance field.See another example of comparing two result sets in Compare data at youtube.com.

Pin the tab with query results
If one and the same tab is used to show your query results, and you get the result that you want to keep, you can pin the tab to the tool window.
Right-click the tab and select Pin Tab.

Sort data
Click the column name to sort the column data. The column sorting is not stacked by default. It means that if you click a column name to sort data by, the sorting based on other columns will be cleared. If you prefer to use the stacked sorting, click a column name while pressing Alt.
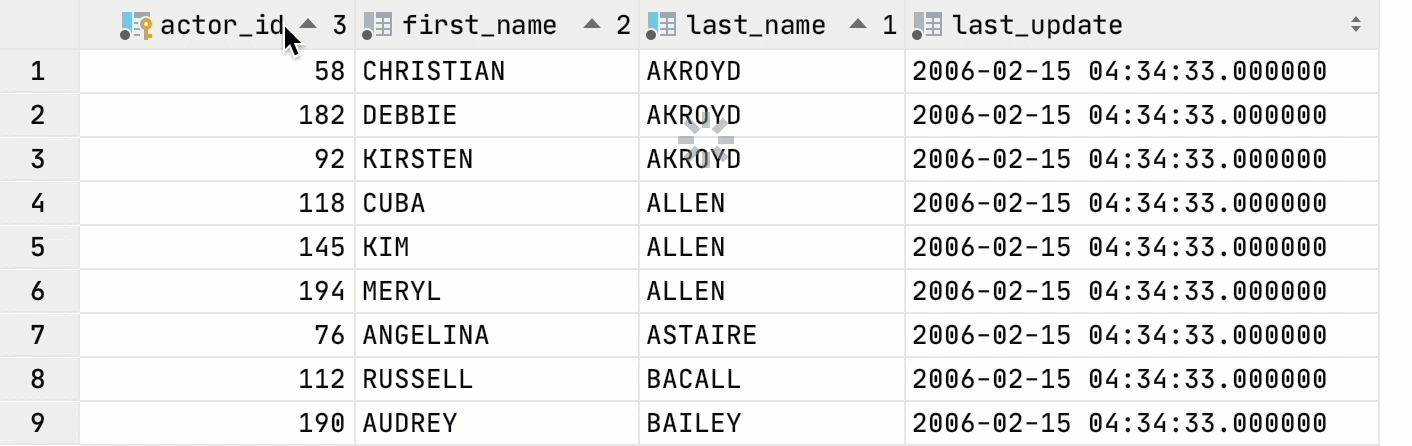
| State | Description |
|---|---|
| Indicates that the data is not sorted in this column. The initial state of the sorting marker. | |
| The data is sorted in the ascending order. The number to the right of the marker (1 on the picture) is the sorting level. You can sort by more than one column. In such cases, different columns will have different sorting levels. | |
| The data is sorted in the descending order. |
Operations with columns in the structure view
The structure view displays you a list of all the columns in the selected table. The structure view is available in the Structure tool window () or in the popup window (Ctrl+F12).
Sort the data in the ascending Alt+Shift+Up or the descending order (Alt+Shift+Down).
Reset the state of sorting ( Ctrl+Alt+Shift+Backspace)
Hide a column or show a hidden column (Space). The names of hidden columns are shown struck-through.

Copy data to another database
Double-click a table to open it in the data editor.
Click the Copy to Database icon on the toolbar.
Specify the database, target schema (to create a new table with the exported data) or table (to add exported data to an existing table).
Configure the data mapping and settings for the target table.

Edit data in INSERT statements as a table
Select
INSERTstatements that you want to edit.Right-click the selection and click Edit as Table.

Logging SQL activity
Change location of the SQL log
To change location of the SQL log, add the -Didea.system.path property to the custom VM options. This change affects all logs.
Click .
At the end of the option list, add the following line:
-Didea.system.path=/path/to/your_log_directory.
