Editing Individual Files on Remote Hosts
The functionality described on this page and in the entire chapter Working with Web Servers: Copying Files is available only in the Ultimate Edition of IntelliJ IDEA.
On this page:
Introduction
Once you've set up synchronization with a remote host, you can open individual files directly from the remote host and edit them in IntelliJ IDEA, without adding/downloading them to the local project. Note that for such files not included in a project, some IntelliJ IDEA features are not supported.
To take advantage of debugging, refactorings, and other advanced features, consider including the files into a project; see Accessing Files on Web Servers for details.
Editing files on remote hosts
To edit a file on a remote host
- Open the Remote Host tool window by choosing Tools | Deployment | Browse Remote Host or View | Tool Windows | Remote Host on the main menu.
- Select the required deployment server from the drop-down list. The tool window shows a tree view of files and folders under the server root. If no relevant server is available in the list, click
 , and in the Deployment dialog box that opens configure access to the required server.
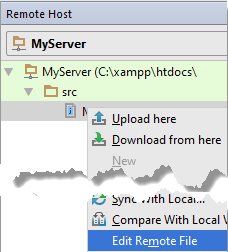
 - To start editing a file, double click its name or select the file name in the Remote Host Tool Window, and choose Edit Remote File on the context menu:

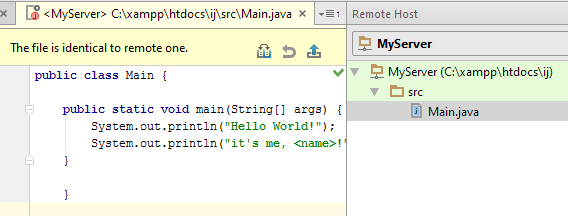
The file opens in the IntelliJ IDEA editor, without being added or downloaded to the local project.

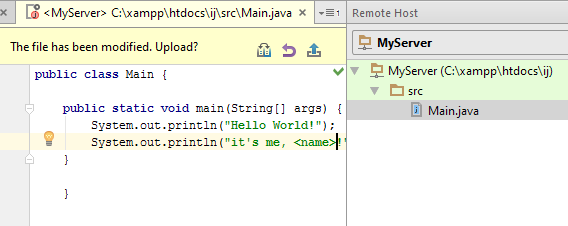
When you work with a remote file, a special toolbar appears at the top of the editor, showing the editing status ("The file is identical to the remote one" or "The file has been changed. Upload?".
Remote files can be easily distinguished from local ones by looking at the annotation, which includes the server name (in our case it is <MyServer>).

- When you are done editing the file, do one of the following:
- To upload the file to the remote host, click
 .
. - To compare the currently opened file with the last uploaded version, click
 . The files are opened in the standard IntelliJ IDEA Difference Viewer, see Differences viewer for files.
 - To discard the changes introduced to the file after the last upload, click
 .
.
- To upload the file to the remote host, click
As it has been mentioned above, an individual file is not added to a project. As a result, all the changes to it are discarded as soon as you close the file or the currently opened project unless these changes have been uploaded. To prevent losing your data accidentally, IntelliJ IDEA displays the following dialog box when you attempt to close the edited file or the entire project:
