Spring
Configure Spring framework
To configure Spring in your application and use IntelliJ IDEA support for it, you need to add a Spring facet to the corresponding project module. IntelliJ IDEA detects Spring configuration in your code and can assist you by adding the facet for you once you select which Spring configuration files to include in its file set.
Spring MVC contexts and Spring Boot projects have strict rules about their configuration and in these cases there is no need to define the file set to include as Spring support can deduce them and create an autodetected file set for you.
IntelliJ IDEA detects both annotation and XML-based Spring configuration. It then suggests to add the configuration to the facet via either an annotation inspection quickfix or a Spring configuration check message with the unmapped application context.

If none of the above cases applied to your scenario, you can always create a facet by:
- Go to Project structure. Ctrl+Shift+Alt+S
- Click on the module you want to add the facet to
- Right-click to choose Add
- Choose Spring
The best way to check whether the Spring facet is configured correctly is to see the Spring gutter icons that mark each component, bean, controller, etc.
Spring application context configuration is defined inside the Spring facet as a file set. A file set can be defined as one or multiple root configuration classes (or XML files) from which other configuration components can be imported.
A file set only needs to contain the root configuration components. Any imported configuration is added implicitly and changes dynamically according to changes in the import definitions in the code.
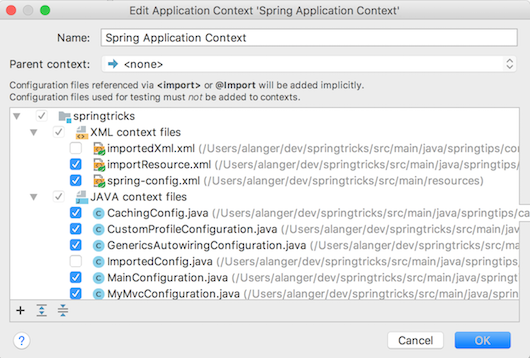
You can add, remove or edit file sets in
or
.
Configure multiple application contexts
In this scenario you need to define a file set for each application context using the Add option ![]() .
.
The file set configuration under the Spring facet also allows you to define a file set hierarchy by configuring a parent to a file set.
Having multiple contexts is typical in a Spring MVC webapp which has a root application context visible to all servlets and filters and at least one other application context for the dispatcher servlet.
In this scenario, the root context is the parent of the servlet application context. This is mapped directly into two file sets and a hierarchy between them. The Spring MVC configuration structure is automatically configured for you. It is autodetected from the servlet meta-data (either web.xml or annotations). In other cases, you will need to define the file sets yourself. 
View Spring dependencies
One of the most powerful features of the Spring support in IntelliJ IDEA is the ability to navigate through the dependent components and from configuration to code via the gutter icons. However, some Spring application contexts can quickly become so complex that just navigating the various annotations or XML elements is not enough to understand the entire configuration graph. When you also use dynamic resolution options such as component scan or @Autowired, understanding the context from just reading the code can be near impossible.
IntelliJ IDEA builds the context in the background just like at runtime and can therefore give you a lot of information and help you navigate the context while still editing the code.
View entire dependencies graph
To be able to view the entire graph you can use the Spring Dependencies Diagram. It will give you a single view of the full graph and dependencies between configuration classes and XML files.
Different colour edges denote different types of connections between components (import, component scan, etc.) Tooltips on the nodes and the edges give you further information on what each element contributes to the application context.
To view the graph:
- Click on the Model dependencies graph gutter icon

- Choose between a local popup view and a full context diagram
Walk a dependency path
The Spring Tool Window gives you a tree view of the contexts and dependencies all the way to the actual beans. This view also shows you implicit beans provided by the Spring framework itself and infrastructure beans such as the component scan which will also point at their respective scan results.
In a Spring MVC project an MVC tab will give you the tree view with the request mappings.

A data tab will appear when your Spring configuration contains Spring data repositories and will include the repositories, their queries and their projection.

Navigate Spring dependencies
The navigation options for Spring components are as close as you'd expect to navigation between java classes. You can navigate from the bean definition to the bean itself, from the init and destroy method declarations to the implementation, from the properties injection to the setter, etc. You can navigate from the Spring Tool Window definition to the code itself and also from the Spring EventListener to the line in the code where the event was fired.
Clicking the various gutter icons for the Spring components is the main navigation option but other options are available as well.
Bean names are considered symbols, therefore navigate to symbol (Ctrl+Shift+Alt+N) can be used to navigate to them.
In Spring MVC you can also use URI request mapping to navigate to symbol. This will get you to the controller method that is mapped to the URI.
The Related Symbol option (Ctrl+Alt+Home) is also a useful navigation tool within the Spring context.
For example, this is one way to navigate from the view to the controller in Spring MVC.
View results of a dynamic dependency resolution
Clicking a component scan gutter icon will show you the list of all beans that have been found and imported by the scan. It will also allow you to navigate to the resolved components.
In the same way, clicking on the icon of an @Autowired annotation will either navigate to the autowired bean or show you the multiple autowired options your context currently has.
In both these cases the resolution results might differ depending on your Spring profile.
If your Spring context uses profiles, your view will be based on your active profile.
Develop with Spring configuration
Beyond the obvious Java language support you get when using an annotation-based configuration, IntelliJ IDEA knows the Spring context and gives you smart auto-completion Ctrl+Space, refactoring that is aware of the Spring context, intentions Alt+Enter and inspections that are aware of common Spring usage patterns and also common Spring pitfalls.
For example, when adding a qualifier, you get auto completion of only the relevant bean names based on type and context.
Another example worth mentioning is when you mark a field as @Autowired in production code. An inspection will warn you about it as this is considered a not recommended way of injecting dependencies. You can accept the warning and use the quick fix Alt+Enter to automatically change the code for you to a constructor-based injection, or if you disagree, disable the inspection.
In Spring XML configuration you can generate (Alt+Insert) various types of beans in XML using a bean template, rename (Shift+F6) bean ids, property names, init / destroy methods, etc. both in XML and code
Choose an active profile
The Spring support is based on the specific context of your Spring configuration, but Spring also allows you to have different contexts available to different environments within the same project. This feature is known as Profiles.
You can select an active profile and this way fine tune the Spring support you get to the profile you've chosen. If you are using profiles, while working on the Spring configuration code, IntelliJ IDEA shows you at the top bar what is the current active profile and also allows you to switch profiles from a link on that top bar.
An action to "Change Active Spring Profiles" is also available by the on the main menu or Ctrl+Shift+A.
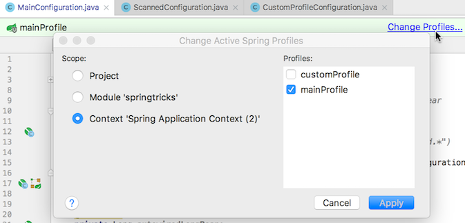
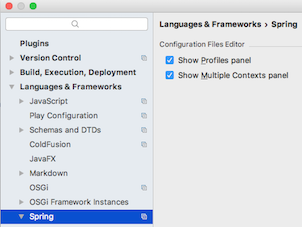
The profiles panel is enabled by default (if there are profiles defined) and can be controlled from the Spring settings at
for Windows and Linux
for macOS
Extend Spring via Meta-annotations
Meta-annotations are used by the Spring framework to compose and extend annotations with a specific meaning to the Spring configuration. Anyone can create a new meta-annotation and so it's impossible for the IDE to know in advance all annotations that will be used in your project.
IntelliJ IDEA Spring support understands meta-annotations and can apply all the inspections and support it offers for the original annotation to the new annotation.
If you are using or developing your own meta-annotation, the use of @AliasFor on the annotation attributes also helps IntelliJ IDEA to apply any auto-completion on the new attribute.
Write SpEL expressions
Spring expression language (SpEL) is used in many different contexts within the Spring framework.
IntelliJ IDEA supports the syntax of SpEL expressions and can also identify the context from which you use a SpEL expression. This allows you to make use of context-dependent parameters resolution and smart auto-completion suggestions when writing SpEL expressions.
For example, IntelliJ IDEA knows whether this SpEL expression is a value of a specific Security annotation which accepts only a very limited subset of SpEL expressions, or possibly a boolean condition in a different context. IntelliJ IDEA also knows specific variables which are available in specific contexts and can be used by the expression.

Use attributes in the Spring MVC view
When developing a Spring view using most view technologies (such as JSP, Velocity, Freemarker), you can resolve attribute values and see the point in the controller code when they were assigned without moving from the view page. You can do that by using the quick definition (Ctrl+Shift+I) feature.

Register custom autoconfig classes via spring.factories
spring.factories is used extensively in Spring Boot but is not limited to it. IntelliJ IDEA detects any spring.factories files in the path and uses them when building its context. IntelliJ IDEA also knows the possible keys available to you in a spring.factories file and helps edit it.
Develop a Spring Data JPA Repository
Spring data can derive data queries from method names defined on the repository. To write such query on a JPA Repository interface:
- Set the entity as the generics entry in your Repository definition.
- Write the method name using auto-complete.
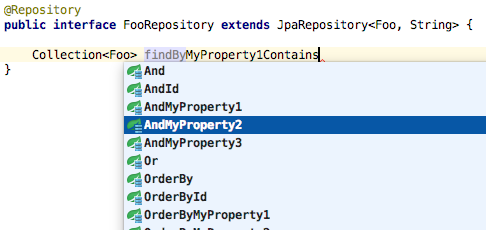
- Use the intention suggestion to create parameters on the method.

In order to view the results of your work on Spring data repositories, entities and projections, you can use the data tab in the Spring tool window.
Detect errors before runtime
Spring projects rely on convention, annotations or XML files for their configuration. This approach reduces boilerplate code and can allow for simpler and clear configuration but means that the Java compiler has a much smaller role in checking the code's validity.
Spring users must be aware of that and the fact that some types of errors can only really be discovered at runtime. This feedback cycle can be too big and the cost of a small configuration error can be very high.
IntelliJ IDEA helps you reduce the feedback cycle and keep on top of Spring configuration by offering a few ways of finding Spring configuration errors while still editing the code.
Detect errors in configuration code
When you enable the Spring support for your project, you allow IntelliJ IDEA to constantly check the validity of the configuration and highlight errors to you in the same way it can highlight Java compilation errors. These include bean wiring issues such as references to unknown beans, ambiguous autowiring, duplicated bean ids, etc.
Errors will be highlighted in the editor when Spring support is enabled with a description of the problem. 
Inspections can also offer to fix the problem for you. For example, an IntelliJ IDEA inspection allows you to add a qualifier when autowiring fails (with a list of all possible beans to use).
Other errors that IntelliJ IDEA Spring support helps you to detect are more subtle issues such as missing annotation attributes. In some cases Spring allows to set an attribute value at either method level or the class level (for all methods). This means the attribute can not be mandatory (with no default value) and therefore the compiler is unable to check whether this value was set at all.
Take cacheNames for example, in @Cacheable. You must provide a value to "cacheNames" but the annotation does not force it (@CacheConfig could be used at the class level).
Defining no cacheNames will compile but will break at runtime. IntelliJ IDEA inspection detects this issue.

Detect dependencies errors in diagram
Errors in your Spring config. can also happen at the dependencies level, specifically cycles.
These are extremely hard to detect as they don't cause any obvious error but some beans will be loaded multiple times possibly resulting in unexpected behaviour. Red arrows mark the cycles in the graph and allow you to easily spot and remove them from your Spring configuration. 
Write tests with Spring configuration
One of the ways you can reduce the feedback cycle when using Spring is writing tests and finding possible Spring configuration issues when running those tests.
Spring offers a specific Spring-test module, which is supported by IntelliJ IDEA with special gutter icons, navigation, code completion, etc.
It is important to note that because IntelliJ IDEA can differentiate between production and test sources, it can also offer specific test context support. This means inspections and warnings take the source context into account. For example, injection of a field is considered a bad practice for your production code and by default there is an inspection to alert you about it, but in tests this is a common and helpful option. IntelliJ IDEA will not alert you about autowiring a field in test source code.
Develop a Spring Boot application
Spring Boot lets you quickly build stand-alone Spring-based Applications. It is based on an opinionated view of Spring projects and third-party libraries to ensure minimal configuration. To do that it provides a few tools, an API and integration with build tools (Maven, Gradle).
Create a Spring Boot application
The easiest way to create a Spring Boot application is using the Spring Initializr service to quickly generate either a Maven or a Gradle project for you with automatically configured dependencies based on a selection of technologies.
Spring Initializr is integrated in the New Project wizard.
Using Spring Initializr from within IntelliJ IDEA creates you a new fully-functional IntelliJ IDEA project, adds Spring Facet for you and integrates the selected build tool including all dependencies defined in it.
To do that:
- Click Create New Project on the welcome screen or select File | New | Project.
- Select Spring Initializr in the left pane.
- Select the version of Spring Boot to use (the default being the latest GA version). Note that this selection has a direct affect on the dependencies that are supported and are available for you. After selecting the Spring Boot version, unavailable dependencies are greyed out.
- Choose the dependencies your application needs. There are many possible dependencies you can choose from. The wizard breaks them into sections and also includes a search capability
https://start.spring.io Spring Initializr service, but allows you to use any other custom instance if needed. If your Spring Boot application was created outside IntelliJ IDEA, it will detect the Spring Boot configuration when you import your project to the IDE and a Spring Facet will be configured for the project by applying a quick fix.
Add Spring Boot module to an existing project
The Spring Initializr service can also be used from the New Module wizard. To use it:
- Open the Project Structure dialog and select Modules in the left pane.
- Right click the project root and select Add | New Module from the context menu.
- Select Spring Initializr in the left pane.
- Continue using the wizard in the same way you would with a new project.
Manage application configuration
Spring Boot itself and its dependencies all have properties to allow you to configure various aspects of the application at runtime. It uses configuration files which IntelliJ IDEA identifies and helps you manage. When editing the configuration, you get auto-completion of all possible property keys you can use.
If you are using @EnableConfigurationProperties to generate your own meta-data IntelliJ IDEA will also show the properties you defined in the @ConfigurationProperties beans as options when editing the configuration files.
You can also navigate between the property definition in a class and the values in the configuration file. (Either Ctrl+Click on the property key or click on the gutter icon next to @ConfigurationProperties).
If you are using profile specific configuration IntelliJ IDEA also links between the profile and the configuration which means that renaming a profile also renames the right configuration file.
View Spring Boot application dependencies
Just like in any other Spring framework project, you can use the Spring dependencies diagram to view the dependencies. However, Spring Boot is slightly special as it has auto-configuration. A lot of the dependencies you get are hidden inside the Spring Boot starter jars. In order to view these you need to enable the Show library models option by clicking on its icon ![]() at the diagram icon bar.
at the diagram icon bar.
Run a Spring Boot application
IntelliJ IDEA has a dedicated Run/Debug configuration type for Spring Boot. This type allows you to run/debug a Spring Boot application and also contains useful control options when doing so.
You can override your application's configuration properties and get all the auto-completion you get when editing Spring Boot configuration files.
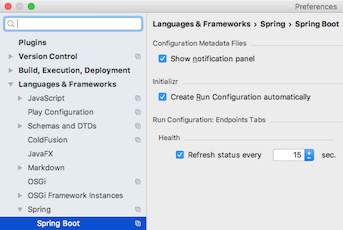
IntelliJ IDEA creates a run/debug configuration for your Spring Boot application automatically by default. This option is controlled from the Spring Boot settings at
for Windows and Linux
for macOS.
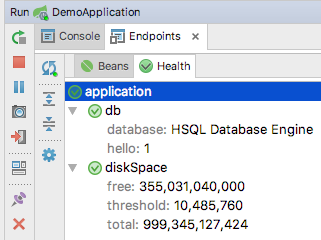
When running / debugging a Spring Boot application, the Run/Debug tool window will contain an Endpoints tab which will include information retrieved from the application's actuator endpoints Health and Beans while the application is running. (spring-boot-starter-actuator must be added as a dependency to the application to enable these endpoints).
The polling frequency of the endpoints can be controlled from the Spring Boot settings at
for Windows and Linux
for macOS.
See Also
Reference:
External Links:
- Spring
- Spring Boot
- IntelliJ IDEA 2017.2 EAP: Run Dashboard for Spring Boot
- Spring Testing Improvements in IntelliJ IDEA 2017.1
- Spring Data Improvements in IntelliJ IDEA 2017.1
- Webinar Recording: What’s New in IntelliJ IDEA 2016.2 for Spring Developers
- IntelliJ IDEA 2016.1: What’s New for Spring Developers