Working with modules
In IntelliJ IDEA, a module is an essential part of any project — it's created automatically together with a project. Projects can contain multiple modules — you can add new modules, group them, and unload modules you don't need at the moment.
Modules consist of a content root and a module file. A content root is a folder where you store your code. Usually, it contains subfolders for source code, unit tests, resource files, and so on. A module file (the .iml file) is used for keeping module configuration, including content or source roots, dependencies, framework-specific settings in facets, and so on.
Configure content roots
Content in IntelliJ IDEA is a group of files that contain your source code, build scripts, unit tests, and documentation. These files are usually organized in a hierarchy. The top-level folder is called a content root.
Modules normally have one content root. You can add more content roots. For example, this might be useful if pieces of your code are stored in different locations on your computer.
At the same time, modules can exist without content roots. In this case, you can use them as a collection of dependencies for other modules.
The content root directory in IntelliJ IDEA is marked with the ![]() icon.
icon.
Add and remove content roots
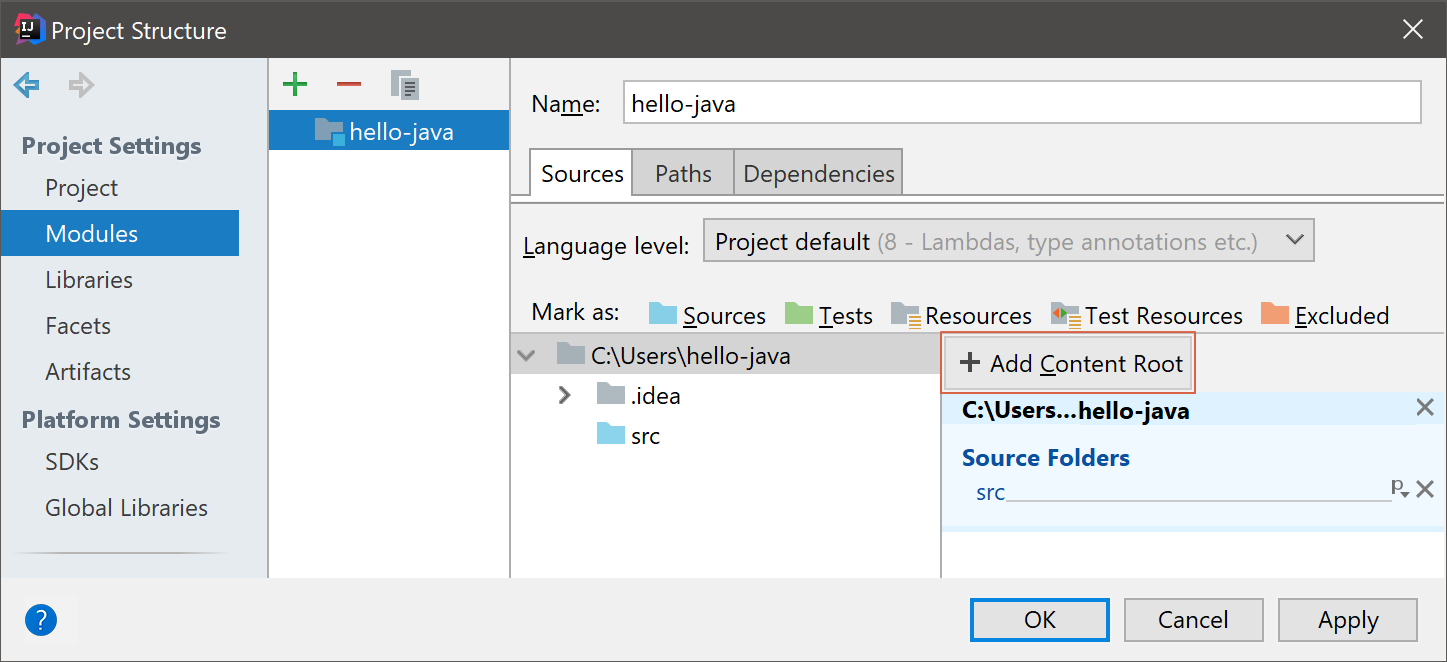
To add a new content root:
- Go to , or press Ctrl+Shift+Alt+S.
- Select Modules under the Project Settings section.
- Select the necessary module, and then open the Sources tab in the right-hand part of the dialog.
- Click Add Content Root.
- Specify the folder that you want to add as a new content root, and click OK.
To remove a content root:
- While on the Sources tab, select the content root that you want to remove, click
 .
. - Confirm the deletion. Note that the corresponding folder won't be physically deleted.
Folder categories
Folders within content roots can be assigned to several categories.
- Sources Root

Production code that should be compiled.
- Generated Sources Root

If a folder is marked as generated, the IDE will think that files in this folder are generated automatically rather than written manually, and can be regenerated.
- Test Sources Root

These folders allow you to keep code related to testing separately from production code. Compilation results for sources and test sources, normally, are placed into different folders.
- Generated Test Sources Root

If a folder is marked as generated, the IDE will think that files in this folder are generated automatically rather than written manually, and can be regenerated.
- Resources Root
 (available only in Java modules)
 Resource files used in your application (images, configuration XML and properties files, etc.). During the build process, resource files are copied to the output folder as is.
- Load Path Root
 (available only when the Ruby plugin is enabled)
 The load path is the path where the
requireandloadstatements look for files. - Test Resources Root
 (available only in Java modules)
 These folders are for resource files associated with your test sources.
- Excluded

Files in excluded folders are ignored by code completion, navigation and inspection. That is why, when you exclude a folder that you don't need at the moment, you can increase the IDE performance.
Normally, compilation output folders are marked as excluded.
Apart from excluding the entire folders, you can also exclude specific files.
Configure folder categories
- Right-click a folder in the Project tool window.
- Select Mark Directory as from the context menu.
- Select the necessary category.
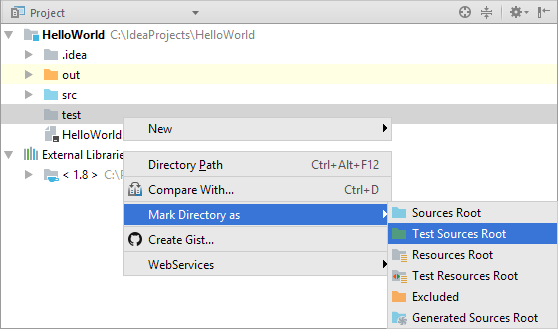
This way, you can assign categories to sub-folders as well.
To restore the previous category of a folder, right-click this folder again, select Mark Directory as, and then select Unmark as <folder category>. For excluded folders, select Cancel Exclusion.
You can also configure folder categories in .
Exclude files
If you don't need specific files, but you don't want to completely remove them, you can temporarily exclude these files from the project. Excluded files are ignored by code completion, navigation and inspections.
To exclude a file, you need to mark it as a plain text file. You can always return excluded files to their original state.
- Right-click the necessary file in the directory tree of the Project tool window.
- Select from the menu.
Plain text files are marked with the ![]() icon in the directory tree.
icon in the directory tree.
To revert the changes, right-click the file and select Mark as <file type> from the menu.
Exclude files and folders by name patterns
In some cases, excluding files or folders one by one is not convenient. For example, this may be inconvenient if your source code files and files that are generated automatically (by a compiler, for instance) are placed in the same directories, and you want to exclude the generated files only. In this case, you can configure one or several name patterns for a specific content root.
If a folder or a file name located inside the selected content root matches one of the patters, it will be marked as excluded. Objects outside the selected content root won't be affected.
- Navigate to , or press Ctrl+Shift+Alt+S.
- Click Modules under the Project Settings section, and then select a module. If there're several content roots in this module, select the one that you want to exclude files or folders from.
-
In the Exclude files field located at the bottom of the dialog, enter a pattern. For example, enter
*.ajto exclude AspectJ files.You can configure multiple patters and separate them with the
;(semicolon) symbol.
Assign a package prefix to Java sources
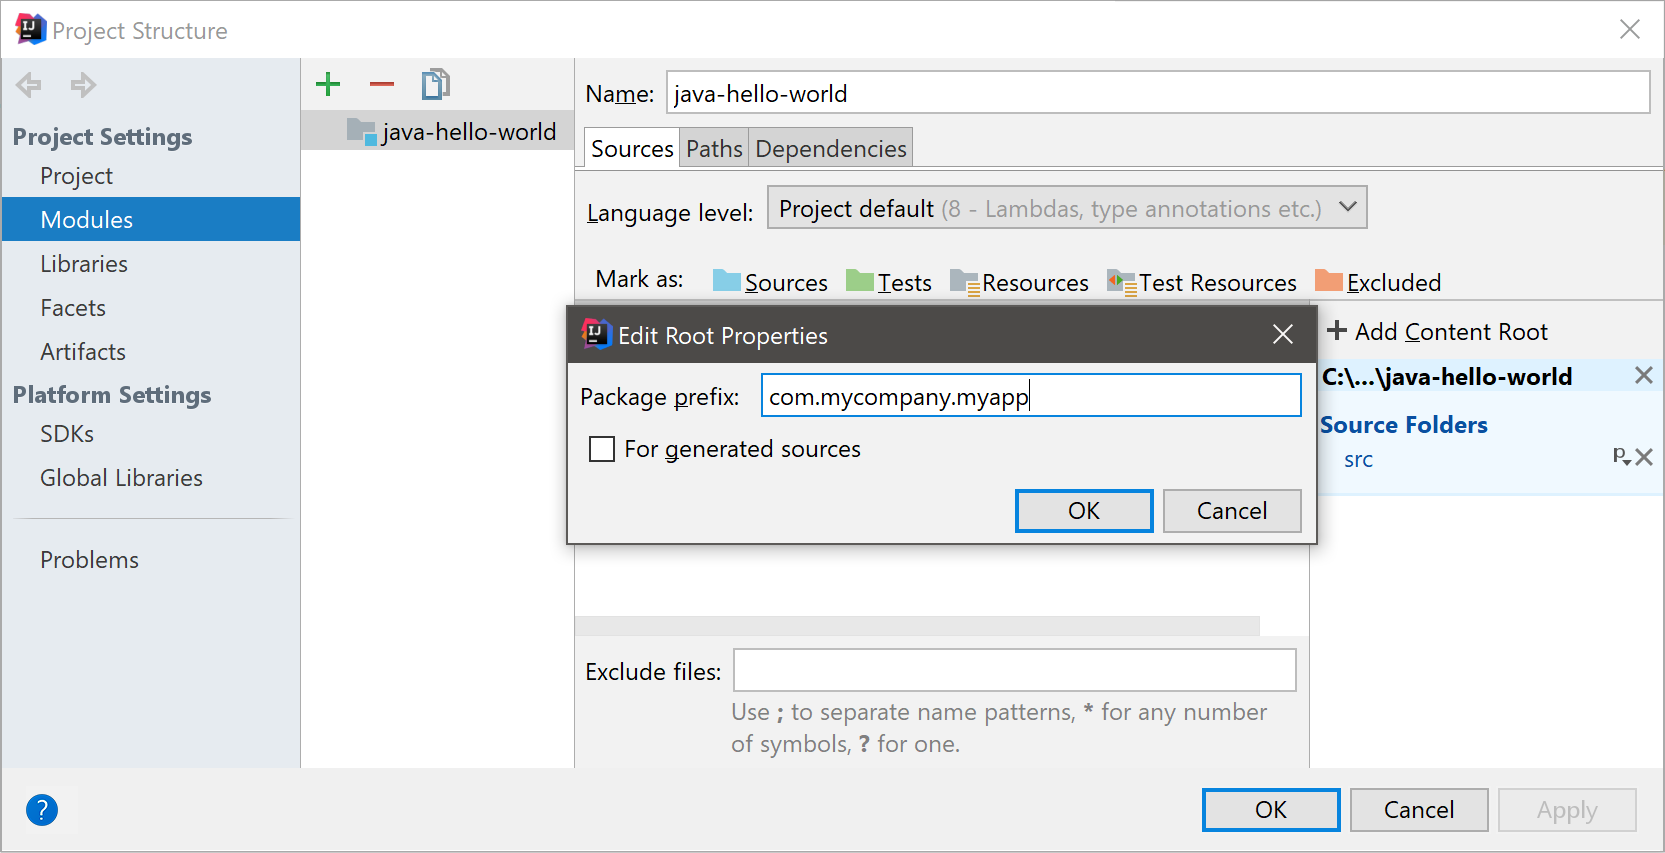
In Java, you can assign a package prefix to a folder instead of configuring a folder structure manually. A package prefix can be assigned to source folders, generated source folders, test source folders and generated test source folders.
- Press Ctrl+Shift+Alt+S to open the Project Structure dialog, and then select Modules.
- Select the necessary module, and open the Sources tab.
- In the right-hand pane, click
 next to Source Folders or Test Source Folders.
 - Specify the package prefix and click OK.
Change the output path for resources
When you're building a project, the resources are copied into the compilation output folder by default. You can specify a different directory within the output folder to place resources.
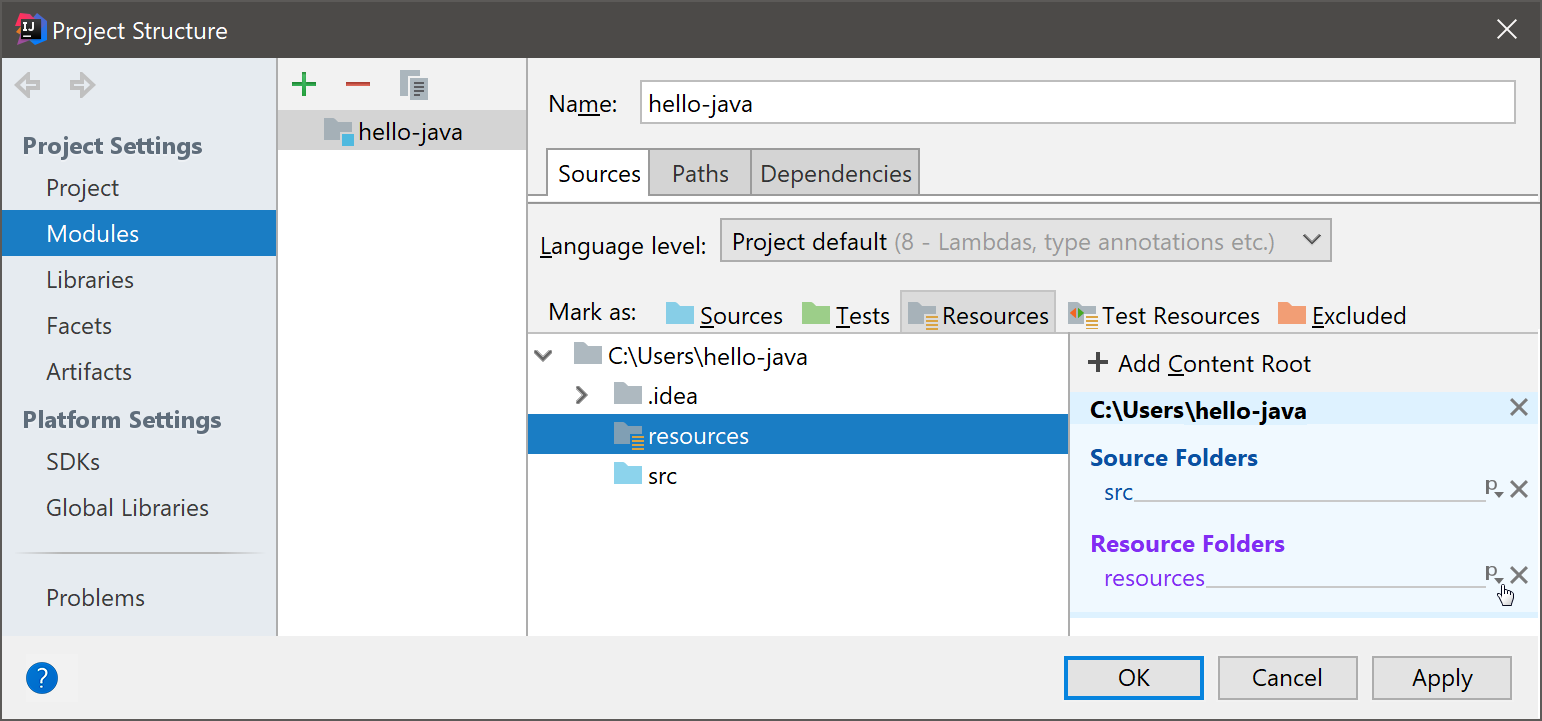
- Press Ctrl+Shift+Alt+S to open the Project Structure dialog.
- Select Modules and then select the necessary module.
- In the right-hand part of the dialog, select the Sources tab.
- In the right-hand pane, under Resource Folders or Test Resource Folders, click
 to the right of the necessary folder (folder path).
 - Specify the path relative to the output folder root, and click OK.
Group modules
IntelliJ IDEA allows you to logically group modules. If you have a large project with multiple modules, grouping will make it easier to navigate through your project.
To sort out modules, you should give them fully qualified names. Support for qualified names is enabled by default, so no further configuration is required. For example, if you want to group all CDI modules, you can add the cdi. prefix to their names.
You can use the Flatten Modules context menu option to view modules on the same level. 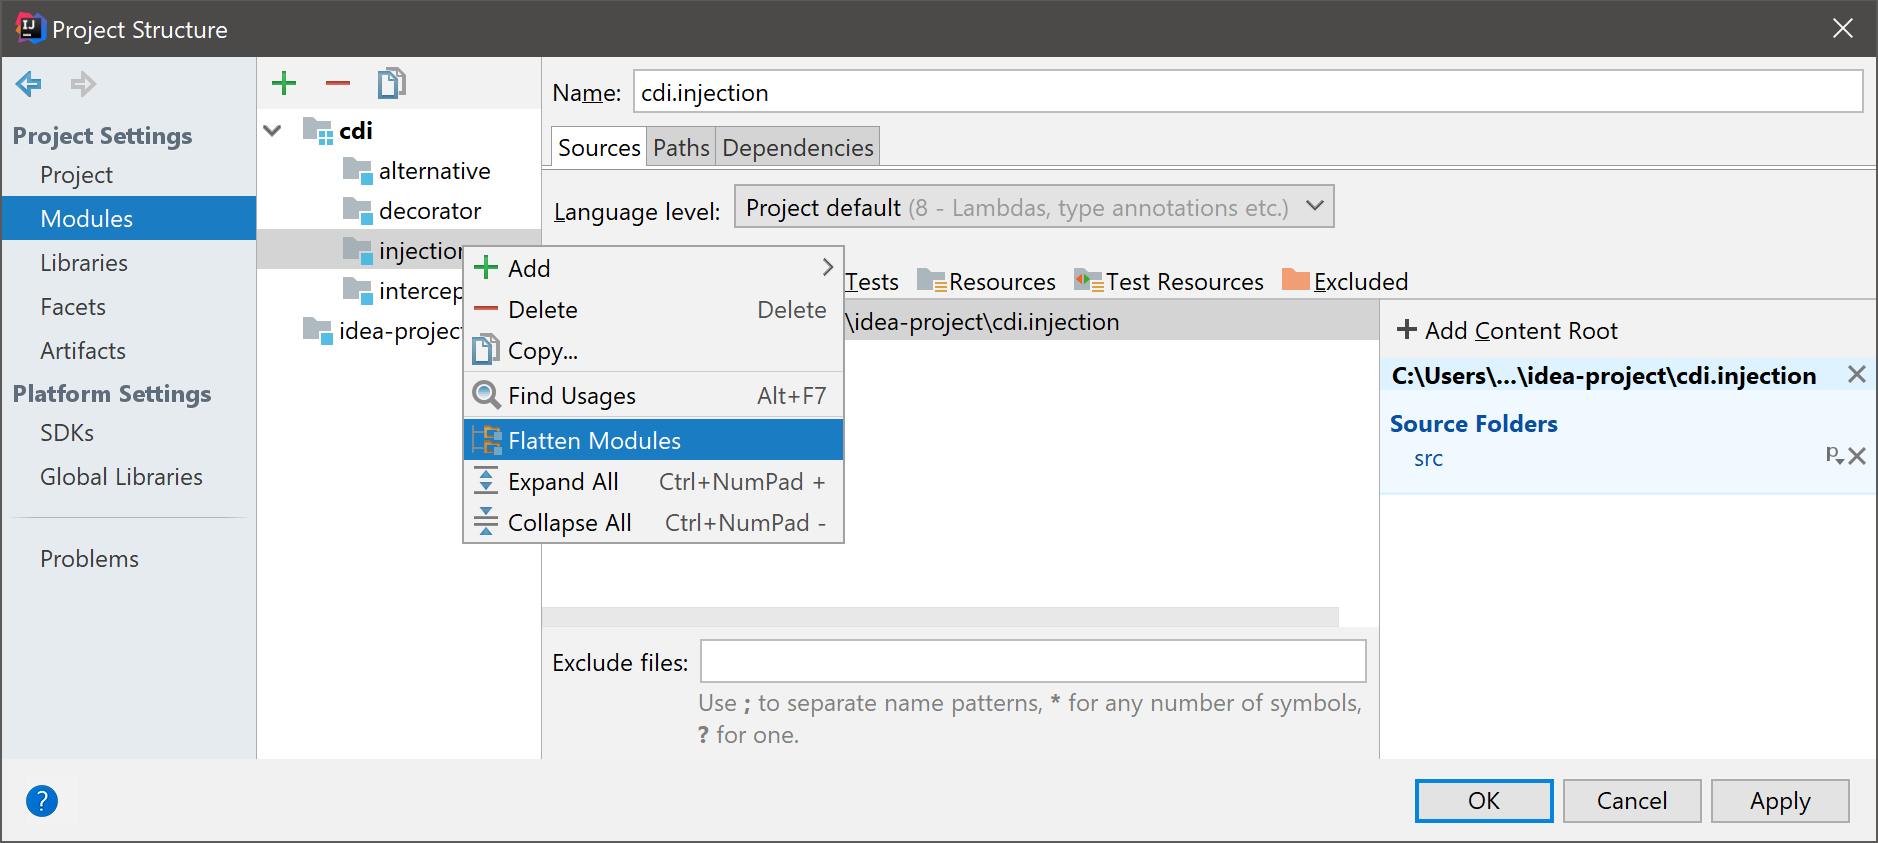
If there are module groups in your project, you will be able to continue working with them, but qualified names won't be available.
To enable qualified names, select all modules in the Project tool window, open the context menu and select . After that all manually defined modules groups will be disabled, and you will be able to use qualified names to group modules.
Module dependencies
Modules can depend on SDKs, JAR files (libraries) or other modules within a project. When you compile or run your code, the list of module dependencies is used to form the classpath for the compiler or the JVM.
To add a new dependency:
- Navigate to or press Ctrl+Shift+Alt+S.
- Select .
- Click
 or press Alt+Insert, and select a dependency type:
 - JARs or directories.
- Library. You can select an existing library or create a new one and then add it to the list of dependencies.
- Module Dependency.
To remove a dependency, select it and then click ![]() or press Alt+Delete.
or press Alt+Delete.
Before removing a dependency you can make sure that it is not used in other modules in the project. To do so, select the necessary dependency and press Alt+F7. You can also use the Find Usages option of the context menu.
Specify a dependency scope
Specifying a dependency scope allows you to control at which step of the build the dependency should be used.
To configure a dependency scope:
- Navigate to or press Ctrl+Shift+Alt+S
- Select .
- Select the necessary scope from the list in the Scope column:
- Compile: required to build, test, and run a project (the default scope).
- Test: required to compile and run unit tests.
- Runtime: part of the classpath to test and run a project.
- Provided: used for building and testing a project.
IntelliJ IDEA processes dependencies for test sources differently from other build tools (e.g. Gradle and Maven). If your module (say, module A) depends on another module (module B), IntelliJ IDEA assumes that the test sources in A depend not only on the sources in B but also on its own test sources. Consequently, the test sources of B are also included in the corresponding classpaths.
Sort dependencies
The order of dependencies is important as IntelliJ IDEA will process them in the same order as they are specified in the list.
During compilation, the order of dependencies defines the order in which the compiler (javac) looks for classes to resolve the corresponding references. At runtime, this list defines the order in which the JVM searches for the classes.
You can sort dependencies by their names and scopes. You can also use the ![]() and
and ![]() buttons to move the items up and down the list.
buttons to move the items up and down the list.
Analyze dependencies
If you want to check whether a dependency still exists in your project, and find its exact usages, you can run dependency analysis:
- Navigate to or press Ctrl+Shift+Alt+S.
- Select .
- Right-click the necessary dependency and select Analyze This Dependency.
You can analyze several dependencies one by one without closing the dialog. The result of each analysis will be opened in a separate tab of the tool window. After you analyze all necessary dependencies, you can close the Project Structure dialog and view results.
If IntelliJ IDEA finds no dependency usages in the project, you will be prompted to remove this dependency.
Add support for frameworks and technologies
For developing framework-specific applications, IntelliJ IDEA features facets. Facets allow you to configure framework-specific settings, and are applied to modules.
Add a facet to a module
IntelliJ IDEA can identify a file or a directory that is typical for a certain framework, and add a facet for you. Once a framework is detected and added, IntelliJ IDEA will inform you about the missing configuration and will suggest the necessary actions, for example, to configure facet settings.
If a facet is not detected automatically, you can add it manually:
- Navigate to , or press Ctrl+Shift+Alt+S, and click Facets.
- Click
 (or press Alt+Insert) and select a framework from the list.
 - Select a module to which you want to add a facet and configure the facet, if required.
You can also add a facet as you create a new project or a new module.
Exclude frameworks from auto-detection
By default, auto-detection is enabled for all the supported frameworks. You can disable framework auto-detection completely, or exclude individual frameworks from auto-detection.
- Open the Project Structure dialog, select Facets, and then select Detection.
- Click
 (or press Alt+Insert), then select the necessary option. For example, you can disable auto-detection of all frameworks in one directory only.
 - Deselect the Enable framework detection checkbox to disable auto-detection of all frameworks in the entire project.
Unload modules
To make the IDE work faster, you can temporary set aside or unload modules that you don't need at the moment. IntelliJ IDEA ignores the unloaded modules when you search through or refactor your code, or compile your project.
When you unload modules, you do it locally — the information about unloaded modules is not shared through version control.
To unload or load modules:
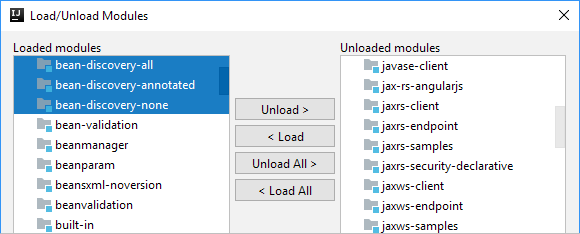
- In the Project tool window, right-click a module, and select Load/Unload Modules.
- You can double-click a module in the dialog to load or unload it.
Troubleshooting
If modules in your project depend on each other, you may face errors when you unload one or more of them.
For example, if Module 1 depends on Module 2, and you unload Module 2, IntelliJ IDEA won't be able to resolve references to classes in Module 2. Moreover, compilation of Module 1 will probably fail.
To avoid such errors, the IDE analyzes dependencies when you load or unload modules. When you load modules, IntelliJ IDEA will suggest to load all dependencies as well. When you unload modules, the IDE will find all dependent modules and will unload them, too. 
If you unload Module 1, you may not see any errors in code in Module 2, and you will also be able to compile Module 2. However, you may accidentally break compilation of dependant code in Module 1 by making changes in code in Module 2. Since Module 1 is unloaded, you won't be able to see any errors until you load it back and compile.
If you invoke Find Usages (Alt+F7) or a refactoring on a class, field, or method (Ctrl+Shift+Alt+T), contained in Module 2, the result may be incomplete because the contents of Module 1 are not taken into account. IntelliJ IDEA will inform you about that.
Moreover, the IDE will compile unloaded modules every time you commit changes, and will check that the changes don't affect unloaded modules. See more information in Committing changes with unloaded modules. 
Automatically load and unload new modules
If your teammates add new modules to a project, you will download them to your computer on the project update. After that, the IDE will analyze the dependencies between all modules in the updated project.
If you have unloaded modules, IntelliJ IDEA will load or unload new modules according to the results of the dependency analysis.
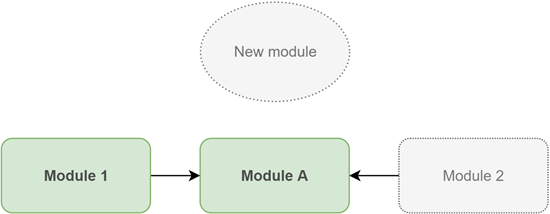
If new modules depend on the existing unloaded modules, the new modules will be marked as unloaded. IntelliJ IDEA will ignore them because otherwise you may face errors when you try to compile them.
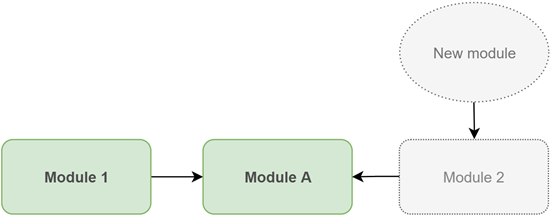
If existing loaded modules have direct dependencies on new modules, the new modules will be marked as loaded.
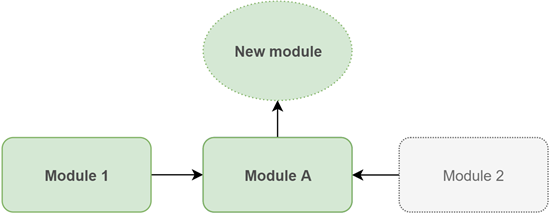
If existing loaded modules have no dependencies on the newly added modules, the new modules will be marked as unloaded. You can manually mark them as loaded as soon as you need them.
Commit changes with unloaded modules
If you have unloaded modules, and you make changes in files that your unloaded modules depend on, compilation of these modules may fail after you load them back.
To avoid compilation failures of unloaded modules, make sure that the Compile affected unloaded modules option is selected in the Commit Changes dialog.
Before committing changed files, IntelliJ IDEA will compile unloaded modules to make sure that the changes don't affect these modules. The IDE will inform you about the detected errors, and will suggest resolving them before the commit.