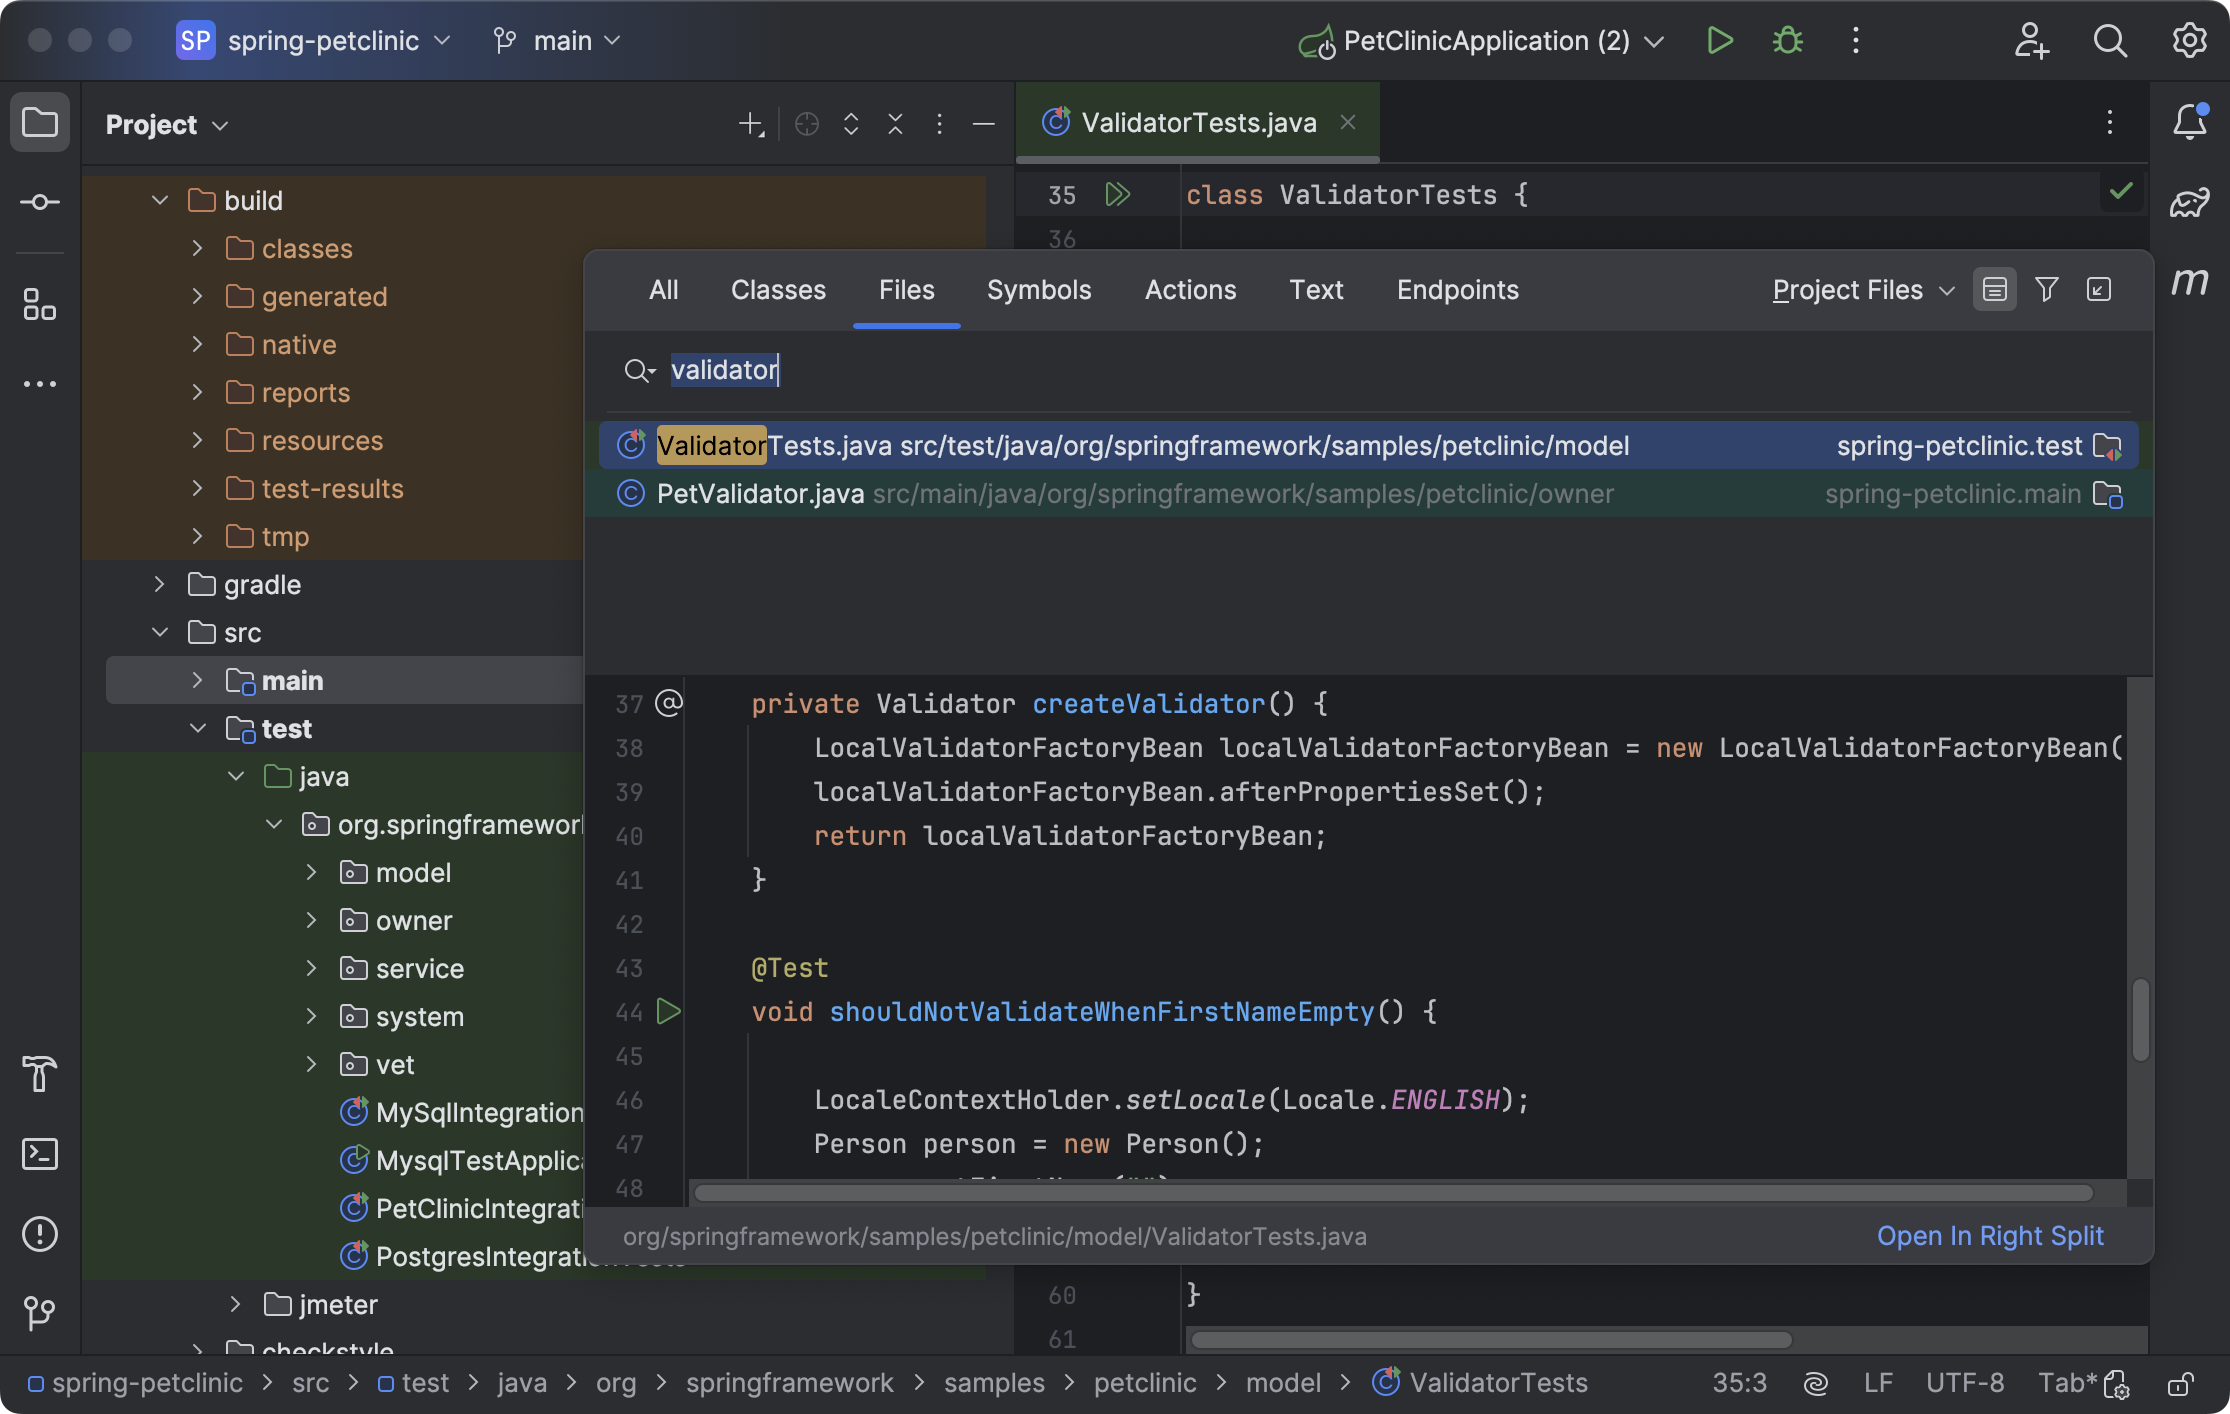
Project tool window
The Project tool window Alt+1 lets you take a look at your project from various viewpoints and perform different tasks such as creating new items (directories, files, classes, and so on) , opening files in the editor, navigating to the necessary code fragments, and more.
Views
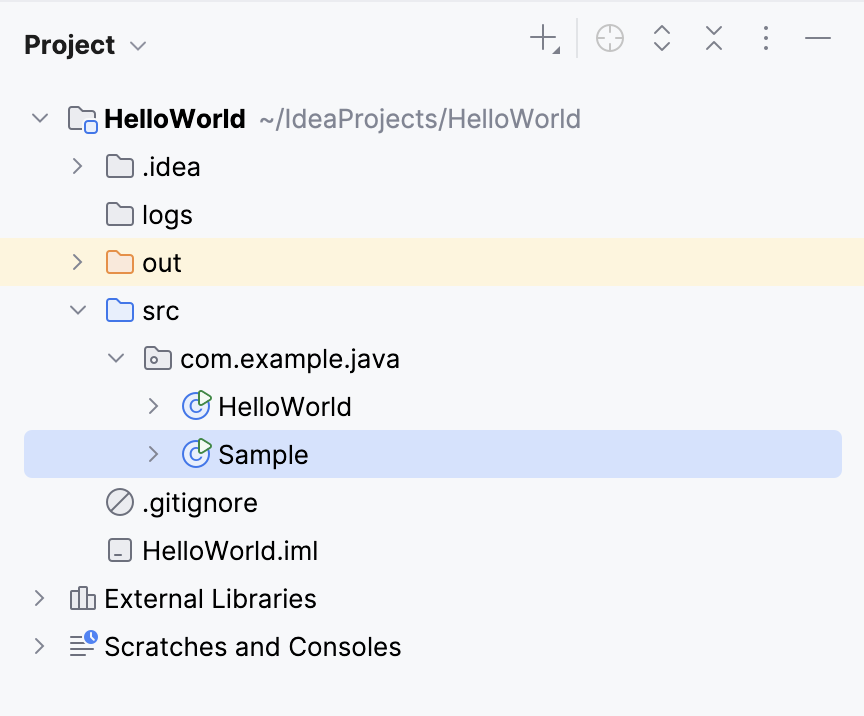
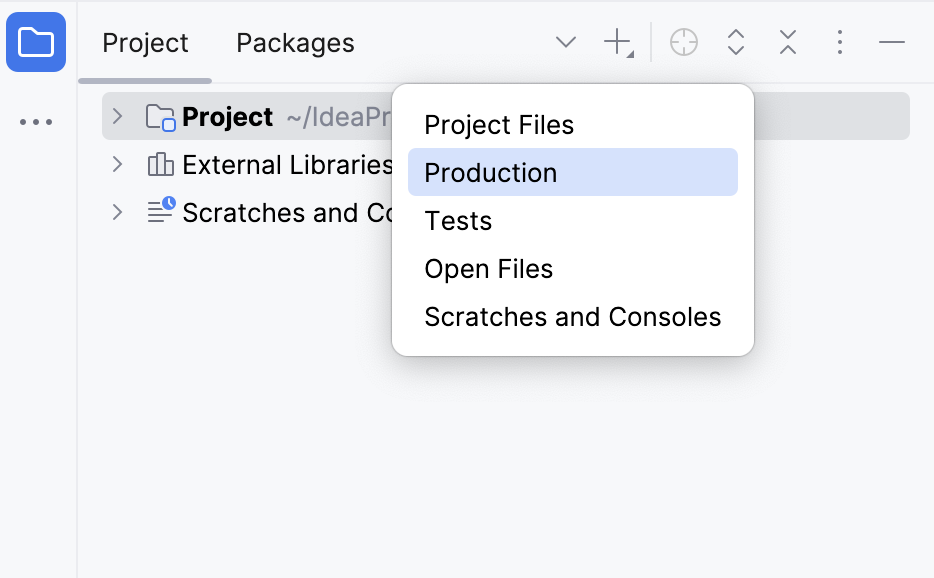
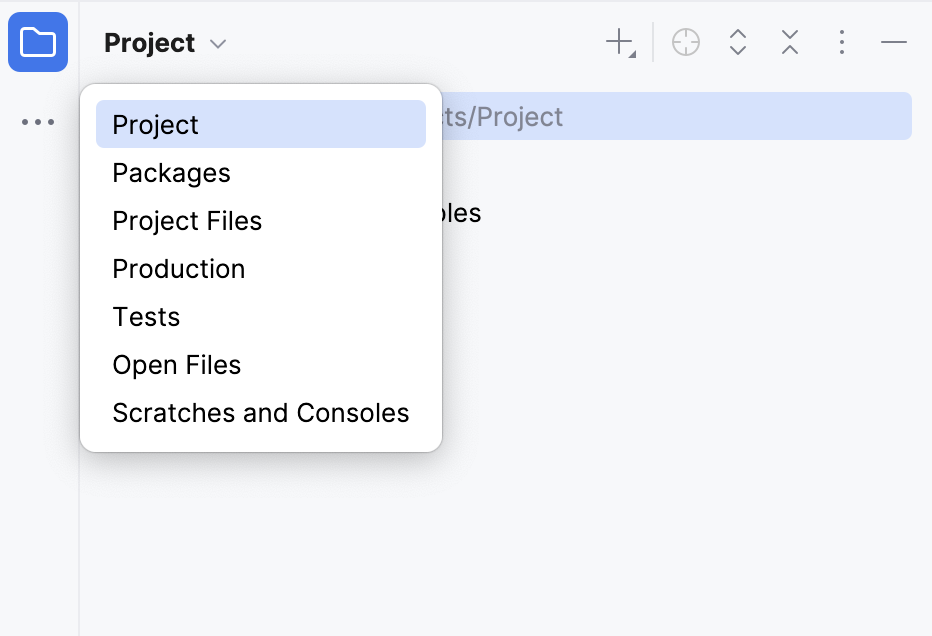
The tool window has several views:
Project view. This view displays all the project items along with their dependencies (SDKs and libraries) . The emphasis is on the directory structure, although the packages are also shown.
Packages view. This view emphasizes the package structure of the project. Modules, SDKs, and libraries, are not displayed by default.
Scope views (Project Files, Open Files, and so on). These views display the contents of the predefined and user-defined scopes.
To switch between views, press Alt+Right/Alt+Left or select a view from the list on the header.
You can also display each view in a separate tab: click and disable the Group Tabs option.
Appearance and behavior
Quickly add files and folders
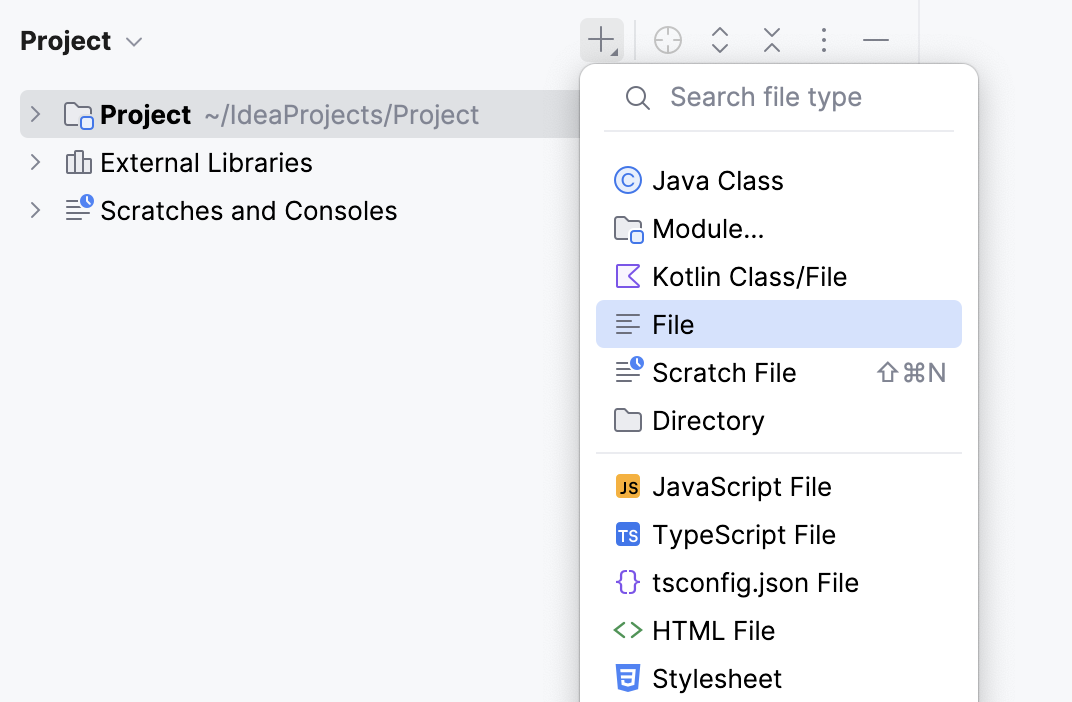
You can create a new file or folder from the tool window toolbar. The available options depend on the node selected in the tool window.
For example, if the Java sources root is selected, you can create Java classes and packages. If the project directory is selected, you can create folders, files, or modules.
Click
on the tool window toolbar and select an option from the list.
Use the speed search to find options faster: start typing the file type you want to create to narrow down the results.
Preview files
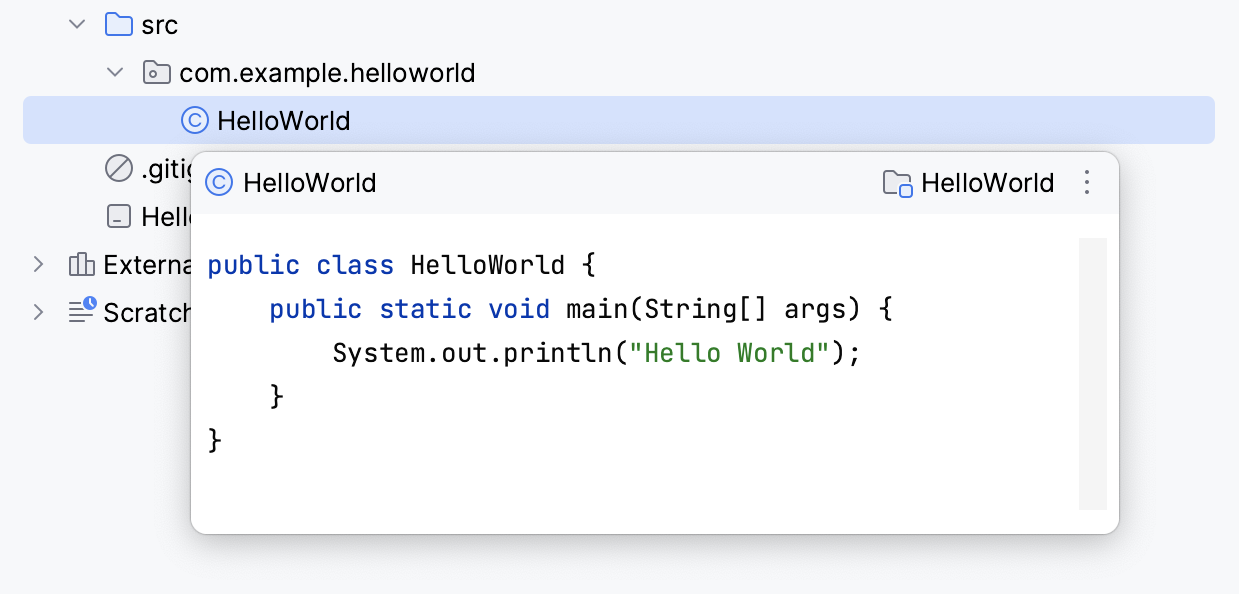
There are two ways to preview files without opening each one in a separate tab:
Use the file preview popup: select a file in the Project tool window Alt+1 and press Space.
Enable the preview tab: click
and select .
Show file size and modification timestamp
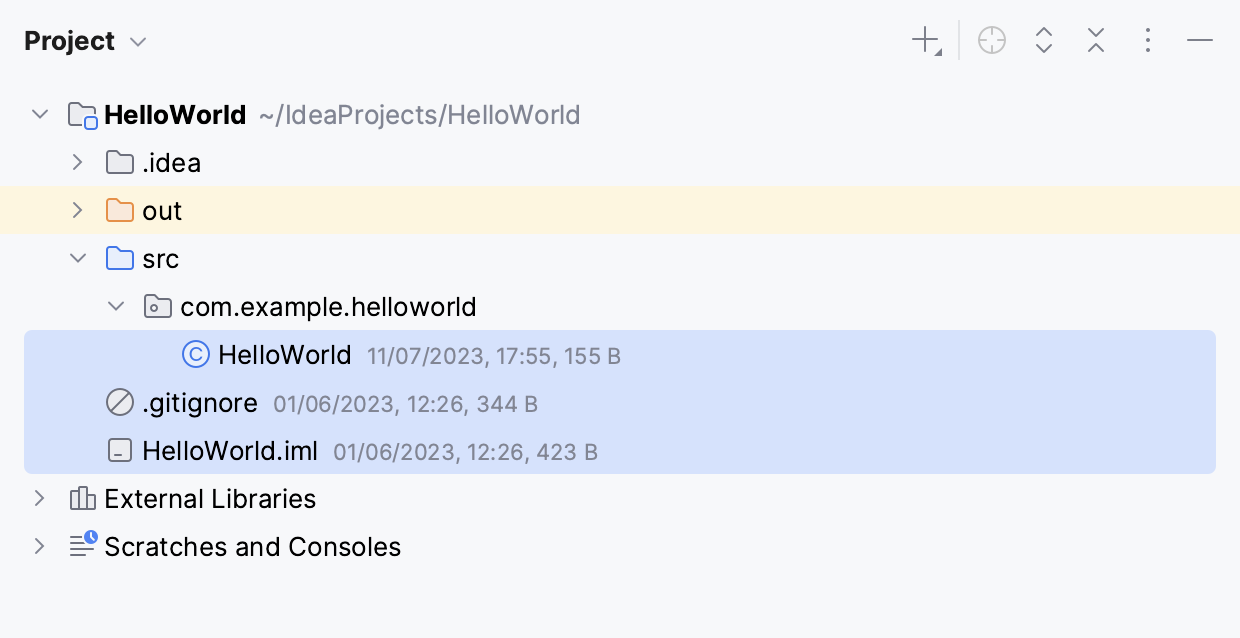
You can view the size and modification timestamp for the files in the project tree.
In the Project tool window Alt+1, click
and select .
Show tree indent guides
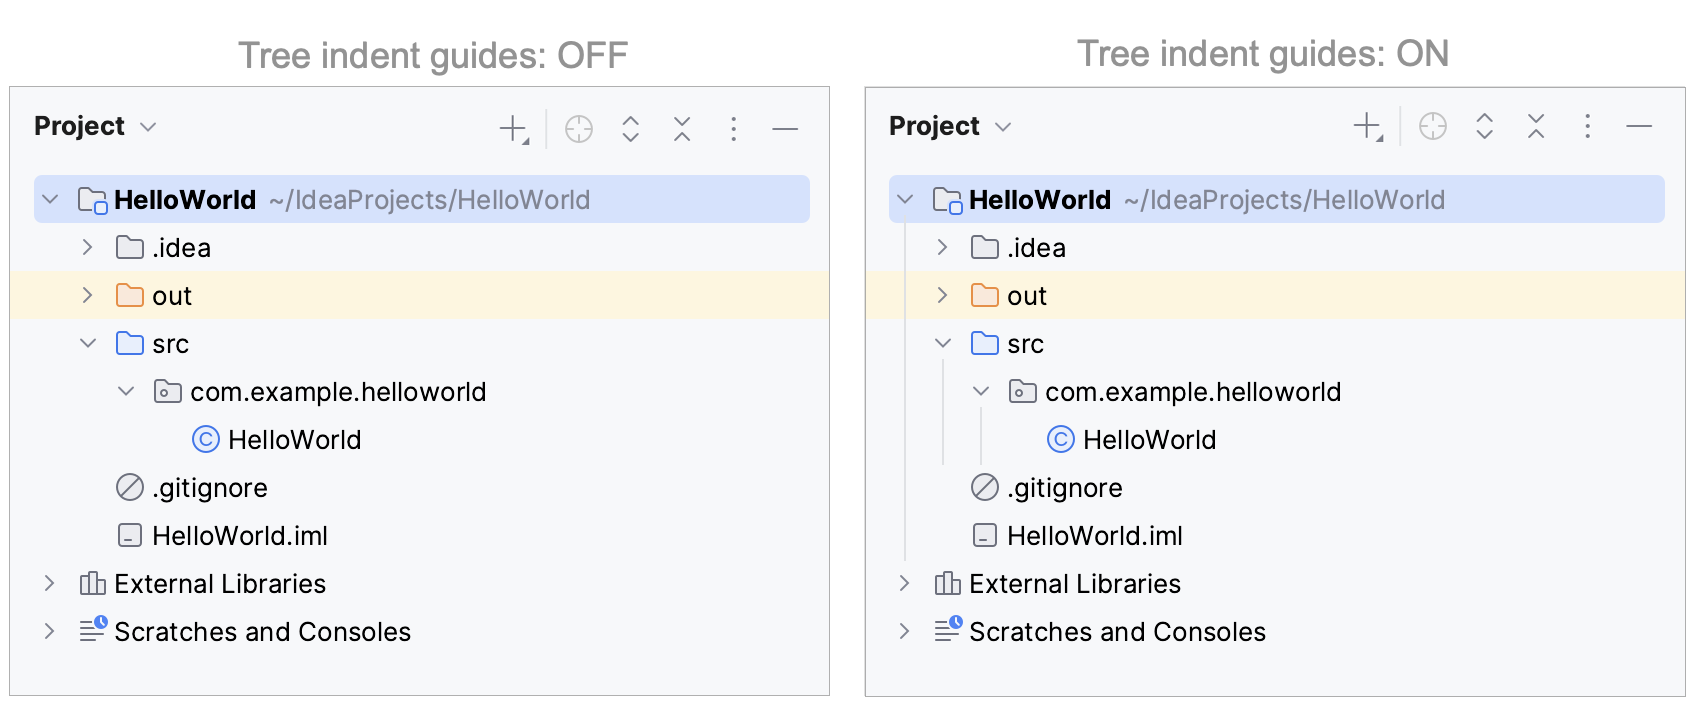
In the Project tool window, you can display vertical lines that mark indent levels and help you better understand the hierarchy of the components in your project.
Press Ctrl+Alt+S to open settings and then select .
In the Tree Views section, enable the Show indent guides option.
Open files with one click
You can configure the Project tool window to open files in the editor with a single click.
In the Project tool window, click
and enable the option.
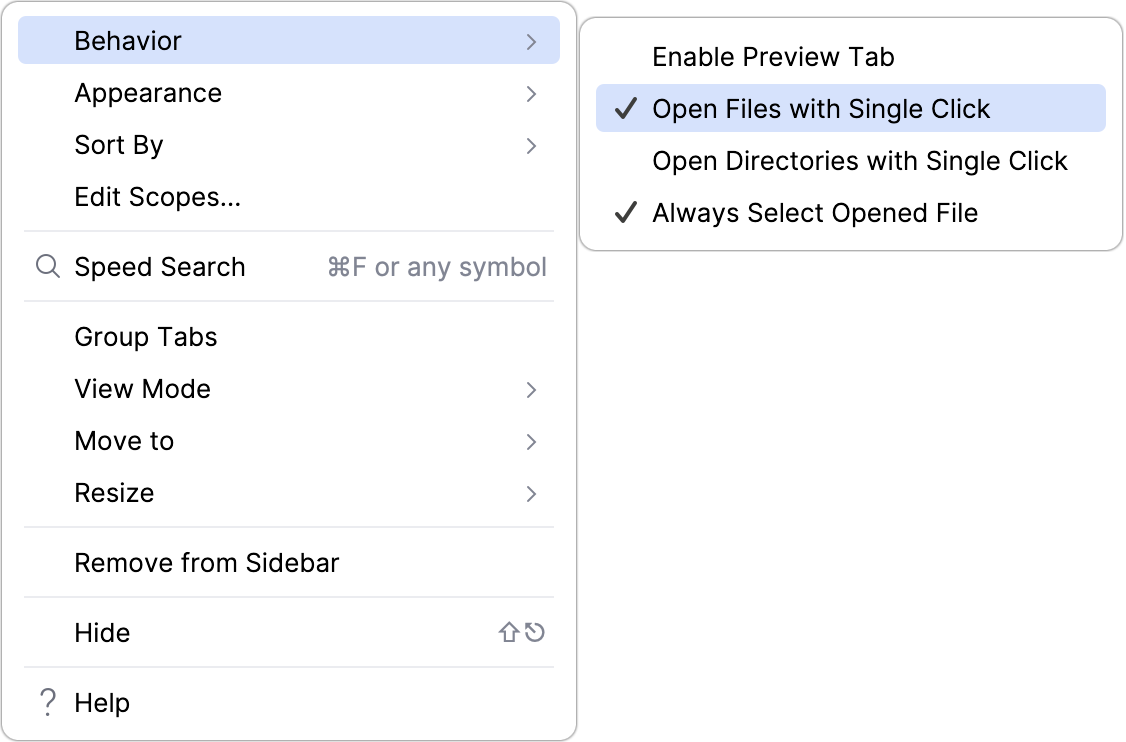
Quickly locate files in the Project tool window
IntelliJ IDEA can help you keep track of the file currently open in the active editor tab by automatically selecting it in the Project tool window.
In the Project tool window, click
and enable the option.
Header context menu
The context menu that appears by right-clicking the header or clicking the Options button provides settings for project views, viewing modes, as well as for switching between the views, resizing the tool window, and more.
The following table lists and briefly explains the available commands and options.
Item | Shortcut | Description |
|---|---|---|
Select Next View or Tab | Alt+Right | Use this option to switch between different views. The option is only available when Group Tabs is disabled. |
Select Previous View or Tab | Alt+Left | Use this option to switch between different views. The option is only available when Group Tabs is disabled. |
Show List of Views or Tabs | Alt+Down | Use this option to switch between different views. The option is only available when Group Tabs is disabled. |
Behavior | ||
Enable Preview Tab | Enable the preview tab that allows you to view files in a single tab one by one without opening each file in a new tab. | |
Open Files with Single Click | Open an item in the editor by clicking it in the Project tool window once. Otherwise, you need to double-click items to open them. Note that you cannot disable this option if you enable the preview tab. | |
Open Directories with Single Click | Expand and collapse directories in the Project tool window by clicking them once. Otherwise, you need to double-click a directory to open it or use the | |
Always Select Opened File | If this option is on, IntelliJ IDEA automatically locates documents that you open in the editor in the current view of this window. | |
Appearance | ||
Modules | This option is available only in the Packages view and scope views. (In the Project view, modules are always shown.) Turn this option on or off to show or hide modules. | |
Members | If this option is on, the files in the tree that contain classes turn into nodes. When such a node is unfolded, the contained classes with their fields, methods, and other members of the selected item are shown. 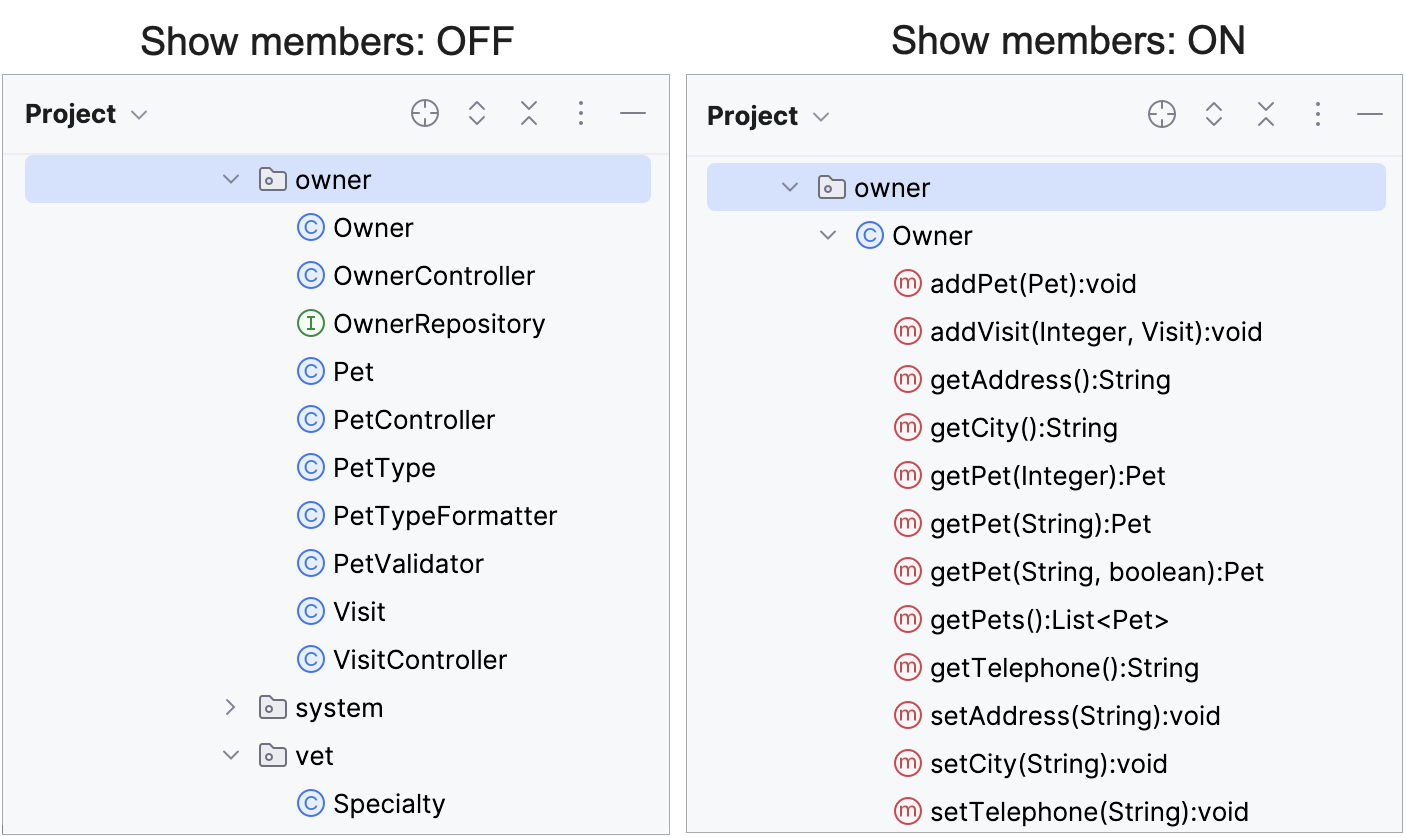 | |
Excluded Files | This option is available only in the Project view. Turn this option on or off to show or hide excluded folders and files. | |
Visibility Icons | Display visibility modifiers for classes in the project tree:
| |
Scratches and Consoles | Hide or display the Scratches and Consoles node. This node contains your scratch files and query consoles. | |
Library Contents | This option is available only in the Packages view. (In the Project view, libraries are always shown; in the scope views, libraries are never shown.) Turn this option on or off to show or hide libraries and their contents. Note that within the Libraries category are the libraries included in module dependencies and also the SDKs associated with your modules. | |
Flatten Modules | If this option is off, modules are shown as a hierarchy or in groups. If this option is on, all modules appear at the same level. | |
Flatten Packages | If this option is off, packages are shown as a hierarchy. If this option is on, all packages appear at the same level and are identified by their qualified names. | |
Abbreviate Qualified Names | This option is available only if the Flatten Packages option is on. If the option is on, most of the initial <name>. fragments in qualified package names are abbreviated. 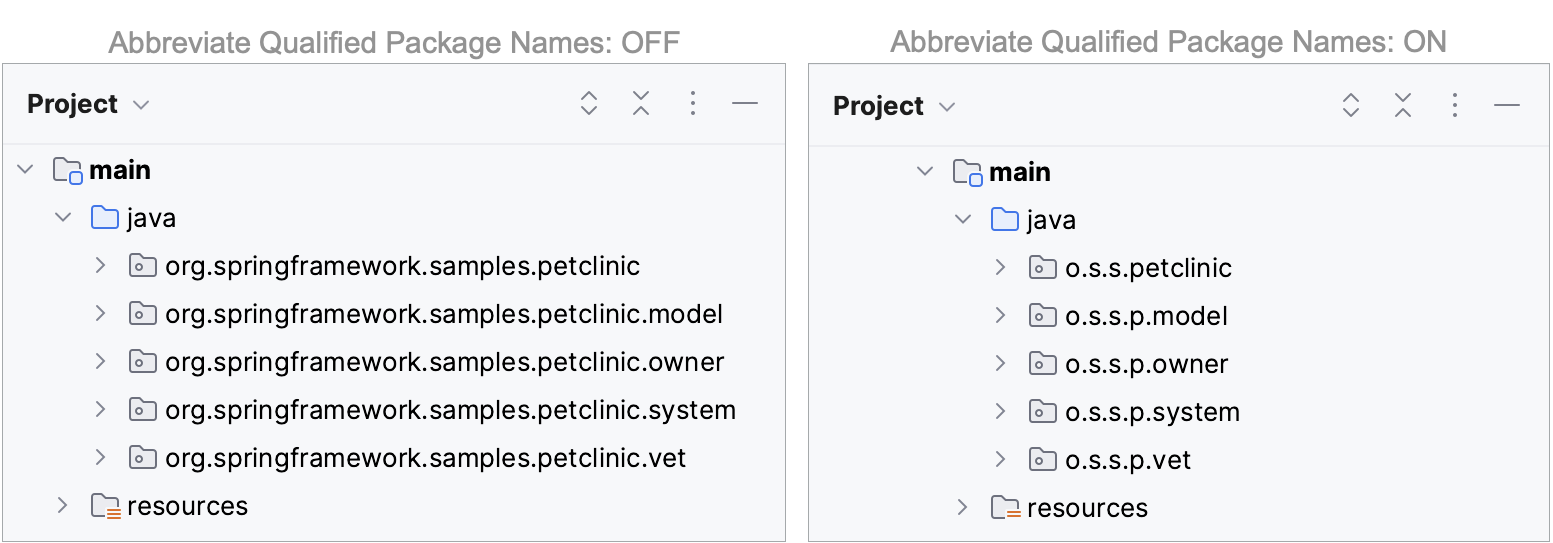 | |
Compact Middle Packages/Hide Empty Middle Packages | This option lets you specify how or whether empty packages are to be shown. (Empty packages are ones that contain nothing but other packages.) If the option is on, empty packages are shown compacted. | |
File Details | Select this option to have the size and modification timestamp of files displayed. | |
File Nesting | Opens the File nesting dialog where you can configure presentation of files that have same names but different extensions. | |
Customize Tree Views | Navigate to to configure options for tree views. | |
Sort By | ||
Name | Sort files alphabetically by their names. The option does not affect the order of folders, they are always sorted alphabetically. | |
Type | Sort files by their extensions. java files appear in the following order: interfaces, classes, enumerations, and so on. The option does not affect the order of folders, they are always sorted alphabetically. | |
Modification Time (Newest First/Oldest First) | Sort files by the time they were modified. To display this information, select from the main menu. The option does not affect the order of folders, they are always sorted alphabetically. | |
Folders Always on Top | If the option is on, folders are shown above the files. Otherwise, all items are sorted alphabetically, and files and folders appear intermixed. | |
Edit Scopes | Open the Scopes dialog in which you can create and edit used-defined scopes. Note that this command is available only if the current view is a scope view. | |
Speed Search | Ctrl+F | Search for an item. Learn more from Speed Search in tool windows |
Group Tabs | If this option is on, there is a list in the left part of the header from which you can select the necessary view. If this option is off, the views are represented by tabs which appear in the left part of the header. | |
View Mode | This option lets you control general appearance and behavior of the tool window. For full information, refer to Tool window view modes. | |
Move to | To associate the tool window with a different tool window bar, select this command, and then select the destination tool window bar (Top, Left, Bottom or Right). For full information, refer to the Move tool windows chapter. | |
Resize | To resize the tool window by moving one of its borders, select this command, and then select the necessary Stretch to option. Note that this command is not available for the floating mode. | |
Remove from Sidebar | This command hides the tool window, removes the associated tool window button from the tool window bar, and removes the tool window from the quick access menu ( To open the tool window again (and restore the associated features), use the main menu: or press Alt+1. | |
Hide | Shift+Escape | Hide the tool window. |
Help | This command opens the description of the Project tool window in the IntelliJ IDEA online help. | |
Context menu commands for the content pane items
The context menu of an item provides access to all the functions available for this item.
Item | Shortcut | Description |
|---|---|---|
New | Alt+Insert | Create a new item (module, package, directory, file, class, and so on.) within the selected one. (project, module, directory or package) In the Scratches view, this command also lets you create a query console. |
Cut | Ctrl+X | Move the selected item or items from the current location to the clipboard. |
Copy | Ctrl+C | Copy the selected item or items to the clipboard. |
Copy Path/Reference | Use this command and one of the following options to copy the selected item(s) to the clipboard:
| |
Paste | Ctrl+V | Insert the contents of the clipboard into the selected location. |
Open Module Settings | F4 | Open the settings for the selected module. These will be shown on the Modules page in the Project Structure dialog. |
Find Usages | Alt+F7 | Search for the usages of the selected item. (The Find Usages dialog will open.) |
Find in Files | Ctrl+Shift+F | Perform a text search. (Find in Files dialog will open.) |
Replace in Files | Ctrl+Shift+R | Perform text search-and-replace. (Replace in Path dialog will open.) |
Analyze | Access the functions related to code inspections and analysis. | |
Rename | Shift+F6 | Rename the selected item. |
Refactor | Perform one of the refactorings available for the selected item. | |
Bookmarks | Add the selected item to an existing or new list of bookmarks. | |
Browse Type Hierarchy | Ctrl+H | For a file (normally, a class): open the class hierarchy for the selected file (class). The Hierarchy tool window will open. For more information, refer to Source code hierarchy. |
Reformat Code | Ctrl+Alt+L | Reformat the source code in the selected file or in all files in the current directory. See also, Reformat code. |
Optimize Imports | Ctrl+Alt+O | Optimize imports in the selected file or in all files in the current directory. This feature removes unused imports and rearranges import statements. |
Delete | Delete | Delete the selected item. Use with care! |
Change Dialect (<CurrentDialect>) | For SQL files and query consoles, change the SQL dialect associated with the file. | |
Remove Module | Delete | Remove a module from your project. Note that the files that make up the module are not physically removed from the disk. |
Build Module '<name>' | Build the current module. | |
Rebuild '<name>' | Ctrl+Shift+F9 | Compile the selected source file or all the source files in the selected directory. |
Override File Type | Change the type of the selected file, for example, to Plain Text to exclude it from project, so it is ignored by inspections, code completion, navigation, and so on. The file will be indicated with a special icon | |
Run '<item_name>' | Ctrl+Shift+F10 | For an SQL file or query console: execute all the statements contained in the selected file. |
Open in Right Split | Shift+Enter | Split the editor into two parts and show the file in the right section. For more information, refer to Split screen. |
Open in | Open a file in your system file manager or in Terminal. | |
Local History | View local history for the selected file or directory, or create a label for the current version of your project. | |
Synchronize '<item_name>' | Synchronize the view in the tool window with the view saved in the file system. If you change a file or directory contents externally, IntelliJ IDEA, under certain circumstances, may not be aware of the corresponding changes unless you use this command. | |
Compare With | Ctrl+D | Compare the selected file or directory with another file or directory. See Compare files, folders, and text sources and Diff Viewer for folders. |
Compare File with Editor | Compare the selected file with the file open on an active editor tab. See Compare files, folders, and text sources and Diff Viewer for files. | |
Load/Unload Modules | ||
External Tools | Launch a third-party tool. | |
Mark Directory As | Make the selected directory a source root or a test source root , to make the directory excluded, and so on. The necessary category for the directory is selected from the submenu. | |
Diagrams | Ctrl+Alt+Shift+U or Ctrl+Alt+U | Open a diagram (for example, a UML diagram) for the selected item. |
Update Copyright | Update the copyright notice for the selected files and folders. See Copyright. | |
WebServices | Access the functions related to developing Web services. See Web services and Web service clients. |
File status highlights
If VCS integration is enabled for the current project, IntelliJ IDEA uses colors to denote VCS file status in the Project tool window.
You can configure VCS file status colors on the Version Control | File Status Colors settings page Ctrl+Alt+S.
The table below lists default file status colors and their meanings in some of the color schemes.
Color | File Status | Description |
|---|---|---|
| Added | The file in the active changelist is scheduled for addition to the repository. |
| Added in not active changelist | The file in an inactive changelist is scheduled for addition to the repository. This file status is available if the Highlight files from non-active changelists option is enabled in . |
| Changelist conflict | The file in an inactive changelist has been modified in the active changelist. In this case, a new dialog will open, prompting you to resolve the changelist conflict. This file status is available if all options are enabled in . |
| Copied | If a file is a copy of another file, its metadata is tracked, and such a file is marked as copied. |
| Deleted | The file is scheduled for deletion from the repository. |
| Deleted from file system | The file has been deleted locally but has not been scheduled for deletion, and it still exists in the repository. |
| Have changed descendants | If a file is modified, the IDE will recursively highlight all directories containing that file. This status is available if the Highlight directories that contain modified files in the Project tree option is enabled in . |
| Have immediate changed children | If a file is modified, the IDE will highlight its parent directory. This status is available if the Highlight directories that contain modified files in the Project tree option is enabled in . |
| Hijacked | [Perforce, ClearCase, VSS] The file is modified without checkout. |
| Ignored | A file is intentionally untracked by VCS. |
| Merged | The file is merged by your VCS as a result of an update. |
| Merged with conflicts | During the last update, the file has been merged with conflicts. |
| Merged with property conflicts | During the last update, the IDE has detected differences between the properties of the local file and its server version. |
| Merged with text and property conflicts | Text and property conflicts happen when two or more developers modify the same lines of a file and the same file properties. |
| Modified | The file has changed since the last synchronization. |
| Modified in not active changelist | The file in an inactive changelist has been modified. This file status is available if the Highlight files from non-active changelists option is enabled in . |
| Obsolete | The file should no longer be in your working copy of the repository. |
| Renamed | Since the last update, the file has been renamed. |
| Switched | [SVN] The file is taken from a different branch than the whole project. |
| (Unknown) Unversioned | The file exists locally but is not in the repository and is not scheduled for addition. |
| Up to date | The file has not been changed. |
File colors
Files that belong to different scopes (production files or test files, for example) can be highlighted in different colors in the Project tool window, search results, and editor tabs.
To each scope, you can assign its own color. For more information, refer to Associate scopes with colors.
