Spring Boot
Get started with Spring Boot
Spring Initializr is a wizard that allows you to select the necessary configuration when you are creating a project or a module. For example, you can select a build tool, and add Spring Boot starters and dependencies.
To access the wizard, go to or Module, and select Spring Initializr. Follow the steps of the wizard to select technologies and dependencies you want to use.
Spring Initializr will create a project with a defined build file (pom.xml or build.gradle), a source file, a test file, and an empty application.properties file. If you have previously configured advanced code formatting settings, they will be applied to the predefined files. If you want Spring Initializr to create a project with the default code formatting settings, open the Settings/Preferences dialog, go to and disable the Reformat Code option.
Configure custom configuration files
Spring Initializr creates one default configuration file that may not always be sufficient for development. If you do not want to use the default configuration file, or if you want to run your code in different environments, you can use custom configuration files.
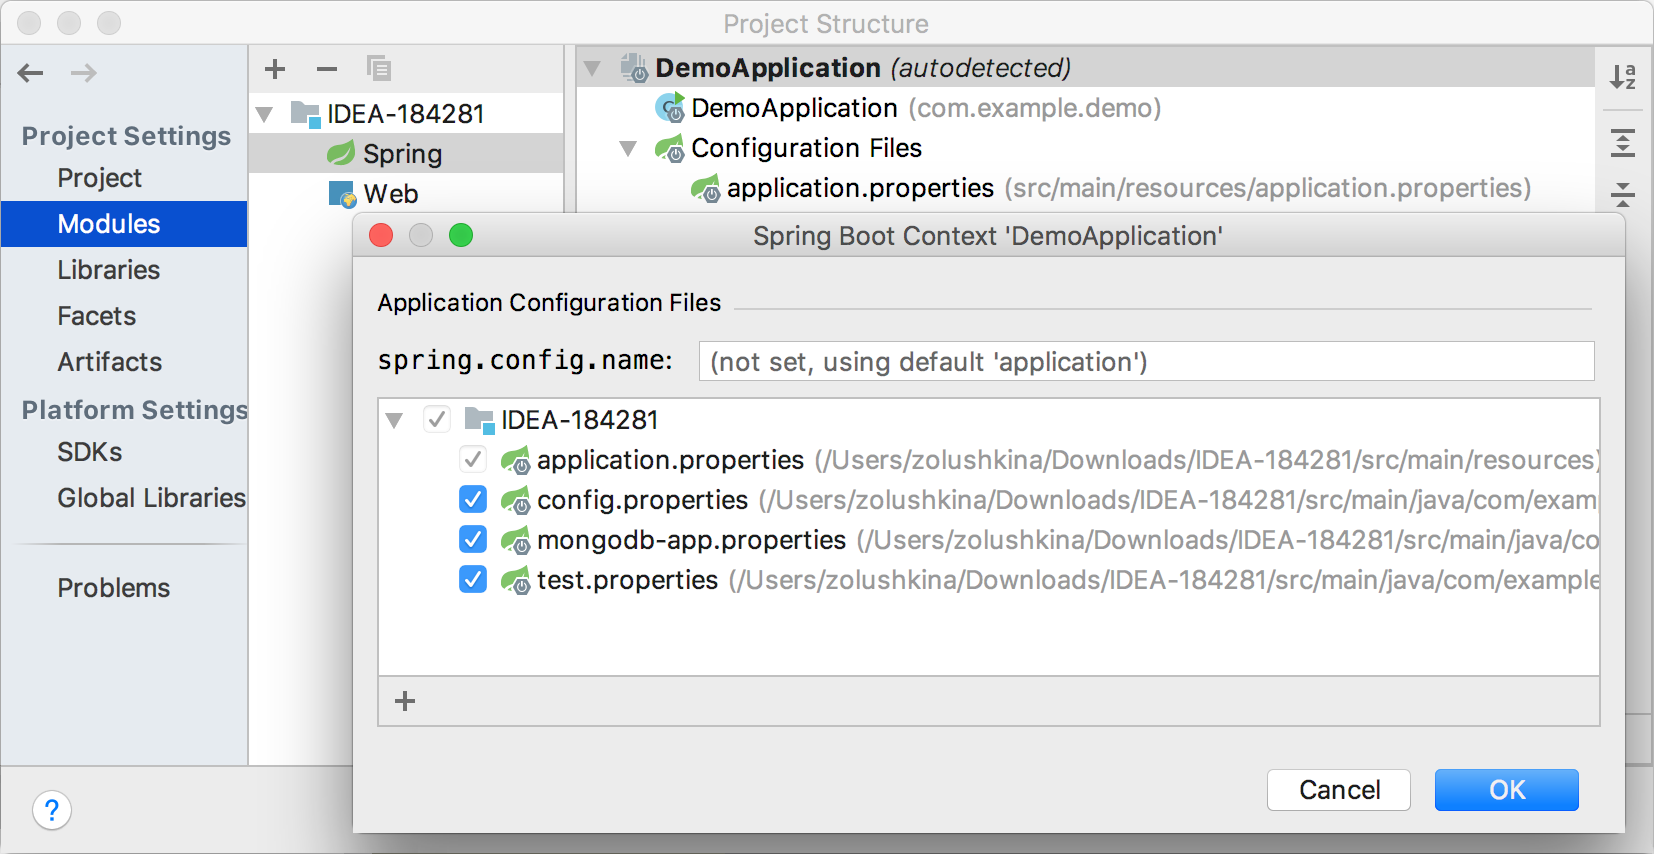
To do so, you have to let IntelliJ IDEA know which files are configuration files in you project. This will enable relevant highlighting and coding assistance.
Go to .
Click
 (Customize Spring Boot) in the toolbar.
 -
If you want to use a custom configuration file instead of the default one, type in the name of a new custom configuration file in the search box.
If you want to use multiple configuration files, click
 and select files from the project tree.
 -
Click OK and apply the changes.
If a custom configuration file is set up correctly, it will be marked with the
 icon.
icon.
Monitor Spring Boot endpoints
Spring Boot has built-in features that allow you to get key metrics and monitor the state of your application in the production environment by invoking different endpoints, such as health or bean details.
In IntelliJ IDEA, you can view endpoints on the Endpoints tab. This tab appears on the Run dashboard, or in the Run tool window after you start your application.
The Endpoints tab enables you to navigate to methods and beans. Double-click the necessary item (or press Enter) on the Mappings or Beans tab to open the selected method or bean in the editor.
Access endpoints in the Run tool window
The Run tool window opens automatically after you start your application.
If you have closed the tool window and want to reopen in, press Alt+4, or go to .
Access endpoints in the Debug tool window
-
The Debug tool window opens once you start debugging your application.
If you have closed the tool window and want to reopen in, press Alt+5, or go to .
Access endpoints on the Run dashboard
From the main menu, select .
Select Templates.
Under the Configurations available in Run dashboard section, click
 , and select Spring Boot.
While in the Run/Debug Configurations dialog, open the necessary Spring Boot configuration, and select the Enable JMX agent checkbox.
Moreover, make sure to add the org.springframework.boot.spring-boot-starter-actuator dependency to your module before running your application.
For the mappings endpoint, add the org.springframework.boot.spring-boot-starter-web starter as well. 
To show or hide the dashboard, go to and click Run dashboard.
When you run an application, the ![]() icon shows up in the gutter on bean declarations indicating that beans are found in the context. You can use this icon to view dependent and injected beans.
icon shows up in the gutter on bean declarations indicating that beans are found in the context. You can use this icon to view dependent and injected beans.
If the icon doesn't appear, make sure the Enable JMX agent checkbox is selected in the Run/Debug Configurations dialog.
While on the Beans tab, you can use icons in the gutter to change the way information on beans is displayed. For example, you can view only your beans and disable showing library beans (![]() ), you can enable and disable showing documentation (
), you can enable and disable showing documentation (![]() ), and so on. Each icon features a tooltip that identifies it.
), and so on. Each icon features a tooltip that identifies it.
View dependencies between runtime beans
The Spring Runtime Beans diagram helps you visualize dependencies between runtime beans of your Spring Boot application.
You can access the diagram on the Endpoints | Beans tab on the Run dashboard, in the Run tool window, or in the Debug tool window. Start your application and click the Diagram Mode icon.

Access HTTP request mappings
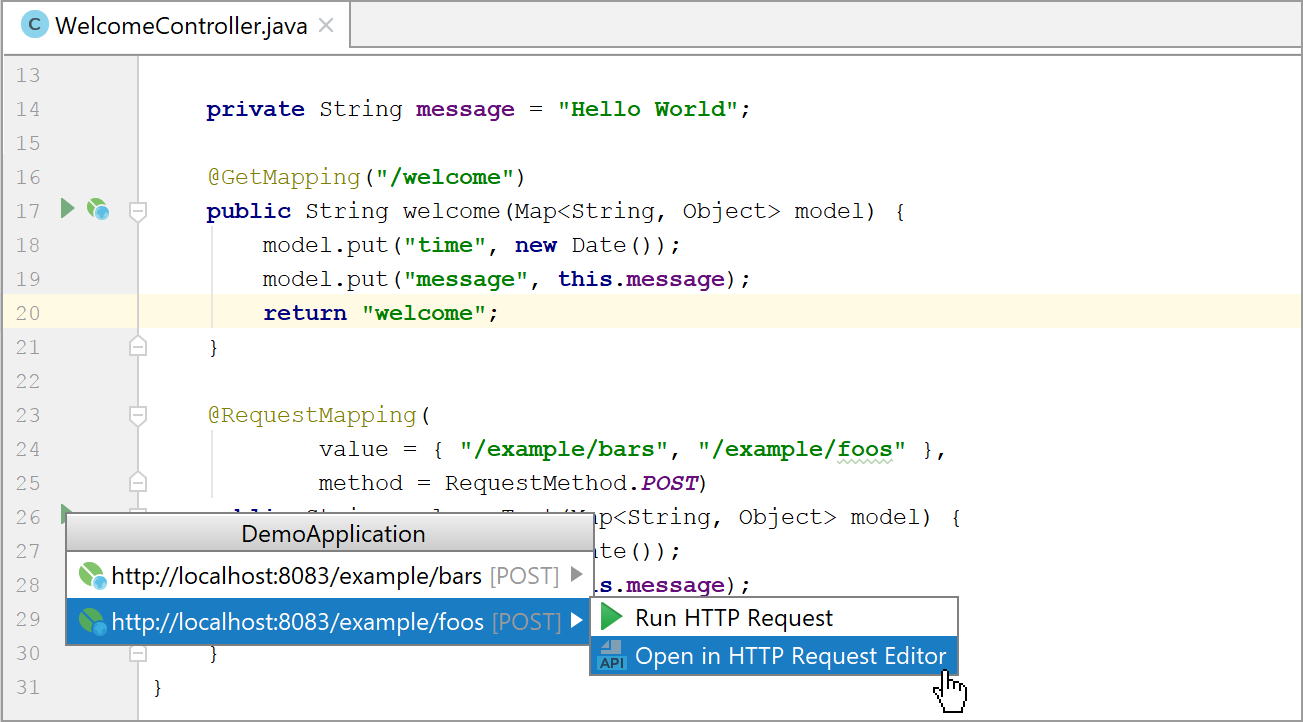
After you run your Spring Boot Web application, the ![]() icon will appear in the gutter for methods with
icon will appear in the gutter for methods with @RequestMapping annotations to indicate that they are registered as handlers by Spring.
Click this icon to select the next action. You can run the request straight away, or you can open it in a scratch file with the HTTP extension in the editor, where you can edit it if necessary, and then run via the REST client. For methods with @GetMapping annotations, you can also open the mapped URLs in a browser.

You can also access request mappings on the Endpoints | Mappings tab on the Run dashboard, in the Run tool window, or in the Debug tool window. Click the necessary request and then select the next action:

Configure application update policies with devtools
With the spring-boot-devtools module, your application will restart every time files on the classpath change. However, if you want your application to restart only at specific moments, you can set a trigger file. In this case your application will restart only after you modify the trigger file.
IntelliJ IDEA provides more options for updating a running application. After you enable the devtools, the Update <application name> Application ![]() option (Ctrl+F10) becomes available on the left frame of the Run dashboard, in the Run/Debug tool window, and from the main menu (). Depending on your needs, you can configure what the IDE will do after you click this option.
option (Ctrl+F10) becomes available on the left frame of the Run dashboard, in the Run/Debug tool window, and from the main menu (). Depending on your needs, you can configure what the IDE will do after you click this option.
From the main menu, select .
Select the necessary Spring Boot configuration, or create a new one (click
 and select
  Spring Boot).
Specify the main class that this configuration must be applied to.
From the On 'Update' action list, select a policy. You can update resources only, update classes and resources (build your application), update the trigger file (restart), or perform a class hot swap, and if it fails, IntelliJ IDEA will update the trigger file (restart).
From the On frame deactivation list, you can also select an action that the IDE will do after you switch to another application. IntelliJ IDEA can update resources, or build your application.