Vue.js
IntelliJ IDEA integrates with the Vue.js framework intended for developing user interfaces and advanced single-page applications.
Before you start
-
Download and install Node.js.
-
Install and enable the Vue.js plugin on the Plugins page as described in Installing plugins from repository.
Creating a new Vue.js application
The recommended way to create a new Vue.js app is Vue CLI, which IntelliJ IDEA downloads and runs for you using npx.E
Of course, you can still download Vue CLI yourself or create an empty IntelliJ IDEA project and install Vue.js in it.
To create an application
-
Select from the main menu or click the New Project button on the Welcome screen.
-
In the New Project dialog, select Static Web in the left-hand pane.
In the right-hand pane, choose Vue.js and click Next.
-
On the second page of the wizard, specify the project name and the folder to create it in. In the Node Interpreter field, specify the Node.js interpreter to use. Select a configured interpreter from the list or choose Add to configure a new one.
From the Vue CLI list, select npx --package @vue/cli vue.
Alternatively, for npm version 5.1 and earlier, install the
@vue/clipackage yourself by runningnpm install --g @vue/cliin the Terminal Alt+F12. When creating an application, select the folder where the@vue/clipackage is stored.To bootstrap your application with babel and ESLint, select the Use the default project setup checkbox.
-
When you click Finish, IntelliJ IDEA generates a Vue.js-specific project with all the required configuration files and downloads the necessary dependencies. You can view the progress in the Run tool window.
To create an empty IntelliJ IDEA project
-
Select from the main menu or click the New Project button on the Welcome screen.
-
In the New Project dialog, select Static Web in the left-hand pane.
In the right-hand pane, choose Static Web and click Next.
On the second page of the wizard, specify the project name and the folder to create it in.
When you click Finish, IntelliJ IDEA creates and opens an empty project.
To install Vue.js in an empty project
Starting with an existing Vue.js application
To continue developing an existing Vue.js application, open it in IntelliJ IDEA and download the required dependencies.
To open the application sources that are already on your machine
To check out the application sources from your version control
-
Click Get from Version Control on the Welcome screen or select from the main menu.
-
In the invoked dialog, select your version control system from the list and specify the repository to check out the application sources from.
To download the dependencies
Click Run 'npm install' in the popup:

Creating Vue.js components
IntelliJ IDEA recognizes the .vue file type and provides a dedicated .vue file template for Vue.js components.
To create a Vue.js component
In the Project tool window, select the parent folder for the new component and choose Vue Component from the list.

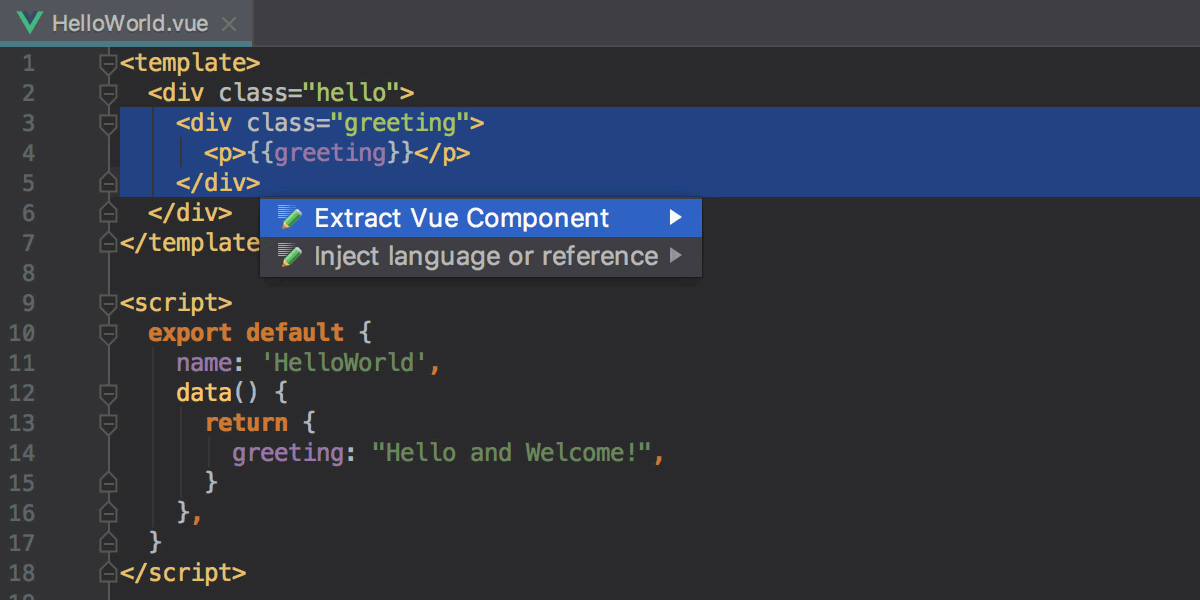
You can also extract a new Vue.js component from an existing one without any copying and pasting but using a dedicated intention action or refactoring. All the data and methods used in the newly extracted template stay in the parent component. IntelliJ IDEA passes them to the new component with properties and copies the related styles.
To extract a component
-
Select the template fragment to extract and invoke component extraction:
To use the intention action, press Alt+Enter, and then choose Extract Vue Component from the list.
To use the refactoring, choose from the main menu or from the context menu of the selection.
Type the name of the new component. If this name is already used or invalid, IntelliJ IDEA shows a warning. Otherwise a new single-file component is created and imported into the parent component.
Coding assistance
In .vue files, IntelliJ IDEA recognizes script, style, and template blocks. You can use JavaScript and TypeScript inside script tags, Style Sheet languages inside style tags, and HTML and Pug inside template tags.
When you use TypeScript inside a script tag, IntelliJ IDEA invokes the TypeScript Language Service for type checking and shows detected errors in the Errors and Compile errors tabs of the TypeScript tool window.
Code completion
By default, IntelliJ IDEA provides code completion for ECMAScript 6 inside script blocks and for CSS inside style blocks.

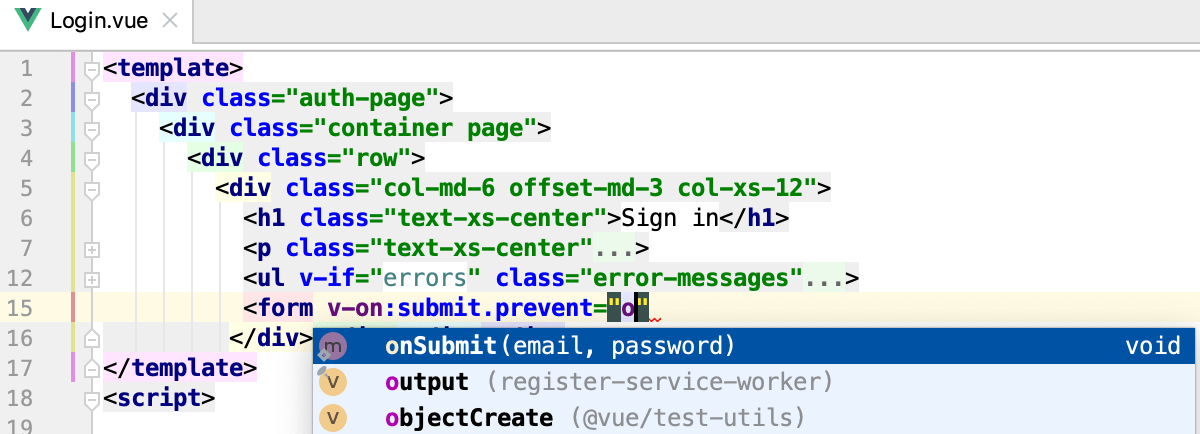
Inside the template tag, code completion Ctrl+Space and navigation to the definition Ctrl+B for Vue.js components and attributes is available.
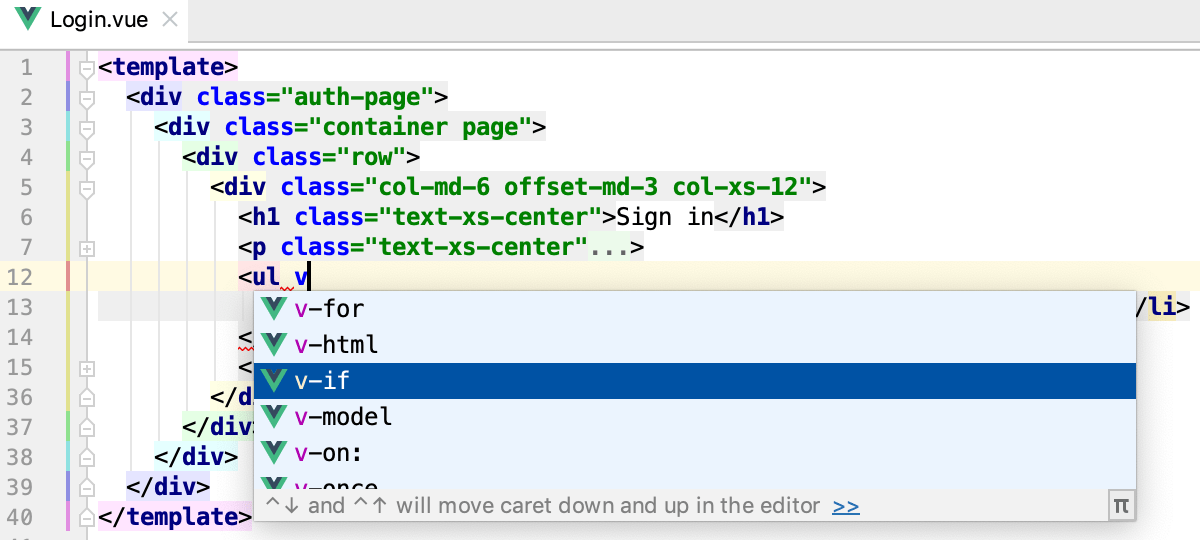
IntelliJ IDEA also suggests completion for Vue.js properties, properties in the data object, computed properties, and methods.
IntelliJ IDEA provides completion for the names of slots from library components and from components defined in your project.
If your project contains a component with named slots, IntelliJ IDEA shows suggestions for these names in the v-slot directive of a template tag.
If you’re using Vuetify, Quasar, or BootstrapVue, code completion for slot names is also available.
If a component is defined in several files, IntelliJ IDEA recognizes the links between the parts of the component and provides proper code completion for properties, data, and methods.
For example, if the parts of your component are defined in separate JavaScript and stylsheet files that are linked in the vue file through the src attribute, properties defined in JavaScript are properly completed in the template as methods do.
Templates inside template literals in the template property of component get completion just as if this code were inside a template tag.
Completion is also available if a template is defined in a separate HTML file and then linked to the template property.
Parameter hints
Parameter hints show the names of parameters in methods and functions to make your code easier to read. By default, parameter hints are shown only for values that are literals or function expressions but not for named objects.Configure parameter hints
-
Select Parameter hints from the list, make sure the Show parameter hints checkbox is selected, and then specify the context where you want parameter hints shown.
-
For some methods and functions, IntelliJ IDEA does not show parameter hints in any context. Click Black list... to view these methods and functions, possibly enable parameter hints for them, or add new items to the list.
Linting TypeScript in Vue.js components using TSLint
You can lint TypeScript code in your Vue.js single file components using typescript-tslint-plugin.
Because typescript-tslint-plugin works only with TypeScript that is installed in the current project, make sure the typescript package from your project node_modules folder is selected in the TypeScript field on the TypeScript page of the Settings/Preferences dialog Ctrl+Alt+S.
Install and configure typescript-tslint-plugin
-
In the embedded Terminal (Alt+F12), type:
npm install --save-dev typescript-tslint-plugin -
In the
pluginsproperty of your tsconfig.json file, type:{ "compilerOptions": { "plugins": [{"name": "typescript-tslint-plugin"}] } } -
When you are using
typescript-tslint-plugin, TSLint is running via the TypeScript Language Service so you can disable the TSLint integration with IntelliJ IDEA to avoid duplicate error reporting.To do that, open the Settings/Preferences dialog Ctrl+Alt+S, go to , and select Disable TSLint.
Generating code with Vue.js Live templates
With IntelliJ IDEA, you can use a collection of Live templates for Vue.js adapted from the collection created by Sarah Drasner.
To use a Vue.js Live template
Type the template's abbreviation or press Ctrl+J and select it from the list of available templates.
To expand the template, press Tab.
To move from one variable to another inside the template, press Tab again.

Reformatting Vue.js code with Prettier
Prettier is a tool to format .js, .ts, .css, .less, .scss, .vue, and .json code. With IntelliJ IDEA, you can format selected code fragments as well as entire files or directories using the Reformat with Prettier action. IntelliJ IDEA adds this action as soon as you install Prettier as a dependency in your project or globally on your computer. Learn more from Prettier.
To reformat code with Prettier

IntelliJ IDEA can apply the key code style rules from the Prettier's configuration to the IntelliJ IDEA Code Style settings so that generated code (for example, after refactoring or quick-fix) and the code that is already processed with Prettier are formatted consistently.
To apply Prettier code style rules
In the project where Prettier is enabled, open package.json and click Yes in the pane at the top of the tab.

To re-apply the Prettier code style (after you've clicked No in the pane or modified the code style), press Ctrl+Shift+A and select Apply Prettier Code Style Rules from the Find Action list.