Getting started with ActionScript, Flex or AIR application development
To prepare for ActionScript or Flex application development:
Make sure that the Flash/Flex Support plugin is enabled. The plugin is activated by default. If the plugin is disabled, enable it on the Plugins page as described in Manage plugins.
Download and install a Flex or AIR SDK on your computer. IntelliJ IDEA provides integration with Apache Flex, Adobe Flex, Adobe AIR and Adobe Gaming SDKs.
Register the Flex or AIR SDK in IntelliJ IDEA. (You can postpone this step until a later time. You will be able to specify the SDK when creating a Flash module.)
Check general Flex compiler settings and, if necessary, adjust them to your needs.
-
Create a new project with a Flash module, or add a Flash module to an existing project. See Creating a Flash module.
Note that you can create a project or a module by importing Adobe Flash Builder projects.
-
Check the initial module configuration and make the necessary adjustments. These may include configuring the module contents, adding libraries, modifying the existing build configuration and creating additional ones, and so on.
All these tasks, however, may be performed at a later time, when needed, in parallel with developing your source code.
Register a Flex or AIR SDK in IntelliJ IDEA
From the main menu, select (Ctrl+Shift+Alt+S).
Under Platform Settings, click SDKs.
Click
 (Add New SDK) on the toolbar and select Add Flex/AIR SDK.
 -
In the dialog that opens select the directory in which the Flex or AIR SDK is installed and click OK.
As a result, the SDK configuration is shown on the SDK page in the right-hand part of the Project Structure dialog.
-
Generally, you don't need to make any changes on the Classpath and Sourcepath tabs because all the necessary libraries and sources are already there. However, you may want to add external online documentation to be able to access additional reference information when writing your code. To do that:
On the Documentation Paths tab, click
 . In the dialog that opens, just click OK. (The URL suggested by IntelliJ IDEA is the one you want.)
 Click OK in the Project Structure dialog.
Configure general Flex compiler settings
Open the Settings/Preferences dialog (for example, Ctrl+Alt+S, or
 on the toolbar).
In the left-hand part of the dialog, under Build, Execution, Deployment node, open the Compiler node and click ActionScript and Flex Compiler.
On the Compiler > ActionScript and Flex Compiler page, configure the settings as required.
Creating a Flash module
-
Click Create New Project on the Welcome screen or select .
If you are going to add a module to an existing project, open the project to which you want to add a module, and select .
On the first page of the wizard, in the left-hand pane, select Flash.
-
In the right-hand part of the page, select the necessary options and click Next.
On the next step, specify the name and location settings and click Finish.
New Flash project: options
| Target platform | Select the target environment for the content that you are going to develop:
|
| Pure ActionScript | Select this checkbox if you are not going to use .mxml (that is, all your source code will be written in ActionScript). |
| Output type | Select the intended output type, that is, what your resulting content is going to be:
|
| Target devices | For a Mobile Application: use the Android and iOS checkboxes to specify the intended target devices for your application. As a result, IntelliJ IDEA enables or disables creating an application descriptor and packaging your application for the corresponding devices. |
| Flex/AIR SDK | Select the Flex or AIR SDK to be used. If the list is empty or does not contain the required SDK, click |
| Target player | For the Web target platform: the target Flash Player version (readonly). This setting is defined by the selected Flex SDK version. |
| Create sample app | For the Application output type: select this checkbox if you want a sample application to be created. You can use this sample application for learning and also as a basis for your own application development. If necessary, change the source filename suggested by IntelliJ IDEA. |
| Create HTML wrapper template | For a Web Application: select this checkbox if you want an HTML wrapper template for your application to be created. Select or deselect the associated options as needed:
|
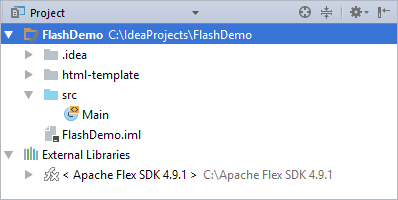
As a result, the module structure looking similar to this is generated (the contents may be different depending on the module options that you have selected):

In this structure:
html-template is a folder with files that constitute an HTML wrapper template.
src is a folder for your application source files .as and, possibly, .mxml.
In addition to the module itself, IntelliJ IDEA creates the following:
One build configuration.
One run/debug configuration. If when creating the module you have selected to create a sample application, you can use this configuration to run the application straight away. To do that, click
 on the toolbar Shift+F10.
Configuring module contents
The module contents are configured by adding and removing the module content roots as well as by assigning individual folders (within the content roots) to source folders, test source folders and also by excluding the folders.
For a Flash module, generally, these task are performed on the Module page of the Project Structure dialog.
From the main menu, select (Ctrl+Shift+Alt+S).
Under Project Settings, select Modules.
Select the necessary Flash module.