# Commit and push changes to Git repository
> **TL;DR**
> Configure commit options: Settings | Version Control | Commit
>
>
>
> Commit tool window `Alt+0` (Windows), `⌘ 0` (macOS), `⌘ 0` (IntelliJ IDEA Classic (macOS)), `⌘ 0` (macOS System Shortcuts), `Alt+0` (XWin), `Alt+0` (GNOME), `Alt+0` (KDE), `Alt+0` (Emacs), `Alt+0` (Sublime Text), `⌘ 0` (Sublime Text (macOS)), `Alt+0` (NetBeans), `Alt+0` (Visual Studio), `Alt+0` (Visual Studio (macOS)), `Alt+0` (Eclipse), `⌘ 0` (Eclipse (macOS))
>
>
>
> Commit `Ctrl+K` (Windows), `⌘ K` (macOS), `⌘ K` (IntelliJ IDEA Classic (macOS)), `⌘ K` (macOS System Shortcuts), `Ctrl+K` (XWin), `Ctrl+K` (GNOME), `Ctrl+K` (KDE), `Ctrl+K` (Emacs), `Ctrl+K` (Sublime Text), `Ctrl+K` (Sublime Text (macOS)), `Ctrl+K` (NetBeans), `Ctrl+Alt+K` (Visual Studio), `⌘ ⌥ ⇧ K` (Visual Studio (macOS)), `Ctrl+K` (Eclipse), `Ctrl+K` (Eclipse (macOS))
>
>
>
> Commit and Push `Ctrl+Alt+K` (Windows), `⌘ ⌥ K` (macOS), `⌘ ⌥ K` (IntelliJ IDEA Classic (macOS)), `⌘ ⌥ K` (macOS System Shortcuts), `Ctrl+Alt+K` (XWin), `Ctrl+Alt+K` (GNOME), `Ctrl+Alt+K` (KDE), `Ctrl+Alt+K` (Emacs), `Ctrl+Alt+K` (Sublime Text), `⌘ ⌥ K` (Sublime Text (macOS)), `Ctrl+Alt+K` (NetBeans), `Ctrl+Alt+Shift+K` (Visual Studio), `⌘ ⌥ K` (Visual Studio (macOS)), `Ctrl+Alt+K` (Eclipse), `⌘ ⌥ K` (Eclipse (macOS))
>
>
>
> Push `Ctrl+Shift+K` (Windows), `⌘ ⇧ K` (macOS), `⌘ ⇧ K` (IntelliJ IDEA Classic (macOS)), `⌘ ⇧ K` (macOS System Shortcuts), `Ctrl+Shift+K` (XWin), `Ctrl+Shift+K` (GNOME), `Ctrl+Shift+K` (KDE), `Ctrl+Shift+K` (Emacs), `Ctrl+Shift+K` (Sublime Text), `⌘ ⇧ K` (Sublime Text (macOS)), `Ctrl+Shift+K` (NetBeans), `Ctrl+Shift+K` (Visual Studio), `⌘ ⇧ K` (Visual Studio (macOS)), `Ctrl+Shift+K` (Eclipse), `⌘ ⇧ K` (Eclipse (macOS))
After you've [added new files to the Git
repository](set-up-a-git-repository.html#add-new-files), or modified files that are already under Git version control, and you are happy with their current state, you can share the results of your work. This involves [committing](#commit) them locally to record the snapshot of your repository to the project history, and then [pushing](#push) them to the remote repository so that they become available to others.
Procedure: Set your Git username
Git needs to know your username to associate commits with an identity. If you have not set your username, IntelliJ IDEA will prompt you to specify it when you first attempt to commit changes.
* Open the [Terminal](terminal-emulator.html) and execute one of the following commands:
* To set a name for every Git repository on your machine, use `$ git config --global user.name "John Smith"`
* To set a name for a single repository, use `$ git config user.name "John Smith"`
## Commit changes locally
Procedure:
1. Open the vertical Commit tool window (`Alt+0` (Windows), `⌘ 0` (macOS), `⌘ 0` (IntelliJ IDEA Classic (macOS)), `⌘ 0` (macOS System Shortcuts), `Alt+0` (XWin), `Alt+0` (GNOME), `Alt+0` (KDE), `Alt+0` (Emacs), `Alt+0` (Sublime Text), `⌘ 0` (Sublime Text (macOS)), `Alt+0` (NetBeans), `Alt+0` (Visual Studio), `Alt+0` (Visual Studio (macOS)), `Alt+0` (Eclipse), `⌘ 0` (Eclipse (macOS)) ) located on the left:
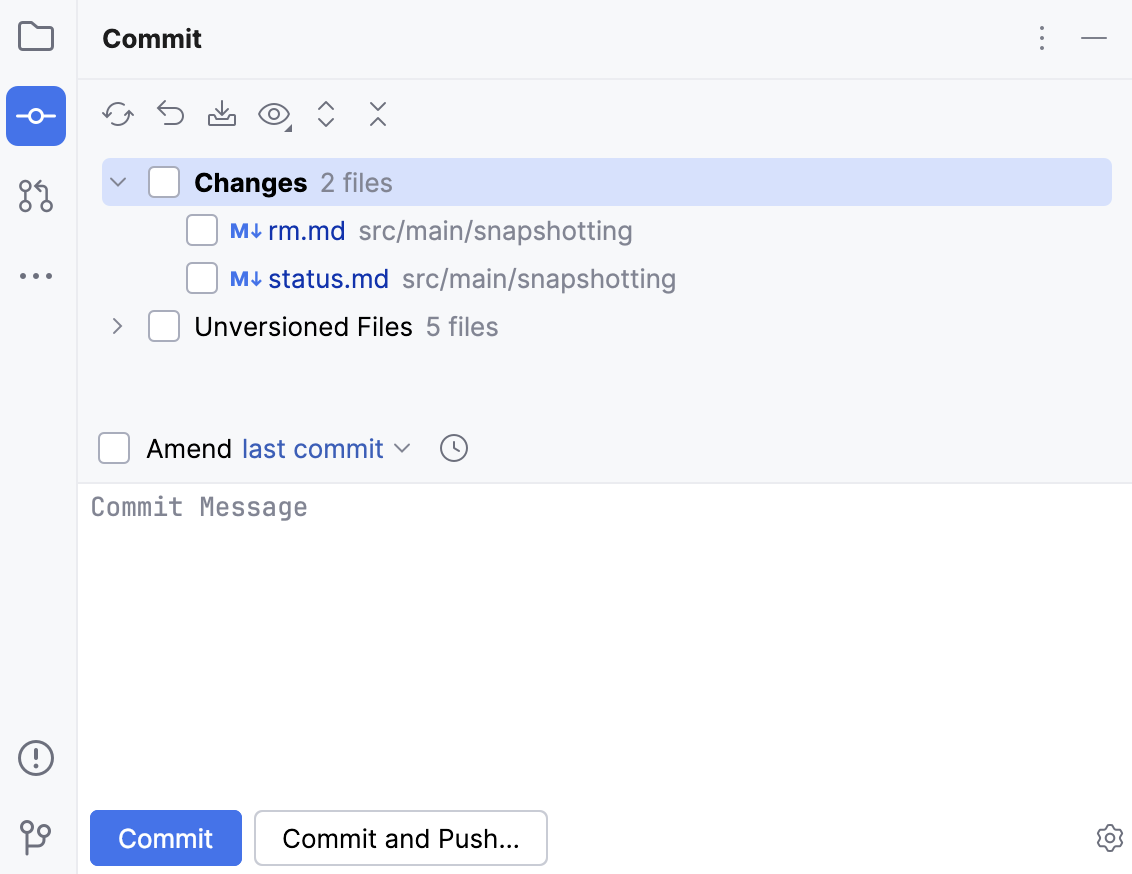
2. As your changes are ready to be committed, select the corresponding files or an entire changelist.
If you press `Ctrl+K` (Windows), `⌘ K` (macOS), `⌘ K` (IntelliJ IDEA Classic (macOS)), `⌘ K` (macOS System Shortcuts), `Ctrl+K` (XWin), `Ctrl+K` (GNOME), `Ctrl+K` (KDE), `Ctrl+K` (Emacs), `Ctrl+K` (Sublime Text), `Ctrl+K` (Sublime Text (macOS)), `Ctrl+K` (NetBeans), `Ctrl+Alt+K` (Visual Studio), `⌘ ⌥ ⇧ K` (Visual Studio (macOS)), `Ctrl+K` (Eclipse), `Ctrl+K` (Eclipse (macOS)), the entire active changelist will be selected.
You can also select files under the Unversioned Files node — IntelliJ IDEA will stage and commit these files in one step.
3. If you want to [append your local changes to an existing local commit](edit-project-history.html#amend-commit) rather than create a new one, select Amend and click  to choose the commit you want to modify.
4. Enter the commit message. You can click  to choose from the list of recent commit messages.
You can also [edit the commit message](edit-project-history.html#reword-commit) later before you've pushed the commit.
> **Tip:**
> You can customize commit message rules on the Version Control | Commit settings page `Ctrl+Alt+S` (Windows), `⌘ Comma` (macOS), `⌘ Comma` (IntelliJ IDEA Classic (macOS)), `⌘ Comma` (macOS System Shortcuts), `Ctrl+Alt+S` (XWin), `Ctrl+Alt+S` (GNOME), `Ctrl+Alt+S` (KDE), `Ctrl+Alt+S` (Emacs), `Ctrl+Alt+S` (Sublime Text), `⌘ Comma` (Sublime Text (macOS)), `Ctrl+Alt+S` (NetBeans), `Ctrl+Alt+S` (Visual Studio), `⌘ Comma` (Visual Studio (macOS)), `Ctrl+Alt+S` (Eclipse), `⌘ Comma` (Eclipse (macOS)) . There is also a quick-fix and the Reformat action that wrap a long line or reformat the message.
>
>
>
> You can also define a commit template that will be used as the default commit message. Specify the boilerplate text you want to use in a `.txt` file and execute the following command in the terminal to add it to your Git config: `git config --local commit.template `
5. If you need to perform commit checks, upload files to a server after the commit, or commit with advanced options, click  in the bottom-right corner or press `Ctrl+O` (Windows), `⌃ O` (macOS), `⌃ O` (IntelliJ IDEA Classic (macOS)), `⌃ O` (macOS System Shortcuts), `Ctrl+O` (XWin), `Ctrl+O` (GNOME), `Ctrl+O` (KDE), `Ctrl+O` (Emacs), `Ctrl+O` (Sublime Text), `Ctrl+O` (Sublime Text (macOS)), `Ctrl+O` (NetBeans), `Ctrl+O` (Visual Studio), `Ctrl+O` (Visual Studio (macOS)), `Ctrl+O` (Eclipse), `Ctrl+O` (Eclipse (macOS)):
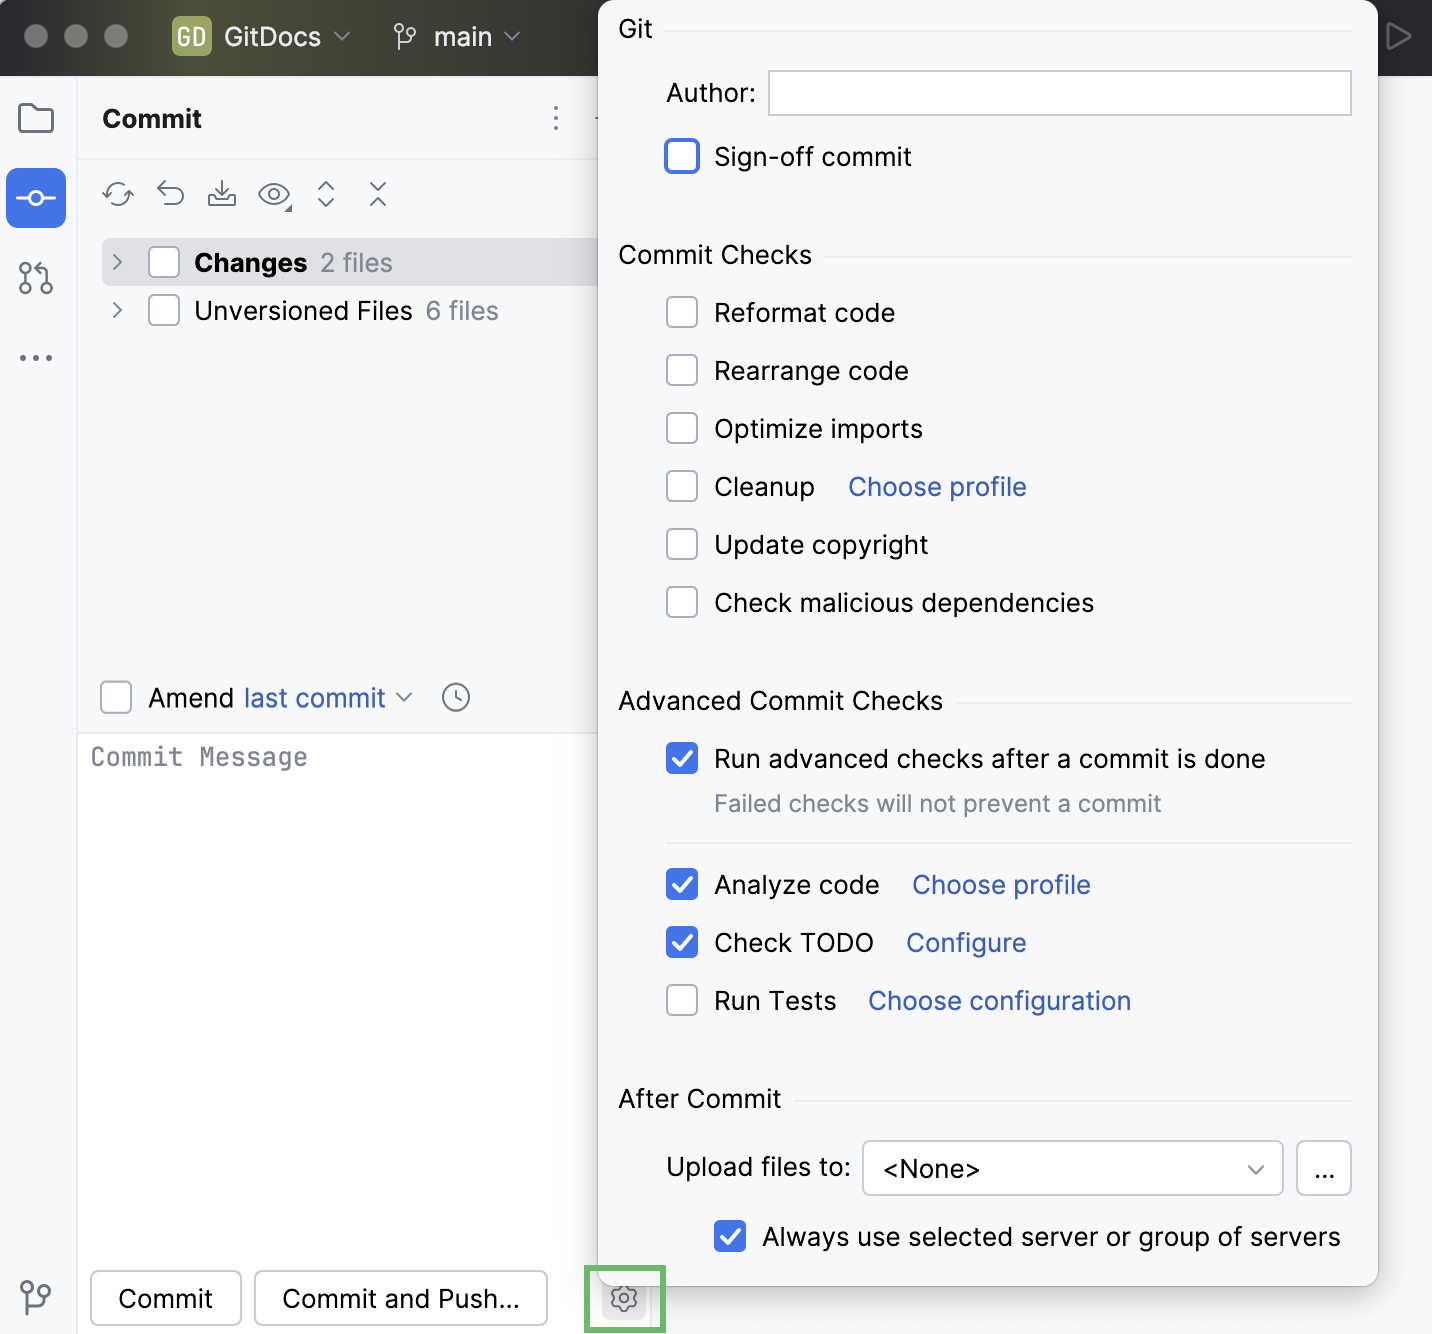
The following options are available:
* Author: if you are committing changes made by another person, you can specify the author of these changes.
* Sign-off commit: select if you want to sign off your commit to certify that the changes you are about to check in have been made by you, or that you take the responsibility for the code you are committing. When this option is enabled, the following line is automatically added at the end of the commit message: Signed off by:
* In the Commit Checks area, select the actions you want IntelliJ IDEA to perform before committing the selected files to the local repository. The following options are available: * Reformat code: perform code formatting according to the [Project Code Style settings](settings-code-style.html) . * Rearrange code: rearrange your code according to the [arrangement rules preferences](reformat-and-rearrange-code.html) . * Optimize imports: remove redundant import statements. * Cleanup: batch-apply quick-fixes from code cleanup inspections. Click Choose profile to select a [profile](customizing-profiles.html) from which the IDE will run inspections. * Update copyright: [add or update a copyright notice](null) according to the selected copyright profile - scope combination. * Check malicious dependencies: search for [malicious NPM and PyPI dependencies](package-analysis.html#malicious-dependencies) that might be declared in your project.
* In the Advanced Commit Checks area, the following options are available: * Run advanced checks after a commit is done: enable this option to run the selected advanced commit checks after a commit is done. With this option enabled, if some of the advanced commit checks fail, the changes will be committed anyway. > **Note:** > Note that if you want to Commit and Push (`Ctrl+Alt+K` (Windows), `⌘ ⌥ K` (macOS), `⌘ ⌥ K` (IntelliJ IDEA Classic (macOS)), `⌘ ⌥ K` (macOS System Shortcuts), `Ctrl+Alt+K` (XWin), `Ctrl+Alt+K` (GNOME), `Ctrl+Alt+K` (KDE), `Ctrl+Alt+K` (Emacs), `Ctrl+Alt+K` (Sublime Text), `⌘ ⌥ K` (Sublime Text (macOS)), `Ctrl+Alt+K` (NetBeans), `Ctrl+Alt+Shift+K` (Visual Studio), `⌘ ⌥ K` (Visual Studio (macOS)), `Ctrl+Alt+K` (Eclipse), `⌘ ⌥ K` (Eclipse (macOS))) your changes right away, the checks will be done before the commit. > > > > Also, this option is not available for the modal commit interface. * Analyze code: analyze modified files while committing them. Click Choose profile to select an [inspection profile](customizing-profiles.html) from which the IDE will run inspections. * Check TODO: Review the [TODO items](using-todo.html) matching the specified filter. Click Configure to choose an [existing TODO filter](using-todo.html), or open the [TODO settings page](settings-todo.html) and define a new filter to be applied. * Run Configuration: [run tests as commit checks](performing-tests.html#run-tests-after-commit). Click Choose configuration near Run Configuration and select which configuration you want to run.
* In the After Commit area, you can select the [server access configuration](configuring-synchronization-with-a-remote-host.html) or a [server group](server-groups.html) to use for uploading the committed files to a local or remote host, a mounted disk, or a directory. For more information, refer to [Deployment](deploying-applications.html). The following options are available: * Upload files to: select the [server access configuration](configuring-synchronization-with-a-remote-host.html) or a [server group](server-groups.html) to use for uploading the committed files to a local or remote host, a mounted disk, or a directory. * To suppress uploading, choose None. * To add a server configuration to the list, click  and fill in the required fields in the Deployment dialog that opens. The list is only available if the FTP/SFTP/WebDAV Connectivity plugin is enabled. * Always use selected server or group of servers: always upload files to the selected [server](configuring-synchronization-with-a-remote-host.html) or a [server group](server-groups.html). The checkbox is only available if the FTP/SFTP/WebDAV Connectivity plugin is enabled.
6. When you're ready, click Commit or Commit and Push (`Ctrl+Alt+K` (Windows), `⌘ ⌥ K` (macOS), `⌘ ⌥ K` (IntelliJ IDEA Classic (macOS)), `⌘ ⌥ K` (macOS System Shortcuts), `Ctrl+Alt+K` (XWin), `Ctrl+Alt+K` (GNOME), `Ctrl+Alt+K` (KDE), `Ctrl+Alt+K` (Emacs), `Ctrl+Alt+K` (Sublime Text), `⌘ ⌥ K` (Sublime Text (macOS)), `Ctrl+Alt+K` (NetBeans), `Ctrl+Alt+Shift+K` (Visual Studio), `⌘ ⌥ K` (Visual Studio (macOS)), `Ctrl+Alt+K` (Eclipse), `⌘ ⌥ K` (Eclipse (macOS))) to push the changes to the remote repository immediately after the commit. You will be able to review the current commit as well as all other commits before they are pushed to the remote.
> **Note:**
> If there are [Git hooks](https://git-scm.com/book/en/v2/Customizing-Git-Git-Hooks) stored in `.git/hooks`, they are executed automatically during commit operations.
>
>
>
> You can disable running Git hooks for a particular commit in the [commit settings](#commit_settings) by clearing the Run Git hooks checkbox.
>
>
>
> To disable this option on the IDE level, go to `Settings | Advanced settings | Version Control. Git` and select the Do not run Git commit hooks checkbox.
> **Tip:**
> If you want to commit local changes in a separate modal commit dialog, go to `Settings | Advanced Settings | Version Control` to enable the [Modal Commit Interface plugin](https://plugins.jetbrains.com/plugin/26647-modal-commit-interface).
>
>
>
> Also, check the options to [customize the commit tool window
> behavior](#customize-changes-review).
### Commit part of a file
Sometimes when you make changes that are related to a specific task, you also apply other unrelated code modifications that affect the same file. Including all such changes into one commit may not be a good option, since it would be more difficult to review, [revert](undo-changes.html#revert-commit), [cherry-pick](apply-changes-from-one-branch-to-another.html#cherry-pick) them, and so on.
IntelliJ IDEA lets you commit such changes separately in one of the following ways:
* [select modified code chunks and lines](#select_chunks_in_commit_changes_dialog) that you want to include in a commit right in the Commit Changes dialog and leave other changes pending so that you can commit them later.
* [put different code chunks into different changelists](#put_changes_into_different_changelists) on the fly, when you edit code, and then commit these changelists separately. > **Tip:** > You can also create a new changelist and [make it active](managing-changelists.html), then all changes that you make after that will fall into that changelist, while any modifications you made before that will stay where they are.
Procedure: Select chunks and specific lines you want to commit
1. Open the Commit tool window (`Alt+0` (Windows), `⌘ 0` (macOS), `⌘ 0` (IntelliJ IDEA Classic (macOS)), `⌘ 0` (macOS System Shortcuts), `Alt+0` (XWin), `Alt+0` (GNOME), `Alt+0` (KDE), `Alt+0` (Emacs), `Alt+0` (Sublime Text), `⌘ 0` (Sublime Text (macOS)), `Alt+0` (NetBeans), `Alt+0` (Visual Studio), `Alt+0` (Visual Studio (macOS)), `Alt+0` (Eclipse), `⌘ 0` (Eclipse (macOS)) ) .
2. To display the differences between the repository version and the local version of the selected file, in the Commit tool window (`Alt+0` (Windows), `⌘ 0` (macOS), `⌘ 0` (IntelliJ IDEA Classic (macOS)), `⌘ 0` (macOS System Shortcuts), `Alt+0` (XWin), `Alt+0` (GNOME), `Alt+0` (KDE), `Alt+0` (Emacs), `Alt+0` (Sublime Text), `⌘ 0` (Sublime Text (macOS)), `Alt+0` (NetBeans), `Alt+0` (Visual Studio), `Alt+0` (Visual Studio (macOS)), `Alt+0` (Eclipse), `⌘ 0` (Eclipse (macOS)) ) , click  on the toolbar or press `Ctrl+D` (Windows), `⌘ D` (macOS), `⌘ D` (IntelliJ IDEA Classic (macOS)), `⌘ D` (macOS System Shortcuts), `Ctrl+D` (XWin), `Ctrl+D` (GNOME), `Ctrl+D` (KDE), `Ctrl+D` (Emacs), `Ctrl+D` (Sublime Text), `⌘ D` (Sublime Text (macOS)), `Ctrl+D` (NetBeans), `Ctrl+D` (Visual Studio), `⌘ D` (Visual Studio (macOS)), `Ctrl+D` (Eclipse), `⌘ D` (Eclipse (macOS)).
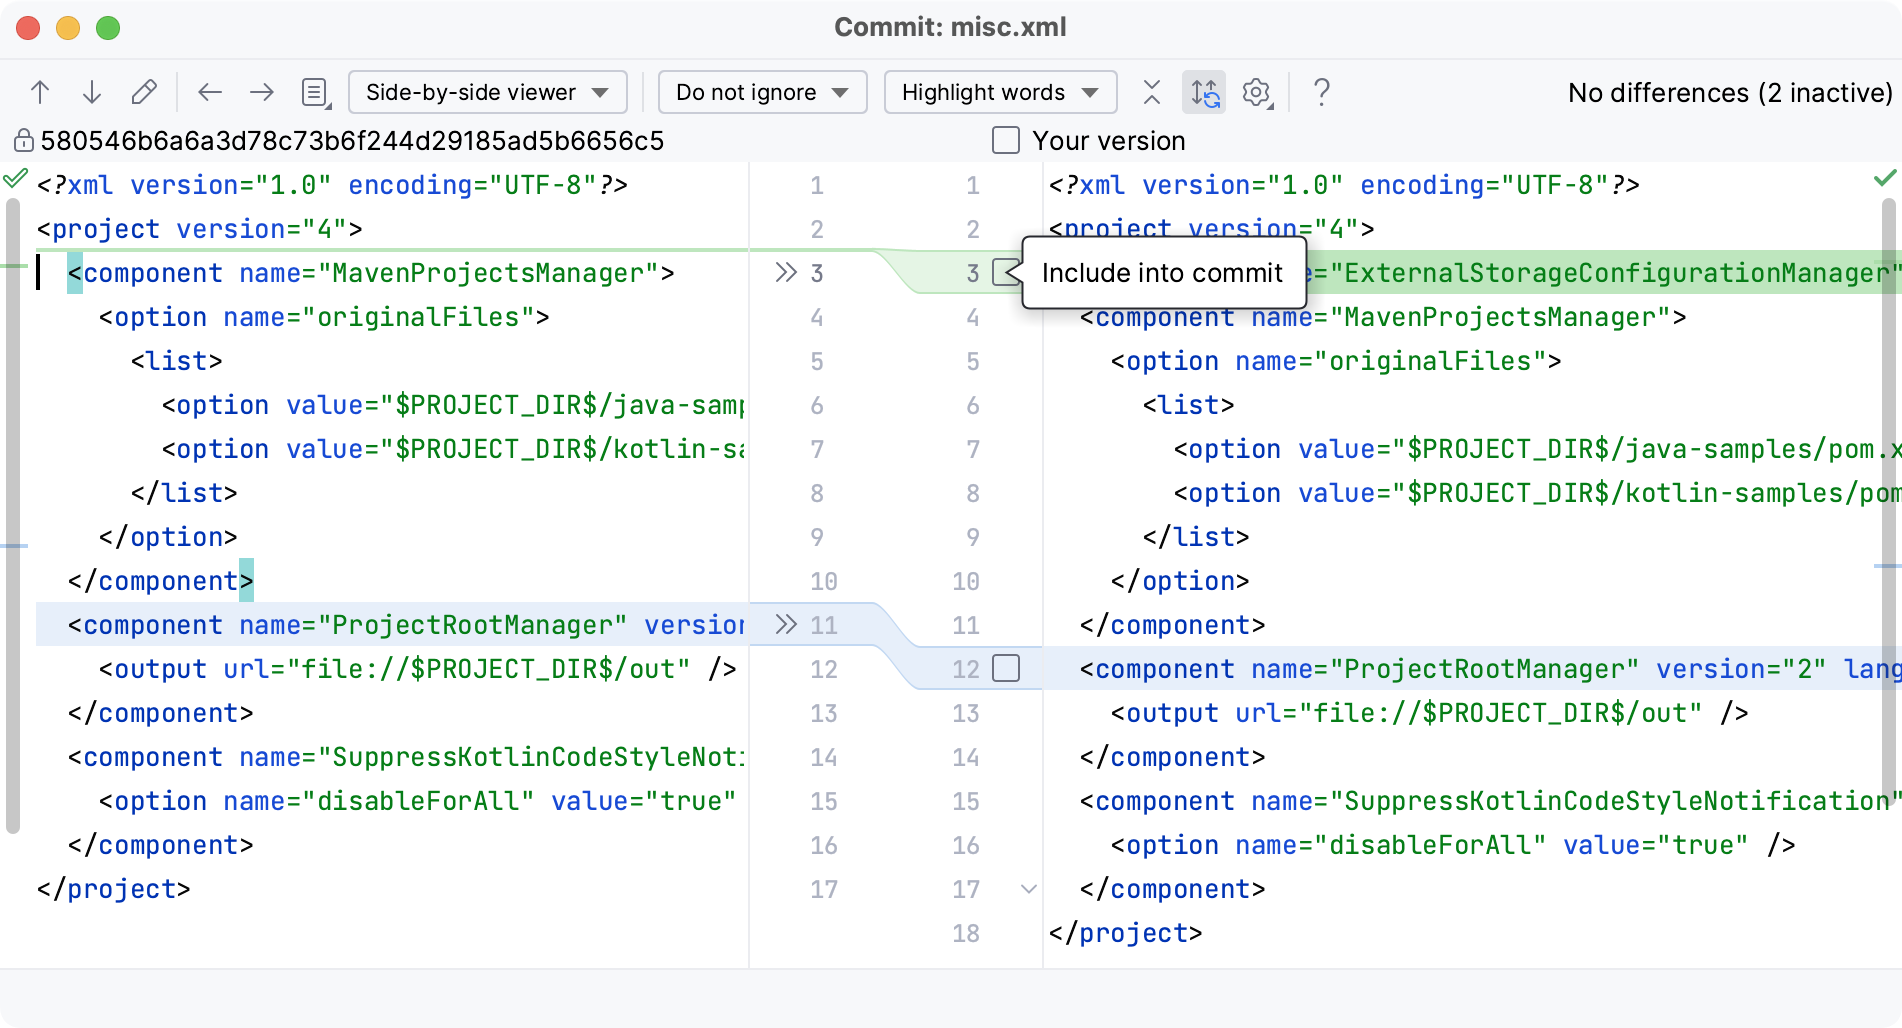
3. Select the checkbox next to each chunk of modified or newly added code that you want to commit, and leave other changes unselected:
> **Tip:**
> You can also select Move to Another Changelist… from the context menu of a modified chunk to split changes between different changelists that you can commit separately.
>
>
>
> To assign a custom shortcut for this action, look for the Move Lines to Another Changelist… action under Version Control Systems on the Keymap settings page `Ctrl+Alt+S` (Windows), `⌘ Comma` (macOS), `⌘ Comma` (IntelliJ IDEA Classic (macOS)), `⌘ Comma` (macOS System Shortcuts), `Ctrl+Alt+S` (XWin), `Ctrl+Alt+S` (GNOME), `Ctrl+Alt+S` (KDE), `Ctrl+Alt+S` (Emacs), `Ctrl+Alt+S` (Sublime Text), `⌘ Comma` (Sublime Text (macOS)), `Ctrl+Alt+S` (NetBeans), `Ctrl+Alt+S` (Visual Studio), `⌘ Comma` (Visual Studio (macOS)), `Ctrl+Alt+S` (Eclipse), `⌘ Comma` (Eclipse (macOS)) .
4. If you want to commit only a specific line from a chunk, right-click the line you want to include and select Split Chunks and Include Selected Lines into Commit.
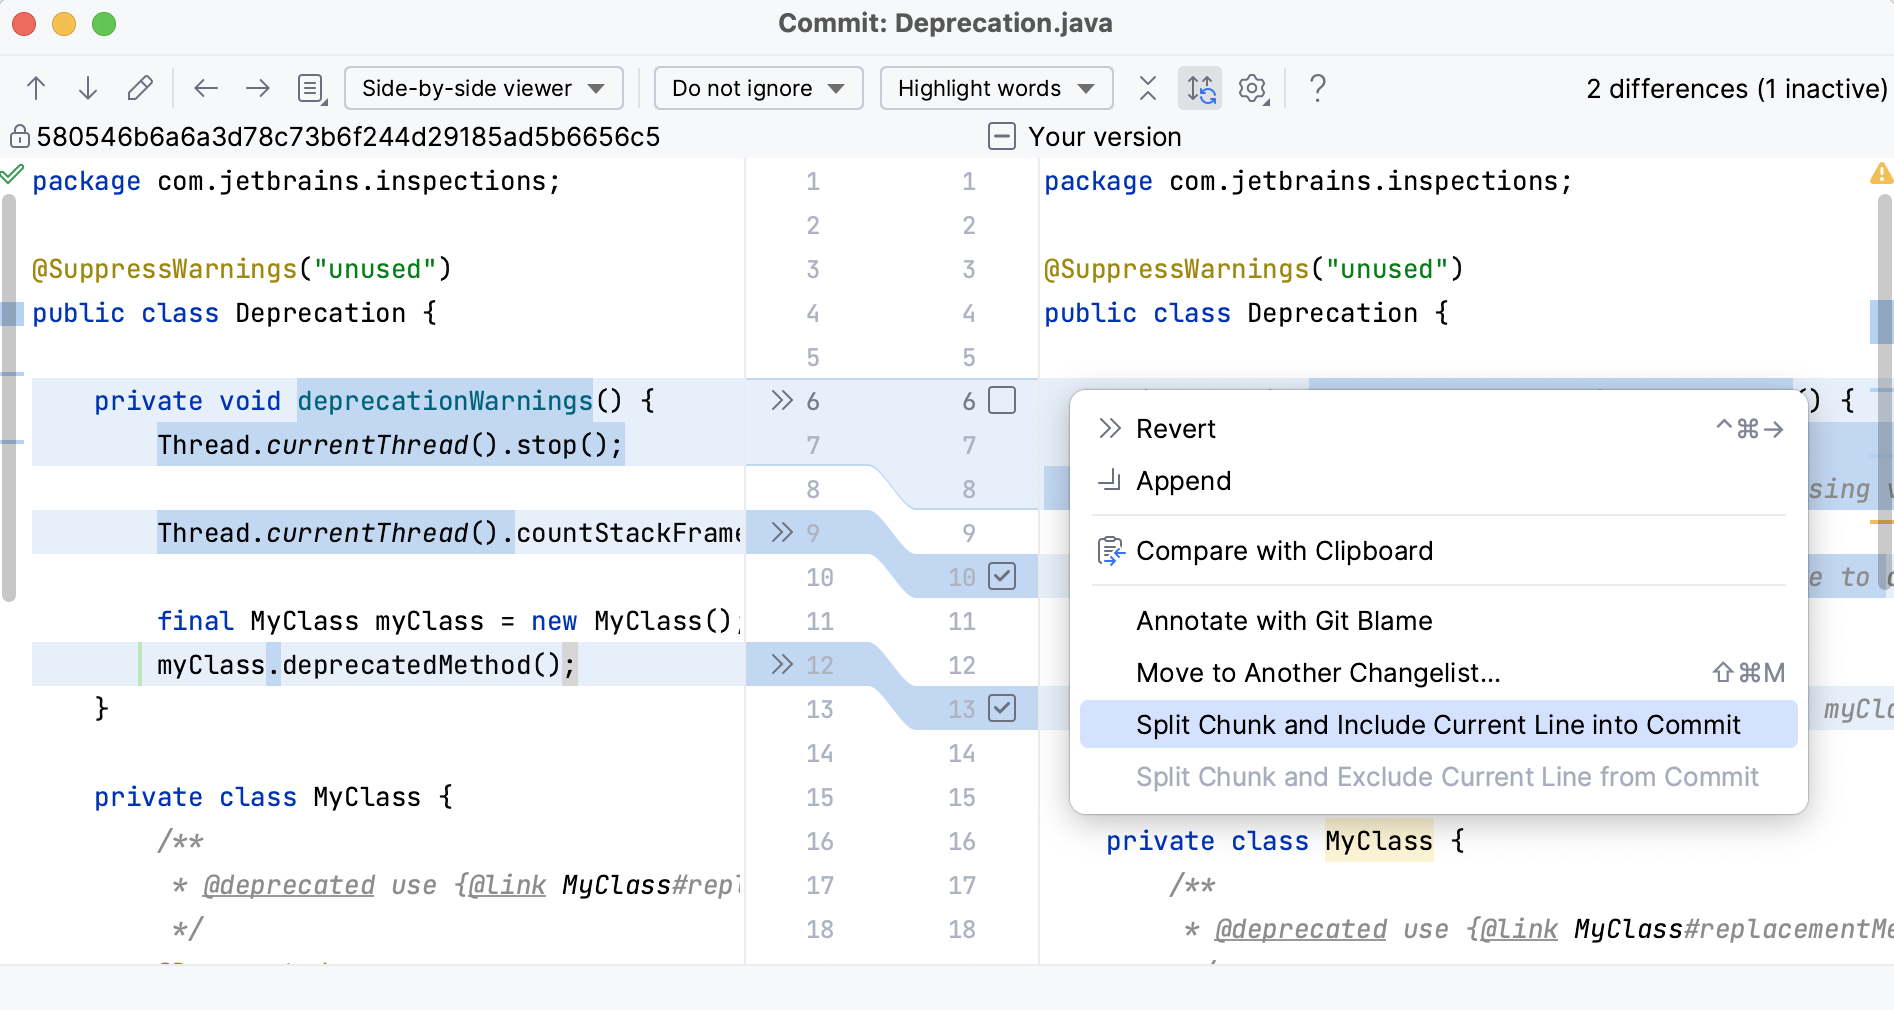
Alternatively, hover over the gutter and select or clear the checkbox next to the line you want to include in the commit or exclude from it.
5. Click Commit. Unselected changes will stay in the current changelist, so that you can commit them separately.
Procedure: Commit selected changes from the editor
If you have already committed your changes and then realized you have forgotten something, you can quickly commit any updates right from the editor.
1. When you make a change to a file in the editor, click the corresponding [change marker](adding-files-to-version-control.html#track_changes) in the gutter.
> **Note:**
> If there are no change markers in the gutter, make sure the Highlight modified lines in the gutter option is enabled on the Version Control | Confirmation | Gutter settings page `Ctrl+Alt+S` (Windows), `⌘ Comma` (macOS), `⌘ Comma` (IntelliJ IDEA Classic (macOS)), `⌘ Comma` (macOS System Shortcuts), `Ctrl+Alt+S` (XWin), `Ctrl+Alt+S` (GNOME), `Ctrl+Alt+S` (KDE), `Ctrl+Alt+S` (Emacs), `Ctrl+Alt+S` (Sublime Text), `⌘ Comma` (Sublime Text (macOS)), `Ctrl+Alt+S` (NetBeans), `Ctrl+Alt+S` (Visual Studio), `⌘ Comma` (Visual Studio (macOS)), `Ctrl+Alt+S` (Eclipse), `⌘ Comma` (Eclipse (macOS)) .
2. In the toolbar that appears, write the commit message and click  Commit this change.

Click  Amend in the commit message field to append the local changes to the latest commit.
Procedure: Put changes into different changelists
1. When you make a change to a file in the editor, click the corresponding [change marker](adding-files-to-version-control.html#track_changes) in the gutter.
> **Note:**
> If there are no change markers in the gutter, make sure the Highlight modified lines in the gutter option is enabled on the Version Control | Confirmation | Gutter settings page `Ctrl+Alt+S` (Windows), `⌘ Comma` (macOS), `⌘ Comma` (IntelliJ IDEA Classic (macOS)), `⌘ Comma` (macOS System Shortcuts), `Ctrl+Alt+S` (XWin), `Ctrl+Alt+S` (GNOME), `Ctrl+Alt+S` (KDE), `Ctrl+Alt+S` (Emacs), `Ctrl+Alt+S` (Sublime Text), `⌘ Comma` (Sublime Text (macOS)), `Ctrl+Alt+S` (NetBeans), `Ctrl+Alt+S` (Visual Studio), `⌘ Comma` (Visual Studio (macOS)), `Ctrl+Alt+S` (Eclipse), `⌘ Comma` (Eclipse (macOS)) .
2. In the toolbar that appears, select the target changelist for the modified code chunk (or create a new changelist):
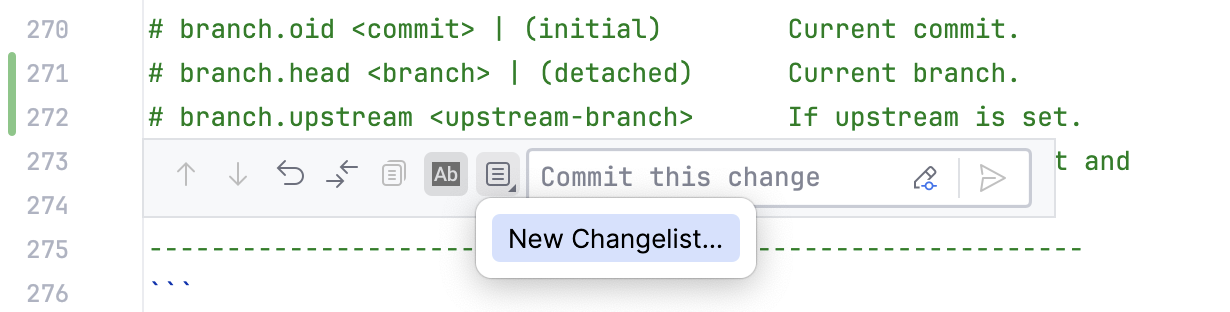
3. Commit each changelist separately.
### Customize the way you review the local changes
IntelliJ IDEA has different settings to customize your workflow for reviewing the local changes before commit.
Procedure: Customize the commit tool window
The location and behavior of the Commit tool window (`Alt+0` (Windows), `⌘ 0` (macOS), `⌘ 0` (IntelliJ IDEA Classic (macOS)), `⌘ 0` (macOS System Shortcuts), `Alt+0` (XWin), `Alt+0` (GNOME), `Alt+0` (KDE), `Alt+0` (Emacs), `Alt+0` (Sublime Text), `⌘ 0` (Sublime Text (macOS)), `Alt+0` (NetBeans), `Alt+0` (Visual Studio), `Alt+0` (Visual Studio (macOS)), `Alt+0` (Eclipse), `⌘ 0` (Eclipse (macOS)) ) can be changed based on your preferred workflow.
* The commit interface can be opened as a separate window that would look like a dialog, but would still be non-blocking (or non-modal).
In the Commit tool window (`Alt+0` (Windows), `⌘ 0` (macOS), `⌘ 0` (IntelliJ IDEA Classic (macOS)), `⌘ 0` (macOS System Shortcuts), `Alt+0` (XWin), `Alt+0` (GNOME), `Alt+0` (KDE), `Alt+0` (Emacs), `Alt+0` (Sublime Text), `⌘ 0` (Sublime Text (macOS)), `Alt+0` (NetBeans), `Alt+0` (Visual Studio), `Alt+0` (Visual Studio (macOS)), `Alt+0` (Eclipse), `⌘ 0` (Eclipse (macOS)) ) , click  Options and select `View Mode | Window`. To always keep the window in front of the IDE, select `View Mode | Float`.
> **Tip:**
> If you do not want the Commit tool window to close after you commit your changes, click  Options and clear the Close Tool Window After Committing option.
>
>
>
> Alternatively, in `Settings | Advanced settings | Version Control`, clear the Automatically close the Commit tool window in Window/Float mode after committing checkbox.
* You can set up the Commit tool window to work as a window with a list of local changes and switch on the commit controls (with  Commit or `Ctrl+K` (Windows), `⌘ K` (macOS), `⌘ K` (IntelliJ IDEA Classic (macOS)), `⌘ K` (macOS System Shortcuts), `Ctrl+K` (XWin), `Ctrl+K` (GNOME), `Ctrl+K` (KDE), `Ctrl+K` (Emacs), `Ctrl+K` (Sublime Text), `Ctrl+K` (Sublime Text (macOS)), `Ctrl+K` (NetBeans), `Ctrl+Alt+K` (Visual Studio), `⌘ ⌥ ⇧ K` (Visual Studio (macOS)), `Ctrl+K` (Eclipse), `Ctrl+K` (Eclipse (macOS))) when you are ready to commit your changes.
In `Settings | Advanced settings |Version Control`, select the Toggle commit controls checkbox.
* The Commit tool window can become the Local changes tab in the Log tab of the Git tool window `Alt+9` (Windows), `⌘ 9` (macOS), `⌘ 9` (IntelliJ IDEA Classic (macOS)), `⌘ 9` (macOS System Shortcuts), `Alt+9` (XWin), `Alt+9` (GNOME), `Alt+9` (KDE), `Alt+9` (Emacs), `Alt+9` (Sublime Text), `⌘ 9` (Sublime Text (macOS)), `Alt+9` (NetBeans), `Alt+9` (Visual Studio), `⌘ 9` (Visual Studio (macOS)), `Alt+9` (Eclipse), `⌘ 9` (Eclipse (macOS)) .
In `Settings | Advanced settings | Version Control`, clear the Enable Commit tool window checkbox.
> **Tip:**
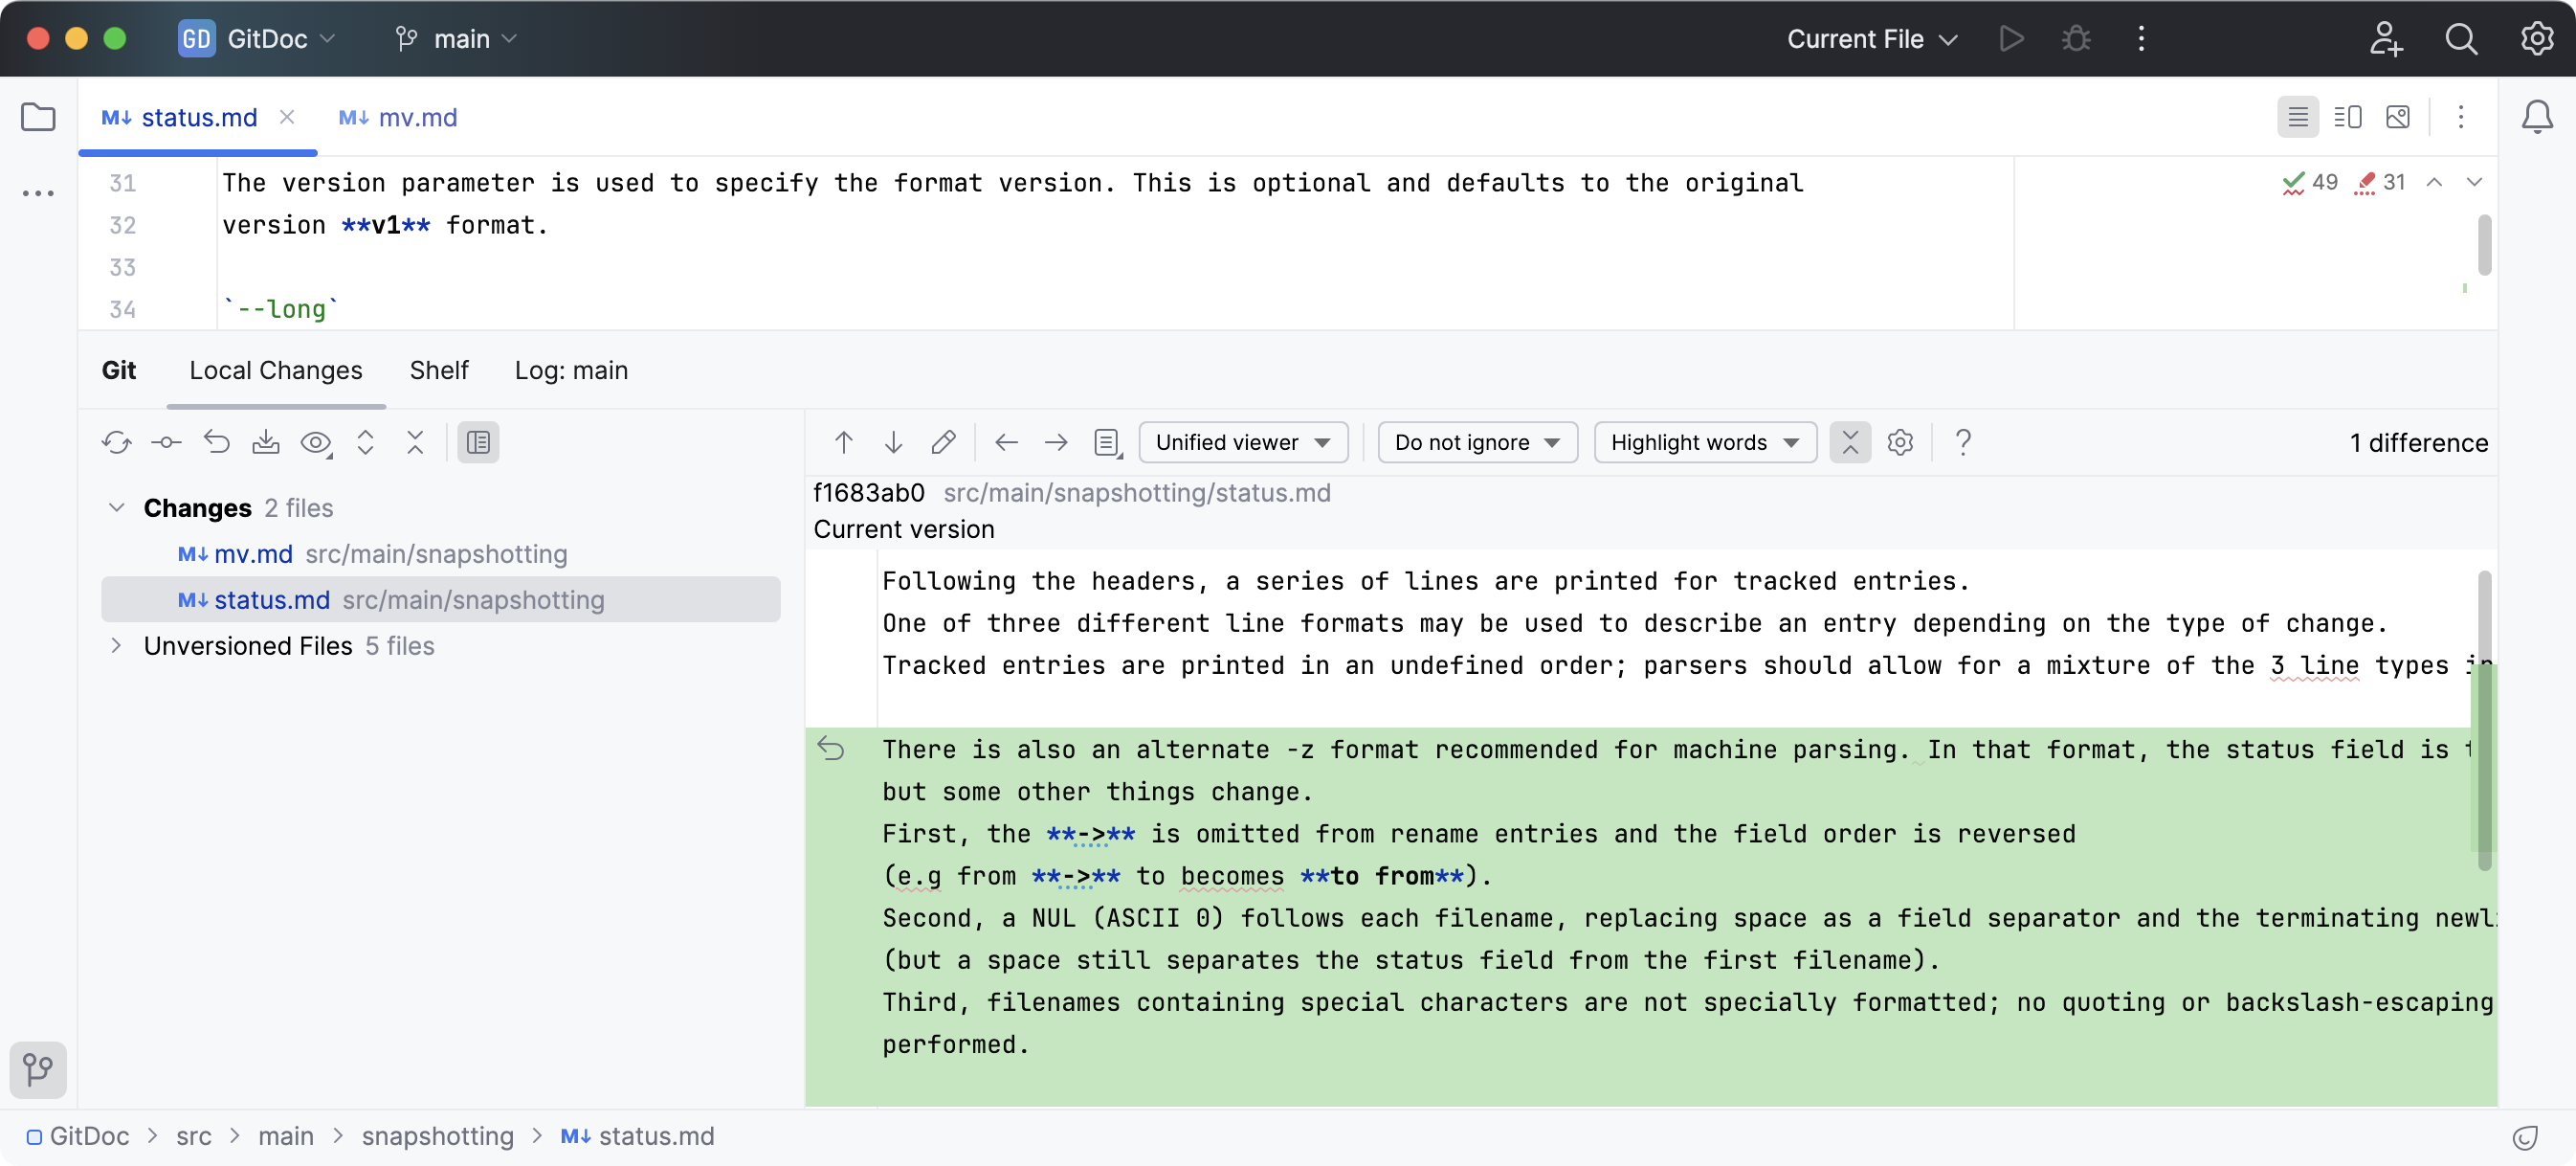
> If you switch on the Toggle commit controls option and switch off the Enable Commit tool window option, this is what the Commit tab will look like:
>
>
>
> 
Procedure: Customize Diff Viewer behavior
1. In the Commit tool window (`Alt+0` (Windows), `⌘ 0` (macOS), `⌘ 0` (IntelliJ IDEA Classic (macOS)), `⌘ 0` (macOS System Shortcuts), `Alt+0` (XWin), `Alt+0` (GNOME), `Alt+0` (KDE), `Alt+0` (Emacs), `Alt+0` (Sublime Text), `⌘ 0` (Sublime Text (macOS)), `Alt+0` (NetBeans), `Alt+0` (Visual Studio), `Alt+0` (Visual Studio (macOS)), `Alt+0` (Eclipse), `⌘ 0` (Eclipse (macOS)) ) , there is a list of changed files. The double click on the changed file can either open the Diff Viewer or the source file.
Click  Options, select Show on Double-Click and then the preferred option:
* Diff to always open the Diff Viewer when you double-click the changed file so that you could review the changes.
* Source to always open the file itself so that you could edit it.
2. You can also set up the Diff Viewer to open in the editor or in a separate window with one of these settings:
* In the Diff Viewer, click  Settings on the toolbar and select Show Diff in Separate Window.
* In `Settings | Advanced Settings | Version Control`, clear the Open Diff as Editor Tab checkbox.
### Use the Git staging area to commit changes
If you are more used to the concept of [staging](https://git-scm.com/docs/git-add) changes for commit instead of using [changelists](managing-changelists.html) where modified files are staged automatically, press `Ctrl+Alt+S` (Windows), `⌘ Comma` (macOS), `⌘ Comma` (IntelliJ IDEA Classic (macOS)), `⌘ Comma` (macOS System Shortcuts), `Ctrl+Alt+S` (XWin), `Ctrl+Alt+S` (GNOME), `Ctrl+Alt+S` (KDE), `Ctrl+Alt+S` (Emacs), `Ctrl+Alt+S` (Sublime Text), `⌘ Comma` (Sublime Text (macOS)), `Ctrl+Alt+S` (NetBeans), `Ctrl+Alt+S` (Visual Studio), `⌘ Comma` (Visual Studio (macOS)), `Ctrl+Alt+S` (Eclipse), `⌘ Comma` (Eclipse (macOS)) to open settings and select Version Control | Git , then select the Enable staging area checkbox.
The Commit tool window will now look as follows:
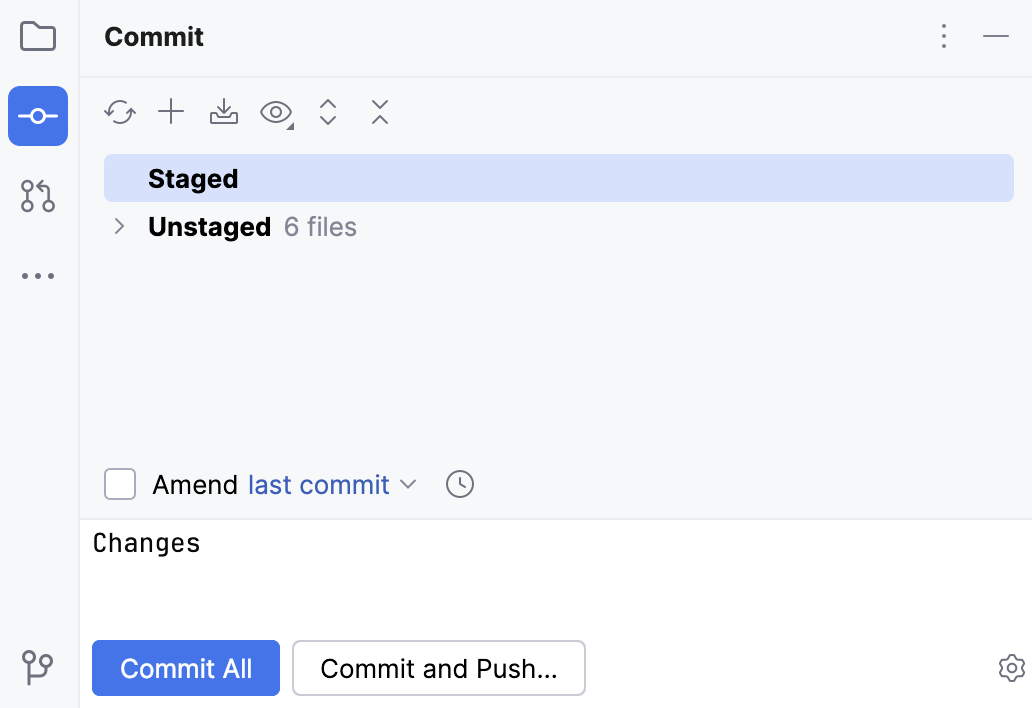
Using the staging area allows you to easily commit changes to the same file separately (including overlapping changes), and see which changes are already staged without switching focus from the editor.
> **Note:**
> When you switch from using changelists to the Git staging area, all existing changelists are saved. You can switch between the two modes without losing your changes.
Procedure: Stage changes for commit
1. Do one of the following:
* To stage an entire file, in the Commit tool window (`Alt+0` (Windows), `⌘ 0` (macOS), `⌘ 0` (IntelliJ IDEA Classic (macOS)), `⌘ 0` (macOS System Shortcuts), `Alt+0` (XWin), `Alt+0` (GNOME), `Alt+0` (KDE), `Alt+0` (Emacs), `Alt+0` (Sublime Text), `⌘ 0` (Sublime Text (macOS)), `Alt+0` (NetBeans), `Alt+0` (Visual Studio), `Alt+0` (Visual Studio (macOS)), `Alt+0` (Eclipse), `⌘ 0` (Eclipse (macOS)) ) , select this file and click  on the right next to it or press `Ctrl+Alt+A` (Windows), `⌘ ⌥ A` (macOS), `⌘ ⌥ A` (IntelliJ IDEA Classic (macOS)), `⌘ ⌥ A` (macOS System Shortcuts), `Ctrl+Alt+A` (XWin), `Ctrl+Alt+A` (GNOME), `Ctrl+Alt+A` (KDE), `Ctrl+Alt+A` (Emacs), `Ctrl+Alt+A` (Sublime Text), `⌘ ⌥ A` (Sublime Text (macOS)), `Ctrl+Alt+A` (NetBeans), `Ctrl+Alt+A` (Visual Studio), `⌘ ⌥ A` (Visual Studio (macOS)), `Ctrl+Alt+A` (Eclipse), `⌘ ⌥ A` (Eclipse (macOS)). 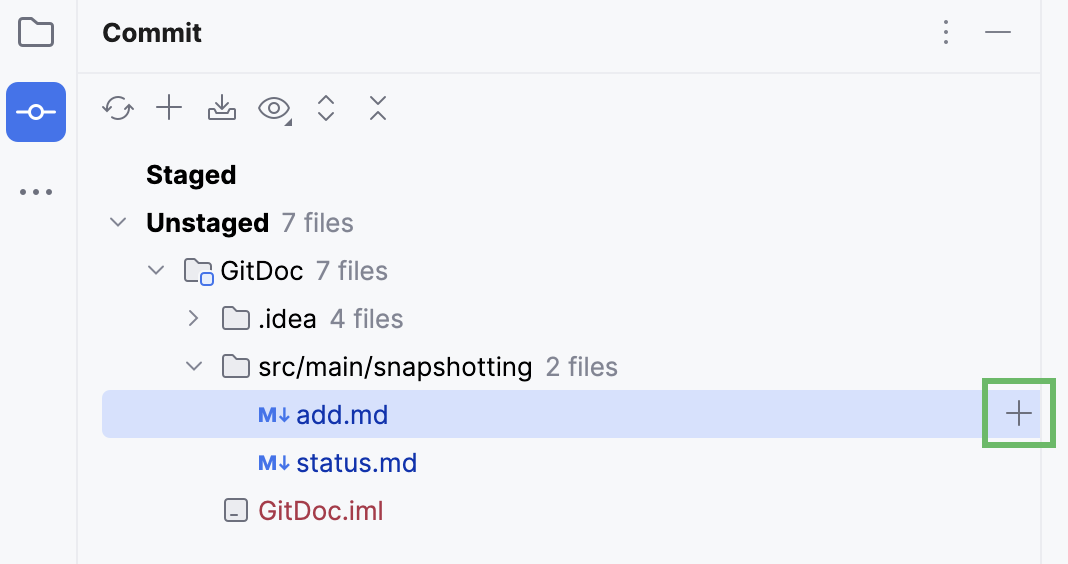
* To stage a specific chunk inside a file, in the editor click the [change marker](adding-files-to-version-control.html#track_changes) in the gutter next to the modified chunk and click Stage. 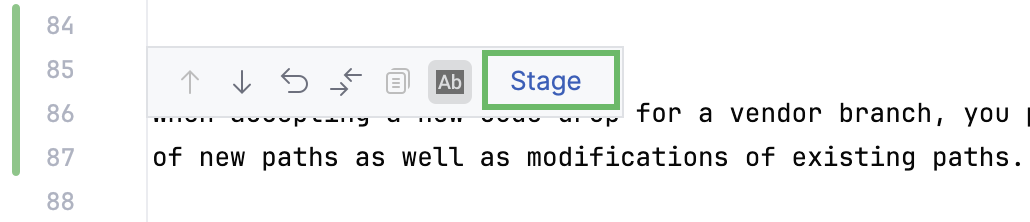 Staged changes (including changes staged from outside IntelliJ IDEA) are marked with a hollow change marker in the editor: 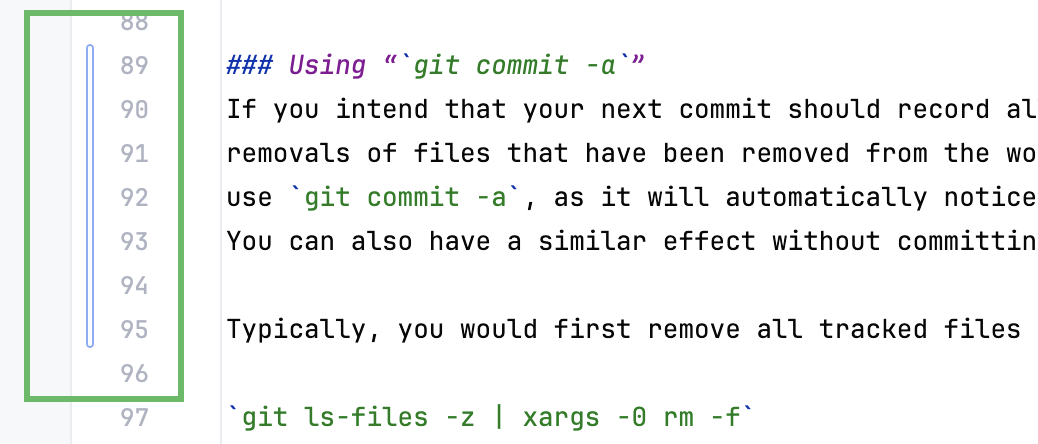
* To stage granular changes like a single line instead of a code chunk, or even one of several changes to a single line, in the Commit tool window (`Alt+0` (Windows), `⌘ 0` (macOS), `⌘ 0` (IntelliJ IDEA Classic (macOS)), `⌘ 0` (macOS System Shortcuts), `Alt+0` (XWin), `Alt+0` (GNOME), `Alt+0` (KDE), `Alt+0` (Emacs), `Alt+0` (Sublime Text), `⌘ 0` (Sublime Text (macOS)), `Alt+0` (NetBeans), `Alt+0` (Visual Studio), `Alt+0` (Visual Studio (macOS)), `Alt+0` (Eclipse), `⌘ 0` (Eclipse (macOS)) ) , select the file containing the change and choose Compare HEAD, Staged and Local Versions from the context menu. This will open a three-way [Diff Viewer](differences-viewer.html) where the left pane shows the repository version, the right pane shows the local version, and the central pane is a fully-functional editor where you can make the changes you want to stage. 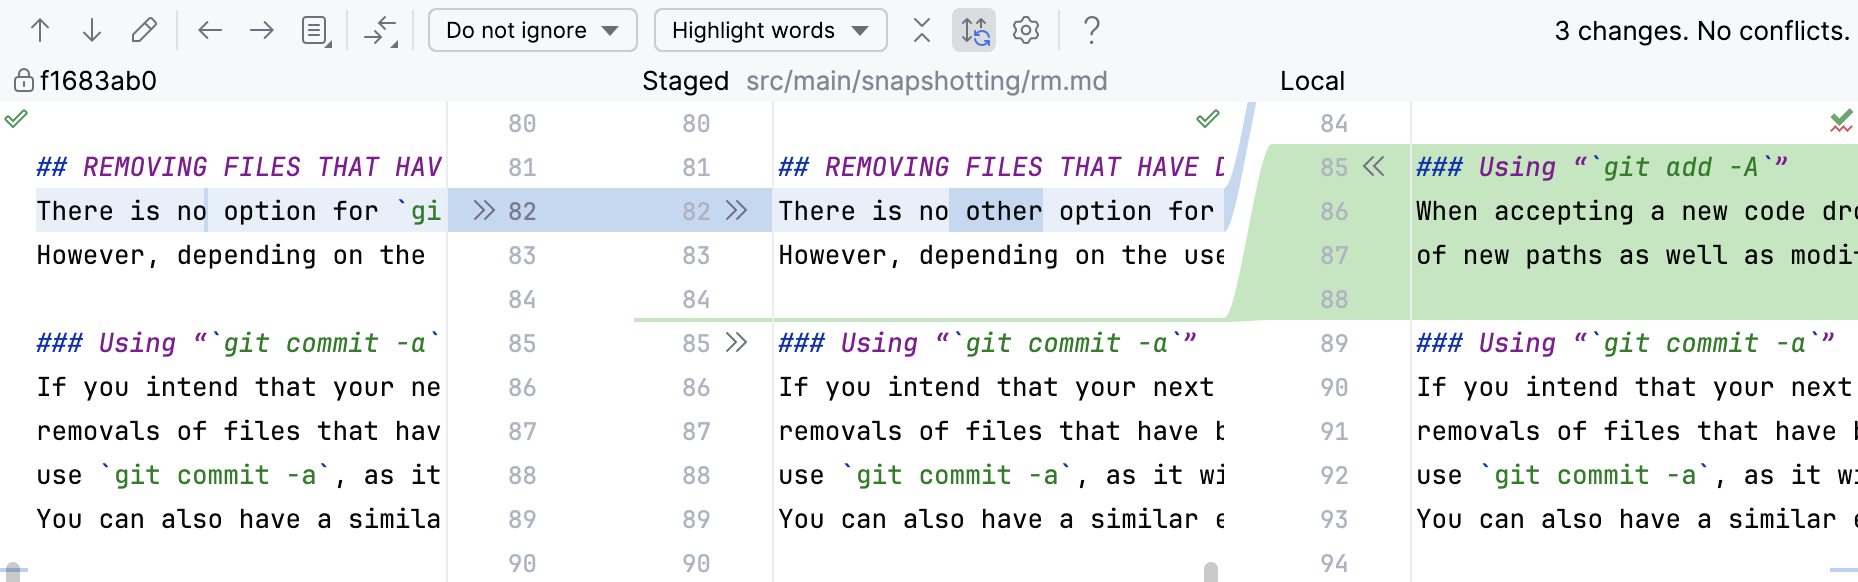
2. When ready, commit the changes as described in [Commit changes
locally](#commit_tool_window).
## Push changes to a remote repository
Before pushing your changes:
* [Sync with the remote](sync-with-a-remote-repository.html) and make sure your local copy of the repository is up to date to avoid conflicts.
* Review the local commits in the Log tab of the Git tool window `Alt+9` (Windows), `⌘ 9` (macOS), `⌘ 9` (IntelliJ IDEA Classic (macOS)), `⌘ 9` (macOS System Shortcuts), `Alt+9` (XWin), `Alt+9` (GNOME), `Alt+9` (KDE), `Alt+9` (Emacs), `Alt+9` (Sublime Text), `⌘ 9` (Sublime Text (macOS)), `Alt+9` (NetBeans), `Alt+9` (Visual Studio), `⌘ 9` (Visual Studio (macOS)), `Alt+9` (Eclipse), `⌘ 9` (Eclipse (macOS)) : select your branch in the Local node of the [branches pane](log-tab.html#BranchesPane) on the left, and then check the list of your commits in the [commits pane](log-tab.html#CommitsPane) in the central part of the tool window.
IntelliJ IDEA allows you to upload changes from any branch to its [tracked branch](https://git-scm.com/book/en/v2/Git-Branching-Remote-Branches) or to any other remote branch.
Procedure:
1. Do one of the following:
* To push changes from the current branch press `Ctrl+Shift+K` (Windows), `⌘ ⇧ K` (macOS), `⌘ ⇧ K` (IntelliJ IDEA Classic (macOS)), `⌘ ⇧ K` (macOS System Shortcuts), `Ctrl+Shift+K` (XWin), `Ctrl+Shift+K` (GNOME), `Ctrl+Shift+K` (KDE), `Ctrl+Shift+K` (Emacs), `Ctrl+Shift+K` (Sublime Text), `⌘ ⇧ K` (Sublime Text (macOS)), `Ctrl+Shift+K` (NetBeans), `Ctrl+Shift+K` (Visual Studio), `⌘ ⇧ K` (Visual Studio (macOS)), `Ctrl+Shift+K` (Eclipse), `⌘ ⇧ K` (Eclipse (macOS)) or choose `Git | Push` from the main menu.
* To push changes from any local branch that has a remote, select this branch in the VCS widget and choose Push from the list of actions.
* If you have some commits you've made but not yet want to push to a remote branch, in the Log tab of the Git tool window (`Alt+9` (Windows), `⌘ 9` (macOS), `⌘ 9` (IntelliJ IDEA Classic (macOS)), `⌘ 9` (macOS System Shortcuts), `Alt+9` (XWin), `Alt+9` (GNOME), `Alt+9` (KDE), `Alt+9` (Emacs), `Alt+9` (Sublime Text), `⌘ 9` (Sublime Text (macOS)), `Alt+9` (NetBeans), `Alt+9` (Visual Studio), `⌘ 9` (Visual Studio (macOS)), `Alt+9` (Eclipse), `⌘ 9` (Eclipse (macOS))), select the last commit you want to push and choose the Push All up to Here… option from the list of actions.
The Push Commits dialog opens showing all Git repositories (for multi-repository projects) and listing all commits made in the current branch in each repository since the last push.
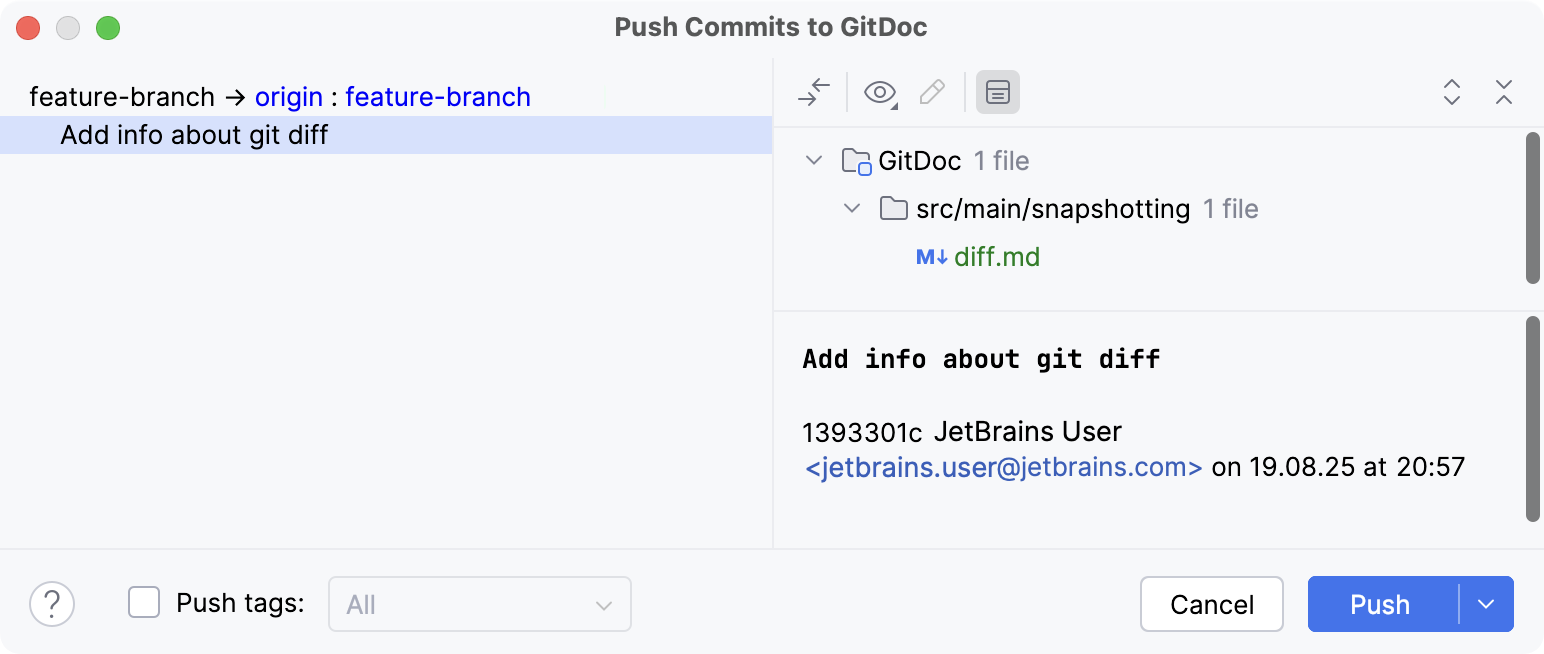
In case you chose the Push All up to Here… option, there will be a list of all commits up to the selected commit hash.
If you have a project that uses multiple repositories that are not controlled synchronously, only the current repository is selected by default (for more information about enabling synchronous repositories control, refer to [Version Control Settings: Git](settings-version-control-git.html)).
If you want to modify the target repository for your push, click the repository name. You can either select an existing repository from the list or click Define remote to specify a new remote's name and URL.
> **Tip:**
> You can press `Ctrl+Q` (Windows), `F1` (macOS), `⌃ J` (IntelliJ IDEA Classic (macOS)), `⌘ I` (macOS System Shortcuts), `Ctrl+Q` (XWin), `Ctrl+Q` (GNOME), `Ctrl+Q` (KDE), `Ctrl+Q` (Emacs), `Ctrl+Q` (Sublime Text), `Ctrl+Q` (Sublime Text (macOS)), `Ctrl+Q` (NetBeans), `Ctrl+K, I` (Visual Studio), `⌘ K, I` (Visual Studio (macOS)), `Alt+Middle-Click` (Eclipse), `⌥ Middle-Click` (Eclipse (macOS)) for the selected commit to display extra info, such as the commit author, time, hash and the commit message.
2. If there are no remotes in the repository, the Define remote link appears. Click this link and specify the remote name and URL in the dialog that opens. It will be saved, and you can edit it later via `Git | Manage Remotes` (for more information, refer to [Add a remote repository](set-up-a-git-repository.html#add-remote)).
3. If you want to modify the target branch where you want to push, you can click the branch name. The label turns into a text field where you can type an existing branch name, or create a new branch. You can also click the Edit all targets link in the bottom-right corner to edit all branch names simultaneously.
Note that you cannot change the local branch: the current branch for each selected repository will be pushed.
4. If you want to preview changes before pushing them, select the required commit. The right-hand pane shows the changes included in the selected commit. You can use the toolbar buttons to examine the commit details.
> **Tip:**
> You can also switch to the editing mode by pressing `Enter` (Windows), `⏎` (macOS), `⏎` (IntelliJ IDEA Classic (macOS)), `⏎` (macOS System Shortcuts), `Enter` (XWin), `Enter` (GNOME), `Enter` (KDE), `Enter` (Emacs), `Enter` (Sublime Text), `⏎` (Sublime Text (macOS)), `Enter` (NetBeans), `Enter` (Visual Studio), `⏎` (Visual Studio (macOS)), `Enter` (Eclipse), `⏎` (Eclipse (macOS)) for the selected file.
If the author of a commit is different from the current user, this commit is marked with an asterisk.
> **Tip:**
> If you select an entire repository, all files from all commits will be listed in the right pane.
>
>
>
> If the same file was modified within several commits, it will only be listed once if you select these commits or the entire repository, and if you invoke the [Diff Viewer](differences-viewer.html) for this file, all changes will be zipped together.
5. Select the Push tags checkbox to push tags with your commits.
By default, when you perform the `push` operation, tags are not sent to the remote repositories, unless you select this checkbox.
* Select All if you want to push all tags, including the tags that do not belong to the selected branches you are about to push (equivalent to `git push --tags`).
* Select Current Branch if you want to push only the tags that belong to the selected branches you are about to push (equivalent to `git push --follow-tags` available since Git 1.8.3).
6. Click the Push button when ready and select which operation you want to perform from the drop-down menu: Push or Force push (equivalent to `git push --force-with-lease`).
These choice options are only available if the current branch is not listed in the Protected branches field (refer to [Version Control Settings: Git](settings-version-control-git.html)), otherwise, you can only perform the `push` operation.
Procedure: Update your working copy if push is rejected
If push is rejected because your working copy is outdated, IntelliJ IDEA displays the Push Rejected dialog, provided that the Auto-update if push of the current branch was rejected option in the [Git settings](settings-version-control-git.html) page of the Settings dialog is not selected. Do the following:
1. If your project uses several Git repositories, specify which of them you want to update. If you want to update all repositories, no matter whether push was rejected for them or not, select the Update all repositories option. If this option is cleared, only the affected repositories will be updated.
2. If you want IntelliJ IDEA to apply the update procedure silently the next time push is rejected using the update method you choose in this dialog, select the Remember the update method choice and silently update in the future option.
After you leave this dialog, the Auto-update if push of the current branch was rejected checkbox in the [Git settings](settings-version-control-git.html) page of the Settings dialog will be selected, and the applied update method will become the default one.
To change the update strategy, deselect this option to invoke the Push Rejected dialog the next time push of the current branch is rejected, apply a different update procedure, and select the Remember the update method choice option once again.
3. Select the update method by clicking the Rebase or Merge button respectively.
> **Tip:**
> To understand which method better suits your needs, refer to [Merge branches](apply-changes-from-one-branch-to-another.html#merge) and [Rebase branches (git-rebase)](apply-changes-from-one-branch-to-another.html#rebase-branch).
### When do I need to use force push?
When you run push, Git will refuse to complete the operation if the remote repository has changes that you are missing and that you are going to overwrite with your local copy of the repository. Normally, you need to perform [pull](sync-with-a-remote-repository.html#pull) to synchronize with the remote before you update it with your changes.
The `git push --force` command disables this check and lets you overwrite the remote repository, thus erasing its history and causing data loss. Under the hood, when you choose to force push, IntelliJ IDEA performs the `git push --force-with-lease` operation which is a safer option that helps you ensure you do not overwrite someone else's commits (refer to [git push](https://git-scm.com/docs/git-push) for more details on the push options).
A possible situation when you may still need to perform `git push --force` is when you rebase a pushed branch and then want to push it to the remote server. In this case, when you try to push, Git will reject your changes because the remote ref is not an ancestor of the local ref. If you perform pull in this situation, you will end up with two copies of the branch which you then need to merge.