# Create your first Java application
In this tutorial, you will learn how to create, run, and package a simple Java application that prints `Hello World` to the system output.
You will get acquainted with compact source files from [Java
25](https://openjdk.org/projects/jdk/25/) and learn how to convert them to regular classes. Along the way, you will become familiar with IntelliJ IDEA features for boosting your productivity as a developer: coding assistance and supplementary tools.
For this tutorial, you only need basic knowledge of Java and familiarity with IntelliJ IDEA.
You can also watch the demo of how you can build and run a basic Java application using IntelliJ IDEA:
[Video](https://www.youtube.com/v/V_vXRRydnYI)
## Create a new Java project
Procedure:
In IntelliJ IDEA, a [project](creating-and-managing-projects.html) helps you organize your source code, tests, libraries that you use, build instructions, and your personal settings in a single unit.
1. Launch IntelliJ IDEA.
If the Welcome screen opens, click New Project.
Otherwise, go to `File | New Project` in the main menu.
2. In the New Project wizard, select Java from the New Project list.
3. Name the project (for example, `HelloWorld`) and change the default location if necessary.
4. Leave the Create Git repository option disabled as we are not going to work with version control systems in this tutorial.
5. Make sure that IntelliJ is selected in Build system.
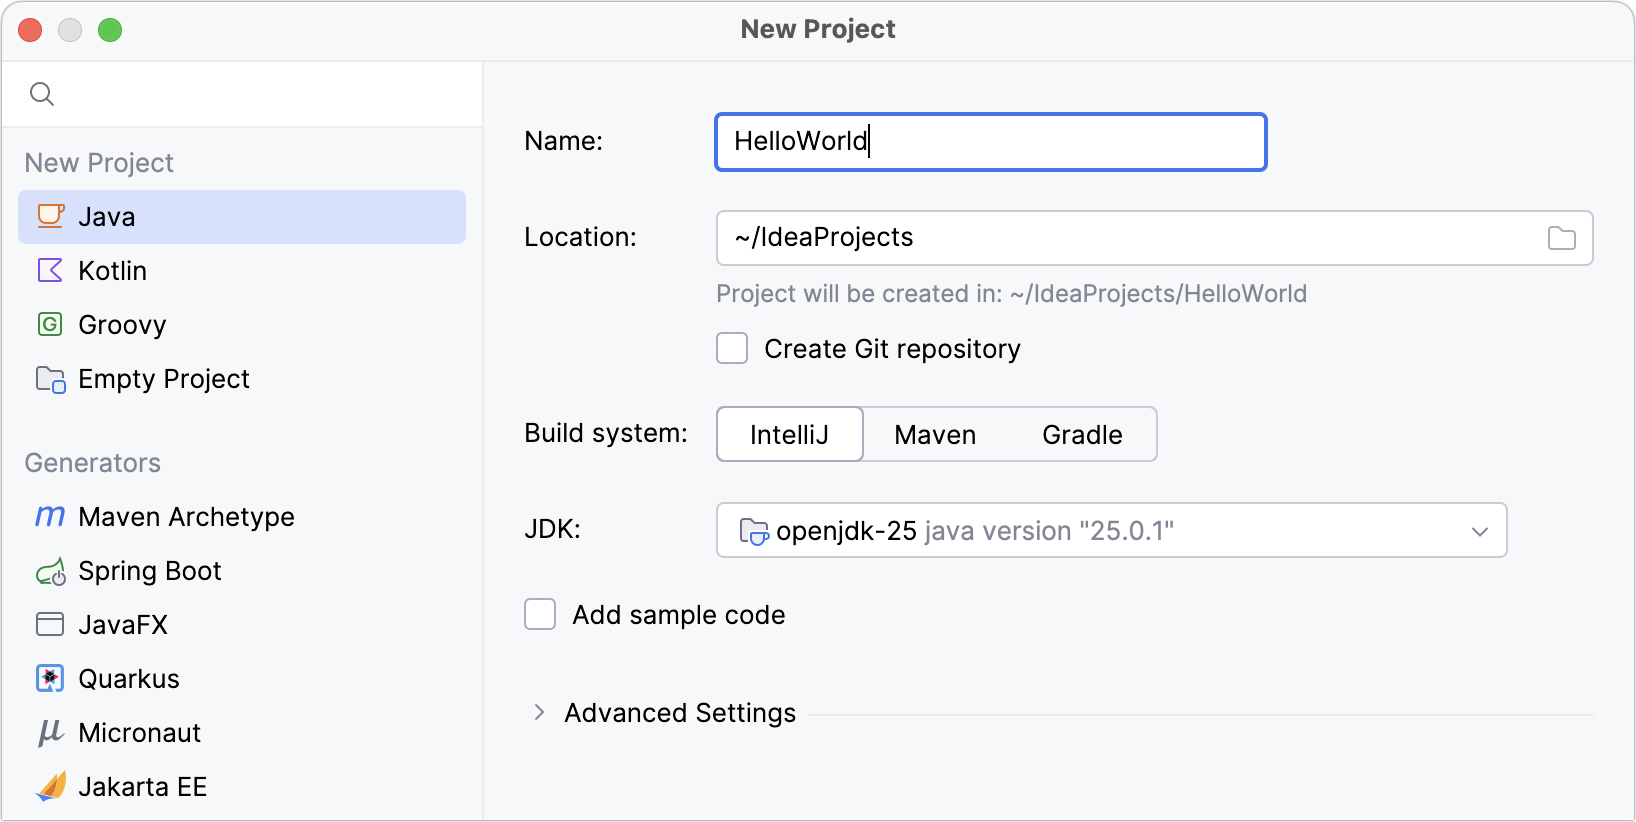
6. To develop Java applications in IntelliJ IDEA, you need a Java SDK (JDK ).
In this tutorial, we need Java 25 or higher. If it is already defined in IntelliJ IDEA, select it from the JDK list.
If the JDK is installed on your computer, but not defined in the IDE, select Add JDK from Disk and specify the path to the JDK home directory (for example, `/Library/Java/JavaVirtualMachines/openjdk-25.0.1`).
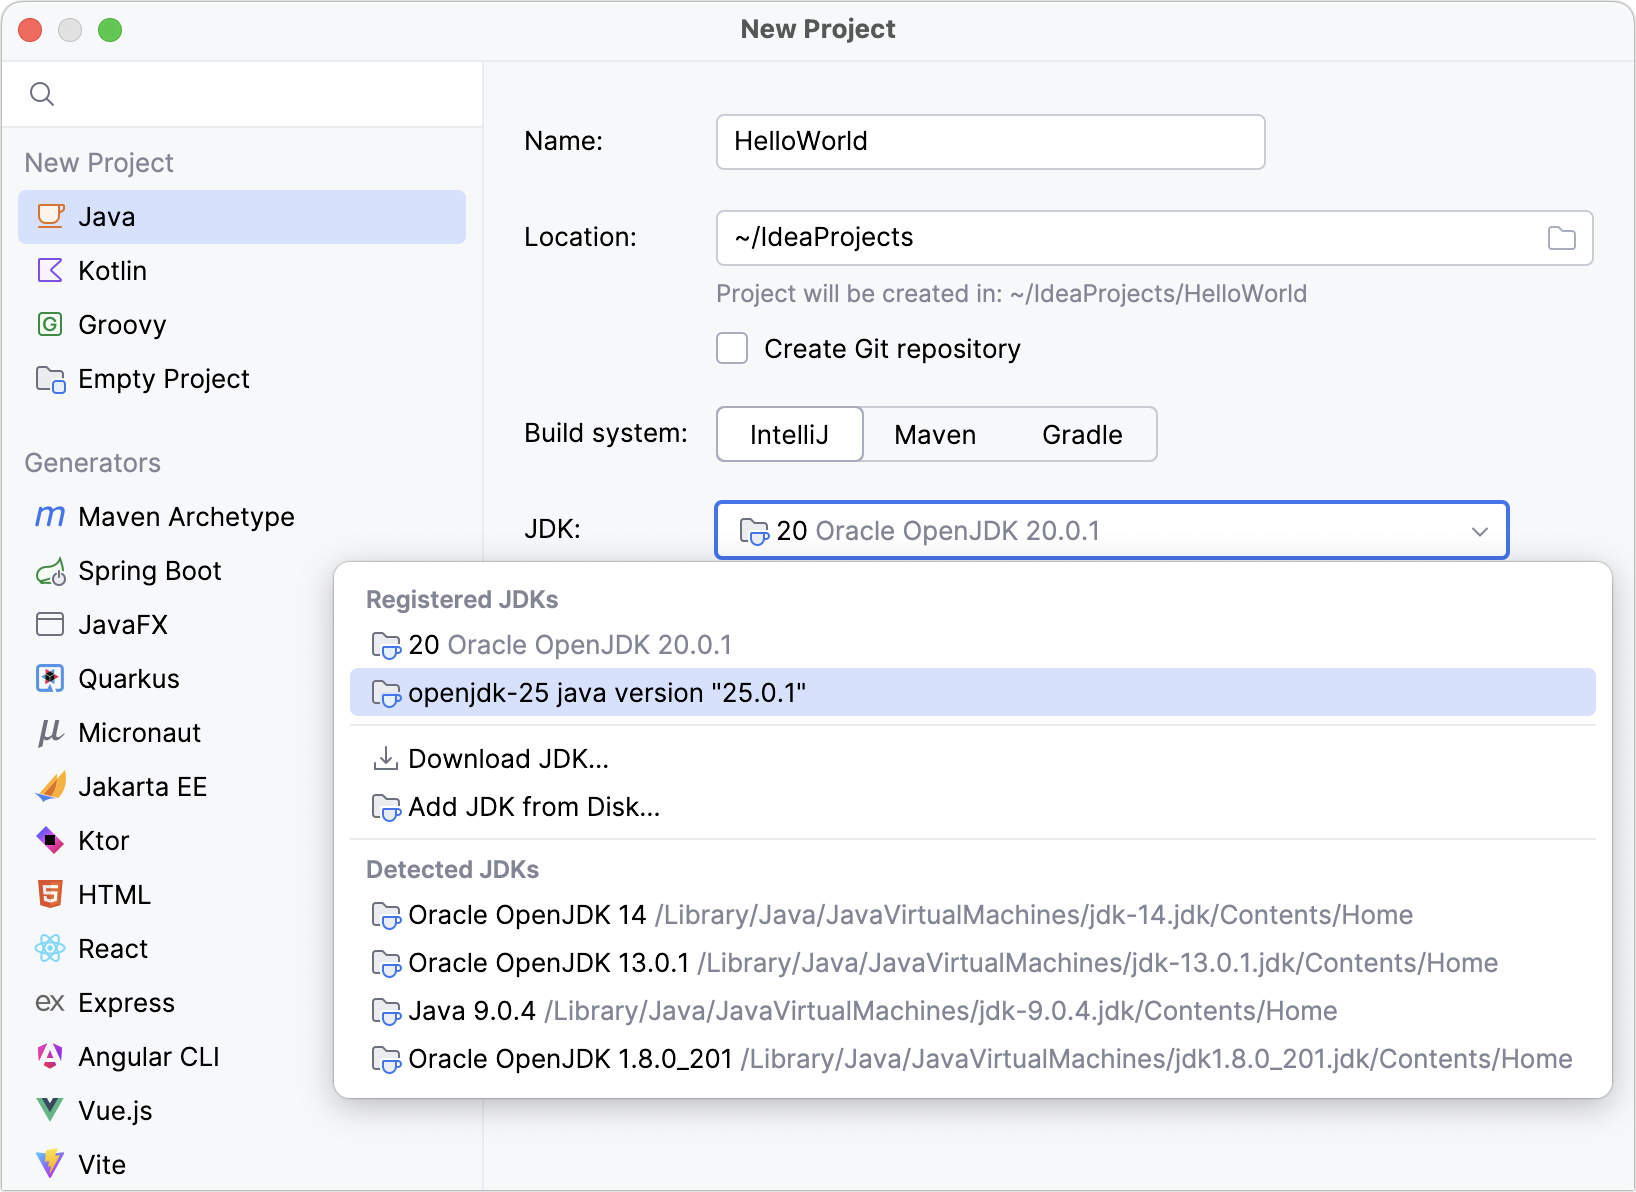
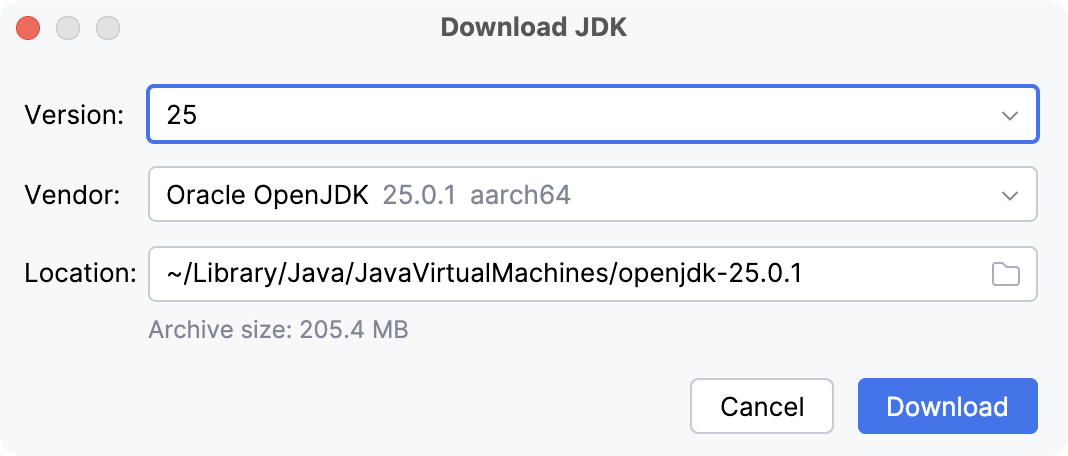
If you do not have the necessary JDK on your computer, select `Download JDK`. In the next dialog, select version 25 (for example, Oracle OpenJDK 25), change the installation path if required, and click Select.
7. Leave the Add sample code option disabled as we are going to do everything from scratch in this tutorial. Click Create.
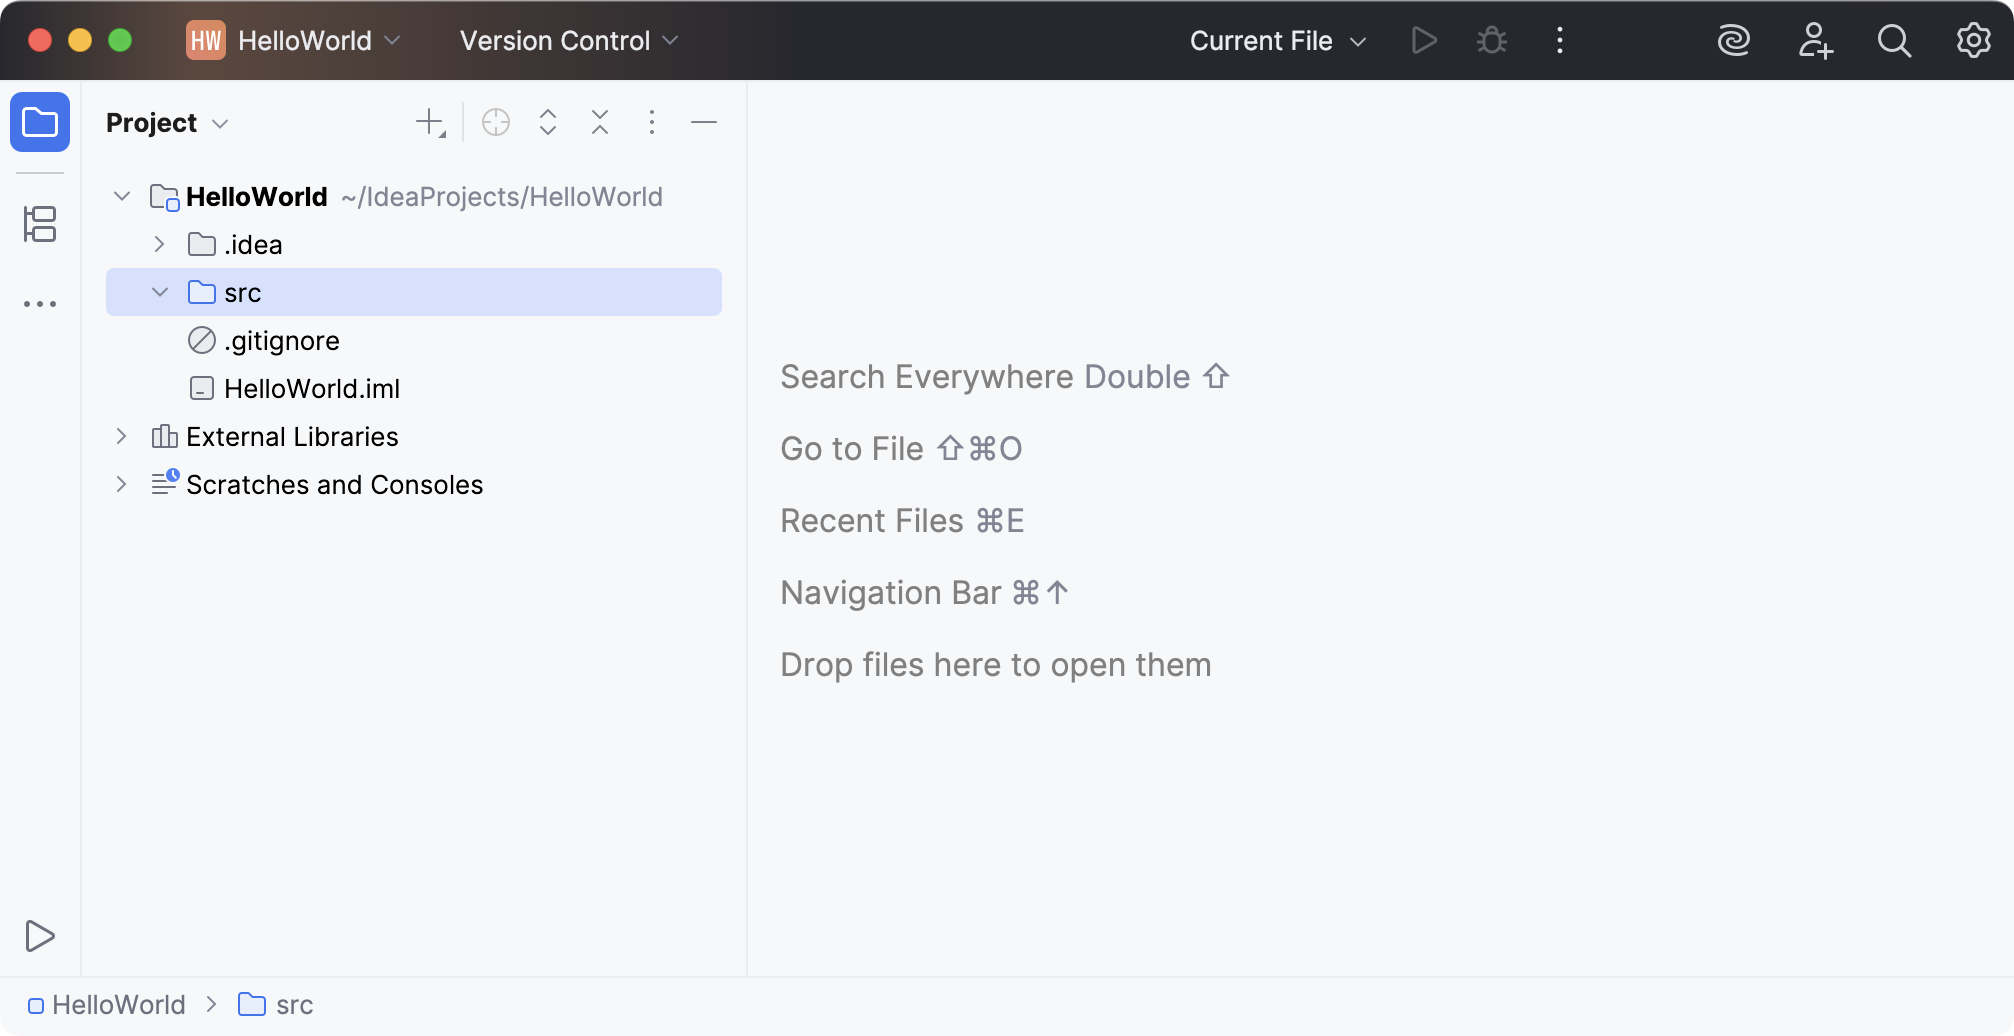
After that, the IDE will create and load the new project for you.
Once the project is loaded, the project window opens. On the left, you will see the [Project tool window](project-tool-window.html). It displays the structure of your application and helps you browse the project files. To open the tool window, press `Alt+1` (Windows), `⌘ 1` (macOS), `⌘ 1` (IntelliJ IDEA Classic (macOS)), `⌘ 1` (macOS System Shortcuts), `Alt+1` (XWin), `Alt+1` (GNOME), `Alt+1` (KDE), `Alt+1` (Emacs), `Alt+1` (Sublime Text), `⌘ 1` (Sublime Text (macOS)), `Ctrl+1` (NetBeans), `Ctrl+Alt+L` (Visual Studio), `⌘ ⌥ L` (Visual Studio (macOS)), `Alt+1` (Eclipse), `Alt+1` (Eclipse (macOS)) or go to `View | Tool Windows | Project` in the main menu.
## Write the code
Let's start by creating a compact source file. [Java compact source files](https://openjdk.org/jeps/512) look different from usual Java classes. They do not have a class declaration, and the `public class` boilerplate is also not required. They are useful for smaller code samples and tutorials.
Procedure: Create a compact source file
1. In the Project tool window, make sure the `src` folder is selected.
2. Click  on the tool window toolbar (or press `Alt+Insert` (Windows), `⌘ N` (macOS), `⌃ N` (IntelliJ IDEA Classic (macOS)), `⌘ N` (macOS System Shortcuts), `Alt+Insert` (XWin), `Alt+Insert` (GNOME), `Alt+Insert` (KDE), `Alt+Insert` (Emacs), `Ctrl+N` (Sublime Text), `⌘ N` (Sublime Text (macOS)), `Alt+Insert` (NetBeans), `Ctrl+N` (Visual Studio), `⌘ N` (Visual Studio (macOS)), `Alt+Insert` (Eclipse), `⌘ N` (Eclipse (macOS))) and select Java Compact File.
3. Name the file `HelloWorld` and press `Enter` (Windows), `⏎` (macOS), `⏎` (IntelliJ IDEA Classic (macOS)), `⏎` (macOS System Shortcuts), `Enter` (XWin), `Enter` (GNOME), `Enter` (KDE), `Enter` (Emacs), `Enter` (Sublime Text), `⏎` (Sublime Text (macOS)), `Enter` (NetBeans), `Enter` (Visual Studio), `⏎` (Visual Studio (macOS)), `Enter` (Eclipse), `⏎` (Eclipse (macOS)).
[Video](https://resources.jetbrains.com/help/img/idea/2026.2/java-t-create-compact-file.mp4)
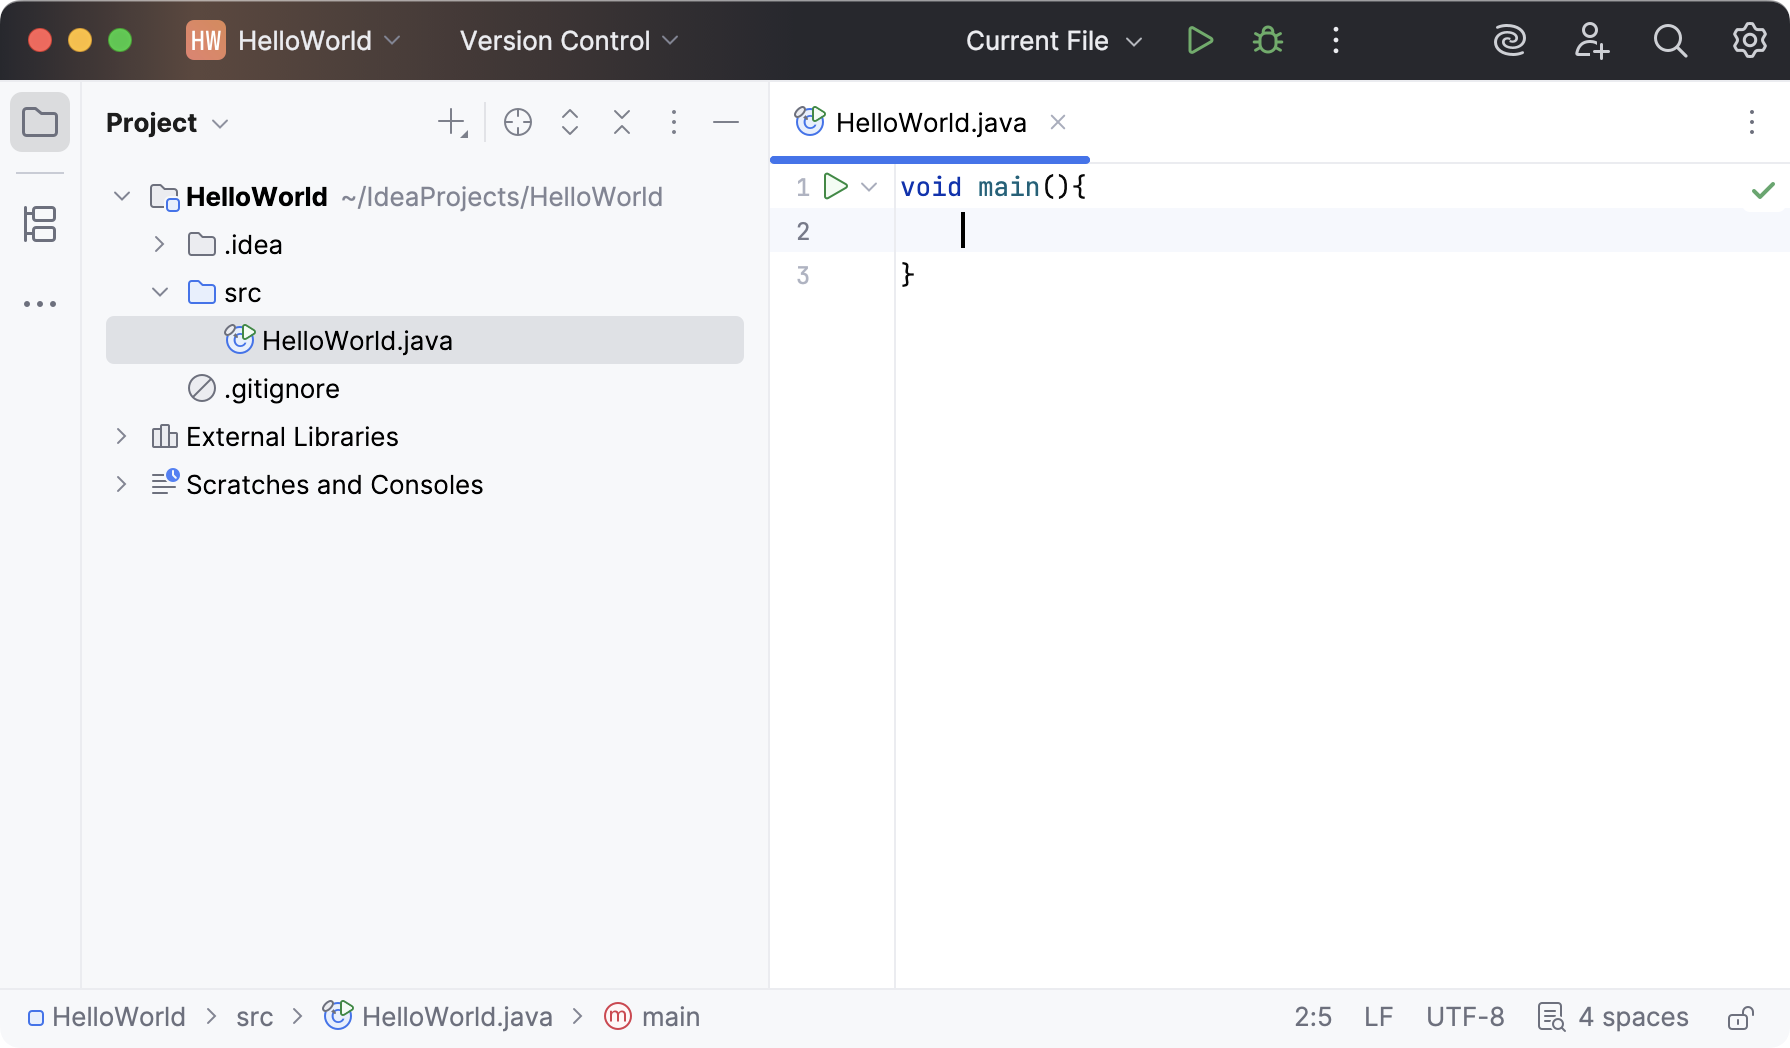
Together with the file, IntelliJ IDEA has automatically generated a method declaration. This is done by means of file templates. Depending on the type of the file that you create, the IDE inserts initial code and formatting that is expected to be in all files of that type. For more information about how to use and configure templates, refer to [File templates](using-file-and-code-templates.html).
Procedure: Call the println() method using code completion
IntelliJ IDEA automatically places the caret at the next line after the `main()` method declaration. Let's call a method that prints some text to the standard system output.
1. Type `IO` and press `Ctrl+.` (Windows), `⌃ .` (macOS), `⌃ .` (IntelliJ IDEA Classic (macOS)), `⌃ .` (macOS System Shortcuts), `Ctrl+.` (XWin), `Ctrl+.` (GNOME), `Ctrl+.` (KDE), `Ctrl+.` (Emacs), `Ctrl+.` (Sublime Text), `⌃ .` (Sublime Text (macOS)), `Ctrl+.` (NetBeans), `Ctrl+.` (Visual Studio), `⌃ .` (Visual Studio (macOS)), `Ctrl+.` (Eclipse), `⌃ .` (Eclipse (macOS)) to insert the selection with a trailing period.
2. From the completion list that opens, select the println method and press `Enter` (Windows), `⏎` (macOS), `⏎` (IntelliJ IDEA Classic (macOS)), `⏎` (macOS System Shortcuts), `Enter` (XWin), `Enter` (GNOME), `Enter` (KDE), `Enter` (Emacs), `Enter` (Sublime Text), `⏎` (Sublime Text (macOS)), `Enter` (NetBeans), `Enter` (Visual Studio), `⏎` (Visual Studio (macOS)), `Enter` (Eclipse), `⏎` (Eclipse (macOS)).
3. Type `"`. The second quotation mark is inserted automatically, and the caret is placed between the quotation marks. Type `Hello World`.
[Video](https://resources.jetbrains.com/help/img/idea/2026.2/java-t-write-code.mp4)
> **Tip:**
> If you use IntelliJ IDEA with the [Ultimate
> subscription](https://www.jetbrains.com/products/compare/?product=idea), the IDE suggests completing the line for you by inserting `Hello World` in a pale font. To accept the suggestion, press `Tab` (Windows), `Tab` (macOS), `Tab` (IntelliJ IDEA Classic (macOS)), `Tab` (macOS System Shortcuts), `Tab` (XWin), `Tab` (GNOME), `Tab` (KDE), `Tab` (Emacs), `Tab` (Sublime Text), `Tab` (Sublime Text (macOS)), `Tab` (NetBeans), `Tab` (Visual Studio), `Tab` (Visual Studio (macOS)), `Tab` (Eclipse), `Tab` (Eclipse (macOS)). Learn more from [Full Line code completion](full-line-code-completion.html).
Code completion analyzes the context around the current caret position and provides suggestions as you type. You can open the completion list manually by pressing `Ctrl+Space` (Windows), `⌃ Space` (macOS), `⌃ Space` (IntelliJ IDEA Classic (macOS)), `⌃ Space` (macOS System Shortcuts), `Ctrl+Space` (XWin), `Ctrl+Space` (GNOME), `Ctrl+Space` (KDE), `Alt+/` (Emacs), `Ctrl+Space` (Sublime Text), `⌃ Space` (Sublime Text (macOS)), `Ctrl+Space` (NetBeans), `Ctrl+Space` (Visual Studio), `⌃ Space` (Visual Studio (macOS)), `Ctrl+Space` (Eclipse), `⌃ Space` (Eclipse (macOS)).
For more information about different completion modes, refer to [Code completion](auto-completing-code.html).
Procedure: Call the println() method using a live template
You can call the `println()` method much quicker using the `iop` [live template](using-live-templates.html).
1. Type `iop` and press `Enter` (Windows), `⏎` (macOS), `⏎` (IntelliJ IDEA Classic (macOS)), `⏎` (macOS System Shortcuts), `Enter` (XWin), `Enter` (GNOME), `Enter` (KDE), `Enter` (Emacs), `Enter` (Sublime Text), `⏎` (Sublime Text (macOS)), `Enter` (NetBeans), `Enter` (Visual Studio), `⏎` (Visual Studio (macOS)), `Enter` (Eclipse), `⏎` (Eclipse (macOS)).
2. Type `"`. The second quotation mark is inserted automatically, and the caret is placed between the quotation marks. Type `Hello World`.
Alternatively, if completion suggests finishing the line for you, press `Tab` (Windows), `Tab` (macOS), `Tab` (IntelliJ IDEA Classic (macOS)), `Tab` (macOS System Shortcuts), `Tab` (XWin), `Tab` (GNOME), `Tab` (KDE), `Tab` (Emacs), `Tab` (Sublime Text), `Tab` (Sublime Text (macOS)), `Tab` (NetBeans), `Tab` (Visual Studio), `Tab` (Visual Studio (macOS)), `Tab` (Eclipse), `Tab` (Eclipse (macOS)) to accept the suggestion.
[Video](https://resources.jetbrains.com/help/img/idea/2026.2/java-tutorial-iop.mp4)
## Build and run the application
Valid Java classes and compact source files can be compiled into bytecode. You can compile and run files with the `main()` method right from the editor using the green arrow icon  in the gutter.
Procedure:
1. Click  in the gutter and select Run 'HelloWorld.main()' in the popup. The IDE starts compiling your code.
2. When the compilation is complete, the Run tool window opens at the bottom of the screen.
The first line shows the command that IntelliJ IDEA used to run the compiled class. The second line shows the program output: `Hello World`. And the last line shows the exit code `0`, which indicates that the program exited successfully.
If your code is not correct and the IDE cannot compile it, the Run tool window will display the corresponding error.
[Video](https://resources.jetbrains.com/help/img/idea/2026.2/jt-run-app.mp4)
When you click Run, IntelliJ IDEA creates a special run configuration that performs a series of actions. First, it builds your application. At this stage, javac compiles your source code into JVM bytecode.
Once javac finishes compilation, it places the compiled bytecode to the `out` directory, which is highlighted with yellow in the Project tool window.
After that, the JVM runs the bytecode.
> **Tip:**
> Automatically created run configurations are temporary, but you can [modify and save them](run-debug-configuration.html).
> **Tip:**
> If you want to reopen the Run tool window, press `Alt+4` (Windows), `⌘ 4` (macOS), `⌘ 4` (IntelliJ IDEA Classic (macOS)), `⌘ 4` (macOS System Shortcuts), `Alt+4` (XWin), `Alt+4` (GNOME), `Alt+4` (KDE), `Alt+4` (Emacs), `Alt+4` (Sublime Text), `⌘ 4` (Sublime Text (macOS)), `Alt+4` (NetBeans), `Alt+4` (Visual Studio), `⌘ 4` (Visual Studio (macOS)), `Alt+4` (Eclipse), `⌘ 4` (Eclipse (macOS)).
IntelliJ IDEA automatically analyzes the file that is currently opened in the editor and searches for different types of problems: from syntax errors to typos. The Inspections widget in the top-right corner of the editor allows you to quickly see all the detected problems and look at each problem in detail. For more information, refer to [Current file](file-and-project-wide-analysis.html#analysis-current-file).
## Convert the compact source file into a regular class
A compact file is a minimal, single-file Java program. It is typically used for demos, tutorials, or small scripts. Compact files are defined outside of packages. However, in production projects, it is recommended that you place Java classes inside packages. To follow this practice, you can convert the compact file into a regular Java class and move it into a package.
Procedure: Convert the file using a context action
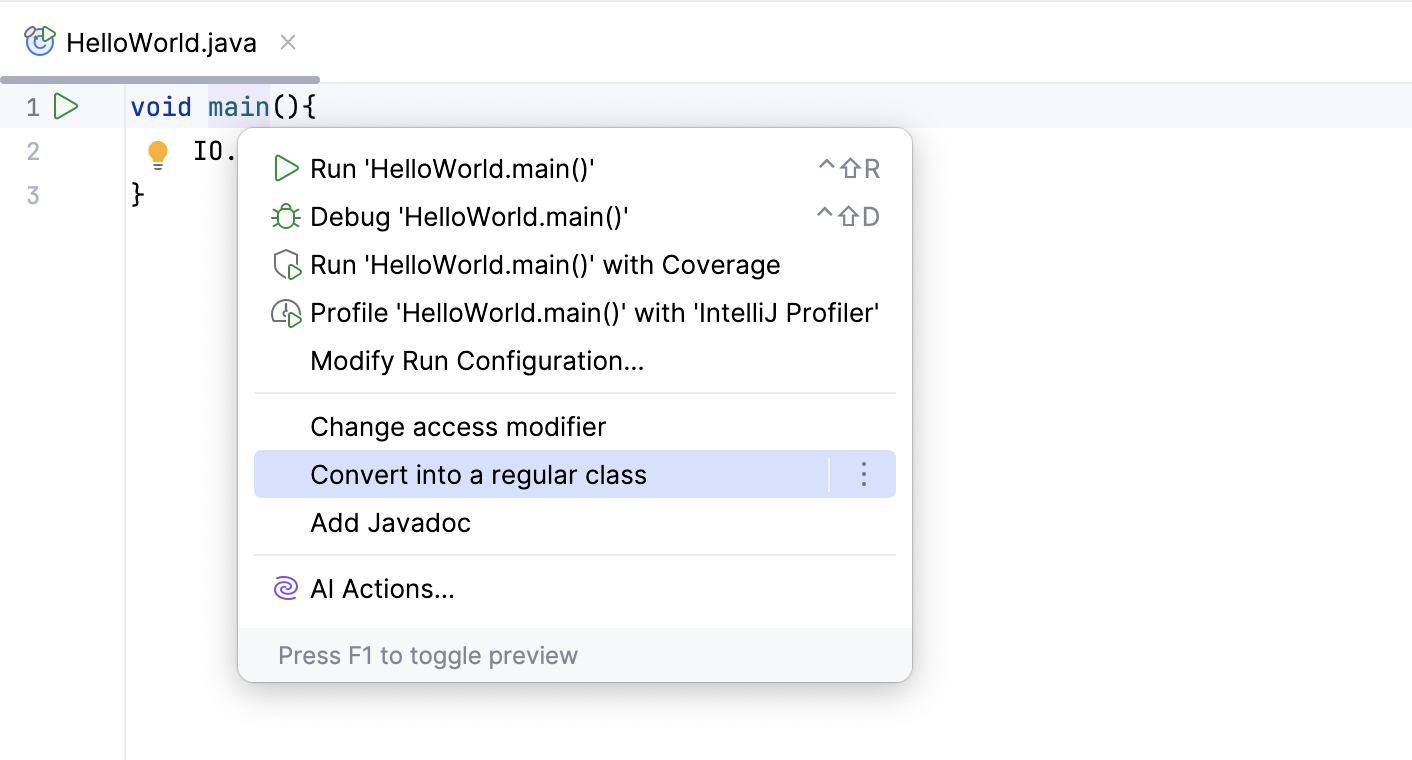
1. In the editor, place the caret at `void main()` and press `Alt+Enter` (Windows), `⌥ ⏎` (macOS), `⌥ ⏎` (IntelliJ IDEA Classic (macOS)), `⌥ ⏎` (macOS System Shortcuts), `Alt+Enter` (XWin), `Alt+Enter` (GNOME), `Alt+Enter` (KDE), `Alt+Enter` (Emacs), `Alt+Enter` (Sublime Text), `⌥ ⏎` (Sublime Text (macOS)), `Alt+Enter` (NetBeans), `Alt+Enter` (Visual Studio), `⌥ ⏎` (Visual Studio (macOS)), `Ctrl+1` (Eclipse), `⌘ 1` (Eclipse (macOS)).
2. Select Convert into a regular class.
Procedure: Move the class into a package
1. In the Project tool window, right-click the `scr` folder and select `New | Package`.
2. Name the new package `com.example.helloworld` and press `Enter` (Windows), `⏎` (macOS), `⏎` (IntelliJ IDEA Classic (macOS)), `⏎` (macOS System Shortcuts), `Enter` (XWin), `Enter` (GNOME), `Enter` (KDE), `Enter` (Emacs), `Enter` (Sublime Text), `⏎` (Sublime Text (macOS)), `Enter` (NetBeans), `Enter` (Visual Studio), `⏎` (Visual Studio (macOS)), `Enter` (Eclipse), `⏎` (Eclipse (macOS)).
3. In the Project tool window, drag the `HelloWorld` class into the newly created package.
IntelliJ IDEA invokes the Move refactoring and shows you a confirmation dialog.
4. Click Refactor. The class is now located within the package. The package declaration appears at the top of your class as a result of the refactoring.
[Video](https://resources.jetbrains.com/help/img/idea/2026.2/java-t-move-to-package.mp4)
Refactoring is a process of improving your source code without creating a new functionality. Learn more from [Code refactoring](refactoring-source-code.html).
## Package the application in a JAR
When the code is ready, you can package your application in a Java archive (JAR) so that you can share it with other developers. A built Java archive is called an artifact.
Procedure: Create an artifact configuration for the JAR
1. In the main menu, go to File | Project Structure (`Ctrl+Alt+Shift+S` (Windows), `⌘ ;` (macOS), `⌘ ;` (IntelliJ IDEA Classic (macOS)), `⌘ ⇧ Comma` (macOS System Shortcuts), `Ctrl+Alt+Shift+S` (XWin), `Ctrl+Alt+Shift+S` (GNOME), `Ctrl+Alt+Shift+S` (KDE), `Ctrl+Alt+Shift+S` (Emacs), `Ctrl+Alt+Shift+S` (Sublime Text), `⌘ ;` (Sublime Text (macOS)), `Ctrl+Alt+Shift+S` (NetBeans), `Ctrl+Alt+Shift+S` (Visual Studio), `⌘ ;` (Visual Studio (macOS)), `Ctrl+Alt+Shift+S` (Eclipse), `⌘ ;` (Eclipse (macOS))) and select Artifacts from the Project Settings list.
2. Click , point to JAR and select From modules with dependencies.
3. To the right of the Main Class field, click . Select HelloWorld (com.example.helloworld) in the dialog that opens and click OK.
4. Click OK in the Project Settings dialog.
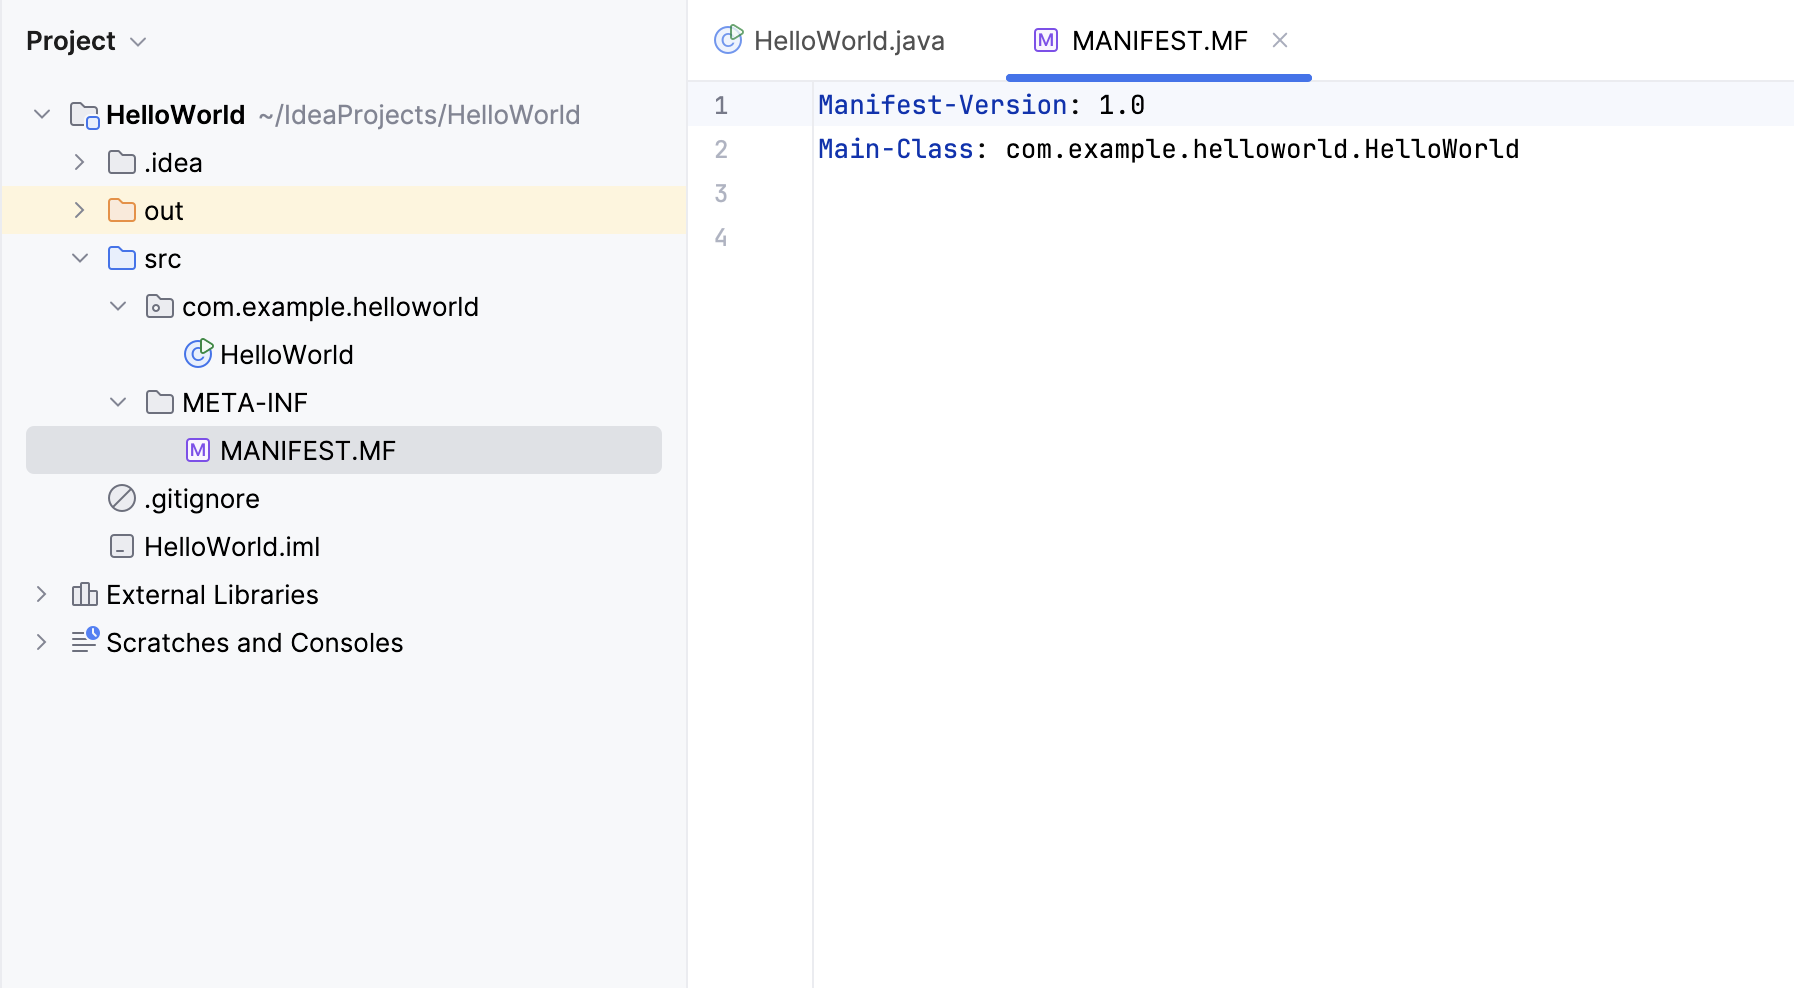
IntelliJ IDEA creates the artifact configuration and shows its settings in the right part of the Project Structure dialog.
[Video](https://resources.jetbrains.com/help/img/idea/2026.2/manifest.mp4)
5. Apply the changes and close the dialog.
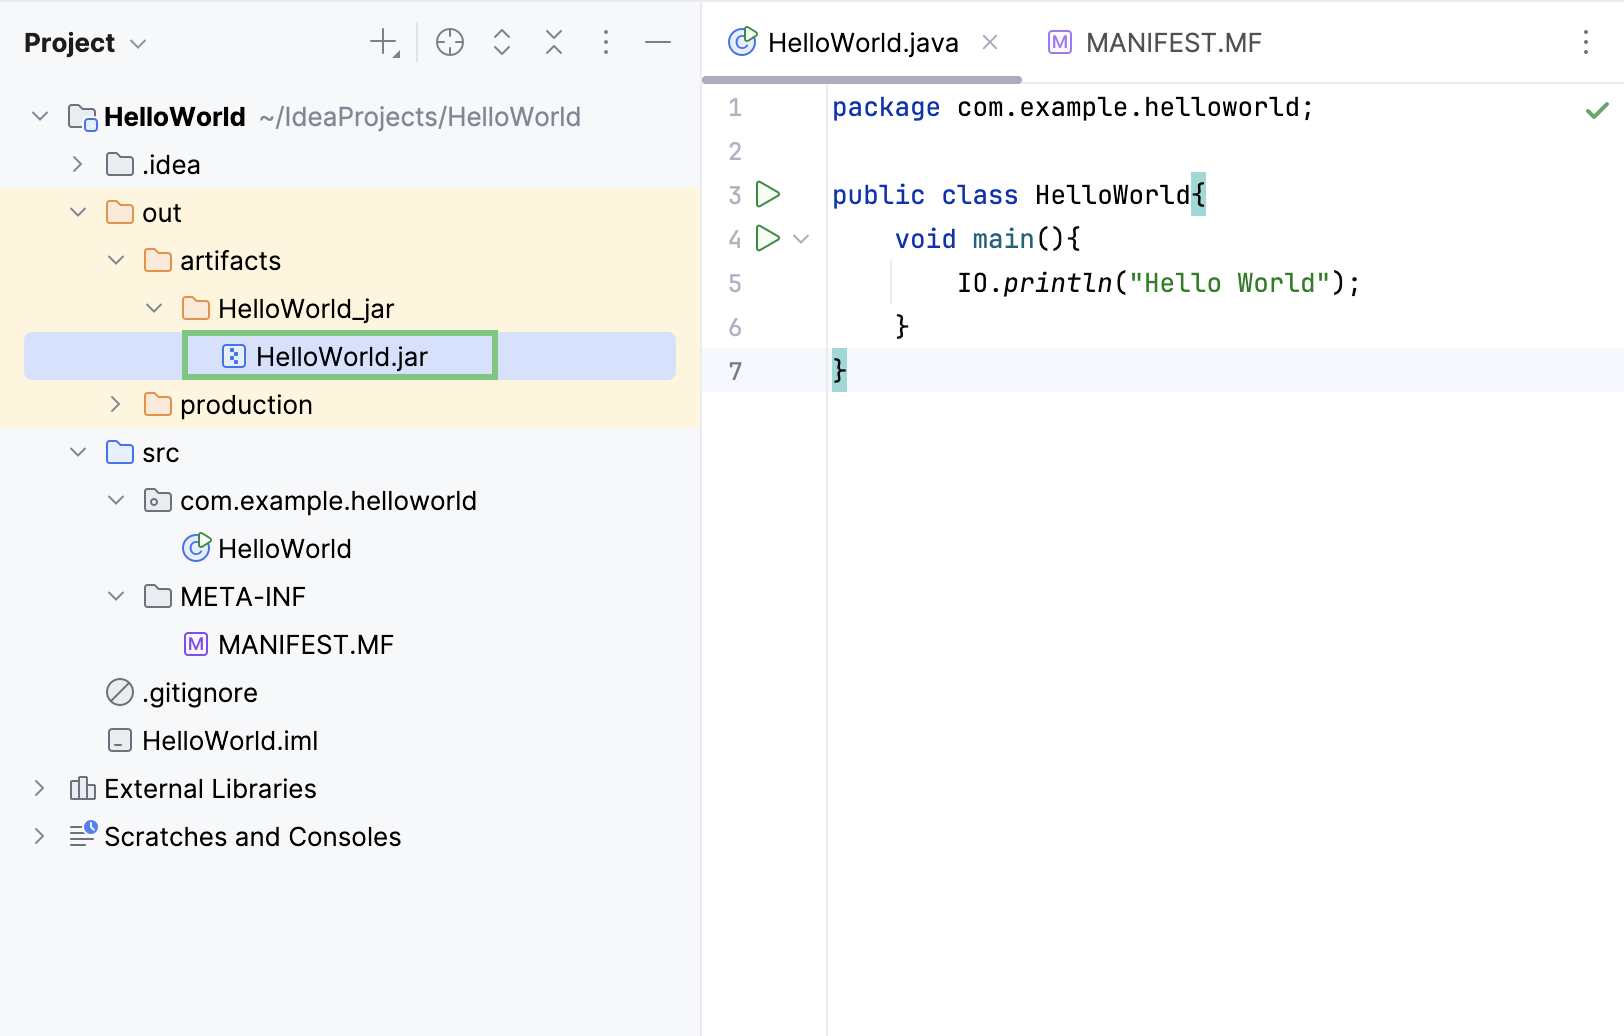
In the Project tool window, you can now see the `MANIFEST.MF` file. This file has metadata about your JAR, such as the main class to run.
Procedure: Build the JAR artifact
1. In the main menu, go to Build | Build Artifacts.
2. Point to HelloWorld:jar and select Build.
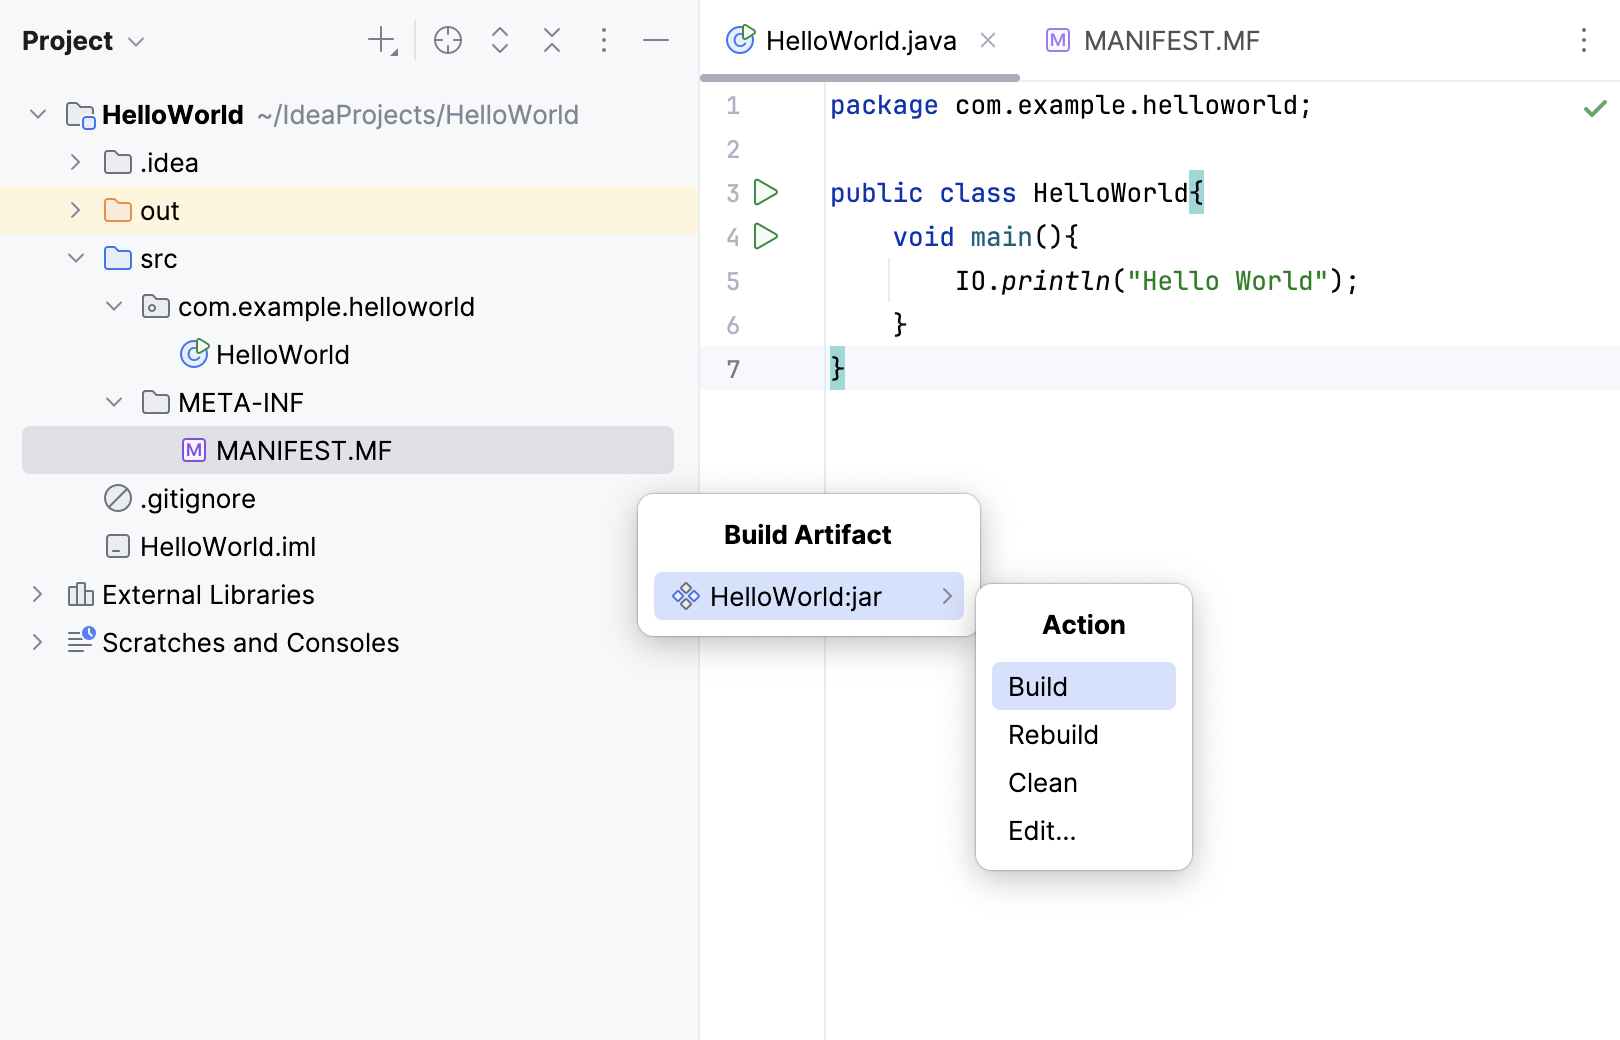
If you now look at the `out/artifacts` folder, you'll find your JAR there.
## Run the packaged application
To make sure that the JAR artifact is created correctly, you can run it.
> **Tip:**
> Use Find Action `Ctrl+Shift+A` (Windows), `⌘ ⇧ A` (macOS), `⌘ ⇧ A` (IntelliJ IDEA Classic (macOS)), `⌘ ⇧ P` (macOS System Shortcuts), `Ctrl+Shift+A` (XWin), `Ctrl+Shift+A` (GNOME), `Ctrl+Shift+A` (KDE), `Escape, X` (Emacs), `Ctrl+Shift+P` (Sublime Text), `⌘ ⇧ P` (Sublime Text (macOS)), `Ctrl+I` (NetBeans), `Ctrl+Shift+A` (Visual Studio), `⌘ ⇧ A` (Visual Studio (macOS)), `Ctrl+Shift+A` (Eclipse), `⌘ 3` (Eclipse (macOS)) to search for actions and settings across the entire IDE.
Procedure: Create a run configuration for the packaged application
To run a Java application packaged in a JAR, IntelliJ IDEA allows you to create a dedicated run configuration.
1. Press `Ctrl+Shift+A` (Windows), `⌘ ⇧ A` (macOS), `⌘ ⇧ A` (IntelliJ IDEA Classic (macOS)), `⌘ ⇧ P` (macOS System Shortcuts), `Ctrl+Shift+A` (XWin), `Ctrl+Shift+A` (GNOME), `Ctrl+Shift+A` (KDE), `Escape, X` (Emacs), `Ctrl+Shift+P` (Sublime Text), `⌘ ⇧ P` (Sublime Text (macOS)), `Ctrl+I` (NetBeans), `Ctrl+Shift+A` (Visual Studio), `⌘ ⇧ A` (Visual Studio (macOS)), `Ctrl+Shift+A` (Eclipse), `⌘ 3` (Eclipse (macOS)), find and run the Edit Configurations action or go to `Run | Edit Configurations` in the main menu.
2. In the Run/Debug Configurations dialog, click  and select JAR Application.
3. Name the new configuration: `HelloWorldJar`.
[Video](https://resources.jetbrains.com/help/img/idea/2026.2/run-debug.mp4)
4. In the Path to JAR field, click  and specify the path to the JAR file on your computer.
5. Scroll down the dialog and under Before launch, click , select `Build Artifacts | HelloWorld:jar`. Click OK.
Doing this means that the `HelloWorld.jar` is built automatically every time you execute this run configuration.
6. Click OK to finish creating the run configuration.
[Video](https://resources.jetbrains.com/help/img/idea/2026.2/run-config-ending.mp4)
Run configurations allow you to define how you want to run your application, with which arguments and options. You can have multiple run configurations for the same application, each with its own settings.
> **Tip:**
> You can change run configurations using the Run/Debug Configurations dialog at any time.
Procedure: Execute the run configuration
* On the toolbar, select the `HelloWorldJar` configuration and click  to the right of the run configuration widget. Alternatively, press `Shift+F10` (Windows), `⌃ R` (macOS), `⇧ F10` (IntelliJ IDEA Classic (macOS)), `⌥ ⇧ R` (macOS System Shortcuts), `Shift+F10` (XWin), `Shift+F10` (GNOME), `Shift+F10` (KDE), `Shift+F10` (Emacs), `Shift+F10` (Sublime Text), `Shift+F10` (Sublime Text (macOS)), `F6` (NetBeans), `Ctrl+F5` (Visual Studio), `⌃ F5` (Visual Studio (macOS)), `Alt+Shift+X` (Eclipse), `⌘ ⇧ F11` (Eclipse (macOS)) if you prefer shortcuts.
As before, the Run tool window opens and shows you the application output.
[Video](https://resources.jetbrains.com/help/img/idea/2026.2/jt-run-jar.mp4)
The process has exited successfully, which means that the application is packaged correctly.
## Summary
In this tutorial, you have learned how to:
* Create a Java project from scratch
* Create files and packages
* Run applications in IntelliJ IDEA
* Create run configurations
* Package applications in JAR
* Run packaged applications
## Next steps
Learn how to complete other tasks in IntelliJ IDEA from these tutorials:
* [Tutorial: Get started with JUnit](junit.html)
* [Tutorial: Debug your first Java application](debugging-your-first-java-application.html)
* [Tutorial: Getting started with Git in IntelliJ IDEA](working-with-git-tutorial.html)
For a full list of available tutorials, refer to [IntelliJ IDEA tutorials](instance-tutorials.html).
## See also
### External Links
[Building a Java application in IntelliJ IDEA](https://dev.java/learn/intellij-idea/) on dev.java [Video tutorials](https://www.jetbrains.com/idea/documentation/video-tutorials.jsp)