Flyway
Flyway is a database migration tool that lets you version, track, and apply database changes. IntelliJ IDEA provides the following support for Flyway:
Actions for generating migrations and callbacks
Quick navigation between SQL migrations and entity classes
Run configuration for executing SQL migrations and callbacks against the database
Customization of naming patterns for migration files
Prior to IntelliJ IDEA version 2024.1, some Flyway features were only available with the JPA Buddy plugin. The following video demonstrates these features, which are now available with the Flyway plugin.
Add Flyway to an existing project
Open the build file in the editor (pom.xml or build.gradle depending on the build tool used in your project).
Add the Flyway library, and make sure its version matches the rest of your project:
<dependency> <groupId>org.flywaydb</groupId> <artifactId>flyway-core</artifactId> <version>13.1.0</version> </dependency>implementation 'org.flywaydb:flyway-core:13.1.0'implementation("org.flywaydb:flyway-core:13.1.0")(Optional) If you want to run Flyway commands using Maven or Gradle, add the dedicated plugin:
<plugin> <groupId>org.flywaydb</groupId> <artifactId>flyway-maven-plugin</artifactId> <version>13.1.0</version> <configuration> <url>${YOUR_DATABASE_URL}</url> <user>${YOUR_DATABASE_USERNAME}</user> <password>${YOUR_DATABASE_PASSWORD}</password> </configuration> </plugin>For more information about configuring the plugin, refer to the official Flyway documentation.
plugins { id 'org.flywaydb.flyway' version '13.1.0' } flyway { url = '<YOUR DATABASE URL>' user = '<YOUR DATABASE USERNAME>' password = '<YOUR DATABASE PASSWORD>' }For more information about configuring the plugin, refer to the official Flyway documentation.
plugins { id ("org.flywaydb.flyway") version "13.1.0" } flyway { url = "<YOUR DATABASE URL>" user = "<YOUR DATABASE USERNAME>" password = "<YOUR DATABASE PASSWORD>" }For more information about configuring the plugin, refer to the official Flyway documentation.
Press Ctrl+Shift+O to import the changes.
For more information about working with build tools, refer to Maven or Gradle.
Flyway migrations
Flyway migrations define changes to the database schema or data. These are typically SQL files, but Flyway also supports Java-based and script migrations. IntelliJ IDEA provides built-in actions for generating the following types of Flyway migrations:
Init migration: captures a selected data model (database, persistence unit, or mapping context) in its current form. The result is a DDL script that you can use to recreate that data model in an empty database.
Diff migration: captures the differences between two data models: for example, between the current database schema and the entity mappings in your code. The result is a DDL script that you can run against the target model to make it match the source.
Empty migration: creates an empty SQL file that follows Flyway's naming patterns.
Java migration: creates a Java class that extends Flyway's BaseJavaMigration class and includes a stub of the migrate() method. IntelliJ IDEA does not capture the data model or any schema changes when generating Java migrations.
Generate an init migration
Open the Persistence tool window.
In the tool window, right-click a persistence unit, mapping context, or entity, and select
 New |
New |  Flyway Init Migration….
In the Flyway Init Schema Migration dialog that opens, select which data model the migration should be based on:
Model: entity mappings from one of the following:
persistence unit (in JPA and Spring Data JPA projects)
mapping context (in Spring Data JDBC projects)
DB: schema from a connected database
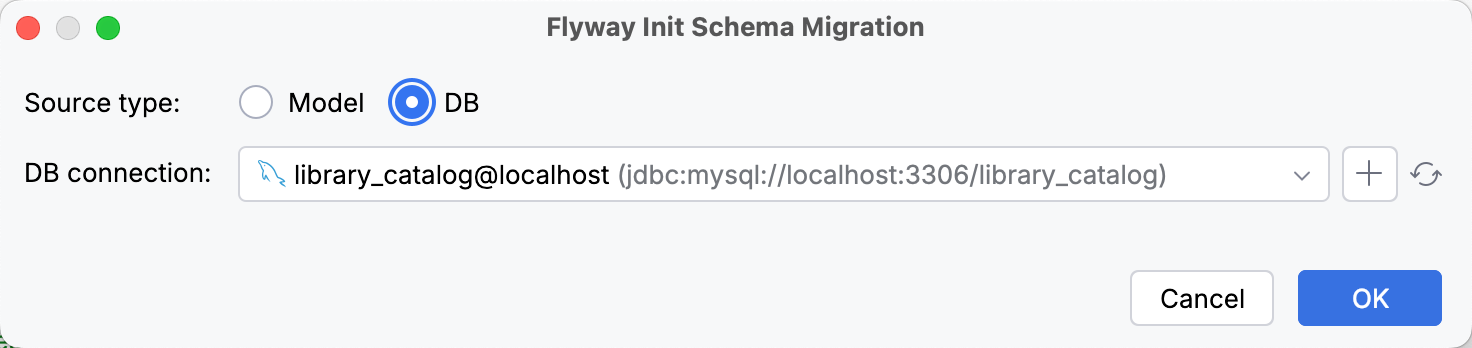
Based on your selection, IntelliJ IDEA automatically fills in the persistence unit, mapping context, or database connection, which you can change if needed.
Click OK.
In the Flyway Migration Preview dialog that opens, configure the migration and click Save.
Generate a diff migration
Make sure IntelliJ IDEA is connected to your database.
Open the Database tool window, right-click a database or table, and select
 Create Flyway Migration….
Alternatively, open the Persistence tool window, right-click a persistence unit, mapping context, or entity, and select
New | Flyway Migration….
In the Flyway Diff Migration dialog that opens, select which data models to compare:
Source (referenceURL) (current data model):
DB: schema from a connected database
Model: entity mappings from one of the following:
persistence unit (in JPA and Spring Data JPA projects)
mapping context (in Spring Data JDBC projects)
Target (URL) (previous data model):
DB: schema from a connected database
Snapshot: schema from a data model snapshot
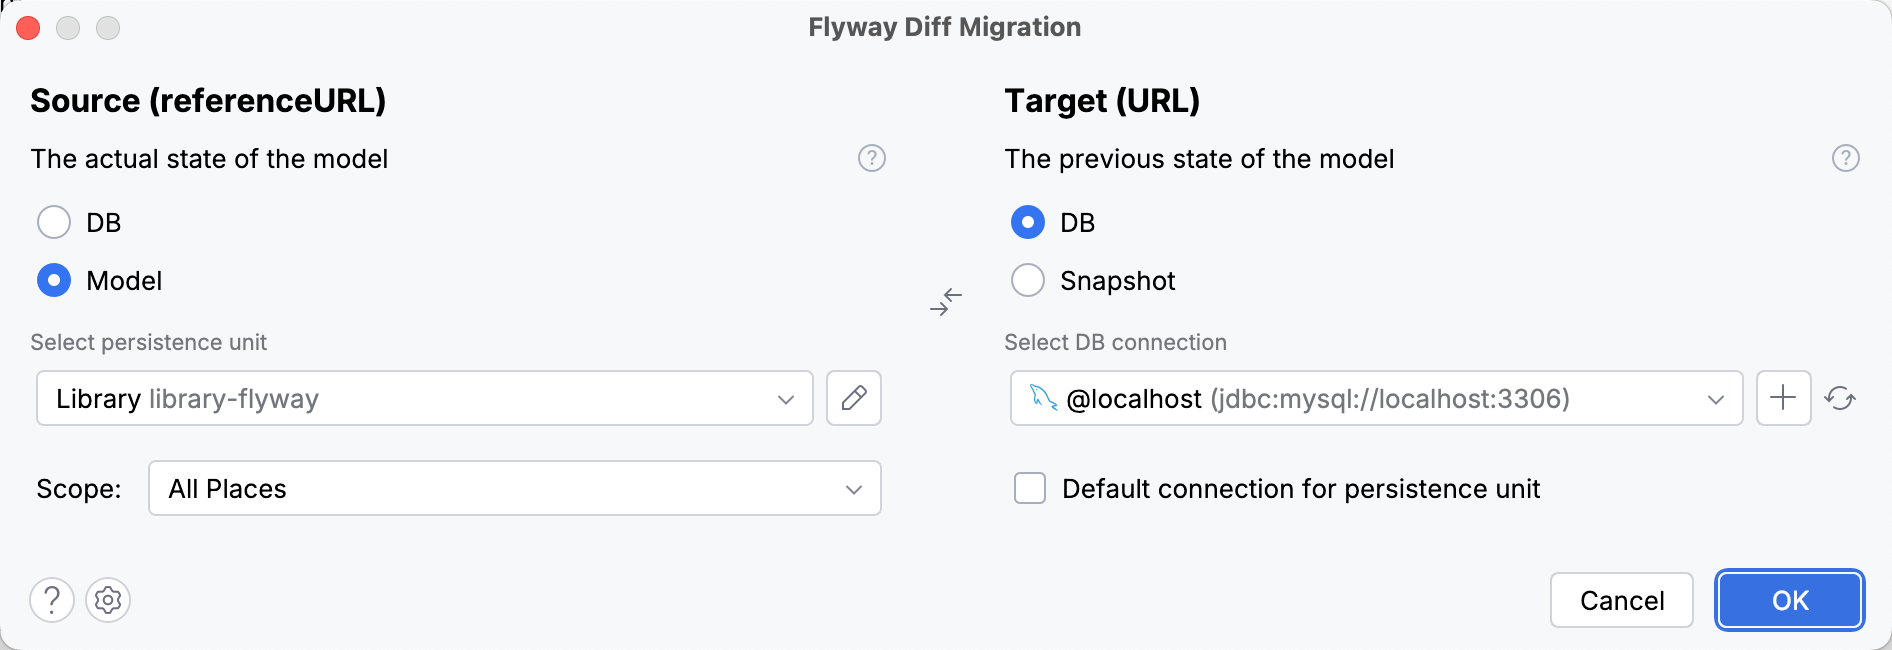
If you select DB or Model, IntelliJ IDEA automatically fills in the persistence unit, mapping context, or database connection, which you can change if needed.
Click OK.
In the Flyway Migration Preview dialog that opens, configure the migration and click Save.
Create an empty migration
Apart from generating migrations that are already filled with DDL scripts, you can also create an empty SQL migration and fill it out yourself.
Open the Project tool window (Alt+1).
Right-click the folder with your SQL migrations and select New |
 Flyway Empty Migration.
 Alternatively, select the folder, press Alt+Insert, and select
Flyway Empty Migration.
IntelliJ IDEA automatically fills in the prefix and version based on the Flyway plugin settings and opens the new migration in the editor.
To use quick navigation in a migration file, place the caret at a table name, press Ctrl+B, and select a destination from the Choose Declaration list. Note that you cannot invoke quick navigation on CREATE TABLE statements.

Flyway Migration Preview dialog
The Flyway Migration Preview dialog lets you review the generated DDL statements, organize them into migrations, and configure how to save them.
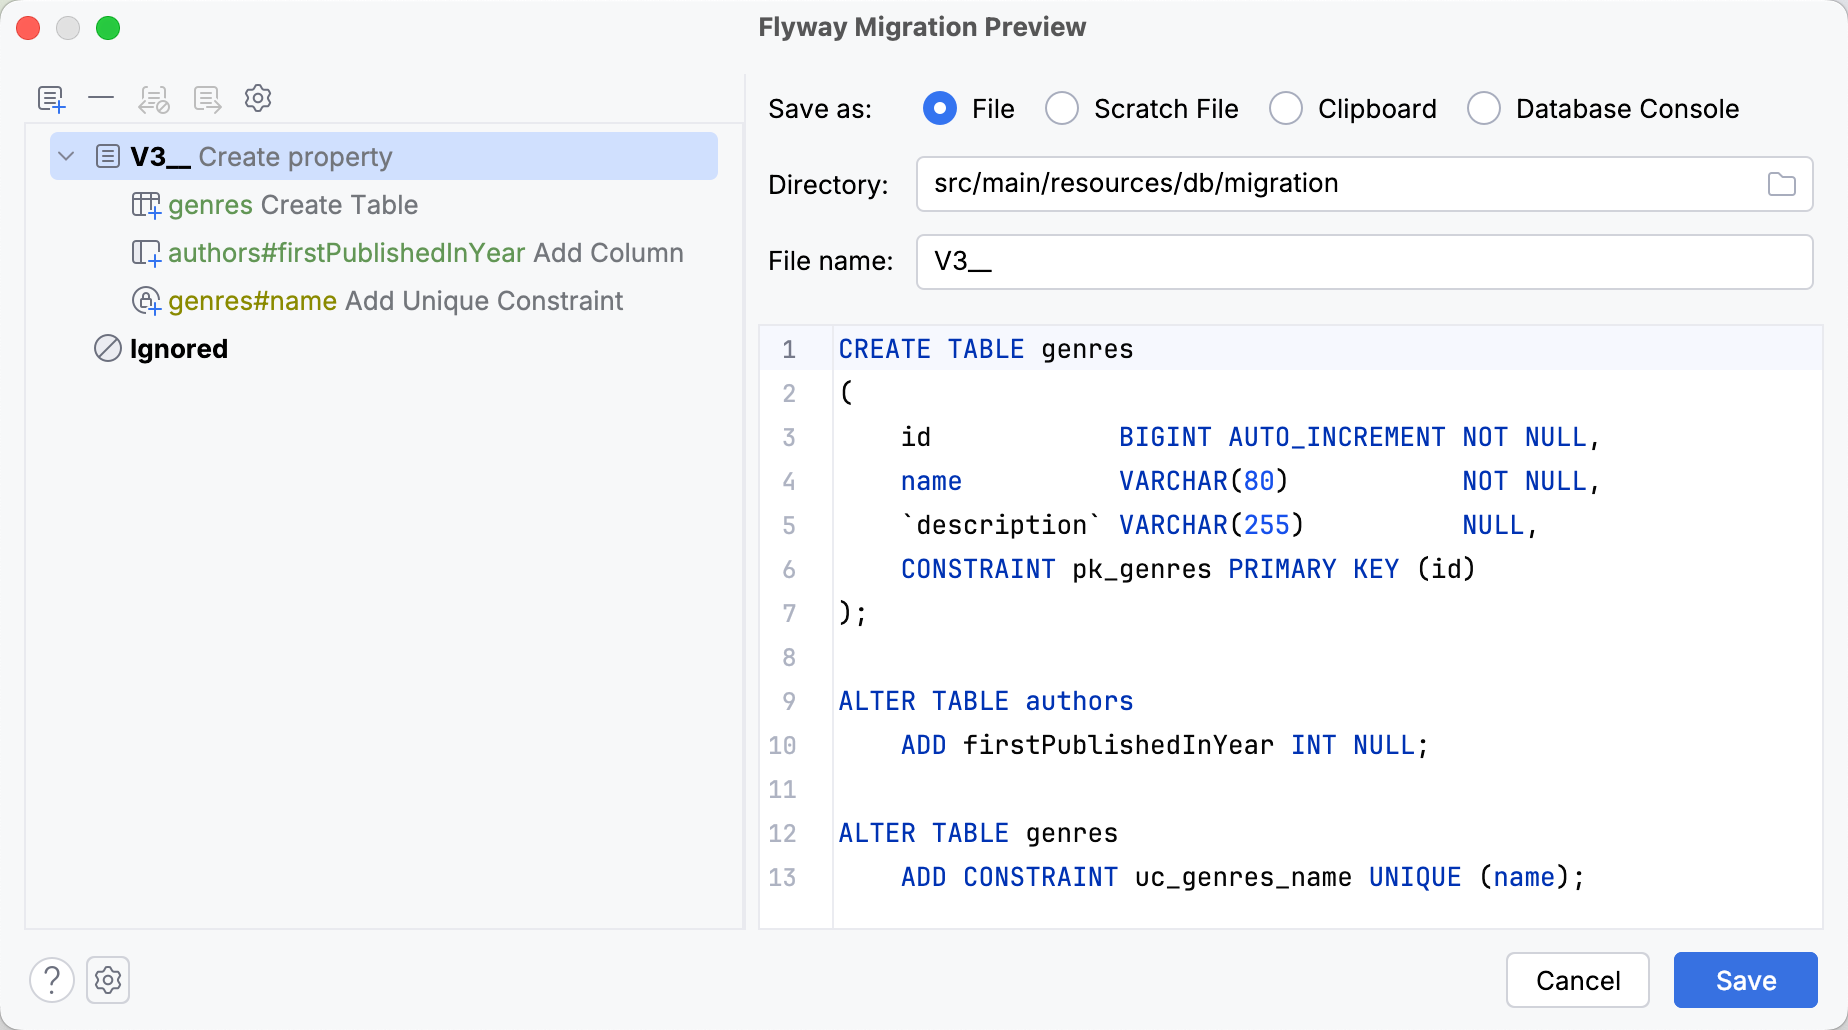
The left side of the dialog displays a tree of the generated schema changes. Each change is color-coded by its danger level and marked with an icon that represents the change type. If you select a specific change, IntelliJ IDEA displays its DDL statement on the right side of the dialog.
The icons above the change tree let you manage the generated changes and migrations:

Add Migration
Create an additional migration.

Remove from Migration
Remove the selected changes from the migration and, optionally, move them to the Ignored section so they are excluded from future migrations.

Restore from Ignored
Move the selected changes from the Ignored section to a migration of your choice.

Move to Another Migration
Move the selected changes to another migration.
If you select this option when there are no other migrations in the dialog, IntelliJ IDEA creates one automatically.

Show Other Actions
Interact with multiple changes at once: Select All with a specific danger level, Expand All, or Collapse All.
The right side of the dialog displays the generated DDL statements for the currently selected changes. If you select a migration (not an individual change), you can also use this section to specify how you want to save it:
Item | Description |
|---|---|
Save as | Choose whether to save the migration as an SQL file, save it as a scratch file, copy it to the clipboard, or open it in a query console. |
Directory | Select a location where IntelliJ IDEA should save the SQL file. |
File name | Set the file name. IntelliJ IDEA automatically fills in the prefix and version based on the Flyway plugin settings. |
Java-based migrations
Java-based migrations are an alternative to SQL migrations for changes that cannot easily be expressed in SQL. They are Java classes that implement Flyway's JavaMigration interface (typically by extending the BaseJavaMigration class) and follow Flyway's naming patterns.
Generate a Java migration
Press Ctrl+Shift+A, type
Flyway Java Migration, and press Enter.In the Flyway Java Migration dialog that opens, set the file name. IntelliJ IDEA automatically fills in the prefix and version based on the Flyway plugin settings.
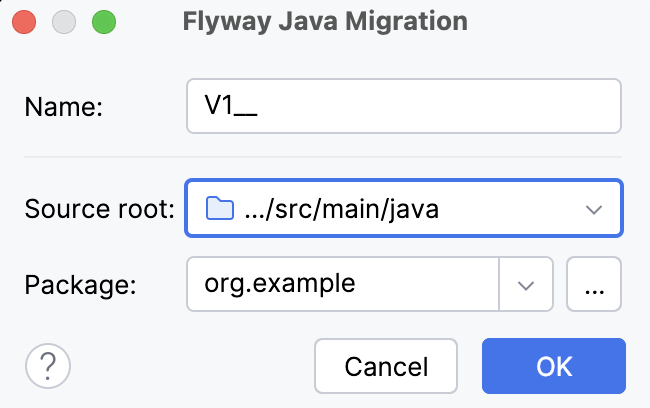
If needed, change the source root or package where the migration should be created.
Click OK.
IntelliJ IDEA opens the generated Java migration class in the editor.
Flyway callbacks
When you run the migration process, Flyway executes pending migrations one by one and finishes the process once all migrations are applied. While this flow suits most common scenarios, more complex projects may require running additional logic with each migration or at specific points in the migration lifecycle. Flyway supports such requirements through callbacks.
IntelliJ IDEA provides built-in actions for generating the following types of Flyway callbacks:
SQL callback: creates an empty SQL file with a name that matches one of the recognized callback events.
Java callback: generates a Java class that implements the
Callbackinterface and includes initial implementations of all its methods.
Create an empty SQL callback
Press Ctrl+Shift+A, type
Flyway SQL Callback, and press Enter.The Flyway SQL Callback dialog opens. IntelliJ IDEA automatically fills in the source root and directory where the callback will be created, but you can change them if needed.
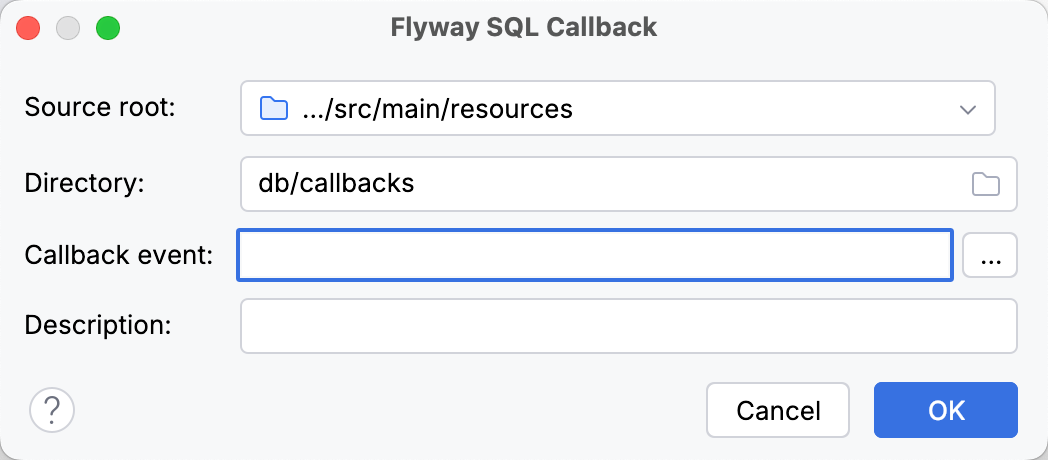
Click
 next to the Callback event field. This opens the Choose Callback Event dialog, where you can select at which point in the migration lifecycle your callback will run.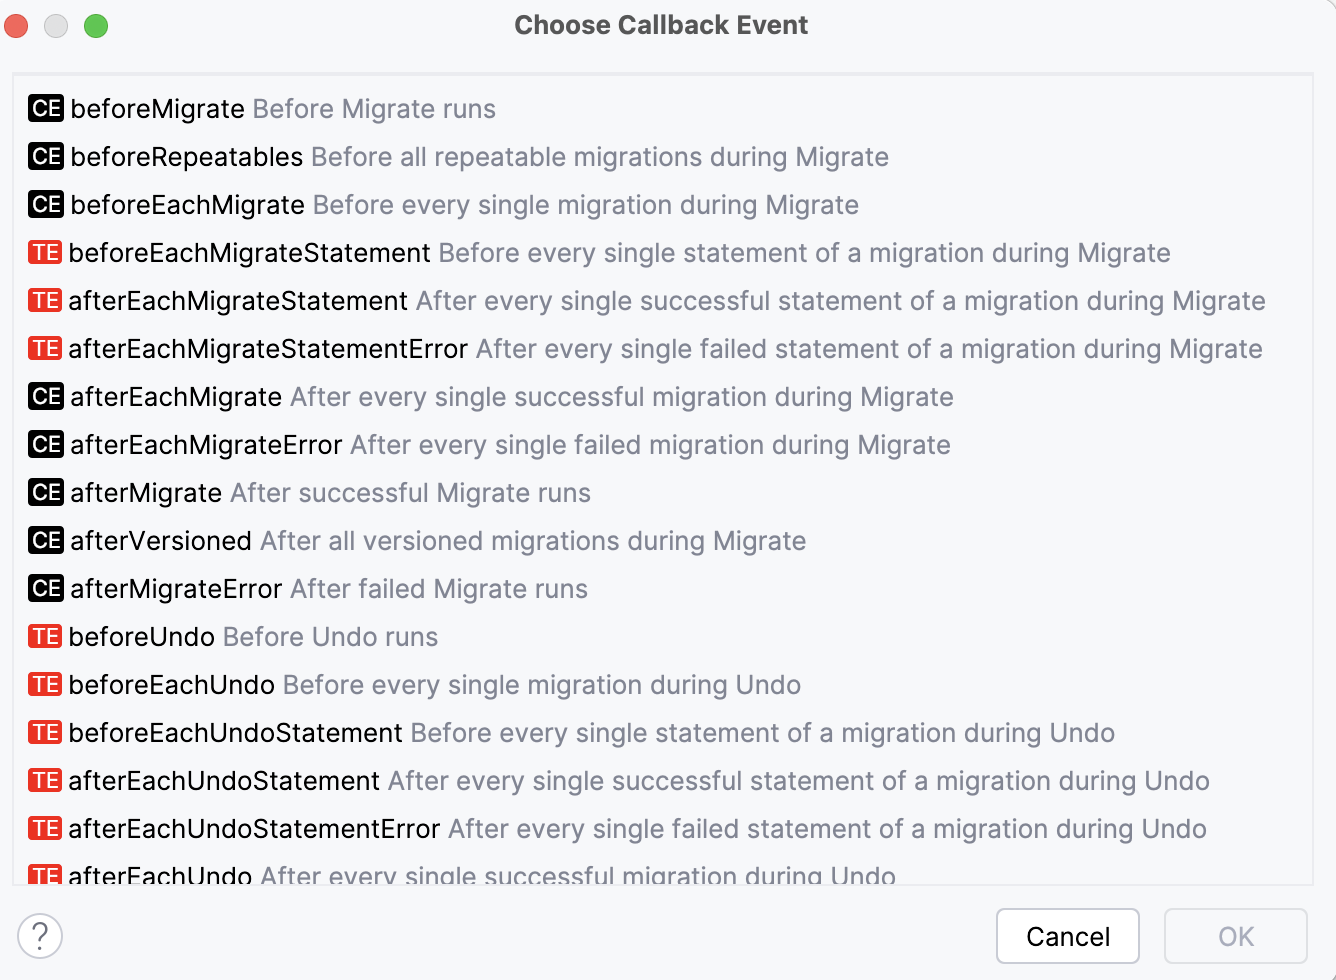
The icon next to each callback event indicates if it is available in Flyway Community Edition (CE) or if it requires the Enterprise Edition (TE).
(Optional) Include a callback description. This value will be appended to the file name.
Click OK.
The IDE opens the callback file in the editor. You can now add SQL statements that will be executed during the selected callback event.
Generate a Java callback
Press Ctrl+Shift+A, type
Flyway Java Callback, and press Enter.The Flyway Java Callback dialog opens. Its options determine the callback class name, location, and initial implementations of the interface methods.
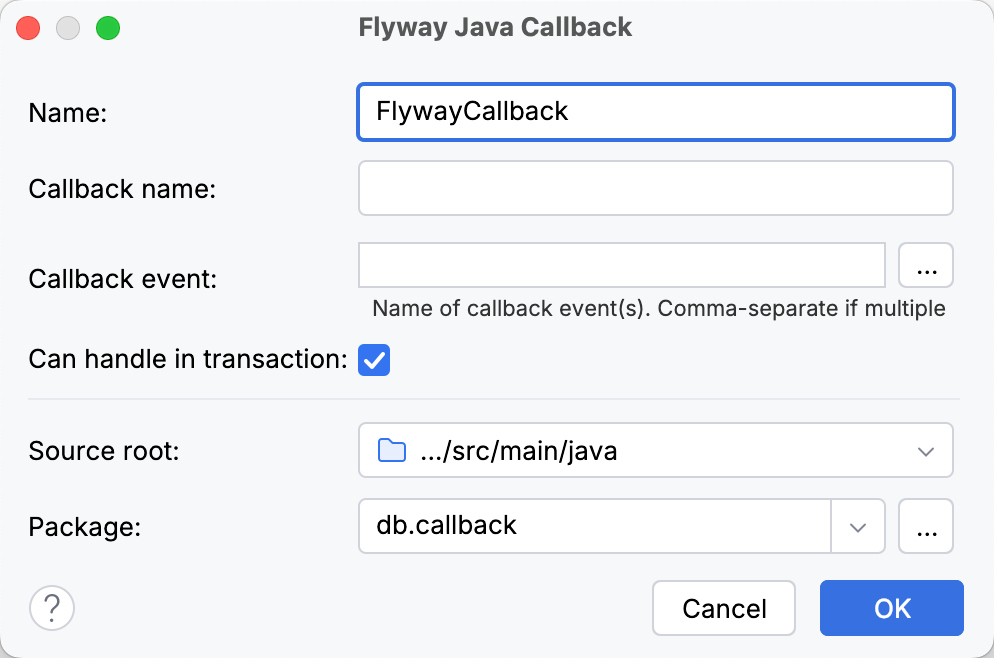
Configure the callback options:
Item
Description
Name
Specify the class name.
Callback name
Specify the callback name. It will be the return value of the
getCallbackName()method.Callback event
Specify at which points in the migration lifecycle Flyway will call the
handle()method from this class. IntelliJ IDEA will automatically add them to thesupports()method.You can type the event names manually or click
to select them from the Choose Callback Event dialog.Can handle in transaction
If you want the
canHandleInTransaction()method to returntrue, select this option.Source root
Select the source root where you want to create the callback.
Package
Select the package where you want to create the callback.
Click OK.
IntelliJ IDEA opens the generated Java callback class in the editor.
Deploy migrations
Once your migrations and callbacks are ready, you can use a dedicated Flyway run configuration to trigger the migration process and bring your database up to date with your code. You can launch this run configuration from multiple places in IntelliJ IDEA.
Run the migration process from the run widget
If the Flyway run configuration is already selected in the widget, click
 Run.
Run. Alternatively, press Shift+F10.
If another configuration is selected in the widget, click its name. In the popup that opens, find the Flyway run configuration and click
Run next to it.Alternatively, press Alt+Shift+F10. In the popup that opens, select the Flyway run configuration.
IntelliJ IDEA launches the run configuration in the Run tool window.
Run the migration process from a tool window
You can launch the Flyway run configuration from the following tool windows:
Persistence tool window:
Right-click anywhere in the tool window and select
 Run Flyway Migrate….
Database tool window:
Go to the toolbar and select
Run Flyway Migrate….Right-click a database, schema, or table, and select
Run Flyway Migrate….
Project tool window:
Right-click the directory with your SQL migration files and select
 Run |
Run |  Flyway.
IntelliJ IDEA launches the run configuration in the Run tool window.
Run the migration process from the configuration file
You can launch the Flyway run configuration from the following files:
Flyway configuration file (flyway.conf)
Spring Boot configuration file (application.properties or application.yml)
Open the configuration file in the editor.
In the gutter, click
Run Flyway Migrate….
IntelliJ IDEA launches the run configuration in the Run tool window.
Migration statuses
Typically, if you want to check which migrations were already executed and with what result, you need to either run Flyway's info command or inspect its schema history table in your database. IntelliJ IDEA provides a faster alternative by displaying the statuses of your SQL migrations directly in the IDE.
Statuses of whole migration files are displayed in the Project tool window (Alt+1).
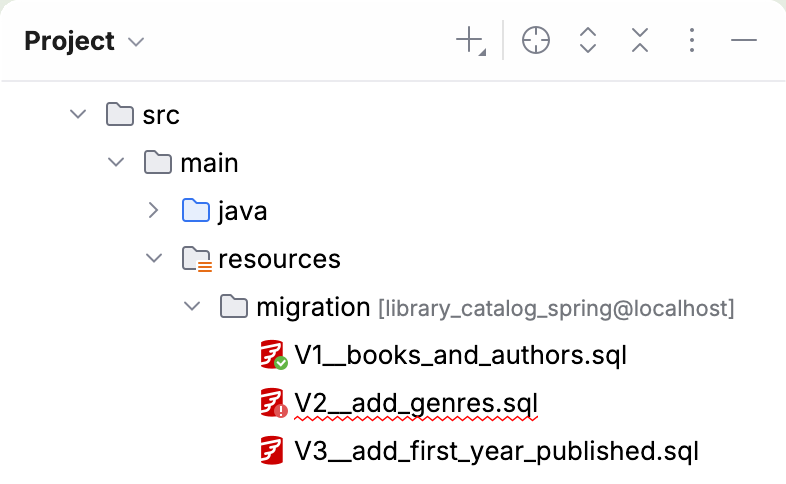
Each migration is represented by the Flyway logo (), and its status is reflected by a small icon in the logo's lower-right corner:
Icon | Status |
|---|---|
| The migration was successfully applied to the database. |
| The migration was executed, but one of its SQL statements failed. If a failed migration is additionally underlined in red, you can find out more about the error by hovering over the file name. 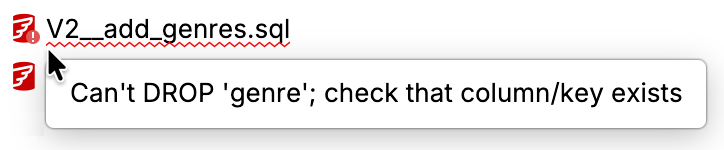 To check which SQL statement caused the error, open the underlined migration in the editor and look for a red exclamation mark in the gutter. 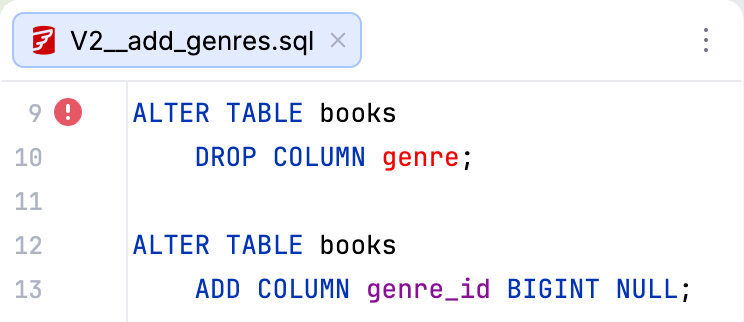 |
(None) | The migration was not executed yet. |


Flyway run configuration
The Flyway run configuration lets you execute your SQL migration files and callbacks against a connected database without having to run the whole application or use the terminal. Under the hood, this configuration runs the Flyway migrate command.
Create a Flyway run configuration
Open the Run/Debug Configurations dialog:
In the main toolbar, click the run widget and select Edit Configurations….
Alternatively, go to .
On the left side of the dialog, select
 Add New Configuration | Flyway.
Set up the run configuration options.
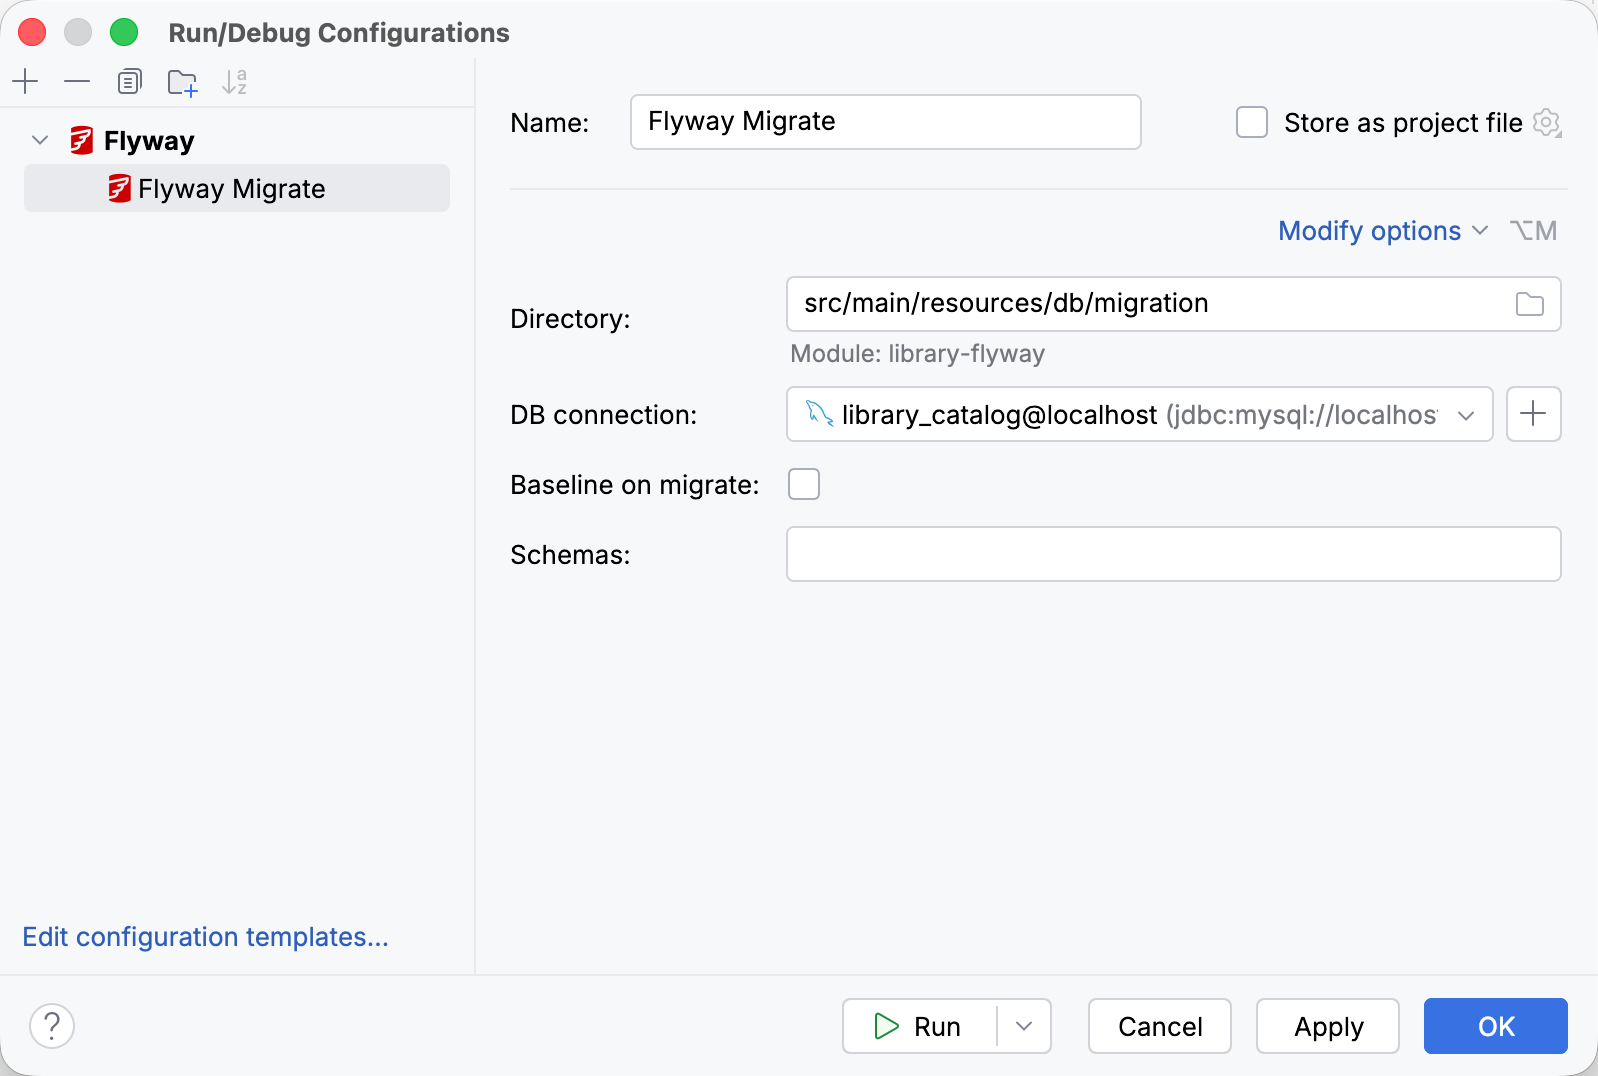
Reference: Run configuration options
Item | Description |
|---|---|
Name | Specify a name for the run configuration to quickly identify it among others when editing or running. |
Store as project file | Save the run configuration settings to a file that you can share with other team members. The default location is .idea/runConfigurations. However, if you do not want to share the .idea directory, you can save the configuration to any other directory within the project. By default, this option is disabled, and IntelliJ IDEA stores run configuration settings in .idea/workspace.xml. |
Required options
Item | Description |
|---|---|
DB connection | Specify which database Flyway should target when running the migrations. You need to select an existing data source from the Database tool window or create a new one by clicking |
Directories | Specify the paths to the directories with your SQL migrations. Learn more about this setting from the official Flyway documentation. |
 .
.Additional options
To add these options to your run configuration, select Modify options on the right side of the dialog.
Item | Description |
|---|---|
Baseline on migrate | Decide how Flyway will behave if you try to execute migrations against a non-empty database schema that does not have a schema history table:
Learn more about this setting from the official Flyway documentation. |
Schemas | Specify which database schema Flyway should target when running the migrations. In case of multiple values, separate them with commas. Learn more about this setting from the official Flyway documentation. |
Reference: Flyway plugin settings
The Flyway plugin settings in IntelliJ IDEA let you configure the naming patterns that the IDE uses when generating migrations.
To access the Flyway plugin settings, open Settings (Ctrl+Alt+S) and go to .
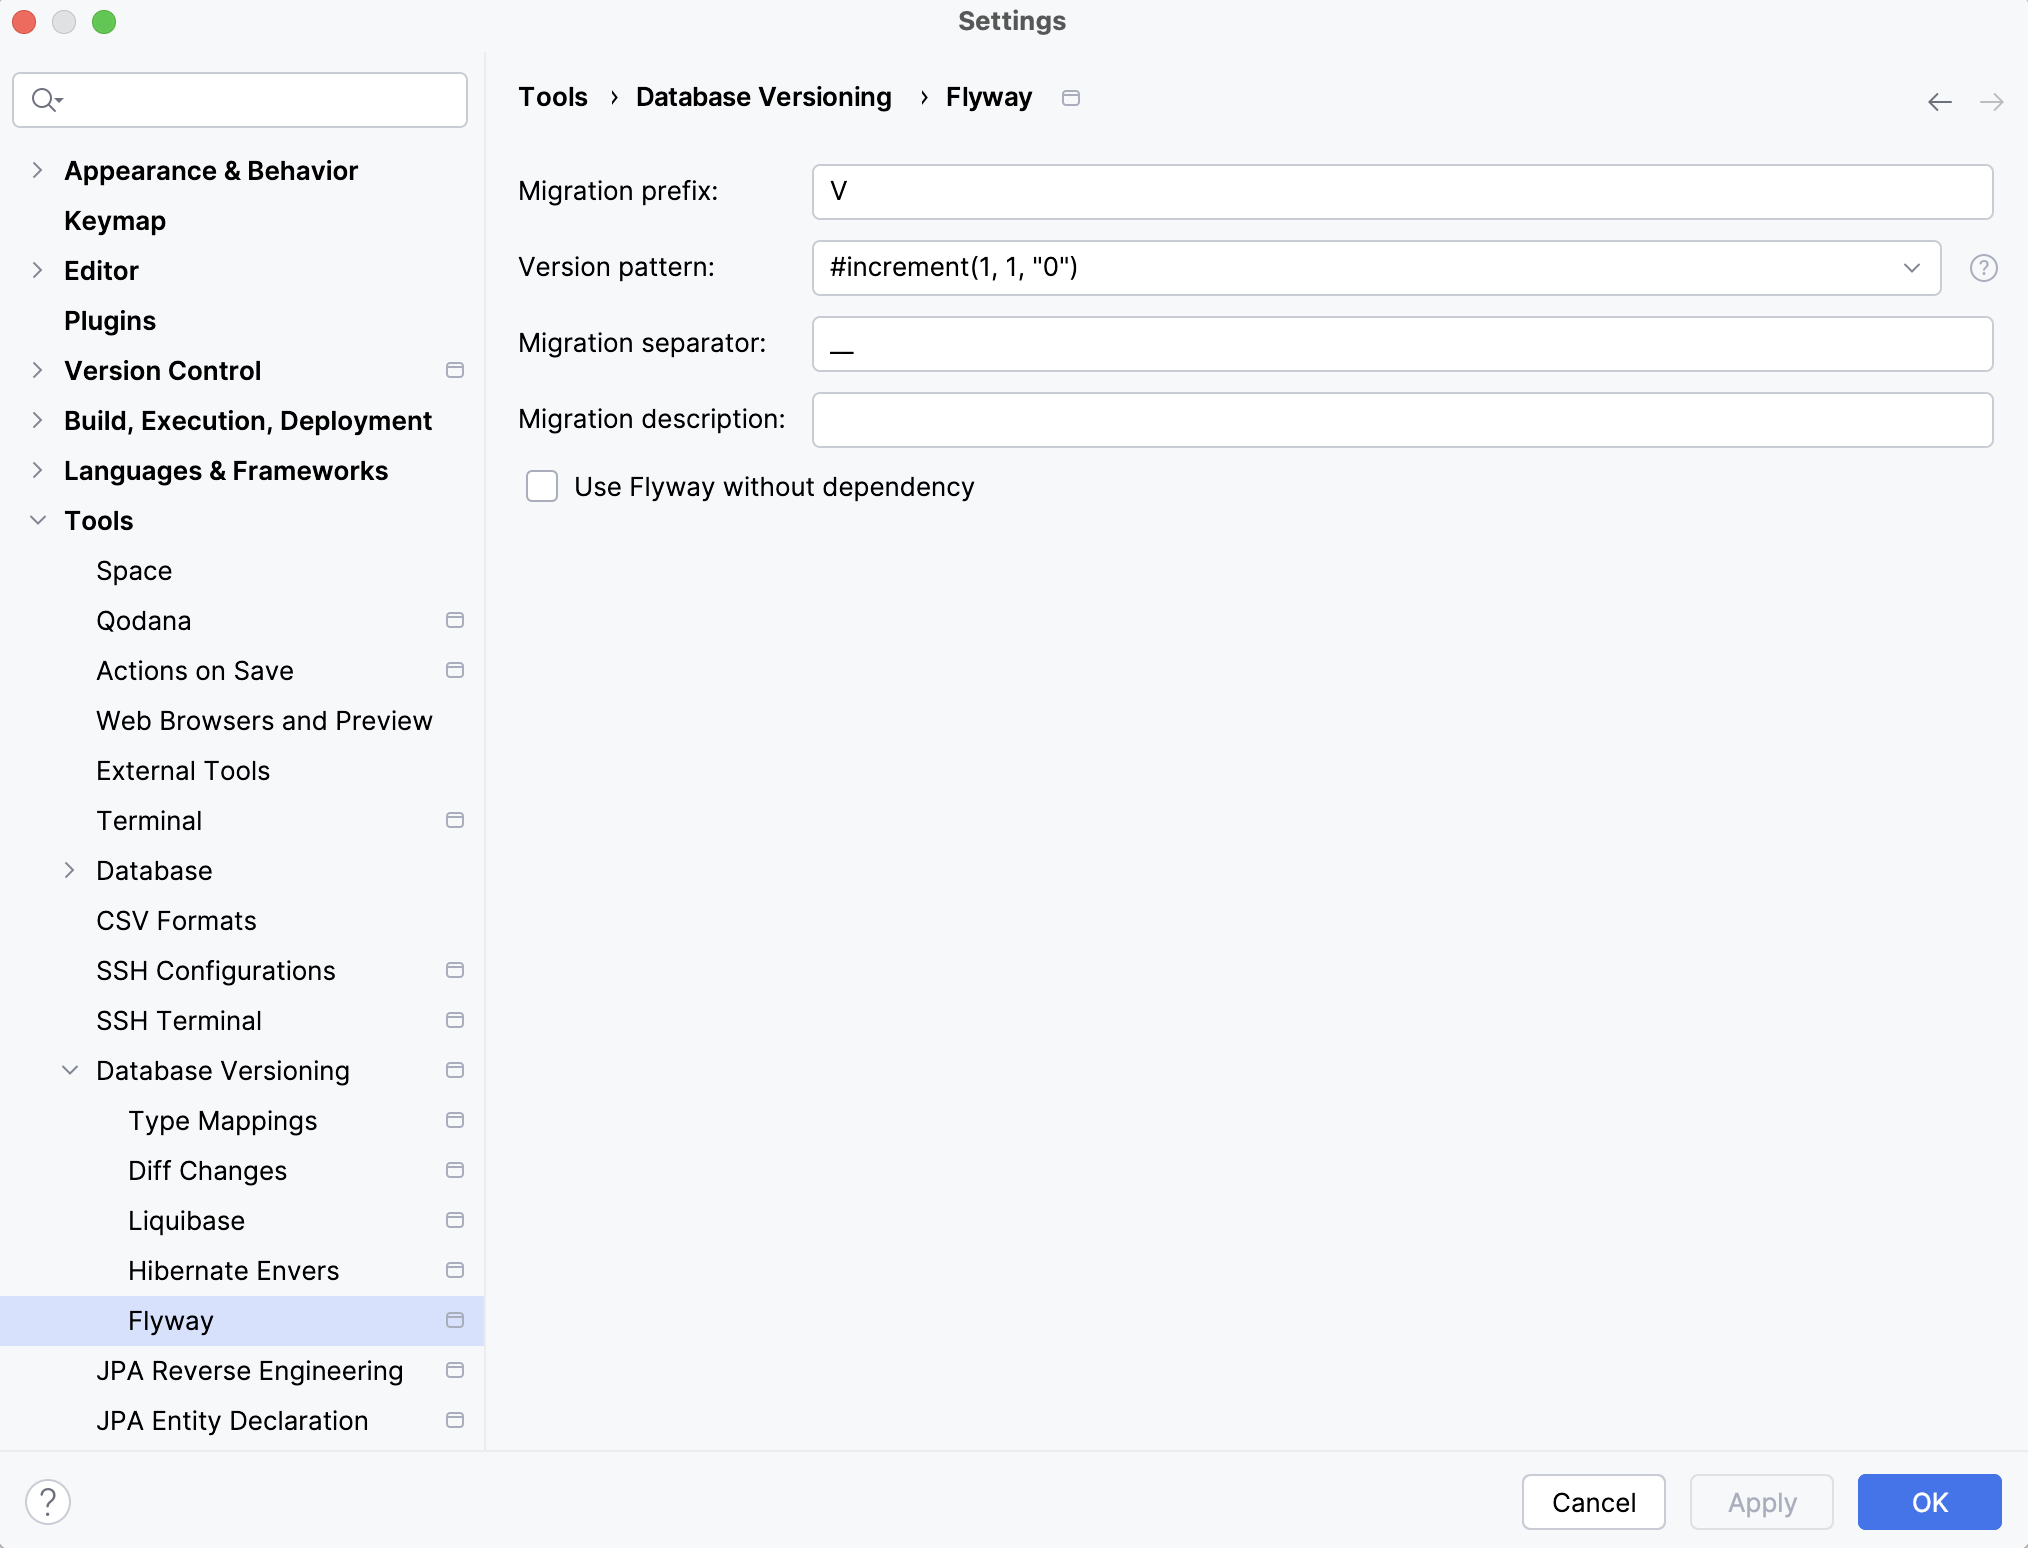
You can configure the following settings:
Item | Description |
|---|---|
Migration prefix | Specify what prefix the IDE should use when generating migration file names. |
Version pattern | Specify a pattern the IDE should use when setting the file version. You can include the following macros:
|
Migration separator | Specify the separator between the file version and description. |
Migration description | Specify the description that will be added after the separator in each file name. |
Use Flyway without dependency | If you want to use Flyway features in IntelliJ IDEA without adding the dependency to your build files, select this option. |
Troubleshooting
- Cannot create an empty migration
Make sure that:
You added the Flyway dependency to your project's build file.
You connected to the corresponding database, and the connection is active in the Database tool window.
Your configuration file (application.properties or application.yml) meets the following criteria:
spring.flyway.locationspoints to either the directory where you are invoking the action or its parent directory.spring.flyway.urlorspring.datasource.urlmatches the URL you used to connect to the database.
- Cannot run the migration process from the configuration file
Make sure that:
You added the Flyway dependency to your project's build file.
You connected to the corresponding database, and the connection is active in the Database tool window.
Your configuration file (application.properties or application.yml) meets the following criteria:
spring.flyway.locationspoints to the directories with your migration files.spring.flyway.urlorspring.datasource.urlmatches the URL you used to connect to the database.
- Migrations are displayed without status icons
Make sure that:
You added the Flyway dependency to your project's build file.
You connected to the corresponding database, and the connection is active in the Database tool window.
Your configuration file (application.properties or application.yml) meets the following criteria:
spring.flyway.locationspoints to the directories with your migration files.spring.flyway.urlorspring.datasource.urlmatches the URL you used to connect to the database.spring.flyway.default-schemamatches the database schema you migrated.
You already ran the migration process, and its results were recorded in the schema history table.
- Cannot create an empty migration
Make sure that:
You added the Flyway dependency to your project's build file.
You connected to the corresponding database, and the connection is active in the Database tool window.
Your configuration file (flyway.conf) meets the following criteria:
flyway.locationspoints to either the directory where you are invoking the action or its parent directory.flyway.urlmatches the URL you used to connect to the database.
- Cannot run the migration process from the configuration file
Make sure that:
You added the Flyway dependency to your project's build file.
You connected to the corresponding database, and the connection is active in the Database tool window.
Your configuration file (flyway.conf) meets the following criteria:
flyway.locationspoints to the directories with your migration files.flyway.urlmatches the URL you used to connect to the database.
- Migrations are displayed without status icons
Make sure that:
You added the Flyway dependency to your project's build file.
You connected to the corresponding database, and the connection is active in the Database tool window.
Your configuration file (flyway.conf) meets the following criteria:
flyway.locationspoints to the directories with your migration files.flyway.urlmatches the URL you used to connect to the database.flyway.defaultSchemamatches the database schema you migrated.
You already ran the migration process, and its results were recorded in the schema history table.