# Get started with Kotlin
IntelliJ IDEA provides first-class support for Kotlin. It includes Kotlin-specific project templates, coding assistance, refactorings, debugging, analysis tools, and so on. Most of the Java tools are available for Kotlin, so, for example, if you know how to use Java debugger or refactorings, your experience will be enough to use these in Kotlin. In this topic, you will find the instructions to get started with Kotlin in IntelliJ IDEA.
> **Note:**
> This page covers Kotlin support in IntelliJ IDEA. For the language itself, refer to [Kotlin documentation](https://kotlinlang.org).
[Video](https://www.youtube.com/v/0bfEO6z-Bgs)
Procedure: Enable the Kotlin plugin
This functionality relies on the [Kotlin](https://plugins.jetbrains.com/plugin/6954-kotlin) plugin, which is bundled and enabled in IntelliJ IDEA by default. If the relevant features are not available, make sure that you did not disable the plugin.
1. Press `Ctrl+Alt+S` (Windows), `⌘ Comma` (macOS), `⌘ Comma` (IntelliJ IDEA Classic (macOS)), `⌘ Comma` (macOS System Shortcuts), `Ctrl+Alt+S` (XWin), `Ctrl+Alt+S` (GNOME), `Ctrl+Alt+S` (KDE), `Ctrl+Alt+S` (Emacs), `Ctrl+Alt+S` (Sublime Text), `⌘ Comma` (Sublime Text (macOS)), `Ctrl+Alt+S` (NetBeans), `Ctrl+Alt+S` (Visual Studio), `⌘ Comma` (Visual Studio (macOS)), `Ctrl+Alt+S` (Eclipse), `⌘ Comma` (Eclipse (macOS)) to open settings and then select `Plugins`.
2. Open the Installed tab, find the Kotlin plugin, and select the checkbox next to the plugin name.
> **Tip:**
> To create a [Kotlin Multiplatform project](https://www.jetbrains.com/kotlin-multiplatform/), see the [Kotlin Multiplatform quickstart](https://www.jetbrains.com/help/kotlin-multiplatform-dev/quickstart.html) guide. You can select one or more platforms according to your needs.
## Create a Kotlin project
This is a general-purpose project without specific frameworks. You will be able to add the necessary frameworks and technologies later at any time.
Procedure:
1. On the Welcome screen, click New Project. Alternatively, in the main menu, go to `File | New | Project`.
2. From the list on the left, select Kotlin.
3. Name the new project and change its location if necessary.
4. Select the Create Git repository checkbox to place the new project under version control.
You will be able to do it later at any time.
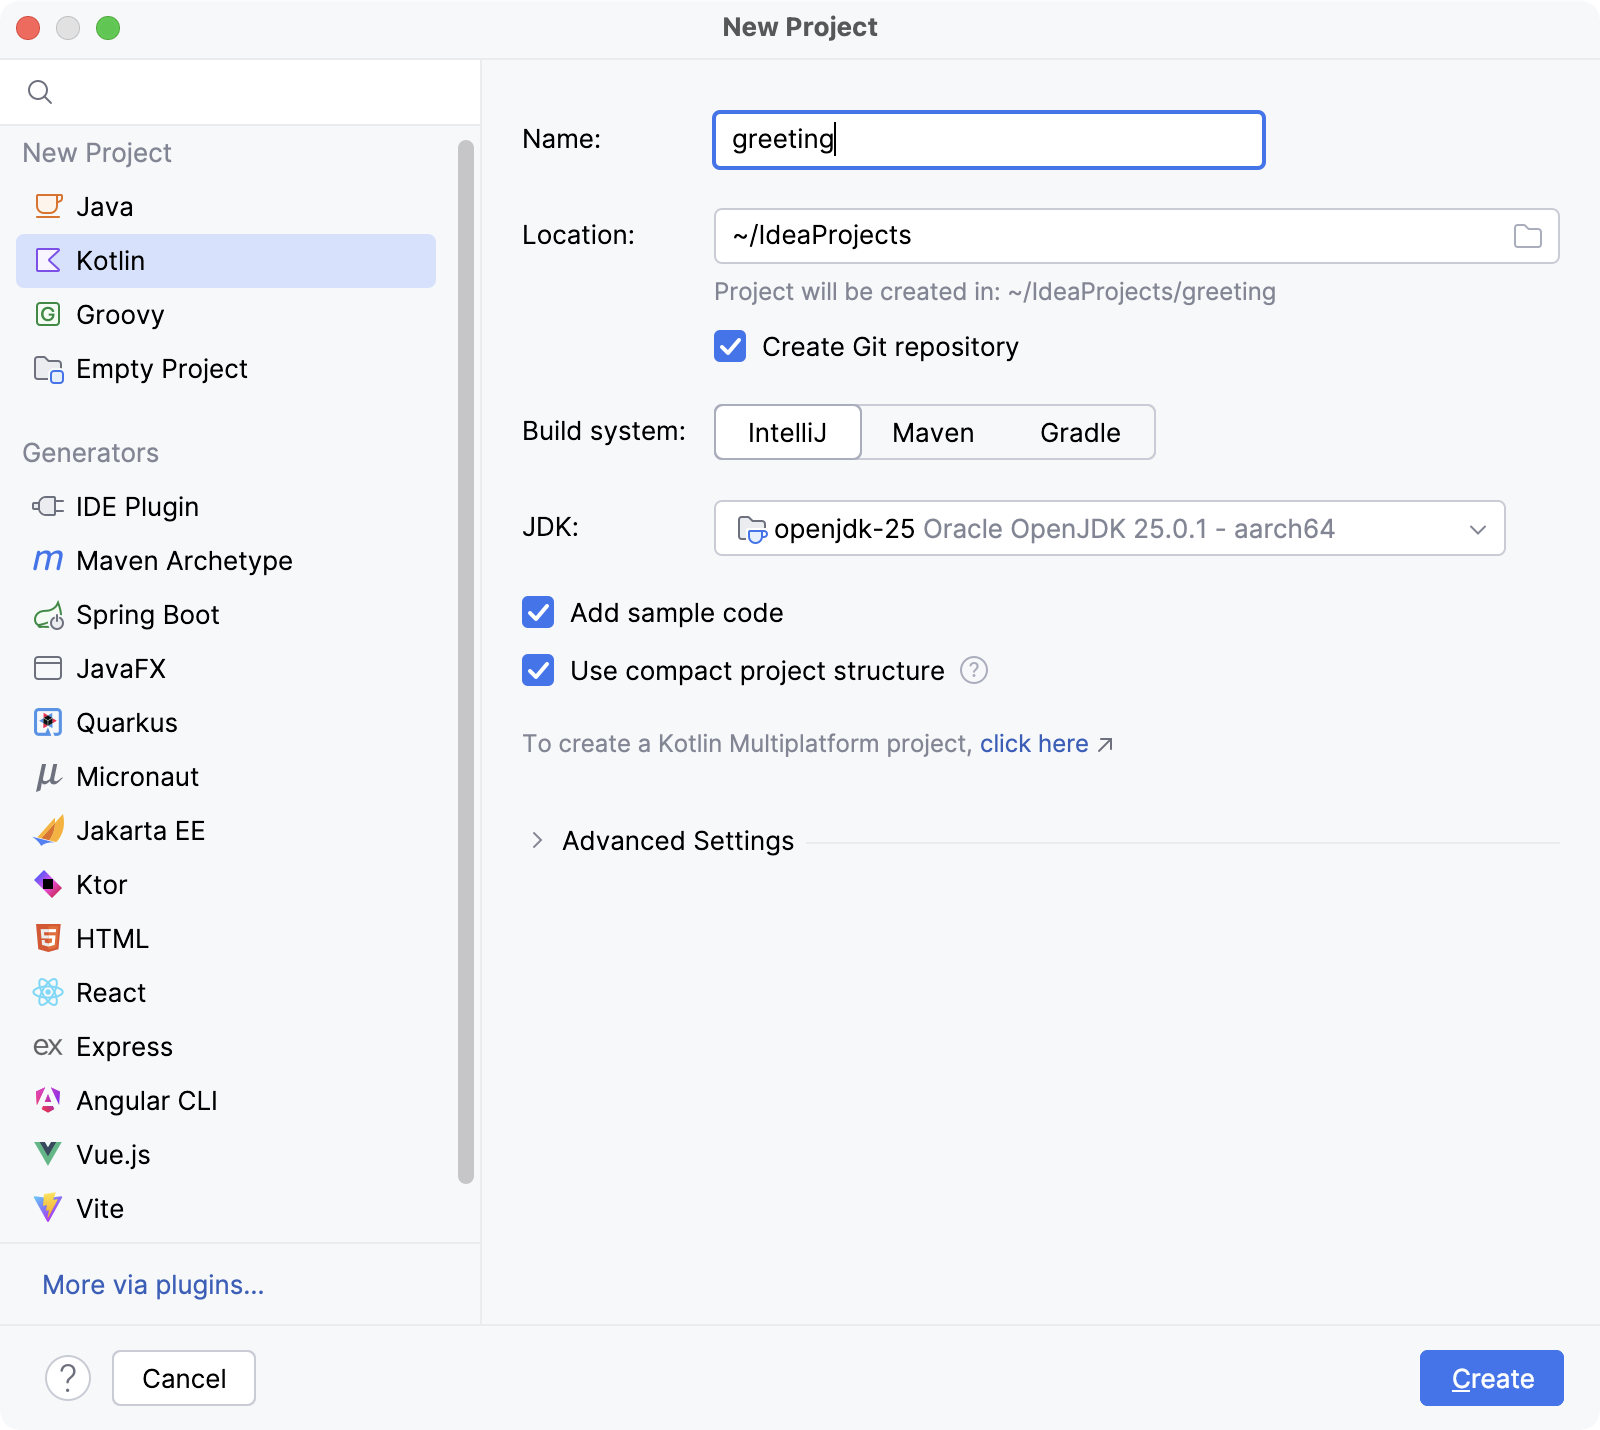
5. Select the IntelliJ build system. It's a native builder that doesn't require downloading additional artifacts.
If you want to create a more complex project that needs further configuration, select [Maven](maven-support.html) or [Gradle](gradle.html). For Gradle, choose a language for the build script: Groovy or Kotlin.
6. From the JDK list, select the [JDK](sdk.html#jdk) that you want to use in your project.
* If the JDK is installed on your computer, but not defined in the IDE, select  Add JDK from Disk… and specify the path to the JDK home directory.
* If you don't have the necessary JDK on your computer, select  Download JDK .
> **Tip:**
> If you don't know which distribution to choose, and you don't have specific requirements that instruct you to use one of the existing distributions, use Oracle OpenJDK.
For more information about JDK and how to install it, see the [Java Development
Kit
(JDK) guide](sdk.html#jdk).
7. Enable the Add sample code option to create a file with a sample `Hello World!` application.
8. Click Create.
After creating your project, you can start writing Kotlin code. See the [Create your first Kotlin
app](create-your-first-kotlin-app.html#write-code) tutorial for a quick start.
## Mix Java and Kotlin in one project
You can call Java code from Kotlin and vice versa. This enables you to gradually transition a project to Kotlin or use both languages in parallel, for example, by using Kotlin for testing an existing Java codebase.
> **Note:**
> The peculiarities of Kotlin/Java interop at the language level are not covered in this topic. For more information, refer to [Calling Java from Kotlin](https://kotlinlang.org/docs/java-interop.html) and [Calling Kotlin from Java](https://kotlinlang.org/docs/java-to-kotlin-interop.html) in the Kotlin language documentation.
To start using Kotlin in your project, make sure that the Kotlin plugin is enabled and the Kotlin dependency is added to your project.
Procedure: Add Kotlin dependency to an existing JVM project
* If your project uses the IntelliJ IDEA build tool, it adds the Kotlin dependency automatically. The first time you create a Kotlin file in the project, a notification appears to confirm that the Kotlin configuration is ready.
* For other build tools, follow the steps in:
* [Gradle](https://kotlinlang.org/docs/gradle.html)
* [Maven](https://kotlinlang.org/docs/maven.html)
* [Ant](https://kotlinlang.org/docs/ant.html)
Procedure: Convert Java to Kotlin
IntelliJ IDEA allows you to automatically convert your Java code to Kotlin. The resulting code is not supposed to be perfect, however, it may be helpful in some situations.
If you are not satisfied with the result of conversion, you can roll it back with `Ctrl+Z` (Windows), `⌘ Z` (macOS), `⌘ Z` (IntelliJ IDEA Classic (macOS)), `⌘ Z` (macOS System Shortcuts), `Ctrl+Z` (XWin), `Ctrl+Z` (GNOME), `Ctrl+Z` (KDE), `Ctrl+Shift+Minus` (Emacs), `Ctrl+Z` (Sublime Text), `⌘ Z` (Sublime Text (macOS)), `Ctrl+Z` (NetBeans), `Ctrl+Z` (Visual Studio), `⌘ Z` (Visual Studio (macOS)), `Ctrl+Z` (Eclipse), `⌘ Z` (Eclipse (macOS)).
* Paste Java code in a Kotlin file. In the dialog that appears, click Yes.
* With a Java file open in the editor, go to the main menu and select `Code | Convert Java to Kotlin` or press `Ctrl+Alt+Shift+K` (Windows), `⌘ ⌥ ⇧ K` (macOS), `⌘ ⌥ ⇧ K` (IntelliJ IDEA Classic (macOS)), `⌘ ⌥ ⇧ K` (macOS System Shortcuts), `Ctrl+Alt+Shift+K` (XWin), `Ctrl+Alt+Shift+K` (GNOME), `Ctrl+Alt+Shift+K` (KDE), `Ctrl+Alt+Shift+K` (Emacs), `Ctrl+Alt+Shift+K` (Sublime Text), `⌘ ⌥ ⇧ K` (Sublime Text (macOS)), `Ctrl+Alt+Shift+K` (NetBeans), `Ctrl+Alt+Shift+K` (Visual Studio), `⌘ ⌥ ⇧ K` (Visual Studio (macOS)), `Ctrl+Alt+Shift+K` (Eclipse), `⌘ ⌥ ⇧ K` (Eclipse (macOS)).
If you would like to get all the Kotlin news right in your inbox, make sure to subscribe to the [Kotlin newsletter](https://lp.jetbrains.com/subscribe-to-kotlin-news/).
## See also
### External Links
[Java to Kotlin comparison](https://kotlinlang.org/docs/comparison-to-java.html)