<html><head><link rel="canonical" href="https://www.jetbrains.com/help/idea/installing-and-removing-external-software-using-node-package-manager.html.md/" data-react-helmet="true"/></head><body># npm, pnpm, and Yarn

IntelliJ&nbsp;IDEA integrates with the [npm](https://docs.npmjs.com/), [pnpm](https://pnpm.io), [Yarn](https://classic.yarnpkg.com/lang/en/), [Yarn
2](https://yarnpkg.com/getting-started), Yarn&nbsp;3, and [Bun](https://bun.sh/). so you can install, locate, update, and remove packages of reusable code from inside the IDE, in the built-in [Terminal](terminal-emulator.html).

IntelliJ&nbsp;IDEA also lets you run and debug npm, Yarn, and pnpm scripts. IntelliJ&nbsp;IDEA parses `package.json` files, recognizing definitions of scripts, shows scripts in a tree view, and lets you navigate between a script in the tree and its definition in the `package.json` file. For more information, refer to [npm](https://docs.npmjs.com/misc/scripts), [Yarn](https://classic.yarnpkg.com/en/docs/cli/run/), and [pnpm](https://pnpm.io/cli/run) official websites.

&gt; **Warning:**
&gt; Debugging scripts is only supported in the Ultimate edition.

IntelliJ&nbsp;IDEA detects projects with [Yarn workspaces](https://yarnpkg.com/features/workspaces#) and, during project analysis, indexes all the dependencies that are listed in the `package.json` files of the workspaces but are located in the root `node_modules` folder.

## Before you start

Procedure:

* Download and install [Node.js](http://nodejs.org/#download).  Note that npm is also installed, so if you are going to use it, you are through with the preliminary steps.

* To use Yarn, install it as described on the [Yarn official website](https://yarnpkg.com/getting-started/install).

* To use pnpm,    open your command-line shell or  the embedded Terminal (`Alt+F12` (Windows), `⌥ F12` (macOS), `⌥ F12` (IntelliJ IDEA Classic (macOS)), `⌘ ⌃ T` (macOS System Shortcuts), `Alt+F12` (XWin), `Alt+F12` (GNOME), `Alt+F12` (KDE), `Alt+F12` (Emacs), `Alt+F12` (Sublime Text), `⌥ F12` (Sublime Text (macOS)), `Alt+F12` (NetBeans), `Ctrl+Alt+1` (Visual Studio), `⌘ ⌃ 1` (Visual Studio (macOS)), `Alt+F12` (Eclipse), `⌥ F12` (Eclipse (macOS)))  and type:

`npm install --g pnpm`

Learn more from the [pnpm official website](https://pnpm.io/installation).

* To use Bun, install it as described on the [Bun official website](https://bun.sh/docs/installation).

## Choose a project package manager

With IntelliJ&nbsp;IDEA, you can choose whether to use npm, Yarn, Yarn 2, Bun, or pnpm in a project.

By default, IntelliJ&nbsp;IDEA suggests npm. However, if you open a project with a `yarn.lock` file and Yarn is installed on your computer, IntelliJ&nbsp;IDEA automatically changes the package manager for this project to Yarn.

Accordingly, if you open a project with a `pnpm-lock` file and pnpm is installed on your computer, IntelliJ&nbsp;IDEA automatically changes the package manager for this project to pnpm.

If your project contains a `bun.lock` or a `bun.lockb` file and Bun is installed on your computer, IntelliJ&nbsp;IDEA suggests that you use Bun instead of npm for the current project.

You can also [set Yarn 1 or pnpm as default IntelliJ&nbsp;IDEA package
manager](#ws_npm_yarn_set_yarn_default).

Procedure:

1. In the Settings dialog (`Ctrl+Alt+S` (Windows), `⌘ Comma` (macOS), `⌘ Comma` (IntelliJ IDEA Classic (macOS)), `⌘ Comma` (macOS System Shortcuts), `Ctrl+Alt+S` (XWin), `Ctrl+Alt+S` (GNOME), `Ctrl+Alt+S` (KDE), `Ctrl+Alt+S` (Emacs), `Ctrl+Alt+S` (Sublime Text), `⌘ Comma` (Sublime Text (macOS)), `Ctrl+Alt+S` (NetBeans), `Ctrl+Alt+S` (Visual Studio), `⌘ Comma` (Visual Studio (macOS)), `Ctrl+Alt+S` (Eclipse), `⌘ Comma` (Eclipse (macOS))), go to `Languages &amp; Frameworks | JavaScript Runtime`. The [JavaScript Runtime](javascript-runtime.html) page opens.

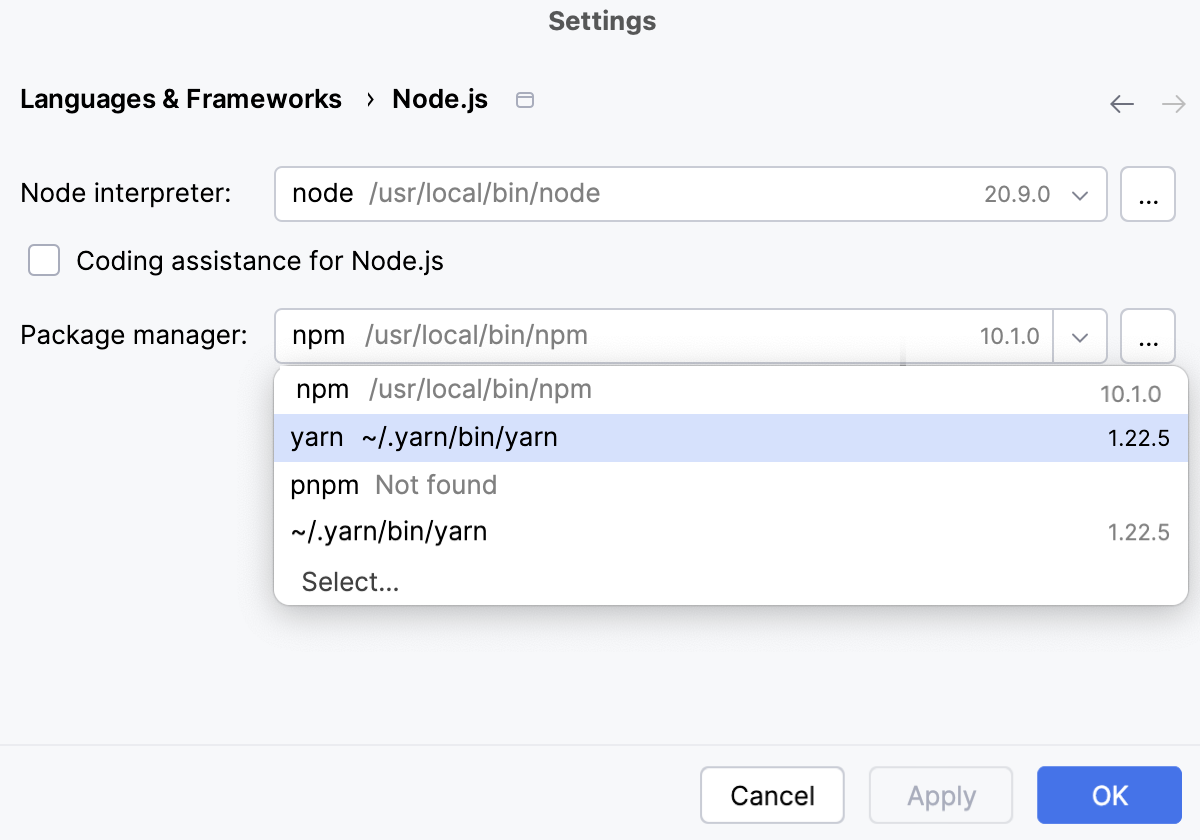
2. In the Package manager field, specify the package manager for your project.
![Select project package manager: choose the system default installation](https://resources.jetbrains.com/help/img/idea/2026.2/ws_package_manager_configuration_select_package_manager.png)

* Select npm, yarn, pnpm, or bun to use the system default installation. &gt; **Tip:** &gt; IntelliJ&nbsp;IDEA uses the `npm`, `yarn`, `pnpm`, and `bun` aliases for the current system paths to these managers. If you choose another Node.js version, IntelliJ&nbsp;IDEA also changes the aliased path to point to the package manager version bundled with the selected Node.js version.

* To use a custom installation of a package manager, click Select, and select the installation folder of the relevant package manager. ![Select project package manager: choose a custom installation](https://resources.jetbrains.com/help/img/idea/2026.2/ws_package_manager_configuration.png)
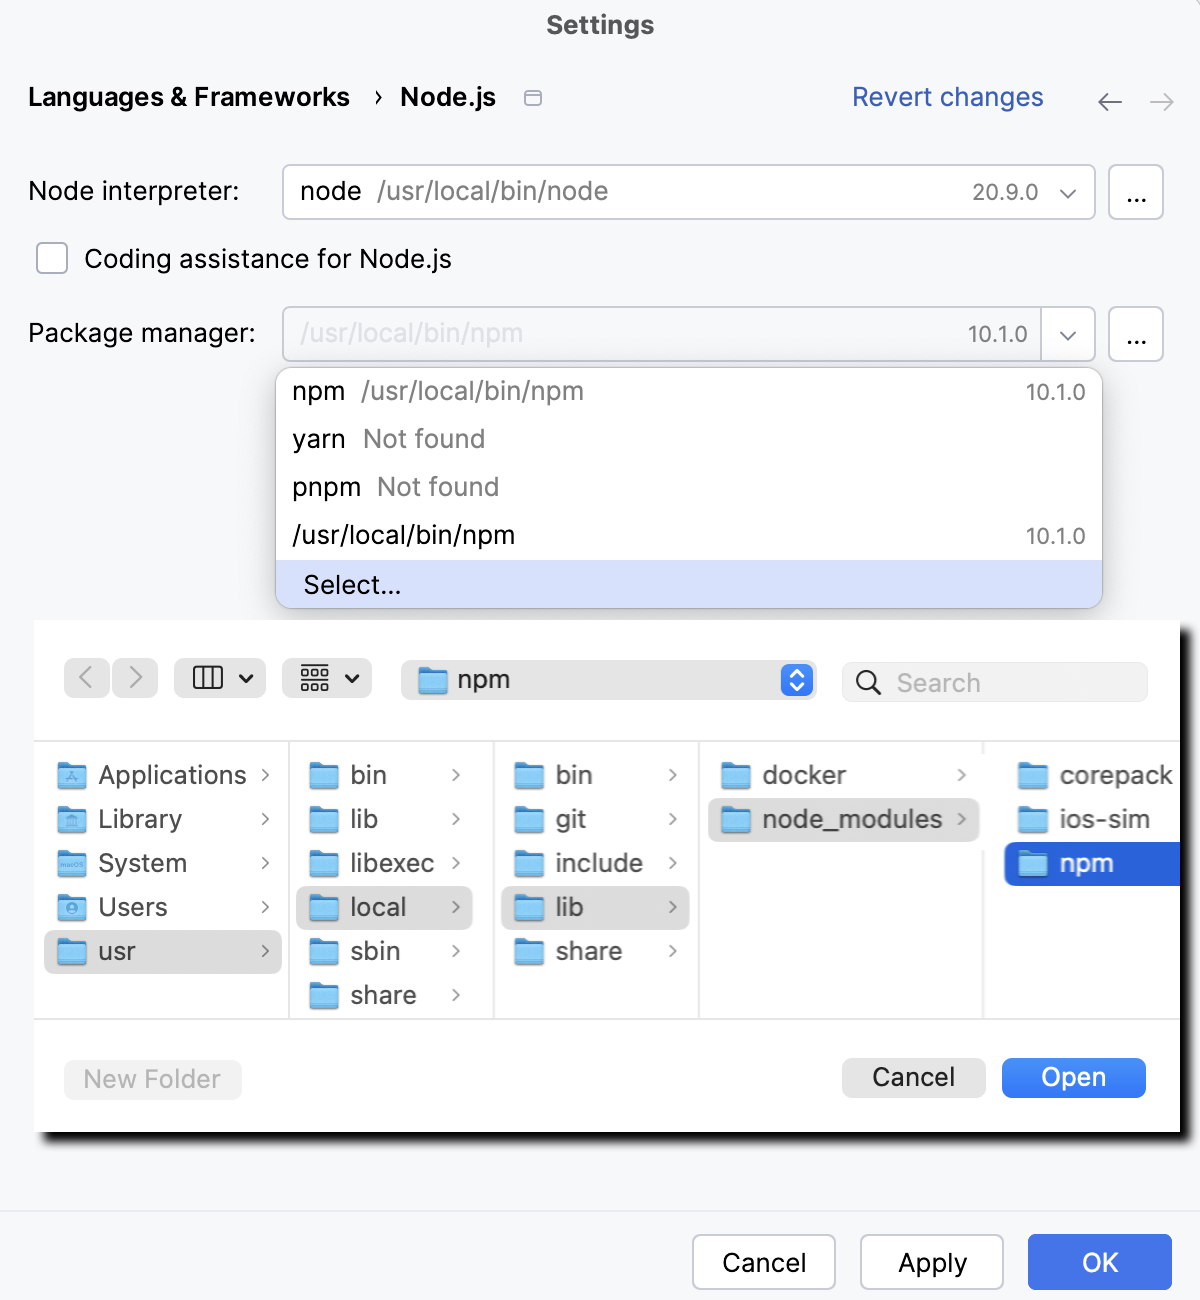
IntelliJ&nbsp;IDEA automatically uses the chosen package manager when you select the `Project` alias from the Package manager list in the [Run/Debug Configuration: NPM](run-debug-configuration-npm.html) dialog. IntelliJ&nbsp;IDEA also uses the path to the chosen package manager every time you invoke the Run 'npm install'/ Run 'yarn install'/Run 'pnpm install' command or run an npm/Yarn/pnpm script. For more information, refer to [Running and debugging scripts](#ws_npm_running_npm_scripts).

Procedure: Set the default IntelliJ&nbsp;IDEA package manager for new projects

1. Open the Settings for New Projects dialog (`File | New Projects Setup | Settings for New Projects`)  and go to `Languages &amp; Frameworks | JavaScript Runtime`.

2. On the Node.js and NPM  page that opens, select the required package manager from the list.

After that, IntelliJ&nbsp;IDEA will suggest the selected package manager as default every time you create a new project.

Procedure: Set up Yarn 2 in your project

1. Make sure you have Yarn 1 installed globally and enable Yarn 2 in your project as described on the [Yarn official website](https://yarnpkg.com/getting-started/install). Use the embedded Terminal `Alt+F12` (Windows), `⌥ F12` (macOS), `⌥ F12` (IntelliJ IDEA Classic (macOS)), `⌘ ⌃ T` (macOS System Shortcuts), `Alt+F12` (XWin), `Alt+F12` (GNOME), `Alt+F12` (KDE), `Alt+F12` (Emacs), `Alt+F12` (Sublime Text), `⌥ F12` (Sublime Text (macOS)), `Alt+F12` (NetBeans), `Ctrl+Alt+1` (Visual Studio), `⌘ ⌃ 1` (Visual Studio (macOS)), `Alt+F12` (Eclipse), `⌥ F12` (Eclipse (macOS)) to type the commands.

2. In the Settings dialog (`Ctrl+Alt+S` (Windows), `⌘ Comma` (macOS), `⌘ Comma` (IntelliJ IDEA Classic (macOS)), `⌘ Comma` (macOS System Shortcuts), `Ctrl+Alt+S` (XWin), `Ctrl+Alt+S` (GNOME), `Ctrl+Alt+S` (KDE), `Ctrl+Alt+S` (Emacs), `Ctrl+Alt+S` (Sublime Text), `⌘ Comma` (Sublime Text (macOS)), `Ctrl+Alt+S` (NetBeans), `Ctrl+Alt+S` (Visual Studio), `⌘ Comma` (Visual Studio (macOS)), `Ctrl+Alt+S` (Eclipse), `⌘ Comma` (Eclipse (macOS))), go to `Languages &amp; Frameworks | JavaScript Runtime` and select the path to the Yarn 2 package in your project from the Package manager list.

## Edit package.json

IntelliJ&nbsp;IDEA helps you handle your project dependencies in `package.json` files providing extensive coding assistance.

Procedure:

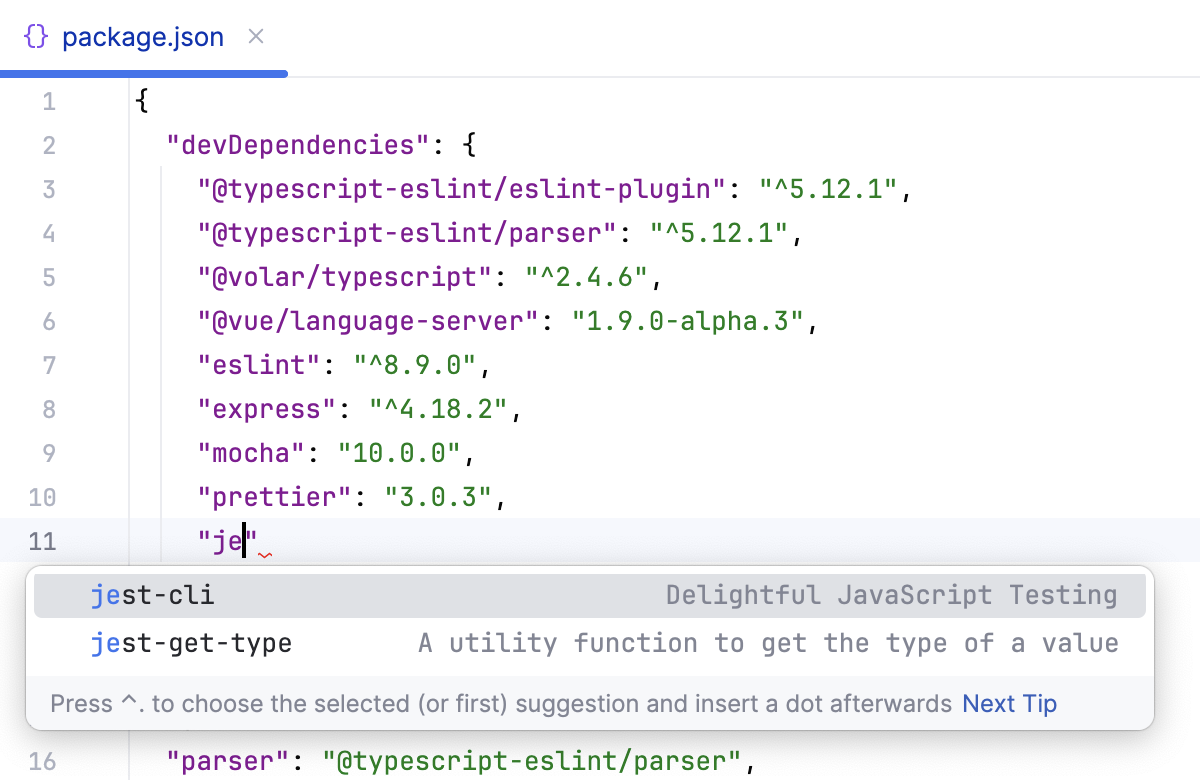
* Code completion for package names.
![Code completion for package names](https://resources.jetbrains.com/help/img/idea/2026.2/ws_npm_yarn_package_json_completion_for_package.png)

* Information on the latest available package version.
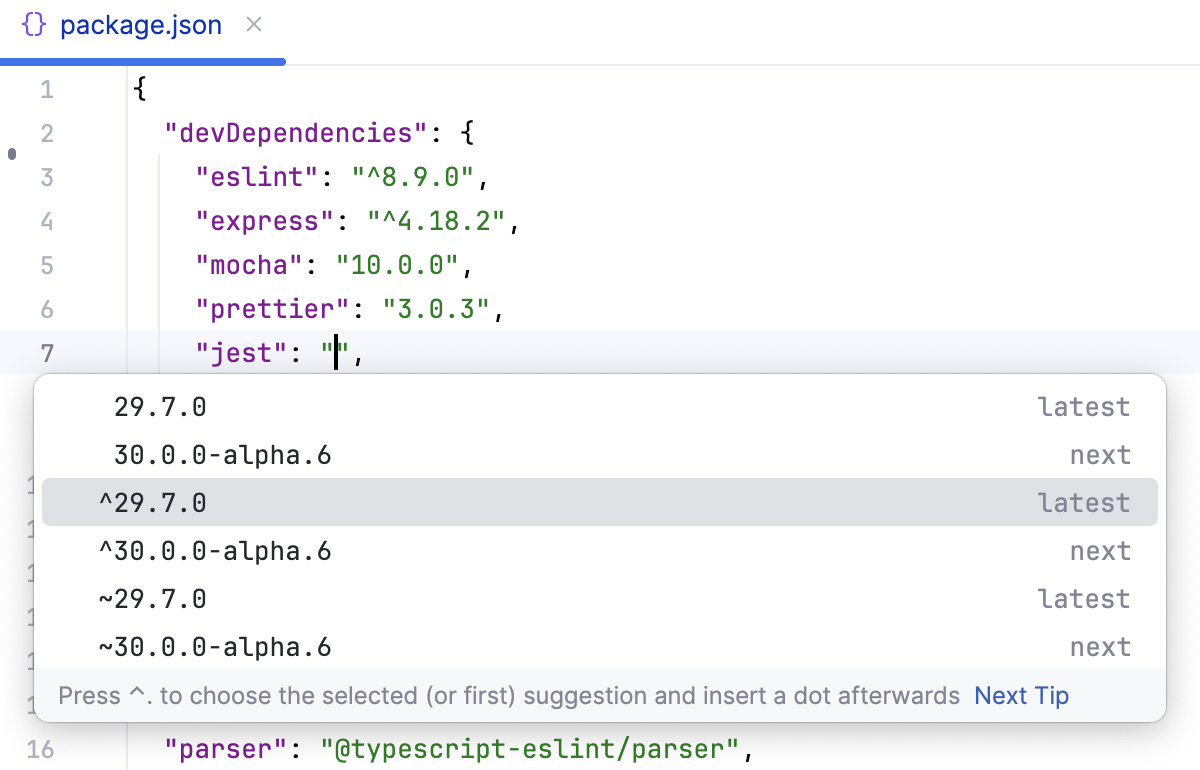
![Showing the latest available package version](https://resources.jetbrains.com/help/img/idea/2026.2/ws_npm_yarn_package_json_latest_version_for_package.png)

* Information about the range of versions that can be installed through `npm install <package>@<version>` or `yarn add <package>@<version>`. `Note that running `npm install` or `yarn install` will install the latest available version from this range.

Press `Ctrl` (Windows), `Ctrl` (macOS), `Ctrl` (IntelliJ IDEA Classic (macOS)), `Ctrl` (macOS System Shortcuts), `Ctrl` (XWin), `Ctrl` (GNOME), `Ctrl` (KDE), `Ctrl` (Emacs), `Ctrl` (Sublime Text), `Ctrl` (Sublime Text (macOS)), `Ctrl` (NetBeans), `Ctrl` (Visual Studio), `Ctrl` (Visual Studio (macOS)), `Ctrl` (Eclipse), `Ctrl` (Eclipse (macOS)) and hover over the version to see the information in a tooltip. See the [npm Official documentation](https://docs.npmjs.com/about-semantic-versioning) for details about semantic versioning.
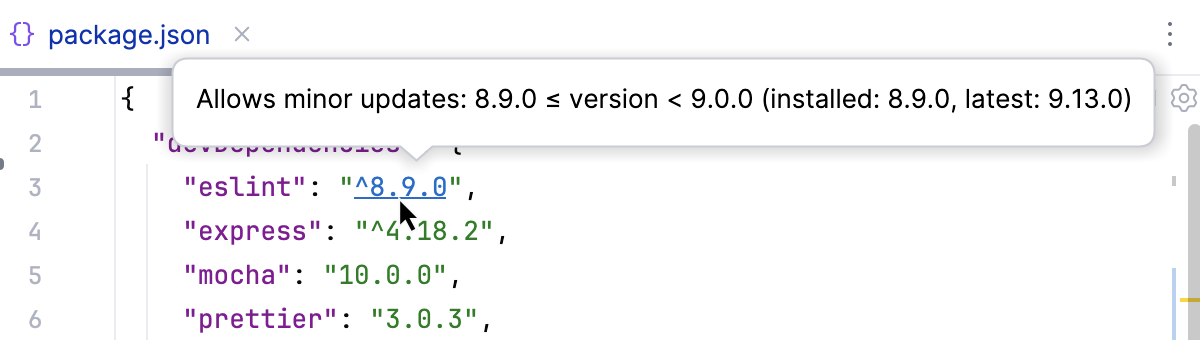
![Showing the range of available package versions](https://resources.jetbrains.com/help/img/idea/2026.2/ws_npm_semver.png)

* Indication whether the specified version of a package is installed or not and information about the latest available version
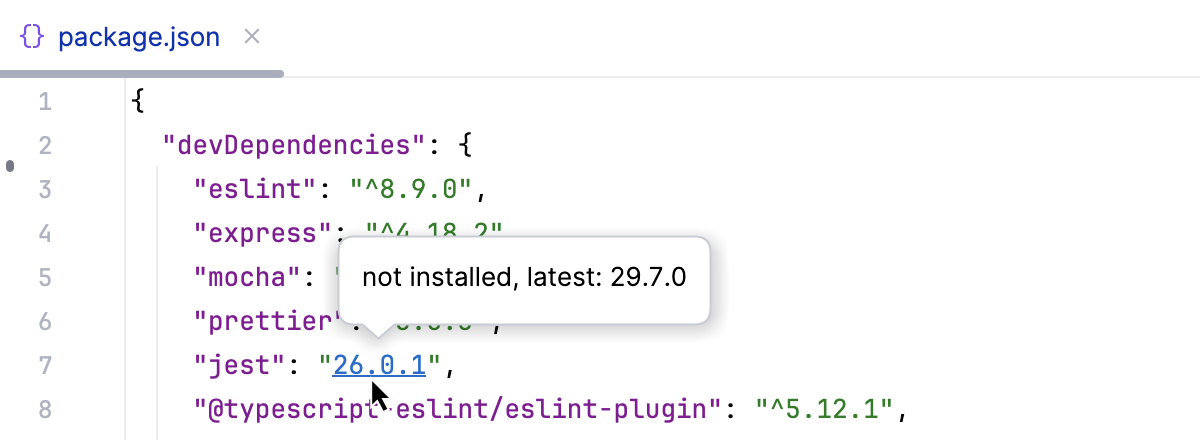
![Info whether the version of a package is installed](https://resources.jetbrains.com/help/img/idea/2026.2/ws_npm_package_json_popup_not_installed.png)

* Code completion for previous package versions. When you press `Ctrl+Space` (Windows), `⌃ Space` (macOS), `⌃ Space` (IntelliJ IDEA Classic (macOS)), `⌃ Space` (macOS System Shortcuts), `Ctrl+Space` (XWin), `Ctrl+Space` (GNOME), `Ctrl+Space` (KDE), `Alt+/` (Emacs), `Ctrl+Space` (Sublime Text), `⌃ Space` (Sublime Text (macOS)), `Ctrl+Space` (NetBeans), `Ctrl+Space` (Visual Studio), `⌃ Space` (Visual Studio (macOS)), `Ctrl+Space` (Eclipse), `⌃ Space` (Eclipse (macOS)) or start typing a version different from the latest one, IntelliJ&nbsp;IDEA displays a suggestion list with all the previous versions of the package.
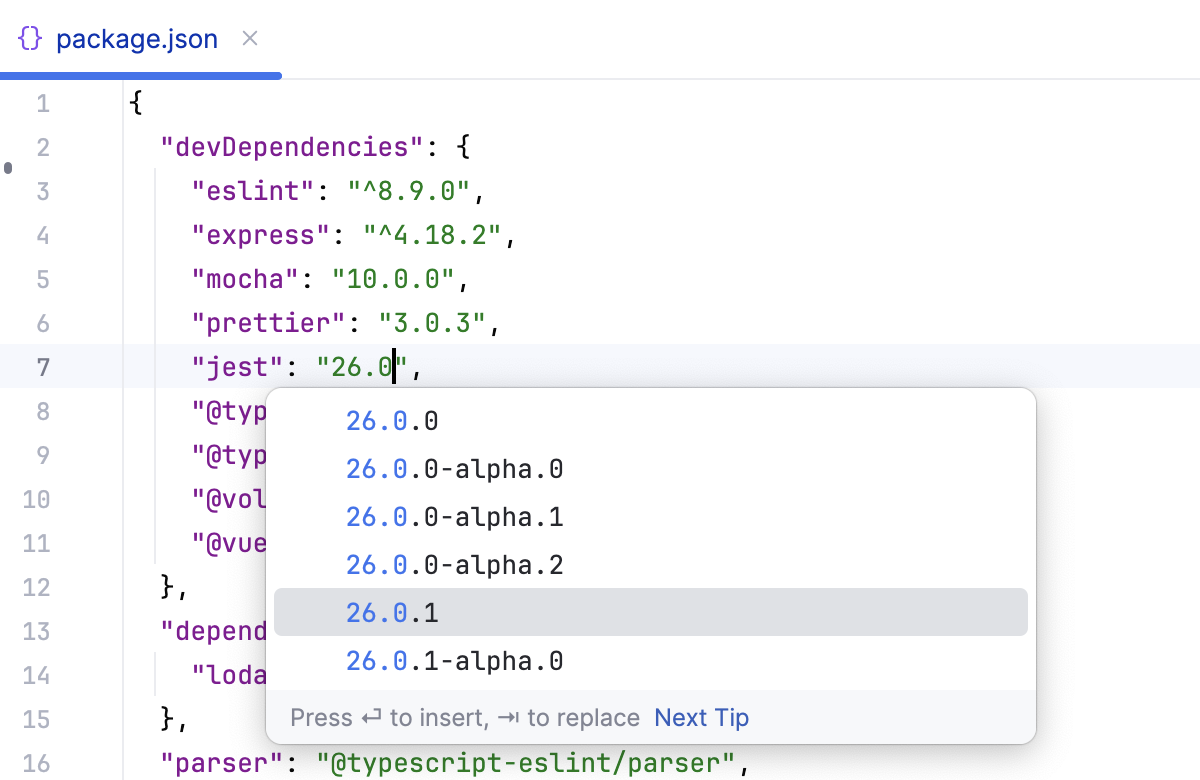
![Code completion for previous package versions](https://resources.jetbrains.com/help/img/idea/2026.2/ws_npm_yarn_package_json_completion_for_earlier_package_versions.png)

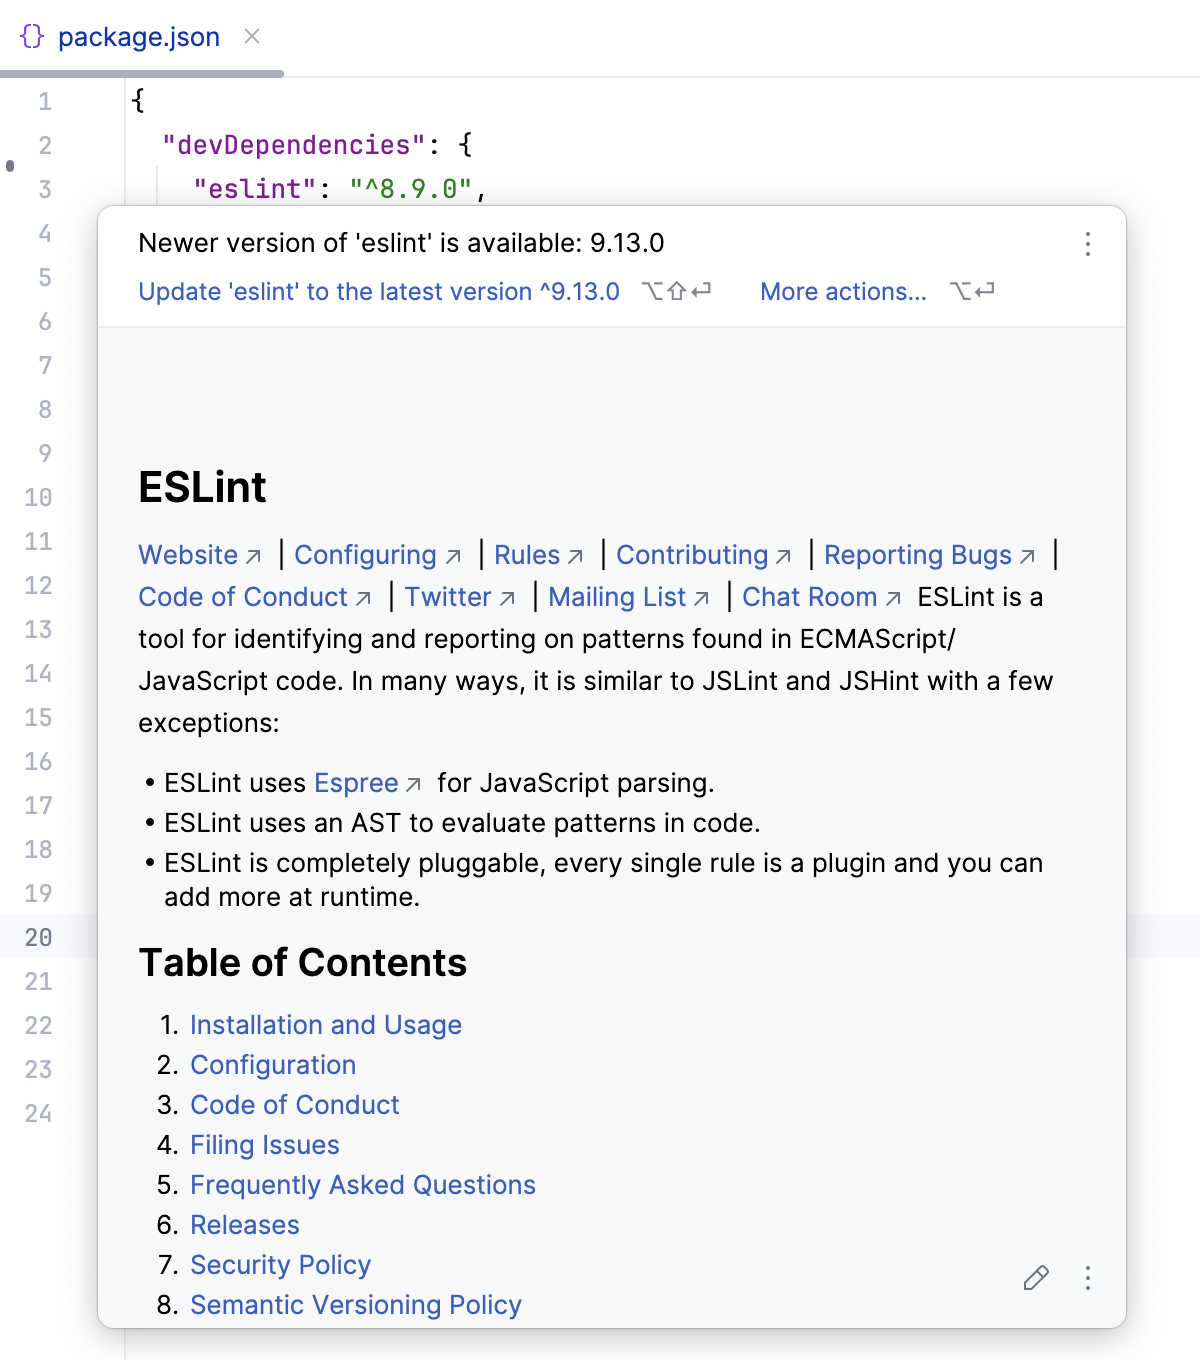
* Quick documentation look-up for packages.
![Quick documentation look-up for packages](https://resources.jetbrains.com/help/img/idea/2026.2/ws_npm_yarn_package_json_quick_doc_for_package.png)

&gt; **Tip:**
&gt; IntelliJ&nbsp;IDEA also shows `readme` files for npm packages when you invoke documentation look-up from `require` or `import` statements.

## Install and update packages

As you may know, npm can install packages both [globally](https://docs.npmjs.com/getting-started/installing-npm-packages-globally) or as project dependencies or development dependencies, learn more from the [npm official website](https://docs.npmjs.com/cli-commands/install.html).

pnpm also installs packages globally or as project dependencies or development dependencies,  learn more from the [pnpm official website](https://pnpm.io/cli/add#options).

With Yarn, you can install packages [globally](https://yarnpkg.com/en/docs/cli/global) or as project dependencies. For more information, refer to [Yarn official
website](https://yarnpkg.com/en/docs/cli/install).

In IntelliJ&nbsp;IDEA, packages can be installed in the editor, from a `package.json` file, in the built-in Terminal `Alt+F12` (Windows), `⌥ F12` (macOS), `⌥ F12` (IntelliJ IDEA Classic (macOS)), `⌘ ⌃ T` (macOS System Shortcuts), `Alt+F12` (XWin), `Alt+F12` (GNOME), `Alt+F12` (KDE), `Alt+F12` (Emacs), `Alt+F12` (Sublime Text), `⌥ F12` (Sublime Text (macOS)), `Alt+F12` (NetBeans), `Ctrl+Alt+1` (Visual Studio), `⌘ ⌃ 1` (Visual Studio (macOS)), `Alt+F12` (Eclipse), `⌥ F12` (Eclipse (macOS)), or on the [JavaScript Runtime](javascript-runtime.html) page.

### From package.json

Procedure: Install your project dependencies

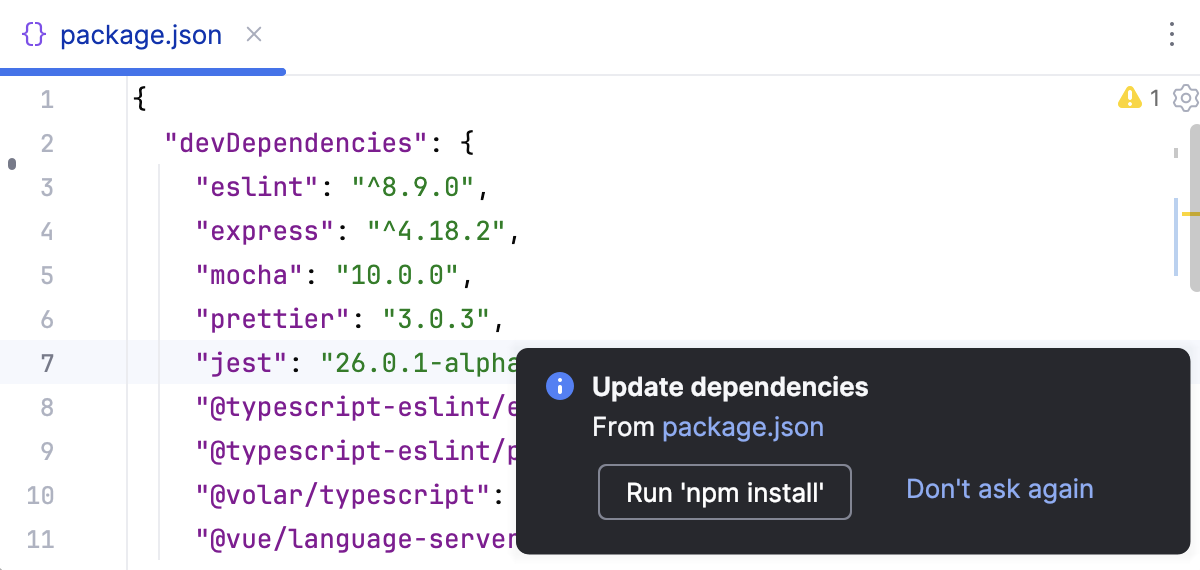
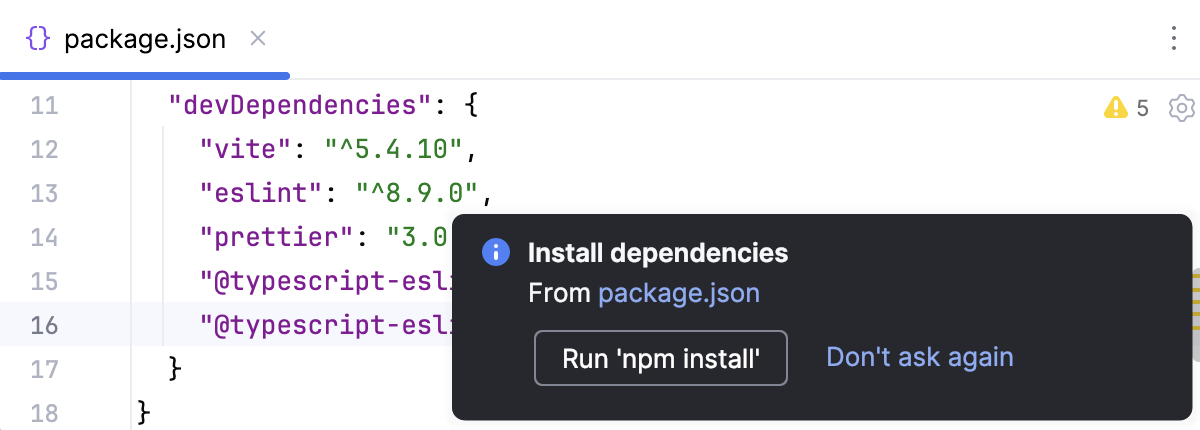
* Click the Run 'npm install', Run 'yarn install', or Run 'pnpm install' link in the popup:
![Install dependencies popup](https://resources.jetbrains.com/help/img/idea/2026.2/ws_npm_yarn_package_run_npm_install_package_json_dependent.png)

IntelliJ&nbsp;IDEA shows this popup when the dependencies are not installed yet or when they have changed. If you close the popup or turn it off by choosing Don't ask again, you can still install the dependencies using the Run '<package_manager> install' action or [in the built-in terminal](#ws_npm_install_all_dependencies).

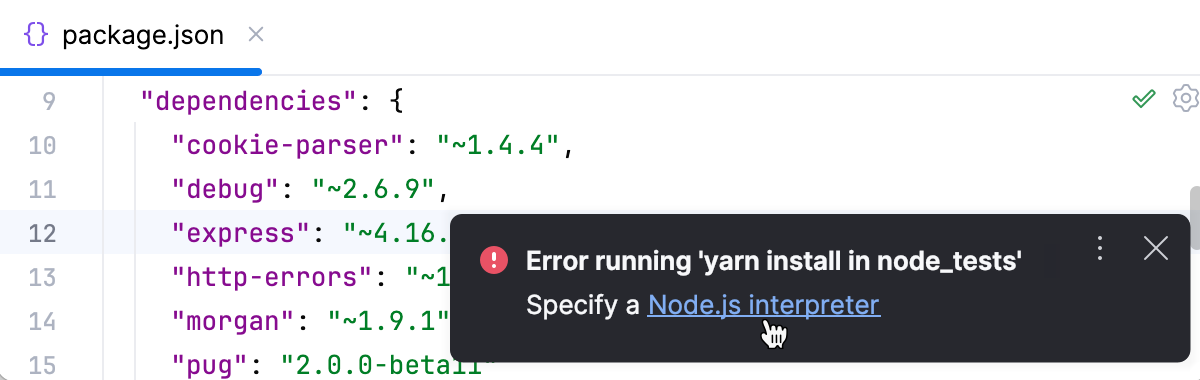
If IntelliJ&nbsp;IDEA cannot detect a Node.js runtime, the error is reported in a popup with a link to the [JavaScript Runtimes](javascript-runtime.html) page where you can [configure a Node.js
interpreter](http://localhost:63343/JetBrains+Desktop+Products/preview/developing-node-js-applications.html#ws_node_configure_local_node_interpreter).
![Node.js not found](https://resources.jetbrains.com/help/img/idea/2026.2/npm_install_from_package_json_node_not_found.png)

If you have accidentally dismissed this notification and now want to get it back, press `Ctrl+Shift+A` (Windows), `⌘ ⇧ A` (macOS), `⌘ ⇧ A` (IntelliJ IDEA Classic (macOS)), `⌘ ⇧ P` (macOS System Shortcuts), `Ctrl+Shift+A` (XWin), `Ctrl+Shift+A` (GNOME), `Ctrl+Shift+A` (KDE), `Escape, X` (Emacs), `Ctrl+Shift+P` (Sublime Text), `⌘ ⇧ P` (Sublime Text (macOS)), `Ctrl+I` (NetBeans), `Ctrl+Shift+A` (Visual Studio), `⌘ ⇧ A` (Visual Studio (macOS)), `Ctrl+Shift+A` (Eclipse), `⌘ 3` (Eclipse (macOS)), start typing `Enable notifications`, and select  Enable Notifications about Installing Dependencies from package.json  from the list.

* Alternatively, open the relevant `package.json` file in the editor or select it in the  Project  tool window and choose Run 'npm install' from the context menu.

Procedure: Update your project dependencies

* Click Run '<package manager> install' in the popup.

![Update dependencies: popup](https://resources.jetbrains.com/help/img/idea/2026.2/ws_npm_yarn_package_run_npm_update.png)

IntelliJ&nbsp;IDEA shows this popup every time you open a project, update it from the version control, or edit a `package.json`.

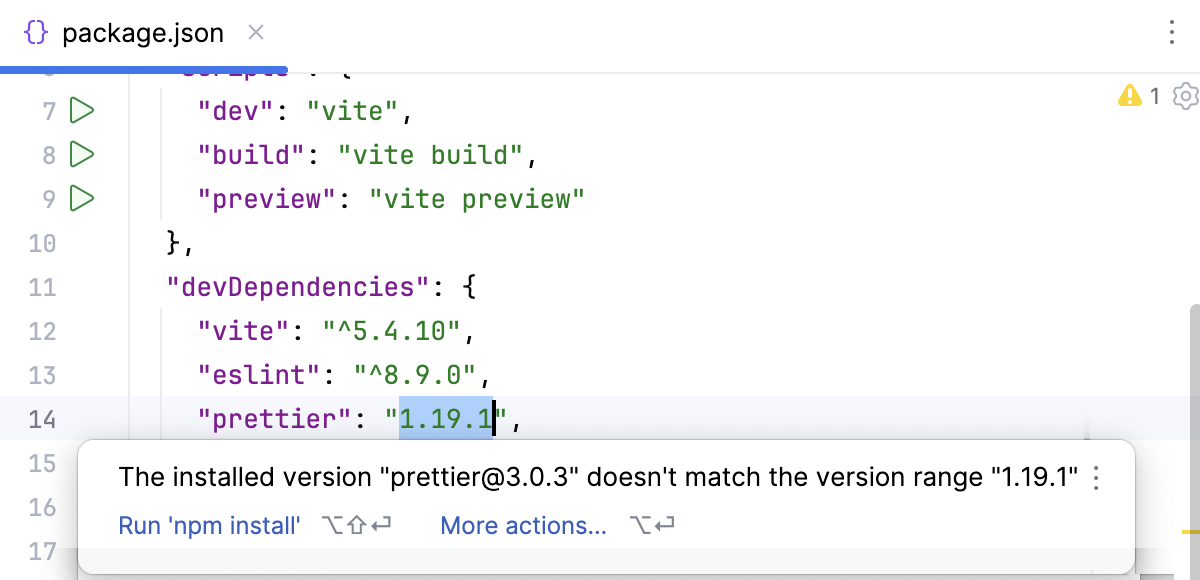
* IntelliJ&nbsp;IDEA also runs an inspection that checks whether the packages from `dependencies` or `devDependencies` are installed and their versions match the specified range. If the inspection detects any mismatch, it suggests a quick-fix. To apply it, click the Run '<package manager> install' link.

![Installed version of a package is not up to date](https://resources.jetbrains.com/help/img/idea/2026.2/ws_node_inspect_that_package_up_to_date.png)

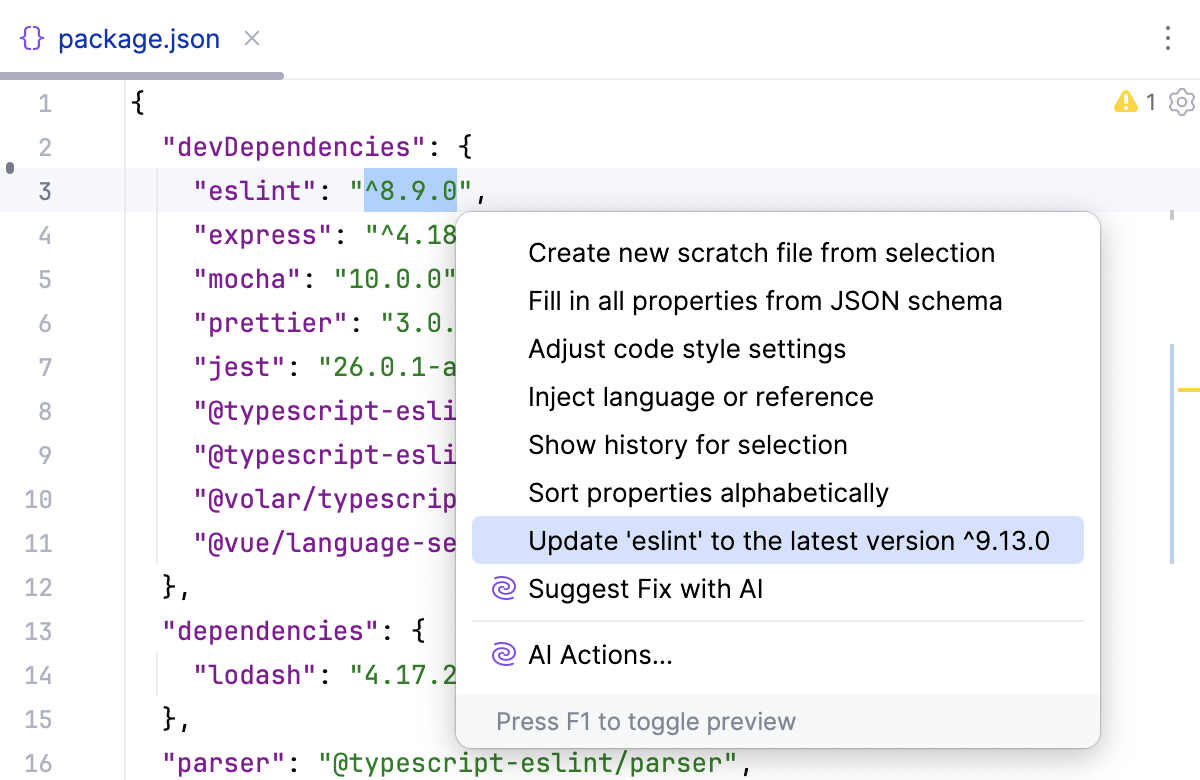
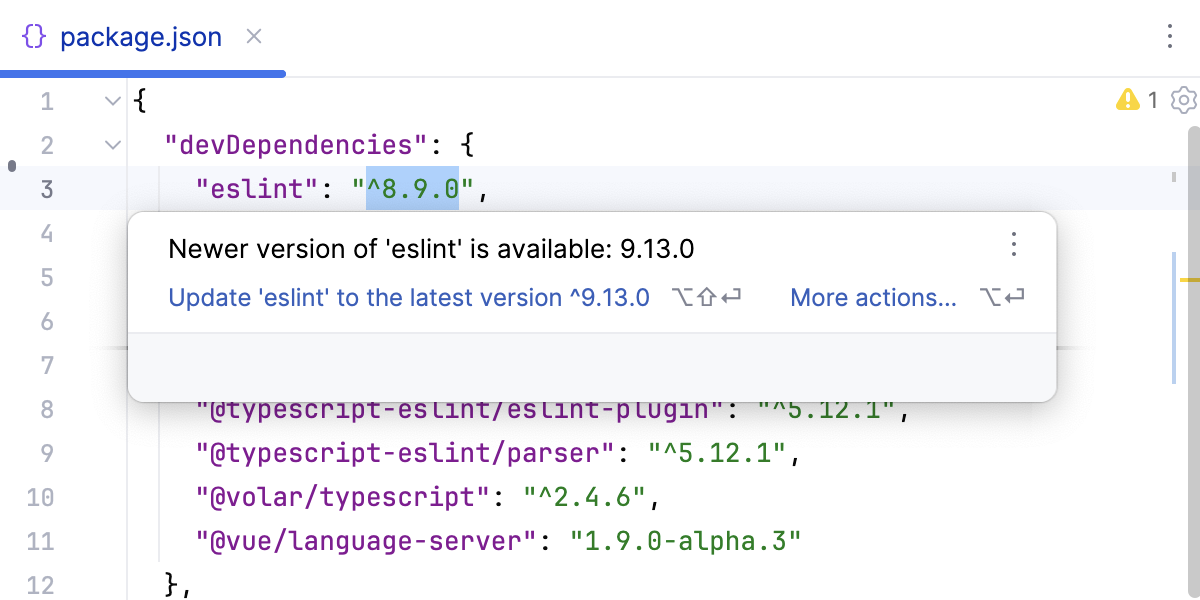
* IntelliJ&nbsp;IDEA also detects packages for which later versions are available and provides a quick-fix when you hover over the package version.
![Update package to latest version: tooltip](https://resources.jetbrains.com/help/img/idea/2026.2/ws_node_package_json_update_to_latest_version_tooltip.png)

Alternatively, press `Alt+Enter` (Windows), `⌥ ⏎` (macOS), `⌥ ⏎` (IntelliJ IDEA Classic (macOS)), `⌥ ⏎` (macOS System Shortcuts), `Alt+Enter` (XWin), `Alt+Enter` (GNOME), `Alt+Enter` (KDE), `Alt+Enter` (Emacs), `Alt+Enter` (Sublime Text), `⌥ ⏎` (Sublime Text (macOS)), `Alt+Enter` (NetBeans), `Alt+Enter` (Visual Studio), `⌥ ⏎` (Visual Studio (macOS)), `Ctrl+1` (Eclipse), `⌘ 1` (Eclipse (macOS)) and select Update <package> to the latest version from the list:

![Update package to latest version: quick-fix](https://resources.jetbrains.com/help/img/idea/2026.2/ws_node_package_json_update_to_latest_version_quick_fix.png)

&gt; **Note:**
&gt; Quick-fixes for updating packages to their latest version are not available if a [custom npm
&gt; registry](https://docs.npmjs.com/creating-and-publishing-private-packages) is detected.

### In the built-in Terminal

Procedure:

In your command-line shell or in the embedded Terminal (`Alt+F12` (Windows), `⌥ F12` (macOS), `⌥ F12` (IntelliJ IDEA Classic (macOS)), `⌘ ⌃ T` (macOS System Shortcuts), `Alt+F12` (XWin), `Alt+F12` (GNOME), `Alt+F12` (KDE), `Alt+F12` (Emacs), `Alt+F12` (Sublime Text), `⌥ F12` (Sublime Text (macOS)), `Alt+F12` (NetBeans), `Ctrl+Alt+1` (Visual Studio), `⌘ ⌃ 1` (Visual Studio (macOS)), `Alt+F12` (Eclipse), `⌥ F12` (Eclipse (macOS)))  , type one of the following commands:

* For global installation:

* `npm install&nbsp;--global <package_name>`

* `yarn global add <package_name>`

* `pnpm --global add <package_name>`

* To install a package as a project dependency or a development dependency:

* `npm install&nbsp;--save <package_name>` or `npm install&nbsp;--save-dev <package_name>`

* `yarn add <package_name> --dev`

* `pnpm add --save-dev <package_name>`

Procedure: Install all dependencies listed in a package.json file

In your command-line shell or in the embedded Terminal (`Alt+F12` (Windows), `⌥ F12` (macOS), `⌥ F12` (IntelliJ IDEA Classic (macOS)), `⌘ ⌃ T` (macOS System Shortcuts), `Alt+F12` (XWin), `Alt+F12` (GNOME), `Alt+F12` (KDE), `Alt+F12` (Emacs), `Alt+F12` (Sublime Text), `⌥ F12` (Sublime Text (macOS)), `Alt+F12` (NetBeans), `Ctrl+Alt+1` (Visual Studio), `⌘ ⌃ 1` (Visual Studio (macOS)), `Alt+F12` (Eclipse), `⌥ F12` (Eclipse (macOS)))  , type one of the following commands:

* `npm install`

* `yarn install`

* `pnpm install`

As a result you get all the dependencies listed in the `package.json` from the current folder. Learn more from [Editing package.json](#ws_npm_yarn_edit_package_json).

&gt; **Note:**
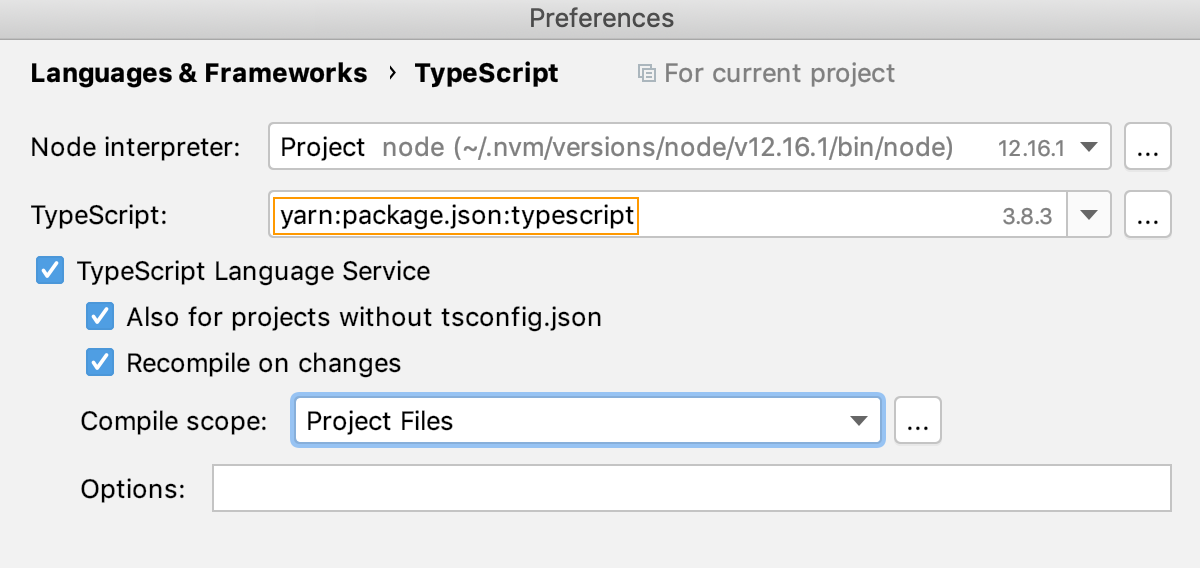
&gt; For packages installed via Yarn 2, IntelliJ&nbsp;IDEA shows `yarn:package.json:&lt; package name&gt;` instead of the actual path to a package. Note that this format is used only for presenting a package in the Settings dialog but not for specifying its location in your code or elsewhere.
&gt;
&gt;
&gt;
&gt; ![Path to package installed via yarn2](https://resources.jetbrains.com/help/img/idea/2026.2/ws_package_manager_yarn_path_to_downloaded_package.png)

### Detect vulnerable packages

IntelliJ&nbsp;IDEA detects vulnerabilities in the packages used in your projects by checking across the [Mend.io Vulnerability Database](https://www.mend.io/vulnerability-database/?utm_source=JetBrains) and the [National Vulnerability Database](https://nvd.nist.gov/). As you write your code, the IDE highlights packages that are considered vulnerable, provides descriptions for them, and suggests fixes where available. The entire list of detected vulnerable packages is shown in the Problems tool window.

Vulnerability check is handled by the Vulnerable declared dependency [code inspections](code-inspection.html) that rely on the [Package Checker](https://plugins.jetbrains.com/plugin/18337-package-checker?_ga=2.120695503.698934348.1705064018-934746540.1705064018) plugin. The plugin is powered by [Mend.io](https://www.mend.io/jetbrains-lp/?utm_source=JetBrains). The plugin is bundled with IntelliJ&nbsp;IDEA and enabled by default. If the relevant features aren't available, make sure that you didn't disable the plugin. For more information, refer to [Open plugin settings](managing-plugins.html#open-plugin-settings).

![Detect vulnerable packages and fix them in the editor](https://resources.jetbrains.com/help/img/idea/2026.2/ws_vulnerable_packages_editor.animated.gif)

Procedure: Solve package vulnerability problems in the editor

* Hover over the highlighted package in a `package.json` file. The popup tool window shows a description of the detected vulnerability.

* To apply a quick-fix, click More actions `Alt+Enter` (Windows), `⌥ ⏎` (macOS), `⌥ ⏎` (IntelliJ IDEA Classic (macOS)), `⌥ ⏎` (macOS System Shortcuts), `Alt+Enter` (XWin), `Alt+Enter` (GNOME), `Alt+Enter` (KDE), `Alt+Enter` (Emacs), `Alt+Enter` (Sublime Text), `⌥ ⏎` (Sublime Text (macOS)), `Alt+Enter` (NetBeans), `Alt+Enter` (Visual Studio), `⌥ ⏎` (Visual Studio (macOS)), `Ctrl+1` (Eclipse), `⌘ 1` (Eclipse (macOS)) and select the relevant suggestion.

Procedure: View vulnerable packages in the Problems tool window

1. Click ![the Problems icon](https://resources.jetbrains.com/help/img/idea/2026.2/app.toolwindows.problems.svg) in the inspection widget.

2. The File tab of the Problems tool window lists all the vulnerable packages from the `package.json` that is open in the active editor tab. Each item is supplied with a description.

To solve a problem, select the vulnerable package in the list, click ![the Yellow bulb icon](https://resources.jetbrains.com/help/img/idea/2026.2/app.expui.codeInsight.intentionBulb.png) on the toolbar or press `Alt+Enter` (Windows), `⌥ ⏎` (macOS), `⌥ ⏎` (IntelliJ IDEA Classic (macOS)), `⌥ ⏎` (macOS System Shortcuts), `Alt+Enter` (XWin), `Alt+Enter` (GNOME), `Alt+Enter` (KDE), `Alt+Enter` (Emacs), `Alt+Enter` (Sublime Text), `⌥ ⏎` (Sublime Text (macOS)), `Alt+Enter` (NetBeans), `Alt+Enter` (Visual Studio), `⌥ ⏎` (Visual Studio (macOS)), `Ctrl+1` (Eclipse), `⌘ 1` (Eclipse (macOS)), and then select the relevant suggestion.

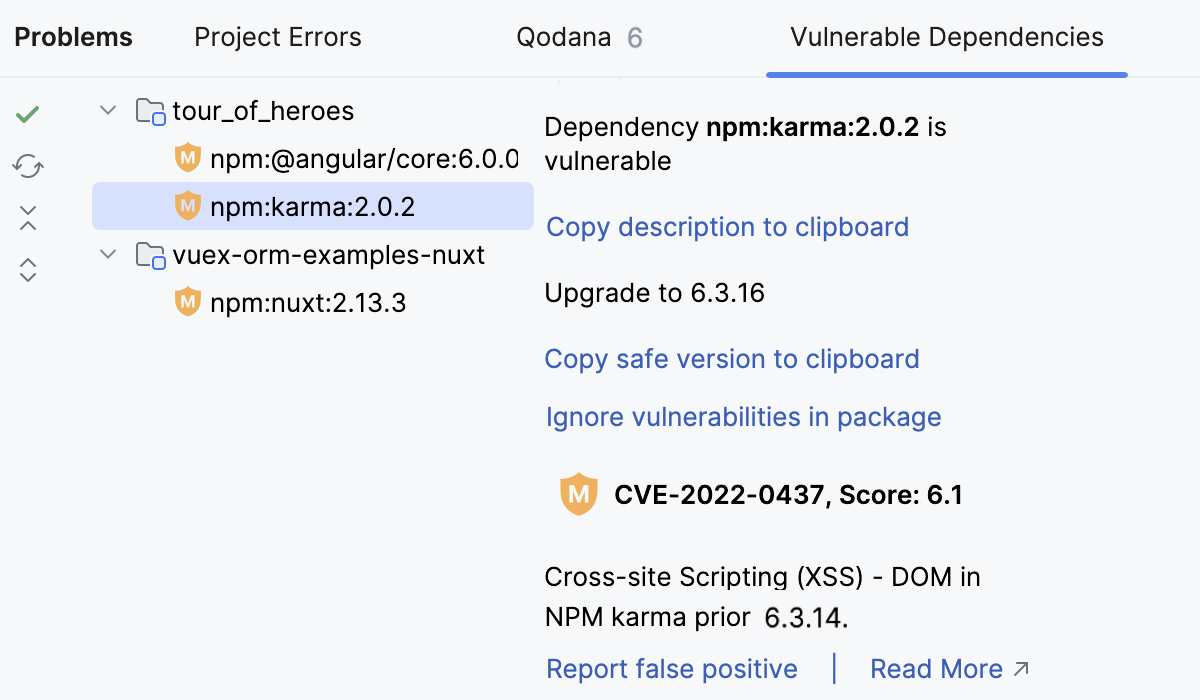
3. The Vulnerable Dependencies tab lists all the vulnerable packages detected in your project.
![Problems tool window: Vulnerable Dependencies tab](https://resources.jetbrains.com/help/img/idea/2026.2/ws_problems_tw_vulnerable_dependencies_tab_600.png)

To fix a problem, select the vulnerable package in the list, click the Copy safe version to clipboard link on the right-hand pane, and then paste the copied version to your `package.json`.

Learn more from [Get results and fix problems](resolving-problems.html).

Procedure: Disable package vulnerability check

By default, package vulnerability check is enabled.

* To turn it off,   open the Settings dialog (`Ctrl+Alt+S` (Windows), `⌘ Comma` (macOS), `⌘ Comma` (IntelliJ IDEA Classic (macOS)), `⌘ Comma` (macOS System Shortcuts), `Ctrl+Alt+S` (XWin), `Ctrl+Alt+S` (GNOME), `Ctrl+Alt+S` (KDE), `Ctrl+Alt+S` (Emacs), `Ctrl+Alt+S` (Sublime Text), `⌘ Comma` (Sublime Text (macOS)), `Ctrl+Alt+S` (NetBeans), `Ctrl+Alt+S` (Visual Studio), `⌘ Comma` (Visual Studio (macOS)), `Ctrl+Alt+S` (Eclipse), `⌘ Comma` (Eclipse (macOS))), go to `Editor | Inspection`, and clear the checkbox next to the Vulnerable declared dependency inspection under the Security  node.

* Alternatively,   open the Settings dialog (`Ctrl+Alt+S` (Windows), `⌘ Comma` (macOS), `⌘ Comma` (IntelliJ IDEA Classic (macOS)), `⌘ Comma` (macOS System Shortcuts), `Ctrl+Alt+S` (XWin), `Ctrl+Alt+S` (GNOME), `Ctrl+Alt+S` (KDE), `Ctrl+Alt+S` (Emacs), `Ctrl+Alt+S` (Sublime Text), `⌘ Comma` (Sublime Text (macOS)), `Ctrl+Alt+S` (NetBeans), `Ctrl+Alt+S` (Visual Studio), `⌘ Comma` (Visual Studio (macOS)), `Ctrl+Alt+S` (Eclipse), `⌘ Comma` (Eclipse (macOS))), go to `Plugins`, locate the Package Checker plugin, and click Disable.

## Debug packages

You can debug packages from the `node_modules` folder.

[Video](https://resources.jetbrains.com/help/img/idea/2026.2/ws_debug_packages.mp4)

Procedure:

1. Press `Ctrl+Alt+S` (Windows), `⌘ Comma` (macOS), `⌘ Comma` (IntelliJ IDEA Classic (macOS)), `⌘ Comma` (macOS System Shortcuts), `Ctrl+Alt+S` (XWin), `Ctrl+Alt+S` (GNOME), `Ctrl+Alt+S` (KDE), `Ctrl+Alt+S` (Emacs), `Ctrl+Alt+S` (Sublime Text), `⌘ Comma` (Sublime Text (macOS)), `Ctrl+Alt+S` (NetBeans), `Ctrl+Alt+S` (Visual Studio), `⌘ Comma` (Visual Studio (macOS)), `Ctrl+Alt+S` (Eclipse), `⌘ Comma` (Eclipse (macOS))  to open settings and then select `Build, Execution, Deployment | Debugger | Stepping`.

2. Clear the Do not step into library scripts and Do not step into scripts checkboxes.

3. Set [breakpoints](using-breakpoints.html) as necessary and [start a
debugging](starting-the-debugger-session.html) session.

4. Step through your code, including files under the `node_modules` folder.

&gt; **Tip:**
&gt; Alternatively, you can also use the [Force Step Into action](stepping-through-the-program.html#force-step-into).

## Run scripts

You can launch npm, Yarn, or pnpm scripts from a `package.json` file in the editor, from a tree of scripts in the dedicated npm tool window, according to a dedicated run configuration, or automatically, as a start-up or a before-launch task.

The results of script execution are displayed in the [Run tool window](run-tool-window.html).  The tool window shows the npm or Yarn script output, reports the errors occurred, lists the packages or plugins that have not been found, etc. The name of the last executed script is displayed on the title bar of the tool window.

[Video](https://resources.jetbrains.com/help/img/idea/2026.2/ws_launch_npm_script_from_package_json_run.mp4)

If you launch a script debugging session, IntelliJ&nbsp;IDEA opens the [Debug tool window](debug-tool-window.html), where you can  [step through the script](stepping-through-the-program.html) ,  [stop and
resume](starting-the-debugger-session.html#pause-resume)  the script execution, [examine it when suspended](examining-suspended-program.html), [run JavaScript code snippets in the
Debugger Console](node-interactive-debugger-console.html), and so on.

### Run scripts from package.json

IntelliJ&nbsp;IDEA lets you quickly launch single scripts from `package.json` files. To run or debug several scripts, use a run configuration or the npm tool window.

Procedure:

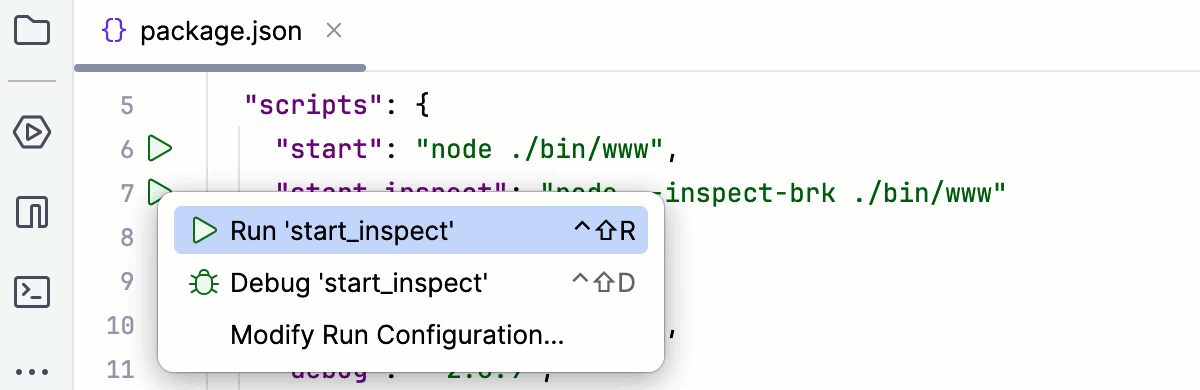
* Open the relevant `package.json` file in the editor, click ![the Run button](https://resources.jetbrains.com/help/img/idea/2026.2/app-client.expui.run.run.svg) in the gutter next to the script, and select  Run <script_name> from the context menu.

![Run/debug a script from package.json](https://resources.jetbrains.com/help/img/idea/2026.2/ws_launch_npm_script_from_package_json.png)

* You can also run a script by pressing `Ctrl+Shift+F10` (Windows), `⌃ ⇧ R` (macOS), `⌃ ⇧ F10` (IntelliJ IDEA Classic (macOS)), `⌃ ⇧ R` (macOS System Shortcuts), `Ctrl+Shift+F10` (XWin), `Ctrl+Shift+F10` (GNOME), `Ctrl+Shift+F10` (KDE), `Ctrl+Shift+F10` (Emacs), `Ctrl+Shift+F10` (Sublime Text), `Ctrl+Shift+F10` (Sublime Text (macOS)), `Alt+Shift+F6` (NetBeans), `Ctrl+Alt+F5` (Visual Studio), `⌃ ⌥ F5` (Visual Studio (macOS)), `Ctrl+Shift+F10` (Eclipse), `⌃ ⇧ R` (Eclipse (macOS)).

The script output is shown in the Run tool window.

If you launch a script in the debug mode, IntelliJ&nbsp;IDEA opens the [Debug tool window](debug-tool-window.html), where you can  [step through the script](stepping-through-the-program.html) ,  [stop and
resume](starting-the-debugger-session.html#pause-resume)  the script execution, [examine it when suspended](examining-suspended-program.html), [run JavaScript code snippets in the
Debugger Console](node-interactive-debugger-console.html), and so on.

### Run scripts from the npm tool window

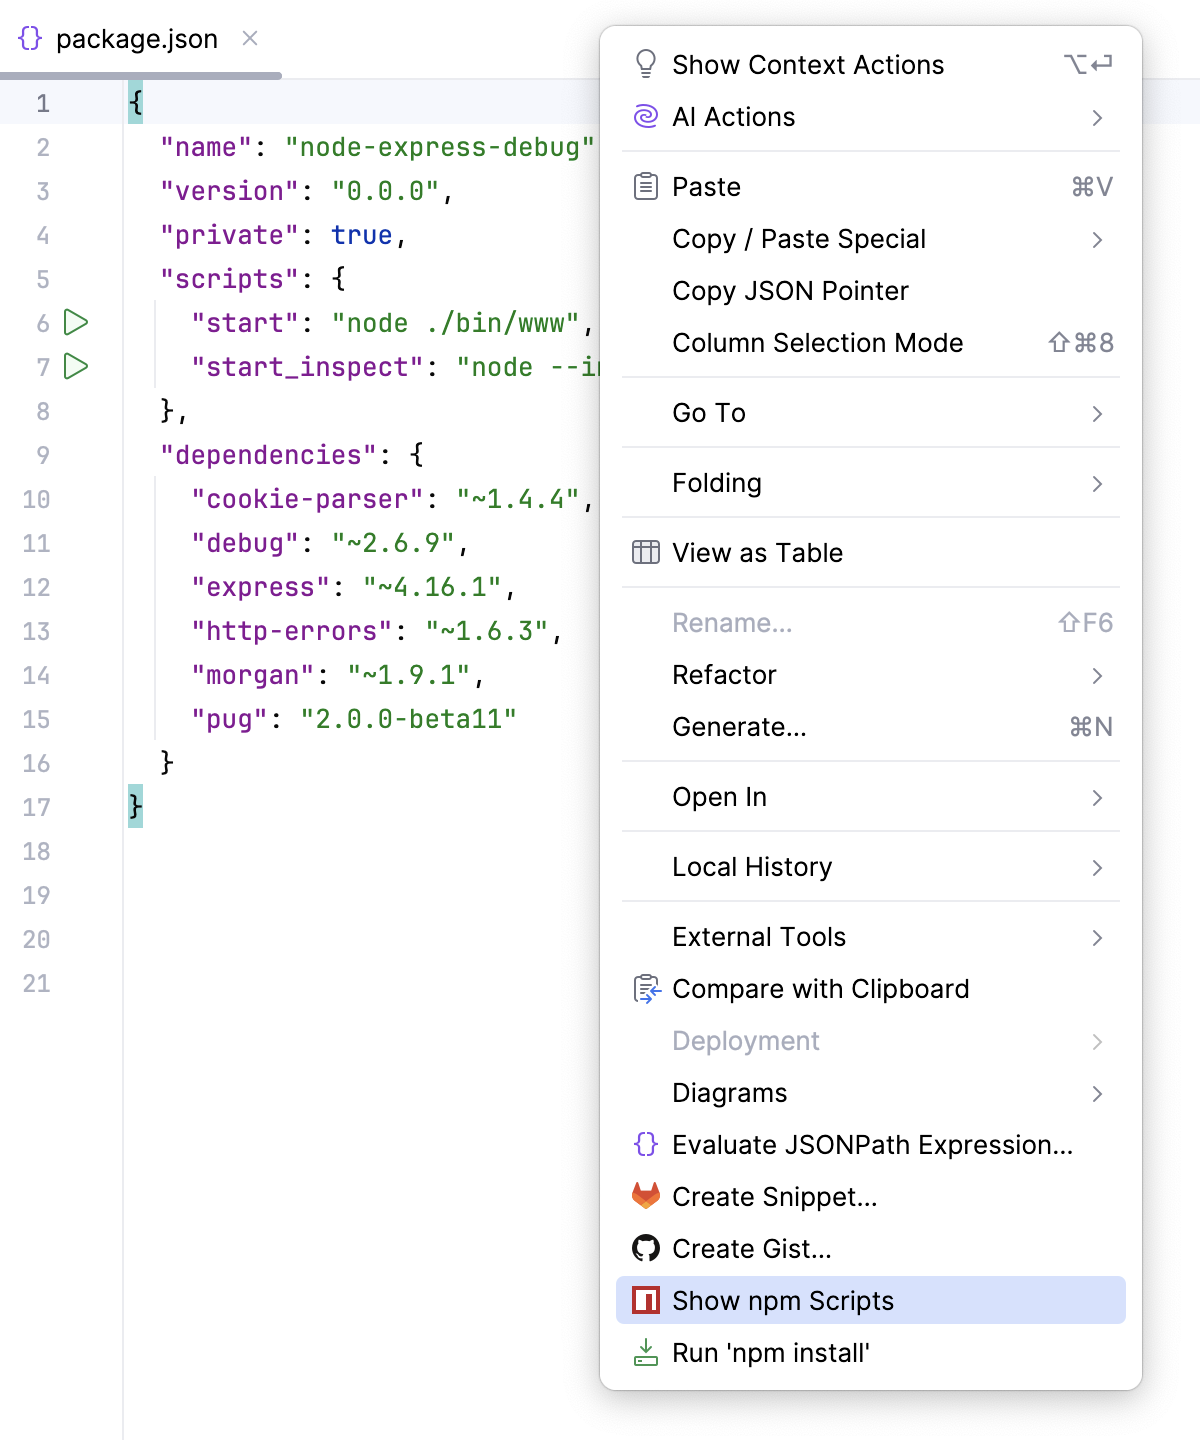
The npm tool window opens when you select a `package.json` file in the    Project tool window   (`Alt+1` (Windows), `⌘ 1` (macOS), `⌘ 1` (IntelliJ IDEA Classic (macOS)), `⌘ 1` (macOS System Shortcuts), `Alt+1` (XWin), `Alt+1` (GNOME), `Alt+1` (KDE), `Alt+1` (Emacs), `Alt+1` (Sublime Text), `⌘ 1` (Sublime Text (macOS)), `Ctrl+1` (NetBeans), `Ctrl+Alt+L` (Visual Studio), `⌘ ⌥ L` (Visual Studio (macOS)), `Alt+1` (Eclipse), `Alt+1` (Eclipse (macOS)))  or open it in the editor and select Show npm Scripts from the context menu.

As soon as you invoke npm, pnpm, or Yarn, the tool starts building a tree of scripts defined within the `scripts` property  of the `package.json` file on which it was invoked.

If you have several `package.json` files in your project, you can build a separate script tree for each of them and run scripts without dropping the previously built trees. Each tree is shown under a separate node.

Procedure: Open the npm tool window if it is not opened yet

* Select the required `` file in the    Project tool window   (`Alt+1` (Windows), `⌘ 1` (macOS), `⌘ 1` (IntelliJ IDEA Classic (macOS)), `⌘ 1` (macOS System Shortcuts), `Alt+1` (XWin), `Alt+1` (GNOME), `Alt+1` (KDE), `Alt+1` (Emacs), `Alt+1` (Sublime Text), `⌘ 1` (Sublime Text (macOS)), `Ctrl+1` (NetBeans), `Ctrl+Alt+L` (Visual Studio), `⌘ ⌥ L` (Visual Studio (macOS)), `Alt+1` (Eclipse), `Alt+1` (Eclipse (macOS)))  or open it in the editor and choose Show npm Scripts from the context menu.
![Open the nmp tool window](https://resources.jetbrains.com/help/img/idea/2026.2/ws_open_npm_tw.png)

The npm tool window opens showing the scripts tree built according to the selected or opened `package.json` file.

Procedure: Build a tree of scripts in an already opened npm tool window

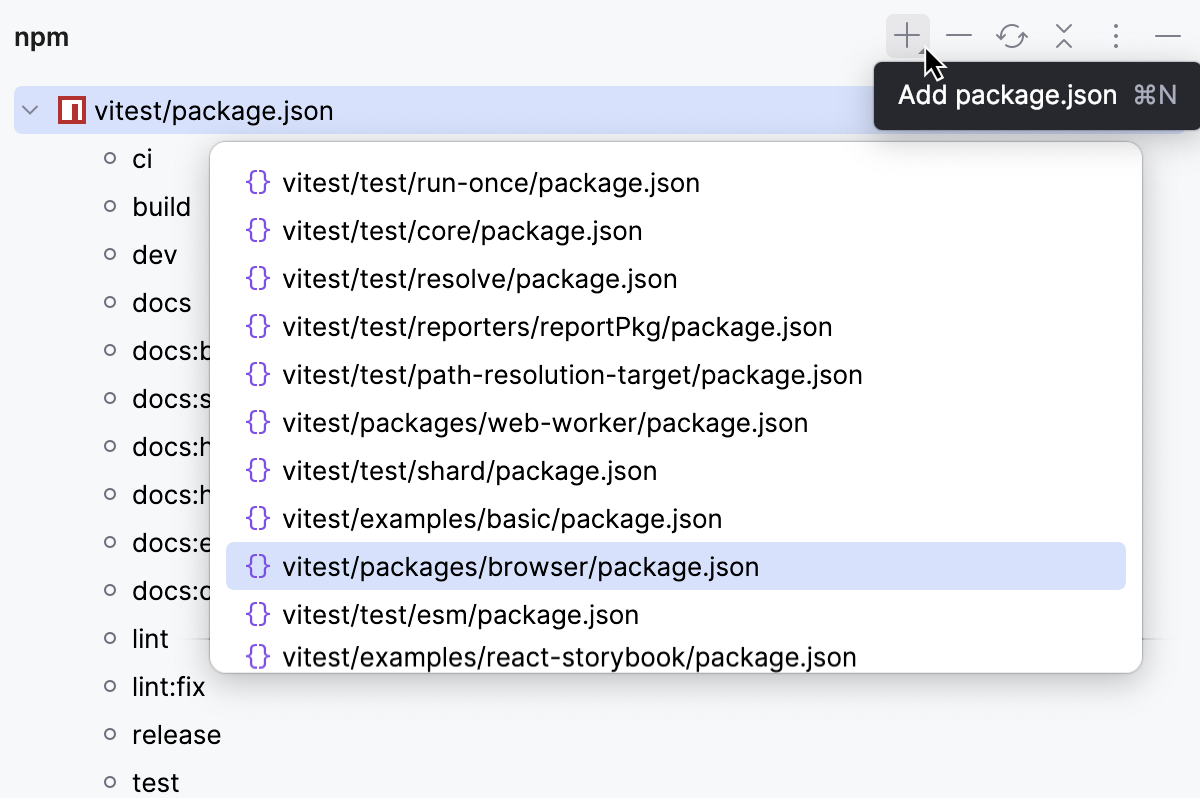
1. In the npm tool window, click ![the Add button](https://resources.jetbrains.com/help/img/idea/2026.2/app.expui.general.add.svg) on the toolbar and choose the required `package.json` file from the list.         By default, IntelliJ&nbsp;IDEA shows the `package.json` file in the root of your project.

2. If you have another `package.json` file, click Choose package.json and select the `package.json` file you need in the dialog that opens. IntelliJ&nbsp;IDEA adds a new node with the path to the chosen `package.json` file on its title and builds a scripts tree under the new node.
![Build another script tree](https://resources.jetbrains.com/help/img/idea/2026.2/ws_npm_tw_build_tree.png)

Procedure: Re-build a tree

* Switch to the required node and click ![Reload Scripts](https://resources.jetbrains.com/help/img/idea/2026.2/app.actions.refresh.svg) on the toolbar.

[Video](https://resources.jetbrains.com/help/img/idea/2026.2/ws_npm_tw_reload_scripts.mp4)

Procedure: Sort the scripts in a tree by their names

* Click ![Settings](https://resources.jetbrains.com/help/img/idea/2026.2/app.general.gear.svg) on the toolbar, choose Sort by from the menu, and then choose Name.

By default, a tree shows the scripts in the order in which they are defined in `package.json` (option Definition order).

[Video](https://resources.jetbrains.com/help/img/idea/2026.2/ws_npm_tw_sort_scripts.mp4)

Procedure: Run one script

* Double-click the script.

* Select the script in the tree and press `Enter` (Windows), `⏎` (macOS), `⏎` (IntelliJ IDEA Classic (macOS)), `⏎` (macOS System Shortcuts), `Enter` (XWin), `Enter` (GNOME), `Enter` (KDE), `Enter` (Emacs), `Enter` (Sublime Text), `⏎` (Sublime Text (macOS)), `Enter` (NetBeans), `Enter` (Visual Studio), `⏎` (Visual Studio (macOS)), `Enter` (Eclipse), `⏎` (Eclipse (macOS)) or choose Run <script name> from the context menu.

[Video](https://resources.jetbrains.com/help/img/idea/2026.2/ws_run_npm_script_from_npm_tw.mp4)

Procedure: Run several scripts

* Use the multiselect mode: hold `Shift` (Windows), `Shift` (macOS), `Shift` (IntelliJ IDEA Classic (macOS)), `Shift` (macOS System Shortcuts), `Shift` (XWin), `Shift` (GNOME), `Shift` (KDE), `Shift` (Emacs), `Shift` (Sublime Text), `Shift` (Sublime Text (macOS)), `Shift` (NetBeans), `Shift` (Visual Studio), `Shift` (Visual Studio (macOS)), `Shift` (Eclipse), `Shift` (Eclipse (macOS)) (for adjacent items) or `Ctrl` (Windows), `Ctrl` (macOS), `Ctrl` (IntelliJ IDEA Classic (macOS)), `Ctrl` (macOS System Shortcuts), `Ctrl` (XWin), `Ctrl` (GNOME), `Ctrl` (KDE), `Ctrl` (Emacs), `Ctrl` (Sublime Text), `Ctrl` (Sublime Text (macOS)), `Ctrl` (NetBeans), `Ctrl` (Visual Studio), `Ctrl` (Visual Studio (macOS)), `Ctrl` (Eclipse), `Ctrl` (Eclipse (macOS)) (for non-adjacent items) keys and select the required scripts, then choose Run or Debug from the context menu of the selection.

![Run multiple scripts](https://resources.jetbrains.com/help/img/idea/2026.2/ws_npm_tw_run_multiple_scripts.png)

### Run scripts by a run configuration

When you run or debug scripts from the editor or from the npm tool window, IntelliJ IDEA automatically creates temporary run configurations. Besides using them, you can create and launch your own npm run configurations.

Procedure: Create an NPM run/debug configuration

1. Go to `Run | Edit Configurations`. Alternatively, select Edit Configurations from the Run widget on the toolbar.

![Open the Edit Configurations dialog](https://resources.jetbrains.com/help/img/idea/2026.2/ws_node_run_config_create.png)

2. In the Edit Configurations dialog that opens,    click the Add button (![the Add button](https://resources.jetbrains.com/help/img/idea/2026.2/app.expui.general.add.svg)) on the toolbar and select npm from the list.  The [Run/Debug Configuration: npm dialog](run-debug-configuration-npm.html) opens.

3. Specify the CLI command to execute, the scripts to run (use blank spaces as separators), and the location of the `package.json` file where these scripts are defined. Optionally, type the [command-line arguments](https://docs.npmjs.com/cli/run-script#description) for executing the scripts.

4. Specify the Node.js runtime to use.

If you choose the Project alias, IntelliJ IDEA will automatically use the project default interpreter from the Node runtime field on the [JavaScript Runtime](javascript-runtime.html) page . In most cases, IntelliJ IDEA detects the project default runtime and fills in the field itself.

You can also choose another configured local or remote interpreter or click ![the Browse button](https://resources.jetbrains.com/help/img/idea/2026.2/app.general.ellipsis.svg) and configure a new one.

Optionally specify the [Node.js-specific option parameters](run-debug-configuration-node-js.html#node_parameters) and the [environment variables](https://www.w3schools.com/nodejs/nodejs_environment.asp) to be passed to Node.js.

The definitions of variables are displayed in the Environment variables field with semicolons (`;`) as separators, for example:

* `NODE_PATH` A list of additional directories to search when resolving modules. To separate directories in a list, use colon (`:`) on macOS or Linux, use semicolon (`;`) on Windows.

* `NODE_MODULE_CONTEXTS` Set to 1 to load modules in their own global contexts.

* `NODE_DISABLE_COLORS` Set to 1 to disable colors in the REPL.

![Environment variables](https://resources.jetbrains.com/help/img/idea/2026.2/nodeEnvironmentVariables.png)

Alternatively, click Browse ![the Edit environment variables](https://resources.jetbrains.com/help/img/idea/2026.2/app-client.expui.inline.variables.svg) to the right of the field and configure a list of variables in the Environment Variables dialog, that opens:

* Use ![](https://resources.jetbrains.com/help/img/idea/2026.2/app.expui.general.add.svg), ![](https://resources.jetbrains.com/help/img/idea/2026.2/app.expui.general.remove.svg), ![](https://resources.jetbrains.com/help/img/idea/2026.2/app.expui.general.copy.svg) and ![](https://resources.jetbrains.com/help/img/idea/2026.2/app.expui.general.paste.svg) buttons to manage the list of custom variables.

* The dialog also shows a list of available system environment variables. Clear the Include system environment variables checkbox if you don't want to use the system environment variables for the current configuration.

* Click OK, when ready.

5. Specify the package manager to use. If you choose the `Project` alias, IntelliJ IDEA will use the default project package manager from the [JavaScript Runtime](javascript-runtime.html) page. You can also choose the relevant package alias (npm or yarn) or specify an explicit path to a custom installation  of a package manager.

6. If you are using a remote Node.js runtime in a Docker container,  check autogenerated Docker container settings. Click ![the Expand icon](https://resources.jetbrains.com/help/img/idea/2026.2/app-client.expui.inline.expand.svg) to open the settings in a popup.

![Check Docker container settings](https://resources.jetbrains.com/help/img/idea/2026.2/ws_npm_docker_run_configuration_docker_container_settings.png)

Learn more from [npm, pnpm, and yarn with Docker](#ws_node_docker_manage_dependencies) and [Configuring remote Node .js runtimes](configuring-remote-node-interpreters.html).

Procedure: Run your scripts

* From the Run widget on the toolbar, select the newly created run configuration and then click ![Run](https://resources.jetbrains.com/help/img/idea/2026.2/app.expui.run.run.svg) or ![Debug](https://resources.jetbrains.com/help/img/idea/2026.2/app.expui.run.debug.svg) next to it.

* The results of script execution are displayed in the [Run tool
window](run-tool-window.html).

* If you click ![Debug](https://resources.jetbrains.com/help/img/idea/2026.2/app.expui.run.debug.svg), IntelliJ IDEA opens the [Debug tool window](debug-tool-window.html), where you can  [step through the script](stepping-through-the-program.html) ,  [stop and
resume](starting-the-debugger-session.html#pause-resume)  the script execution, [examine it when suspended](examining-suspended-program.html), [run JavaScript code snippets in the
Debugger Console](node-interactive-debugger-console.html), and so on.

### Run scripts with Run Anything

Run Anything is a quick way to start scripts.

Procedure:

1. Press `Ctrl` (Windows), `Ctrl` (macOS), `Ctrl` (IntelliJ IDEA Classic (macOS)), `Ctrl` (macOS System Shortcuts), `Ctrl` (XWin), `Ctrl` (GNOME), `Ctrl` (KDE), `Ctrl` (Emacs), `Ctrl` (Sublime Text), `Ctrl` (Sublime Text (macOS)), `Ctrl` (NetBeans), `Ctrl` (Visual Studio), `Ctrl` (Visual Studio (macOS)), `Ctrl` (Eclipse), `Ctrl` (Eclipse (macOS)) twice or click ![the Run Anything button](https://resources.jetbrains.com/help/img/idea/2026.2/app.actions.run_anything.svg) on the Navigation bar. The Run Anything popup opens.

2. Type the name of a package manager in the search field. As you type, IntelliJ IDEA shows the matching commands.

![Run Anything: type the name of a package manager](https://resources.jetbrains.com/help/img/idea/2026.2/ws_run_anything_npm.png)

Alternatively, type the name of a script.

![Run Anything: type the name of a script](https://resources.jetbrains.com/help/img/idea/2026.2/ws_run_anything_type_script_name.png)

Finally, you can type `?` to get a list of command hints.

![List of the available commands in Run Anything](https://resources.jetbrains.com/help/img/idea/2026.2/ws_run_anything_commands_hints.png)

Navigate to the relevant hint and press `Space` (Windows), `Space` (macOS), `Space` (IntelliJ IDEA Classic (macOS)), `Space` (macOS System Shortcuts), `Space` (XWin), `Space` (GNOME), `Space` (KDE), `Space` (Emacs), `Space` (Sublime Text), `Space` (Sublime Text (macOS)), `Space` (NetBeans), `Space` (Visual Studio), `Space` (Visual Studio (macOS)), `Space` (Eclipse), `Space` (Eclipse (macOS)) to get a list of available commands, select the required command from the list, and press `Enter` (Windows), `⏎` (macOS), `⏎` (IntelliJ IDEA Classic (macOS)), `⏎` (macOS System Shortcuts), `Enter` (XWin), `Enter` (GNOME), `Enter` (KDE), `Enter` (Emacs), `Enter` (Sublime Text), `⏎` (Sublime Text (macOS)), `Enter` (NetBeans), `Enter` (Visual Studio), `⏎` (Visual Studio (macOS)), `Enter` (Eclipse), `⏎` (Eclipse (macOS)).

To view the command output in the Run tool window, press `Ctrl+Enter` (Windows), `Ctrl+Enter` (macOS), `Ctrl+Enter` (IntelliJ IDEA Classic (macOS)), `Ctrl+Enter` (macOS System Shortcuts), `Ctrl+Enter` (XWin), `Ctrl+Enter` (GNOME), `Ctrl+Enter` (KDE), `Ctrl+Enter` (Emacs), `Ctrl+Enter` (Sublime Text), `Ctrl+Enter` (Sublime Text (macOS)), `Ctrl+Enter` (NetBeans), `Ctrl+Enter` (Visual Studio), `Ctrl+Enter` (Visual Studio (macOS)), `Ctrl+Enter` (Eclipse), `Ctrl+Enter` (Eclipse (macOS)), to show the output in the Debug tool window, press `Shift+Enter` (Windows), `Shift+Enter` (macOS), `Shift+Enter` (IntelliJ IDEA Classic (macOS)), `Shift+Enter` (macOS System Shortcuts), `Shift+Enter` (XWin), `Shift+Enter` (GNOME), `Shift+Enter` (KDE), `Shift+Enter` (Emacs), `Shift+Enter` (Sublime Text), `Shift+Enter` (Sublime Text (macOS)), `Shift+Enter` (NetBeans), `Shift+Enter` (Visual Studio), `Shift+Enter` (Visual Studio (macOS)), `Shift+Enter` (Eclipse), `Shift+Enter` (Eclipse (macOS)).

![Run an npm command in the Run or Debug tool window from the Run Anything popup](https://resources.jetbrains.com/help/img/idea/2026.2/ws_smart_command_execution_npm_serve_run_anything_debug.animated.gif)

### Run scripts automatically on start-up

If you have some scripts that you run on a regular basis, you can add the corresponding run configurations to a list of startup tasks. The tasks will be executed automatically on the project start-up.

Procedure:

1. In the Settings dialog (`Ctrl+Alt+S` (Windows), `⌘ Comma` (macOS), `⌘ Comma` (IntelliJ IDEA Classic (macOS)), `⌘ Comma` (macOS System Shortcuts), `Ctrl+Alt+S` (XWin), `Ctrl+Alt+S` (GNOME), `Ctrl+Alt+S` (KDE), `Ctrl+Alt+S` (Emacs), `Ctrl+Alt+S` (Sublime Text), `⌘ Comma` (Sublime Text (macOS)), `Ctrl+Alt+S` (NetBeans), `Ctrl+Alt+S` (Visual Studio), `⌘ Comma` (Visual Studio (macOS)), `Ctrl+Alt+S` (Eclipse), `⌘ Comma` (Eclipse (macOS))), go to `Tools | Startup Tasks`.

2. On the [Startup Tasks page](settings-tools-startup-tasks.html) that opens, click ![the Add button](https://resources.jetbrains.com/help/img/idea/2026.2/app.expui.general.add.svg) on the toolbar.

3. From the list, choose the required npm run configuration. The configuration is added to the list.

If no applicable configuration is available in the project, click ![the Add button`](https://resources.jetbrains.com/help/img/idea/2026.2/app.expui.general.add.svg) and choose Edit Configurations. Then define a configuration with the required settings on the [Run/Debug configuration](run-debug-configuration-npm.html) page that opens. When you save the new configuration it is automatically added to the list of startup tasks.

### Run scripts as before-launch tasks

Procedure:

1. Open the [Run/debug configurations dialog](run-debug-configurations-dialog.html)  dialog by choosing `Run | Edit Configurations` from the main menu, and select the required configuration from the list or create it anew by clicking ![Add New Configuration](https://resources.jetbrains.com/help/img/idea/2026.2/app.expui.general.add.svg) and choosing the relevant run configuration type.

2. In the dialog that opens, click ![Add](https://resources.jetbrains.com/help/img/idea/2026.2/app.expui.general.add.svg) in the Before launch area and choose Run npm script from the list.

3. In the NPM Script dialog that opens, specify the [npm run/debug configuration settings]().

## Debug scripts

You can start debugging npm, Yarn, or pnpm scripts from a `package.json` file in the editor, from a tree of scripts in the dedicated npm tool window, or according to a dedicated run configuration.

In either case, IntelliJ IDEA opens the [Debug tool window](debug-tool-window.html), where you can  [step through the script](stepping-through-the-program.html) ,  [stop and
resume](starting-the-debugger-session.html#pause-resume)  the script execution, [examine it when suspended](examining-suspended-program.html), [run JavaScript code snippets in the
Debugger Console](node-interactive-debugger-console.html), and so on.

### Debug scripts from package.json

IntelliJ IDEA lets you quickly start a debugging session for single scripts from `package.json` files. To debug several scripts, use a run configuration or the npm tool window.

Procedure:

* Open the relevant `package.json` file in the editor, click ![the Run button](https://resources.jetbrains.com/help/img/idea/2026.2/app-client.expui.run.run.svg) in the gutter next to the script, and select  Debug <script_name> from the context menu.

![Debug a script from package.json](https://resources.jetbrains.com/help/img/idea/2026.2/ws_debug_npm_script_from_package_json.png)

IntelliJ IDEA opens the [Debug tool window](debug-tool-window.html), where you can  [step through the script](stepping-through-the-program.html) ,  [stop and
resume](starting-the-debugger-session.html#pause-resume)  the script execution, [examine it when suspended](examining-suspended-program.html), [run JavaScript code snippets in the
Debugger Console](node-interactive-debugger-console.html), and so on.

### Debug scripts from the npm tool window

The npm tool window opens when you select a `package.json` file in the    Project tool window   (`Alt+1` (Windows), `⌘ 1` (macOS), `⌘ 1` (IntelliJ IDEA Classic (macOS)), `⌘ 1` (macOS System Shortcuts), `Alt+1` (XWin), `Alt+1` (GNOME), `Alt+1` (KDE), `Alt+1` (Emacs), `Alt+1` (Sublime Text), `⌘ 1` (Sublime Text (macOS)), `Ctrl+1` (NetBeans), `Ctrl+Alt+L` (Visual Studio), `⌘ ⌥ L` (Visual Studio (macOS)), `Alt+1` (Eclipse), `Alt+1` (Eclipse (macOS)))  or open it in the editor and select Show npm Scripts from the context menu.

As soon as you invoke npm, pnpm, or Yarn, the tool starts building a tree of scripts defined within the `scripts` property  of the `package.json` file on which it was invoked.

If you have several `package.json` files in your project, you can build a separate script tree for each of them and run scripts without dropping the previously built trees. Each tree is shown under a separate node.

#### Open the npm tool window if it is not opened yet

Procedure:

* Select the required `` file in the    Project tool window   (`Alt+1` (Windows), `⌘ 1` (macOS), `⌘ 1` (IntelliJ IDEA Classic (macOS)), `⌘ 1` (macOS System Shortcuts), `Alt+1` (XWin), `Alt+1` (GNOME), `Alt+1` (KDE), `Alt+1` (Emacs), `Alt+1` (Sublime Text), `⌘ 1` (Sublime Text (macOS)), `Ctrl+1` (NetBeans), `Ctrl+Alt+L` (Visual Studio), `⌘ ⌥ L` (Visual Studio (macOS)), `Alt+1` (Eclipse), `Alt+1` (Eclipse (macOS)))  or open it in the editor and choose Show npm Scripts from the context menu.

![Open the nmp tool window](https://resources.jetbrains.com/help/img/idea/2026.2/ws_open_npm_tw.png)

The npm tool window opens showing the scripts tree built according to the selected or opened `package.json` file.

#### Build a tree of scripts in an already opened npm tool window

Procedure:

1. In the npm tool window, click ![the Add button](https://resources.jetbrains.com/help/img/idea/2026.2/app.expui.general.add.svg) on the toolbar and choose the required `package.json` file from the list.         By default, IntelliJ IDEA shows the `package.json` file in the root of your project.

2. If you have another `package.json` file, click Choose package.json and select the `package.json` file you need in the dialog that opens. IntelliJ IDEA adds a new node with the path to the chosen `package.json` file on its title and builds a scripts tree under the new node.

![Build another script tree](https://resources.jetbrains.com/help/img/idea/2026.2/ws_npm_tw_build_tree.png)

#### Re-build a tree

Procedure:

* Switch to the required node and click ![Reload Scripts](https://resources.jetbrains.com/help/img/idea/2026.2/app.actions.refresh.svg) on the toolbar.

[Video](https://resources.jetbrains.com/help/img/idea/2026.2/ws_npm_tw_reload_scripts.mp4)

#### Sort the scripts in a tree by their names

Procedure:

* Click ![Settings](https://resources.jetbrains.com/help/img/idea/2026.2/app.general.gear.svg) on the toolbar, choose Sort by from the menu, and then choose Name.

By default, a tree shows the scripts in the order in which they are defined in `package.json` (option Definition order).

[Video](https://resources.jetbrains.com/help/img/idea/2026.2/ws_npm_tw_sort_scripts.mp4)

#### Debug one script

Procedure:

* Select the script in the tree and choose Debug <script_name> from the context menu.

IntelliJ IDEA opens the [Debug tool window](debug-tool-window.html) where you can  [step through the script](stepping-through-the-program.html) ,  [stop and
resume](starting-the-debugger-session.html#pause-resume)  the script execution, [examine it when suspended](examining-suspended-program.html), [run JavaScript code snippets in the
Debugger Console](node-interactive-debugger-console.html), and so on.

[Video](https://resources.jetbrains.com/help/img/idea/2026.2/ws_debug_npm_script_from_npm_tw.mp4)

#### Debug several scripts

Procedure:

* Use the multiselect mode: hold `Shift` (Windows), `Shift` (macOS), `Shift` (IntelliJ IDEA Classic (macOS)), `Shift` (macOS System Shortcuts), `Shift` (XWin), `Shift` (GNOME), `Shift` (KDE), `Shift` (Emacs), `Shift` (Sublime Text), `Shift` (Sublime Text (macOS)), `Shift` (NetBeans), `Shift` (Visual Studio), `Shift` (Visual Studio (macOS)), `Shift` (Eclipse), `Shift` (Eclipse (macOS)) (for adjacent items) or `Ctrl` (Windows), `Ctrl` (macOS), `Ctrl` (IntelliJ IDEA Classic (macOS)), `Ctrl` (macOS System Shortcuts), `Ctrl` (XWin), `Ctrl` (GNOME), `Ctrl` (KDE), `Ctrl` (Emacs), `Ctrl` (Sublime Text), `Ctrl` (Sublime Text (macOS)), `Ctrl` (NetBeans), `Ctrl` (Visual Studio), `Ctrl` (Visual Studio (macOS)), `Ctrl` (Eclipse), `Ctrl` (Eclipse (macOS)) (for non-adjacent items) keys and select the required scripts, then choose Run or Debug from the context menu of the selection.

![Debug multiple scripts](https://resources.jetbrains.com/help/img/idea/2026.2/ws_npm_tw_debug_multiple_scripts.png)

### Debug scripts by a run configuration

When you run or debug scripts from the editor or from the npm tool window, IntelliJ IDEA automatically creates temporary run configurations. Besides using them, you can create and launch your own npm run configurations.

Procedure:

1. Go to `Run | Edit Configurations`. Alternatively, select Edit Configurations from the Run widget on the toolbar.

![Open the Edit Configurations dialog](https://resources.jetbrains.com/help/img/idea/2026.2/ws_node_run_config_create.png)

2. In the Edit Configurations dialog that opens,    click the Add button (![the Add button](https://resources.jetbrains.com/help/img/idea/2026.2/app.expui.general.add.svg)) on the toolbar and select npm from the list.  The [Run/Debug Configuration: npm dialog](run-debug-configuration-npm.html) opens.

3. Specify the CLI command to execute, the scripts to run (use blank spaces as separators), and the location of the `package.json` file where these scripts are defined. Optionally, type the [command-line arguments](https://docs.npmjs.com/cli/run-script#description) for executing the scripts.

4. Specify the Node.js runtime to use.

If you choose the Project alias, IntelliJ IDEA will automatically use the project default interpreter from the Node runtime field on the [JavaScript Runtime](javascript-runtime.html) page . In most cases, IntelliJ IDEA detects the project default runtime and fills in the field itself.

You can also choose another configured local or remote interpreter or click ![the Browse button](https://resources.jetbrains.com/help/img/idea/2026.2/app.general.ellipsis.svg) and configure a new one.

Optionally specify the [Node.js-specific option parameters](run-debug-configuration-node-js.html#node_parameters) and the [environment variables](https://www.w3schools.com/nodejs/nodejs_environment.asp) to be passed to Node.js.

The definitions of variables are displayed in the Environment variables field with semicolons (`;`) as separators, for example:

* `NODE_PATH` A list of additional directories to search when resolving modules. To separate directories in a list, use colon (`:`) on macOS or Linux, use semicolon (`;`) on Windows.

* `NODE_MODULE_CONTEXTS` Set to 1 to load modules in their own global contexts.

* `NODE_DISABLE_COLORS` Set to 1 to disable colors in the REPL.

![Environment variables](https://resources.jetbrains.com/help/img/idea/2026.2/nodeEnvironmentVariables.png)

Alternatively, click Browse ![the Edit environment variables](https://resources.jetbrains.com/help/img/idea/2026.2/app-client.expui.inline.variables.svg) to the right of the field and configure a list of variables in the Environment Variables dialog, that opens:

* Use ![](https://resources.jetbrains.com/help/img/idea/2026.2/app.expui.general.add.svg), ![](https://resources.jetbrains.com/help/img/idea/2026.2/app.expui.general.remove.svg), ![](https://resources.jetbrains.com/help/img/idea/2026.2/app.expui.general.copy.svg) and ![](https://resources.jetbrains.com/help/img/idea/2026.2/app.expui.general.paste.svg) buttons to manage the list of custom variables.

* The dialog also shows a list of available system environment variables. Clear the Include system environment variables checkbox if you don't want to use the system environment variables for the current configuration.

* Click OK, when ready.

5. Specify the package manager to use. If you choose the `Project` alias, IntelliJ IDEA will use the default project package manager from the [JavaScript Runtime](javascript-runtime.html) page. You can also choose the relevant package alias (npm or yarn) or specify an explicit path to a custom installation  of a package manager.

6. If you are using a remote Node.js runtime in a Docker container,  check autogenerated Docker container settings. Click ![the Expand icon](https://resources.jetbrains.com/help/img/idea/2026.2/app-client.expui.inline.expand.svg) to open the settings in a popup.

![Check Docker container settings](https://resources.jetbrains.com/help/img/idea/2026.2/ws_npm_docker_run_configuration_docker_container_settings.png)

Learn more from [npm, pnpm, and yarn with Docker](#ws_node_docker_manage_dependencies) and [Configuring remote
Node.js runtimes](configuring-remote-node-interpreters.html).

7. From the Run widget on the toolbar, select the newly created run configuration and then click ![Debug](https://resources.jetbrains.com/help/img/idea/2026.2/app.expui.run.debug.svg) next to it.

IntelliJ IDEA opens the [Debug tool window](debug-tool-window.html), where you can  [step through the script](stepping-through-the-program.html) ,  [stop and
resume](starting-the-debugger-session.html#pause-resume)  the script execution, [examine it when suspended](examining-suspended-program.html), [run JavaScript code snippets in the
Debugger Console](node-interactive-debugger-console.html), and so on.

## npm, pnpm, and yarn in Docker

With IntelliJ IDEA, you can edit `package.json`, install, update, and remove dependencies of a project in a Docker container just in the same way as you do it locally.

Procedure:

1. Install and enable the Node.js Remote Interpreter plugin on the Settings | Plugins page, tab Marketplace, as described in [Installing plugins from
JetBrains Marketplace](managing-plugins.html#install_plugin_from_repo).

2. Make sure the Node.js and Docker required plugins are enabled on the Settings | Plugins page, tab Installed. For more information, refer to [Managing plugins](managing-plugins.html).

3. Download, install, and configure Docker as described in [Docker](docker.html)

4. [Configure a Node.js remote
runtime in Docker](node-with-docker.html#ws_node_docker_configure_interpreter) or via [Docker Compose](node-with-docker-compose.html#ws_node_docker_compose_configure_interpreter) and [set it as default](node-with-docker.html#ws_node_docker_manage_dependencies) in your project. Also make sure the package manager associated with this remote runtime is [set as project default](node-with-docker.html#ws_node_docker_manage_dependencies).

5. Proceed as with local development: [edit your package.json](#ws_npm_yarn_edit_package_json), [manage you
project dependencies](#ws_installing_and_upgrading_packages), and [run or debug scripts](#ws_npm_running_npm_scripts).

## See also

### Procedures

[Bower](using-bower-package-manager.html) [File Watchers](using-file-watchers.html)

### Reference

[JavaScript Runtimes](javascript-runtime.html)

</script></script_name></package_name></package_name></package_name></package_name></package_name></package_name></package_name></package></package></package></package_manager></version></package></version></package></body></html>