Javadocs
Javadoc is a JDK tool that lets you generate an API reference for your project. It relies on documentation comments, which are placed right before the declarations they describe, are intended to be shared outside the code, and support advanced formatting options. Javadocs are considered the industry standard for documenting Java code.

IntelliJ IDEA provides the following support for Javadoc:
Actions for generating Javadoc comment stubs
Inspections and quick fixes for problems in Javadoc comments
Rendering of Javadoc comments in the editor
Dialog for generating an API reference from Javadoc comments in the project
Rendering of library Javadocs in the IDE
Documentation comments are also available in JavaScript, Python, Ruby, PHP, and Kotlin.
Write Javadoc comments
Since Java 23, Javadoc supports two comment styles: traditional and Markdown. Depending on which style you choose, you might need to follow different guidelines. Learn more from JavaDoc Documentation Comment Specification for the Standard Doclet (oracle.com).
To help you document your code more quickly, IntelliJ IDEA lets you generate Javadoc comment stubs for your declarations. This is especially useful for methods, where the IDE automatically inserts the required Javadoc tags based on the method structure: @param for each parameter, @return if the method returns a value, and @throws for each exception the method can throw.
Add a Javadoc comment using automatic completion
To insert a traditional documentation comment, type
/**before a declaration and press Enter.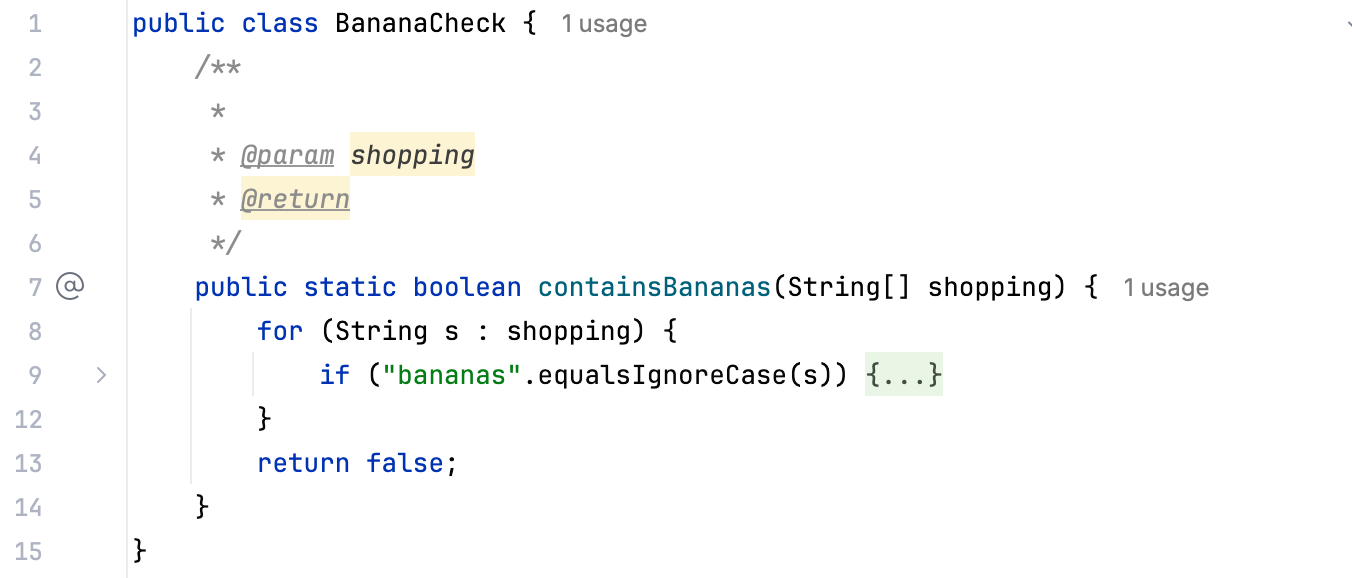
To insert a Markdown documentation comment, type
///before a declaration and press Enter.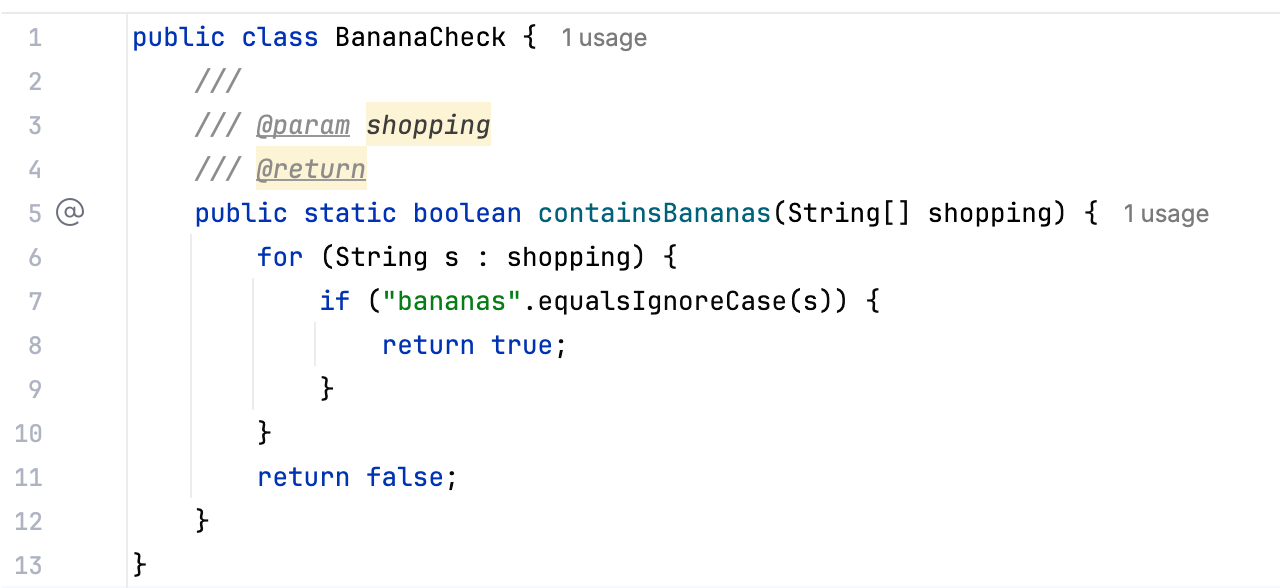
Add a Javadoc comment using a context action
Place the caret at a declaration name.
Press Alt+Enter and select Add Javadoc.

Add a Javadoc comment using command completion
Place the caret at the end of a declaration name.
Type
..and select Add Javadoc.
Formatting in traditional Javadoc comments
You can format traditional Javadoc comments using HTML tags as well as Javadoc-specific tags. This chapter lists some of the most commonly used ones. For a complete list of available tags, refer to How to Write Doc Comments for the Javadoc Tool (oracle.com).
HTML tags:
Use
<p>for paragraphs.Use
<h1>,<h2>and so on for headings.Use
<img>to add images, for example:<img src="jb_logo.png"/>.Use
<pre>to preserve whitespaces.For lists, use
<ul>(unordered),<ol>(ordered),<li>for items in ordered and unordered lists.
Inline Javadoc tags:
Use
{@code text}to format inline text as code.Use
{@literal text}to display special characters like < and >.Use
{@link ClassName}to insert a hyperlink to another class or method.
Block Javadoc tags:
Use
@param name descriptionto describe a method parameter.Use
@return descriptionto describe what a method returns.Use
@deprecated reasonto mark a method or class as deprecated.Use
@author nameto specify the author of a class or interface.

Render Javadocs in the editor
IntelliJ IDEA allows you to render Javadoc comments in the editor. Rendered comments are easier to read, they let you click links to go to referenced web pages, and they do not overload your code with extra tags.
To render a Javadoc comment, click ![]() Toggle Rendered View in the gutter (or press Ctrl+Alt+Q). To edit the comment, click
Toggle Rendered View in the gutter (or press Ctrl+Alt+Q). To edit the comment, click ![]() Toggle Rendered View.
Toggle Rendered View.


Render Javadoc comments by default
You can configure the IDE to always render Javadoc comments in the editor.
In the gutter, right-click
 Toggle Rendered View (or
  Toggle Rendered View) and select Render All Doc Comments.
Alternatively, open Settings (Ctrl+Alt+S), go to , and select Render documentation comments.
To edit a rendered Javadoc comment, click ![]() Toggle Rendered View in the gutter.
Toggle Rendered View in the gutter.
Change the font size of rendered Javadoc comments
Right-click a rendered Javadoc comment and select Adjust Appearance.
In the popup that appears, adjust the Font size slider.
Note that rendered comments use the same font size as the Quick Documentation popup.
Generate a Javadoc reference
IntelliJ IDEA provides a utility that lets you generate a Javadoc reference for your project.
In the main menu, go to .
In the dialog that opens, select a scope: a set of files or directories for which you want to generate the reference.
In the Output directory, specify the folder where the generated documentation will be placed.
From the Visibility level list, select the visibility level of members that will be included in the generated documentation:
Public: include only public classes and members. The level corresponds to the
-publicJavadoc parameter.Protected: include only public and protected classes and members. The level corresponds to the
-protectedJavadoc parameter.Package: include all classes and members except the private ones. The level corresponds to the
-packageJavadoc parameter.Private: include all classes and members. The level corresponds to the
-privateJavadoc parameter.
You can specify a locale (for example
en_US.UTF-8), command line arguments, and the maximum heap size. For descriptions of all controls, refer to the reference.Click Generate to generate the reference.
Reference: Generate JavaDoc dialog
The controls of the Generate JavaDoc dialog correspond to the options and tags of the Javadoc utility.
Item | Description |
|---|---|
JavaDoc Scope | Use this area to specify the subset of files, folders, and packages for which Javadoc should be generated. This scope can be the whole project, recently modified files, current file, custom scope, and so on. |
Include test sources | Include documentation comments for test to the generated Javadoc. |
Include JDK and library sources in -sourcepath | If this checkbox is selected, then paths to the JDK and library sources will be passed to the Javadoc utility. For more information, refer to the Javadoc documentation. |
Link to JDK documentation (use -link option) | If this checkbox is selected, the references to the classes and packages from JDK will turn into links, which corresponds to using the -link option of the Javadoc utility. This checkbox is only enabled when a link to the online documentation is specified in the Documentation Paths tab of the SDK settings. For more information, refer to the Javadoc documentation. |
Output directory | Specify the fully qualified path to the directory where the generated documentation will be stored. Type the path manually or click |
Visibility level | Specify the visibility level of members that you want to include in the generated documentation:
|
Generate hierarchy tree | Generate the class hierarchy. If this checkbox is cleared, the |
Generate navigator bar | Generate the navigator bar. If this checkbox is cleared, the |
Generate index | Generate the documentation index. If this checkbox is cleared, the |
Separate index per letter | Generate a separate index file for each letter. If this checkbox is cleared, the The checkbox is available only if the Generate index checkbox is selected. |
@use | Document the use of the class and the package. When selected, the checkbox corresponds to the |
@author | Include the |
@version | Include the |
@deprecated | Include the |
Deprecated list | Generate the deprecated list. When the checkbox is cleared, the The checkbox is available only if the @deprecated checkbox is selected. |
Locale | Type the required locale. |
Command line arguments | Type additional arguments to be passed to a Javadoc. Use the command line syntax. |
Maximum heap size | Type the maximum heap size in Mb to be used by Java VM for running Javadoc. |
Open generated documentation in browser | Automatically open the generated Javadoc in a browser. |
Use custom tags in Javadocs
In addition to the predefined tags, you can also use custom tags in your Javadoc comments. Later on, when you generate a Javadoc reference, you can choose to include the custom tags in the generated documentation.
Recognize custom tags
When you use a custom tag for the first time, the Javadoc declaration problems inspection highlights it in the editor as a wrong tag. To avoid that, add the tag to the list of recognized tags.
Place the caret at your custom tag, press Alt+Enter, and select Add '@tagname' to custom tags.

Alternatively, open Settings (Ctrl+Alt+S) and go to . Locate the Javadoc declaration problems inspection in the list and add your tag to the Additional Javadoc tags list.

Include custom tags in a Javadoc reference
To include your custom tags in an HTML Javadoc reference, add them as command-line arguments.
Go to and in the Command line arguments field, specify
-tag tagname:Xaoptcmf:"taghead".Example:
-tag location:a:"Development Location:"Xaoptcmfdetermines where in the source code the tag is allowed to be placed. You can useato allow the tag in all places. Learn more about block tags in Javadocs from the Javadoc documentation.Configure other options as described in Generate a Javadoc reference and generate the reference guide.
The information from the tag is displayed on the corresponding pages.

Customize the Javadoc code style
The Javadoc code style defines how IntelliJ IDEA formats Javadoc comments in the editor.
Open Settings (Ctrl+Alt+S) and go to .
Locate the JavaDoc tab.

Configure the code style settings as necessary. Use the right part of the dialog to preview the changes.
Reference: Javadoc code style settings
Item | Description |
|---|---|
Alignment | Define the way Javadoc comments should be aligned.
|
Blank lines | Define where blank lines should be inserted in Javadoc comments.
|
Invalid tags | In this area, define whether invalid tags should be preserved or not.
|
Other | In this area, specify additional formatting options for Javadoc comments.
|
Use Javadocs with libraries
Apart from Javadoc comments in your code, IntelliJ IDEA can also render Javadocs for libraries used in your project. You can view external Javadocs for any symbol or method signature right from the editor as long as the Javadocs are added to the library in the project settings.
View library Javadocs in IntelliJ IDEA
Invoke the Quick Documentation popup in one of the following ways:
Hover over the necessary symbol in the editor.
Place the caret at the symbol and press Ctrl+Q ().
Place the caret at the end of the symbol, type
.., and select Quick Documentation.
To open the documentation in a dedicated tool window, press Ctrl+Q one more time.
If a library in your project is normally provided with Javadocs, but they are not available in IntelliJ IDEA, you can download the Javadocs (using built-in download options) or add them manually.
Download library Javadocs
The quickest way to add Javadocs to a library is to download them. The location of the download option is different depending on the build tool that your project is using.
Open the Maven tool window.
Click
 Download Sources and/or Documentation and select Download Documentation.
In the editor, hover over a symbol or a method signature from the library.
In the popup that appears, click
 Download documentation.
Open the Project Structure dialog (Ctrl+Alt+Shift+S) and select Libraries.
Select the necessary library and click Edit in the right section of the dialog.
In the dialog that opens, select Download Javadocs and click OK.

Apply the changes and close the dialog.
Manually add Javadocs to a library
You can add Javadocs to a library manually by providing an external URL or by adding a JAR file that includes Javadocs.
Specify a Javadocs URL
Open the Project Structure dialog (Ctrl+Alt+Shift+S) and go to Libraries.
Select a library from the list and click
 Specify Documentation URL in the right section of the dialog.
In the dialog that opens, enter the documentation URL and click OK.

Apply the changes and close the dialog.
Add a JAR file with Javadocs
Open the Project Structure dialog (Ctrl+Alt+Shift+S) and go to Libraries.
Select a library from the list and click
 Add in the right section of the dialog.
In the dialog that opens, select the JAR file that includes the documentation and click Open.
Apply the changes and close the dialog.
Troubleshoot Javadoc issues
Javadoc inspection problems
If a method signature has been changed, IntelliJ IDEA highlights the tag that does not match the method signature and suggests a quick-fix.
Fix using context actions
Place the caret at the tag, press Alt+Enter, and select an action. You can change the tag or delete it.

Fix using the Fix doc comment action
Place the caret at the tag and press Ctrl+Shift+A.
Type
fix doc commentand press Enter.
Javadoc generation errors
If IntelliJ IDEA encounters any errors while generating a Javadoc reference, it displays the error details in the Run tool window (Alt+4).
Fix malformed locale name caused by UTF-8 encoding
If you encounter javadoc: error – Malformed locale name: en_US.UTF-8, try moving the UTF-8 encoding to the command line arguments:
In the main menu, go to .
Clear the Locale field.
In the Command line arguments field, type
-encoding utf8 -docencoding utf8 -charset utf8.-encoding: encoding used in your source files.-docencoding: encoding that should be used in the output HTML files.-charset: charset that Javadoc should insert into the HTML head section of every output file.
Generate the Javadoc reference again.