# JavaScript
> **TL;DR**
> Required plugin:
>
>
>
> `JavaScript and TypeScript` - the plugin is bundled with IntelliJ IDEA and enabled by default.
With IntelliJ IDEA, you can develop modern web, mobile, and desktop applications with JavaScript .
The availability of features depends on the subscription type:
IntelliJ IDEA:
JavaScript-aware coding assistance includes [completion](auto-completing-code.html) for keywords, labels, variables, parameters, and functions, [error and syntax highlighting](#ws_js_syntax_highlighting), formatting, [code inspections](code-inspection.html) and [quick-fixes](intention-actions.html), as well as [common and
JavaScript-specific
refactoring](specific-javascript-refactorings.html). IntelliJ IDEA also integrates with [JavaScript linters](linters.html).
IntelliJ IDEA with the Ultimate subscription:
JavaScript-aware coding assistance includes [completion](auto-completing-code.html) for keywords, labels, variables, parameters, and functions, [error and syntax highlighting](#ws_js_syntax_highlighting), formatting, [code inspections](code-inspection.html) and [quick-fixes](intention-actions.html), as well as [common and
JavaScript-specific
refactoring](specific-javascript-refactorings.html). IntelliJ IDEA also integrates with [JavaScript linters](linters.html) and the [Flow type checker](using-the-flow-type-checker.html).
With the built-in debugger, you can debug both your client-side and server-side code and even run JavaScript code snippets in the [interactive debugger console](interactive-debugger-console.html). Note that IntelliJ IDEA supports debugging JavaScript only in Chrome or any other browser of the Chrome family. Learn more from [Debug JavaScript in Chrome](debugging-javascript-in-chrome.html).
IntelliJ IDEA integrates with [Jest](running-unit-tests-on-jest.html), [Karma](running-unit-tests-on-karma.html), [Protractor](protractor.html), [Cucumber](running-cucumber-js-unit-tests.html), and [Mocha](running-unit-tests-on-mocha.html) testing frameworks. IntelliJ IDEA supports running and debugging tests as well as navigation between tests and subjects or between a failed test and the fragment of code that caused the problem.
On this page you will find a short Getting Started Guide that will walk you step by step from creating a web application to debugging and testing it.
## Before you start
Make sure the JavaScript and TypeScript plugin is enabled in the settings. Press `Ctrl+Alt+S` (Windows), `⌘ Comma` (macOS), `⌘ Comma` (IntelliJ IDEA Classic (macOS)), `⌘ Comma` (macOS System Shortcuts), `Ctrl+Alt+S` (XWin), `Ctrl+Alt+S` (GNOME), `Ctrl+Alt+S` (KDE), `Ctrl+Alt+S` (Emacs), `Ctrl+Alt+S` (Sublime Text), `⌘ Comma` (Sublime Text (macOS)), `Ctrl+Alt+S` (NetBeans), `Ctrl+Alt+S` (Visual Studio), `⌘ Comma` (Visual Studio (macOS)), `Ctrl+Alt+S` (Eclipse), `⌘ Comma` (Eclipse (macOS)) to open settings and then select `Plugins`. Click the Installed tab. In the search field, type JavaScript and TypeScript. For more information about plugins, refer to [Managing plugins](managing-plugins.html).
## Create a new application
Since IntelliJ IDEA version 2024.1, the New Project wizard has no longer an option to create a JavaScript project (or module) with a general static web page structure. Use one of the available options to create a more specific structure or create an empty project and populate it according to your preferences and needs.
Procedure:
1. Click New Project on the Welcome screen or select `File | New | Project` from the main menu.
2. In the New Project dialog that opens, select one of the following options to create a project with a framework-specific structure, then fill in the fields in the right-hand pane:
* [HTML](editing-html-files.html)
* [React](react.html)
* [Express](developing-node-js-applications.html)
* [Angular CLI](angular.html)
* [Vue.js](vue-js.html)
* [Vite](vite.html).
* [Nuxt](nuxt.html)
Alternatively, select Empty Project and populate it as necessary.
## Start with an existing JavaScript application
If you are going to continue developing an existing JavaScript application, open it in IntelliJ IDEA, [choose the JavaScript version to use](#ws_js_choose_language_version), and configure the libraries in it. Optionally [download the required npm dependencies](#ws_js_download_npm_dependencies).
Procedure: Open the application sources that are already on your machine
* Click Open or Import on the Welcome screen or select `File | Open` from the main menu. In the dialog that opens, select the folder where your sources are stored.
Procedure: Check out the application sources from your version control
1. Click Clone Repository on the Welcome screen.
Alternatively, select `File | New | Project from Version Control…` or `Git | Clone…` or `VCS | Get from Version Control` from the main menu.
Instead of Git in the main menu, you may see any other Version Control System that is associated with your project. For example, Mercurial or Perforce.
2. In the dialog that opens, select your version control system from the list and specify the repository to check out the application sources from. For more information, refer to [Check out a
project (clone)](manage-projects-hosted-on-github.html#clone-from-GitHub).
### Project security
When you open a project that was created outside IntelliJ IDEA and was imported into it, IntelliJ IDEA displays a dialog where you can decide how to handle this project with unfamiliar source code.
Select one of the following options:
* Preview in Safe Mode: in this case, IntelliJ IDEA opens the project in a preview mode. It means that you can browse the project's sources but you cannot run tasks and script or run/debug your project. IntelliJ IDEA displays a notification on top of the editor area, and you can click the Trust project… link and load your project at any time.
* Trust Project: in this case, IntelliJ IDEA opens and loads a project. That means the project is initialized, project's plugins are resolved, dependencies are added, and all IntelliJ IDEA features are available.
* Don't Open: in this case, IntelliJ IDEA doesn't open the project.
Learn more from [Project security](project-security.html).
> **Tip:**
> Projects created from the Welcome screen or via `File | New | Project` as described in are automatically considered trusted.
## Choose the JavaScript language version
To get reliable and efficient coding assistance, you need to specify the language version that will be used in all JavaScript files of your project by default.
Procedure:
1. In the Settings dialog (`Ctrl+Alt+S` (Windows), `⌘ Comma` (macOS), `⌘ Comma` (IntelliJ IDEA Classic (macOS)), `⌘ Comma` (macOS System Shortcuts), `Ctrl+Alt+S` (XWin), `Ctrl+Alt+S` (GNOME), `Ctrl+Alt+S` (KDE), `Ctrl+Alt+S` (Emacs), `Ctrl+Alt+S` (Sublime Text), `⌘ Comma` (Sublime Text (macOS)), `Ctrl+Alt+S` (NetBeans), `Ctrl+Alt+S` (Visual Studio), `⌘ Comma` (Visual Studio (macOS)), `Ctrl+Alt+S` (Eclipse), `⌘ Comma` (Eclipse (macOS))), go to `Languages & Frameworks | JavaScript`. The [JavaScript page](settings-languages-javascript.html) opens.
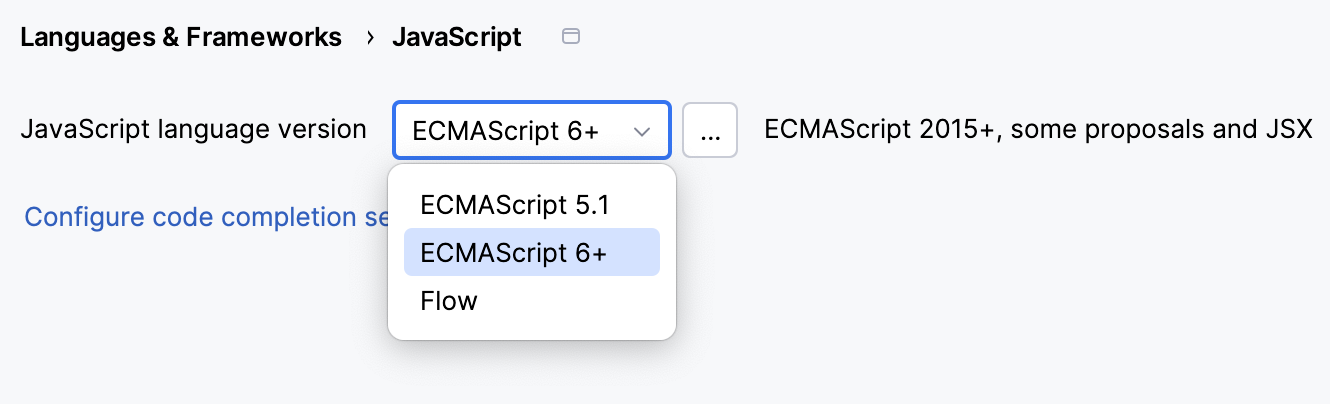
2. From the list, choose one of the supported JavaScript language versions:
* [ECMAScript 5.1](http://www.ecma-international.org/ecma-262/5.1/)
* [ECMAScript 6+](http://www.ecma-international.org/ecma-262/6.0/): This version adds support for the features introduced in ECMAScript 2015-2020 and for JSX syntax as well as some current proposals to the standard.
* [Flow](https://flow.org/): This version adds support for the Flow syntax.
### Use multiple JavaScript versions
If you are working on an application that uses both ECMAScript 5.1 and a newer version of ECMAScript, the easiest way is to choose the highest language version for the whole project from the list on the [JavaScript page](settings-languages-javascript.html) (`Settings | Languages & Frameworks | JavaScript`).
Procedure:
1. On the [JavaScript page](settings-languages-javascript.html), click  next to the JavaScript language version list. The JavaScript Language Versions dialog opens.
2. Click  and in the dialog that opens select the folder where you need a custom language version. IntelliJ IDEA brings you back to the JavaScript Language Versions dialog where the selected folder is shown in the Path field.
3. From the Language list, choose the language version for the files in the selected folder. In all the other JavaScript files in the project IntelliJ IDEA will use the version chosen on the [JavaScript page](settings-languages-javascript.html).
### JSX syntax in JavaScript code
If you are using JSX syntax in your JavaScript code, enable ECMAScript 6+.
Procedure:
* In the Settings dialog (`Ctrl+Alt+S` (Windows), `⌘ Comma` (macOS), `⌘ Comma` (IntelliJ IDEA Classic (macOS)), `⌘ Comma` (macOS System Shortcuts), `Ctrl+Alt+S` (XWin), `Ctrl+Alt+S` (GNOME), `Ctrl+Alt+S` (KDE), `Ctrl+Alt+S` (Emacs), `Ctrl+Alt+S` (Sublime Text), `⌘ Comma` (Sublime Text (macOS)), `Ctrl+Alt+S` (NetBeans), `Ctrl+Alt+S` (Visual Studio), `⌘ Comma` (Visual Studio (macOS)), `Ctrl+Alt+S` (Eclipse), `⌘ Comma` (Eclipse (macOS))), go to `Languages & Frameworks | JavaScript`, and select ECMAScript 6+ from the JavaScript language version list.
* To be warned when JSX syntax is used by mistake, open the Settings dialog (`Ctrl+Alt+S` (Windows), `⌘ Comma` (macOS), `⌘ Comma` (IntelliJ IDEA Classic (macOS)), `⌘ Comma` (macOS System Shortcuts), `Ctrl+Alt+S` (XWin), `Ctrl+Alt+S` (GNOME), `Ctrl+Alt+S` (KDE), `Ctrl+Alt+S` (Emacs), `Ctrl+Alt+S` (Sublime Text), `⌘ Comma` (Sublime Text (macOS)), `Ctrl+Alt+S` (NetBeans), `Ctrl+Alt+S` (Visual Studio), `⌘ Comma` (Visual Studio (macOS)), `Ctrl+Alt+S` (Eclipse), `⌘ Comma` (Eclipse (macOS))), go to `Editor | Inspections`, and enable the JSX syntax used inspection under JavaScript and TypeScript | General node. Use the search field to locate the inspection.
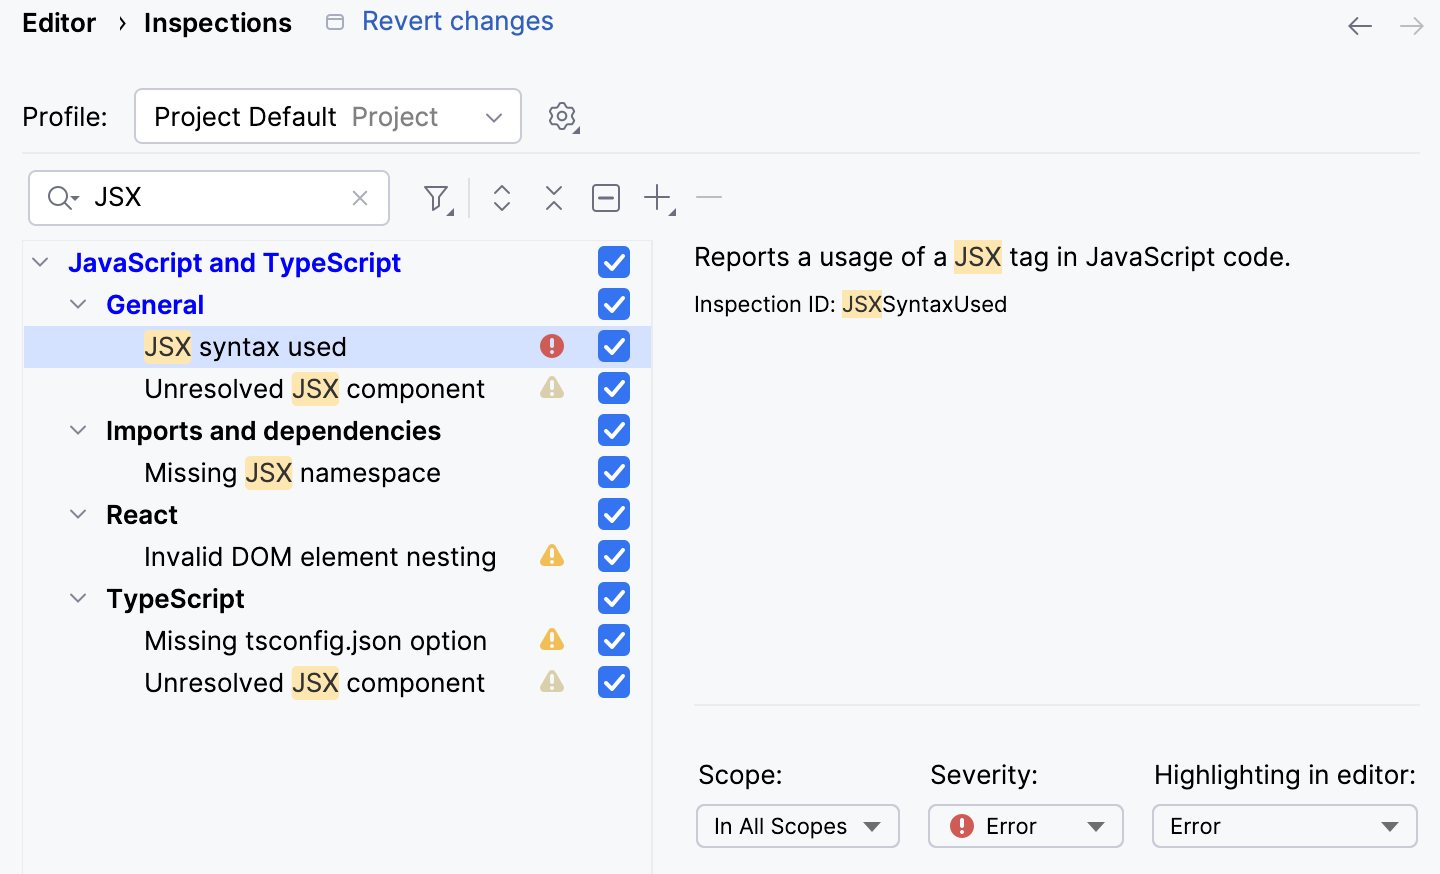
Optionally, configure the inspection severity and scope. Learn more from [Code inspections](code-inspection.html).
## Download project dependencies
If your application uses some tools, libraries, or frameworks, download the required packages. To manage your project dependencies, you can use [npm](https://docs.npmjs.com/), [Yarn 1](https://classic.yarnpkg.com/lang/en/), or [Yarn 2](https://yarnpkg.com/), refer to [npm and Yarn](installing-and-removing-external-software-using-node-package-manager.html) for details.
Procedure: Install a package in an empty project
* In your command-line shell or in the embedded Terminal (`Alt+F12` (Windows), `⌥ F12` (macOS), `⌥ F12` (IntelliJ IDEA Classic (macOS)), `⌘ ⌃ T` (macOS System Shortcuts), `Alt+F12` (XWin), `Alt+F12` (GNOME), `Alt+F12` (KDE), `Alt+F12` (Emacs), `Alt+F12` (Sublime Text), `⌥ F12` (Sublime Text (macOS)), `Alt+F12` (NetBeans), `Ctrl+Alt+1` (Visual Studio), `⌘ ⌃ 1` (Visual Studio (macOS)), `Alt+F12` (Eclipse), `⌥ F12` (Eclipse (macOS))) , type:
`npm install `.
Procedure: If you already have a package.json file in your project
* Right-click the `package.json` file in the editor or in the Project tool window (`Alt+1` (Windows), `⌘ 1` (macOS), `⌘ 1` (IntelliJ IDEA Classic (macOS)), `⌘ 1` (macOS System Shortcuts), `Alt+1` (XWin), `Alt+1` (GNOME), `Alt+1` (KDE), `Alt+1` (Emacs), `Alt+1` (Sublime Text), `⌘ 1` (Sublime Text (macOS)), `Ctrl+1` (NetBeans), `Ctrl+Alt+L` (Visual Studio), `⌘ ⌥ L` (Visual Studio (macOS)), `Alt+1` (Eclipse), `Alt+1` (Eclipse (macOS))) and choose Run 'npm install' from the context menu.
* Alternatively, run `npm install` in the Terminal `Alt+F12` (Windows), `⌥ F12` (macOS), `⌥ F12` (IntelliJ IDEA Classic (macOS)), `⌘ ⌃ T` (macOS System Shortcuts), `Alt+F12` (XWin), `Alt+F12` (GNOME), `Alt+F12` (KDE), `Alt+F12` (Emacs), `Alt+F12` (Sublime Text), `⌥ F12` (Sublime Text (macOS)), `Alt+F12` (NetBeans), `Ctrl+Alt+1` (Visual Studio), `⌘ ⌃ 1` (Visual Studio (macOS)), `Alt+F12` (Eclipse), `⌥ F12` (Eclipse (macOS)).
> **Note:**
> Before you start, make sure you have [Node.js](http://nodejs.org/) on your computer.
## Configure code completion for project dependencies
To provide code completion for project dependencies, IntelliJ IDEA automatically creates a node_modules library. In context of the language and the IDE, a library is a file or a set of files. Functions and methods of these files are added to IntelliJ IDEA's internal knowledge in addition to the functions and methods that IntelliJ IDEA retrieves from the project code that you edit. For more information, refer to [Configure JavaScript libraries](configuring-javascript-libraries.html) and [Code completion](auto-completing-code.html).
## View inlay hints
Inlay hints appear in the editor and provide you with additional information about your code to make it easier to read and navigate.
### Parameter hints
Parameter hints show the names of parameters in methods and functions to make your code easier to read. By default, parameter hints are shown only for values that are literals or function expressions but not for named objects.

Procedure: Configure parameter hints
1. Open the Settings dialog (`Ctrl+Alt+S` (Windows), `⌘ Comma` (macOS), `⌘ Comma` (IntelliJ IDEA Classic (macOS)), `⌘ Comma` (macOS System Shortcuts), `Ctrl+Alt+S` (XWin), `Ctrl+Alt+S` (GNOME), `Ctrl+Alt+S` (KDE), `Ctrl+Alt+S` (Emacs), `Ctrl+Alt+S` (Sublime Text), `⌘ Comma` (Sublime Text (macOS)), `Ctrl+Alt+S` (NetBeans), `Ctrl+Alt+S` (Visual Studio), `⌘ Comma` (Visual Studio (macOS)), `Ctrl+Alt+S` (Eclipse), `⌘ Comma` (Eclipse (macOS))) and go to `Editor | Inlay Hints`.
2. Expand JavaScript under Parameter names.
3. Specify the context in which you want parameter hints shown by selecting the corresponding checkboxes.
The preview shows how the changes you make in the settings affect the code appearance.
4. For some methods and functions, IntelliJ IDEA does not show parameter hints in any context. Click Exclude list... to view these methods and functions, possibly enable parameter hints for them, or add new items to the list.
5. To hide parameter hints for any value type in any context, clear the JavaScript checkbox under Parameter names.
### Return type hints
IntelliJ IDEA can display function return types in function calls and call chains.
* Function return type hints are inferred from a [JSDoc comment](creating-jsdoc-comments.html) or based on the static analysis of your code.
* Return type hints in method chains are displayed if the method calls are split between multiple lines and return at least 2 different types. Return type hints in method chains are provided by the internal IntelliJ IDEA evaluator.
Procedure: Configure method return type hints
1. Open the Settings dialog (`Ctrl+Alt+S` (Windows), `⌘ Comma` (macOS), `⌘ Comma` (IntelliJ IDEA Classic (macOS)), `⌘ Comma` (macOS System Shortcuts), `Ctrl+Alt+S` (XWin), `Ctrl+Alt+S` (GNOME), `Ctrl+Alt+S` (KDE), `Ctrl+Alt+S` (Emacs), `Ctrl+Alt+S` (Sublime Text), `⌘ Comma` (Sublime Text (macOS)), `Ctrl+Alt+S` (NetBeans), `Ctrl+Alt+S` (Visual Studio), `⌘ Comma` (Visual Studio (macOS)), `Ctrl+Alt+S` (Eclipse), `⌘ Comma` (Eclipse (macOS))) and go to `Editor | Inlay Hints`.
2. Under Types, expand the JavaScript node, and then select the Function return types checkbox.
3. To show return type hints in method chains, expand the Method chains node and select the JavaScript checkbox.
The preview shows how the changes you make in the settings affect the code appearance.
### Type hints
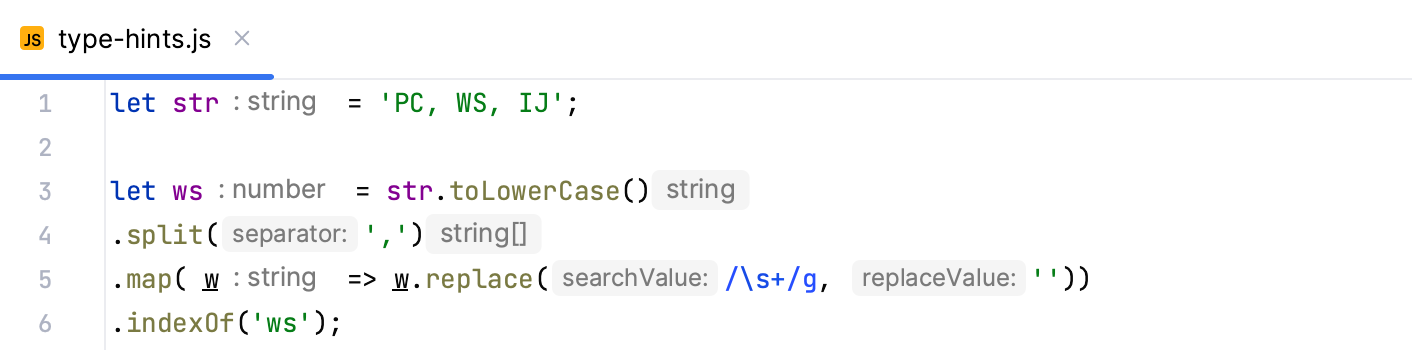
Type hints show the types of variables, fields, or parameters. The types of variables and fields are displayed next to their definition. Type hints for parameters are shown in function calls. Type hints are inferred from [JSDoc
comments](creating-jsdoc-comments.html) or static analysis of your code.
Procedure: Configure type hints
1. Open the Settings dialog (`Ctrl+Alt+S` (Windows), `⌘ Comma` (macOS), `⌘ Comma` (IntelliJ IDEA Classic (macOS)), `⌘ Comma` (macOS System Shortcuts), `Ctrl+Alt+S` (XWin), `Ctrl+Alt+S` (GNOME), `Ctrl+Alt+S` (KDE), `Ctrl+Alt+S` (Emacs), `Ctrl+Alt+S` (Sublime Text), `⌘ Comma` (Sublime Text (macOS)), `Ctrl+Alt+S` (NetBeans), `Ctrl+Alt+S` (Visual Studio), `⌘ Comma` (Visual Studio (macOS)), `Ctrl+Alt+S` (Eclipse), `⌘ Comma` (Eclipse (macOS))) and go to `Editor | Inlay Hints`.
2. In the tree of categories, expand `Types | JavaScript`.
3. Specify the context where you want type hints to be shown.
The preview shows how the changes you make in the settings affect the code appearance.
[Video](https://resources.jetbrains.com/help/img/idea/2026.2/ws_type_annotations_javascript.mp4)
4. To hide parameter parameter type and return type hints for any value type in any context, clear the JavaScript checkbox under Types.
## Add import statements
IntelliJ IDEA can generate import statements for modules, classes, components, and any other symbols that are exported. Import statements can be added on the fly, as you complete a symbol, or later, via an import tooltip or using a quick-fix or an intention action. Learn more from [Auto import](creating-and-optimizing-imports.html).
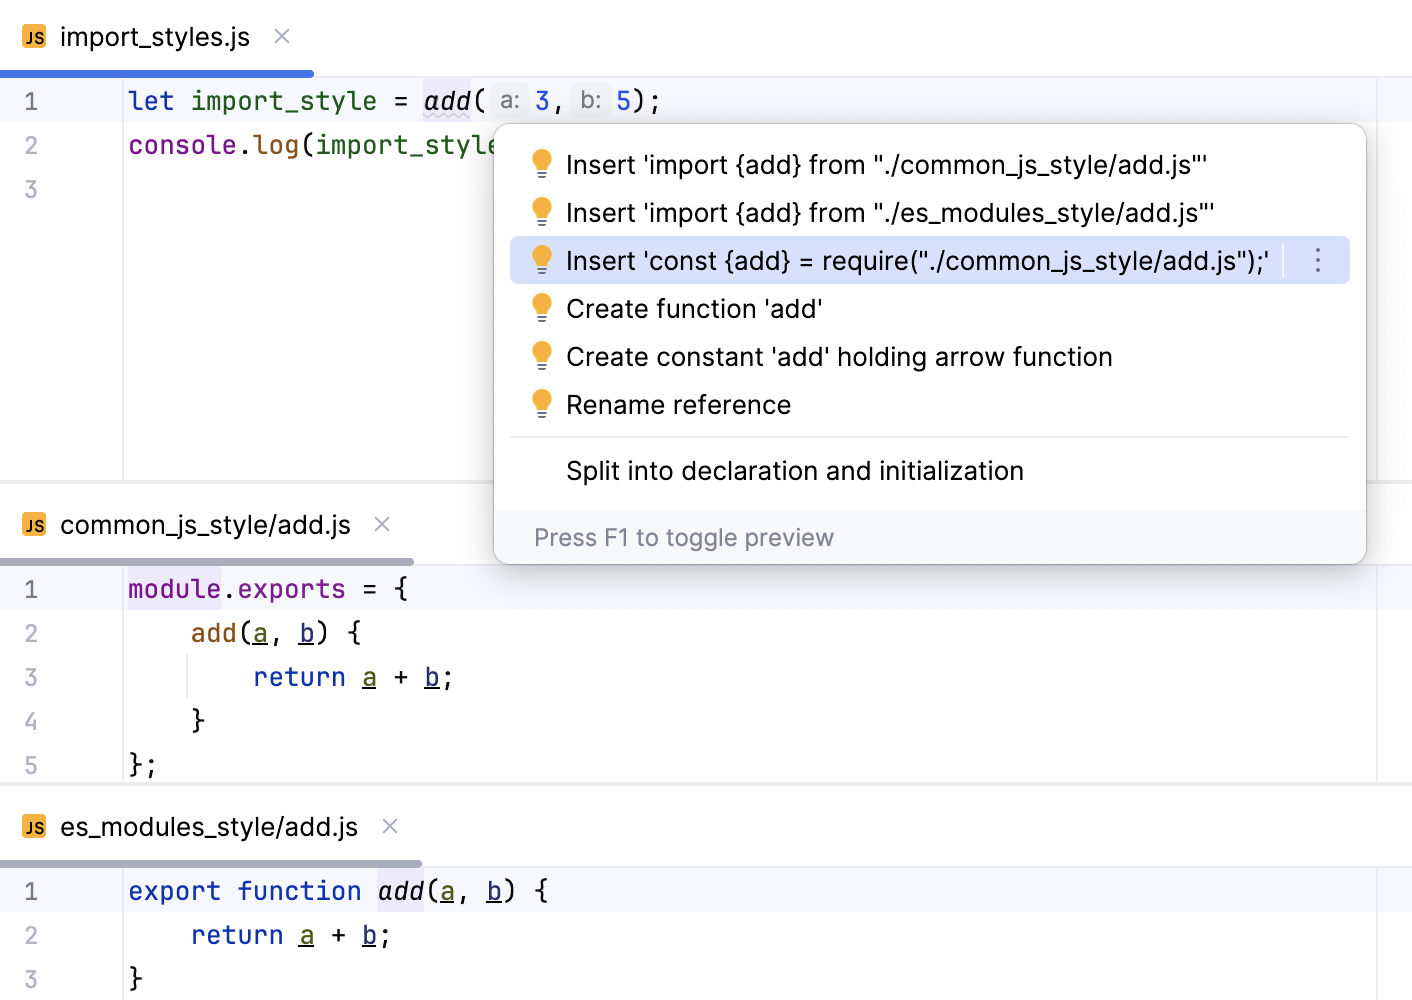
IntelliJ IDEA can generate import statements in both [ES6](#ws_js_auto_import_es6_module) or [CommonJS](#ws_js_auto_import_common_js) style. IntelliJ IDEA either decides on the style of an import statement itself or displays a popup where you can choose the style you need.
If IntelliJ IDEA cannot define automatically what syntax should be used in a file, it displays a popup where you can choose between using the ES6 and CommonJS syntax.
To always automatically add ES6 import statements on code completion, open the Settings dialog (`Ctrl+Alt+S` (Windows), `⌘ Comma` (macOS), `⌘ Comma` (IntelliJ IDEA Classic (macOS)), `⌘ Comma` (macOS System Shortcuts), `Ctrl+Alt+S` (XWin), `Ctrl+Alt+S` (GNOME), `Ctrl+Alt+S` (KDE), `Ctrl+Alt+S` (Emacs), `Ctrl+Alt+S` (Sublime Text), `⌘ Comma` (Sublime Text (macOS)), `Ctrl+Alt+S` (NetBeans), `Ctrl+Alt+S` (Visual Studio), `⌘ Comma` (Visual Studio (macOS)), `Ctrl+Alt+S` (Eclipse), `⌘ Comma` (Eclipse (macOS))), go to `Editor | General | Auto Import`, and select the Add JavaScript imports automatically checkbox in the TypeScript / JavaScript area.
### Add ES6 import statements
Import statements can be added on the fly, as you complete a symbol, or later, via an import tooltip or using a quick-fix or an intention action.
Auto-import on completion:
Procedure:
If you are importing a symbol from your project into a file that is a ES6 module or that already contains ES import statements, IntelliJ IDEA automatically inserts an ES6 import on symbol completion.

Use auto-import tooltip:
Procedure:
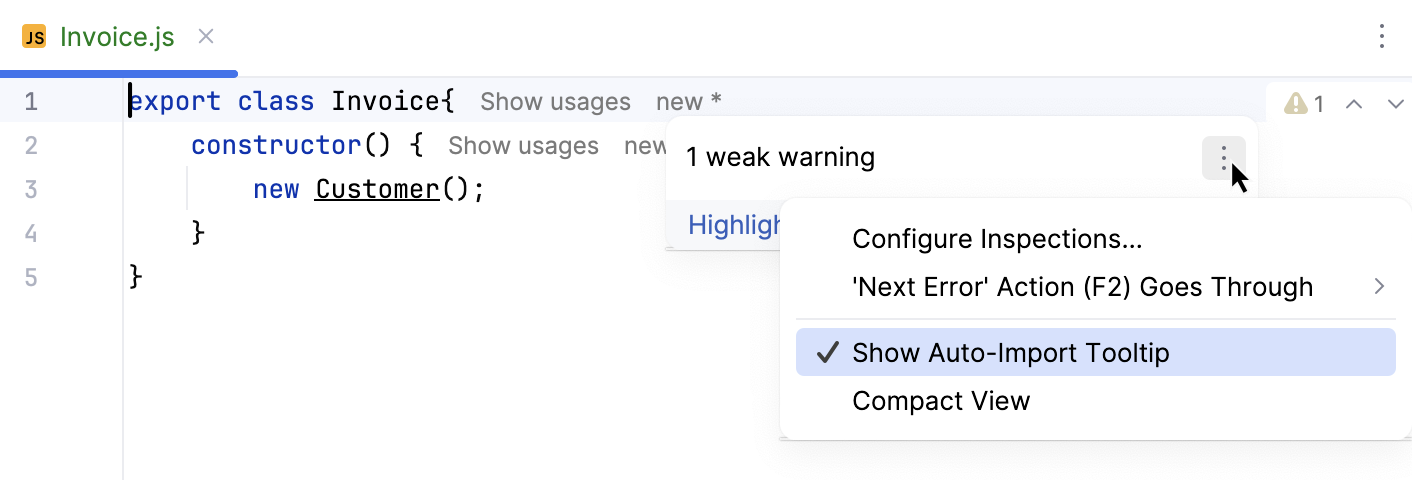
An auto-import tooltip appears as you hover over an unresolved symbol and suggest to add an import statement.
* To accept the suggestion, press `Alt+Enter` (Windows), `⌥ ⏎` (macOS), `⌥ ⏎` (IntelliJ IDEA Classic (macOS)), `⌥ ⏎` (macOS System Shortcuts), `Alt+Enter` (XWin), `Alt+Enter` (GNOME), `Alt+Enter` (KDE), `Alt+Enter` (Emacs), `Alt+Enter` (Sublime Text), `⌥ ⏎` (Sublime Text (macOS)), `Alt+Enter` (NetBeans), `Alt+Enter` (Visual Studio), `⌥ ⏎` (Visual Studio (macOS)), `Ctrl+1` (Eclipse), `⌘ 1` (Eclipse (macOS)).

* To disable the tooltip, hover over the inspection widget in the top-right corner of the editor, click , and clear the Show Auto-Import Tooltip option.
Use quick-fix or intention action:
Procedure:
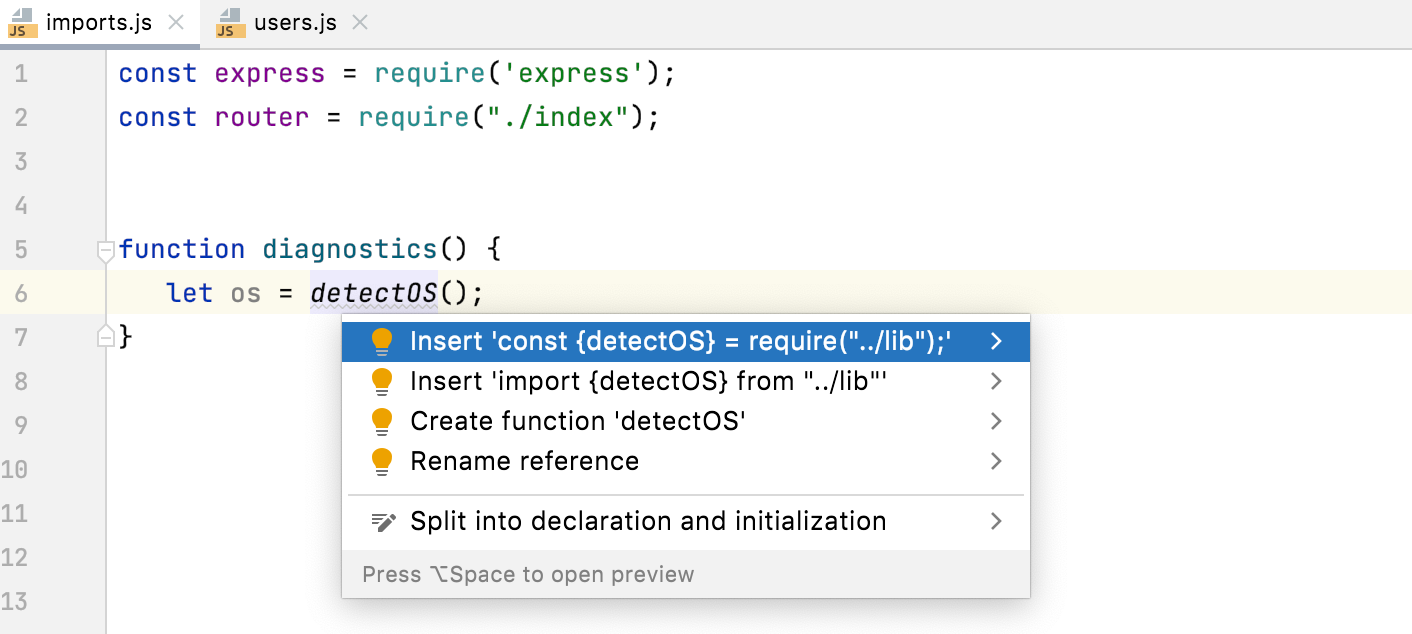
For earlier JavaScript versions or when [auto-import
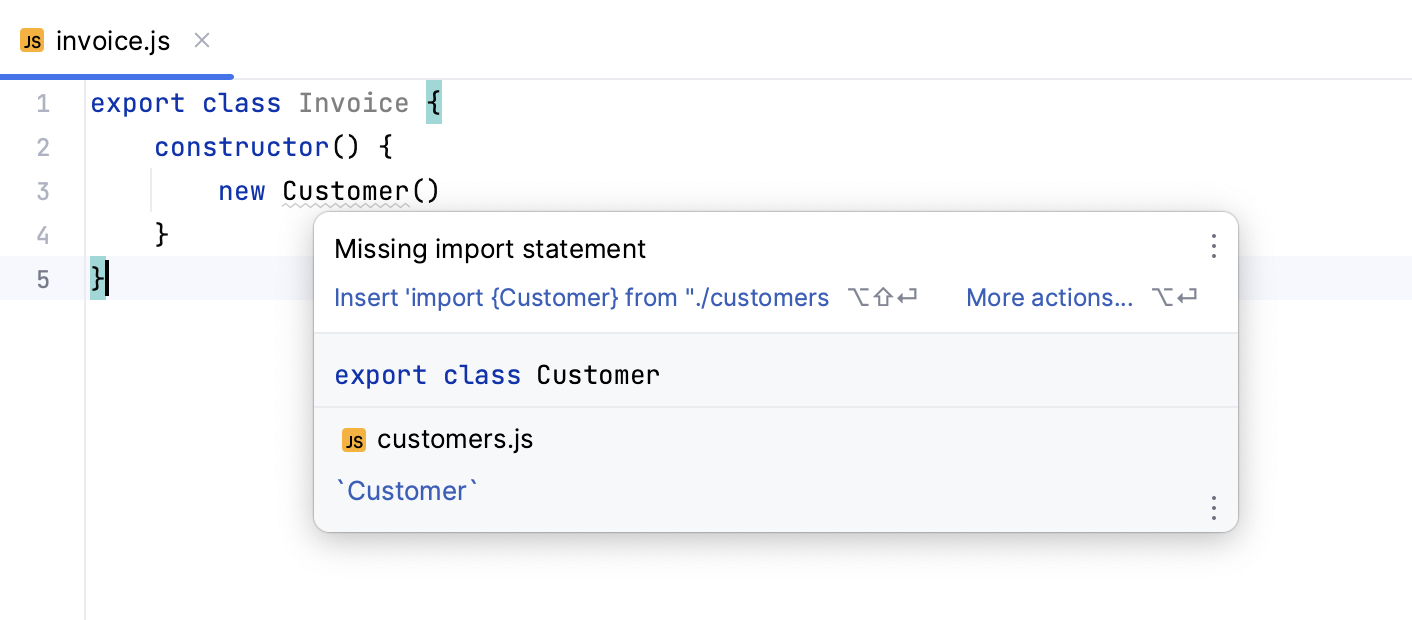
on completion is disabled](creating-and-optimizing-imports.html#disable-imports), IntelliJ IDEA marks the symbol as unresolved and shows a popup with a description of the error and a suggested quick-fix:
* To accept the suggestion, press `Alt+Shift+Enter` (Windows), `⌥ ⇧ ⏎` (macOS), `⌥ ⇧ ⏎` (IntelliJ IDEA Classic (macOS)), `⌥ ⇧ ⏎` (macOS System Shortcuts), `Alt+Shift+Enter` (XWin), `Alt+Shift+Enter` (GNOME), `Alt+Shift+Enter` (KDE), `Alt+Shift+Enter` (Emacs), `Alt+Shift+Enter` (Sublime Text), `⌥ ⇧ ⏎` (Sublime Text (macOS)), `Alt+Shift+Enter` (NetBeans), `Alt+Shift+Enter` (Visual Studio), `Alt+Shift+Enter` (Visual Studio (macOS)), `Alt+Shift+Enter` (Eclipse), `⌥ ⇧ ⏎` (Eclipse (macOS)).
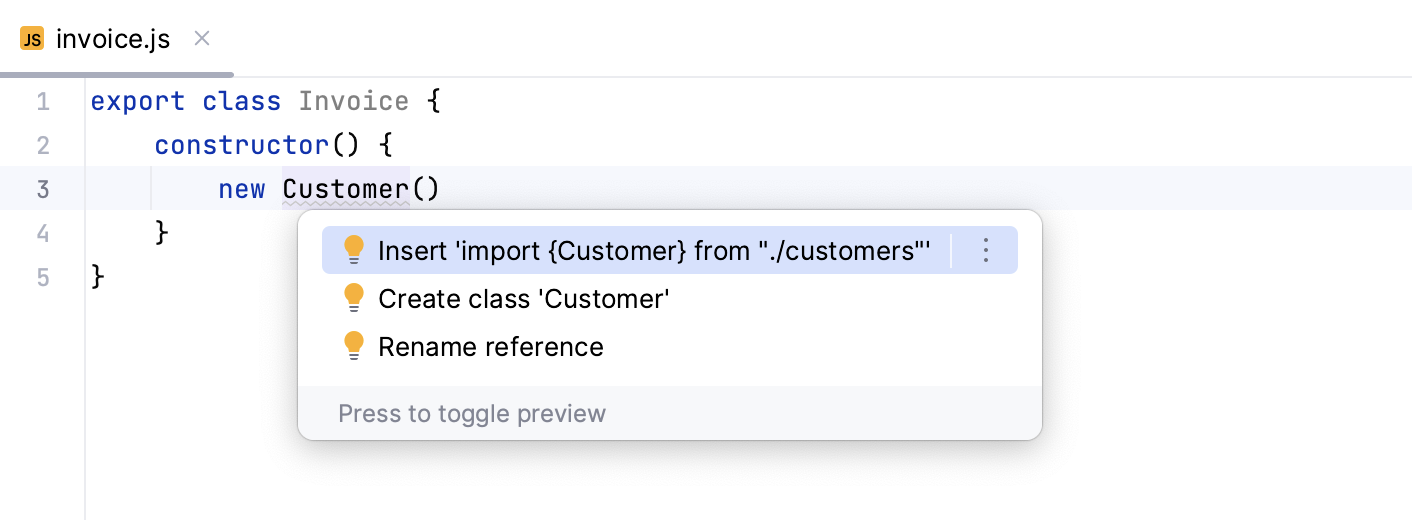
* Alternatively, press `Alt+Enter` (Windows), `⌥ ⏎` (macOS), `⌥ ⏎` (IntelliJ IDEA Classic (macOS)), `⌥ ⏎` (macOS System Shortcuts), `Alt+Enter` (XWin), `Alt+Enter` (GNOME), `Alt+Enter` (KDE), `Alt+Enter` (Emacs), `Alt+Enter` (Sublime Text), `⌥ ⏎` (Sublime Text (macOS)), `Alt+Enter` (NetBeans), `Alt+Enter` (Visual Studio), `⌥ ⏎` (Visual Studio (macOS)), `Ctrl+1` (Eclipse), `⌘ 1` (Eclipse (macOS)):
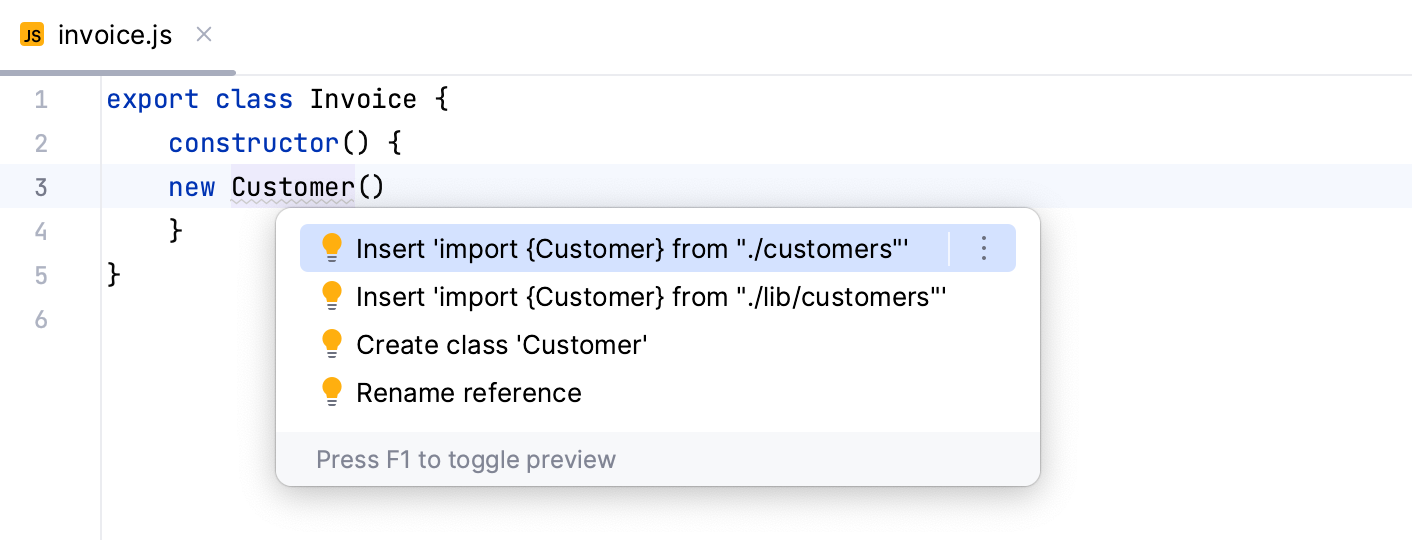
* If there's more than one possible source of import, IntelliJ IDEA shows a list of suggestions:
IntelliJ IDEA can also generate import statements for symbols defined in the project’s dependencies. Auto-import works for symbols from packages that contain [TypeScript definition files](https://github.com/Microsoft/TypeScript/tree/master/lib) (like in [moment](https://www.npmjs.com/package/moment) or [redux](https://www.npmjs.com/package/redux)) or sources written as ES modules.
If the current file already contains a ES6 import statement, IntelliJ IDEA inserts a new one also in the ES6 style.

### Add CommonJS (require) import statements
If you are importing a symbol from your project into a file that already is a CommonJS module (with a `require` statement or `module.export`), IntelliJ IDEA automatically inserts a CommonJS import on symbol completion.

Alternatively, place the caret at the symbol to import, press `Alt+Enter` (Windows), `⌥ ⏎` (macOS), `⌥ ⏎` (IntelliJ IDEA Classic (macOS)), `⌥ ⏎` (macOS System Shortcuts), `Alt+Enter` (XWin), `Alt+Enter` (GNOME), `Alt+Enter` (KDE), `Alt+Enter` (Emacs), `Alt+Enter` (Sublime Text), `⌥ ⏎` (Sublime Text (macOS)), `Alt+Enter` (NetBeans), `Alt+Enter` (Visual Studio), `⌥ ⏎` (Visual Studio (macOS)), `Ctrl+1` (Eclipse), `⌘ 1` (Eclipse (macOS)), and select a quick-fix with the CommonJS (`require`) import style.
### Add import defer statements
IntelliJ IDEA supports the [import defer](https://github.com/tc39/proposal-defer-import-eval/) syntax in the JavaScript context, providing code completion, error highlighting, live templates for `import` statements, and search for usages.
[Video](https://resources.jetbrains.com/help/img/idea/2026.2/ws_js_import_defer.mp4)
The `import.defer` syntax is also supported:
[Video](https://resources.jetbrains.com/help/img/idea/2026.2/ws_js_await_import_defer.mp4)
> **Note:**
> Named imports, default imports, and combination of `type` and `defer` are not supported by the `import defer` syntax.
### Add import source statements
IntelliJ IDEA supports the [import source](https://github.com/tc39/proposal-source-phase-imports) syntax in the JavaScript context, providing code completion, error highlighting, live templates for `import` statements, and search for usages.
[Video](https://resources.jetbrains.com/help/img/idea/2026.2/ws_js_import_source.mp4)
The `import.source` syntax is also supported:
[Video](https://resources.jetbrains.com/help/img/idea/2026.2/ws_js_await_import_source.mp4)
> **Note:**
> * Named imports, namespace imports, and combination of `type` and `source` are not supported by the `import source` syntax.
>
> * To use the `import source` syntax with babel, install the [@babel/plugin-syntax-import-source plugin](https://babeljs.io/docs/babel-plugin-syntax-import-source).
### Configure auto import
Procedure:
1. To always automatically add ES6 import statements on code completion, open the Settings dialog (`Ctrl+Alt+S` (Windows), `⌘ Comma` (macOS), `⌘ Comma` (IntelliJ IDEA Classic (macOS)), `⌘ Comma` (macOS System Shortcuts), `Ctrl+Alt+S` (XWin), `Ctrl+Alt+S` (GNOME), `Ctrl+Alt+S` (KDE), `Ctrl+Alt+S` (Emacs), `Ctrl+Alt+S` (Sublime Text), `⌘ Comma` (Sublime Text (macOS)), `Ctrl+Alt+S` (NetBeans), `Ctrl+Alt+S` (Visual Studio), `⌘ Comma` (Visual Studio (macOS)), `Ctrl+Alt+S` (Eclipse), `⌘ Comma` (Eclipse (macOS))), go to `Editor | General | Auto Import`, and select the Add JavaScript imports automatically checkbox in the TypeScript / JavaScript area.
2. To configure the appearance of `import` statements, open the Settings dialog (`Ctrl+Alt+S` (Windows), `⌘ Comma` (macOS), `⌘ Comma` (IntelliJ IDEA Classic (macOS)), `⌘ Comma` (macOS System Shortcuts), `Ctrl+Alt+S` (XWin), `Ctrl+Alt+S` (GNOME), `Ctrl+Alt+S` (KDE), `Ctrl+Alt+S` (Emacs), `Ctrl+Alt+S` (Sublime Text), `⌘ Comma` (Sublime Text (macOS)), `Ctrl+Alt+S` (NetBeans), `Ctrl+Alt+S` (Visual Studio), `⌘ Comma` (Visual Studio (macOS)), `Ctrl+Alt+S` (Eclipse), `⌘ Comma` (Eclipse (macOS))), go to `Editor | Code Style | JavaScript`, and use the controls in the Imports tab. For more information, refer to [Imports tab](settings-code-style-javascript.html#ws_js_settings_editor_code_style_imports_tab).
## Configure syntax highlighting
You can configure JavaScript-aware syntax highlighting according to your preferences and habits.
Procedure:
1. In the Settings dialog (`Ctrl+Alt+S` (Windows), `⌘ Comma` (macOS), `⌘ Comma` (IntelliJ IDEA Classic (macOS)), `⌘ Comma` (macOS System Shortcuts), `Ctrl+Alt+S` (XWin), `Ctrl+Alt+S` (GNOME), `Ctrl+Alt+S` (KDE), `Ctrl+Alt+S` (Emacs), `Ctrl+Alt+S` (Sublime Text), `⌘ Comma` (Sublime Text (macOS)), `Ctrl+Alt+S` (NetBeans), `Ctrl+Alt+S` (Visual Studio), `⌘ Comma` (Visual Studio (macOS)), `Ctrl+Alt+S` (Eclipse), `⌘ Comma` (Eclipse (macOS))), go to `Editor | Color Scheme | JavaScript`.
2. Select the color scheme, accept the highlighting settings inherited from the defaults or customize them as described in [Colors and fonts](configuring-colors-and-fonts.html).
## Reformat code
IntelliJ IDEA lets you reformat your JavaScript code according to your current [code style scheme](configuring-code-style.html#configure-code-style-schemes).
You can also specify formatting settings in [.editorconfig](configuring-code-style.html) or use [Prettier.](prettier.html)
### Decorators
For decorators, it may be important to suppress inserting line breaks after each of them during reformatting.
The following formatting options are available for decorators:
#### Do not wrap
With this option selected, no wrapping is applied while reformatting lines with decorators.
Class decorators:
[Video](https://resources.jetbrains.com/help/img/idea/2026.2/ws_js_reformat_class_decorator_do_not_wrap.mp4)
Method decorators:
[Video](https://resources.jetbrains.com/help/img/idea/2026.2/ws_js_reformat_code_decorators_do_not_wrap_class_method_decorators.mp4)
Field decorators:
[Video](https://resources.jetbrains.com/help/img/idea/2026.2/ws_js_reformat_code_decorators_do_not_wrap_class_field_decorators.mp4)
Function parameter decorators:
[Video](https://resources.jetbrains.com/help/img/idea/2026.2/ws_js_reformat_code_decorators_do_not_wrap_function_parameter_decorators.mp4)
#### Wrap if long
With this option selected, lines are wrapped if they go beyond the right margin.
The right margin is defined in the Hard wrap at field on the [Settings | Editor
| Code Style | JavaScript | Wrapping and Braces](settings-code-style-javascript.html#ws_js_settings_editor_code_style_wrapping_and_braces_tab). If the line goes beyond the specified number, then it will be wrapped.
Class decorators:
[Video](https://resources.jetbrains.com/help/img/idea/2026.2/ws_js_reformat_class_decorator_wrap_if_long.mp4)
Method decorators:
[Video](https://resources.jetbrains.com/help/img/idea/2026.2/ws_js_reformat_code_decorators_wrap_if_long_class_method_decorators.mp4)
Field decorators:
[Video](https://resources.jetbrains.com/help/img/idea/2026.2/ws_js_reformat_code_decorators_wrap_if_long_class_field_decorators.mp4)
Function parameter decorators:
[Video](https://resources.jetbrains.com/help/img/idea/2026.2/ws_js_reformat_code_decorators_wrap_if_long_function_parameter_decorators.mp4)
#### Chop down if long
With this option selected, decorators will be formatted as one per line if they go beyond the right margin.
#### Wrap always
With this option selected, all decorators will be formatted as one per line.
Class decorators:
[Video](https://resources.jetbrains.com/help/img/idea/2026.2/ws_js_reformat_class_decorator_wrap_always.mp4)
Method decorators:
[Video](https://resources.jetbrains.com/help/img/idea/2026.2/ws_js_reformat_code_decorators_wrap_always_class_method_decorators.mp4)
Field decorators:
[Video](https://resources.jetbrains.com/help/img/idea/2026.2/ws_js_reformat_code_decorators_wrap_always_class_field_decorators.mp4)
Function parameter decorators:
[Video](https://resources.jetbrains.com/help/img/idea/2026.2/ws_js_reformat_code_decorators_wrap_always_function_parameter_decorators.mp4)
## Run JavaScript in browser
Procedure:
1. In the editor, open the HTML file with the JavaScript reference. This HTML file does not necessarily have to be the one that implements the starting page of the application.
2. Do one of the following:
* Choose `View | Open in Browser` from the main menu or press `Alt+F2` (Windows), `⌥ F2` (macOS), `⌥ F2` (IntelliJ IDEA Classic (macOS)), `⌥ F2` (macOS System Shortcuts), `Alt+F2` (XWin), `Alt+F2` (GNOME), `Alt+F2` (KDE), `Alt+F2` (Emacs), `Alt+F2` (Sublime Text), `Alt+F2` (Sublime Text (macOS)), `Alt+F2` (NetBeans), `Alt+F2` (Visual Studio), `⌥ F2` (Visual Studio (macOS)), `Alt+F2` (Eclipse), `⌥ F2` (Eclipse (macOS)). Then select the desired browser from the list.
* Hover over the code to show the browser icons bar:        . Click the icon that indicates the desired browser.
## Debug JavaScript
IntelliJ IDEA provides a built-in debugger for your client-side JavaScript code that works with Chrome or any other browser of the Chrome family. With IntelliJ IDEA, you can debug JavaScript applications running on the built-in server, on an external server, or on a remote server. For more information, refer to [Debug JavaScript in Chrome](debugging-javascript-in-chrome.html).