# Linting TypeScript
> **TL;DR**
> Required plugin:
>
>
>
> `JavaScript and TypeScript` - the plugin is bundled with IntelliJ IDEA and enabled by default.
The recommended linter for TypeScript code is [ESLint](http://eslint.org/) which brings a wide range of linting rules that can also be extended with plugins. IntelliJ IDEA shows warnings and errors reported by ESLint right in the editor, as you type. Learn more from [ESLint](eslint.html).
> **Note:**
> You can also use TSLint [as described below](#ws_tslint_linting_typescript_files_with_ts_lint). Note that TSLint has been deprecated as of 2019. For more information, refer to the [TSLint official website](https://palantir.github.io/tslint/).
IntelliJ IDEA highlights errors reported by ESLint in `.ts` and `.tsx` files when `@typescript-eslint/parser` is set as a parser in your project ESLint configuration. Learn more from the [readme file in the
typescript-eslint repo](https://github.com/typescript-eslint/typescript-eslint).
## Before you start
Procedure:
1. Download and install [Node.js](http://nodejs.org/#download).
2. Configure a Node.js runtime in your project as described in [Configuring a local Node.js
interpreter](developing-node-js-applications.html#ws_node_configure_local_node_interpreter), in [Using
Node.js on Windows Subsystem for Linux](developing-node-js-applications.html#ws_node_wsl), or in [Configuring remote Node.js runtimes](configuring-remote-node-interpreters.html).
3. Make sure the JavaScript and TypeScript bundled plugin is enabled in the settings. Press `Ctrl+Alt+S` (Windows), `⌘ Comma` (macOS), `⌘ Comma` (IntelliJ IDEA Classic (macOS)), `⌘ Comma` (macOS System Shortcuts), `Ctrl+Alt+S` (XWin), `Ctrl+Alt+S` (GNOME), `Ctrl+Alt+S` (KDE), `Ctrl+Alt+S` (Emacs), `Ctrl+Alt+S` (Sublime Text), `⌘ Comma` (Sublime Text (macOS)), `Ctrl+Alt+S` (NetBeans), `Ctrl+Alt+S` (Visual Studio), `⌘ Comma` (Visual Studio (macOS)), `Ctrl+Alt+S` (Eclipse), `⌘ Comma` (Eclipse (macOS)) to open settings and then select `Plugins`. Click the Installed tab. In the search field, type JavaScript and TypeScript. For more information about plugins, refer to [Managing plugins](managing-plugins.html).
## Install ESLint
Procedure: ESLint version 9 and later
* In your command-line shell or in the embedded Terminal (`Alt+F12` (Windows), `⌥ F12` (macOS), `⌥ F12` (IntelliJ IDEA Classic (macOS)), `⌘ ⌃ T` (macOS System Shortcuts), `Alt+F12` (XWin), `Alt+F12` (GNOME), `Alt+F12` (KDE), `Alt+F12` (Emacs), `Alt+F12` (Sublime Text), `⌥ F12` (Sublime Text (macOS)), `Alt+F12` (NetBeans), `Ctrl+Alt+1` (Visual Studio), `⌘ ⌃ 1` (Visual Studio (macOS)), `Alt+F12` (Eclipse), `⌥ F12` (Eclipse (macOS))) , type:
npm:
`npm install --save-dev eslint @eslint/js typescript typescript-eslint`
pnpm:
`pnpm add --save-dev eslint @eslint/js typescript typescript-eslint`
yarn:
`yarn add --dev eslint @eslint/js typescript typescript-eslint`
Learn more from the [typescript-eslint
official website](https://typescript-eslint.io/getting-started/).
Procedure: ESLint version 8 and earlier
* In your command-line shell or in the embedded Terminal (`Alt+F12` (Windows), `⌥ F12` (macOS), `⌥ F12` (IntelliJ IDEA Classic (macOS)), `⌘ ⌃ T` (macOS System Shortcuts), `Alt+F12` (XWin), `Alt+F12` (GNOME), `Alt+F12` (KDE), `Alt+F12` (Emacs), `Alt+F12` (Sublime Text), `⌥ F12` (Sublime Text (macOS)), `Alt+F12` (NetBeans), `Ctrl+Alt+1` (Visual Studio), `⌘ ⌃ 1` (Visual Studio (macOS)), `Alt+F12` (Eclipse), `⌥ F12` (Eclipse (macOS))) , type:
npm:
`npm install --save-dev @typescript-eslint/parser @typescript-eslint/eslint-plugin eslint typescript`
pnpm:
`pnpm add --save-dev eslint @eslint/js typescript-eslint`
yarn:
`yarn add --dev eslint @eslint/js typescript-eslint`
Learn more from the [typescript-eslint
official website](https://typescript-eslint.io/getting-started/legacy-eslint-setup/).
## Configuration file
Depending on the ESLint version you are using, IntelliJ IDEA recognizes configurations in the following file types:
### ESLint version 9 and later
`eslint.config.js`, `eslint.config.mjs`, `eslint.config.cjs` (flat format), `eslint.config.ts`, `eslint.config.mts`, or `eslint.config .cts`. Learn more from the [ESLint official website](https://eslint.org/docs/latest/use/configure/configuration-files#configuration-file).
### ESLint version 8 and earlier
* `.eslintrc.*` (`.eslintrc`, `.eslintrc.json`, or `.eslintrc.yaml` file, or a file in another supported format).
* `.eslintignore`
* `package.json` with a `eslintIgnore` or a `eslintConfig` property. This configuration system is deprecated, learn more from the [ESLint official website](https://eslint.org/docs/latest/use/configure/configuration-files-deprecated).
Learn how to switch to the flat format from [ESLint configuration migration
guide](https://eslint.org/docs/latest/use/configure/migration-guide).
### Create and edit a configuration file
Procedure:
* Open a configuration file or create a new one in the root of your project. Populate the configuration file depending on the ESLint version you are using:
ESLint version 9 and later:
```JAVASCRIPT
// @ts-check
import eslint from '@eslint/js';
import tseslint from 'typescript-eslint';
export default tseslint.config(
eslint.configs.recommended,
tseslint.configs.recommended,
);
```
Learn more from the [typescript-eslint official website.](https://typescript-eslint.io/getting-started/)
ESLint version 8 and earlier:
```JAVASCRIPT
/* eslint-env node */
module.exports = {
extends: ['eslint:recommended', 'plugin:@typescript-eslint/recommended'],
parser: '@typescript-eslint/parser',
plugins: ['@typescript-eslint'],
root: true,
};
```
Learn more from the [typescript-eslint official website](https://typescript-eslint.io/getting-started/legacy-eslint-setup/).
## Configure ESLint in IntelliJ IDEA
By default, ESLint is configured [automatically](eslint.html#ws_js_eslint_automatic_configuration). You can choose to specify all the configuration settings [manually](eslint.html#ws_js_eslint_manual_configuration) or disable ESLint.
Learn more from [ESLint](eslint.html#ws_js_eslint_activate).
### Suppress linting TypeScript code with ESLint
Procedure:
* If you are already using `@typescript-eslint/parser` but you do not want to check TypeScript code with ESLint, add `.ts` or `.tsx` to the `.eslintignore` file.
## Lint your code
When installed and enabled, ESLint activates automatically every time you open a TypeScript file. You can also configure ESLint to [detect and fix
problems automatically on save](eslint.html#ws_eslint_configure_run_eslint_on_save).
By default, IntelliJ IDEA marks detected problems based on the severity levels from the ESLint configuration. See [Configuring ESLint highlighting](eslint.html#ws_eslint_configure_highlighting) to learn how to override these settings.
Descriptions of the errors detected in the current file and quick-fixes for them are available from the editor and from the File tab of the [Problems](linters.html#ws_js_linters_general_problems_tool_window) tool window.
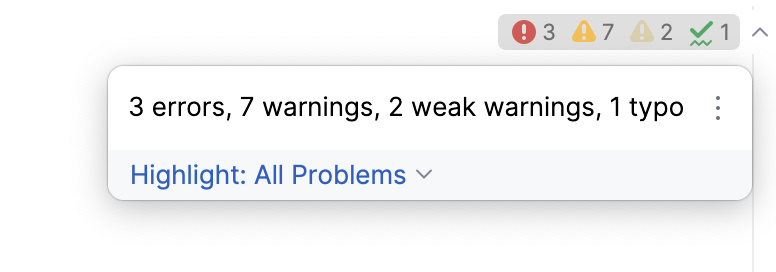
Errors in all previously opened files and quick-fixes for them are shown in the Project Errors tab of the Problems tool window. To open the tool window, click the Inspection widget in the upper-right corner of the editor:
For more information, refer to [View problems and
apply quick-fixes in the editor](linters.html#ws_js_linters_editor) and [Problems tool window](linters.html#ws_js_linters_general_problems_tool_window).
Procedure:
* To view the description of a problem in the editor, hover over the highlighted code.
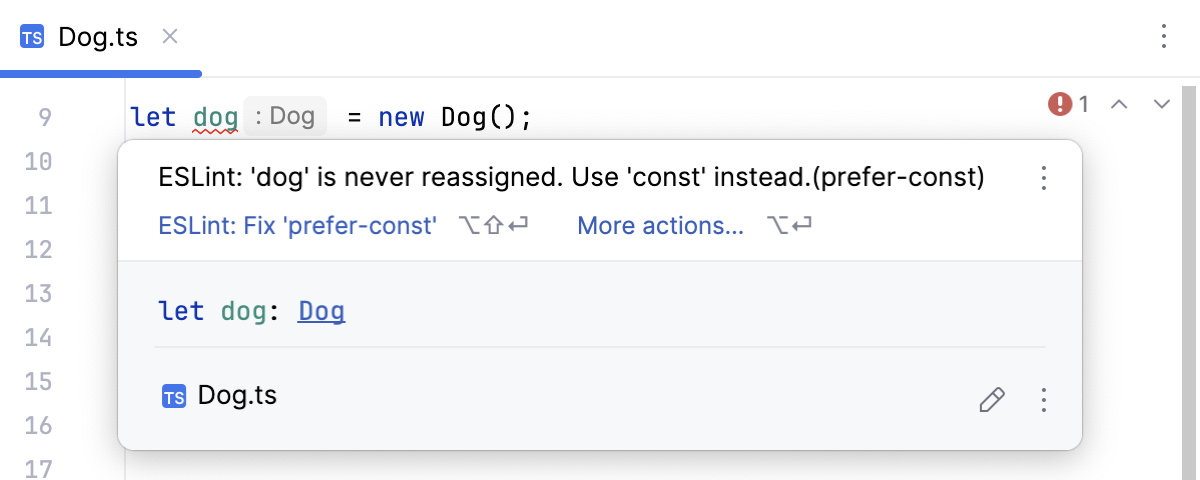
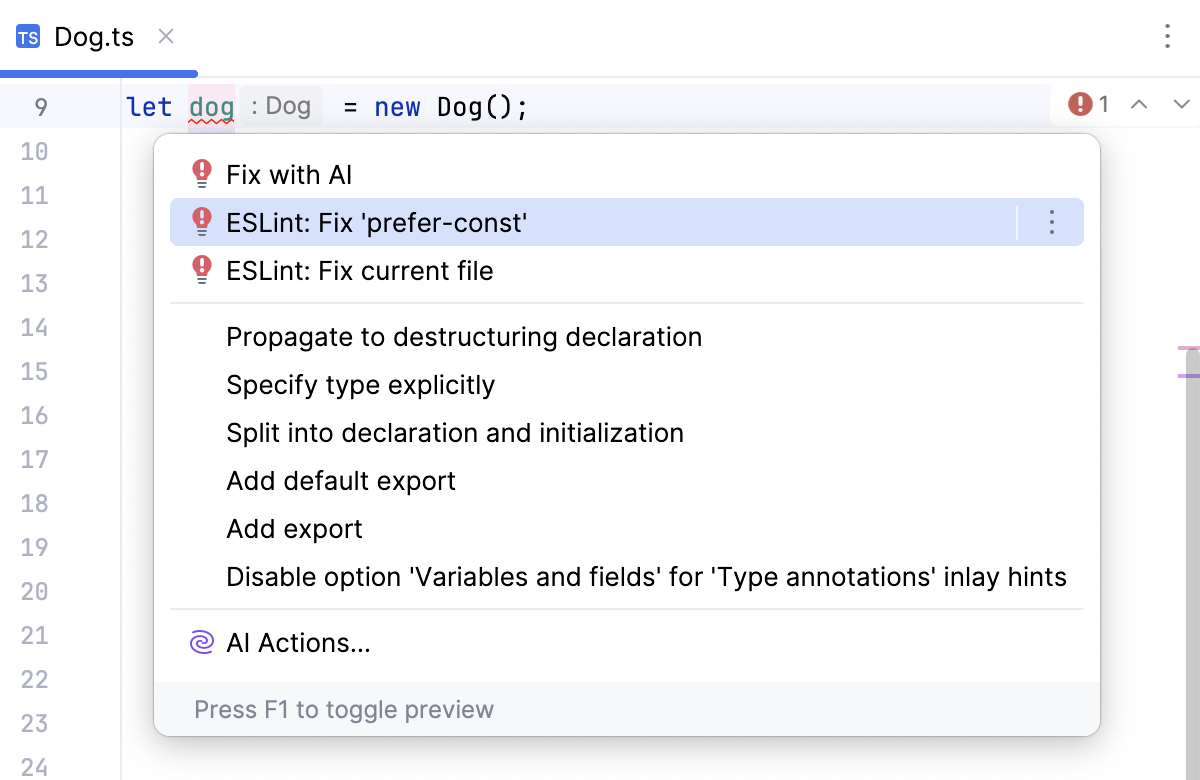
To resolve the detected problem, click ESLint: Fix '' or press `Alt+Shift+Enter` (Windows), `Alt+Shift+Enter` (macOS), `Alt+Shift+Enter` (IntelliJ IDEA Classic (macOS)), `Alt+Shift+Enter` (macOS System Shortcuts), `Alt+Shift+Enter` (XWin), `Alt+Shift+Enter` (GNOME), `Alt+Shift+Enter` (KDE), `Alt+Shift+Enter` (Emacs), `Alt+Shift+Enter` (Sublime Text), `Alt+Shift+Enter` (Sublime Text (macOS)), `Alt+Shift+Enter` (NetBeans), `Alt+Shift+Enter` (Visual Studio), `Alt+Shift+Enter` (Visual Studio (macOS)), `Alt+Shift+Enter` (Eclipse), `Alt+Shift+Enter` (Eclipse (macOS)).
To resolve all the detected problems in the current file, click More actions (`Alt+Enter` (Windows), `⌥ ⏎` (macOS), `⌥ ⏎` (IntelliJ IDEA Classic (macOS)), `⌥ ⏎` (macOS System Shortcuts), `Alt+Enter` (XWin), `Alt+Enter` (GNOME), `Alt+Enter` (KDE), `Alt+Enter` (Emacs), `Alt+Enter` (Sublime Text), `⌥ ⏎` (Sublime Text (macOS)), `Alt+Enter` (NetBeans), `Alt+Enter` (Visual Studio), `⌥ ⏎` (Visual Studio (macOS)), `Ctrl+1` (Eclipse), `⌘ 1` (Eclipse (macOS))) and select `ESLint: Fix current file` from the list.
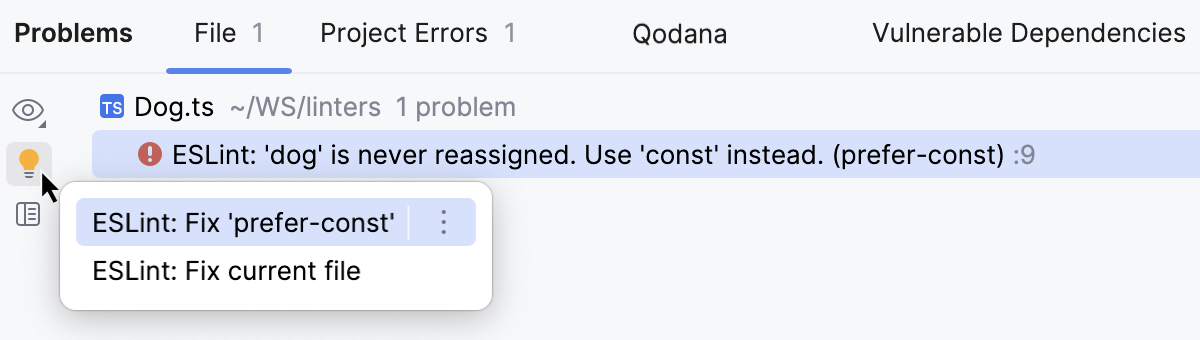
* Alternatively, open the File tab of the Problems tool window `Alt+6` (Windows), `⌘ 6` (macOS), `⌘ 6` (IntelliJ IDEA Classic (macOS)), `⌘ 6` (macOS System Shortcuts), `Alt+6` (XWin), `Alt+6` (GNOME), `Alt+6` (KDE), `Alt+6` (Emacs), `Alt+6` (Sublime Text), `⌘ 6` (Sublime Text (macOS)), `Alt+6` (NetBeans), `Alt+6` (Visual Studio), `⌘ 6` (Visual Studio (macOS)), `Alt+6` (Eclipse), `⌘ 6` (Eclipse (macOS)), where you can view problem descriptions, apply quick-fixes, navigate to the fragments in the source code where errors occurred, as well as fix them in the Editor Preview pane without leaving the tool window.
Learn more from [Problems tool window](problems-tool-window.html).
* You can also configure ESLint to fix all the problems in a file when this file is saved. To configure such behavior, select the Run eslint --fix on save checkbox on the ESLint page of the Settings dialog as described in [Activating and configuring ESLint in IntelliJ IDEA](eslint.html#ws_js_eslint_activate).
Learn more from [View problems and
apply quick-fixes in the editor](linters.html#ws_js_linters_editor) and from [ESLint](eslint.html#ws_js_eslint_verify_code).
## TSLint
You can also use the [TSLint](https://palantir.github.io/tslint/) code verification tool from inside IntelliJ IDEA and check your TypeScript code for the most common mistakes without running the application. When the tool is activated, it lints all the opened TypeScript files and marks the detected problems.
> **Warning:**
> TSLint has been deprecated as of 2019. For more information, refer to the [TSLint
> official website](https://palantir.github.io/tslint/).
>
>
>
> It is recommended that you check your TypeScript code using ESLint [as described above](#ws_eslint_linting_typescript_files_with_eslint_intro).
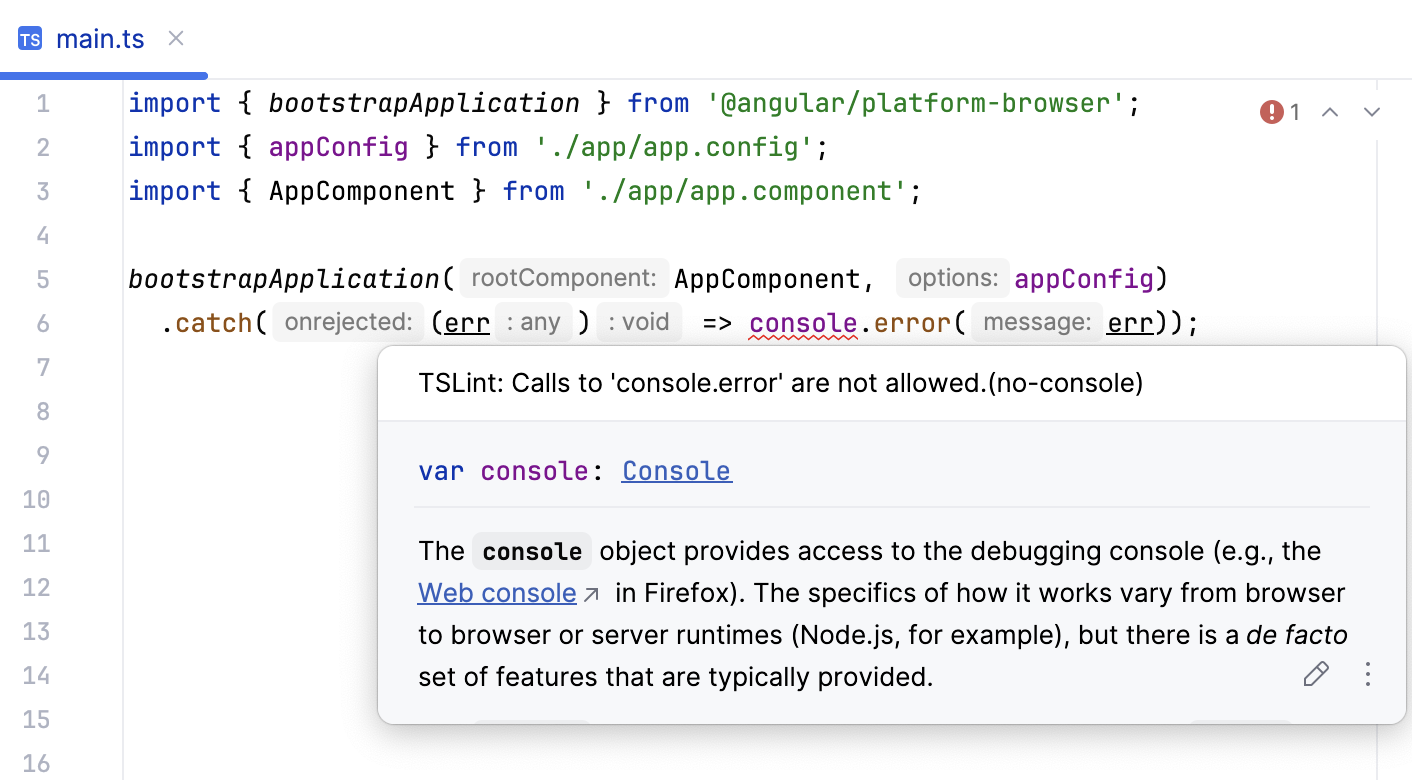
To view the description of a problem, hover over the highlighted code. By default, IntelliJ IDEA marks detected problems based on the severity levels from the TSLint configuration file. See [Configuring TSLint highlighting](#ws_tslint_configure_highlighting) to learn how to override these settings.
### Before you start
Procedure:
1. Download and install [Node.js](http://nodejs.org/#download).
2. Make sure a local Node.js runtime is configured in your project: open the Settings dialog (`Ctrl+Alt+S` (Windows), `⌘ Comma` (macOS), `⌘ Comma` (IntelliJ IDEA Classic (macOS)), `⌘ Comma` (macOS System Shortcuts), `Ctrl+Alt+S` (XWin), `Ctrl+Alt+S` (GNOME), `Ctrl+Alt+S` (KDE), `Ctrl+Alt+S` (Emacs), `Ctrl+Alt+S` (Sublime Text), `⌘ Comma` (Sublime Text (macOS)), `Ctrl+Alt+S` (NetBeans), `Ctrl+Alt+S` (Visual Studio), `⌘ Comma` (Visual Studio (macOS)), `Ctrl+Alt+S` (Eclipse), `⌘ Comma` (Eclipse (macOS))) and go to `Languages & Frameworks | JavaScript Runtime`. The Node runtime field shows the default project Node.js runtime. Learn more from [Configuring a local Node.js
interpreter](developing-node-js-applications.html#ws_node_configure_local_node_interpreter).
3. Make sure the JavaScript and TypeScript and TSLint required plugins are enabled on the Settings | Plugins page, tab Installed. For more information, refer to [Managing plugins](managing-plugins.html).
### Install TSLint
Procedure:
* In your command-line shell or in the embedded Terminal (`Alt+F12` (Windows), `⌥ F12` (macOS), `⌥ F12` (IntelliJ IDEA Classic (macOS)), `⌘ ⌃ T` (macOS System Shortcuts), `Alt+F12` (XWin), `Alt+F12` (GNOME), `Alt+F12` (KDE), `Alt+F12` (Emacs), `Alt+F12` (Sublime Text), `⌥ F12` (Sublime Text (macOS)), `Alt+F12` (NetBeans), `Ctrl+Alt+1` (Visual Studio), `⌘ ⌃ 1` (Visual Studio (macOS)), `Alt+F12` (Eclipse), `⌥ F12` (Eclipse (macOS))) , type:
`npm install tslint typescript --save-dev`
Learn more from the [TSLint official website](https://palantir.github.io/tslint/usage/cli/).
### Create TSLint configuration file
Procedure:
* In your command-line shell or in the embedded Terminal (`Alt+F12` (Windows), `⌥ F12` (macOS), `⌥ F12` (IntelliJ IDEA Classic (macOS)), `⌘ ⌃ T` (macOS System Shortcuts), `Alt+F12` (XWin), `Alt+F12` (GNOME), `Alt+F12` (KDE), `Alt+F12` (Emacs), `Alt+F12` (Sublime Text), `⌥ F12` (Sublime Text (macOS)), `Alt+F12` (NetBeans), `Ctrl+Alt+1` (Visual Studio), `⌘ ⌃ 1` (Visual Studio (macOS)), `Alt+F12` (Eclipse), `⌥ F12` (Eclipse (macOS))) , type:
```SHELL
cd
tslint --init
```
### Activate and configure TSLint in IntelliJ IDEA
By default, IntelliJ IDEA uses the TSLint package from the project `node_modules` folder and the `tslint.json` configuration file from the folder where the current file is stored. If no `tslint.json` configuration file is found in the current file folder, IntelliJ IDEA will look for one in its parent folders up to the project root.
If you have several `package.json` files with TSLint listed as a dependency, IntelliJ IDEA starts a separate process for each `package.json` and processes everything below it. This lets you apply a specific TSLint version or a specific set of plugins to each path in a monorepo or a project with multiple TSLint configurations.
This behavior is default in all new IntelliJ IDEA projects. To enable it in a previously created project, go to `Languages & Frameworks | TypeScript | TSLint` in the Settings dialog (`Ctrl+Alt+S` (Windows), `⌘ Comma` (macOS), `⌘ Comma` (IntelliJ IDEA Classic (macOS)), `⌘ Comma` (macOS System Shortcuts), `Ctrl+Alt+S` (XWin), `Ctrl+Alt+S` (GNOME), `Ctrl+Alt+S` (KDE), `Ctrl+Alt+S` (Emacs), `Ctrl+Alt+S` (Sublime Text), `⌘ Comma` (Sublime Text (macOS)), `Ctrl+Alt+S` (NetBeans), `Ctrl+Alt+S` (Visual Studio), `⌘ Comma` (Visual Studio (macOS)), `Ctrl+Alt+S` (Eclipse), `⌘ Comma` (Eclipse (macOS))) and select the Automatic TSLint configuration option.
You can also configure TSLint manually to use a custom TSLint package and `tslint.json` and specify some additional rules.
Procedure:
1. In the Settings dialog (`Ctrl+Alt+S` (Windows), `⌘ Comma` (macOS), `⌘ Comma` (IntelliJ IDEA Classic (macOS)), `⌘ Comma` (macOS System Shortcuts), `Ctrl+Alt+S` (XWin), `Ctrl+Alt+S` (GNOME), `Ctrl+Alt+S` (KDE), `Ctrl+Alt+S` (Emacs), `Ctrl+Alt+S` (Sublime Text), `⌘ Comma` (Sublime Text (macOS)), `Ctrl+Alt+S` (NetBeans), `Ctrl+Alt+S` (Visual Studio), `⌘ Comma` (Visual Studio (macOS)), `Ctrl+Alt+S` (Eclipse), `⌘ Comma` (Eclipse (macOS))), go to `Languages & Frameworks | TypeScript | TSLint`.
2. Select the Manual Configuration option.
3. Specify the path to the TSLint package.
4. In the Configuration File area, appoint the configuration to use.
By default, IntelliJ IDEA first looks for a `tslint.json`, `tslint.yaml`, or `tslint.yml` configuration file. IntelliJ IDEA starts the search from the folder where the file to be checked is stored, then searches in the parent folder, and so on until reaches the project root. If no `tslint.json`, `tslint.yaml`, or `tslint.yml` configuration file is found, TSLint uses its default embedded configuration file. Accordingly, you have to define the configuration to apply either in a `tslint.json`, `tslint.yaml`, or `tslint.yml` configuration file, or in a custom configuration file, or rely on the default embedded configuration.
* To have IntelliJ IDEA look for a `tslint.json`, `tslint.yaml`, or `tslint.yml` file, choose the Automatic search option.
* To use a custom file, choose the Configuration File option and specify the location of the file in the Path field. Choose the path from the list, or type it manually, or click  and select the relevant file from the dialog that opens.
Learn more about configuring TSLint from the [TSLint official website](https://palantir.github.io/tslint/usage/configuration/).
5. If necessary, in the Additional Rules Directory field, specify the location of the files with additional code verification rules. These rules will be applied after the rules from `tslint.json`, `tslint.yaml`, `tslint.yml`, or from the above specified custom configuration file and accordingly will override them.
### Configure highlighting for TSLint
By default, IntelliJ IDEA marks the detected errors and warnings based on the severity levels from the TSLint configuration file. For example, errors are highlighted with a red squiggly line, while warnings are marked with a yellow background. For more information, refer to [Code inspections](code-inspection.html) and [Change inspection severity](configuring-inspection-severities.html).
Procedure: Change the severity level of a rule in the TSLint configuration
* In TSLint configuration file, locate the rule you want to edit and set its ID to `warning` or to `error`. Learn more from the [TSLint official website](https://palantir.github.io/tslint/usage/configuration/).
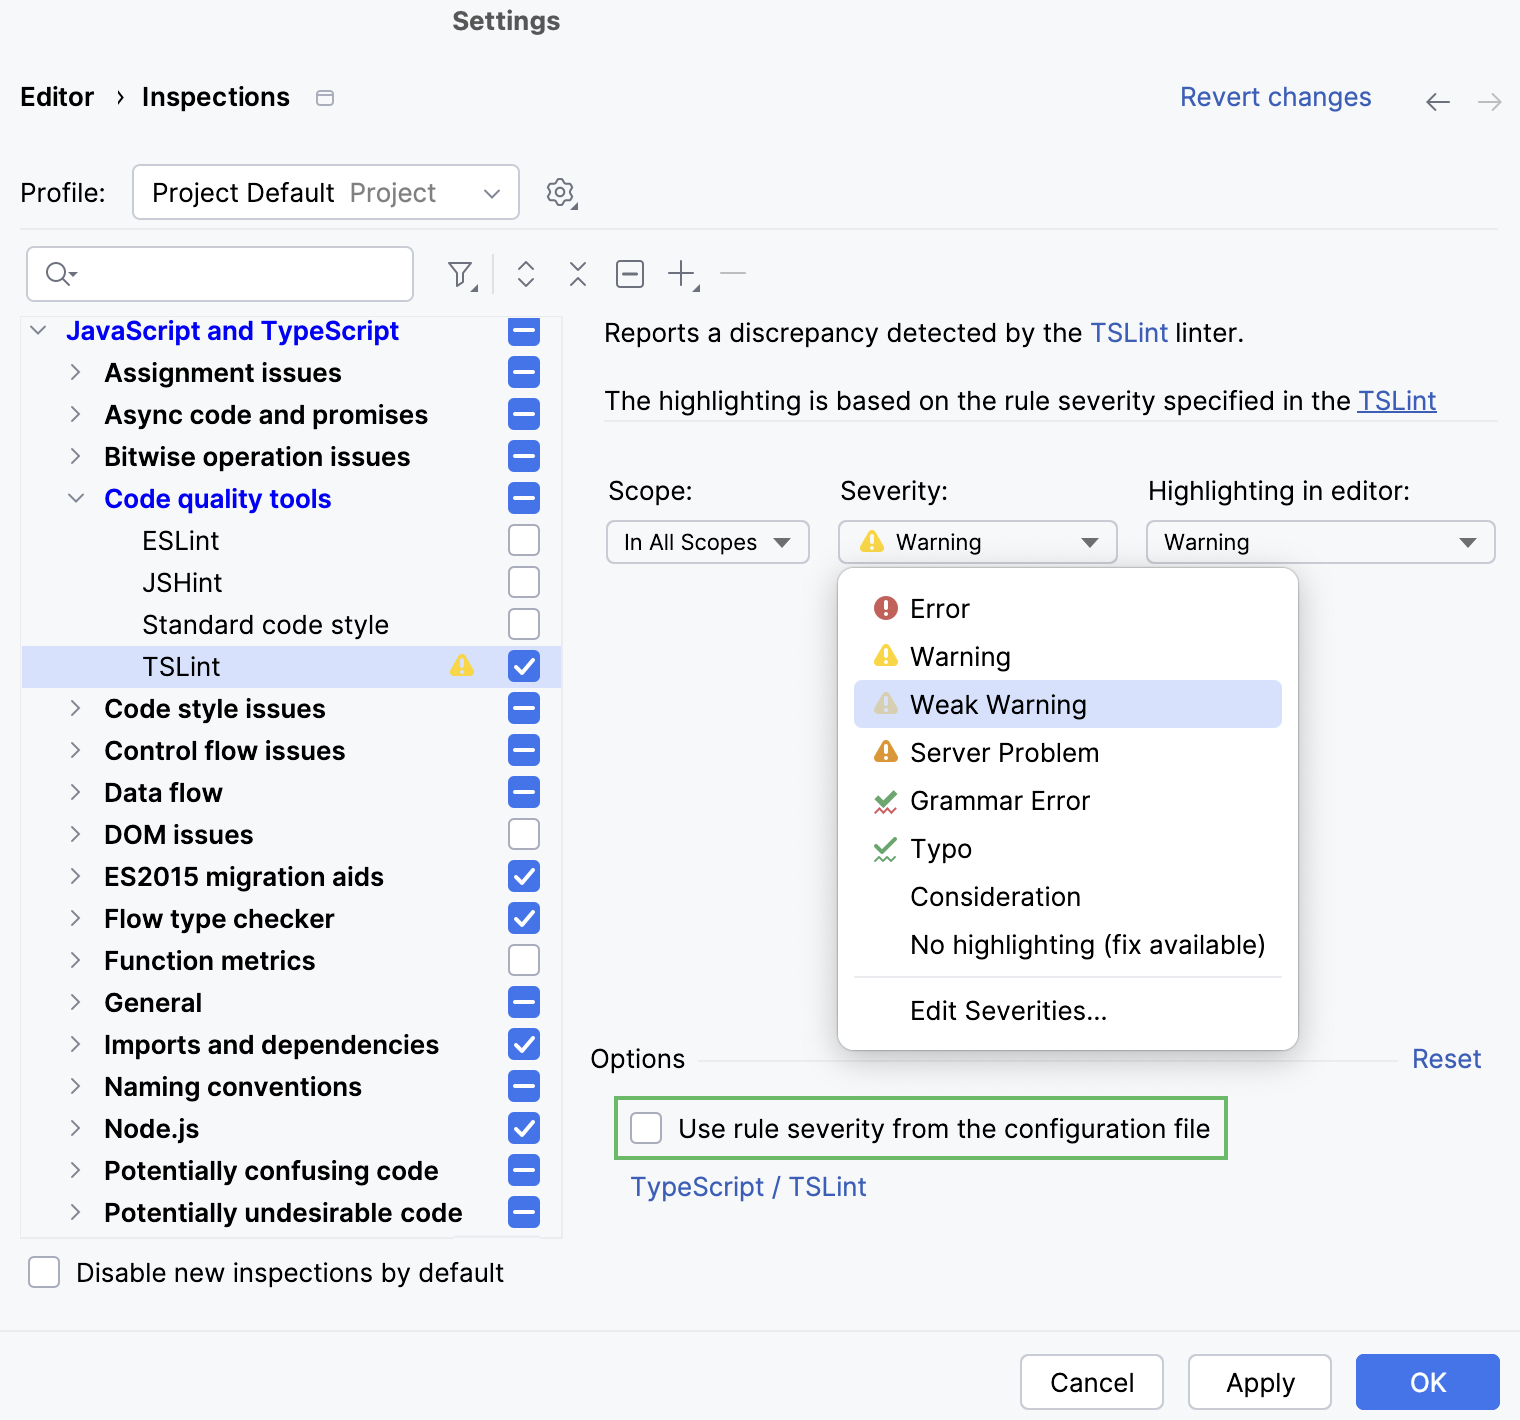
You can override the severities from the TSLint configuration file so that IntelliJ IDEA ignores them and shows everything reported by the linter as errors, warnings, or in a custom color.
Procedure: Ignore the severity levels from the configuration
1. In the Settings dialog (`Ctrl+Alt+S` (Windows), `⌘ Comma` (macOS), `⌘ Comma` (IntelliJ IDEA Classic (macOS)), `⌘ Comma` (macOS System Shortcuts), `Ctrl+Alt+S` (XWin), `Ctrl+Alt+S` (GNOME), `Ctrl+Alt+S` (KDE), `Ctrl+Alt+S` (Emacs), `Ctrl+Alt+S` (Sublime Text), `⌘ Comma` (Sublime Text (macOS)), `Ctrl+Alt+S` (NetBeans), `Ctrl+Alt+S` (Visual Studio), `⌘ Comma` (Visual Studio (macOS)), `Ctrl+Alt+S` (Eclipse), `⌘ Comma` (Eclipse (macOS))), go to `Editor | Inspections`. The [Inspections page](inspections-settings.html) opens.
2. In the central pane, go to JavaScript and TypeScript | Code quality tools | TSLint.
3. In the right pane, clear the Use rule severity from the configuration file checkbox and select the severity level to use instead of the default one.
### Import code style from a TSLint configuration file
IntelliJ IDEA understands some TSLint rules that are described in `tslint.json`, `tslint .yaml`, or `tslint.yml` configuration files and lets you apply them to the [TypeScript code style configuration](null) in your project.
* When you open your project for the first time, IntelliJ IDEA imports the code style from the project `tslint.json`, `tslint.yaml`, or `tslint.yml` automatically.
* If `tslint.json`, `tslint.yaml`, or `tslint.yml` is updated (manually or from your version control), open it in the editor and choose Apply TSLint Code Style Rules from the context menu. 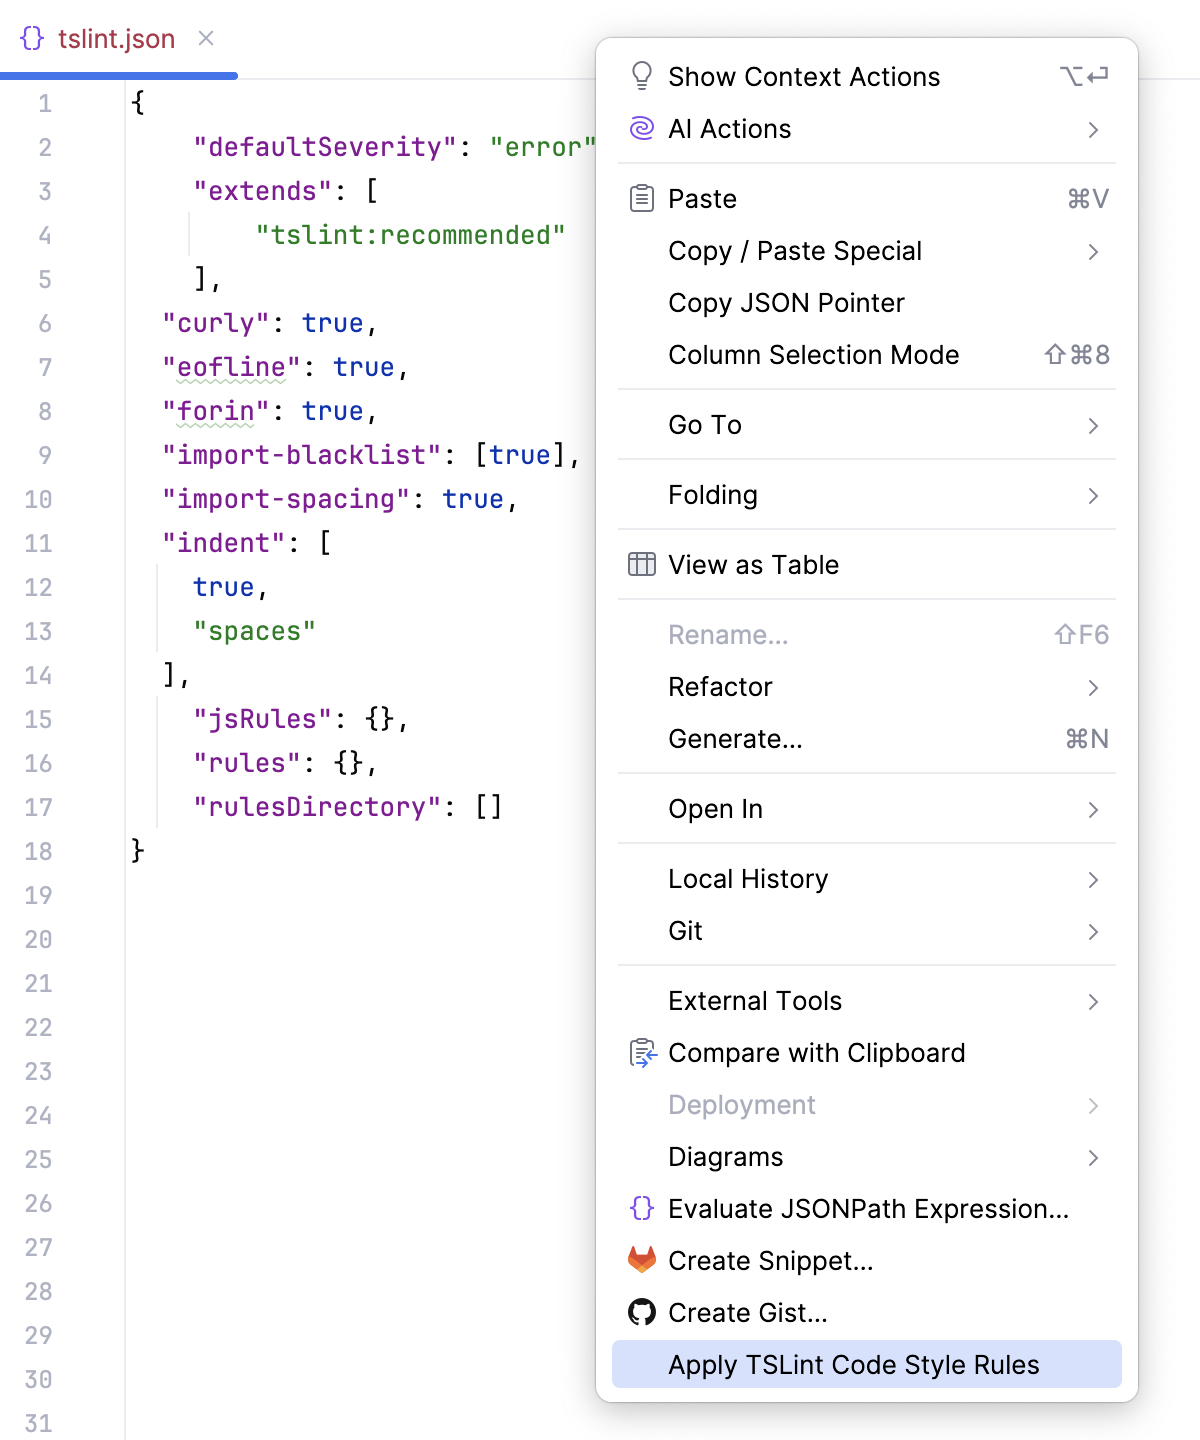
### TSLint quick-fixes
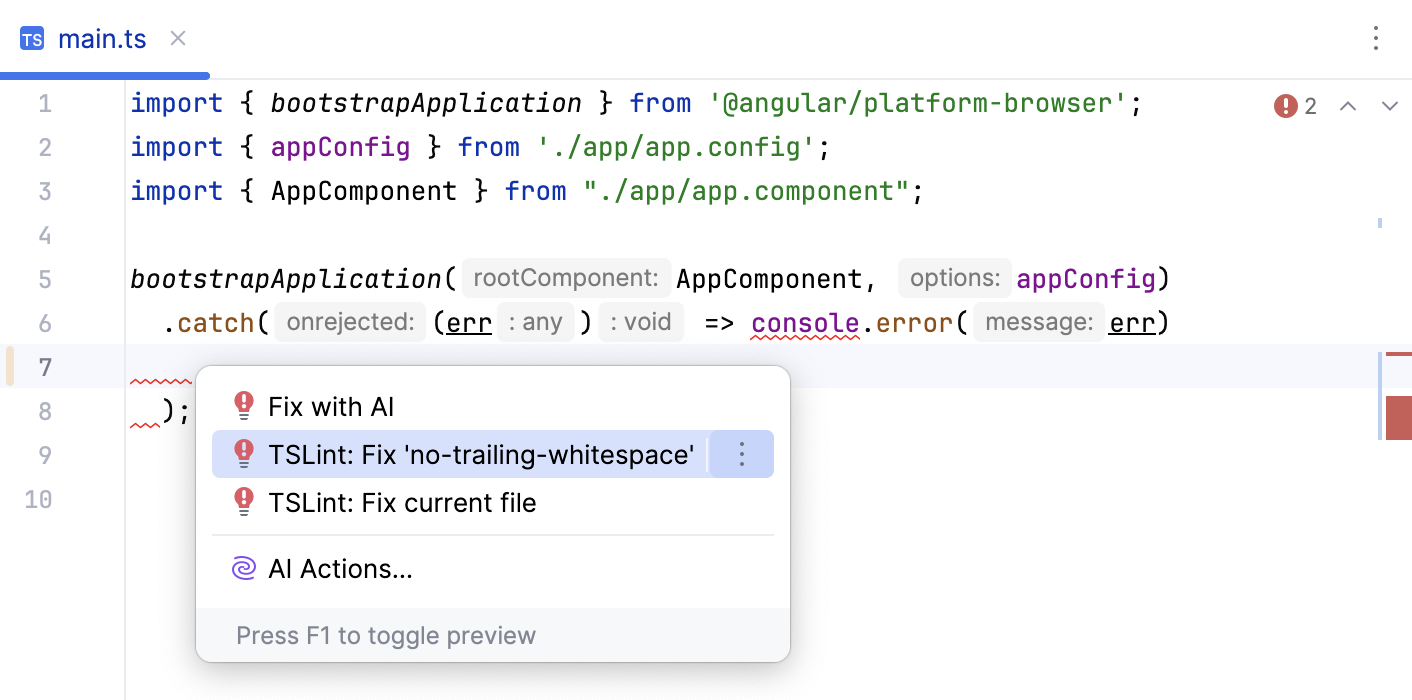
IntelliJ IDEA lets you automatically fix some of the issues that TSLint reports.
Procedure:
* To fix a specific error, place the caret at the highlighted code, press `Alt+Enter` (Windows), `⌥ ⏎` (macOS), `⌥ ⏎` (IntelliJ IDEA Classic (macOS)), `⌥ ⏎` (macOS System Shortcuts), `Alt+Enter` (XWin), `Alt+Enter` (GNOME), `Alt+Enter` (KDE), `Alt+Enter` (Emacs), `Alt+Enter` (Sublime Text), `⌥ ⏎` (Sublime Text (macOS)), `Alt+Enter` (NetBeans), `Alt+Enter` (Visual Studio), `⌥ ⏎` (Visual Studio (macOS)), `Ctrl+1` (Eclipse), `⌘ 1` (Eclipse (macOS)), and then select TSLint: Fix '' from the list.
* To fix all the issues detected in the file, choose TSLint: Fix current file.
You can suppress TSLint rules for the current file and even for the current line. IntelliJ IDEA automatically generates disable comments in the format `/* tslint:disable:` or `// tslint:disable-next-line:` and places them on top of the file or above the current line respectively.
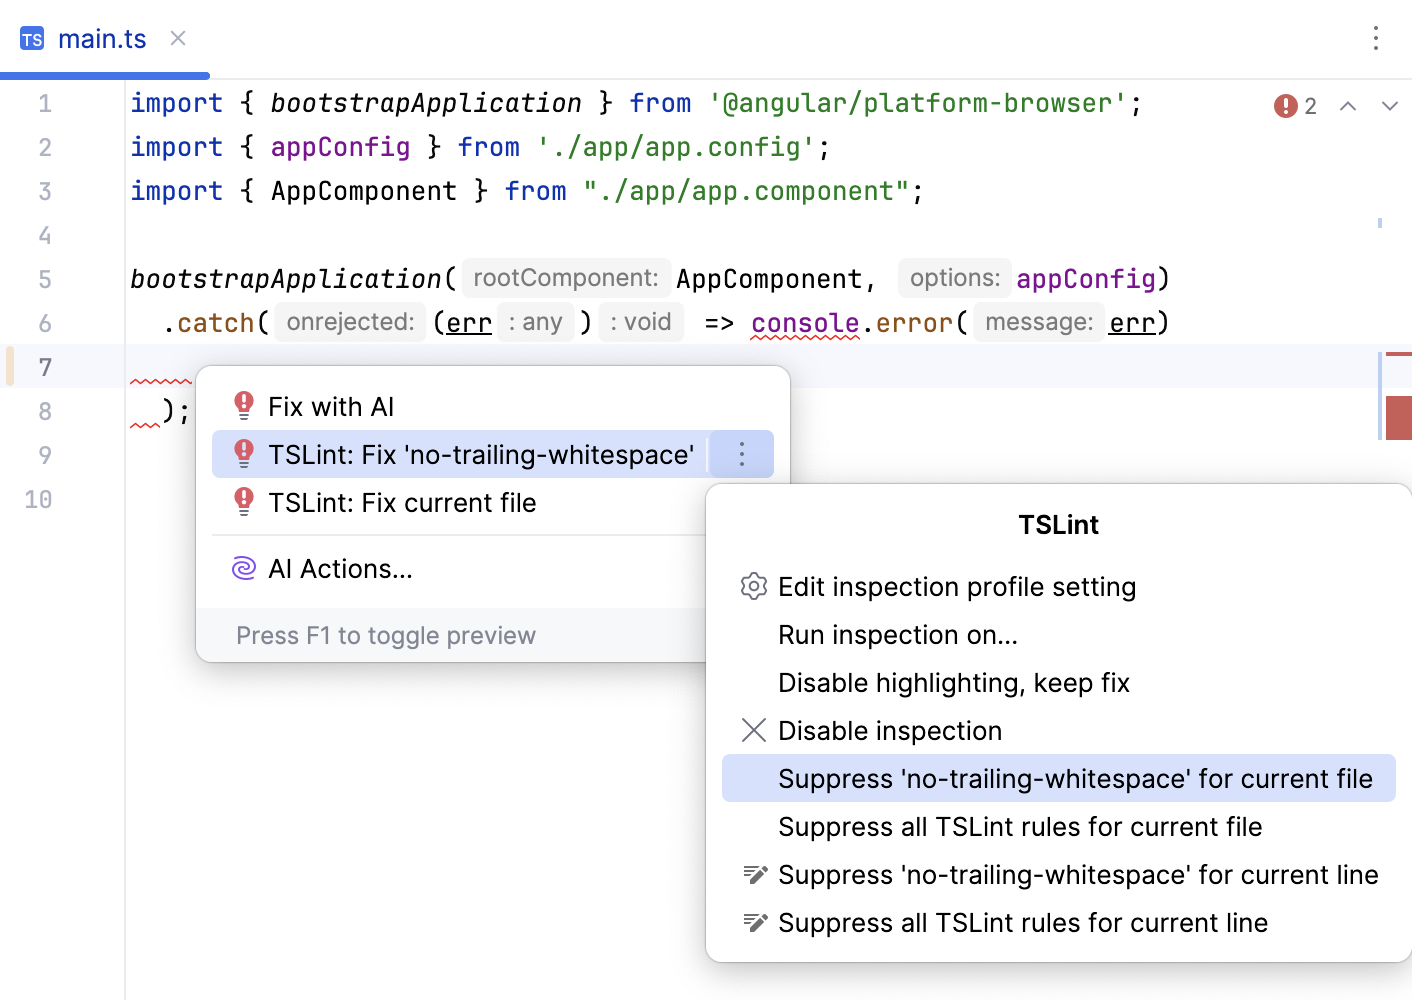
Procedure: Suppress a TSLint rule on the fly
1. Place the caret at an error or a warning reported by TSLint and press `Alt+Enter` (Windows), `⌥ ⏎` (macOS), `⌥ ⏎` (IntelliJ IDEA Classic (macOS)), `⌥ ⏎` (macOS System Shortcuts), `Alt+Enter` (XWin), `Alt+Enter` (GNOME), `Alt+Enter` (KDE), `Alt+Enter` (Emacs), `Alt+Enter` (Sublime Text), `⌥ ⏎` (Sublime Text (macOS)), `Alt+Enter` (NetBeans), `Alt+Enter` (Visual Studio), `⌥ ⏎` (Visual Studio (macOS)), `Ctrl+1` (Eclipse), `⌘ 1` (Eclipse (macOS)).
2. Select the quick-fix for the rule that you want to disable and press `Right` (Windows), `→` (macOS), `→` (IntelliJ IDEA Classic (macOS)), `→` (macOS System Shortcuts), `Right` (XWin), `Right` (GNOME), `Right` (KDE), `Right` (Emacs), `Right` (Sublime Text), `→` (Sublime Text (macOS)), `Right` (NetBeans), `Right` (Visual Studio), `→` (Visual Studio (macOS)), `Right` (Eclipse), `→` (Eclipse (macOS)).
3. From the list, select Suppress for current file or Suppress for current line.
## See also
### Procedures
[TypeScript](typescript-support.html)
### External Links
[TSLint official website](https://github.com/palantir/tslint) [TSLint on npm](https://www.npmjs.org/package/tslint)