# Manage Git branches
In Git, branching is a powerful mechanism that allows you to diverge from the main development line, for example, when you need to work on a feature, or freeze a certain state of a code base for a release, and so on.
In IntelliJ IDEA, all operations with branches are performed in the VCS widget. To invoke it, in the main window header, click the widget with the name of the branch that is currently checked out:
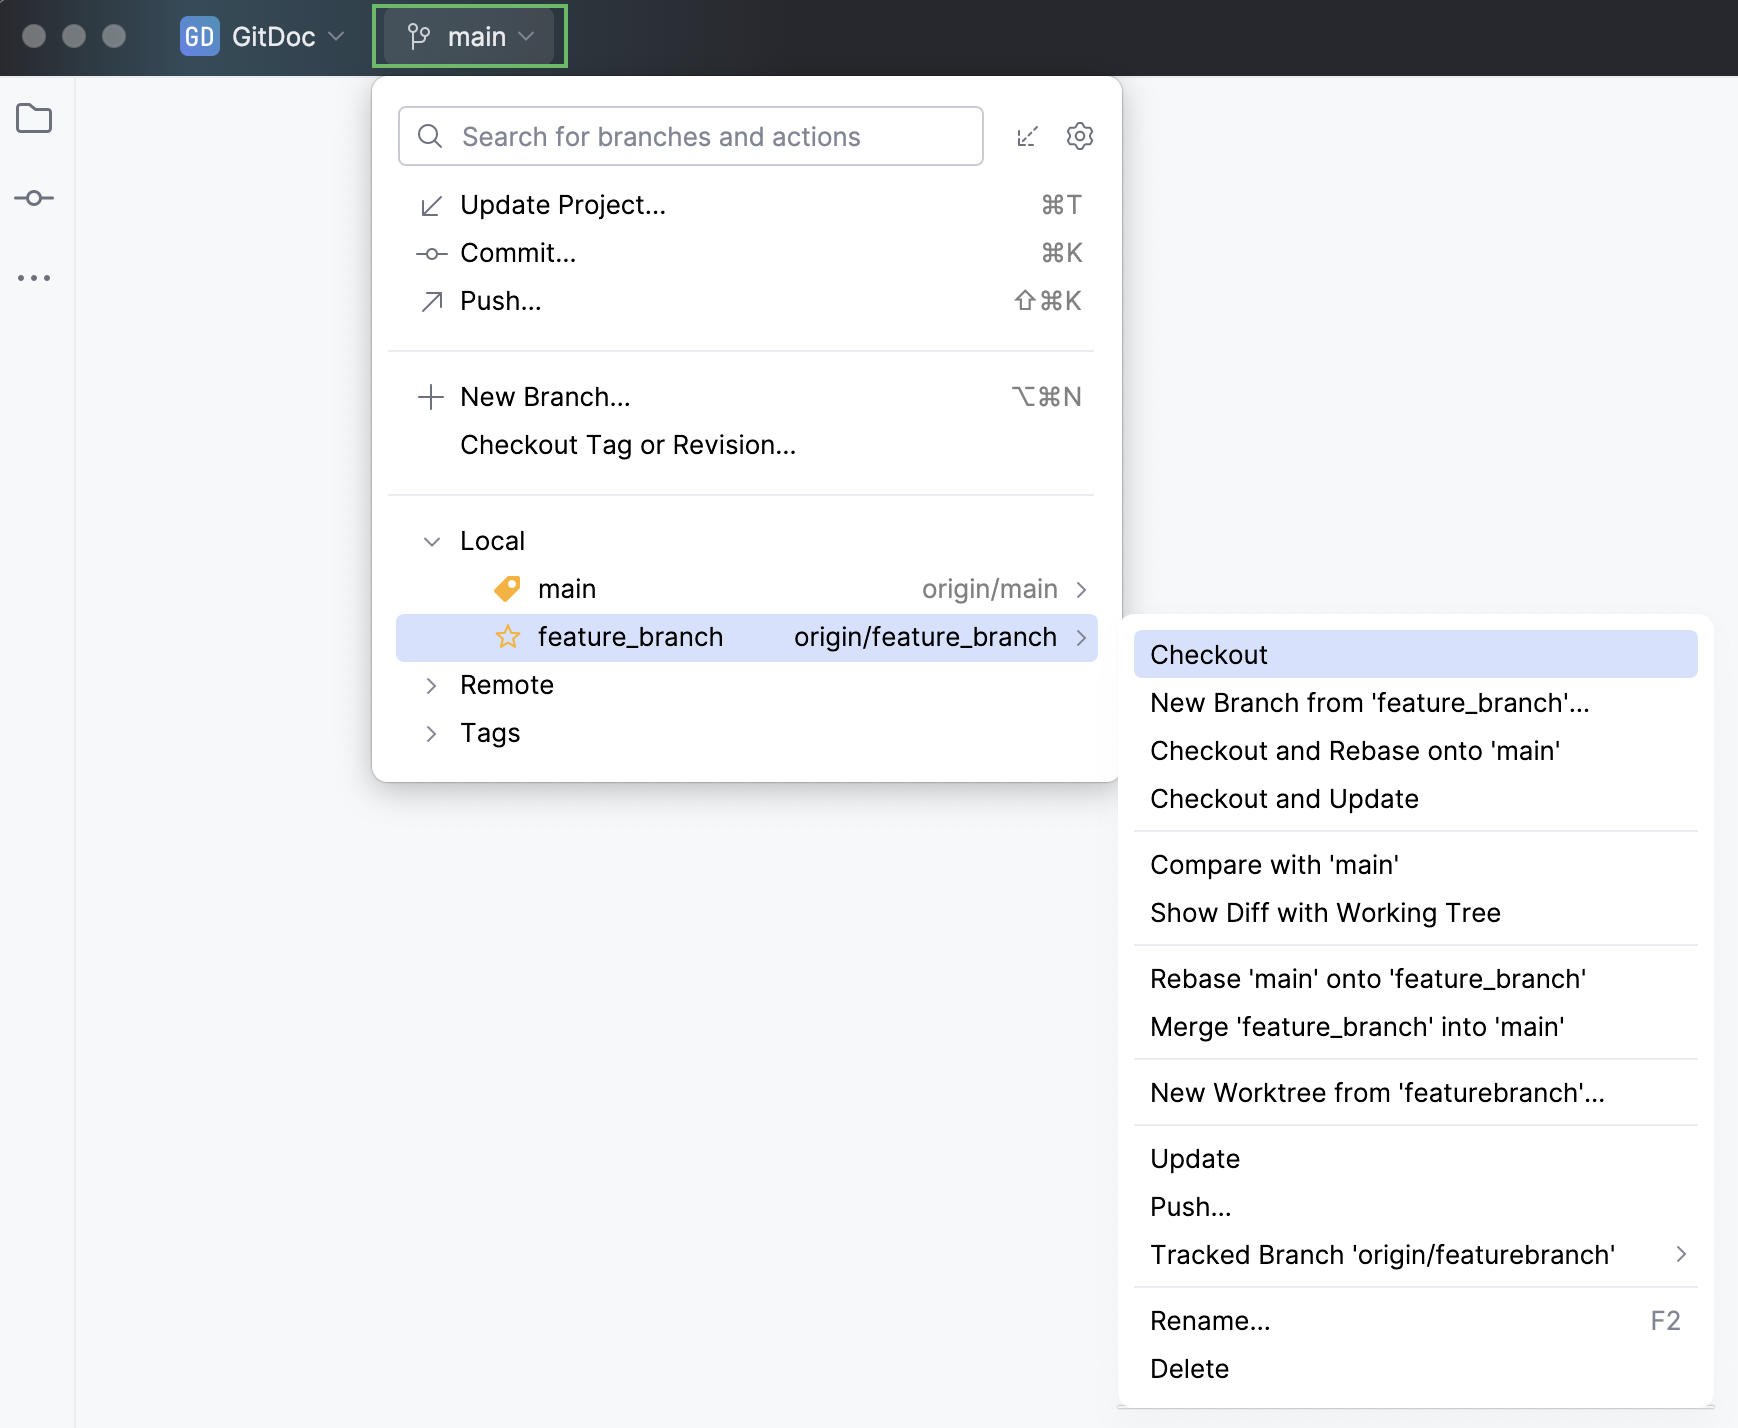
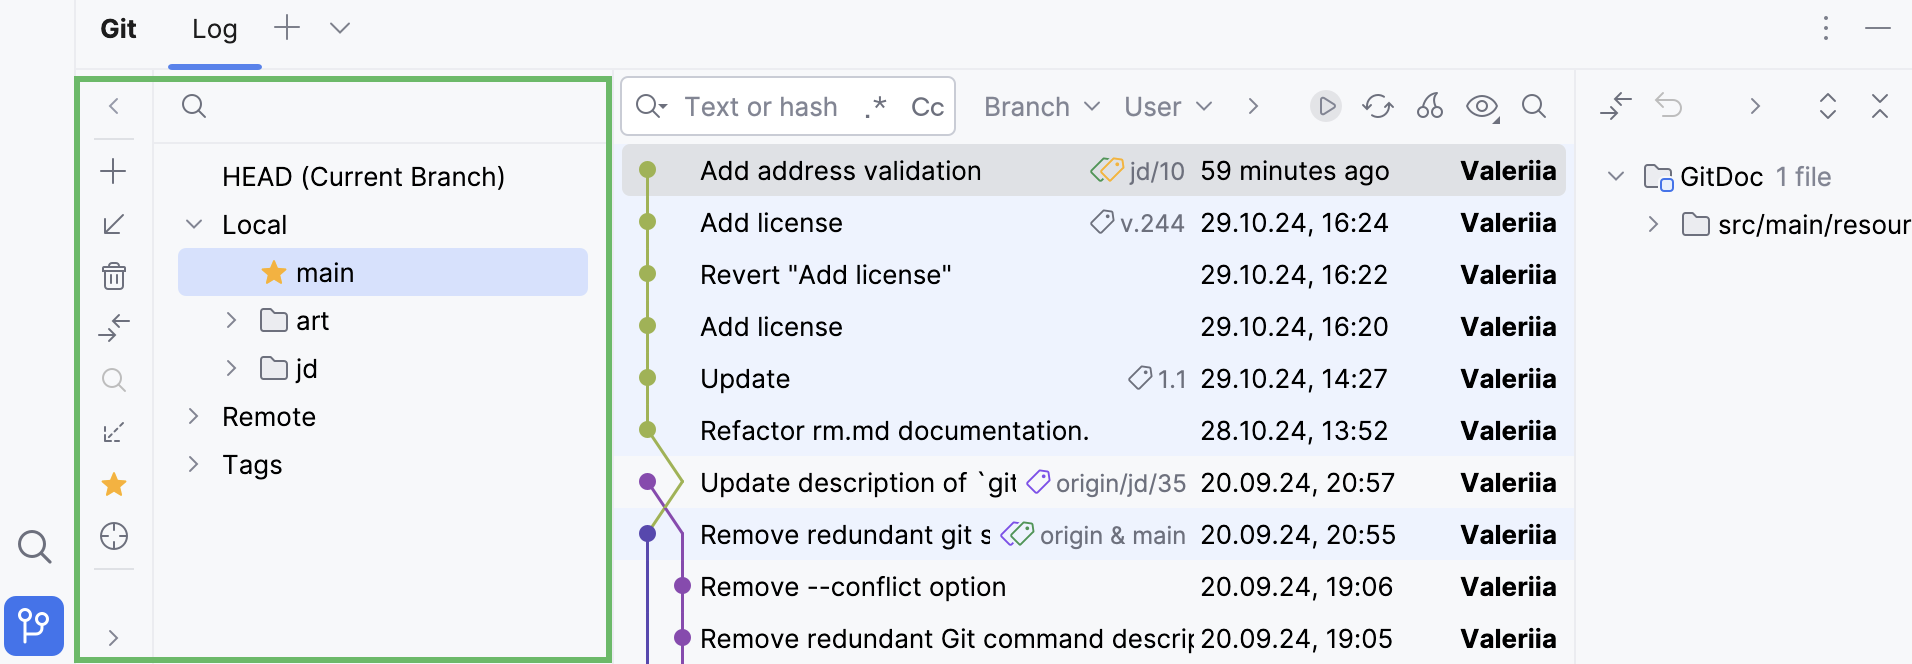
You can also manage branches and perform batch operations with multiple branches in the [Branches pane](log-tab.html#BranchesPane) of the Git tool window.
> **Note:**
> The VCS widget also indicates the number of incoming commits that have not yet been fetched (blue arrow icon  next to the branch name) and the number of outgoing commits (green arrow icon  next to the branch name).
>
>
>
> For more information, refer to [Sync with a remote Git repository (fetch, pull, update)](sync-with-a-remote-repository.html).
## Create a new branch
Procedure: Create a new branch from the current branch
1. In the VCS widget, choose New Branch or right-click the current branch in the Branches pane of the Git tool window and choose New Branch from 'branch name'.
2. In the dialog that opens, specify the branch name, and make sure the Checkout branch option is selected if you want to switch to that branch.
Once you start typing a name for your new branch, IntelliJ IDEA will suggest relevant prefixes based on the names of existing local branches.
The new branch will start from the current branch HEAD.
Procedure: Create a new branch from the selected branch
1. In the VCS widget or in the Branches pane of the Git tool window select a local or a remote branch that you want to start a new branch from and choose New Branch from Selected.
2. In the dialog that opens, specify the branch name, and make sure the Checkout branch option is selected if you want to switch to that branch.
Procedure: Create a new branch from the selected commit
1. In the [Log view](log-tab.html), select the commit that you want to act as a starting point for the new branch and choose New Branch from the context menu.
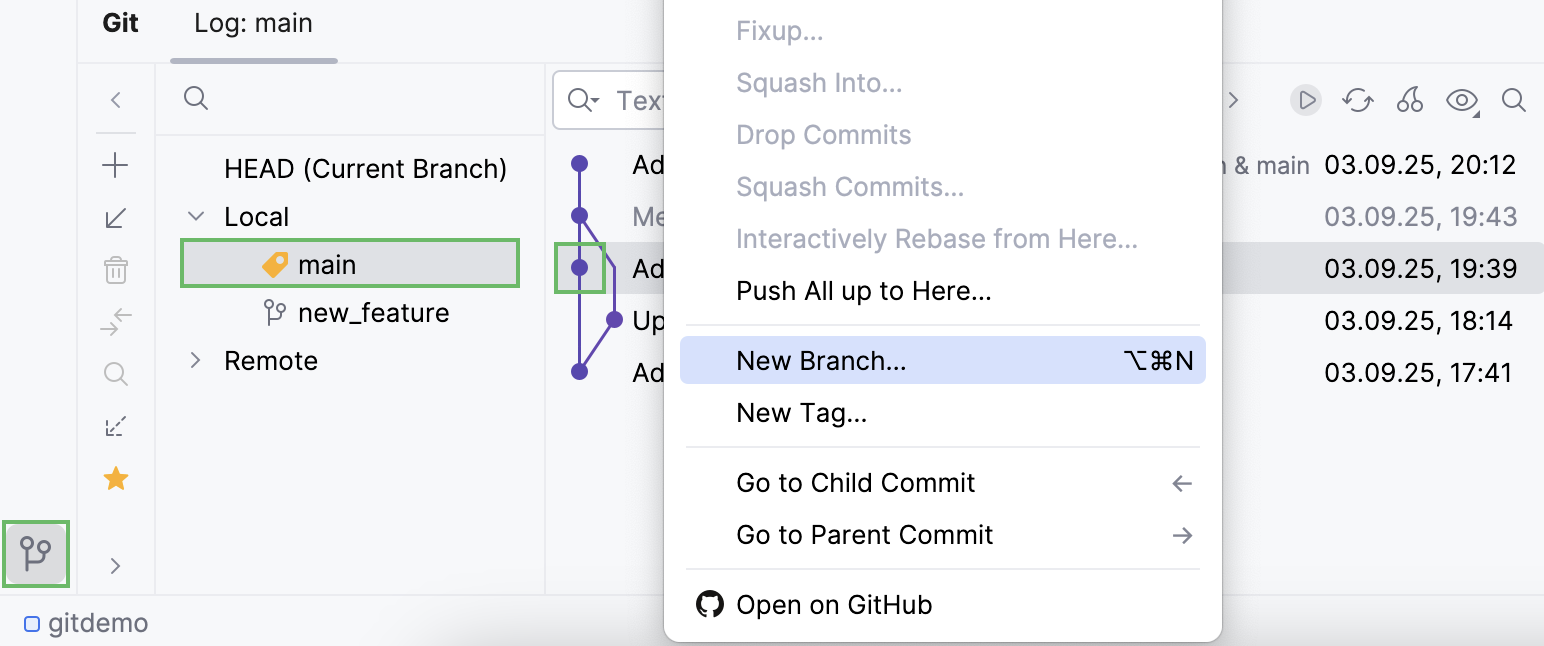
2. In the dialog that opens, specify the branch name, and make sure the Checkout branch option is selected if you want to switch to that branch.
## Rename branches
Procedure:
1. In the VCS widget or in the Branches pane of the Git tool window, select the branch you want to rename and choose Rename in the context menu.
2. In the dialog that opens, change the branch name to the one you need.
Note that this action only renames the local branch. If you want both local and remote tracked branches to have the same new name, you will have to create a new remote branch and start tracking it instead.
3. To stop tracking the current remote branch that has the unchanged old name, select the Unset upstream branch option in the same Rename branch dialog.
Next time you push your changes, the new remote branch will be created and tracked automatically.
After pushing your changes, you can [delete](#delete-branch) the old remote branch with an old name.
> **Tip:**
> To copy the name of a branch, hover over the branch and press `Ctrl+C` (Windows), `⌘ C` (macOS), `⌘ C` (IntelliJ IDEA Classic (macOS)), `⌘ C` (macOS System Shortcuts), `Ctrl+C` (XWin), `Ctrl+C` (GNOME), `Ctrl+C` (KDE), `Ctrl+Insert` (Emacs), `Ctrl+C` (Sublime Text), `⌘ C` (Sublime Text (macOS)), `Ctrl+C` (NetBeans), `Ctrl+C` (Visual Studio), `⌘ C` (Visual Studio (macOS)), `Ctrl+C` (Eclipse), `⌘ C` (Eclipse (macOS)).
## Mark branches as favorites
Procedure:
If you have many branches, you may want to see only your favorite ones. The main branch is marked as a favorite by default. Favorite branches are always displayed at the top of the VCS widget and in the Branches pane of the Git tool window.
* To mark a branch as a favorite, in the VCS widget, hover over the branch name, and click the star outline that appears on the left:
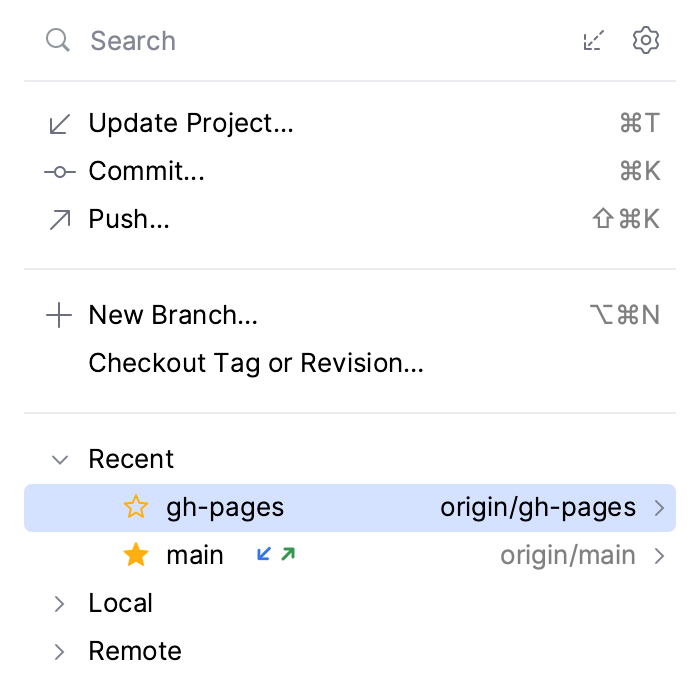
Alternatively, select the branch you want to mark as favourite and press `Space`.
You can also select a branch in the Branches pane of the Git tool window and click  on the toolbar.
> **Note:**
> While searching for a particular branch and navigating the list of branches, press `Ctrl+F` (Windows), `⌘ F` (macOS), `⌘ F` (IntelliJ IDEA Classic (macOS)), `⌘ F` (macOS System Shortcuts), `Ctrl+F` (XWin), `Ctrl+F` (GNOME), `Ctrl+F` (KDE), `Ctrl+Alt+S` (Emacs), `Ctrl+F` (Sublime Text), `⌘ F` (Sublime Text (macOS)), `Ctrl+F` (NetBeans), `Ctrl+F` (Visual Studio), `⌘ F` (Visual Studio (macOS)), `Ctrl+F` (Eclipse), `Ctrl+F` (Eclipse (macOS)) to move the focus back to the search field.
## Group branches
In the VCS widget, IntelliJ IDEA keeps branches and tags in four nodes:
* Recent branches node shows up to five recently checked-out branches.
* Local branches node lists all local branches.
* Remote branches node shows all remote branches available after the latest [fetch](sync-with-a-remote-repository.html#fetch).
* Tags node lists all available tags that you can check out, compare with the working tree, merge, push, or delete.
Also, IntelliJ IDEA automatically groups branches by directory and stores them in expandable lists.
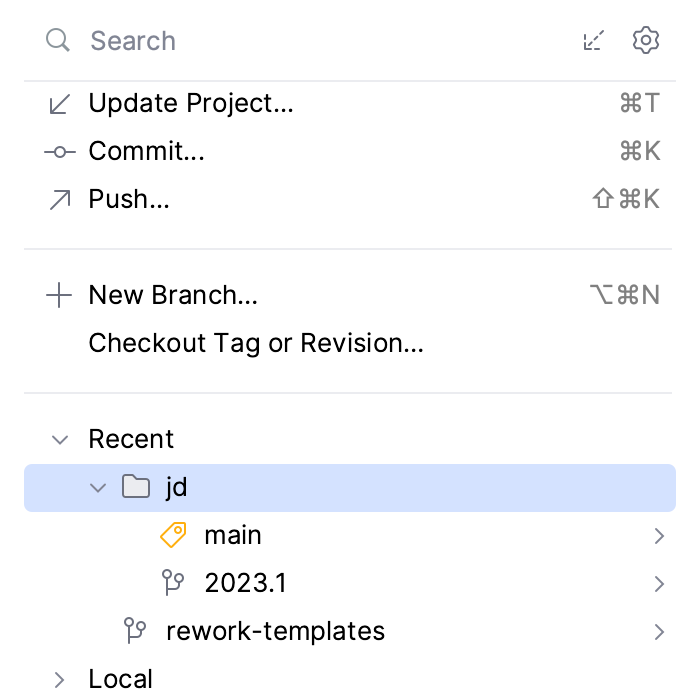
In order for branches to be grouped by directory, prefixes in branches' names should be separated with forward slashes `/`. For example, `jd/2023.1`.
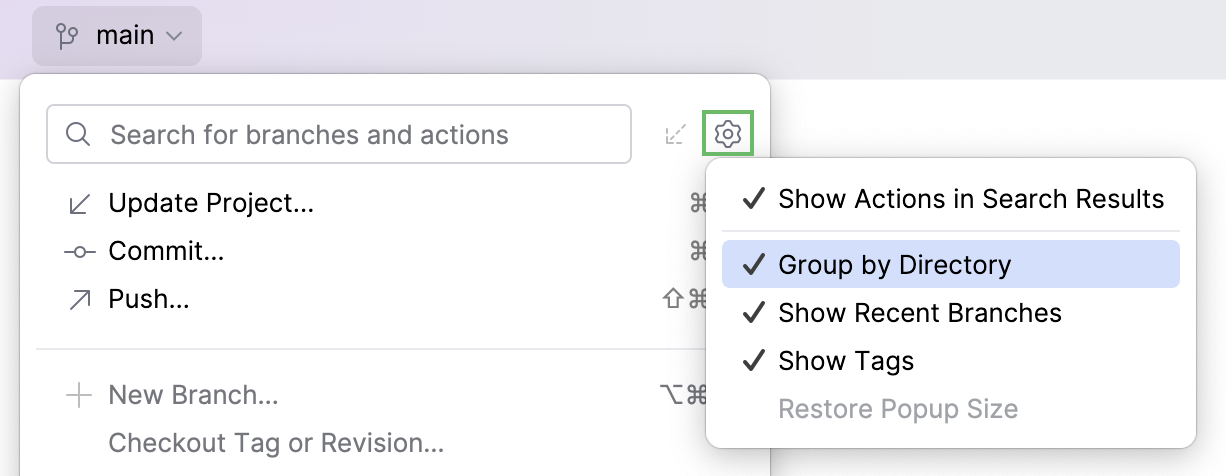
To stop grouping branches by directory or to hide the Recent or Tags nodes, click  Settings in the upper-right corner of the VCS widget and then deselect the Group by Directory, the Show Recent Branches, or the Show Tags options.
## Check out branches (git-checkout)
If you want to work on a branch created by someone else, you need to check it out to create a local copy of that branch.
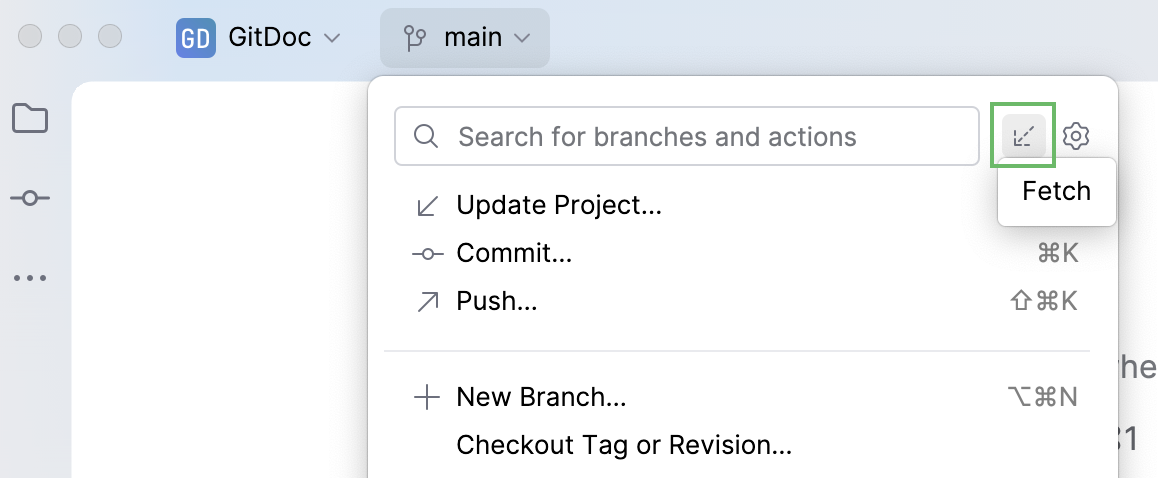
To make sure you have a full list of remote branches, click  in the VCS widget:
Procedure: Check out a branch as a new local branch
1. In the VCS widget or in the Branches pane of the Git tool window, select a branch that you want to check out locally from Remote Branches, or Common Remote Branches if your project has several roots and [synchronous branch control](#synchronous_branch_control) is enabled, or from Repositories | Remote Branches if it is disabled.
2. Choose Checkout from the list of actions.
А new local branch will be created, checked out and set to track the origin remote branch.
It can happen that you already have a local branch with the same name as a remote branch you want to check out. Depending on the situation, here is how you can finish the checkout process:
* If no commits will be lost, and the local branch already tracks the remote, IntelliJ IDEA automatically resets the local branch to the remote branch and then checks it out.
* If the local branch contains commits that can be lost because of the reset, IntelliJ IDEA will offer you to: * Drop Local Commits: IntelliJ IDEA will drop your local commits, reset the local branch, and change tracking. * Rebase onto Remote: IntelliJ IDEA will rebase your local branch onto the remote branch, keep your local commits, reset the local branch, and change tracking.
Procedure: Switch between branches
When multitasking, you often need to jump between branches to commit unrelated changes.
1. In the VCS widget or in the Branches pane of the Git tool window, select the branch that you want to switch to under Local Branches and choose Checkout from the list of available operations.
> **Tip:**
> To automatically sync a branch with its remote version while switching, select Checkout and Update. Learn how the update works from [Update branch](sync-with-a-remote-repository.html#update-git-branch).
For multi-repository projects, branches are automatically grouped by repositories. To check out the necessary branch, in the VCS widget, choose the repository first.
2. What happens next depends on whether there are conflicts between your local changes that you have not committed yet, and the branch that you are going to check out:
* If your working tree is clean (that means you have no uncommitted changes), or your local changes do not conflict with the specified branch, this branch will be checked out (a notification will pop up in the bottom-right corner of the IntelliJ IDEA window).
* If your local changes are going to be overwritten by checkout, IntelliJ IDEA displays a list of files that prevent you from checking out the selected branch, and suggests choosing between Force Checkout and Smart Checkout. If you click Force Checkout, your local uncommitted changes will be overwritten, and you will lose them. If you click Smart Checkout, IntelliJ IDEA will [shelve](shelving-and-unshelving-changes.html#shelve-unshelve-changes) uncommitted changes, check out the selected branch, and then unshelve the changes. If a conflict occurs during the unshelve operation, you will be prompted to merge the changes. For more information, refer to [Resolve conflicts](resolve-conflicts.html). > **Note:** > If you want to clean your working copy using [stash](shelving-and-unshelving-changes.html#stash) instead of shelve, go to the Version Control | Git settings page `Ctrl+Alt+S` (Windows), `⌘ Comma` (macOS), `⌘ Comma` (IntelliJ IDEA Classic (macOS)), `⌘ Comma` (macOS System Shortcuts), `Ctrl+Alt+S` (XWin), `Ctrl+Alt+S` (GNOME), `Ctrl+Alt+S` (KDE), `Ctrl+Alt+S` (Emacs), `Ctrl+Alt+S` (Sublime Text), `⌘ Comma` (Sublime Text (macOS)), `Ctrl+Alt+S` (NetBeans), `Ctrl+Alt+S` (Visual Studio), `⌘ Comma` (Visual Studio (macOS)), `Ctrl+Alt+S` (Eclipse), `⌘ Comma` (Eclipse (macOS)) and choose Stash under the Clean working tree using setting.
> **Tip:**
> IntelliJ IDEA saves your [context](contexts.html) (a set of opened files, the current run configuration, and [breakpoints](using-breakpoints.html)) provided that the Restore workspace on branch switching option is enabled in the Settings dialog `Ctrl+Alt+S` (Windows), `⌘ Comma` (macOS), `⌘ Comma` (IntelliJ IDEA Classic (macOS)), `⌘ Comma` (macOS System Shortcuts), `Ctrl+Alt+S` (XWin), `Ctrl+Alt+S` (GNOME), `Ctrl+Alt+S` (KDE), `Ctrl+Alt+S` (Emacs), `Ctrl+Alt+S` (Sublime Text), `⌘ Comma` (Sublime Text (macOS)), `Ctrl+Alt+S` (NetBeans), `Ctrl+Alt+S` (Visual Studio), `⌘ Comma` (Visual Studio (macOS)), `Ctrl+Alt+S` (Eclipse), `⌘ Comma` (Eclipse (macOS)) under Version Control | Confirmation. When you switch to a branch, IntelliJ IDEA automatically restores your context associated with that branch.
>
>
>
> Note that this behavior currently only works when switching branches via the IDE interface, not the terminal.
## Compare branches
Procedure: Compare a branch with the current branch
If you want to check how a branch has diverged from the current branch, you can compare them.
1. From the VCS widget or from the Branches pane of the Git tool window, select the branch that you want to compare with the current branch, and choose Compare with Current.
A new tab will be added to the Git tool window listing all commits that exist in the selected branch and do not exist in the current branch.
You can click the Swap Branches link to change which branch is considered as a base against which you are comparing the other branch.
2. To see a list of all files that are different in the two branches, press `Ctrl+A` (Windows), `⌘ A` (macOS), `⌘ A` (IntelliJ IDEA Classic (macOS)), `⌘ A` (macOS System Shortcuts), `Ctrl+A` (XWin), `Ctrl+A` (GNOME), `Ctrl+A` (KDE), `Ctrl+X, H` (Emacs), `Ctrl+A` (Sublime Text), `⌘ A` (Sublime Text (macOS)), `Ctrl+A` (NetBeans), `Ctrl+A` (Visual Studio), `⌘ A` (Visual Studio (macOS)), `Ctrl+A` (Eclipse), `⌘ A` (Eclipse (macOS)): the [Changed Files pane](log-tab.html#changedFiles) will list all files that contain differences.
Procedure: Compare a branch with the working tree
Apart from comparing a branch with the current branch, you can compare it against the local state of the current branch. This is useful if you have local uncommitted changes.
* From the VCS widget or from the Branches pane of the Git tool window, select the branch that you want to compare with the local working tree, and choose Show Diff with Working Tree.
The Changes tool window that opens shows a list of all files that are different in the selected branch compared with the branch that is currently checked out:
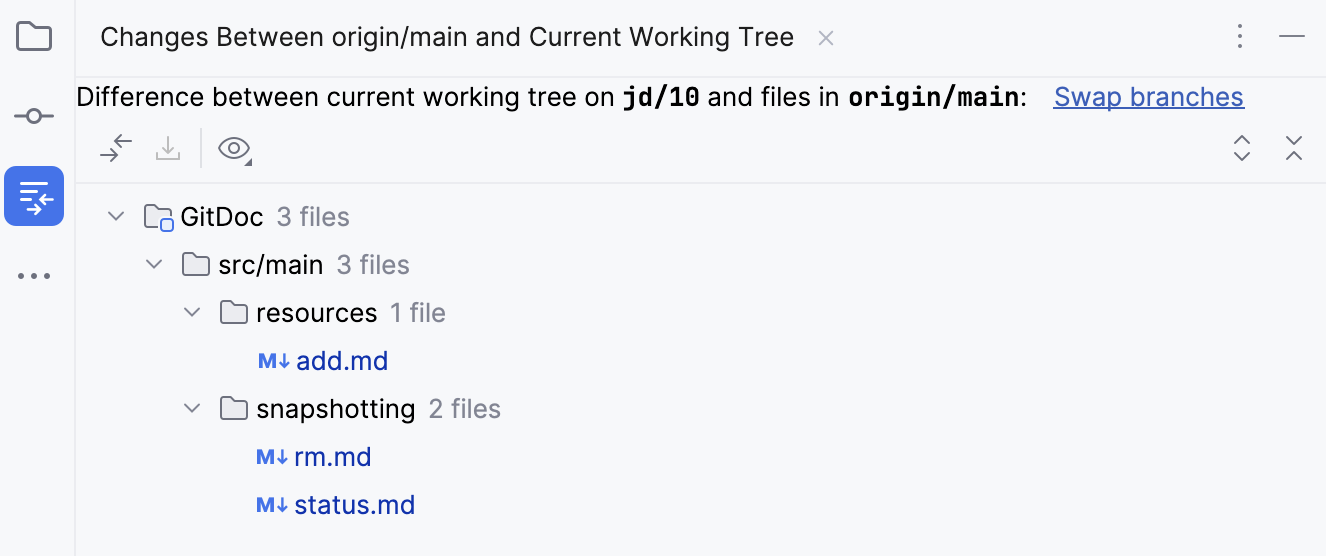
* Files that exist in the selected branch and are missing in the current branch are marked with gray.
* Files that exist in the current branch but are missing in the selected branch are marked with green.
* Files that contain differences between the selected and the current branch are marked with blue.
You can click the Swap Branches link to change which branch is considered as a base against which you are comparing the other branch.
* To review the differences within a specific file, select it and click  on the toolbar, or press `Ctrl+D` (Windows), `⌘ D` (macOS), `⌘ D` (IntelliJ IDEA Classic (macOS)), `⌘ D` (macOS System Shortcuts), `Ctrl+D` (XWin), `Ctrl+D` (GNOME), `Ctrl+D` (KDE), `Ctrl+D` (Emacs), `Ctrl+D` (Sublime Text), `⌘ D` (Sublime Text (macOS)), `Ctrl+D` (NetBeans), `Ctrl+D` (Visual Studio), `⌘ D` (Visual Studio (macOS)), `Ctrl+D` (Eclipse), `⌘ D` (Eclipse (macOS)).
* To apply the entire file contents to the current branch, click . For more information, refer to [Apply separate files](apply-changes-from-one-branch-to-another.html#copy-files-to-branch).
Procedure: List all commits from one branch that are not included in the other branch
You can list all commits from a selected branch that are not included in the other branch by using [two-dot range notation](https://git-scm.com/docs/gitrevisions#Documentation/gitrevisions.txt-Theememtwo-dotRangeNotation).
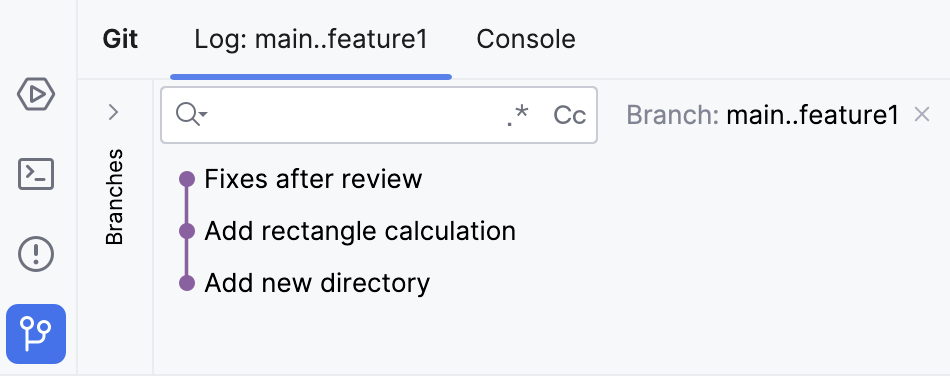
For example, it can be useful when someone works on a feature branch and from time to time merges the main branch into this feature branch. With this filter, you can list only commits in the feature branch and not the main branch.
1. Open the Git tool window `Alt+9` (Windows), `⌘ 9` (macOS), `⌘ 9` (IntelliJ IDEA Classic (macOS)), `⌘ 9` (macOS System Shortcuts), `Alt+9` (XWin), `Alt+9` (GNOME), `Alt+9` (KDE), `Alt+9` (Emacs), `Alt+9` (Sublime Text), `⌘ 9` (Sublime Text (macOS)), `Alt+9` (NetBeans), `Alt+9` (Visual Studio), `⌘ 9` (Visual Studio (macOS)), `Alt+9` (Eclipse), `⌘ 9` (Eclipse (macOS)).
2. In the [Commits pane](log-tab.html#CommitsPane), go to `Branch | Select`.
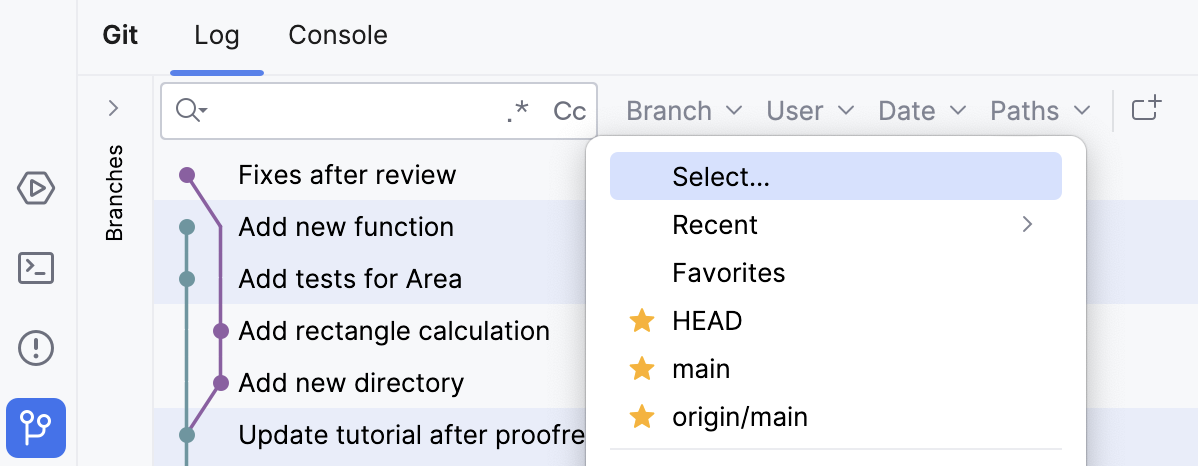
3. Specify the branches that you want to compare as follows: `branch1..branch2` to list all commits from `branch2` that are not included in `branch1`.
4. Press `Ctrl+Enter` (Windows), `⌘ ⏎` (macOS), `⌘ ⏎` (IntelliJ IDEA Classic (macOS)), `⌘ ⏎` (macOS System Shortcuts), `Ctrl+Enter` (XWin), `Ctrl+Enter` (GNOME), `Ctrl+Enter` (KDE), `Ctrl+Enter` (Emacs), `Ctrl+Enter` (Sublime Text), `⌘ ⏎` (Sublime Text (macOS)), `Ctrl+Enter` (NetBeans), `Ctrl+Enter` (Visual Studio), `⌘ ⏎` (Visual Studio (macOS)), `Ctrl+Enter` (Eclipse), `⌘ ⏎` (Eclipse (macOS)).
In this example, the list contains the commits that are in branch `feature1` and are not included in branch `main`:
Watch this video to get a better view on how to compare changes to your branch:
[Video](https://www.youtube.com/v/7Rjl1Cerbl0)
## Delete branches
Procedure:
After you have [integrated the changes](apply-changes-from-one-branch-to-another.html) from a feature branch into the main line of development, you can delete the branch you do not need anymore.
1. Check out a branch that you are going to use for further work.
2. In the VCS widget or from the Branches pane of the Git tool window, right-click the branch you want to delete and choose Delete.
After you have deleted a branch, a notification will be displayed in the bottom-right corner from which you can restore the deleted branch:

If the branch contained commits that have not yet been merged to its upstream branch or to the current branch, it will still be deleted immediately (equivalent to the `git branch --D` or `git branch --delete --force` command), but the notification will also contain a link allowing you to view the unmerged commits.
If the deleted branch was tracking a remote branch, there will also be a link in this notification to remove the remote branch.
> **Note:**
> If you've closed the notification and later decide you want to restore a deleted branch, the link will be available in the [Notifications tool window](notifications.html) until you restart IntelliJ IDEA.
## Configure synchronous branch control
Procedure:
If you have a multi-rooted repository, you can configure IntelliJ IDEA to perform all branch operations (such as checkout, merge, delete, and so on) simultaneously on all roots as if it were a single repository.
1. Press `Ctrl+Alt+S` (Windows), `⌘ Comma` (macOS), `⌘ Comma` (IntelliJ IDEA Classic (macOS)), `⌘ Comma` (macOS System Shortcuts), `Ctrl+Alt+S` (XWin), `Ctrl+Alt+S` (GNOME), `Ctrl+Alt+S` (KDE), `Ctrl+Alt+S` (Emacs), `Ctrl+Alt+S` (Sublime Text), `⌘ Comma` (Sublime Text (macOS)), `Ctrl+Alt+S` (NetBeans), `Ctrl+Alt+S` (Visual Studio), `⌘ Comma` (Visual Studio (macOS)), `Ctrl+Alt+S` (Eclipse), `⌘ Comma` (Eclipse (macOS)) to open settings and then select `Version Control | Git`.
2. Select the Execute branch operations on all roots option (note that this option is only available if your project has multiple roots).
If an operation fails at least in one of the repositories, IntelliJ IDEA prevents branches from diverging by suggesting that you roll back this operation in the repositories where it was successful.
> **Note:**
> If you check out a branch only on one of the roots, IntelliJ IDEA will show the Branches have diverged warning in the VCS widget. It means that the root projects are on different branches.
>
>
>
> In case you want to proceed, either ignore this warning or disable the Execute branch operations on all roots option. If you still want to execute branch operations on all roots simultaneously, check out the branch with the same name in the rest of the repositories manually.