# Source code navigation
You can quickly navigate through your code in the editor using different actions and popups.
* For the details on navigating between the editor and tool windows, as well as working with the editor tabs and breadcrumbs, refer to [Editor basics](using-code-editor.html).
* For the details on navigating recent files, locations, and changes, refer to [Recent files and changes](recent-files-and-changes.html).
* For the details on how to locate a required file, refer to [File navigation](file-navigation.html).
* For the details on how to view and navigate the structure of a file, refer to [File structure](viewing-structure-of-a-source-file.html).
You can start with watching a video tutorial to check what navigation options are available in IntelliJ IDEA.
[Video](https://www.youtube.com/v/1UHsJyCq1SU)
Procedure: Navigate with the caret
* To see the previous caret position, select `Navigate | Back` from the main menu or press `Ctrl+Alt+Left` (Windows), `⌘ [` (macOS), `⌘ ⌥ ←` (IntelliJ IDEA Classic (macOS)), `⌘ [` (macOS System Shortcuts), `Ctrl+Alt+Left` (XWin), `Alt+Shift+Left` (GNOME), `Ctrl+Alt+Left` (KDE), `Ctrl+Alt+Left` (Emacs), `Alt+NumPad -` (Sublime Text), `⌃ NumPad -` (Sublime Text (macOS)), `Alt+Left` (NetBeans), `Ctrl+Minus` (Visual Studio), `⌘ Minus` (Visual Studio (macOS)), `Alt+Left` (Eclipse), `⌘ [` (Eclipse (macOS)). To move forward, select `Navigate | Forward` or press `Ctrl+Alt+Right` (Windows), `⌘ ]` (macOS), `⌘ ⌥ →` (IntelliJ IDEA Classic (macOS)), `⌘ ]` (macOS System Shortcuts), `Ctrl+Alt+Right` (XWin), `Alt+Shift+Right` (GNOME), `Ctrl+Alt+Right` (KDE), `Ctrl+Alt+Right` (Emacs), `Alt+Shift+NumPad -` (Sublime Text), `⌃ ⇧ NumPad -` (Sublime Text (macOS)), `Alt+Right` (NetBeans), `Ctrl+Shift+Minus` (Visual Studio), `⌘ ⇧ Minus` (Visual Studio (macOS)), `Alt+Right` (Eclipse), `⌘ ]` (Eclipse (macOS)).
* To quickly move to the top of the editor, press `Ctrl+Page Up` (Windows), `⌘ Page ↑` (macOS), `⌘ Page ↑` (IntelliJ IDEA Classic (macOS)), `⌘ Page ↑` (macOS System Shortcuts), `Ctrl+Page Up` (XWin), `Ctrl+Page Up` (GNOME), `Ctrl+Page Up` (KDE), `Ctrl+Page Up` (Emacs), `Ctrl+Page Up` (Sublime Text), `⌘ Page ↑` (Sublime Text (macOS)), `Alt+Shift+Home` (NetBeans), `Ctrl+Page Up` (Visual Studio), `⌘ Page ↑` (Visual Studio (macOS)), `Ctrl+Page Up` (Eclipse), `Ctrl+Page Up` (Eclipse (macOS)). To move the caret to the bottom of your editor, press `Ctrl+Page Down` (Windows), `⌘ Page ↓` (macOS), `⌘ Page ↓` (IntelliJ IDEA Classic (macOS)), `⌘ Page ↓` (macOS System Shortcuts), `Ctrl+Page Down` (XWin), `Ctrl+Page Down` (GNOME), `Ctrl+Page Down` (KDE), `Ctrl+Page Down` (Emacs), `Ctrl+Page Down` (Sublime Text), `⌘ Page ↓` (Sublime Text (macOS)), `Alt+Shift+End` (NetBeans), `Ctrl+Page Down` (Visual Studio), `⌘ Page ↓` (Visual Studio (macOS)), `Ctrl+Page Down` (Eclipse), `Ctrl+Page Down` (Eclipse (macOS)).
* To navigate to the last edited location, press `Ctrl+Shift+Backspace` (Windows), `⌘ ⇧ ⌫` (macOS), `⌘ ⇧ ⌫` (IntelliJ IDEA Classic (macOS)), `⌘ ⇧ ⌫` (macOS System Shortcuts), `Ctrl+Shift+Backspace` (XWin), `Ctrl+Shift+Backspace` (GNOME), `Ctrl+Shift+Backspace` (KDE), `Ctrl+Shift+Backspace` (Emacs), `Ctrl+Shift+Backspace` (Sublime Text), `⌘ ⇧ ⌫` (Sublime Text (macOS)), `Ctrl+Shift+Backspace` (NetBeans), `Ctrl+Shift+Backspace` (Visual Studio), `⌘ ⇧ ⌫` (Visual Studio (macOS)), `Ctrl+Q` (Eclipse), `⌃ Q` (Eclipse (macOS)).
* To find the current caret location in the editor, press `Ctrl+M`. This action might be helpful if you do not want to scroll through a large file.
Alternatively, you can press `Up` (Windows), `↑` (macOS), `↑` (IntelliJ IDEA Classic (macOS)), `↑` (macOS System Shortcuts), `Up` (XWin), `Up` (GNOME), `Up` (KDE), `Up` (Emacs), `Up` (Sublime Text), `↑` (Sublime Text (macOS)), `Up` (NetBeans), `Up` (Visual Studio), `↑` (Visual Studio (macOS)), `Up` (Eclipse), `↑` (Eclipse (macOS)) and `Down` (Windows), `↓` (macOS), `↓` (IntelliJ IDEA Classic (macOS)), `↓` (macOS System Shortcuts), `Down` (XWin), `Down` (GNOME), `Down` (KDE), `Down` (Emacs), `Down` (Sublime Text), `↓` (Sublime Text (macOS)), `Down` (NetBeans), `Down` (Visual Studio), `↓` (Visual Studio (macOS)), `Down` (Eclipse), `↓` (Eclipse (macOS)) arrow keys to achieve the same result.
* To highlight a word at the caret you are trying to locate, select `Edit | Find | Next Occurrence of the Word at Caret` from the main menu. If you are using Windows, you can also press `Ctrl+F3`.
* To see on what element the caret is currently positioned, press `Alt+Q` (Windows), `⌃ ⇧ Q` (macOS), `⌃ ⇧ Q` (IntelliJ IDEA Classic (macOS)), `⌃ ⇧ Q` (macOS System Shortcuts), `Alt+Q` (XWin), `Alt+Q` (GNOME), `Alt+Q` (KDE), `Alt+Q` (Emacs), `Alt+Q` (Sublime Text), `Alt+Q` (Sublime Text (macOS)), `Alt+Q` (NetBeans), `Alt+Q` (Visual Studio), `⌃ ⇧ Q` (Visual Studio (macOS)), `Alt+Q` (Eclipse), `⌃ ⇧ Q` (Eclipse (macOS)).
* To move caret between matching code block braces, press `Ctrl+Shift+M` (Windows), `⌃ M` (macOS), `⌘ ⇧ M` (IntelliJ IDEA Classic (macOS)), `⌃ M` (macOS System Shortcuts), `Ctrl+Shift+M` (XWin), `Ctrl+Shift+M` (GNOME), `Ctrl+Shift+M` (KDE), `Ctrl+Shift+M` (Emacs), `Ctrl+M` (Sublime Text), `⌃ M` (Sublime Text (macOS)), `Ctrl+Shift+M` (NetBeans), `Ctrl+]` (Visual Studio), `⌘ ]` (Visual Studio (macOS)), `Ctrl+Shift+P` (Eclipse), `⌃ M` (Eclipse (macOS)).
* To navigate between code blocks, press `Ctrl+[` (Windows), `⌘ ⌥ [` (macOS), `⌘ [` (IntelliJ IDEA Classic (macOS)), `⌘ ⌥ [` (macOS System Shortcuts), `Ctrl+[` (XWin), `Ctrl+[` (GNOME), `Ctrl+[` (KDE), `Ctrl+[` (Emacs), `Ctrl+[` (Sublime Text), `Ctrl+[` (Sublime Text (macOS)), `Ctrl+[` (NetBeans), `Alt+Shift+[` (Visual Studio), `⌘ ⌥ [` (Visual Studio (macOS)), `Ctrl+[` (Eclipse), `⌘ ⌥ [` (Eclipse (macOS)) or `Ctrl+]` (Windows), `⌘ ⌥ ]` (macOS), `⌘ ]` (IntelliJ IDEA Classic (macOS)), `⌘ ⌥ ]` (macOS System Shortcuts), `Ctrl+]` (XWin), `Ctrl+]` (GNOME), `Ctrl+]` (KDE), `Ctrl+]` (Emacs), `Ctrl+]` (Sublime Text), `Ctrl+]` (Sublime Text (macOS)), `Ctrl+]` (NetBeans), `Ctrl+]` (Visual Studio), `⌘ ⌥ ]` (Visual Studio (macOS)), `Ctrl+]` (Eclipse), `⌃ ]` (Eclipse (macOS)).
Procedure: Move the caret
You can use different actions to move the caret through code. You can also configure where the caret should stop when moved by words and on line breaks.
* To move the caret to the next word or the previous word, press `Ctrl+Right` (Windows), `⌥ →` (macOS), `⌥ →` (IntelliJ IDEA Classic (macOS)), `⌥ →` (macOS System Shortcuts), `Ctrl+Right` (XWin), `Ctrl+Right` (GNOME), `Ctrl+Right` (KDE), `Ctrl+Right` (Emacs), `Ctrl+Right` (Sublime Text), `⌥ →` (Sublime Text (macOS)), `Ctrl+Right` (NetBeans), `Ctrl+Right` (Visual Studio), `⌥ →` (Visual Studio (macOS)), `Ctrl+Right` (Eclipse), `⌥ →` (Eclipse (macOS)) or `Ctrl+Left` (Windows), `⌥ ←` (macOS), `⌥ ←` (IntelliJ IDEA Classic (macOS)), `⌥ ←` (macOS System Shortcuts), `Ctrl+Left` (XWin), `Ctrl+Left` (GNOME), `Ctrl+Left` (KDE), `Ctrl+Left` (Emacs), `Ctrl+Left` (Sublime Text), `⌥ ←` (Sublime Text (macOS)), `Ctrl+Left` (NetBeans), `Ctrl+Left` (Visual Studio), `⌥ ←` (Visual Studio (macOS)), `Ctrl+Left` (Eclipse), `⌥ ←` (Eclipse (macOS)).
By default, IntelliJ IDEA moves the caret to the end of the current word. When you move the caret to the previous word, it is placed at the beginning of the current word.
You can customize the caret position for these actions. In the Settings dialog (`Ctrl+Alt+S` (Windows), `⌘ Comma` (macOS), `⌘ Comma` (IntelliJ IDEA Classic (macOS)), `⌘ Comma` (macOS System Shortcuts), `Ctrl+Alt+S` (XWin), `Ctrl+Alt+S` (GNOME), `Ctrl+Alt+S` (KDE), `Ctrl+Alt+S` (Emacs), `Ctrl+Alt+S` (Sublime Text), `⌘ Comma` (Sublime Text (macOS)), `Ctrl+Alt+S` (NetBeans), `Ctrl+Alt+S` (Visual Studio), `⌘ Comma` (Visual Studio (macOS)), `Ctrl+Alt+S` (Eclipse), `⌘ Comma` (Eclipse (macOS))), go to `Editor | General`. In the [Caret Movement](settings-editor-general.html#move_caret) section, use the When moving by words and Upon line break options to configure the caret's behavior.
* To move the caret forward to the next paragraph or backward to the previous one, press `Ctrl+Shift+A` (Windows), `⌘ ⇧ A` (macOS), `⌘ ⇧ A` (IntelliJ IDEA Classic (macOS)), `⌘ ⇧ P` (macOS System Shortcuts), `Ctrl+Shift+A` (XWin), `Ctrl+Shift+A` (GNOME), `Ctrl+Shift+A` (KDE), `Escape, X` (Emacs), `Ctrl+Shift+P` (Sublime Text), `⌘ ⇧ P` (Sublime Text (macOS)), `Ctrl+I` (NetBeans), `Ctrl+Shift+A` (Visual Studio), `⌘ ⇧ A` (Visual Studio (macOS)), `Ctrl+Shift+A` (Eclipse), `⌘ 3` (Eclipse (macOS)) and search for the Move Caret Forward a Paragraph or Move Caret Backward a Paragraph action.
You can also select a text and then move the caret forward or backward to a paragraph. Press `Ctrl+Shift+A` (Windows), `⌘ ⇧ A` (macOS), `⌘ ⇧ A` (IntelliJ IDEA Classic (macOS)), `⌘ ⇧ P` (macOS System Shortcuts), `Ctrl+Shift+A` (XWin), `Ctrl+Shift+A` (GNOME), `Ctrl+Shift+A` (KDE), `Escape, X` (Emacs), `Ctrl+Shift+P` (Sublime Text), `⌘ ⇧ P` (Sublime Text (macOS)), `Ctrl+I` (NetBeans), `Ctrl+Shift+A` (Visual Studio), `⌘ ⇧ A` (Visual Studio (macOS)), `Ctrl+Shift+A` (Eclipse), `⌘ 3` (Eclipse (macOS)) and search for the Move Caret Forward a Paragraph with Selection or Move Caret Backward a Paragraph with Selection action.
> **Tip:**
> You can assign shortcuts to these actions. For more information, refer to [Configure keyboard shortcuts](configuring-keyboard-and-mouse-shortcuts.html).
Procedure: Find a line or column
1. In the editor, press `Ctrl+G` (Windows), `⌘ L` (macOS), `⌘ G` (IntelliJ IDEA Classic (macOS)), `⌘ L` (macOS System Shortcuts), `Ctrl+G` (XWin), `Ctrl+G` (GNOME), `Ctrl+G` (KDE), `Alt+G` (Emacs), `Ctrl+G` (Sublime Text), `⌃ G` (Sublime Text (macOS)), `Ctrl+G` (NetBeans), `Ctrl+G` (Visual Studio), `⌘ G` (Visual Studio (macOS)), `Ctrl+L` (Eclipse), `⌘ L` (Eclipse (macOS)).
2. In the Go to Line/Column dialog, specify a line or column number, or both, separating them with : and click OK.
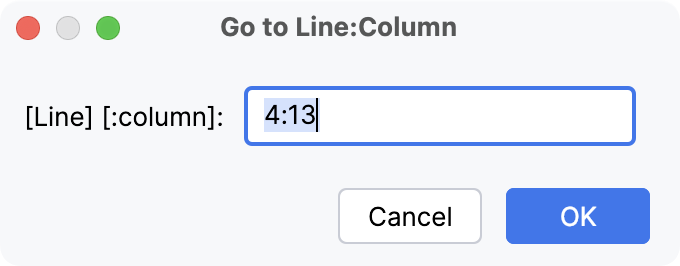
3. If you do not want to see the line numbers in the editor, in the Settings dialog (`Ctrl+Alt+S` (Windows), `⌘ Comma` (macOS), `⌘ Comma` (IntelliJ IDEA Classic (macOS)), `⌘ Comma` (macOS System Shortcuts), `Ctrl+Alt+S` (XWin), `Ctrl+Alt+S` (GNOME), `Ctrl+Alt+S` (KDE), `Ctrl+Alt+S` (Emacs), `Ctrl+Alt+S` (Sublime Text), `⌘ Comma` (Sublime Text (macOS)), `Ctrl+Alt+S` (NetBeans), `Ctrl+Alt+S` (Visual Studio), `⌘ Comma` (Visual Studio (macOS)), `Ctrl+Alt+S` (Eclipse), `⌘ Comma` (Eclipse (macOS))), go to `Editor | General | Appearance` and clear the Show line numbers checkbox.
> **Tip:**
> For quicker access, [assign a shortcut](settings-keymap.html) to the Show line numbers action.
## Navigate between code elements
Procedure: Go to declaration and its type
You can navigate to the initial declaration of a symbol and the symbol's type from its usage.
* Place the caret at the necessary symbol and press `Ctrl+B` (Windows), `⌘ B` (macOS), `⌘ B` (IntelliJ IDEA Classic (macOS)), `⌘ B` (macOS System Shortcuts), `Ctrl+B` (XWin), `Ctrl+B` (GNOME), `Ctrl+B` (KDE), `Ctrl+Alt+G` (Emacs), `F12` (Sublime Text), `F12` (Sublime Text (macOS)), `Ctrl+B` (NetBeans), `F12` (Visual Studio), `F12` (Visual Studio (macOS)), `F3` (Eclipse), `F3` (Eclipse (macOS)).
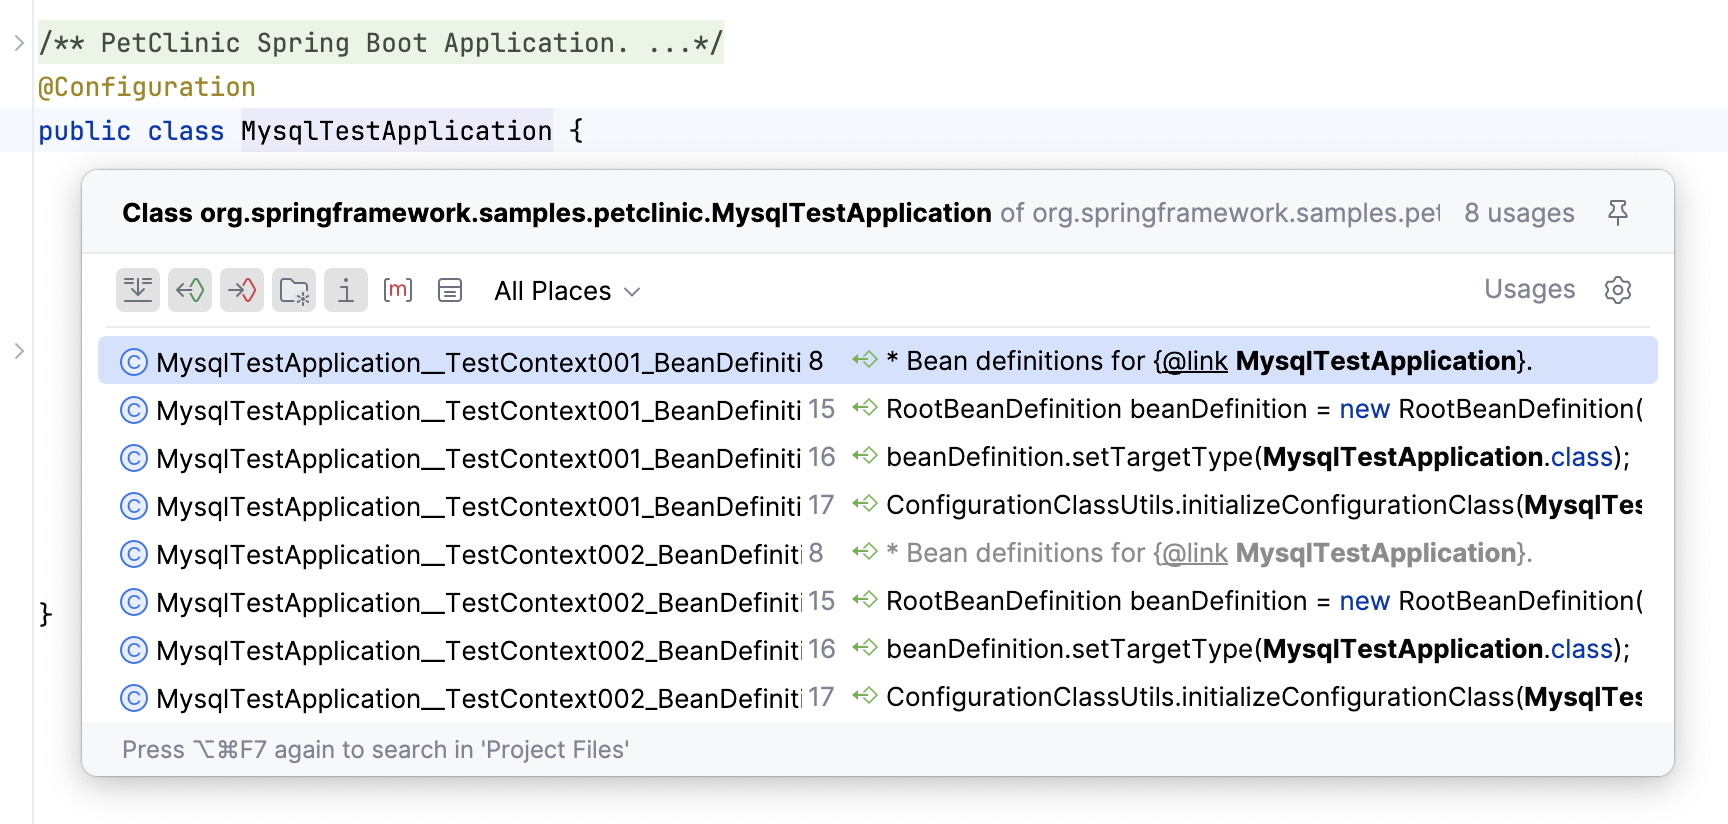
* For a type declaration, press `Ctrl+Shift+B` (Windows), `⌘ ⇧ B` (macOS), `⌃ ⇧ B` (IntelliJ IDEA Classic (macOS)), `⌘ ⇧ B` (macOS System Shortcuts), `Ctrl+Shift+B` (XWin), `Ctrl+Shift+B` (GNOME), `Ctrl+Shift+B` (KDE), `Ctrl+Shift+B` (Emacs), `Ctrl+Shift+B` (Sublime Text), `Ctrl+Shift+B` (Sublime Text (macOS)), `Ctrl+Shift+B` (NetBeans), `Ctrl+Shift+F11` (Visual Studio), `⌘ ⇧ F11` (Visual Studio (macOS)), `Ctrl+Shift+B` (Eclipse), `Ctrl+Shift+B` (Eclipse (macOS)).
Procedure: Go to implementation
You can keep track of class implementations and overriding methods using the gutter icons in the editor, or by pressing the appropriate shortcuts, or by clicking Inheritors inlay hints.
* Click one of the  /  ,  / gutter icons located in the editor and select an ascendant or descendant class from the list.
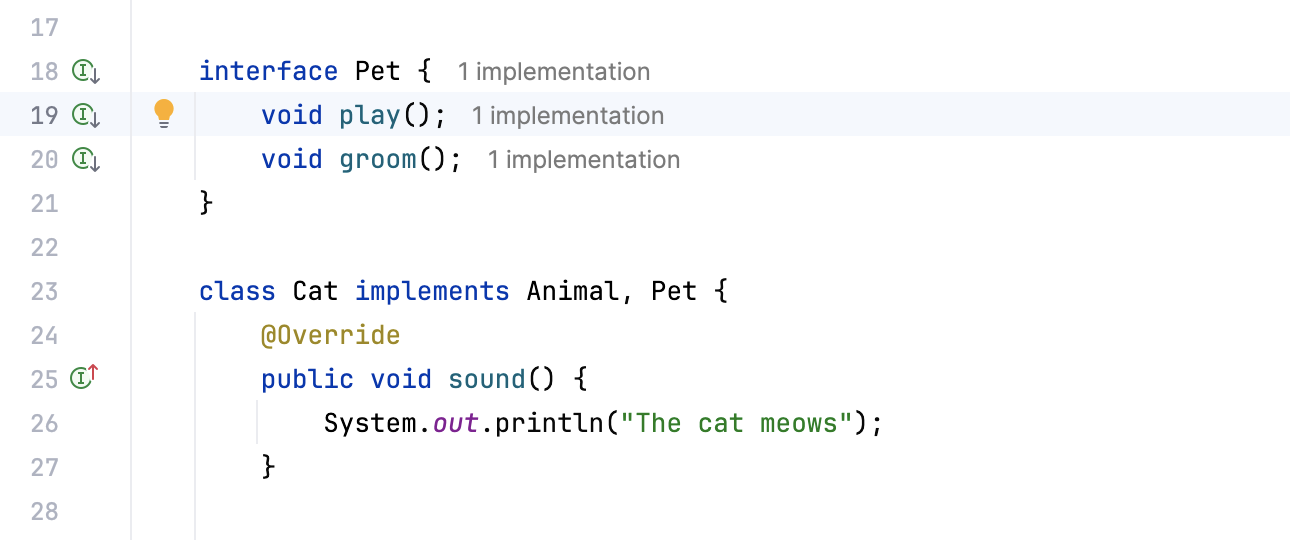
* To navigate to the super method, press `Ctrl+U` (Windows), `⌘ U` (macOS), `⌘ U` (IntelliJ IDEA Classic (macOS)), `⌘ U` (macOS System Shortcuts), `Ctrl+U` (XWin), `Ctrl+U` (GNOME), `Ctrl+U` (KDE), `Ctrl+U` (Emacs), `Ctrl+U` (Sublime Text), `⌘ U` (Sublime Text (macOS)), `Ctrl+Shift+P` (NetBeans), `Alt+Home` (Visual Studio), `⌃ ⌥ ←` (Visual Studio (macOS)), `Ctrl+U` (Eclipse), `Ctrl+U` (Eclipse (macOS)).
* To navigate to the implementation, press `Ctrl+Alt+B` (Windows), `⌘ ⌥ B` (macOS), `⌘ ⌥ B` (IntelliJ IDEA Classic (macOS)), `⌘ ⌥ B` (macOS System Shortcuts), `Ctrl+Alt+B` (XWin), `Ctrl+Alt+B` (GNOME), `Ctrl+Alt+B` (KDE), `Ctrl+Alt+B` (Emacs), `Ctrl+Alt+B` (Sublime Text), `⌘ ⌥ B` (Sublime Text (macOS)), `Ctrl+Alt+B` (NetBeans), `Alt+End` (Visual Studio), `⌘ ⌥ Click` (Visual Studio (macOS)), `Ctrl+T` (Eclipse), `Ctrl+Alt+B` (Eclipse (macOS)).
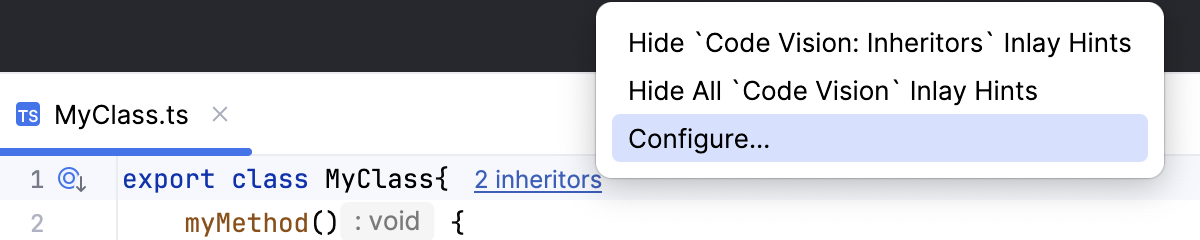
* Use Inheritors hints that are displayed next to a class or an interface and show the number of its descendants. Click the hint to jump to the descendant. If there are several implementations, select the relevant one from the list.
Inheritors inlay hints are enabled by default. To turn them off, hover over a hint and select Hide 'Code Vision: Inheritors' Inlay Hints or Hide All 'Code Vision' Inlay Hints from the context menu.
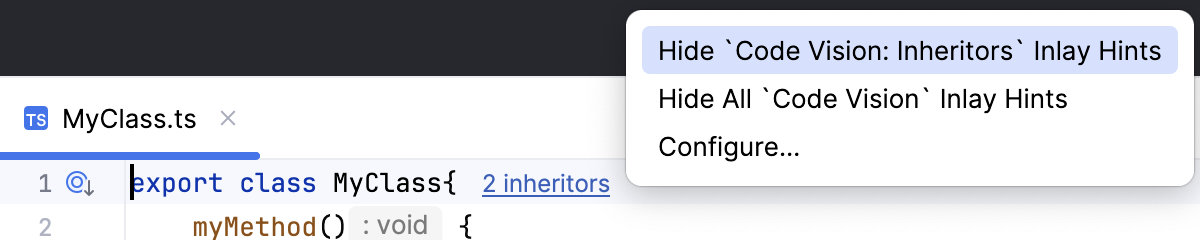
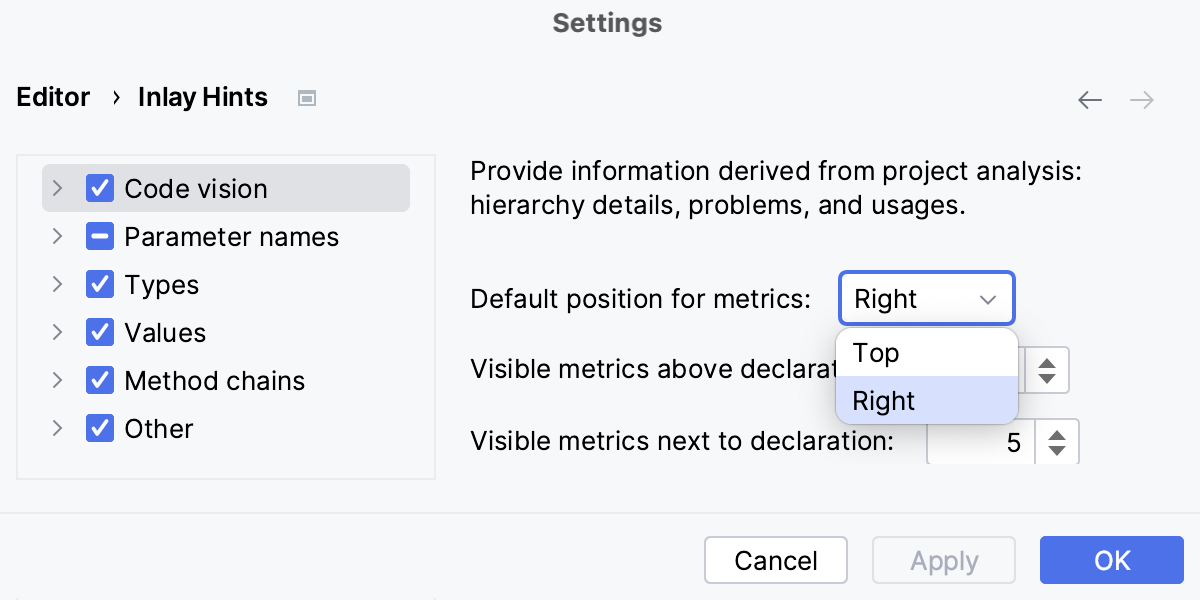
By default, Inheritors hints are shown above classes and interfaces. To change this position, click Configure from the context menu of a hint.
On the Inlay Hints page, that opens, select the appropriate setting from the Position list. Alternatively, select the Code vision node and change the Default position for metrics.
Procedure: Navigate between errors or warnings
* To jump to the next or previous found issue in your code, press `F2` (Windows), `F2` (macOS), `F2` (IntelliJ IDEA Classic (macOS)), `⌃ Comma` (macOS System Shortcuts), `F2` (XWin), `F2` (GNOME), `F2` (KDE), `F2` (Emacs), `F2` (Sublime Text), `F2` (Sublime Text (macOS)), `F2` (NetBeans), `Alt+Page Down` (Visual Studio), `⌥ Page ↓` (Visual Studio (macOS)), `F2` (Eclipse), `⌘ .` (Eclipse (macOS)) or `Shift+F2` (Windows), `⇧ F2` (macOS), `⇧ F2` (IntelliJ IDEA Classic (macOS)), `⌃ ⇧ Comma` (macOS System Shortcuts), `Shift+F2` (XWin), `Shift+F2` (GNOME), `Shift+F2` (KDE), `Shift+F2` (Emacs), `Shift+F2` (Sublime Text), `Shift+F2` (Sublime Text (macOS)), `Shift+F2` (NetBeans), `Alt+Page Up` (Visual Studio), `⌥ Page ↑` (Visual Studio (macOS)), `Shift+F1` (Eclipse), `⌘ ⇧ .` (Eclipse (macOS)) respectively. Alternatively, go to `Navigate | Next / Previous Highlighted Error` in the main menu.
IntelliJ IDEA places the caret immediately before the code issue.
* Configure the way IntelliJ IDEA navigates between code issues: it can either jump between all code issues or skip minor issues and only navigate between detected errors. Right-click the code analysis marker in the scroll bar area and choose one of the available navigation modes from the context menu:
* To have IntelliJ IDEA skip warnings, infos, and other minor issues, choose Problems with Highest Priority.
* To have IntelliJ IDEA jump between all detected code issues, choose All Problems.
Procedure: Show siblings
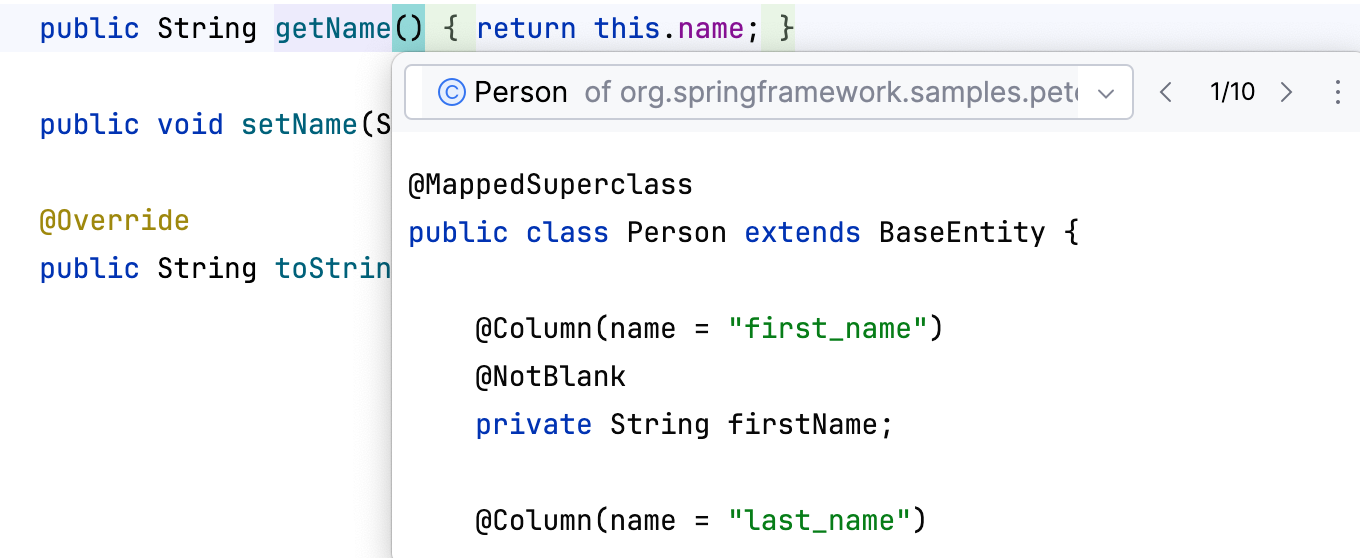
You can view the implementations of methods in the neighboring classes in a separate popup.
1. In the editor, place the caret at the method's name.
2. In the main menu, go to `View | Show Siblings`.
IntelliJ IDEA opens a popup where you can browse through the implementations, navigate to source, edit code, and open the list in the Find tool window.
Procedure: Browse through methods
* Press `Alt+Down` (Windows), `⌃ ⇧ ↓` (macOS), `⌃ ↓` (IntelliJ IDEA Classic (macOS)), `⌃ ⌥ ↓` (macOS System Shortcuts), `Alt+Down` (XWin), `Alt+Down` (GNOME), `Alt+Down` (KDE), `Alt+Down` (Emacs), `Alt+Down` (Sublime Text), `Alt+Down` (Sublime Text (macOS)), `Ctrl+Alt+Down` (NetBeans), `Alt+Down` (Visual Studio), `⌃ ⇧ ↓` (Visual Studio (macOS)), `Ctrl+Shift+Down` (Eclipse), `⌃ ⌥ ↓` (Eclipse (macOS)) or `Alt+Up` (Windows), `⌃ ⇧ ↑` (macOS), `⌃ ↑` (IntelliJ IDEA Classic (macOS)), `⌃ ⌥ ↑` (macOS System Shortcuts), `Alt+Up` (XWin), `Alt+Up` (GNOME), `Alt+Up` (KDE), `Alt+Up` (Emacs), `Alt+Up` (Sublime Text), `Alt+Up` (Sublime Text (macOS)), `Ctrl+Alt+Up` (NetBeans), `Alt+Up` (Visual Studio), `⌃ ⇧ ↑` (Visual Studio (macOS)), `Ctrl+Shift+Up` (Eclipse), `⌃ ⌥ ↑` (Eclipse (macOS)).
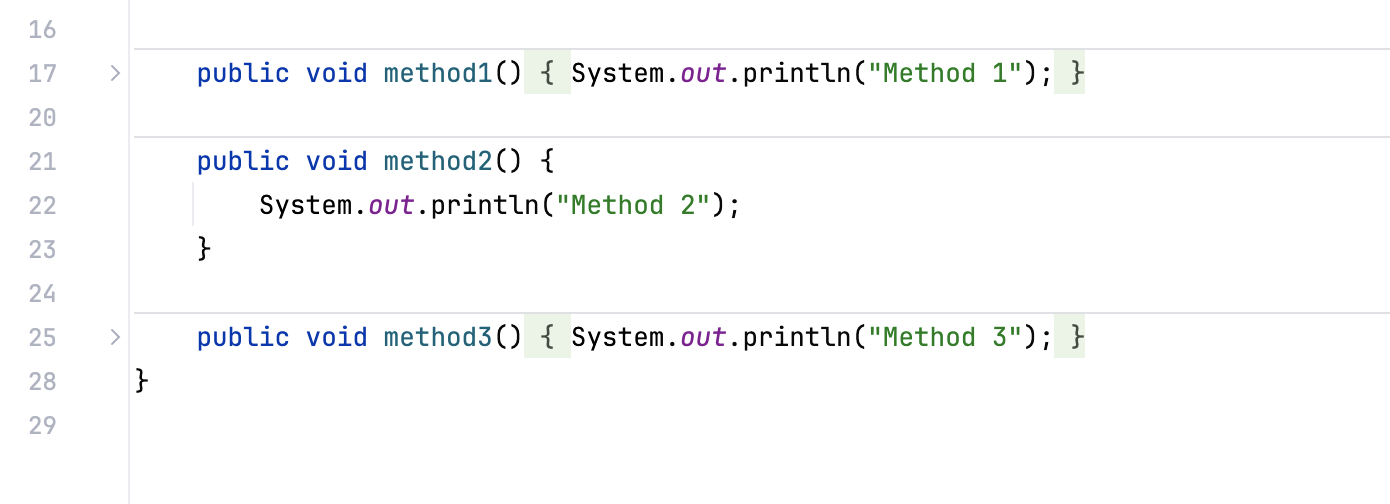
* To visually separate methods in code, in the Settings dialog (`Ctrl+Alt+S` (Windows), `⌘ Comma` (macOS), `⌘ Comma` (IntelliJ IDEA Classic (macOS)), `⌘ Comma` (macOS System Shortcuts), `Ctrl+Alt+S` (XWin), `Ctrl+Alt+S` (GNOME), `Ctrl+Alt+S` (KDE), `Ctrl+Alt+S` (Emacs), `Ctrl+Alt+S` (Sublime Text), `⌘ Comma` (Sublime Text (macOS)), `Ctrl+Alt+S` (NetBeans), `Ctrl+Alt+S` (Visual Studio), `⌘ Comma` (Visual Studio (macOS)), `Ctrl+Alt+S` (Eclipse), `⌘ Comma` (Eclipse (macOS))), go to `Editor | General | Appearance` and select the Show method separators option.
* To open the Structure tool window, press `Alt+7` (Windows), `⌘ 7` (macOS), `⌘ 7` (IntelliJ IDEA Classic (macOS)), `⌘ 7` (macOS System Shortcuts), `Alt+7` (XWin), `Alt+7` (GNOME), `Alt+7` (KDE), `Alt+7` (Emacs), `Alt+7` (Sublime Text), `⌘ 7` (Sublime Text (macOS)), `Ctrl+7` (NetBeans), `Ctrl+Alt+F` (Visual Studio), `⌃ ⌥ F` (Visual Studio (macOS)), `Alt+7` (Eclipse), `⌘ 7` (Eclipse (macOS)).
## Navigation in SQL code and files
> **Note:**
> This functionality relies on the [Database Tools and SQL](https://plugins.jetbrains.com/plugin/10925-database-tools-and-sql-for-webstorm--rustrover) plugin, which you need to install and enable. For more information, refer to [Open plugin settings](managing-plugins.html#open-plugin-settings).
Procedure: Go from a reference to an object in the Database tool window
* To go to the definition of a column, table or any other object, select the object name in your code and press `Alt+Shift+B` (Windows), `Alt+Shift+B` (macOS), `Alt+Shift+B` (IntelliJ IDEA Classic (macOS)), `Alt+Shift+B` (macOS System Shortcuts), `Alt+Shift+B` (XWin), `Alt+Shift+B` (GNOME), `Alt+Shift+B` (KDE), `Alt+Shift+B` (Emacs), `Alt+Shift+B` (Sublime Text), `Alt+Shift+B` (Sublime Text (macOS)), `Alt+Shift+B` (NetBeans), `Alt+Shift+B` (Visual Studio), `Alt+Shift+B` (Visual Studio (macOS)), `Alt+Shift+B` (Eclipse), `Alt+Shift+B` (Eclipse (macOS)).
[Video](https://resources.jetbrains.com/help/img/idea/2026.2/highlight_object_in_the_db_tool_window.mp4)
Procedure: Open a DDL definition of an object
In IntelliJ IDEA, you can open and [edit the source code of a database object](modifying-source-code-of-database-objects.html#edit_source_code_of_an_object) directly in the editor. The source code can be opened from the editor or Database tool window .
* In the editor, click an object and select `Go To | Declaration or Usages`. Alternatively, press `Ctrl+B` (Windows), `⌘ B` (macOS), `⌘ B` (IntelliJ IDEA Classic (macOS)), `⌘ B` (macOS System Shortcuts), `Ctrl+B` (XWin), `Ctrl+B` (GNOME), `Ctrl+B` (KDE), `Ctrl+Alt+G` (Emacs), `F12` (Sublime Text), `F12` (Sublime Text (macOS)), `Ctrl+B` (NetBeans), `F12` (Visual Studio), `F12` (Visual Studio (macOS)), `F3` (Eclipse), `F3` (Eclipse (macOS)).
[Video](https://resources.jetbrains.com/help/img/idea/2026.2/db_goto_declaration.mp4)
* In the Database tool window , do one of the following:
1. Click the DDL button on the toolbar.
2. Click an object and select `Navigation | Go to DDL`.
3. Press `Ctrl+B` (Windows), `⌘ B` (macOS), `⌘ B` (IntelliJ IDEA Classic (macOS)), `⌘ B` (macOS System Shortcuts), `Ctrl+B` (XWin), `Ctrl+B` (GNOME), `Ctrl+B` (KDE), `Ctrl+Alt+G` (Emacs), `F12` (Sublime Text), `F12` (Sublime Text (macOS)), `Ctrl+B` (NetBeans), `F12` (Visual Studio), `F12` (Visual Studio (macOS)), `F3` (Eclipse), `F3` (Eclipse (macOS)).
[Video](https://resources.jetbrains.com/help/img/idea/2026.2/view_ddl_definition_of_db_object.mp4)
Procedure: Switch between files using the switcher
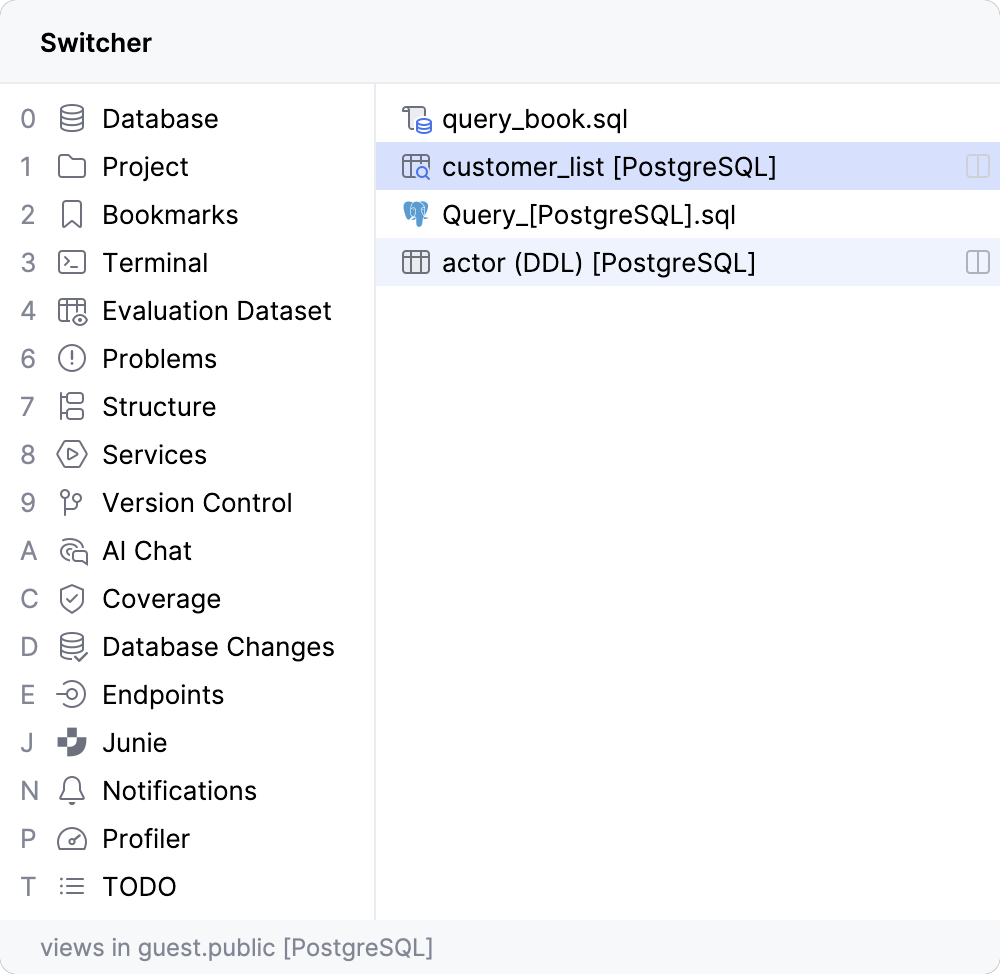
* With the switcher, you can switch between open files, query consoles, and tool windows.
To open the Switcher window, press `Ctrl+Tab` (Windows), `⌃ ⇥` (macOS), `⌃ ⇥` (IntelliJ IDEA Classic (macOS)), `⌃ ⇥` (macOS System Shortcuts), `Ctrl+Tab` (XWin), `Ctrl+Tab` (GNOME), `Ctrl+Tab` (KDE), `Ctrl+X, B` (Emacs), `Ctrl+Tab` (Sublime Text), `⌃ ⇥` (Sublime Text (macOS)), `Ctrl+Tab` (NetBeans), `Ctrl+Tab` (Visual Studio), `⌃ ⇥` (Visual Studio (macOS)), `Ctrl+Tab` (Eclipse), `⌃ ⇥` (Eclipse (macOS)). Do not release the `Ctrl` key. Use arrow keys to move in the Switcher window. When you release the `Ctrl` (Windows), `Ctrl` (macOS), `Ctrl` (IntelliJ IDEA Classic (macOS)), `Ctrl` (macOS System Shortcuts), `Ctrl` (XWin), `Ctrl` (GNOME), `Ctrl` (KDE), `Ctrl` (Emacs), `Ctrl` (Sublime Text), `Ctrl` (Sublime Text (macOS)), `Ctrl` (NetBeans), `Ctrl` (Visual Studio), `Ctrl` (Visual Studio (macOS)), `Ctrl` (Eclipse), `Ctrl` (Eclipse (macOS)) key, the selected item becomes active, and the switcher closes.
> **Tip:**
> Also, you can use `Ctrl+Tab` (Windows), `⌃ ⇥` (macOS), `⌃ ⇥` (IntelliJ IDEA Classic (macOS)), `⌃ ⇥` (macOS System Shortcuts), `Ctrl+Tab` (XWin), `Ctrl+Tab` (GNOME), `Ctrl+Tab` (KDE), `Ctrl+X, B` (Emacs), `Ctrl+Tab` (Sublime Text), `⌃ ⇥` (Sublime Text (macOS)), `Ctrl+Tab` (NetBeans), `Ctrl+Tab` (Visual Studio), `⌃ ⇥` (Visual Studio (macOS)), `Ctrl+Tab` (Eclipse), `⌃ ⇥` (Eclipse (macOS)) to go down the list, and `Ctrl+Tab` (Windows), `⌃ ⇥` (macOS), `⌃ ⇥` (IntelliJ IDEA Classic (macOS)), `⌃ ⇥` (macOS System Shortcuts), `Ctrl+Tab` (XWin), `Ctrl+Tab` (GNOME), `Ctrl+Tab` (KDE), `Ctrl+X, B` (Emacs), `Ctrl+Tab` (Sublime Text), `⌃ ⇥` (Sublime Text (macOS)), `Ctrl+Tab` (NetBeans), `Ctrl+Tab` (Visual Studio), `⌃ ⇥` (Visual Studio (macOS)), `Ctrl+Tab` (Eclipse), `⌃ ⇥` (Eclipse (macOS)) with the additional `Shift` (Windows), `Shift` (macOS), `Shift` (IntelliJ IDEA Classic (macOS)), `Shift` (macOS System Shortcuts), `Shift` (XWin), `Shift` (GNOME), `Shift` (KDE), `Shift` (Emacs), `Shift` (Sublime Text), `Shift` (Sublime Text (macOS)), `Shift` (NetBeans), `Shift` (Visual Studio), `Shift` (Visual Studio (macOS)), `Shift` (Eclipse), `Shift` (Eclipse (macOS)) to go up the list.
> **Note:**
> On macOS, a combination of `Ctrl` and arrow keys are shortcuts that are used for the Mission control functionality. To use the switcher, change the shortcuts in the macOS system settings.
## See also