# Create a new project
> **Note:**
> This section describes the functionality available out of the box. If you are using a framework plugin, refer to the corresponding documentation section.
## New project without frameworks
This is a general-purpose project without specific frameworks. You will be able to add the necessary frameworks and technologies later at any time.
Procedure:
1. Launch IntelliJ IDEA.
If the Welcome screen opens, click New Project. Otherwise, go to `File | New | Project` in the main menu.
2. From the list on the left, select the language that you want to use in your application.
If you want to use a language that is not available in IntelliJ IDEA out of the box (for example, Python or PHP), click More via plugins and select the necessary option.
The IDE will open a dialog in which you can select and install the necessary language plugin. After that, you can close the dialog and keep configuring the new project.
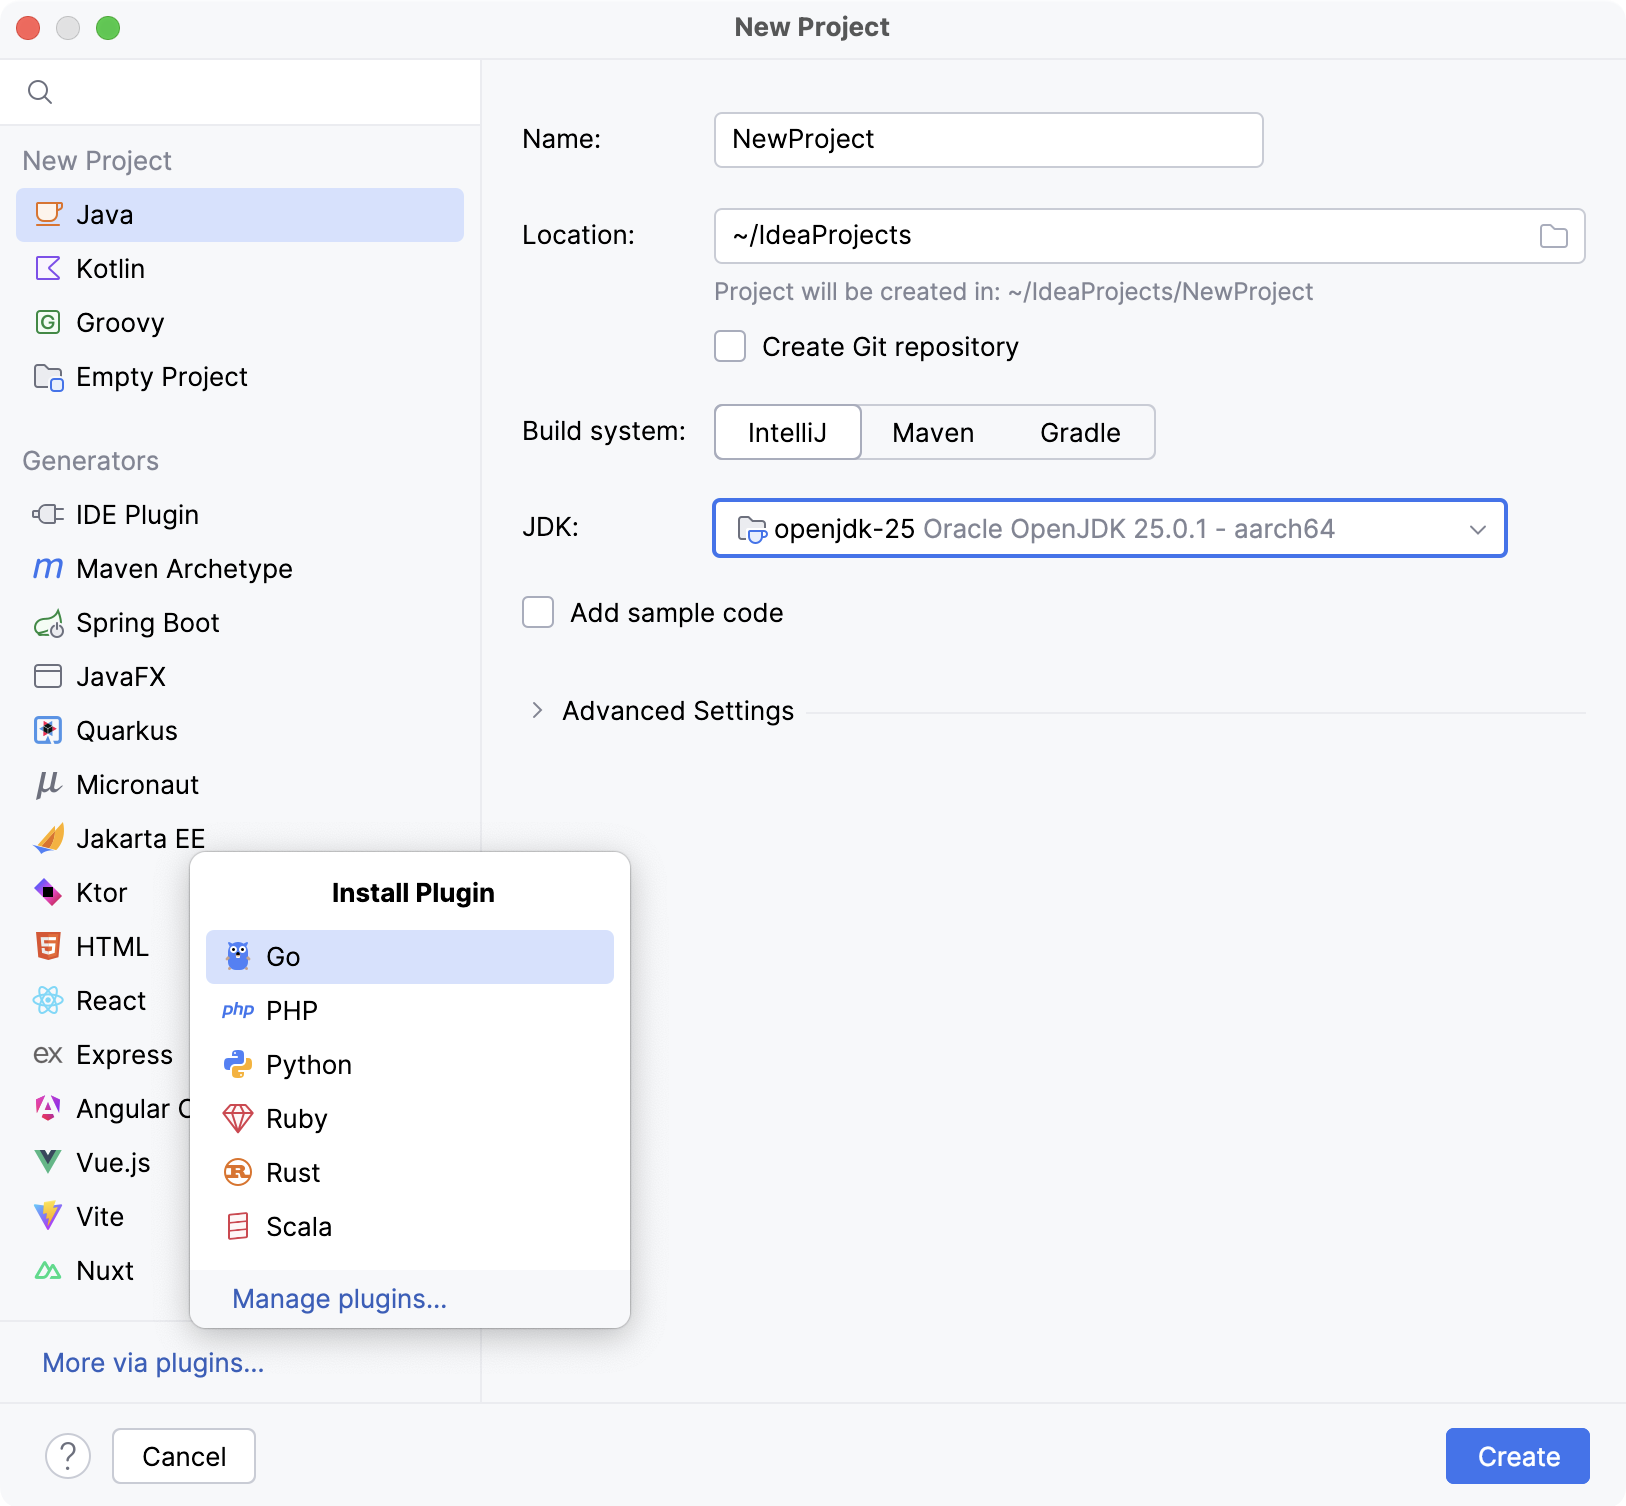
3. Name the new project and change its location if necessary.
4. Select the Create Git repository checkbox to place the new project under version control.
You will be able to do it later at any time.
5. Select the build system that you want to use in your project: the native IntelliJ builder, [Maven](maven-support.html), or [Gradle](gradle.html).
For Gradle, you will also need to select a language for the build script: Groovy or Kotlin.
6. From the JDK list, select the [JDK](sdk.html#jdk) that you want to use in your project.
* If the JDK is installed on your computer, but not defined in the IDE, select  Add JDK from Disk… and specify the path to the JDK home directory.
* If you don't have the necessary JDK on your computer, select  Download JDK .
7. Enable the Add sample code option to create a class with a sample `HelloWorld` application.
### Other languages
* [Go](create-a-project-with-go-modules-integration.html)
* [Ruby](creating-and-running-your-first-language-project.html)
* [PHP](php-specific-guidelines.html)
* [Python](creating-empty-python-project.html)
* [Scala](get-started-with-scala.html)
* [Rust](rust-plugin.html)
## New empty project
This is a basic project that allows you to work with different languages, Java or Kotlin classes without a predefined SDK, which could be useful for adhoc developing, creating mockups, and testing.
Procedure:
1. Launch IntelliJ IDEA.
To start a new project, do one of the following:
* Click New Project on the Welcome screen.
* Select `File | New | Project` from the main menu.
* Click the Project widget in the main window header and select New Project. 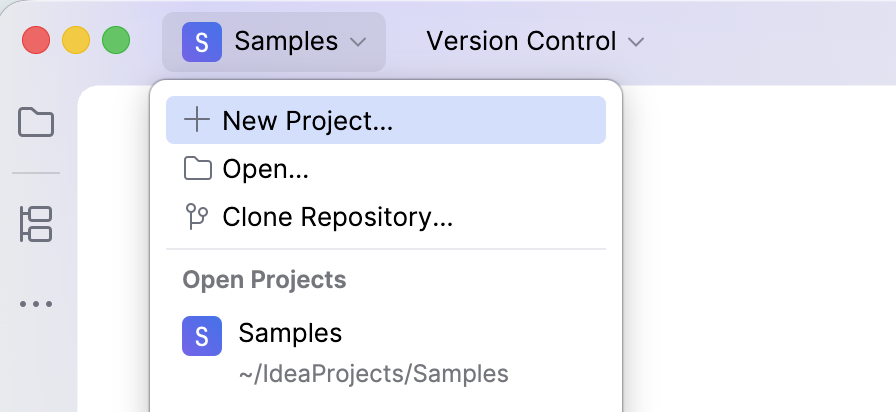
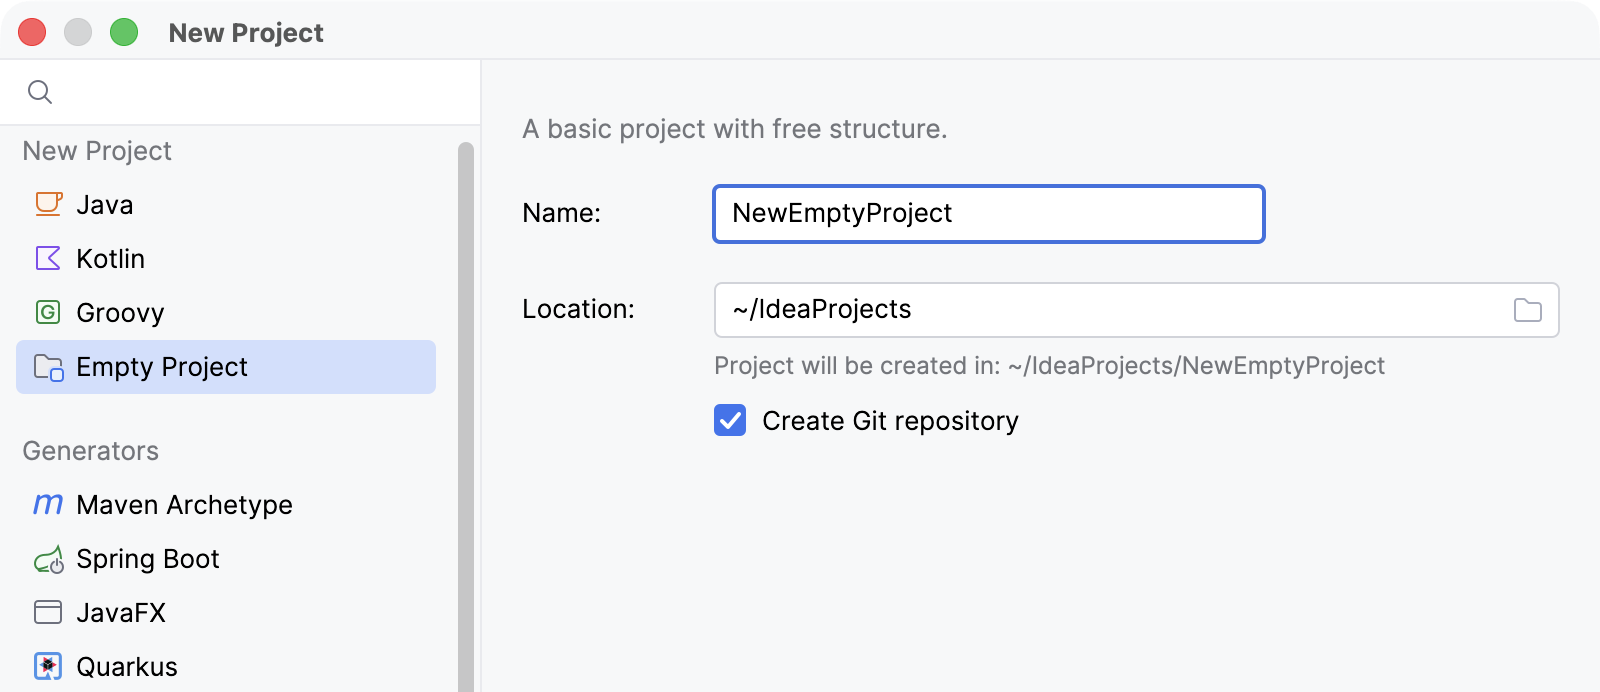
2. From the list on the left, select Empty Project.
3. In the Name field, type a name of a project.
4. In the Location field, type or select a path to the project location.
5. Select the Create Git repository option to place the new project under version control.
You will be able to do it later at any time.
> **Note:**
> The `.gitignore` file is generated in any case.
6. Click Create.
## New framework-based project
These are framework-based projects. Select one of the provided project types to create a project from a pre-defined template.
### Maven Archetype
If you are creating a project using a [Maven
archetype](https://maven.apache.org/guides/introduction/introduction-to-archetypes.html), IntelliJ IDEA displays the [Maven settings](new-projects-from-scratch-maven-settings-page.html) that you can use to set the Maven home directory and Maven repositories. Also, you can check the archetype properties.
| Name | Specify a name for your project. |
| Location | Specify the path to the directory in which you want to create the project. By default, the IDE creates a directory with the same name as the project. |
| Create Git repository | Place the new project under version control. You will be able to do it later at any time. |
| JDK | From the JDK list, select the [JDK](sdk.html#jdk) that you want to use in your project. * If the JDK is installed on your computer, but not defined in the IDE, select  Add JDK from Disk… and specify the path to the JDK home directory. * If you don't have the necessary JDK on your computer, select  Download JDK . |
| Catalog | Specify which Maven repository you want to use in your project. The [internal Maven catalog](https://maven.apache.org/archetype/archetype-common/internal.html) is a default one. You can also select the local repository that is located in the `.m2` directory, or you can select [Maven central repository](https://maven.apache.org/repository/). Moreover, you can click Manage Catalogs and add a custom repository if you need. |
| Archetype | Select the needed [Maven archetype](https://maven.apache.org/archetype/index.html). Click Add to specify the custom archetype. |
| Version | The version is specified automatically. |
| Additional Properties | In this area, you can specify [additional properties](https://maven.apache.org/archetype/maven-archetype-plugin/specification/archetype-metadata.html) on top of the built-in ones |
| Advanced Settings | Specify the following [Maven coordinates](https://maven.apache.org/pom.html#Maven_Coordinates) that are added to the `pom.xml` file: * GroupId: a package of a new project. * ArtifactId: a name of your project. For more information about Maven coordinates, refer to [Maven naming conventions](https://maven.apache.org/guides/mini/guide-naming-conventions.html). |
> **Note:**
> For more information about creating a Maven-based project, refer to [Maven](maven-support.html).
### Spring Boot
For more information about creating a Spring Boot application project, refer to [Spring Boot](spring-boot.html).
### JavaFX
> **Note:**
> For more information about creating a JavaFX application, refer to [Create a new JavaFX project](javafx.html).
Step 1:
| Name | Specify a name for your project. |
| Location | Specify the path to the directory in which you want to create the project. By default, the IDE creates a directory with the same name as the project. |
| Create Git repository | Place the new project under version control. You will be able to do it later at any time. |
| Language | Select the language that you want to use in your application. |
| Build system | Select the build tool that will be used for managing dependencies, testing, packaging, automating the build process, and so on. |
| Group | Specify the unique group identifier for your project. It should preferably start with the reversed domain name you control (for example, `com.example`). |
| Artifact | Specify a name for the artifact within the group, usually the project's name. |
| JDK | From the JDK list, select the [JDK](sdk.html#jdk) that you want to use in your project. * If the JDK is installed on your computer, but not defined in the IDE, select  Add JDK from Disk… and specify the path to the JDK home directory. * If you don't have the necessary JDK on your computer, select  Download JDK . |
Step 2:
Select the libraries that you want to use in your application.
### HTML
> **Note:**
> This section describes controls. For step-by-step instructions on how to create a project, refer to [HTML](editing-html-files.html).
| Name | Specify a name for your project. |
| Location | Specify the path to the directory in which you want to create the project. By default, the IDE creates a directory with the same name as the project. |
| Project type | Select the framework that you want to use in your application. |
| Version | Specify the version of the template in accordance to which the stub will be generated. Click  to refresh the list of available template versions. |
### Ktor
Step 1:
| Name | Specify a name for your project. |
| Location | Specify the path to the directory in which you want to create the project. By default, the IDE creates a directory with the same name as the project. |
| Build system | Select the build tool that will be used for managing dependencies, testing, packaging, automating the build process, and so on. |
| Artifact | A generated artifact name. |
| Ktor version | A required Ktor version. |
| Engine | An [engine](https://ktor.io/docs/engines.html) used to run a server. |
| Configuration in | Select whether to specify server parameters in code or in a [HOCON file](https://ktor.io/docs/create-server.html). |
| Add sample code | Leave this option enabled to add sample code for plugins added on the next page. |
Step 2:
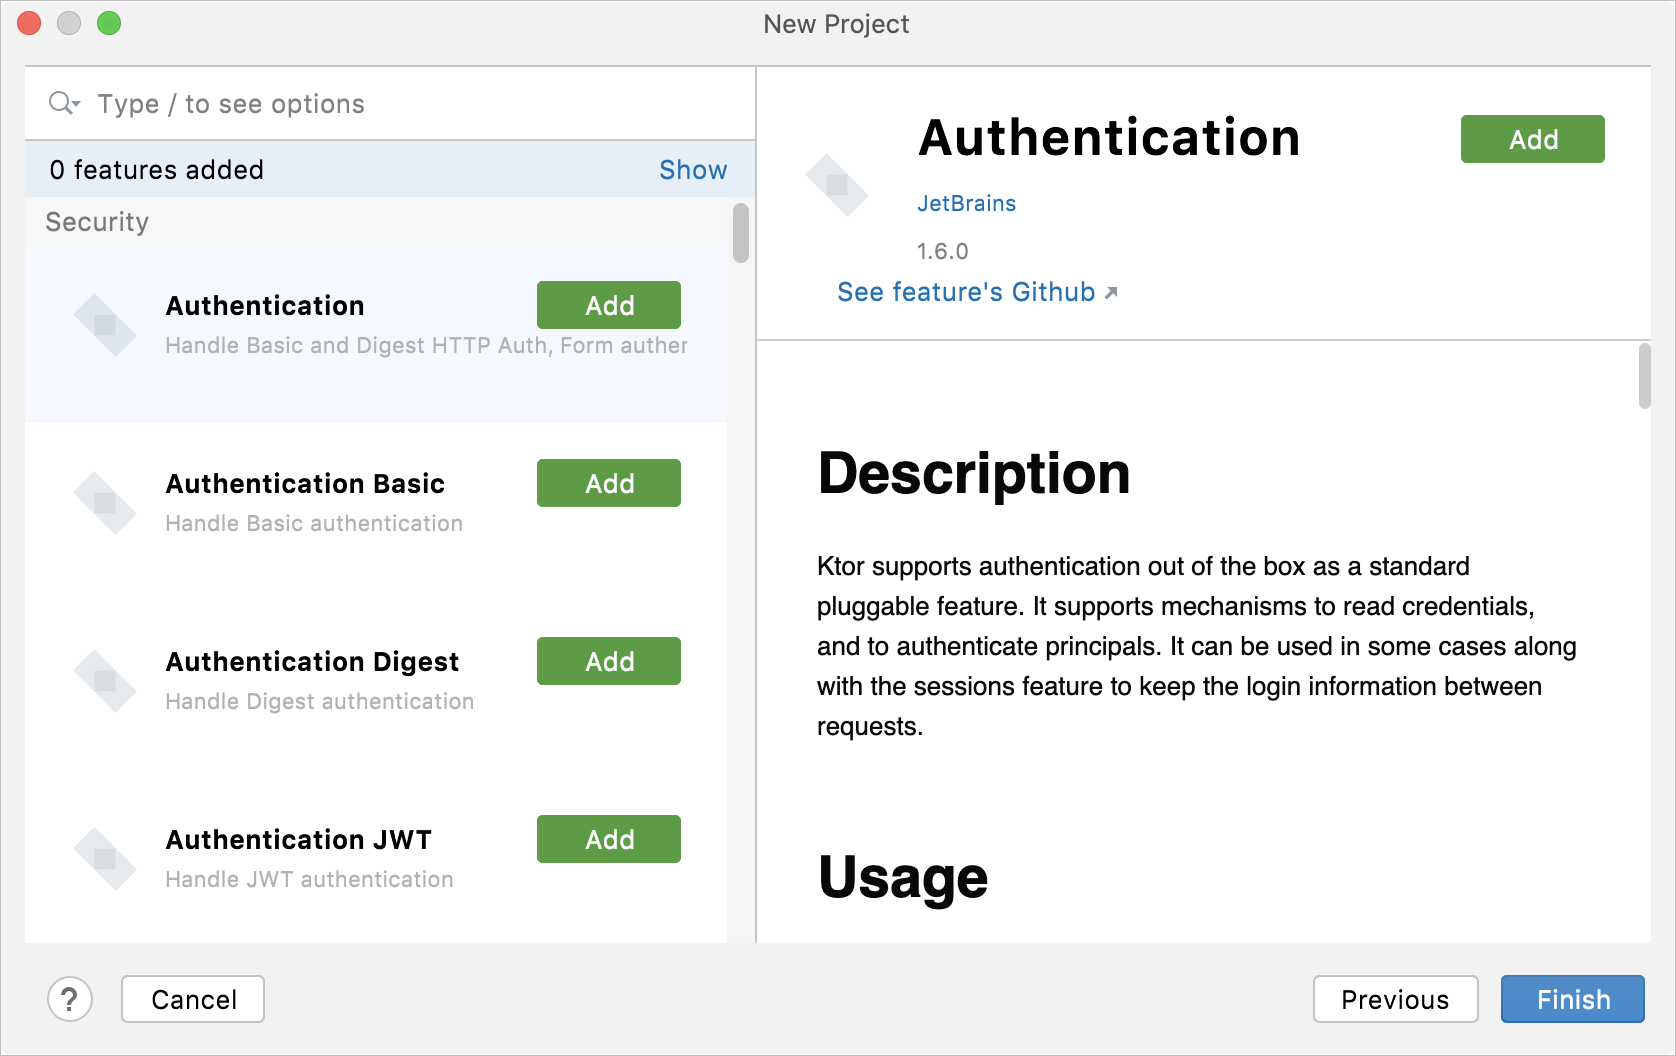
On the next page, select plugins (formerly known as features) that you want to use in this application. They provide common functionality of a Ktor application, for example, authentication, serialization and content encoding, compression, cookie support, and so on.
> **Note:**
> For more information about working with Ktor, refer to [Creating a new Ktor project](https://ktor.io/docs/intellij-idea.html).
### Vite
> **Note:**
> This section describes controls. For step-by-step instructions on how to create a project, refer to [Vite](vite.html).
| Location | Specify the path to the directory in which you want to create the project. By default, the IDE creates a directory with the same name as the project. |
| Node runtime | Specify the Node.js runtime that you want to use in this project. You can select a configured runtime from the list or click Add to configure a new one. If you have no Node.js on your computer, select Download Node.js from the list. |
| Vite | From the Vite list, select npx create-vite. Alternatively, for npm version 5.1 and earlier, install the `create-vite` package yourself by running `npm install --g create-vite` in the Terminal `Alt+F12` (Windows), `⌥ F12` (macOS), `⌥ F12` (IntelliJ IDEA Classic (macOS)), `⌘ ⌃ T` (macOS System Shortcuts), `Alt+F12` (XWin), `Alt+F12` (GNOME), `Alt+F12` (KDE), `Alt+F12` (Emacs), `Alt+F12` (Sublime Text), `⌥ F12` (Sublime Text (macOS)), `Alt+F12` (NetBeans), `Ctrl+Alt+1` (Visual Studio), `⌘ ⌃ 1` (Visual Studio (macOS)), `Alt+F12` (Eclipse), `⌥ F12` (Eclipse (macOS)). When creating an application, select the folder where the `create-vite` package is stored. |
| Template | Select the [community maintained Vite template](https://github.com/vitejs/awesome-vite#templates) that targets the framework you are going to use in your application. |
### Jakarta EE
> **Note:**
> For a step-by-step instruction on how to create a Jakarta EE project, refer to [Tutorial: Your first Jakarta EE application](creating-and-running-your-first-jakarta-ee-application.html).
Step 1:
| Name | Specify a name for your project. |
| Location | Specify the path to the directory in which you want to create the project. By default, the IDE creates a directory with the same name as the project. |
| Create Git repository | Place the new project under version control. You will be able to do it later at any time. |
| Template | Select a template for your application. IntelliJ IDEA will pre-configure your project accordingly. |
| Application server | Specify the application server that you want to use in this application. IntelliJ IDEA provides integration with various application servers, enabling you to start and stop local servers, connect to running remote servers, and deploy your artifacts on those servers. |
| Language | Select the language that you want to use in your application. |
| Build system | Select the build tool that will be used for managing dependencies, testing, packaging, automating the build process, and so on. |
| Group | Specify the unique group identifier for your project. It should preferably start with the reversed domain name you control (for example, `com.example`). |
| JDK | From the JDK list, select the [JDK](sdk.html#jdk) that you want to use in your project. * If the JDK is installed on your computer, but not defined in the IDE, select  Add JDK from Disk… and specify the path to the JDK home directory. * If you don't have the necessary JDK on your computer, select  Download JDK . |
Step 2:
| Version | Select the Jakarta EE version that you want to use. |
| Dependencies | Select the technologies, frameworks and languages that you want your project to support. |
### Quarkus
> **Note:**
> For more information about creating a Quarkus application, refer to [Quarkus](quarkus.html).
Step 1:
| Server URL | Specify the URL of the starter service that you want to use in your application. By default, the `https://code.quarkus/io` instance is specified, but you can use another custom service. |
| Name | Specify a name for your project. |
| Location | Specify the path to the directory in which you want to create the project. By default, the IDE creates a directory with the same name as the project. |
| Create Git repository | Place the new project under version control. You will be able to do it later at any time. |
| Language | Select the language that you want to use in your application. |
| Build system | Select the build tool that will be used for managing dependencies, testing, packaging, automating the build process, and so on. |
| Group | Specify the unique group identifier for your project. It should preferably start with the reversed domain name you control (for example, `com.example`). |
| Artifact | Specify a name for the artifact within the group, usually the project's name. |
| JDK | From the JDK list, select the [JDK](sdk.html#jdk) that you want to use in your project. * If the JDK is installed on your computer, but not defined in the IDE, select  Add JDK from Disk… and specify the path to the JDK home directory. * If you don't have the necessary JDK on your computer, select  Download JDK . |
| Add sample code | Create a code sample together with the project. |
Step 2:
Select extensions that you want to use in your project. If you select technologies that require additional plugins, the IDE will notify you about it once the project is created, and will suggest installing or enabling them.
### Micronaut
> **Note:**
> For more information, refer to [Micronaut](micronaut.html).
Step 1:
| Server URL | Specify the URL of the starter service that you want to use in your application. By default, the `https://micronaut.io/launch/` instance is specified, but you can use another custom service. |
| Name | Specify a name for your project. |
| Location | Specify the path to the directory in which you want to create the project. By default, the IDE creates a directory with the same name as the project. |
| Create Git repository | Place the new project under version control. You will be able to do it later at any time. |
| Language | Select the language that you want to use in your application. |
| Build system | Select the build tool that will be used for managing dependencies, testing, packaging, automating the build process, and so on. |
| Test framework | Select a testing framework. |
| Group | Specify the unique group identifier for your project. It should preferably start with the reversed domain name you control (for example, `com.example`). |
| Artifact | Specify a name for the artifact within the group, usually the project's name. |
| Application type | Select an application type from the list. |
| JDK | From the JDK list, select the [JDK](sdk.html#jdk) that you want to use in your project. * If the JDK is installed on your computer, but not defined in the IDE, select  Add JDK from Disk… and specify the path to the JDK home directory. * If you don't have the necessary JDK on your computer, select  Download JDK . |
| Java | Select the Java version that the initializing service should use. |
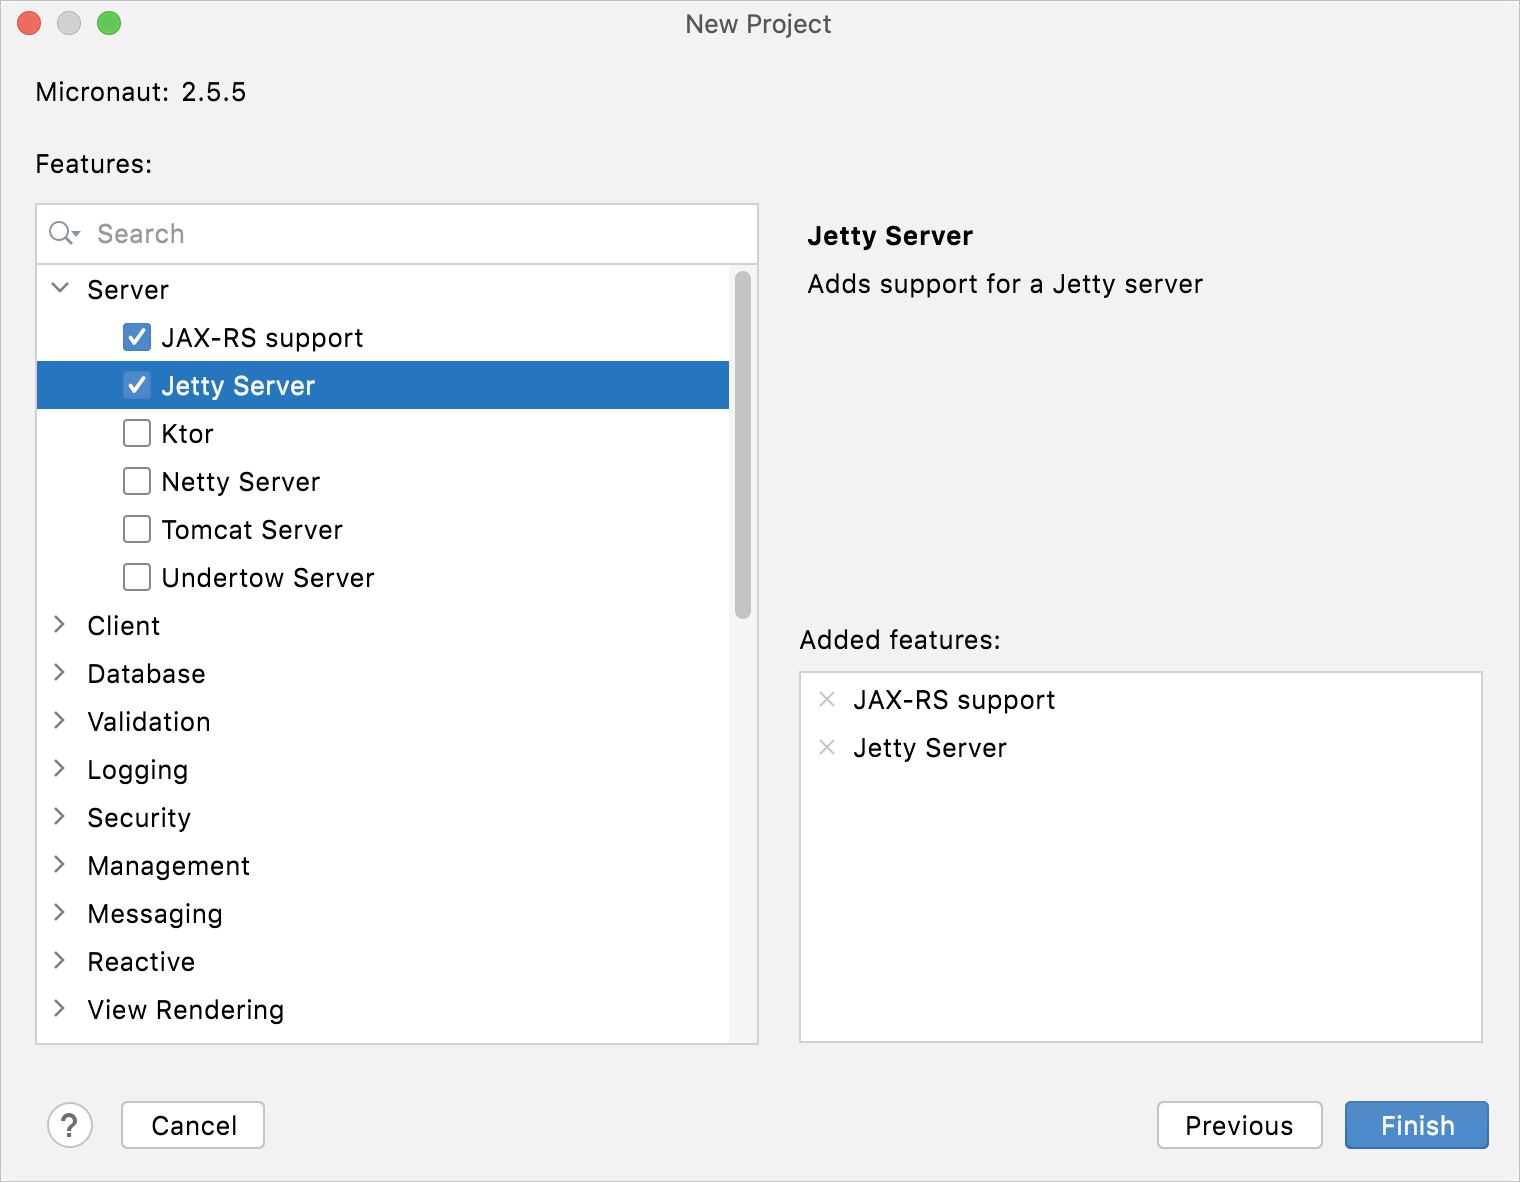
Step 2:
Select extensions that you want to use in your project. If you select technologies that require additional plugins, the IDE will notify you about it once the project is created, and will suggest installing or enabling them.
### React
In the Generators area, select the framework that you want to use in your application.
React:
> **Note:**
> This section describes controls. For step-by-step instructions on how to create a project, refer to [Create a new React application](react.html#create_new_react_app).
| Name | Specify a name for your project. |
| Location | Specify the path to the directory in which you want to create the project. By default, the IDE creates a directory with the same name as the project. |
| Node runtime | Specify the Node.js runtime that you want to use in this project. You can select a configured runtime from the list or click Add to configure a new one. If you have no Node.js on your computer, select Download Node.js from the list. |
| React CLI | Select the generator to use. * Accept the default `[npx create-vite](https://github.com/vitejs/vite/tree/main/packages/create-vite)` to have your development environment preconfigured for using Vite. * Select `[npx create-react-app](https://github.com/facebook/create-react-app)` to have your development environment preconfigured for using webpack, Babel, and ESLint. * To use a custom previously downloaded generator, click Select and specify the path to the generator in the dialog that opens. 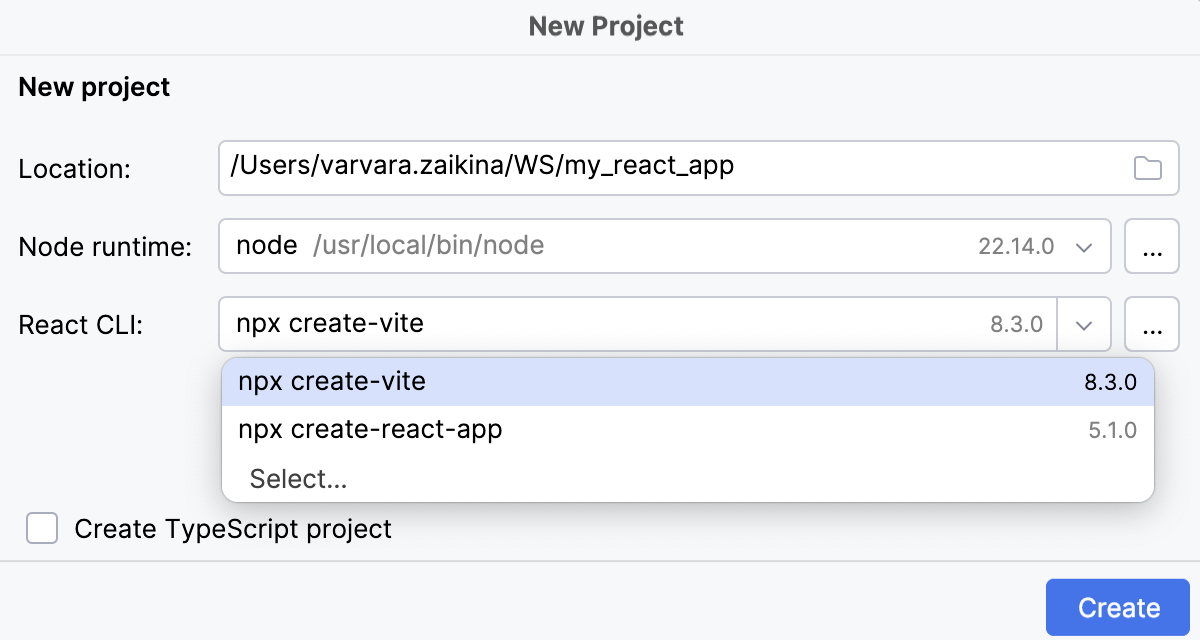 > **Note:** > The recommended way to start a new React single page application is the [create-vite](https://github.com/vitejs/vite/tree/main/packages/create-vite) package, which IntelliJ IDEA downloads and runs for you using [npx](https://www.npmjs.com/package/npx). As a result, your development environment is preconfigured to use Vite with React and TypeScript, learn more from the [Vite > official website](https://blog.logrocket.com/build-react-typescript-app-vite/#benefits-using-react-vite). |
React Native:
> **Note:**
> This section describes controls. For step-by-step instructions on how to create a project, refer to [Creating a new React Native application](react-native.html#create_new_react_native_app).
| Name | Specify a name for your project. |
| Location | Specify the path to the directory in which you want to create the project. By default, the IDE creates a directory with the same name as the project. |
| Node runtime | Specify the Node.js runtime that you want to use in this project. You can select a configured runtime from the list or click Add to configure a new one. If you have no Node.js on your computer, select Download Node.js from the list. |
| React Native | Select npx --package react-native-cli react-native |
Next.js:
> **Note:**
> This section describes controls. For step-by-step instructions on how to create a project, refer to [Create a new Next.js application](next.html#create_new_next_js_app).
| Name | Specify a name for your project. |
| Location | Specify the path to the directory in which you want to create the project. By default, the IDE creates a directory with the same name as the project. |
| Node runtime | Specify the Node.js runtime that you want to use in this project. You can select a configured runtime from the list or click Add to configure a new one. If you have no Node.js on your computer, select Download Node.js from the list. |
| create-next-app | Select npx create-next-app |
| Create TypeScript project | Select this checkbox to generate `.ts` files for your application and a `tsconfig.json` configuration file. |
### Express
| Name | Specify a name for your project. |
| Location | Specify the path to the directory in which you want to create the project. By default, the IDE creates a directory with the same name as the project. |
| Node runtime | In this field, specify the Node.js runtime to use. If you choose the Project alias, IntelliJ IDEA will automatically use the project default interpreter from the Node runtime field on the [JavaScript Runtime](javascript-runtime.html) page . In most cases, IntelliJ IDEA detects the project default runtime and fills in the field itself. You can also choose another configured local or remote interpreter or click  and configure a new one. |
| express-generator | Select the application generator tool with the version to quickly create an application skeleton. |
| Version | Select the version of the template in accordance to which the stub will be generated. Click  to refresh the list of available template versions. |
| View Engine | Select the [template engine](http://expressjs.com/guide/using-template-engines.html) that you want to use. |
| Stylesheet Engine | Select the CSS preprocessor for your project. |
### Cypress
> **Tip:**
> For information about creating a Cypress project and working with it in IntelliJ IDEA, see [Cypress](cypress.html).
### Angular CLI
| Name | Specify a name for your project. |
| Location | Specify the path to the directory in which you want to create the project. By default, the IDE creates a directory with the same name as the project. |
| Node runtime | Specify the Node.js runtime that you want to use in this project. You can select a configured runtime from the list or click Add to configure a new one. If you have no Node.js on your computer, select Download Node.js from the list. |
| Angular CLI | Select `npx --package @angular/cli ng`. Alternatively, for npm version 5.1 and earlier, install the `@angular/cli` package yourself by running `npm install -g @angular/cli` in the Terminal `Alt+F12` (Windows), `⌥ F12` (macOS), `⌥ F12` (IntelliJ IDEA Classic (macOS)), `⌘ ⌃ T` (macOS System Shortcuts), `Alt+F12` (XWin), `Alt+F12` (GNOME), `Alt+F12` (KDE), `Alt+F12` (Emacs), `Alt+F12` (Sublime Text), `⌥ F12` (Sublime Text (macOS)), `Alt+F12` (NetBeans), `Ctrl+Alt+1` (Visual Studio), `⌘ ⌃ 1` (Visual Studio (macOS)), `Alt+F12` (Eclipse), `⌥ F12` (Eclipse (macOS)). When creating an application, select the folder where the `@angular/cli` package is stored. |
| Additional parameters | (Optional) Specify the extra [ng new options](https://github.com/angular/angular-cli/wiki/new) to pass to Angular CLI. Code completion is available in this field: as you start typing the name of an option or press `Ctrl+Space` (Windows), `⌃ Space` (macOS), `⌃ Space` (IntelliJ IDEA Classic (macOS)), `⌃ Space` (macOS System Shortcuts), `Ctrl+Space` (XWin), `Ctrl+Space` (GNOME), `Ctrl+Space` (KDE), `Alt+/` (Emacs), `Ctrl+Space` (Sublime Text), `⌃ Space` (Sublime Text (macOS)), `Ctrl+Space` (NetBeans), `Ctrl+Space` (Visual Studio), `⌃ Space` (Visual Studio (macOS)), `Ctrl+Space` (Eclipse), `⌃ Space` (Eclipse (macOS)), IntelliJ IDEA shows you the available options and their description. |
### Vue.js
> **Note:**
> This section describes controls. For step-by-step instructions on how to create a project, refer to [Vue.js](vue-js.html).
| Name | Specify a name for your project. |
| Location | Specify the path to the directory in which you want to create the project. By default, the IDE creates a directory with the same name as the project. |
| Node runtime | Specify the Node.js runtime that you want to use in this project. You can select a configured runtime from the list or click Add to configure a new one. If you have no Node.js on your computer, select Download Node.js from the list. |
| Vue CLI | From the Vue CLI list, select npx --package @vue/cli vue. Alternatively, for npm version 5.1 and earlier, install the `@vue/cli` package yourself by running `npm install --g @vue/cli` in the Terminal `Alt+F12` (Windows), `⌥ F12` (macOS), `⌥ F12` (IntelliJ IDEA Classic (macOS)), `⌘ ⌃ T` (macOS System Shortcuts), `Alt+F12` (XWin), `Alt+F12` (GNOME), `Alt+F12` (KDE), `Alt+F12` (Emacs), `Alt+F12` (Sublime Text), `⌥ F12` (Sublime Text (macOS)), `Alt+F12` (NetBeans), `Ctrl+Alt+1` (Visual Studio), `⌘ ⌃ 1` (Visual Studio (macOS)), `Alt+F12` (Eclipse), `⌥ F12` (Eclipse (macOS)). When creating an application, select the folder where the `@vue/cli` package is stored. |
| Use the default project setup (babel, elint) | To bootstrap your application with [babel](https://babeljs.io/docs/en/) and [ESLint](https://eslint.org/), select the Use the default project setup checkbox. |