OAuth 2.0 authorization
The HTTP Client supports OAuth 2.0 authorization. You can get an access token and authenticate your request to OAuth 2.0 protected resources. To let you enter the user credentials, the HTTP Client displays the login form in the built-in JCEF browser. This non-modal browser doesn't prevent you from working in the IDE, allowing you, for example, to copy and paste your username and password.
A typical flow includes the following steps:
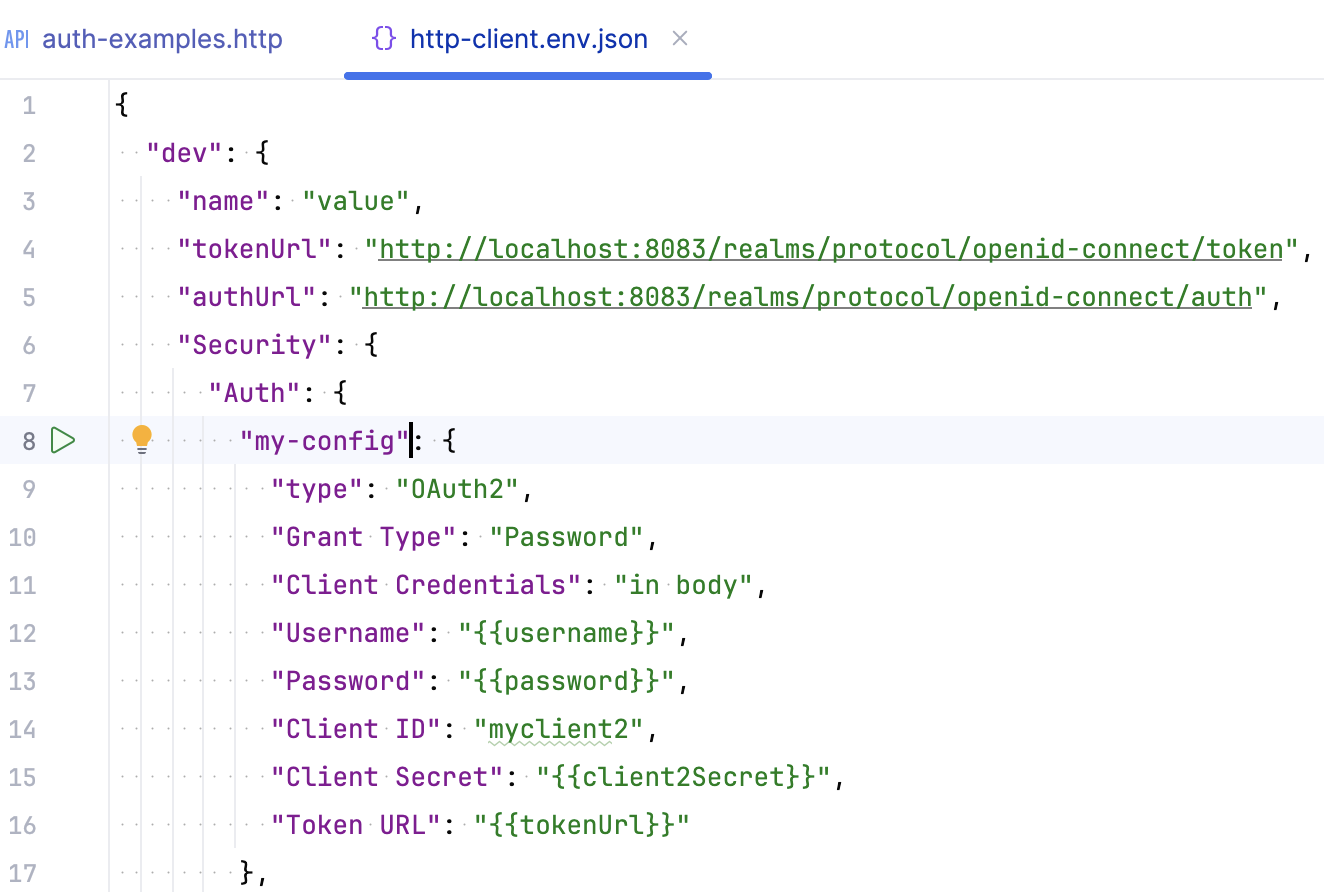
Specify authentication settings, such as the grant type and token URL, in JSON format in a public environment file.
Refer to this authentication configuration in your HTTP requests using the
$auth.tokenvariable.Run the request. If authentication is successful, you will access the protected resource. You can check the received access token and refresh token in the HTTP Client Authentication Log or in the Services tool window.
You can also manually refresh the access token or re-initialize the authentication procedure by requesting a new token.
Create authentication configuration
In an .http file, in the Run with list, select an environment to which you want to add an authentication configuration.
In the toolbar, click
 and select Auth Configuration.
This will add an authentication configuration template to the public environment file, in the
"Auth"object under"Security"of the selected environment. For example:{ "dev": { "Security": { "Auth": { "auth-id": { "Type": "OAuth2", "Grant Type": "", "Client ID": "" } } } } }Replace the placeholder
auth-idwith a meaningful name that you will use to refer to this configuration in your .http file.Specify the authentication parameters. The required parameters depend on the selected
"Grant Type". Use IntelliJ IDEA coding assistance while filling out the authentication parameters: Start typing a parameter name or press Ctrl+Space to get the list of available JSON keys.
Use authentication configuration in HTTP requests
Once an authentication configuration is created, you can use it to get an access token and authenticate your requests.
Pass the name of an authentication configuration to the
{{$auth.token()}}variable, for example,{{$auth.token("my-config")}}. You can use this variable in the requestAuthorizationheader or in query parameters.Click
 to send the request. Before accessing the protected resource, the HTTP Client will send a request to the authorization server to obtain an access token.
When prompted, complete the authentication process. If the authentication is successfully completed, the HTTP Client will access the protected resource.
To quickly add the {{$auth.token()}} variable, you can use live templates: Under the HTTP method, in the header section, start typing AuthorizationToken and select an available authentication from the list of suggestions that appears.
When you run such a request, the Show Auth Log button will be available in the Services tool window. It lets you view the redirect page, access token, and other authentication details.
Manually acquire access token
When you refer to an authentication configuration in an HTTP request, the HTTP Client automatically gets (or refreshes) an access token before accessing the protected resource. If you want to get an access token without sending an actual request to the protected resource, you can acquire the access token manually.
In the http-client.env.json file, click
next to your authentication configuration name.If the authentication configuration contains private variables, select a private environment file in the popup that appears.
When prompted, complete the authentication process.
If the authentication is completed successfully, IntelliJ IDEA will get the access token. If you already have the access token, but it has expired, IntelliJ IDEA will refresh it.
Get new access token
Besides refreshing the token, you can get a new one by re-authenticating, that is, by repeating the original flow that you used to get the initial access token.
In the http-client.env.json file, place the caret on the authentication configuration name.
Press Alt+Enter (Show Context Actions), and select Force Acquire Auth Token.
If the authentication configuration contains private variables, select a private environment file in the popup that appears.
You can invoke the same action when your caret is on the $auth.token variable in the .http file. In this case, you don't need to select a private environment file because the HTTP Client will use the one located in the same folder as your .http file.
When you refresh or get a new token, the access and refresh token and other authentication details are displayed in the HTTP Client Authentication Log tool window ().

Clear browser cookies
Your authorization server may store authentication data in the browser cookies. If you want to test the authentication flow with different data, you may need to clear cookies of the built-in JCEF browser.
In the http-client.env.json file, place the caret on the authentication configuration name and press Alt+Enter (Show Context Actions).
Select Clear browser cookies.
Alternatively, you can clear cookies by clicking ![]() in the HTTP Client Authentication Log tool window.
in the HTTP Client Authentication Log tool window.
Use ID token instead of access token
If your server requires the use of an ID token instead of an access token, you can configure the HTTP Client to do this in any of the following ways:
In your authentication configuration, use the
"Use ID Token": trueparameter.In an .http file, use the
$auth.idTokenvariable, for example,Authorization: Bearer {{$auth.idToken("auth-id-1")}}.
Use custom authentication parameters
The HTTP Client provides an option to define custom request parameters that your authorization server may require. This includes, for example, resource and audience that extend the OAuth 2.0 Authorization framework.
In your authentication configuration, add the
"Custom Request Parameters"object.Inside
"Custom Request Parameters", enter your parameter name and value (a string or an array).If you want to restrict the parameter usage to certain requests, define the value as an object with two keys:
"Value"(parameter value)"Use"— The scope for using the parameter. It has three possible values:"Use": "Everywhere"(in any request)"Use": "In Auth Request"(in authentication requests only)"Use": "In Token Request"(in token requests only)
For example:
"auth-id-1": { "Type": "OAuth2", "Custom Request Parameters": { "audience": { "Value": "https://my-audience.com/", "Use": "In Token Request" }, "resource": [ "https://my-resource/resourceId1", "https://my-resource/resourceId2" ], "my-custom-parameter": "my-custom-value" }, }
Use the HTTP Client Authentication Log tool window to view parameters and their values used in the request.
Use custom request headers
The HTTP Client provides an option to use custom request headers that your authorization server may require.
In your authentication configuration, add the
"Custom Request Headers"object.Inside
"Custom Request Headers", enter your header name and its value.Press Ctrl+Space to get the list of suggestions for popular headers, such as
Accept,Cookie, orUser-Agent.If you want to restrict the header usage to certain requests, define the value as an object with two keys:
"Value"(header value)"Use"— The scope for using the header. It has three possible values:"Use": "Everywhere"(in any request)"Use": "In Auth Request"(in authentication requests only)"Use": "In Token Request"(in token requests only)
For example:
"auth-id-1": { "Type": "OAuth2", "Custom Request Headers": { "Accept": { "Use": "Everywhere", "Value": "application/javascript" }, "my-custom-header": "my-custom-value" }, }
Authentication configuration parameters
- Type
Authentication type. Possible values:
"OAuth2": authenticate your request using OAuth2."Mock"(for development or testing environments): emulate an authentication process — instead of access tokens provided by an OAuth2 server, IntelliJ IDEA will use tokens from the authentication configuration. Provide"Token"to be used as an access token and, optionally,"ID Token"as an ID token. For example:"my-auth-id": { "Type": "Mock", "Token": "my-token" }
- Grant Type
Method to get access tokens. Possible values:
"Authorization Code","Client Credentials","Device Authorization","Implicit", and"Password".- Auth URL
Authorization URL to which the application will redirect the client request to get the auth code.
"Auth URL"is required for Authorization Code and Implicit grant types.- Token URL
The provider's authentication server, to exchange an authorization code for an access token.
"Token URL"is required for Authorization Code, Client Credentials, Device Authorization, and Password grant types.- Redirect URL
Client application callback URL to which the request should be redirected after authentication. This can be a URL from your client application settings, or, if the authorization server accepts any URL, use an arbitrary URL, for example
http://localhost:12345/foo/bar.- Client ID
Public identifier of your client registered with the API provider. The parameter is required for all grant types.
- Client Secret
Confidential identifier used by a client application to authenticate to an authorization server. The parameter is required for the Client Credentials grant type.
- Client Credentials
Enter one of the following:
"none"if you do not want to specify client credentials in the request."in body"if you want to send client credentials in the request body."basic"to send a Basic authentication request in the request header (default value).
- Device Auth URL
The URL to which the client device makes a request in order to obtain the device code and user code.
Applicable and required for the Device Authorization grant type.
- Open Complete URI
When set to
true, the browser opens a verification URI that includes the user code (verification_uri_complete). The default value isfalse: the browser opens the verification URI (without embedded user code) where users are usually supposed to manually enter the code.Applicable with the Device Authorization grant type.
- Start Polling After Browser
When set to
true, the client device should send access token requests to the token endpoint (polling) only after the browser is closed. The default value isfalse: The device continuously polls the token endpoint until the user completes the interaction or the code expires.Applicable with the Device Authorization grant type.
- PKCE
Enables Proof Key for Code Exchange (PKCE). Applicable with the Authorization Code grant type.
Enter
"PKCE": trueto use the default algorithm (SHA-256 hashing the autogenerated code verifier). Or customize the behavior using"Code Challenge Method"(plain or SHA-256) and"Code Verifier". For example:"PKCE": { "Code Challenge Method": "Plain", "Code Verifier": "YYLzIBzrXpVaH5KRx86itubKLXHNGnJBPAogEwkhveM" },- Scope
A scope to limit an application's access to a user's account. Possible values depend on the service you are trying to access.
- Acquire Automatically
By default, the HTTP Client refreshes or acquires an access token automatically before sending the request. Enter
"Acquire Automatically": falseif you do not want to automatically refresh or acquire an access token before sending the request. You can refresh or acquire manually.- Username
The username sent as part of authorization, used with the Password grant type.
- Password
The user's password sent as part of authorization, used with the Password grant type. To avoid sharing your password, you can use a private variable instead of the value, for example,
"Password": "{{password}}".- Custom Request Parameters
Specify custom request parameters
- Custom Request Headers
Specify custom request headers