# sbt
> **TL;DR**
> Required plugin: Scala: [how to install](get-started-with-scala.html#scala_plugin)
## Working with sbt
When you've imported or created your sbt project, you can edit its `build.sbt` file directly in the editor. In `build.sbt` you can specify compiler options, information about your subprojects, and also define your tasks and settings.
Every time you change the `build.sbt` file, you need to synchronize your changes with the project model in IntelliJ IDEA.
You can configure the Sync project after changes in the build scripts option to synchronize the changes made to `build.sbt` automatically. To access this option, select `File | Settings | Build, Execution, Deployment | Build Tools`.
For manual synchronization, use the corresponding action on the sbt projects tool window toolbar: .
Note that any sbt task can be attached to be run before a run configuration.
> **Note:**
> IntelliJ IDEA also lets you use other build tools such as [Gradle](gradle.html) or [Maven](maven-support.html) to build your Scala project.
## Open an existing sbt project
To create a new project, launch the [New Project wizard](new-project-wizard.html) and follow the steps suggested in the wizard, such as selecting Scala and sbt; specifying the project's location, JDK along with sbt and Scala versions. (The sbt and Scala versions are fetched automatically).
If no project is currently opened in IntelliJ IDEA, click Open on the welcome screen (otherwise, select `File | Open` from the main menu). Then, in the dialog, select a file that contains your sbt project description `build.sbt`. Click OK, and - in the next dialog - click Select as Project.
IntelliJ IDEA opens and syncs the sbt project in the IDE. If you need to adjust importing options when you open the project, refer to the [sbt settings](sbt.html).
## Ensure sbt and Scala versions compatibility
Often you share your project across a team and need to use a specific version of sbt. You can override the sbt version in your project's `build.properties` file.
Create or [open](#import_sbt) your sbt project. In the Project tool window, in the source root directory, locate the `build.properties` file and open it in the editor. Then, in the editor explicitly specify the version of sbt that you want to use in the project.
```
sbt.version=xxx
```
Reimport your project. (Click the  in the sbt tool window.)
> **Note:**
> When you try to import an sbt project that contains an old version of sbt, you might get an error. We recommend that you upgrade to sbt versions 1.0 and later which are compatible with the Scala version 2.12 (requires Java 8).
## sbt project structure
When you create or import the sbt project, IntelliJ IDEA generates the following sbt structure:
* sbt project (proper build) which defines a project and contains `build.sbt` file, src, and target directories, modules; anything related to a regular project. 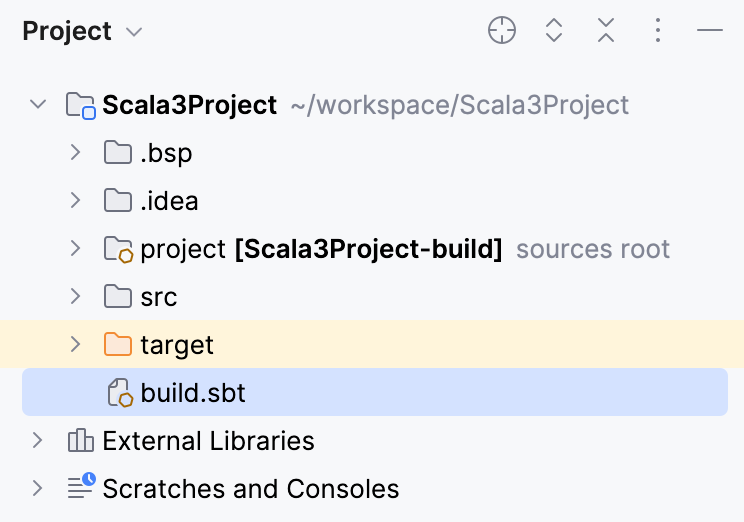
* sbt build project which is defined in the project subdirectory. It contains additional code that is part of the build definition. 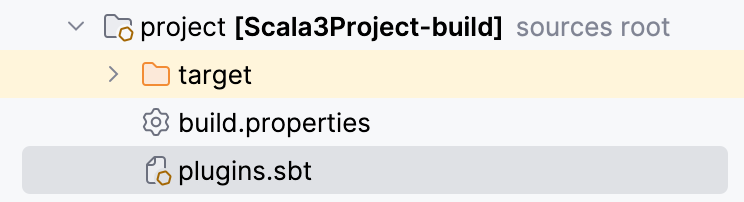
* the sbt tool window which contains sbt tasks, commands, and settings that you can execute. 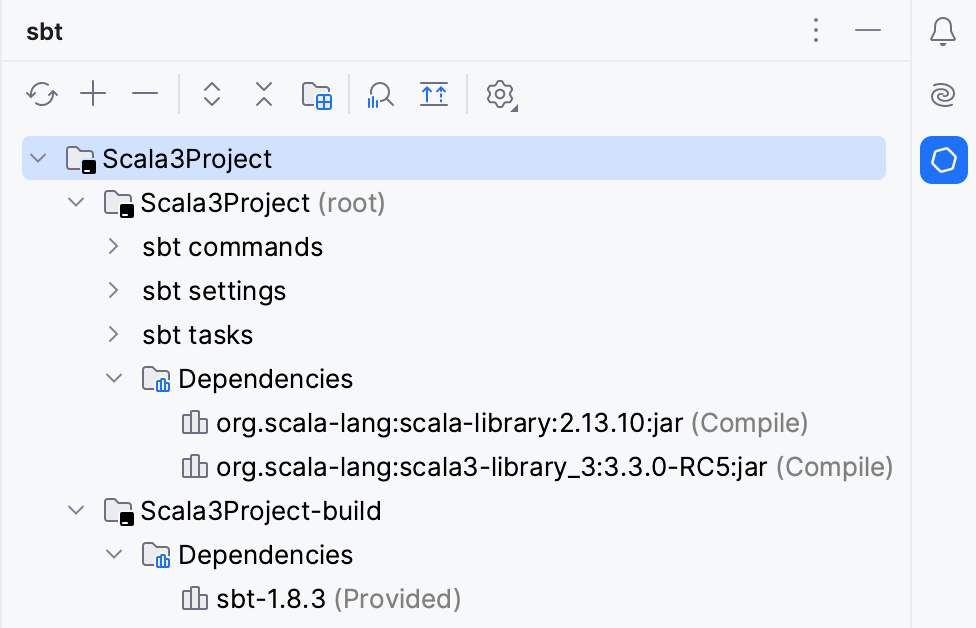
> **Tip:**
> For more information about the sbt project structure, refer to the related [sbt documentation](https://www.scala-sbt.org/1.x/docs/Organizing-Build.html).
## Manage sbt projects
When you work with sbt projects, you use the `build.sbt` file to make main changes to your project since IntelliJ IDEA considers the sbt configuration as a single source of truth.
Every time you manually change `build.sbt` in the editor, you need to load the changes. IntelliJ IDEA displays a notification icon in the right part of the editor suggesting to Load sbt Changes made to the project (`Ctrl+Shift+O` (Windows), `Ctrl+Shift+O` (macOS), `Ctrl+Shift+O` (IntelliJ IDEA Classic (macOS)), `Ctrl+Shift+O` (macOS System Shortcuts), `Ctrl+Shift+O` (XWin), `Ctrl+Shift+O` (GNOME), `Ctrl+Shift+O` (KDE), `Ctrl+Shift+O` (Emacs), `Ctrl+Shift+O` (Sublime Text), `Ctrl+Shift+O` (Sublime Text (macOS)), `Ctrl+Shift+O` (NetBeans), `Ctrl+Shift+O` (Visual Studio), `Ctrl+Shift+O` (Visual Studio (macOS)), `Ctrl+Shift+O` (Eclipse), `Ctrl+Shift+O` (Eclipse (macOS))).
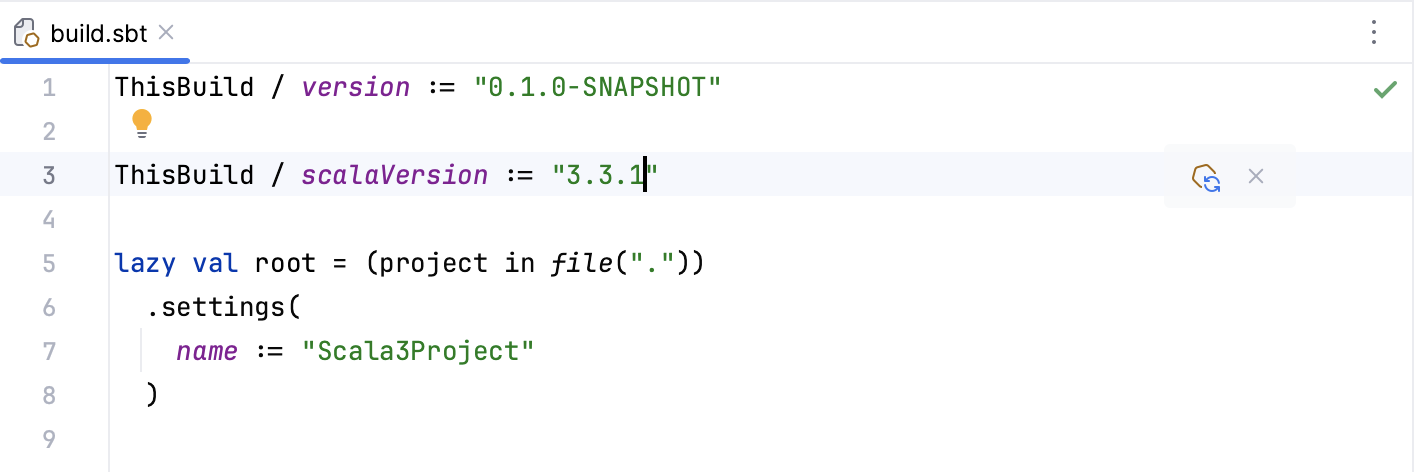
If you want to control the importing process of your project, you can manually trigger the action or configure the auto-reloading process.
Procedure: Reload an sbt project
1. In the [sbt](sbt-tool-window.html) tool window, right-click a linked project.
2. From the context menu, select Reload project .
On invoking this action, IntelliJ IDEA parses the project structure in the sbt tool window.
IntelliJ IDEA cannot reload just a part of your project, it reloads the whole project including subprojects and dependencies.
> **Tip:**
> To reload all sbt projects, click  on the toolbar, in the sbt tool window.
Procedure: Configure the auto-reload
1. In the Settings dialog (`Ctrl+Alt+S` (Windows), `⌘ Comma` (macOS), `⌘ Comma` (IntelliJ IDEA Classic (macOS)), `⌘ Comma` (macOS System Shortcuts), `Ctrl+Alt+S` (XWin), `Ctrl+Alt+S` (GNOME), `Ctrl+Alt+S` (KDE), `Ctrl+Alt+S` (Emacs), `Ctrl+Alt+S` (Sublime Text), `⌘ Comma` (Sublime Text (macOS)), `Ctrl+Alt+S` (NetBeans), `Ctrl+Alt+S` (Visual Studio), `⌘ Comma` (Visual Studio (macOS)), `Ctrl+Alt+S` (Eclipse), `⌘ Comma` (Eclipse (macOS))) , go to `Build, Execution, Deployment | Build Tools`.
Alternatively, In the sbt tool window, click  and select the Auto-Reload Settings option.
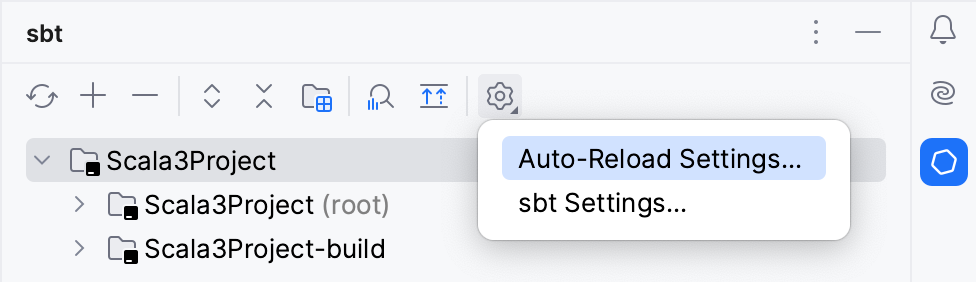
2. In the Build tools settings, specify the following options:
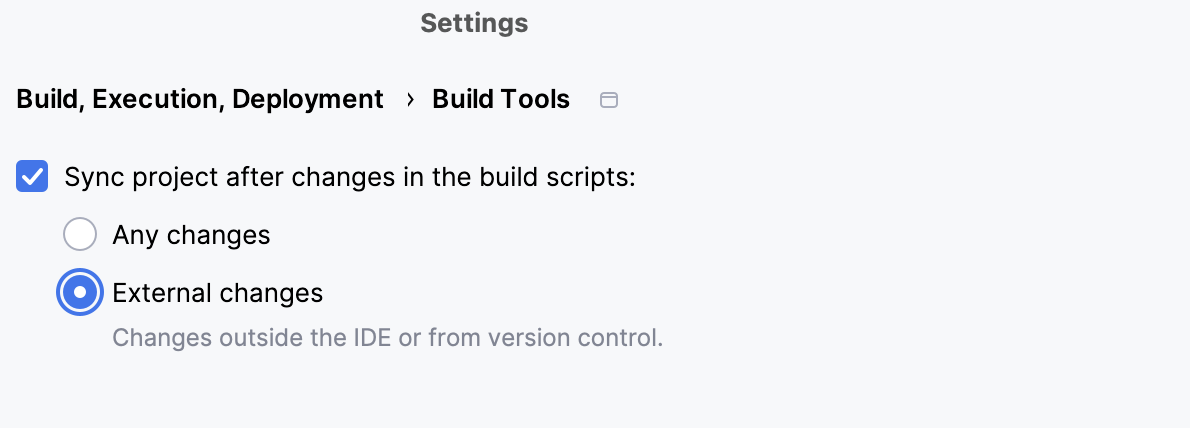
* Reload changes in the build scripts: this option is selected by default. If you want to disable the auto-reload and manually control the reloading process, unselect this checkbox.
* Any changes: select this option if you want to automatically reload the project after any changes you make to `build.sbt` or external changes. Every time you manually change the sbt build script in the editor, you need to load the changes. IntelliJ IDEA displays a notification icon in the right part of the editor suggesting to Load sbt Changes made to the project (`Ctrl+Shift+O` (Windows), `Ctrl+Shift+O` (macOS), `Ctrl+Shift+O` (IntelliJ IDEA Classic (macOS)), `Ctrl+Shift+O` (macOS System Shortcuts), `Ctrl+Shift+O` (XWin), `Ctrl+Shift+O` (GNOME), `Ctrl+Shift+O` (KDE), `Ctrl+Shift+O` (Emacs), `Ctrl+Shift+O` (Sublime Text), `Ctrl+Shift+O` (Sublime Text (macOS)), `Ctrl+Shift+O` (NetBeans), `Ctrl+Shift+O` (Visual Studio), `Ctrl+Shift+O` (Visual Studio (macOS)), `Ctrl+Shift+O` (Eclipse), `Ctrl+Shift+O` (Eclipse (macOS))). 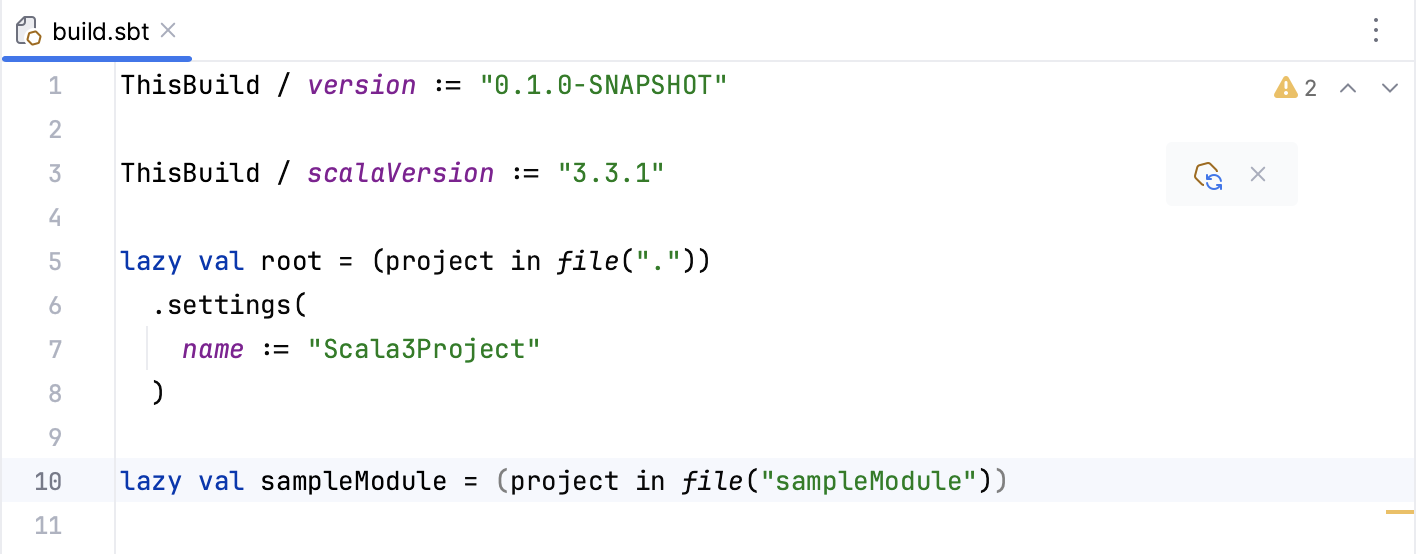 With the Any changes option, IntelliJ IDEA reloads all the changes automatically.
* External changes: when you select this option, IntelliJ IDEA automatically reloads the project only after the VCS changes and changes made to the build files outside the IDE.
Procedure: Link an external sbt project
1. Open your `build.sbt`.
2. Specify the following code:
```
val localDep = RootProject(file("/path/to/project"))
```
`localDep` in this case is a project that is located somewhere on the file system and will be imported as a module.
3. Reload your project. (Click the  in the sbt tool window.)
IntelliJ IDEA displays the added project in the Project tool window as well as in the sbt tool window.
Procedure: Add a sub-project or a module to the sbt project
1. Open `build.sbt` in the editor.
2. Specify, for example:
```SCALA
lazy val sampleModule = (project in file("sampleModule"))
```
`"sampleModule"` in this case is a sub-project that you want to add. You can specify more than one sub-project.
3. Reimport your project. (Click the  in the sbt tool window.)
IntelliJ IDEA generates a subproject directory with the appropriate information and displays it in both Project and sbt tool windows.
Procedure: Update subprojects
If you want the subprojects to automatically update when you change the version of Scala, specify `commonSettings` and `settings` method call for each subproject.
1. Open `build.sbt`.
2. Specify, for example, the following code:
```SCALA
lazy val commonSettings = Seq(
organization := "com.example",
version := "0.1.0-SNAPSHOT",
scalaVersion := "2.12.6"
)
lazy val moduleSample = (project in file("moduleSample"))
.settings(
commonSettings
)
```
The appropriate Scala version is added to the sub-project's directory in the Project tool window and to the sbt tool window as a dependency in the sub-project.
## Work with sbt shell
An sbt shell is embedded in the sbt project and is available on your project start. You can use the sbt shell for executing sbt commands and tasks, for running, and debugging your projects.
Procedure:
* To start the sbt shell, press `Ctrl+Shift+S` (for Windows) or `⌘+⇧+S` (for macOS). Alternatively, click  on the toolbar located at the bottom of the screen.
* To use the sbt shell for build and import procedures, select the Use sbt shell section located in the [sbt settings](#sbt_settings) and perform steps described in the [Run a Scala application using the sbt shell](run-debug-and-test-scala.html#run_sbt_scala_app) section.
> **Note:**
> The sbt versions 0.13.16.+ / 1.0.3.+ are recommended.
* To use the sbt shell for debugging, refer to the [debugging with sbt shell](run-debug-and-test-scala.html#sbt_shell_debug) section.
* To run your tests from the sbt shell:
1. Open a run/debug configuration (`Run | Edit Configurations`).
2. Create a [test configuration](run-debug-and-test-scala.html#run_debug_use_sbt) and select the use sbt option from the available settings.
> **Tip:**
> You can also run `test` or `test/Only` command by entering it in the sbt shell.
## Run sbt tasks
> **Tip:**
> You can execute sbt commands and settings the same way you execute [sbt tasks](#sbt_task).
Procedure:
* You can run sbt tasks by selecting the one you need from the sbt Tasks directory in the sbt tool window.
* You can manually enter your task (code completion is supported) in the sbt shell and run it directly from there.
* You can create a run configuration for a task. For example, you can create a custom task which is not part of the list of tasks located in the sbt tool window.
1. Press `Alt+Shift+F10` (Windows), `⌃ ⌥ R` (macOS), `⌥ ⇧ F10` (IntelliJ IDEA Classic (macOS)), `⌃ ⌥ R` (macOS System Shortcuts), `Alt+Shift+F10` (XWin), `Alt+Shift+F10` (GNOME), `Alt+Shift+F10` (KDE), `Alt+Shift+F10` (Emacs), `Alt+Shift+F10` (Sublime Text), `⌃ ⌥ R` (Sublime Text (macOS)), `Alt+Shift+F10` (NetBeans), `Ctrl+Alt+Shift+R` (Visual Studio), `⌘ ⌥ ⇧ R` (Visual Studio (macOS)), `Alt+Shift+F10` (Eclipse), `⌃ ⌥ R` (Eclipse (macOS)) to open a run configuration.
2. Specify the run configuration settings and click OK. If you need, you can add another configuration or a task to execute before running your configuration. Click  in the Before Launch section and from the list that opens, select what you need to execute.
* When you work in the distraction-free mode (without toolbars and tool windows), you can run sbt tasks or commands from the Run Anything window. Press `Ctrl` (Windows), `Ctrl` (macOS), `Ctrl` (IntelliJ IDEA Classic (macOS)), `Ctrl` (macOS System Shortcuts), `Ctrl` (XWin), `Ctrl` (GNOME), `Ctrl` (KDE), `Ctrl` (Emacs), `Ctrl` (Sublime Text), `Ctrl` (Sublime Text (macOS)), `Ctrl` (NetBeans), `Ctrl` (Visual Studio), `Ctrl` (Visual Studio (macOS)), `Ctrl` (Eclipse), `Ctrl` (Eclipse (macOS)) twice to open it, type your command, and press `Enter` (Windows), `⏎` (macOS), `⏎` (IntelliJ IDEA Classic (macOS)), `⏎` (macOS System Shortcuts), `Enter` (XWin), `Enter` (GNOME), `Enter` (KDE), `Enter` (Emacs), `Enter` (Sublime Text), `⏎` (Sublime Text (macOS)), `Enter` (NetBeans), `Enter` (Visual Studio), `⏎` (Visual Studio (macOS)), `Enter` (Eclipse), `⏎` (Eclipse (macOS)).
IntelliJ IDEA displays results in the sbt shell window.
## Work with sbt settings
Use the sbt settings to configure the build and run actions the sbt project, an sbt version, importing of the project's changes, and so on.
Procedure: Access the sbt settings
1. Press `Ctrl+Alt+S` (Windows), `⌘ Comma` (macOS), `⌘ Comma` (IntelliJ IDEA Classic (macOS)), `⌘ Comma` (macOS System Shortcuts), `Ctrl+Alt+S` (XWin), `Ctrl+Alt+S` (GNOME), `Ctrl+Alt+S` (KDE), `Ctrl+Alt+S` (Emacs), `Ctrl+Alt+S` (Sublime Text), `⌘ Comma` (Sublime Text (macOS)), `Ctrl+Alt+S` (NetBeans), `Ctrl+Alt+S` (Visual Studio), `⌘ Comma` (Visual Studio (macOS)), `Ctrl+Alt+S` (Eclipse), `⌘ Comma` (Eclipse (macOS)) to open settings and then select `Build, Execution, Deployment| sbt`.
2. Alternatively, click  on the toolbar of the sbt tool window to access the sbt settings.
The window is divided into two sections: General settings and sbt Projects.
### General settings
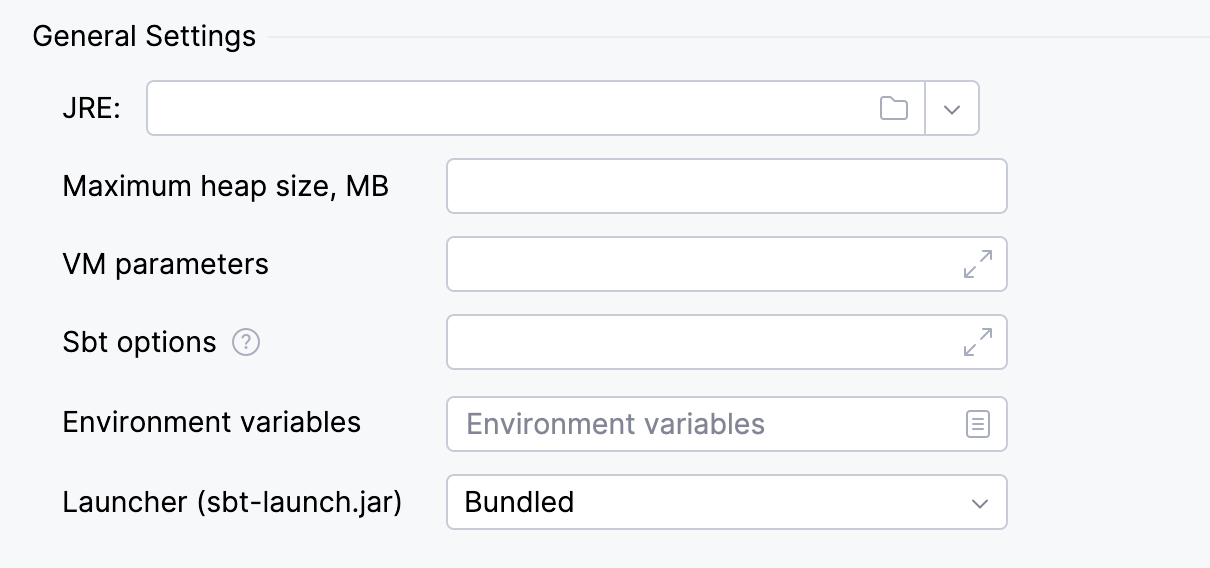
In the General settings section, you can configure the following options:
| Item | Description |
| --- | --- |
| JRE | Choose a JRE to run this project against, either from a dropdown list or by providing a custom location. It takes precedence over the default project SDK. |
| Maximum heap size | Specify the maximum heap size allocated to sbt when it starts. |
| VM parameters | Specify the JVM parameters to be passed to sbt. You can define JVM options in the `JAVA_OPTS` environment variable or in the `.jvmopts` file located in the project root. Options configured in IntelliJ IDEA settings have the highest priority, followed by options in the `.jvmopts` file and then those in the `JAVA_OPTS` environment variable. |
| Sbt options | Specify the sbt options to be passed to sbt. To view all available options, run `sbt --help`. You can define sbt options in the `SBT_OPTS` environment variable or in the `.sbtopts` file located in the project root. The priority for these options follows the same rules as for JVM parameters. |
| Environment variables | Specify the environment variables to be injected into the sbt process. |
| Launcher (sbt-launch.jar) | Specify a custom sbt launcher. By default, IntelliJ IDEA uses the bundled sbt-launch.jar. |
### sbt Projects
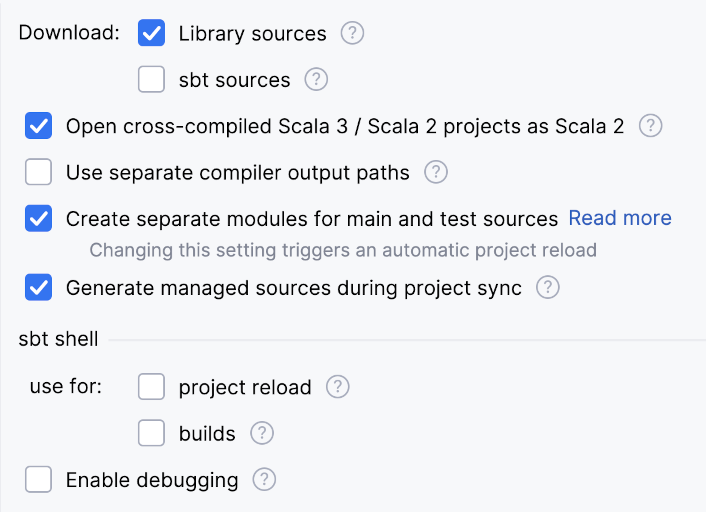
In the sbt Projects section, you can configure the following options:
| Item | Description |
| --- | --- |
| Download | Select one of the options to download sources when reloading the project from sbt: * Library sources: download the sources of the project's library dependencies. * sbt sources: download the sources of sbt and sbt plugins. |
| Open cross-compiled Scala 3 / Scala 2 projects as Scala 2 | Select this option to open the projects that are cross-compiled against both Scala 2 and Scala 3 as Scala 2. |
| Use separate compiler output paths | Select this option to use a different class file directory for compilation than the one used by sbt. |
| Create separate modules for main and test resources | Select this option to organize main and test sources into separate modules. For more details, refer to the [blog post](https://blog.jetbrains.com/scala/2024/11/19/new-module-layout-for-sbt/). |
| sbt shell | Use the checkboxes to control the use of the sbt shell for project reloads and builds. > **Tip:** > Using the sbt shell can speed up reloads, but it requires IntelliJ IDEA to keep the shell in memory. |
| Generate managed sources during project sync | Instructs sbt to generate the sources managed by the source generators enabled in the project during project sync (e.g. sbt-buildinfo, abt-twirl, and other similar sbt plugins). Available also as an action. > **Tip:** > Disable the setting in case source generation takes an exceedingly long time. |
| Enable debugging | Select this option to start the sbt shell as a debuggable process. This allows you to debug sbt plugin code and tests running in the sbt shell. |
To check the most common sbt issues and workarounds, refer to the [sbt troubleshooting](troubleshoot-common-scala-issues.html) section.
## Package Checker support for sbt
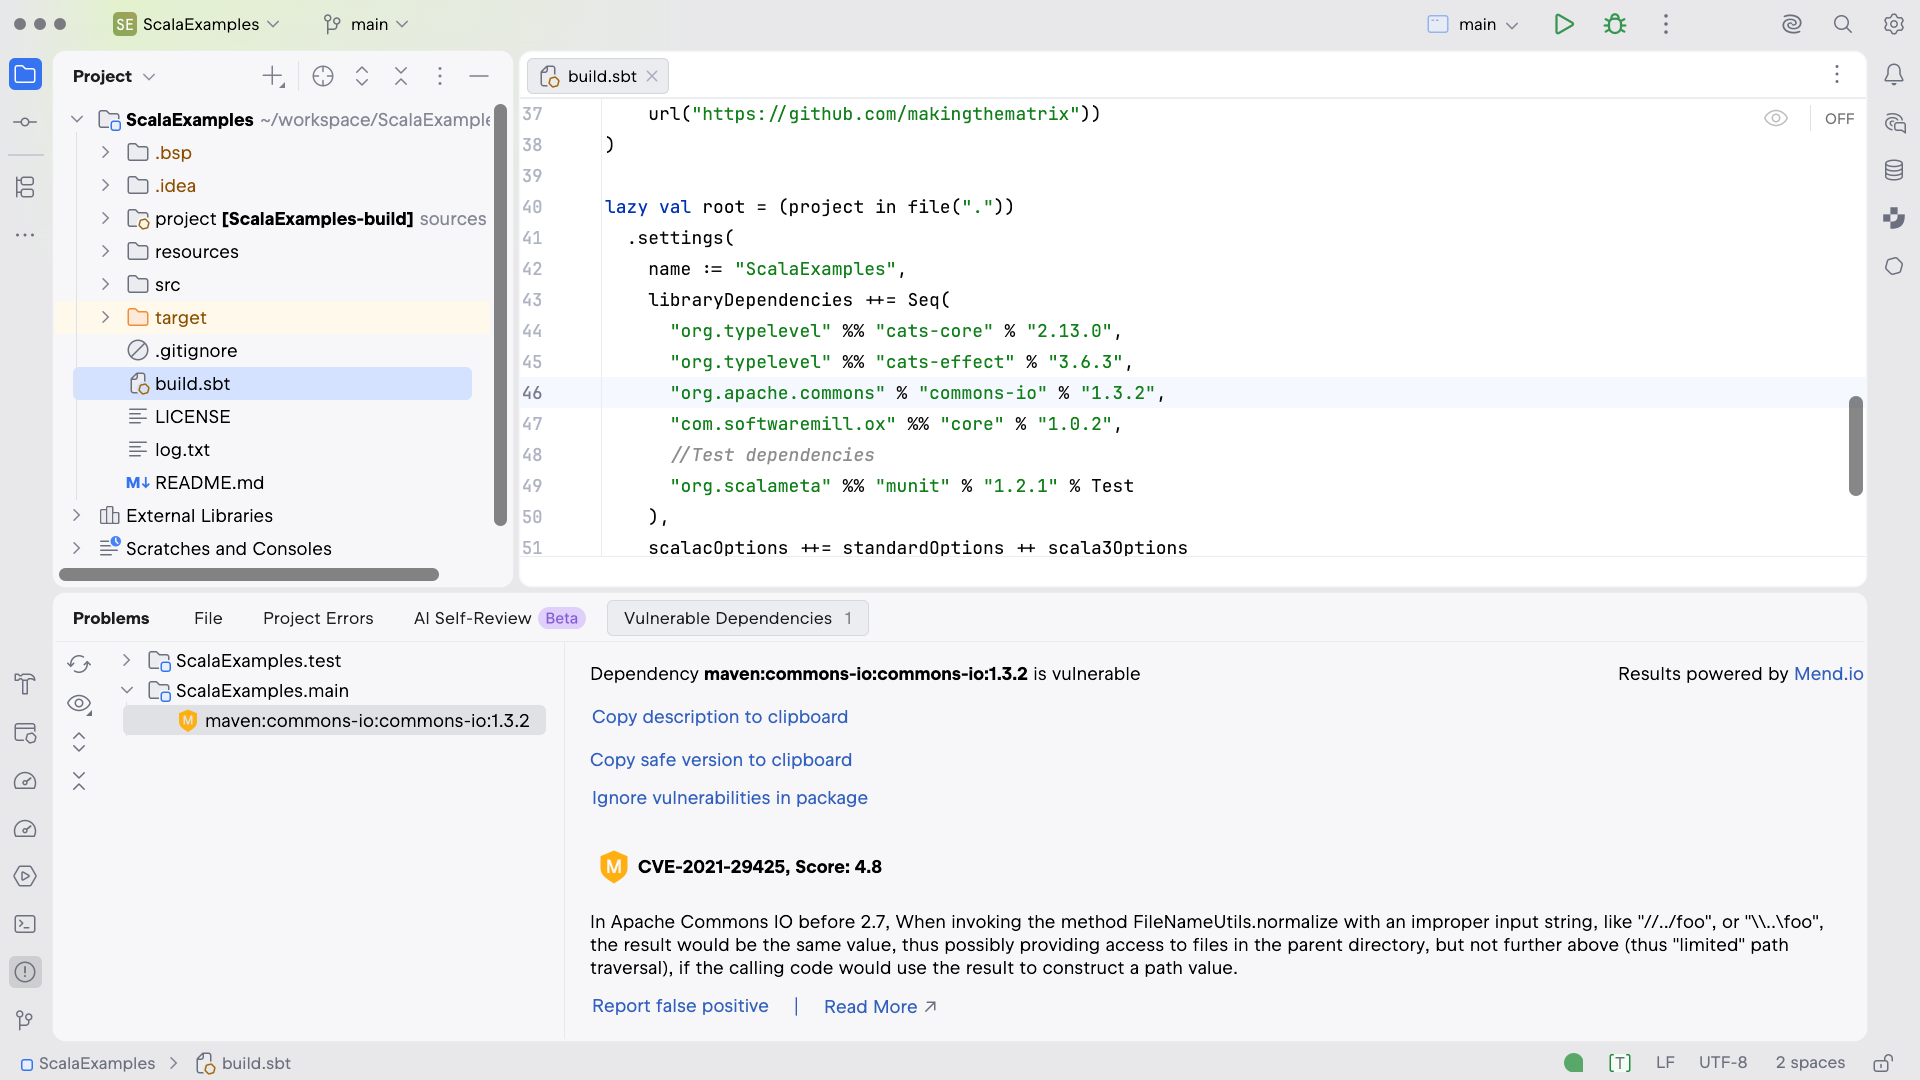
Package Checker is a plugin that checks your third-party dependencies for known vulnerabilities. It suggests a safe version, if available, to make your code more secure. It also scans source code for vulnerable API calls to highlight the most critical problems. The plugin is bundled with IntelliJ IDEA.
Problems identified by Package Checker are reported on the `Problems | Vulnerable Dependencies` tab. The plugin also provides the `Analyze | Vulnerable Dependencies action.`
Here you can see how Package Checker describes a vulnerability in`org.apache.commons % commons.io % 1.3.2`:
For more information, refer to [Find vulnerable and malicious dependencies](package-analysis.html)
## Separate main and test modules
There is a new, experimental mode of working with sbt projects in IntelliJ IDEA with the Scala plugin. If enabled, it organizes main and test sources into separate modules, which improves compilation and dependency management.
Procedure: Enable the separate modules mode
1. Press `Ctrl+Alt+S` (Windows), `⌘ Comma` (macOS), `⌘ Comma` (IntelliJ IDEA Classic (macOS)), `⌘ Comma` (macOS System Shortcuts), `Ctrl+Alt+S` (XWin), `Ctrl+Alt+S` (GNOME), `Ctrl+Alt+S` (KDE), `Ctrl+Alt+S` (Emacs), `Ctrl+Alt+S` (Sublime Text), `⌘ Comma` (Sublime Text (macOS)), `Ctrl+Alt+S` (NetBeans), `Ctrl+Alt+S` (Visual Studio), `⌘ Comma` (Visual Studio (macOS)), `Ctrl+Alt+S` (Eclipse), `⌘ Comma` (Eclipse (macOS)) to open settings and then select `Build, Execution, Deployment | Build Tools | sbt`.
2. Enable the Create separate modules for main and test sources option.
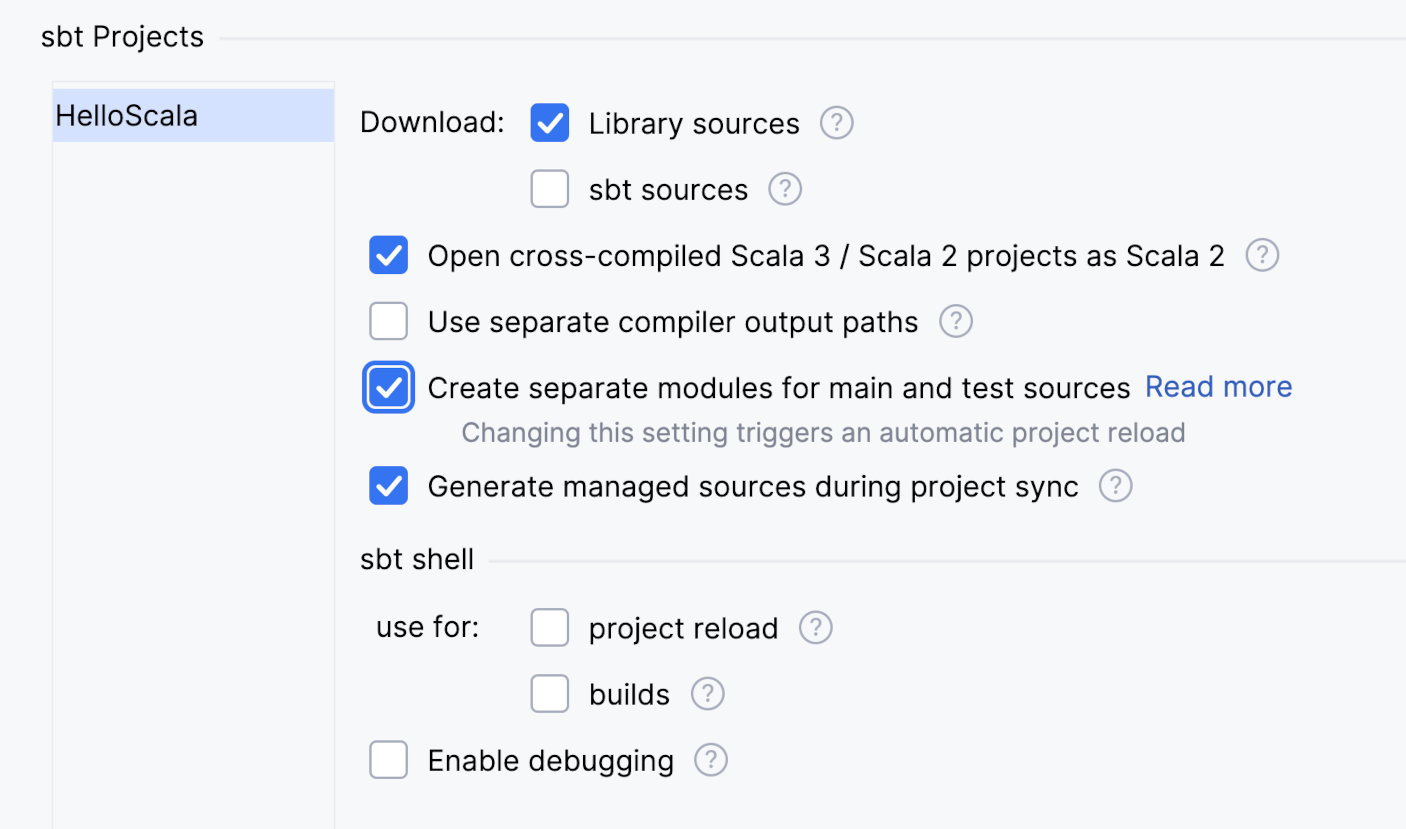
3. Click OK. The project will be reloaded automatically, and new modules will be created.
4. After the reload, each run configuration referencing a module should switch to the corresponding main or test module. In rare cases, changing the modules in the run configurations may not be possible automatically.
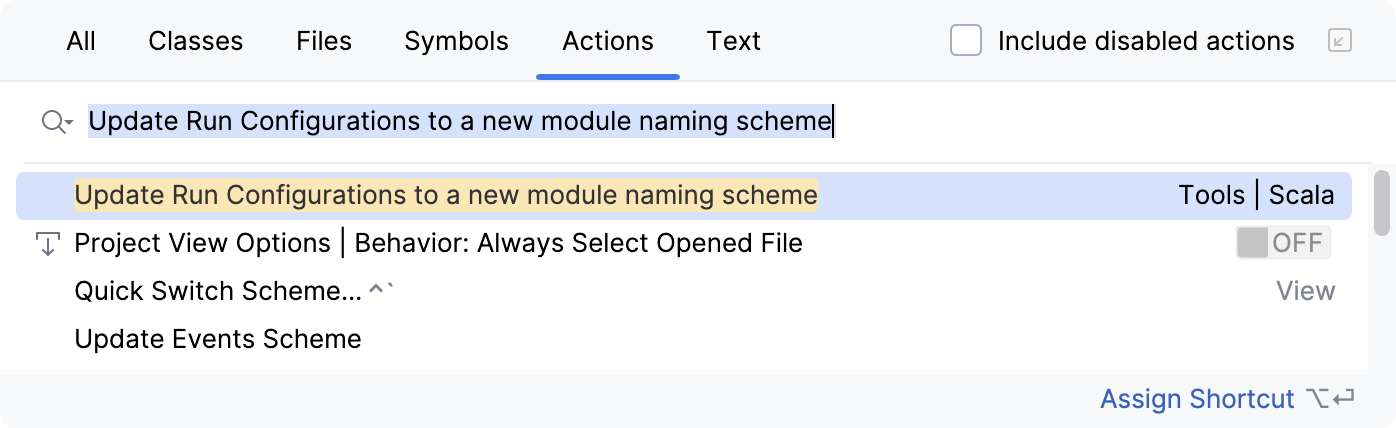
If this happens, you can update the run configurations by explicitly using the Update Run Configurations to a new module naming scheme action. You can find it using Find Action `Ctrl+Shift+A` (Windows), `⌘ ⇧ A` (macOS), `⌘ ⇧ A` (IntelliJ IDEA Classic (macOS)), `⌘ ⇧ P` (macOS System Shortcuts), `Ctrl+Shift+A` (XWin), `Ctrl+Shift+A` (GNOME), `Ctrl+Shift+A` (KDE), `Escape, X` (Emacs), `Ctrl+Shift+P` (Sublime Text), `⌘ ⇧ P` (Sublime Text (macOS)), `Ctrl+I` (NetBeans), `Ctrl+Shift+A` (Visual Studio), `⌘ ⇧ A` (Visual Studio (macOS)), `Ctrl+Shift+A` (Eclipse), `⌘ 3` (Eclipse (macOS)) or by navigating to `Tools | Scala` in the main menu.
Refer to the [New Module
Layout for sbt Projects](https://blog.jetbrains.com/scala/2024/11/19/new-module-layout-for-sbt/) article in the JetBrains blog for more details and examples of how this new mode helps configure sbt projects.