# Services tool window
> **TL;DR**
> `View | Tool Windows | Services` or `Alt+8` (Windows), `⌘ 8` (macOS), `⌘ 8` (IntelliJ IDEA Classic (macOS)), `⌘ 8` (macOS System Shortcuts), `Alt+8` (XWin), `Alt+8` (GNOME), `Alt+8` (KDE), `Alt+8` (Emacs), `Alt+8` (Sublime Text), `⌘ 8` (Sublime Text (macOS)), `Alt+8` (NetBeans), `Alt+8` (Visual Studio), `Alt+8` (Visual Studio (macOS)), `Alt+8` (Eclipse), `⌘ 8` (Eclipse (macOS))
The Services tool window lets you manage various services used in your development workflow, such as run/debug configurations, application servers, database sessions, connections to Kubernetes clusters and Docker. Plugin developers can add other services through the IntelliJ platform API.
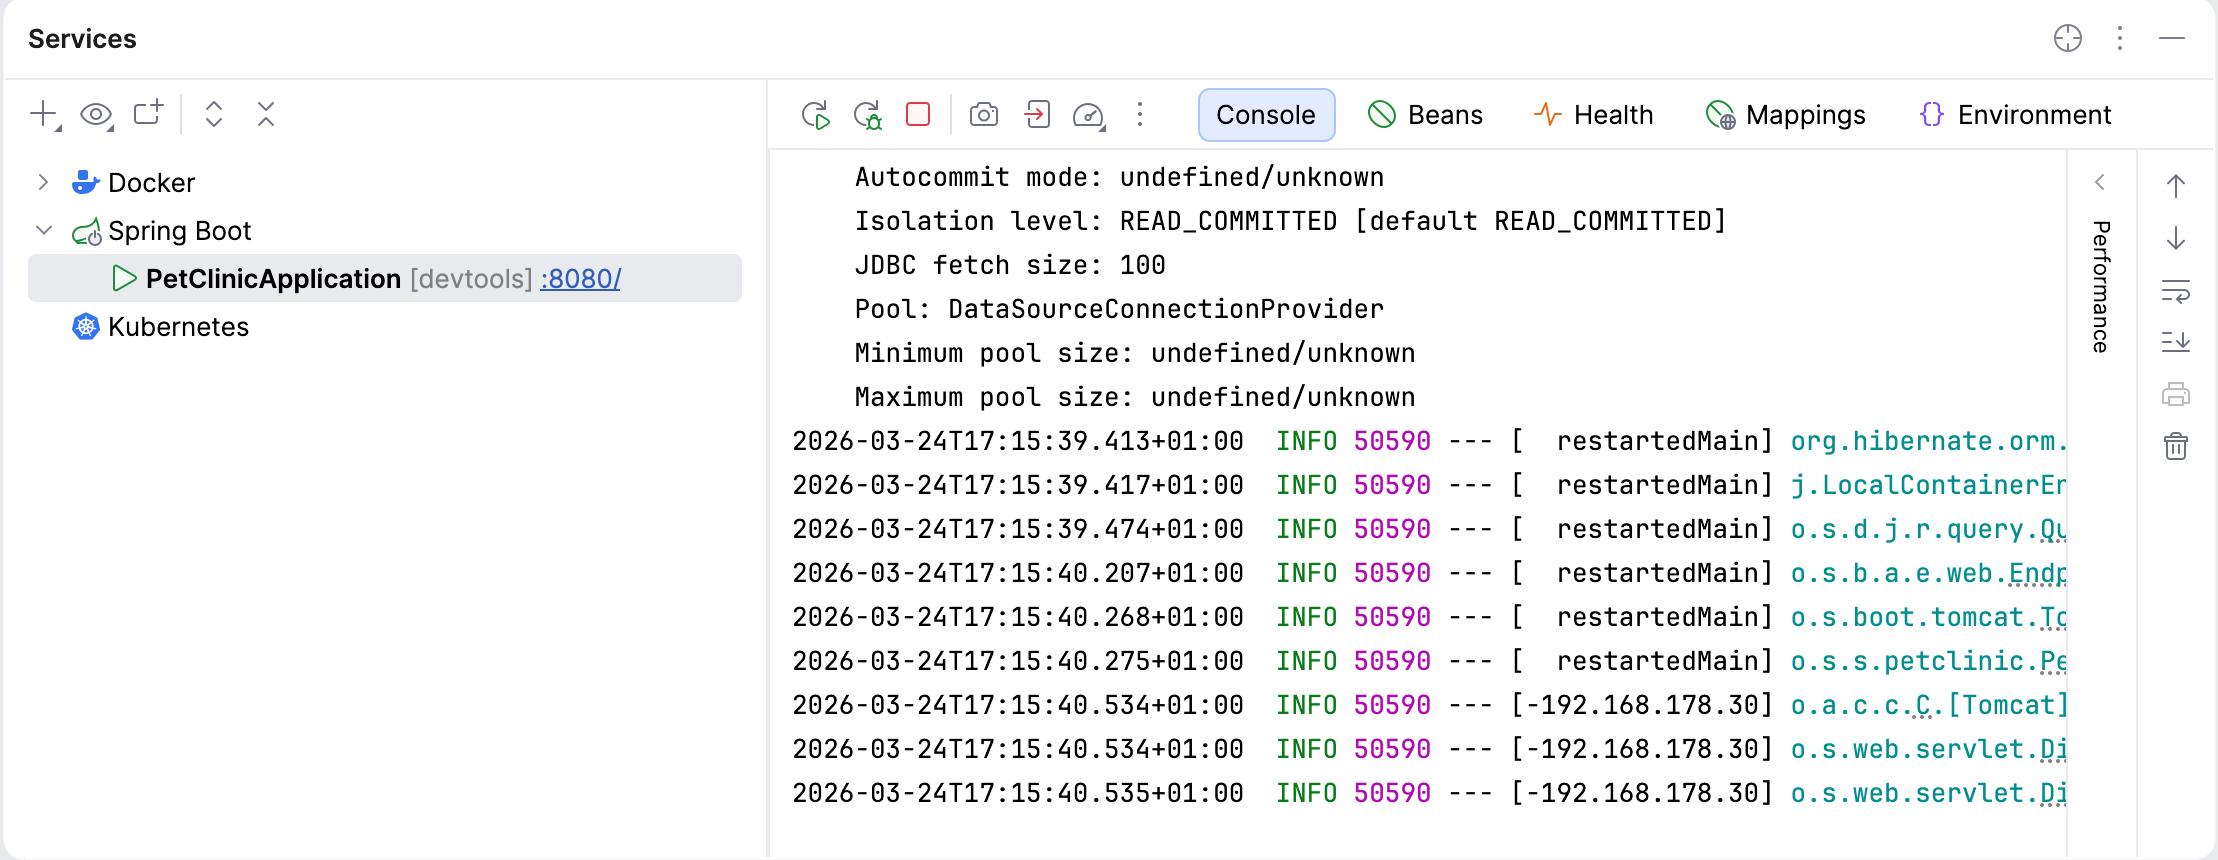
The main toolbar contains the following buttons and menus that are common for all service types:

: Add Service `Alt+Insert` (Windows), `⌘ N` (macOS), `⌃ N` (IntelliJ IDEA Classic (macOS)), `⌘ N` (macOS System Shortcuts), `Alt+Insert` (XWin), `Alt+Insert` (GNOME), `Alt+Insert` (KDE), `Alt+Insert` (Emacs), `Ctrl+N` (Sublime Text), `⌘ N` (Sublime Text (macOS)), `Alt+Insert` (NetBeans), `Ctrl+N` (Visual Studio), `⌘ N` (Visual Studio (macOS)), `Alt+Insert` (Eclipse), `⌘ N` (Eclipse (macOS))
:
: Choose a service type to add.

: Group By
:
: Choose how you want to organize the list of services:
:
:
:
: * Group Services by Type: arrange services by type, such as Run Dashboard, Docker, or Database

: Open in New Tab
:
: Move the selected items to a separate tab.

: Expand All `Ctrl+NumPad +` (Windows), `⌘ NumPad +` (macOS), `⌘ NumPad +` (IntelliJ IDEA Classic (macOS)), `⌘ NumPad +` (macOS System Shortcuts), `Ctrl+NumPad +` (XWin), `Ctrl+NumPad +` (GNOME), `Ctrl+NumPad +` (KDE), `Ctrl+NumPad +` (Emacs), `Ctrl+NumPad +` (Sublime Text), `⌘ NumPad +` (Sublime Text (macOS)), `Ctrl+NumPad +` (NetBeans), `Ctrl+NumPad +` (Visual Studio), `⌘ NumPad +` (Visual Studio (macOS)), `Ctrl+Shift+NumPad *` (Eclipse), `⌘ ⇧ NumPad *` (Eclipse (macOS))
:
: Expand all items in the list.

: Collapse All `Ctrl+NumPad -` (Windows), `⌘ NumPad -` (macOS), `⌘ NumPad -` (IntelliJ IDEA Classic (macOS)), `⌘ NumPad -` (macOS System Shortcuts), `Ctrl+NumPad -` (XWin), `Ctrl+NumPad -` (GNOME), `Ctrl+NumPad -` (KDE), `Ctrl+NumPad -` (Emacs), `Ctrl+NumPad -` (Sublime Text), `⌘ NumPad -` (Sublime Text (macOS)), `Ctrl+NumPad -` (NetBeans), `Ctrl+NumPad -` (Visual Studio), `⌘ NumPad -` (Visual Studio (macOS)), `Ctrl+Shift+NumPad /` (Eclipse), `⌘ ⇧ NumPad /` (Eclipse (macOS))
:
: Collapse all items in the list.
Procedure: Display services in separate tool windows
You can adjust the layout of the Services tool window by moving services to their own separate tool windows.
Right-clicking a service and selecting Open in Separate Tool Window from the context menu moves the service to a dedicated tool window. To move a service back to the Services tool window, right-click the service and select Add to Services Tool Window.
As another option, you can configure the layout for one or several services in a dedicated dialog.
1. In the Services tool window, click  and select Configure Services Tool Window.
Alternatively, press `Ctrl+Shift+A` (Windows), `⌘ ⇧ A` (macOS), `⌘ ⇧ A` (IntelliJ IDEA Classic (macOS)), `⌘ ⇧ P` (macOS System Shortcuts), `Ctrl+Shift+A` (XWin), `Ctrl+Shift+A` (GNOME), `Ctrl+Shift+A` (KDE), `Escape, X` (Emacs), `Ctrl+Shift+P` (Sublime Text), `⌘ ⇧ P` (Sublime Text (macOS)), `Ctrl+I` (NetBeans), `Ctrl+Shift+A` (Visual Studio), `⌘ ⇧ A` (Visual Studio (macOS)), `Ctrl+Shift+A` (Eclipse), `⌘ 3` (Eclipse (macOS)) and start typing `Configure Services Tool Window`.
2. Use the Exclude and Include buttons to move services from the Services tool window to a separate tool window and back.
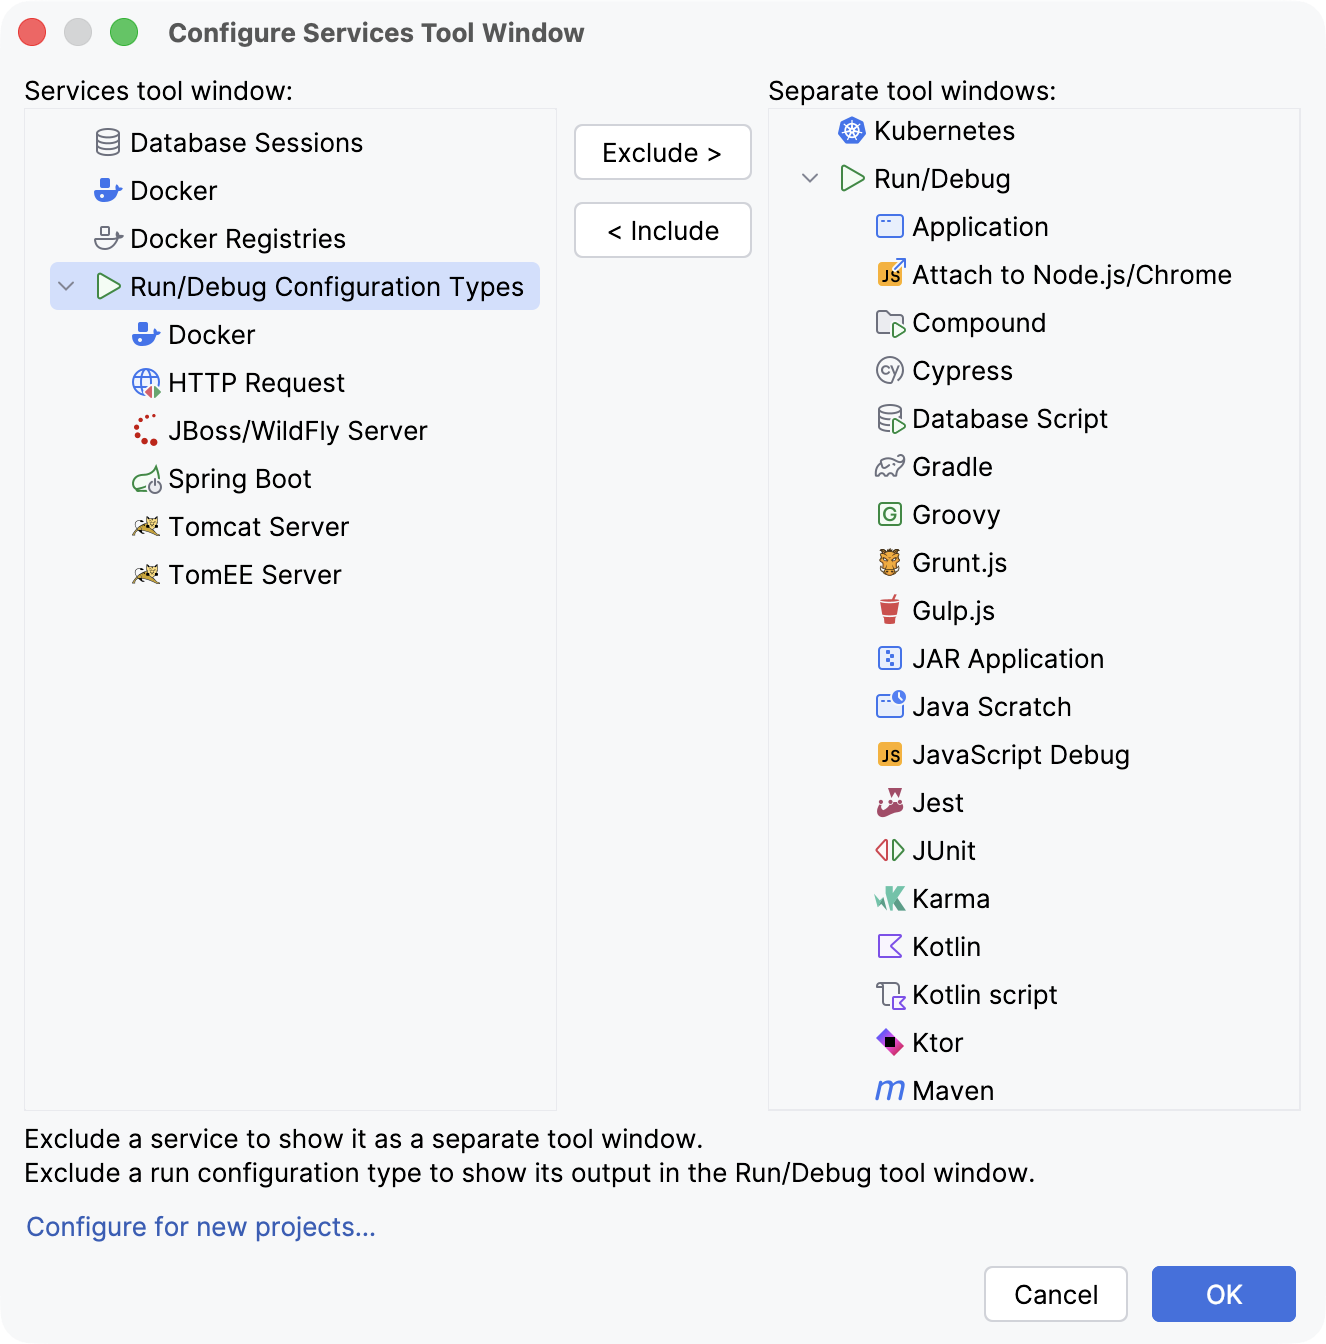
Configurations from the Run/Debug section don't have their own tool windows — instead, they appear in the Run or Debug tool window when they are not included in the Services tool window.
3. Click OK to save the changes.
## Run/debug configurations
[Run/debug configurations](run-debug-configuration.html) are not listed in the Services tool window by default. You need to explicitly specify the types of configurations you want to be available and create the corresponding configurations.
Procedure: Add Run/Debug configurations to the Services window
1. Select `View | Tool Windows | Services` from the main menu or press `Alt+8` (Windows), `⌘ 8` (macOS), `⌘ 8` (IntelliJ IDEA Classic (macOS)), `⌘ 8` (macOS System Shortcuts), `Alt+8` (XWin), `Alt+8` (GNOME), `Alt+8` (KDE), `Alt+8` (Emacs), `Alt+8` (Sublime Text), `⌘ 8` (Sublime Text (macOS)), `Alt+8` (NetBeans), `Alt+8` (Visual Studio), `Alt+8` (Visual Studio (macOS)), `Alt+8` (Eclipse), `⌘ 8` (Eclipse (macOS)).
2. In the Services tool window, click  Add service, then select Run Configuration.
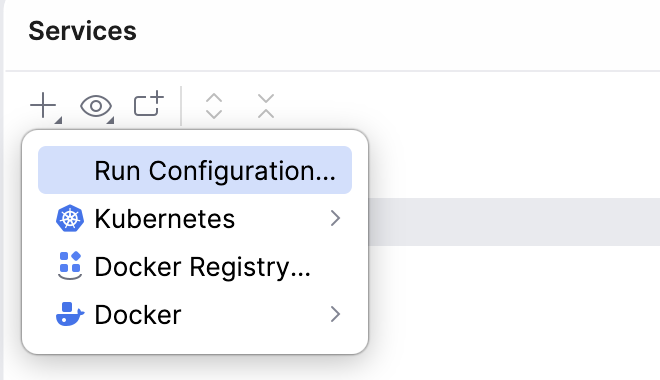
3. Select a run/debug configuration type from the list to add all configurations of this type to the window.
If you have already created one or more configurations of the selected type, IntelliJ IDEA displays them in a dedicated node. If there are no configurations of the selected type yet, the IDE opens the Add New Configuration dialog, where you can [create a new run/debug configuration](run-debug-configuration.html#createExplicitly).
Buttons on the toolbar depend on the selected type of the run/debug configuration and can include the following:

: Run `Ctrl+Shift+F10` (Windows), `⌃ ⇧ R` (macOS), `⌃ ⇧ F10` (IntelliJ IDEA Classic (macOS)), `⌃ ⇧ R` (macOS System Shortcuts), `Ctrl+Shift+F10` (XWin), `Ctrl+Shift+F10` (GNOME), `Ctrl+Shift+F10` (KDE), `Ctrl+Shift+F10` (Emacs), `Ctrl+Shift+F10` (Sublime Text), `Ctrl+Shift+F10` (Sublime Text (macOS)), `Alt+Shift+F6` (NetBeans), `Ctrl+Alt+F5` (Visual Studio), `⌃ ⌥ F5` (Visual Studio (macOS)), `Ctrl+Shift+F10` (Eclipse), `⌃ ⇧ R` (Eclipse (macOS))
:
: Run the selected configuration.

: Debug `⌃ ⇧ D` (Windows), `⌃ ⇧ D` (macOS), `⌃ ⇧ F9` (IntelliJ IDEA Classic (macOS)), `⌃ ⇧ D` (macOS System Shortcuts), `⌃ ⇧ D` (XWin), `⌃ ⇧ D` (GNOME), `⌃ ⇧ D` (KDE), `⌃ ⇧ D` (Emacs), `⌃ ⇧ D` (Sublime Text), `⌃ ⇧ D` (Sublime Text (macOS)), `Ctrl+Shift+F5` (NetBeans), `⌃ ⇧ D` (Visual Studio), `⌃ ⇧ D` (Visual Studio (macOS)), `⌃ ⇧ D` (Eclipse), `⌃ ⇧ D` (Eclipse (macOS))
:
: Run the selected configuration in Debug mode.

: Stop `Ctrl+F2` (Windows), `⌘ F2` (macOS), `⌘ F2` (IntelliJ IDEA Classic (macOS)), `⌃ ⇧ .` (macOS System Shortcuts), `Ctrl+F2` (XWin), `Ctrl+F2` (GNOME), `Ctrl+2` (KDE), `Ctrl+F2` (Emacs), `Ctrl+F2` (Sublime Text), `Ctrl+F2` (Sublime Text (macOS)), `Shift+F5` (NetBeans), `Shift+F5` (Visual Studio), `⇧ F5` (Visual Studio (macOS)), `Ctrl+F2` (Eclipse), `⌘ F2` (Eclipse (macOS))
:
: Stop the selected configuration.

: Rerun `Ctrl+Shift+F10` (Windows), `⌃ ⇧ R` (macOS), `⌃ ⇧ F10` (IntelliJ IDEA Classic (macOS)), `⌃ ⇧ R` (macOS System Shortcuts), `Ctrl+Shift+F10` (XWin), `Ctrl+Shift+F10` (GNOME), `Ctrl+Shift+F10` (KDE), `Ctrl+Shift+F10` (Emacs), `Ctrl+Shift+F10` (Sublime Text), `Ctrl+Shift+F10` (Sublime Text (macOS)), `Alt+Shift+F6` (NetBeans), `Ctrl+Alt+F5` (Visual Studio), `⌃ ⌥ F5` (Visual Studio (macOS)), `Ctrl+Shift+F10` (Eclipse), `⌃ ⇧ R` (Eclipse (macOS))
:
: Rerun the selected configuration.

: Rerun in Debug Mode `⌃ ⇧ D` (Windows), `⌃ ⇧ D` (macOS), `⌃ ⇧ F9` (IntelliJ IDEA Classic (macOS)), `⌃ ⇧ D` (macOS System Shortcuts), `⌃ ⇧ D` (XWin), `⌃ ⇧ D` (GNOME), `⌃ ⇧ D` (KDE), `⌃ ⇧ D` (Emacs), `⌃ ⇧ D` (Sublime Text), `⌃ ⇧ D` (Sublime Text (macOS)), `Ctrl+Shift+F5` (NetBeans), `⌃ ⇧ D` (Visual Studio), `⌃ ⇧ D` (Visual Studio (macOS)), `⌃ ⇧ D` (Eclipse), `⌃ ⇧ D` (Eclipse (macOS))
:
: Rerun the selected configuration in Debug mode.

: Filters
:
: Filter the output for the selected configuration. For example, you can select to show warnings and successful steps.

: More
:
: Additional actions related to the configuration. For example, you can open and modify the settings of the selected configuration.
## Application servers
All types of application server run/debug configurations are available in the Services tool window by default. Create an application server configuration, and it will be available in the list of services.
| Icon | Action | Description |
| --- | --- | --- |
|  | Run `Ctrl+Shift+F10` (Windows), `⌃ ⇧ R` (macOS), `⌃ ⇧ F10` (IntelliJ IDEA Classic (macOS)), `⌃ ⇧ R` (macOS System Shortcuts), `Ctrl+Shift+F10` (XWin), `Ctrl+Shift+F10` (GNOME), `Ctrl+Shift+F10` (KDE), `Ctrl+Shift+F10` (Emacs), `Ctrl+Shift+F10` (Sublime Text), `Ctrl+Shift+F10` (Sublime Text (macOS)), `Alt+Shift+F6` (NetBeans), `Ctrl+Alt+F5` (Visual Studio), `⌃ ⌥ F5` (Visual Studio (macOS)), `Ctrl+Shift+F10` (Eclipse), `⌃ ⇧ R` (Eclipse (macOS)) | Run the selected application server configuration. |
|  | Rerun `Ctrl+Shift+F10` (Windows), `⌃ ⇧ R` (macOS), `⌃ ⇧ F10` (IntelliJ IDEA Classic (macOS)), `⌃ ⇧ R` (macOS System Shortcuts), `Ctrl+Shift+F10` (XWin), `Ctrl+Shift+F10` (GNOME), `Ctrl+Shift+F10` (KDE), `Ctrl+Shift+F10` (Emacs), `Ctrl+Shift+F10` (Sublime Text), `Ctrl+Shift+F10` (Sublime Text (macOS)), `Alt+Shift+F6` (NetBeans), `Ctrl+Alt+F5` (Visual Studio), `⌃ ⌥ F5` (Visual Studio (macOS)), `Ctrl+Shift+F10` (Eclipse), `⌃ ⇧ R` (Eclipse (macOS)) | Restart the selected application server configuration. |
|  | Debug `⌃ ⇧ D` (Windows), `⌃ ⇧ D` (macOS), `⌃ ⇧ F9` (IntelliJ IDEA Classic (macOS)), `⌃ ⇧ D` (macOS System Shortcuts), `⌃ ⇧ D` (XWin), `⌃ ⇧ D` (GNOME), `⌃ ⇧ D` (KDE), `⌃ ⇧ D` (Emacs), `⌃ ⇧ D` (Sublime Text), `⌃ ⇧ D` (Sublime Text (macOS)), `Ctrl+Shift+F5` (NetBeans), `⌃ ⇧ D` (Visual Studio), `⌃ ⇧ D` (Visual Studio (macOS)), `⌃ ⇧ D` (Eclipse), `⌃ ⇧ D` (Eclipse (macOS)) | Debug the selected application server configuration. |
|  | Stop `Ctrl+F2` (Windows), `⌘ F2` (macOS), `⌘ F2` (IntelliJ IDEA Classic (macOS)), `⌃ ⇧ .` (macOS System Shortcuts), `Ctrl+F2` (XWin), `Ctrl+F2` (GNOME), `Ctrl+2` (KDE), `Ctrl+F2` (Emacs), `Ctrl+F2` (Sublime Text), `Ctrl+F2` (Sublime Text (macOS)), `Shift+F5` (NetBeans), `Shift+F5` (Visual Studio), `⇧ F5` (Visual Studio (macOS)), `Ctrl+F2` (Eclipse), `⌘ F2` (Eclipse (macOS)) | Stop the selected application server configuration. |
|  | Deploy All | Deploy all artifacts of the selected application server configuration. |
|  | Artifacts | Configure which artifacts to deploy for the selected application server configuration. |
|  | Update Running Application `Ctrl+F10` (Windows), `⌘ F10` (macOS), `⌘ F10` (IntelliJ IDEA Classic (macOS)), `⌘ F10` (macOS System Shortcuts), `Ctrl+F10` (XWin), `Ctrl+F10` (GNOME), `Ctrl+F10` (KDE), `Ctrl+F10` (Emacs), `Ctrl+F10` (Sublime Text), `⌘ F10` (Sublime Text (macOS)), `Ctrl+F10` (NetBeans), `Ctrl+F10` (Visual Studio), `⌘ F10` (Visual Studio (macOS)), `Ctrl+F10` (Eclipse), `⌘ F10` (Eclipse (macOS)) | Update a running application after modifying the source code. |
## Cloud providers
This type of service is available if you have configured the corresponding cloud provider settings.
Procedure: Add a cloud provider
1. Click , select Cloud Connection, and then select the necessary cloud provider.
2. Configure the cloud provider connection settings and click OK to apply the new configuration.
| Icon | Action | Description |
| --- | --- | --- |
|  | Connect | Connect to the selected cloud provider. |
|  | Disconnect | Disconnect from the selected cloud provider. |
|  | Edit Configuration `Shift+F4` (Windows), `⇧ F4` (macOS), `⇧ F4` (IntelliJ IDEA Classic (macOS)), `⇧ F4` (macOS System Shortcuts), `Shift+F4` (XWin), `Shift+F4` (GNOME), `Shift+F4` (KDE), `Shift+F4` (Emacs), `Shift+F4` (Sublime Text), `Shift+F4` (Sublime Text (macOS)), `Shift+F4` (NetBeans), `Shift+F4` (Visual Studio), `⇧ F4` (Visual Studio (macOS)), `Shift+F4` (Eclipse), `⇧ F4` (Eclipse (macOS)) | Configure the selected cloud provider connection settings. |
|  | Deploy | Deploy artifacts to the selected cloud provider. |
## Database
> **Note:**
> To learn where and how to use database services in Services tool window, refer to the [Sessions](managing-connection-sessions.html), [Query results](viewing-query-results.html), and [Run SQL files](run-sql-files.html) topics.
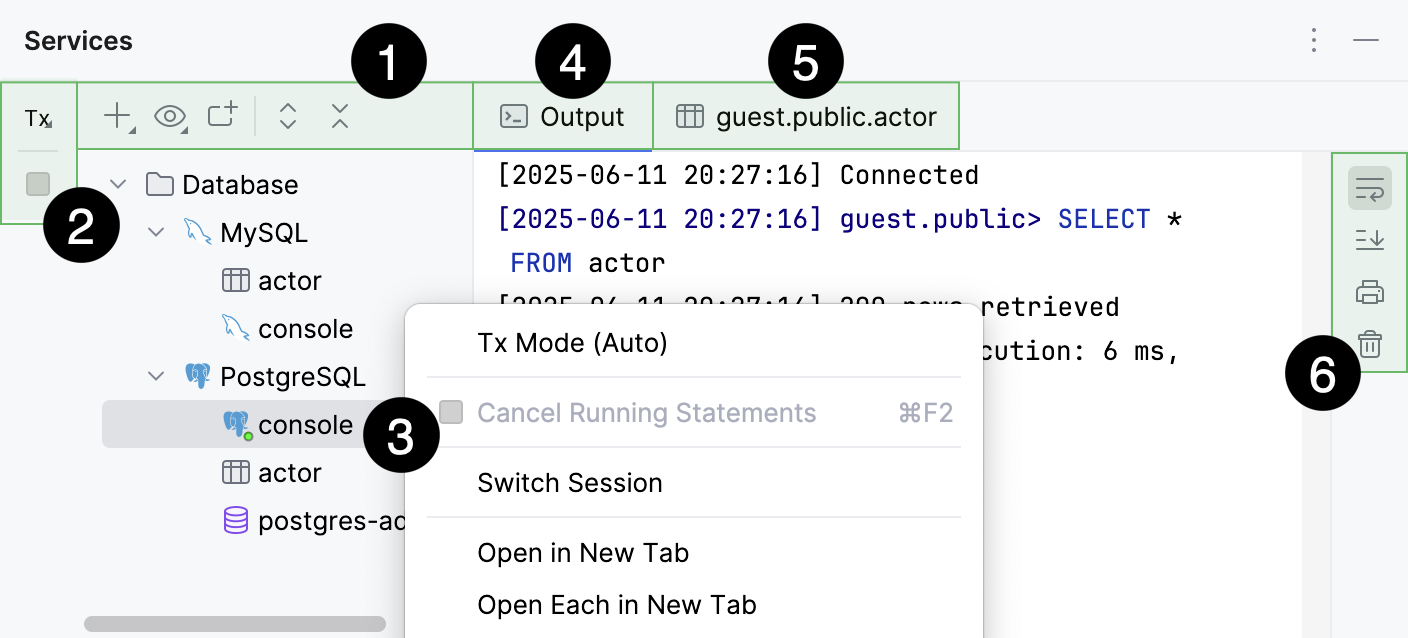
1. [Main toolbar.](#main_toolbar)
2. [Left toolbar.](#db_left_toolbar)
3. [Context menu.](#db_context_menu)
4. [Output tab.](#db_output_tab)
5. [Result tab.](#db_result_tab)
6. [Right toolbar.](#db_output_tab_right_toolbar)
### Left toolbar
Buttons on the toolbar depend on the selected item and can include the following:
| Icon | Action and shortcut | Description |
| --- | --- | --- |
|  | Jump to Query Console `Ctrl+Shift+F10` (Windows), `⌘ ⇧ F10` (macOS), `⌘ ⇧ F10` (IntelliJ IDEA Classic (macOS)), `⌘ ⇧ F10` (macOS System Shortcuts), `Ctrl+Shift+F10` (XWin), `Ctrl+Shift+F10` (GNOME), `Ctrl+Shift+F10` (KDE), `Ctrl+Shift+F10` (Emacs), `Ctrl+Shift+F10` (Sublime Text), `⌘ ⇧ F10` (Sublime Text (macOS)), `Ctrl+Shift+F10` (NetBeans), `Ctrl+Shift+F10` (Visual Studio), `⌘ ⇧ F10` (Visual Studio (macOS)), `Ctrl+Shift+F10` (Eclipse), `⌘ ⇧ F10` (Eclipse (macOS)) | Open the Query Consoles popup. In the Query Consoles popup, you can select a query console that you want to open in the editor. |
|  | Deactivate `Ctrl+F2` (Windows), `⌘ F2` (macOS), `⌘ F2` (IntelliJ IDEA Classic (macOS)), `⌃ ⇧ .` (macOS System Shortcuts), `Ctrl+F2` (XWin), `Ctrl+F2` (GNOME), `Ctrl+2` (KDE), `Ctrl+F2` (Emacs), `Ctrl+F2` (Sublime Text), `Ctrl+F2` (Sublime Text (macOS)), `Shift+F5` (NetBeans), `Shift+F5` (Visual Studio), `⇧ F5` (Visual Studio (macOS)), `Ctrl+F2` (Eclipse), `⌘ F2` (Eclipse (macOS)) | Close the database connection for the selected data source or data sources. (The data sources with connected sessions are indicated with a green dot in the corner of their icon.) |
| `Tx` | Transaction Mode and Transaction Isolation | Select the [isolation level](https://en.wikipedia.org/wiki/Isolation_(database_systems)) for database transactions and the way the transactions are committed. * Auto: the current transaction is committed automatically when you submit your local changes to the database server. * Manual: the changes submitted to the database server are accumulated in a transaction that can either be committed or rolled back explicitly by means of  Submit and Commit or  Roll Back buttons on the toolbar. For more information about database transaction modes and isolation, refer to [Submit changes to a database](submitting-and-reverting-changes.html). |
|  | Commit | (For the Manual transaction mode.) Commit the current transaction. This button is available only for the manual transaction mode. See also, [transaction mode and isolation](submitting-and-reverting-changes.html). |
|  | Roll back | (For the Manual transaction mode.) Roll back changes. This button is available only for the manual transaction mode. See also, [transaction modes and isolation](submitting-and-reverting-changes.html). |
|  | Cancel Running Statements `Ctrl+F2` (Windows), `⌘ F2` (macOS), `⌘ F2` (IntelliJ IDEA Classic (macOS)), `⌃ ⇧ .` (macOS System Shortcuts), `Ctrl+F2` (XWin), `Ctrl+F2` (GNOME), `Ctrl+2` (KDE), `Ctrl+F2` (Emacs), `Ctrl+F2` (Sublime Text), `Ctrl+F2` (Sublime Text (macOS)), `Shift+F5` (NetBeans), `Shift+F5` (Visual Studio), `⇧ F5` (Visual Studio (macOS)), `Ctrl+F2` (Eclipse), `⌘ F2` (Eclipse (macOS)) | Terminate execution of the current statement or statements. |
### Context menu
Actions of the context menu depend on the selected item and can include the following:
| Icon | Action and shortcut | Description |
| --- | --- | --- |
|  | Jump to Query Console `Ctrl+Shift+F10` (Windows), `⌘ ⇧ F10` (macOS), `⌘ ⇧ F10` (IntelliJ IDEA Classic (macOS)), `⌘ ⇧ F10` (macOS System Shortcuts), `Ctrl+Shift+F10` (XWin), `Ctrl+Shift+F10` (GNOME), `Ctrl+Shift+F10` (KDE), `Ctrl+Shift+F10` (Emacs), `Ctrl+Shift+F10` (Sublime Text), `⌘ ⇧ F10` (Sublime Text (macOS)), `Ctrl+Shift+F10` (NetBeans), `Ctrl+Shift+F10` (Visual Studio), `⌘ ⇧ F10` (Visual Studio (macOS)), `Ctrl+Shift+F10` (Eclipse), `⌘ ⇧ F10` (Eclipse (macOS)) | Open the Query Consoles popup. In the Query Consoles popup, you can select a query console that you want to open in the editor. |
|  | Deactivate `Ctrl+F2` (Windows), `⌘ F2` (macOS), `⌘ F2` (IntelliJ IDEA Classic (macOS)), `⌃ ⇧ .` (macOS System Shortcuts), `Ctrl+F2` (XWin), `Ctrl+F2` (GNOME), `Ctrl+2` (KDE), `Ctrl+F2` (Emacs), `Ctrl+F2` (Sublime Text), `Ctrl+F2` (Sublime Text (macOS)), `Shift+F5` (NetBeans), `Shift+F5` (Visual Studio), `⇧ F5` (Visual Studio (macOS)), `Ctrl+F2` (Eclipse), `⌘ F2` (Eclipse (macOS)) | Close the database connection for the selected data source or data sources. (The data sources with connected sessions are indicated with a green dot in the corner of their icon.) |
| | Close All Sessions | Close all opened sessions to a data source. |
| | Open in New Tab | Move the selected items to a separate tab. |
| | Open Each in New Tab | Split the selected items into separate tabs. |
| | Open Each Type in New Tab | Create separate tabs for each type of service. |
| | Delete `Delete` (Windows), `⌦` (macOS), `⌦` (IntelliJ IDEA Classic (macOS)), `⌦` (macOS System Shortcuts), `Delete` (XWin), `Delete` (GNOME), `Delete` (KDE), `Delete` (Emacs), `Delete` (Sublime Text), `⌦` (Sublime Text (macOS)), `Delete` (NetBeans), `Delete` (Visual Studio), `⌦` (Visual Studio (macOS)), `Delete` (Eclipse), `⌦` (Eclipse (macOS)) | Close all opened sessions to a data source. Identical to Close All Sessions. |
| `Tx` | Transaction Mode and Transaction Isolation | Select the [isolation level](https://en.wikipedia.org/wiki/Isolation_(database_systems)) for database transactions and the way the transactions are committed. * Auto: the current transaction is committed automatically when you submit your local changes to the database server. * Manual: the changes submitted to the database server are accumulated in a transaction that can either be committed or rolled back explicitly by means of  Submit and Commit or  Roll Back buttons on the toolbar. For more information about database transaction modes and isolation, refer to [Submit changes to a database](submitting-and-reverting-changes.html). |
|  | Commit | (For the Manual transaction mode.) Commit the current transaction. This button is available only for the manual transaction mode. See also, [transaction mode and isolation](submitting-and-reverting-changes.html). |
|  | Roll back | (For the Manual transaction mode.) Roll back changes. This button is available only for the manual transaction mode. See also, [transaction modes and isolation](submitting-and-reverting-changes.html). |
|  | Cancel Running Statements `Ctrl+F2` (Windows), `⌘ F2` (macOS), `⌘ F2` (IntelliJ IDEA Classic (macOS)), `⌃ ⇧ .` (macOS System Shortcuts), `Ctrl+F2` (XWin), `Ctrl+F2` (GNOME), `Ctrl+2` (KDE), `Ctrl+F2` (Emacs), `Ctrl+F2` (Sublime Text), `Ctrl+F2` (Sublime Text (macOS)), `Shift+F5` (NetBeans), `Shift+F5` (Visual Studio), `⇧ F5` (Visual Studio (macOS)), `Ctrl+F2` (Eclipse), `⌘ F2` (Eclipse (macOS)) | Terminate execution of the current statement or statements. |
| | Close Session | Close the selected session. |
| | Switch session | Attach the selected file to one of the available sessions. |
| | Open in New Tab | Move the selected items to a separate tab. |
| | Open Each in New Tab | Split the selected items into separate tabs. |
| | Open Each Type in New Tab | Create separate tabs for each type of service. |
| | Delete `Delete` (Windows), `⌦` (macOS), `⌦` (IntelliJ IDEA Classic (macOS)), `⌦` (macOS System Shortcuts), `Delete` (XWin), `Delete` (GNOME), `Delete` (KDE), `Delete` (Emacs), `Delete` (Sublime Text), `⌦` (Sublime Text (macOS)), `Delete` (NetBeans), `Delete` (Visual Studio), `⌦` (Visual Studio (macOS)), `Delete` (Eclipse), `⌦` (Eclipse (macOS)) | Close all opened sessions to a data source. Identical to Close All Sessions. |
|  | Jump to Source `F4` (Windows), `⌘ ↓` (macOS), `F4` (IntelliJ IDEA Classic (macOS)), `F4` (macOS System Shortcuts), `F4` (XWin), `F4` (GNOME), `F4` (KDE), `F4` (Emacs), `F4` (Sublime Text), `F4` (Sublime Text (macOS)), `F4` (NetBeans), `F4` (Visual Studio), `⌘ ↓` (Visual Studio (macOS)), `F12` (Eclipse), `F3` (Eclipse (macOS)) | Open the file in the editor. |
### Output tab
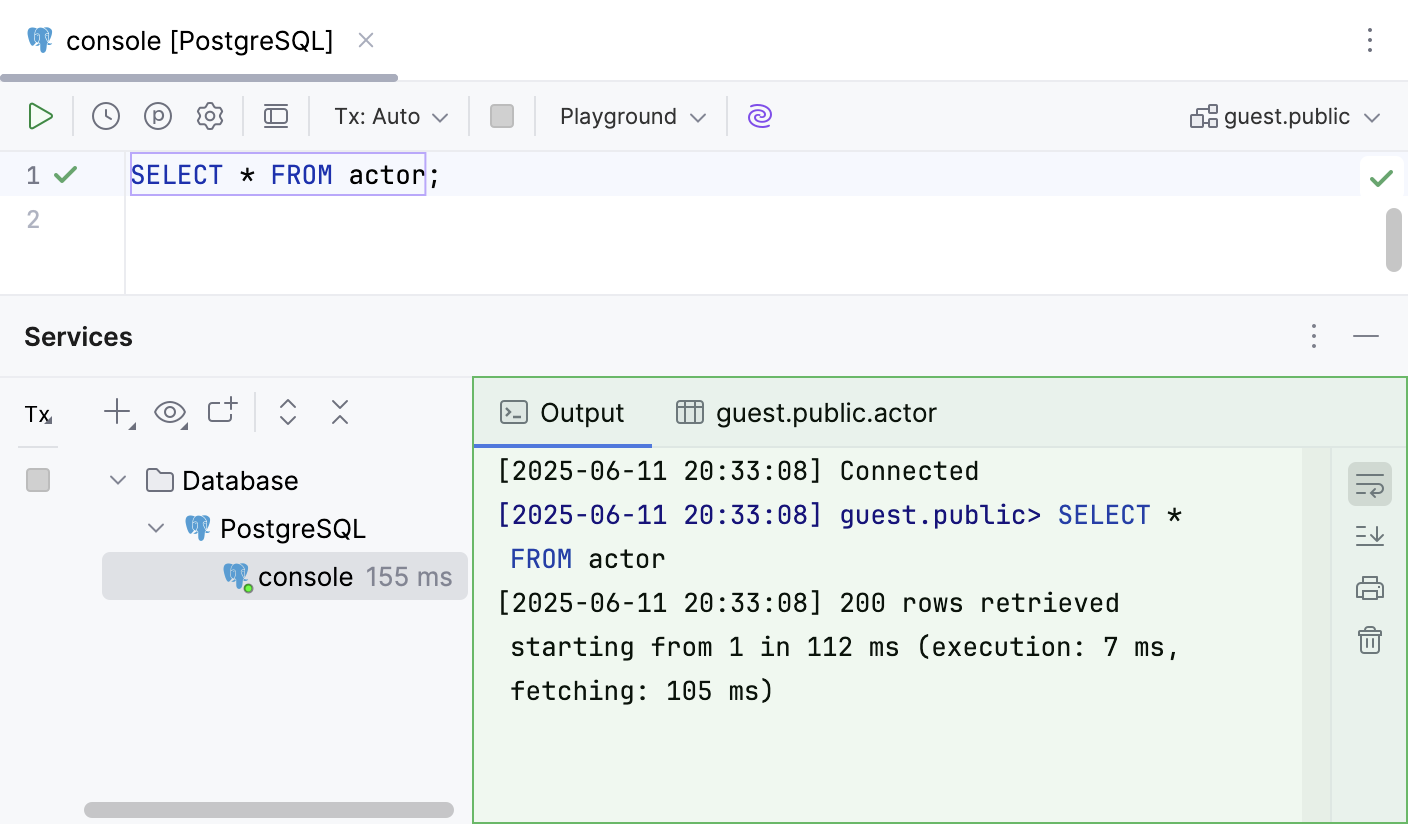
Use the Output tab of Services tool window to view information about SQL statements and other operations that you performed in a query console. Also, the Output tab displays information about errors, timestamps, affected rows, query duration, the autocommit mode, and other operations.
#### Right toolbar
| Item | Tooltip | Description |
| --- | --- | --- |
|  | Soft-Wrap | Wrap long lines of text. |
|  | Scroll to End | Scroll the output log to the end. |
|  | Print… | Print a console file, a selected text, or all the files in a directory. |
|  | Clear All | Clear the Output tab. |
#### Context menu
| Item | Description |
| --- | --- |
|  Copy | Copy the selected text. |
| Copy Path/Reference | Copy a reference link to a file or a line. |
|  Compare with Clipboard | Open the Clipboard vs Editor dialog where you can see the diff between the selected text and the text that you copied to a clipboard. |
| Search with Google | Open a browser and run a search on Google for the selected text. |
| Fold Lines Like This | Fold the lines that include the selected text. |
| Pause Output | Pause the output logging. |
|  Clear All | Clear the output log. |
### Result tab
Use the Result tab of Services tool window to see the data that was retrieved from the database in a table format. You can sort, add, edit, and remove data as well as perform other associated table tasks. For more information about working with tables, rows, columns, and cells, refer to [Tables](working-with-the-data-editor.html).
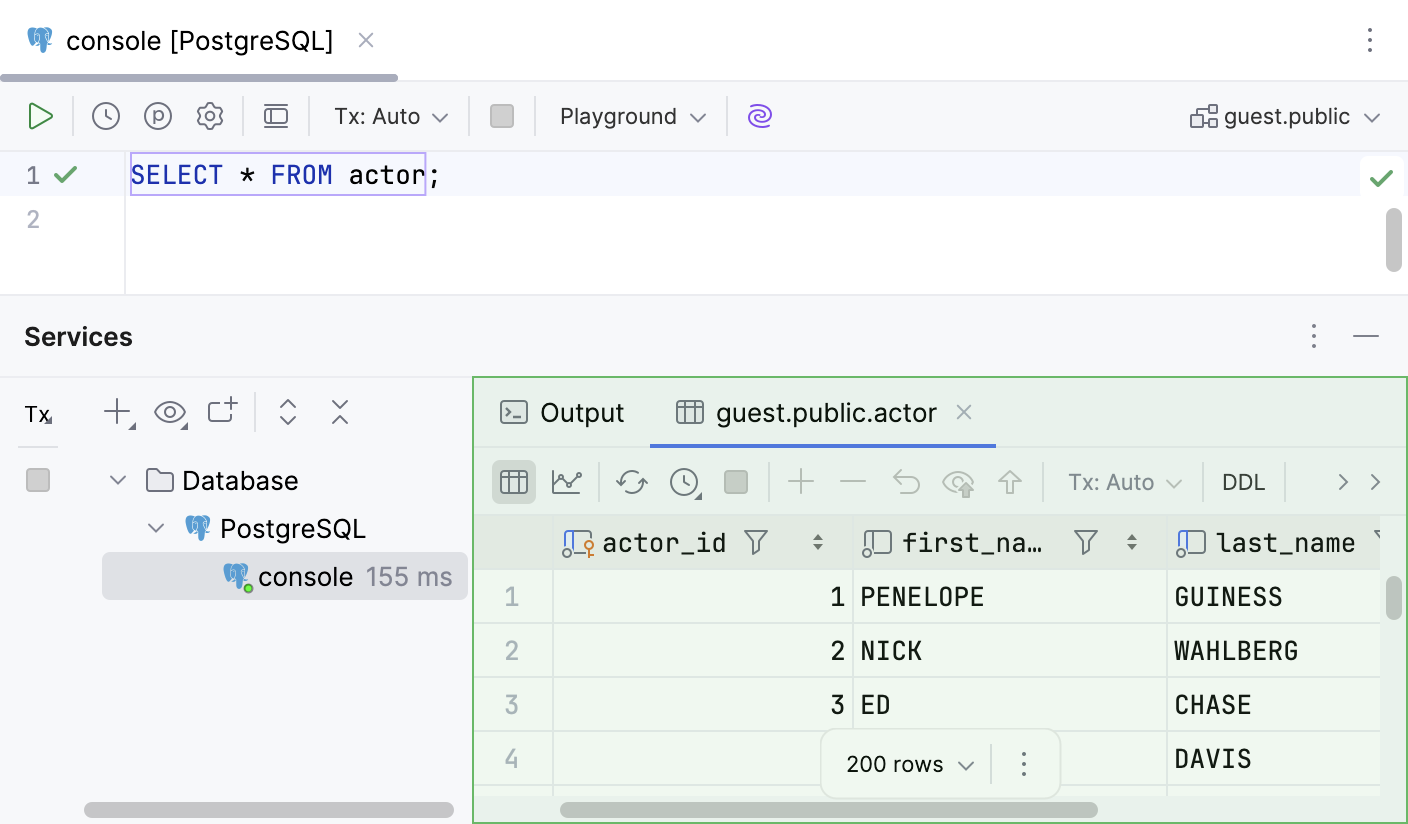
Most of the functions in the Result tab are accessed by using controls on the toolbar, context menu commands for the data cells, and associated keyboard shortcuts. You can see what other actions with tables you can perform in [Tables](working-with-the-data-editor.html).
#### Toolbar controls
| Icon | Action and shortcut | Description |
| --- | --- | --- |
|  | Switch to Table | View the query results as a [table in data editor.](data-editor-and-viewer.html) |
|  | Switch to Chart | View the query results as a [chart](tables-view-data.html#visualize_data). |
|      | First Page Previous Page `Ctrl+Alt+Up` (Windows), `⌘ ⌥ ↑` (macOS), `⌘ ⌥ ↑` (IntelliJ IDEA Classic (macOS)), `⌘ ⌥ ↑` (macOS System Shortcuts), `Ctrl+Alt+Up` (XWin), `Ctrl+Alt+Up` (GNOME), `Ctrl+Alt+Up` (KDE), `Ctrl+Alt+Up` (Emacs), `Ctrl+Alt+Up` (Sublime Text), `⌘ ⌥ ↑` (Sublime Text (macOS)), `Ctrl+Alt+Up` (NetBeans), `Ctrl+Alt+Up` (Visual Studio), `⌘ ⌥ ↑` (Visual Studio (macOS)), `Ctrl+Alt+Up` (Eclipse), `⌘ ⌥ ↑` (Eclipse (macOS)) Change page size Next Page `Ctrl+Alt+Down` (Windows), `⌘ ⌥ ↓` (macOS), `⌘ ⌥ ↓` (IntelliJ IDEA Classic (macOS)), `⌘ ⌥ ↓` (macOS System Shortcuts), `Ctrl+Alt+Down` (XWin), `Ctrl+Alt+Down` (GNOME), `Ctrl+Alt+Down` (KDE), `Ctrl+Alt+Down` (Emacs), `Ctrl+Alt+Down` (Sublime Text), `⌘ ⌥ ↓` (Sublime Text (macOS)), `Ctrl+Alt+Down` (NetBeans), `Ctrl+Alt+Down` (Visual Studio), `⌘ ⌥ ↓` (Visual Studio (macOS)), `Ctrl+Alt+Down` (Eclipse), `⌘ ⌥ ↓` (Eclipse (macOS)) Last Page | Available on the toolbar if the position is selected in the IDE settings (`Ctrl+Alt+S` (Windows), `⌘ Comma` (macOS), `⌘ Comma` (IntelliJ IDEA Classic (macOS)), `⌘ Comma` (macOS System Shortcuts), `Ctrl+Alt+S` (XWin), `Ctrl+Alt+S` (GNOME), `Ctrl+Alt+S` (KDE), `Ctrl+Alt+S` (Emacs), `Ctrl+Alt+S` (Sublime Text), `⌘ Comma` (Sublime Text (macOS)), `Ctrl+Alt+S` (NetBeans), `Ctrl+Alt+S` (Visual Studio), `⌘ Comma` (Visual Studio (macOS)), `Ctrl+Alt+S` (Eclipse), `⌘ Comma` (Eclipse (macOS))) under `Database \| Data editor and viewer \| Controls Customization \| Position of the grid pagination toolbar`. Use navigation icons and corresponding commands for switching between pages that show the retrieved data and change the page size. A number of rows that you see on the Result tab are referred to as a result set page. If this number is less than the number of rows that satisfy the query, only a subset of all the rows is shown at a time. If all the rows are currently shown, navigation icons and the corresponding commands are inactive. You can see the limit between the navigation buttons. You can change it here by clicking and selecting the necessary limit or [in settings](data-editor-and-viewer.html#change_limit_in_settings). *  First Page: jump to the first page of results. *  Previous Page: go to the previous page of results. *  Next Page: go to the next page of results. *  Last Page: jump to the last page of results. To change the size of a result set page, click the Change page size button and select the size. Alternatively, open settings (`Ctrl+Alt+S` (Windows), `⌘ Comma` (macOS), `⌘ Comma` (IntelliJ IDEA Classic (macOS)), `⌘ Comma` (macOS System Shortcuts), `Ctrl+Alt+S` (XWin), `Ctrl+Alt+S` (GNOME), `Ctrl+Alt+S` (KDE), `Ctrl+Alt+S` (Emacs), `Ctrl+Alt+S` (Sublime Text), `⌘ Comma` (Sublime Text (macOS)), `Ctrl+Alt+S` (NetBeans), `Ctrl+Alt+S` (Visual Studio), `⌘ Comma` (Visual Studio (macOS)), `Ctrl+Alt+S` (Eclipse), `⌘ Comma` (Eclipse (macOS))) and navigate to `Tools \| Database \| Data Editor and Viewer`. In the Limit page size to field, type a new size of a result set page. Alternatively, to disable the page size restriction, clear the Limit page size to checkbox. |
|  | Reload Page `Ctrl+F5` (Windows), `⌘ R` (macOS), `⌃ F5` (IntelliJ IDEA Classic (macOS)), `⌘ R` (macOS System Shortcuts), `Ctrl+F5` (XWin), `Ctrl+F5` (GNOME), `Ctrl+5` (KDE), `Ctrl+F5` (Emacs), `Ctrl+F5` (Sublime Text), `⌘ R` (Sublime Text (macOS)), `Ctrl+F5` (NetBeans), `Ctrl+Alt+R` (Visual Studio), `⌘ ⌥ R` (Visual Studio (macOS)), `Ctrl+F5` (Eclipse), `Ctrl+F5` (Eclipse (macOS)) | [Reload data](tables-view-data.html#updating_table_view) for the table view to synchronize the data that you see in the editor with the contents of the database. Also, use the Reload Page button when you want to apply a new [page size limit](rows.html#making_all_rows_visible_proc) setting after its change. |
|  | Update Interval | Select, pause, or disable update interval for the current table. You can also set a custom one. |
|  | Cancel Running Statements `Ctrl+F2` (Windows), `⌘ F2` (macOS), `⌘ F2` (IntelliJ IDEA Classic (macOS)), `⌃ ⇧ .` (macOS System Shortcuts), `Ctrl+F2` (XWin), `Ctrl+F2` (GNOME), `Ctrl+2` (KDE), `Ctrl+F2` (Emacs), `Ctrl+F2` (Sublime Text), `Ctrl+F2` (Sublime Text (macOS)), `Shift+F5` (NetBeans), `Shift+F5` (Visual Studio), `⇧ F5` (Visual Studio (macOS)), `Ctrl+F2` (Eclipse), `⌘ F2` (Eclipse (macOS)) | Terminate execution of the current statement or statements. |
|  | Add Row `Alt+Insert` (Windows), `⌘ N` (macOS), `⌃ N` (IntelliJ IDEA Classic (macOS)), `⌘ N` (macOS System Shortcuts), `Alt+Insert` (XWin), `Alt+Insert` (GNOME), `Alt+Insert` (KDE), `Alt+Insert` (Emacs), `Ctrl+N` (Sublime Text), `⌘ N` (Sublime Text (macOS)), `Alt+Insert` (NetBeans), `Ctrl+N` (Visual Studio), `⌘ N` (Visual Studio (macOS)), `Alt+Insert` (Eclipse), `⌘ N` (Eclipse (macOS)) | Add a row to the table. To save a new row, click  Submit on the toolbar. The Add Row button is disabled in the inappropriate context. For example, if the current table does not permit adding rows. For more information about working with rows, refer to [Rows](rows.html). |
|  | Delete Row `Ctrl+Y` (Windows), `⌘ ⌫` (macOS), `⌘ Y` (IntelliJ IDEA Classic (macOS)), `⌘ ⌫` (macOS System Shortcuts), `Ctrl+Y` (XWin), `Ctrl+Y` (GNOME), `Ctrl+Y` (KDE), `Ctrl+Y` (Emacs), `Ctrl+Shift+K` (Sublime Text), `⌃ ⇧ K` (Sublime Text (macOS)), `Ctrl+E` (NetBeans), `Ctrl+L` (Visual Studio), `⌘ ⇧ L` (Visual Studio (macOS)), `Ctrl+D` (Eclipse), `⌘ D` (Eclipse (macOS)) | Delete the selected row or rows. To select multiple rows, click numbers in the gutter. Also, you can press `Ctrl` (Windows), `Ctrl` (macOS), `Ctrl` (IntelliJ IDEA Classic (macOS)), `Ctrl` (macOS System Shortcuts), `Ctrl` (XWin), `Ctrl` (GNOME), `Ctrl` (KDE), `Ctrl` (Emacs), `Ctrl` (Sublime Text), `Ctrl` (Sublime Text (macOS)), `Ctrl` (NetBeans), `Ctrl` (Visual Studio), `Ctrl` (Visual Studio (macOS)), `Ctrl` (Eclipse), `Ctrl` (Eclipse (macOS)) and click the necessary rows. The Delete Row button is disabled in the inappropriate context. For example, if the current table does not permit removing rows. |
|  | Revert Selected `Ctrl+Alt+Z` (Windows), `⌘ ⌥ Z` (macOS), `⌘ ⌥ Z` (IntelliJ IDEA Classic (macOS)), `⌘ ⌥ Z` (macOS System Shortcuts), `Ctrl+Alt+Z` (XWin), `Ctrl+Alt+Z` (GNOME), `Ctrl+Alt+Z` (KDE), `Ctrl+Alt+Z` (Emacs), `Ctrl+Alt+Z` (Sublime Text), `⌘ ⌥ Z` (Sublime Text (macOS)), `Ctrl+Alt+Z` (NetBeans), `Ctrl+Alt+Z` (Visual Studio), `⌘ ⌥ Z` (Visual Studio (macOS)), `Ctrl+Alt+Z` (Eclipse), `⌃ ⌥ ⇧ Z` (Eclipse (macOS)) | Revert changes that you made to a cell value. You can select a scope of different cells and revert values in this scope. For more information about reverting changes, refer to [Submit changes to a database](submitting-and-reverting-changes.html). |
|  | Preview Pending Changes | [Preview DML](tables-view-data.html#preview-dml) of changes that you made to the table. |
|  | Submit `Ctrl+Enter` (Windows), `⌘ ⏎` (macOS), `⌘ ⏎` (IntelliJ IDEA Classic (macOS)), `⌘ ⏎` (macOS System Shortcuts), `Ctrl+Enter` (XWin), `Ctrl+Enter` (GNOME), `Ctrl+Enter` (KDE), `Ctrl+Enter` (Emacs), `Ctrl+Enter` (Sublime Text), `⌘ ⏎` (Sublime Text (macOS)), `Ctrl+Enter` (NetBeans), `Ctrl+Enter` (Visual Studio), `⌘ ⏎` (Visual Studio (macOS)), `Ctrl+Enter` (Eclipse), `⌘ ⏎` (Eclipse (macOS)) | Submit local changes to the database server. For more information about submitting and reverting changes, refer to [Submit changes to a database](submitting-and-reverting-changes.html). |
|  | Transaction Mode and Transaction Isolation | Select the [isolation level](https://en.wikipedia.org/wiki/Isolation_(database_systems)) for database transactions and the way the transactions are committed. * Auto: the current transaction is committed automatically when you submit your local changes to the database server. * Manual: the changes submitted to the database server are accumulated in a transaction that can either be committed or rolled back explicitly by means of  Submit and Commit or  Roll Back buttons on the toolbar. For more information about database transaction modes and isolation, refer to [Submit changes to a database](submitting-and-reverting-changes.html). |
|  | Submit and Commit`Ctrl+Alt+Shift+Enter` (Windows), `⌘ ⌥ ⇧ ⏎` (macOS), `⌘ ⌥ ⇧ ⏎` (IntelliJ IDEA Classic (macOS)), `⌘ ⌥ ⇧ ⏎` (macOS System Shortcuts), `Ctrl+Alt+Shift+Enter` (XWin), `Ctrl+Alt+Shift+Enter` (GNOME), `Ctrl+Alt+Shift+Enter` (KDE), `Ctrl+Alt+Shift+Enter` (Emacs), `Ctrl+Alt+Shift+Enter` (Sublime Text), `⌘ ⌥ ⇧ ⏎` (Sublime Text (macOS)), `Ctrl+Alt+Shift+Enter` (NetBeans), `Ctrl+Alt+Shift+Enter` (Visual Studio), `⌘ ⌥ ⇧ ⏎` (Visual Studio (macOS)), `Ctrl+Alt+Shift+Enter` (Eclipse), `⌘ ⌥ ⇧ ⏎` (Eclipse (macOS)) | (For the Manual transaction mode.) Submit and commit the current transaction. This button is available only for the manual transaction mode. See also, [transaction mode and isolation](submitting-and-reverting-changes.html). |
|  | Roll Back | (For the Manual transaction mode.) Roll back changes. This button is available only for the manual transaction mode. See also, [transaction modes and isolation](submitting-and-reverting-changes.html). |
|  | Find on Current Page | Client side text search for the current page. |
|  | Enable Local Filter | Enables a local filter for every column of the grid. For more information about local filter, refer to the [Filter data](tables-filter.html#use_the_local_filter) topic. |
|  | Record View | View and edit values of a certain record in a side panel. For more information about the action, refer to the [View data](tables-view-data.html#single_record_view) topic. |
|  | Show Geo Viewer | Enables a graphic viewer to explore geospatial data in your database. For more information about the Geo viewer, refer to the [Using Geo viewer for geographical data in PostgreSQL](tables-view-data.html). |
|  | Show Chart | Opens data visualization. For more information about about charts, refer to [Visualize data](tables-view-data.html#visualize_data). |
|  | Data Extractors | Select an output format for your data. For the list of available formats and full information about data extractors, refer to the [Data extractors](data-extractors.html) topic. Also, you can configure the following options: * Skip Computed Columns: do not include virtual columns that are not physically stored in the table (for example, the identity column). * Skip Generated Columns: for `INSERT` and `UPDATE` statements, do not include auto-increment fields when copying or saving data. * Configure CSV Formats: open the [CSV Formats](data-extractors.html#csv_formats_dialog) dialog where you can manage your delimiter-separated values formats (for example, CSV, TSV). * Go To Scripts Directory: open a directory with scripts that convert table data into different output formats. For more information about data extractors, refer to the [Data extractors](data-extractors.html) topic. |
|  | Export Data | Export the table data to the clipboard or save to a file. |
|  | Copy to Database | Copy the data to another table, schema or database. Select the target schema (a new table will be created) or table (the data will be added to the selected table). In the dialog that opens, specify the data mapping info and the settings for the target table. |
|  | Compare Data | Compare the current table with a table from the list. For more information about comparing tables, refer to [Compare table data](compare-data.html#compare-table-data). |
|  | View as | Select the mode for browsing and editing table data. * Transpose: viewing mode in which rows and columns are [interchanged](tables-view-data.html#transposing_table). You can combine this checkbox with other viewing modes. To make this mode a default for tables and views, open settings by pressing `Ctrl+Alt+S` (Windows), `⌘ Comma` (macOS), `⌘ Comma` (IntelliJ IDEA Classic (macOS)), `⌘ Comma` (macOS System Shortcuts), `Ctrl+Alt+S` (XWin), `Ctrl+Alt+S` (GNOME), `Ctrl+Alt+S` (KDE), `Ctrl+Alt+S` (Emacs), `Ctrl+Alt+S` (Sublime Text), `⌘ Comma` (Sublime Text (macOS)), `Ctrl+Alt+S` (NetBeans), `Ctrl+Alt+S` (Visual Studio), `⌘ Comma` (Visual Studio (macOS)), `Ctrl+Alt+S` (Eclipse), `⌘ Comma` (Eclipse (macOS)) and navigate to `Tools \| Database \| Data Editor and Viewer`. From the Automatically transpose tables list, select Always. When this option is enabled, query results are not transposed. * Table: the default viewing mode of table data. Data in a table is stored in a cell that is an intersection of a vertical column and horizontal row. * Tree: viewing mode in which data is displayed in the key-value table with the possibility to expand the key cell if it contains children nodes. Data from the expanded children node is distributed between key and value columns. You might consider using this mode to work with JSON and array data. * Text: viewing mode in which data is displayed as a text. This mode uses data extractors to represent the data. For example, if the CSV data extractor is selected in the Data extractors list on the toolbar, the database object data is displayed in the CSV format. For more information about data extractors, refer to the [Data extractors](data-extractors.html) topic. For more information about viewing data, refer to [View data](tables-view-data.html). |
|  | Show Options Menu | The Show Options Menu list includes the following options: * Show Value Editor: open a separate editor where you can edit data that is stored in the cell. For more information about the editor, refer to [Value editor](tables-view-data.html#value-editor). * Show Aggregate View: open the aggregate view where you can select values of multiple cells and get a single summary value. For more information about the view, refer to [Aggregate view](tables-view-data.html#aggregate-view). * Paste Format: select how you want to treat the text from the clipboard on paste. * Reset View: restore the initial table view if you customized the table view before (for example, hidden columns or sorted data). * View Query: [view the query](tables-view-data.html#view-the-query-that-generated-the-result-set) that generated the table. * Copy Query to Console: copy the query that generated the table to query console. * Copy Query to Clipboard: copy the query that generated the table to the clipboard. * Open Data View Settings...: open the Data Editor and Viewer section in settings, where you can define how table data are shown and modified in your query consoles and data editors. For more information about the Data Editor and Viewer settings section, refer to [Data editor and viewer](settings-tools-database-data-views.html). |
#### Context menu
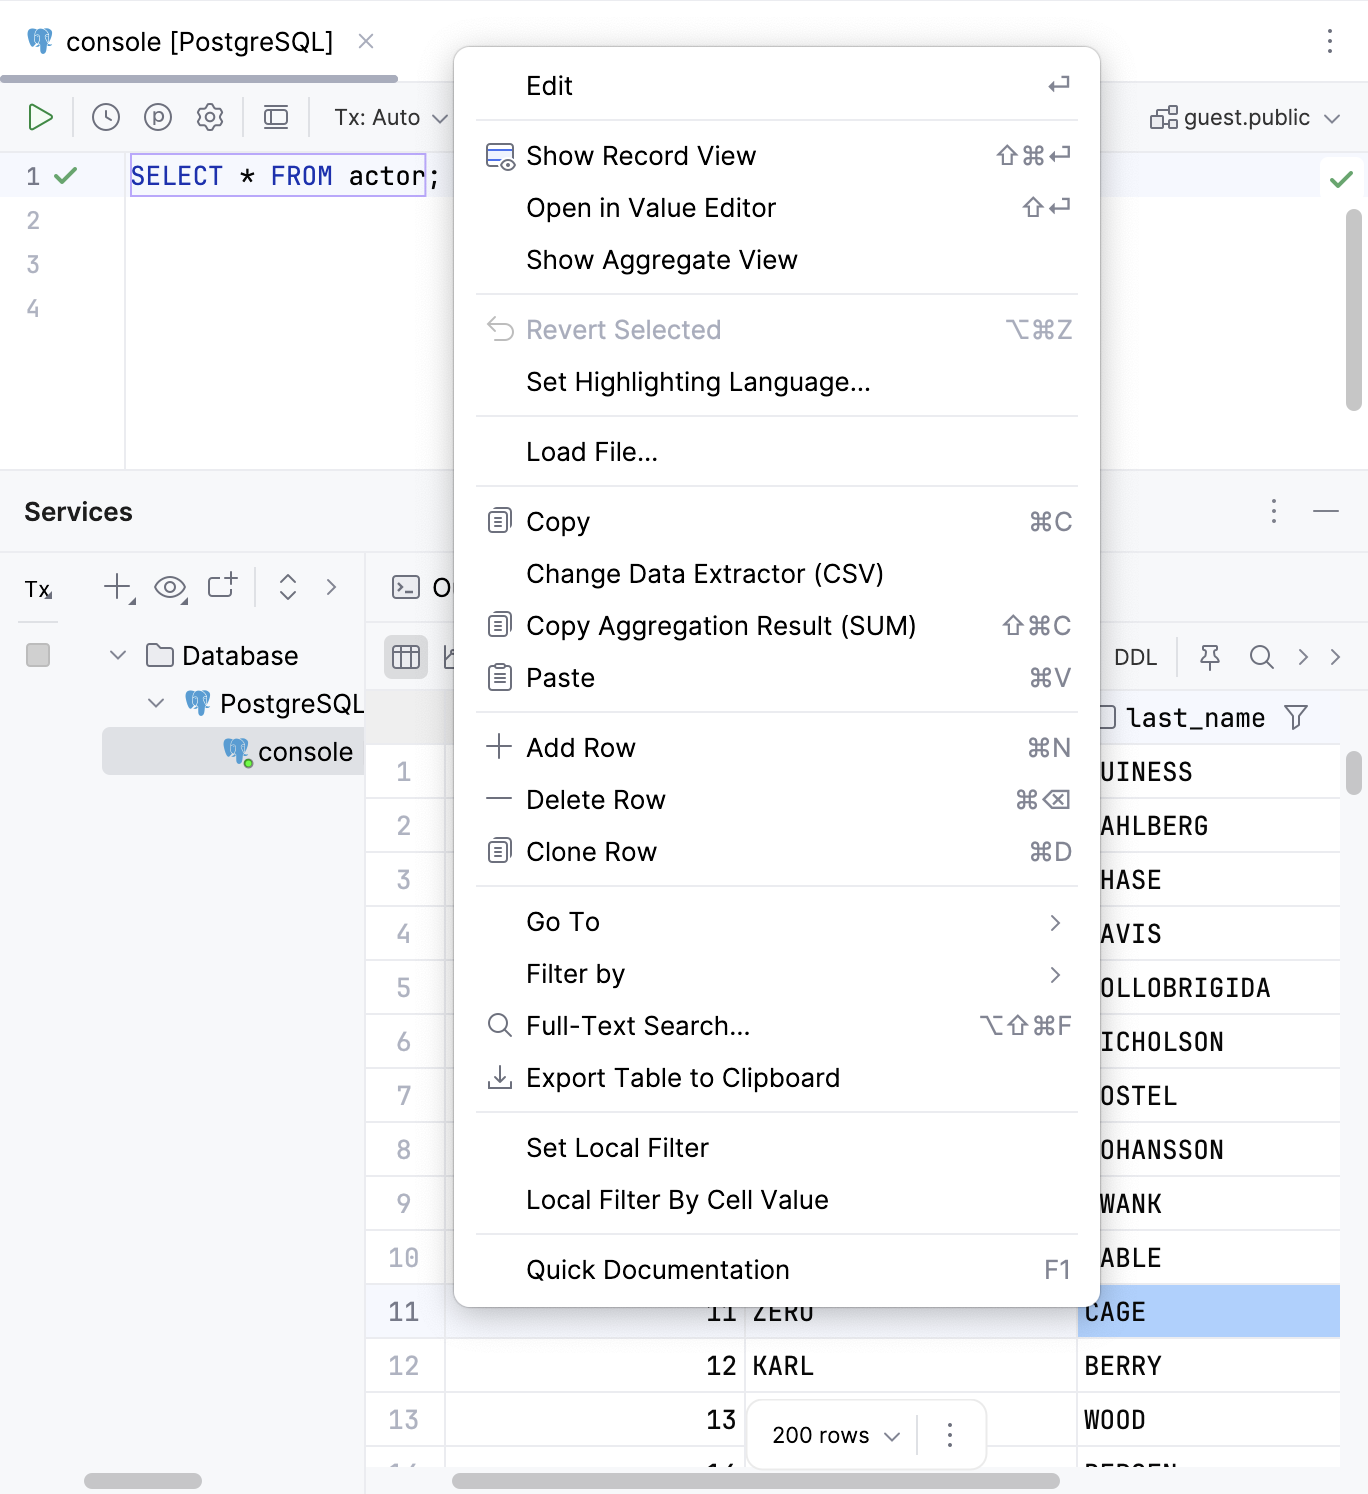
You can find all basic actions for working with cells under the context menu. To call the context menu, right-click the cell that you want to modify. The following table lists all the actions.
| Action | Shortcut | Description |
| --- | --- | --- |
| Edit | `Enter` (Windows), `⏎` (macOS), `⏎` (IntelliJ IDEA Classic (macOS)), `⏎` (macOS System Shortcuts), `Enter` (XWin), `Enter` (GNOME), `Enter` (KDE), `Enter` (Emacs), `Enter` (Sublime Text), `⏎` (Sublime Text (macOS)), `Enter` (NetBeans), `Enter` (Visual Studio), `⏎` (Visual Studio (macOS)), `Enter` (Eclipse), `⏎` (Eclipse (macOS)) | Edit a value in the selected cell or cells. Alternatively, you can double-click the cell and start typing a value. The Edit command is unavailable for read-only values. * To open the auto-completion list, press `Ctrl+Space` (Windows), `⌃ Space` (macOS), `⌃ Space` (IntelliJ IDEA Classic (macOS)), `⌃ Space` (macOS System Shortcuts), `Ctrl+Space` (XWin), `Ctrl+Space` (GNOME), `Ctrl+Space` (KDE), `Alt+/` (Emacs), `Ctrl+Space` (Sublime Text), `⌃ Space` (Sublime Text (macOS)), `Ctrl+Space` (NetBeans), `Ctrl+Space` (Visual Studio), `⌃ Space` (Visual Studio (macOS)), `Ctrl+Space` (Eclipse), `⌃ Space` (Eclipse (macOS)). * To confirm your changes, press `Enter` (Windows), `⏎` (macOS), `⏎` (IntelliJ IDEA Classic (macOS)), `⏎` (macOS System Shortcuts), `Enter` (XWin), `Enter` (GNOME), `Enter` (KDE), `Enter` (Emacs), `Enter` (Sublime Text), `⏎` (Sublime Text (macOS)), `Enter` (NetBeans), `Enter` (Visual Studio), `⏎` (Visual Studio (macOS)), `Enter` (Eclipse), `⏎` (Eclipse (macOS)). * To cancel editing, press `Escape` (Windows), `⎋` (macOS), `⎋` (IntelliJ IDEA Classic (macOS)), `⎋` (macOS System Shortcuts), `Escape` (XWin), `Escape` (GNOME), `Escape` (KDE), `Escape, Escape` (Emacs), `Escape` (Sublime Text), `⎋` (Sublime Text (macOS)), `Escape` (NetBeans), `Escape` (Visual Studio), `⎋` (Visual Studio (macOS)), `Escape` (Eclipse), `⎋` (Eclipse (macOS)). For more information about editing cells, refer to [Cells](cells.html). |
|  Show Record View | | View and edit values of a certain record in a side panel. For more information about the action, refer to the [View data](tables-view-data.html#single_record_view) topic. |
| Open in Value Editor | `Shift+Enter` (Windows), `⇧ ⏎` (macOS), `⇧ ⏎` (IntelliJ IDEA Classic (macOS)), `⇧ ⏎` (macOS System Shortcuts), `Shift+Enter` (XWin), `Shift+Enter` (GNOME), `Shift+Enter` (KDE), `Shift+Enter` (Emacs), `Shift+Enter` (Sublime Text), `⇧ ⏎` (Sublime Text (macOS)), `Shift+Enter` (NetBeans), `Shift+Enter` (Visual Studio), `⇧ ⏎` (Visual Studio (macOS)), `Shift+Enter` (Eclipse), `⇧ ⏎` (Eclipse (macOS)) | Open in a separate value editor where you can edit data that is stored in the cell. For more information about the editor, refer to [Value editor](tables-view-data.html#value-editor). |
| Show Aggregate View | | Open the aggregate view where you can select values of multiple cells and get a single summary value. For more information about the view, refer to [Aggregate view](). |
|  Revert Selected | `Ctrl+Alt+Z` (Windows), `⌘ ⌥ Z` (macOS), `⌘ ⌥ Z` (IntelliJ IDEA Classic (macOS)), `⌘ ⌥ Z` (macOS System Shortcuts), `Ctrl+Alt+Z` (XWin), `Ctrl+Alt+Z` (GNOME), `Ctrl+Alt+Z` (KDE), `Ctrl+Alt+Z` (Emacs), `Ctrl+Alt+Z` (Sublime Text), `⌘ ⌥ Z` (Sublime Text (macOS)), `Ctrl+Alt+Z` (NetBeans), `Ctrl+Alt+Z` (Visual Studio), `⌘ ⌥ Z` (Visual Studio (macOS)), `Ctrl+Alt+Z` (Eclipse), `⌃ ⌥ ⇧ Z` (Eclipse (macOS)) | Revert changes that you made to a cell value. You can select a scope of different cells and revert values in this scope. For more information about reverting changes, refer to [Submit changes to a database](submitting-and-reverting-changes.html). |
| Set Highlighting Language | | Select a language that the IDE should use to highlight data in a cell. |
| Change Display Type | | Select how the IDE should display binary data in the column. 16-byte data is displayed as UUID by default. |
| Set DEFAULT | `Ctrl+Alt+D` (Windows), `⌘ ⌥ D` (macOS), `⌘ ⌥ D` (IntelliJ IDEA Classic (macOS)), `⌃ ⌥ ⇧ D` (macOS System Shortcuts), `Ctrl+Alt+D` (XWin), `Ctrl+Alt+D` (GNOME), `Ctrl+Alt+D` (KDE), `Ctrl+Alt+D` (Emacs), `Ctrl+Alt+D` (Sublime Text), `⌘ ⌥ D` (Sublime Text (macOS)), `Ctrl+Alt+D` (NetBeans), `Ctrl+Alt+D` (Visual Studio), `⌘ ⌥ D` (Visual Studio (macOS)), `Ctrl+Alt+D` (Eclipse), `⌘ ⌥ D` (Eclipse (macOS)) | Set the current cell value to the default value or the value that you specified for the column. For more information about viewing or set a default value, refer to [Manage default and NULL values for a cell](cells.html#manage-default-values-for-a-cell). |
| NULL | `Ctrl+Alt+N` (Windows), `⌘ ⌥ N` (macOS), `⌘ ⌥ N` (IntelliJ IDEA Classic (macOS)), `⌘ ⌥ N` (macOS System Shortcuts), `Ctrl+Alt+N` (XWin), `Ctrl+Alt+N` (GNOME), `Ctrl+Alt+N` (KDE), `Ctrl+Alt+N` (Emacs), `Ctrl+Alt+N` (Sublime Text), `⌘ ⌥ N` (Sublime Text (macOS)), `Ctrl+Alt+N` (NetBeans), `Ctrl+Alt+N` (Visual Studio), `⌘ ⌥ N` (Visual Studio (macOS)), `Ctrl+Alt+N` (Eclipse), `⌘ ⌥ N` (Eclipse (macOS)) | Set the current cell value to NULL. For more information about allowing a NULL value, refer to [Manage default and NULL values for a cell](cells.html#manage-default-values-for-a-cell). |
| Generate UUID | | Generates the UUID for the selected cell. |
| Load File… | | Load a file into the field. |
| Save LOB… | | For the cells that contain a binary large object ([LOB](http://en.wikipedia.org/wiki/Binary_large_object)). Save content of a cell into a file. |
|  Copy | `Ctrl+C` (Windows), `⌘ C` (macOS), `⌘ C` (IntelliJ IDEA Classic (macOS)), `⌘ C` (macOS System Shortcuts), `Ctrl+C` (XWin), `Ctrl+C` (GNOME), `Ctrl+C` (KDE), `Ctrl+Insert` (Emacs), `Ctrl+C` (Sublime Text), `⌘ C` (Sublime Text (macOS)), `Ctrl+C` (NetBeans), `Ctrl+C` (Visual Studio), `⌘ C` (Visual Studio (macOS)), `Ctrl+C` (Eclipse), `⌘ C` (Eclipse (macOS)) | Copy selection to the clipboard. |
| Change Data Extractor | | Change the [data extractor](data-extractors.html) currently selected from the Data Extractors list on the toolbar. |
|  Copy Aggregation Result (SUM) | | Copy a summary value for a range of cells. By default, IntelliJ IDEA copies the `SUM` aggregation result. To change the default, right-click the status bar and ensure that the Aggregator option is selected. Click the aggregator widget on the status bar and select the aggregator to use as default. |
|  Paste | `Ctrl+V` (Windows), `⌘ V` (macOS), `⌘ V` (IntelliJ IDEA Classic (macOS)), `⌘ V` (macOS System Shortcuts), `Ctrl+V` (XWin), `Ctrl+V` (GNOME), `Ctrl+V` (KDE), `Shift+Insert` (Emacs), `Ctrl+Shift+V` (Sublime Text), `⌘ ⇧ V` (Sublime Text (macOS)), `Ctrl+V` (NetBeans), `Ctrl+V` (Visual Studio), `⌘ V` (Visual Studio (macOS)), `Ctrl+V` (Eclipse), `⌘ V` (Eclipse (macOS)) | Paste the contents of clipboard into the table. |
|  Add Row | | Add a row to the end of a table. |
|  Delete Row | `Alt+Delete` (Windows), `Alt+Delete` (macOS), `Alt+Delete` (IntelliJ IDEA Classic (macOS)), `Alt+Delete` (macOS System Shortcuts), `Alt+Delete` (XWin), `Alt+Delete` (GNOME), `Alt+Delete` (KDE), `Alt+Delete` (Emacs), `Alt+Delete` (Sublime Text), `Alt+Delete` (Sublime Text (macOS)), `Alt+Delete` (NetBeans), `Alt+Delete` (Visual Studio), `Alt+Delete` (Visual Studio (macOS)), `Alt+Delete` (Eclipse), `Alt+Delete` (Eclipse (macOS)) | Delete selected rows. |
|  Clone Row | | Create a duplicate of the selected row and adds the duplicate to the end of a table. |
| Go To | Navigation Bar | `Alt+Home` (Windows), `⌘ ↑` (macOS), `⌥ Home` (IntelliJ IDEA Classic (macOS)), `⌘ ⌃ ↑` (macOS System Shortcuts), `Alt+Home` (XWin), `Alt+Home` (GNOME), `Alt+Home` (KDE), `Alt+Home` (Emacs), `Alt+Home` (Sublime Text), `⌥ Home` (Sublime Text (macOS)), `Alt+Home` (NetBeans), `Ctrl+F2` (Visual Studio), `⌘ F2` (Visual Studio (macOS)), `Alt+Home` (Eclipse), `⌘ ⌥ B` (Eclipse (macOS)) | Jump to a navigation bar. |
| Database | `Alt+Shift+B` (Windows), `⌥ ⇧ B` (macOS), `⌥ ⇧ B` (IntelliJ IDEA Classic (macOS)), `⌥ ⇧ B` (macOS System Shortcuts), `Alt+Shift+B` (XWin), `Alt+Shift+B` (GNOME), `Alt+Shift+B` (KDE), `Alt+Shift+B` (Emacs), `Alt+Shift+B` (Sublime Text), `⌥ ⇧ B` (Sublime Text (macOS)), `Alt+Shift+B` (NetBeans), `Alt+Shift+B` (Visual Studio), `⌥ ⇧ B` (Visual Studio (macOS)), `Alt+Shift+B` (Eclipse), `⌥ ⇧ B` (Eclipse (macOS)) | Open the selected object in the Database tool window . |
| Related Symbol… | `Ctrl+Alt+Home` (Windows), `⌘ ⌃ ↑` (macOS), `⌘ ⌥ Home` (IntelliJ IDEA Classic (macOS)), `⌘ ⌃ ↓` (macOS System Shortcuts), `Ctrl+Alt+Home` (XWin), `Ctrl+Alt+Home` (GNOME), `Ctrl+Alt+Home` (KDE), `Ctrl+Alt+Home` (Emacs), `Ctrl+Alt+Home` (Sublime Text), `Ctrl+Alt+Home` (Sublime Text (macOS)), `Ctrl+Alt+Home` (NetBeans), `Ctrl+Alt+F7` (Visual Studio), `⌘ ⇧ F7` (Visual Studio (macOS)), `Ctrl+Alt+Home` (Eclipse), `⌘ ⌃ ↑` (Eclipse (macOS)) | Navigate to one of the related objects. |
| DDL | `Ctrl+Alt+Home` (Windows), `⌘ ⌃ ↑` (macOS), `⌘ ⌥ Home` (IntelliJ IDEA Classic (macOS)), `⌘ ⌃ ↓` (macOS System Shortcuts), `Ctrl+Alt+Home` (XWin), `Ctrl+Alt+Home` (GNOME), `Ctrl+Alt+Home` (KDE), `Ctrl+Alt+Home` (Emacs), `Ctrl+Alt+Home` (Sublime Text), `Ctrl+Alt+Home` (Sublime Text (macOS)), `Ctrl+Alt+Home` (NetBeans), `Ctrl+Alt+F7` (Visual Studio), `⌘ ⇧ F7` (Visual Studio (macOS)), `Ctrl+Alt+Home` (Eclipse), `⌘ ⌃ ↑` (Eclipse (macOS)) | Open an object definition (DDL). |
| Row… | `Ctrl+G` (Windows), `⌘ L` (macOS), `⌘ G` (IntelliJ IDEA Classic (macOS)), `⌘ L` (macOS System Shortcuts), `Ctrl+G` (XWin), `Ctrl+G` (GNOME), `Ctrl+G` (KDE), `Alt+G` (Emacs), `Ctrl+G` (Sublime Text), `⌃ G` (Sublime Text (macOS)), `Ctrl+G` (NetBeans), `Ctrl+G` (Visual Studio), `⌘ G` (Visual Studio (macOS)), `Ctrl+L` (Eclipse), `⌘ L` (Eclipse (macOS)) | Jump to a specified row. In the Go to Row dialog, specify the column and row number (use the `column:row` pattern). |
|  Related Rows | `F4` (Windows), `⌘ ↓` (macOS), `F4` (IntelliJ IDEA Classic (macOS)), `F4` (macOS System Shortcuts), `F4` (XWin), `F4` (GNOME), `F4` (KDE), `F4` (Emacs), `F4` (Sublime Text), `F4` (Sublime Text (macOS)), `F4` (NetBeans), `F4` (Visual Studio), `⌘ ↓` (Visual Studio (macOS)), `F12` (Eclipse), `F3` (Eclipse (macOS)) | Navigates to the related records: * Records that the current record references. * Records that reference the current record. If more than one record is referenced or referencing the current one, select the target record in the popup that appears. The action is not available if there are no related records. For more information about related data, refer to [Navigate between related rows](rows.html#navigate-between-related-rows). For more information about action behavior options, refer to [Advanced Settings](advanced-settings.html#related_rows_action_behavior). |
|  Open URL | `F4` (Windows), `⌘ ↓` (macOS), `F4` (IntelliJ IDEA Classic (macOS)), `F4` (macOS System Shortcuts), `F4` (XWin), `F4` (GNOME), `F4` (KDE), `F4` (Emacs), `F4` (Sublime Text), `F4` (Sublime Text (macOS)), `F4` (NetBeans), `F4` (Visual Studio), `⌘ ↓` (Visual Studio (macOS)), `F12` (Eclipse), `F3` (Eclipse (macOS)) | Opens URL in OS default browser. Requires the links opening URL Click Settings enabled in the Tools \| Database \| Data Editor and Viewer settings page `Ctrl+Alt+S` (Windows), `⌘ Comma` (macOS), `⌘ Comma` (IntelliJ IDEA Classic (macOS)), `⌘ Comma` (macOS System Shortcuts), `Ctrl+Alt+S` (XWin), `Ctrl+Alt+S` (GNOME), `Ctrl+Alt+S` (KDE), `Ctrl+Alt+S` (Emacs), `Ctrl+Alt+S` (Sublime Text), `⌘ Comma` (Sublime Text (macOS)), `Ctrl+Alt+S` (NetBeans), `Ctrl+Alt+S` (Visual Studio), `⌘ Comma` (Visual Studio (macOS)), `Ctrl+Alt+S` (Eclipse), `⌘ Comma` (Eclipse (macOS)) . |
|  Open File | `F4` (Windows), `⌘ ↓` (macOS), `F4` (IntelliJ IDEA Classic (macOS)), `F4` (macOS System Shortcuts), `F4` (XWin), `F4` (GNOME), `F4` (KDE), `F4` (Emacs), `F4` (Sublime Text), `F4` (Sublime Text (macOS)), `F4` (NetBeans), `F4` (Visual Studio), `⌘ ↓` (Visual Studio (macOS)), `F12` (Eclipse), `F3` (Eclipse (macOS)) | Open file URI in OS default file browser. For example, `file:///Users/Username/image.png`. Requires the links opening URL Click Settings enabled in the Tools \| Database \| Data Editor and Viewer settings page `Ctrl+Alt+S` (Windows), `⌘ Comma` (macOS), `⌘ Comma` (IntelliJ IDEA Classic (macOS)), `⌘ Comma` (macOS System Shortcuts), `Ctrl+Alt+S` (XWin), `Ctrl+Alt+S` (GNOME), `Ctrl+Alt+S` (KDE), `Ctrl+Alt+S` (Emacs), `Ctrl+Alt+S` (Sublime Text), `⌘ Comma` (Sublime Text (macOS)), `Ctrl+Alt+S` (NetBeans), `Ctrl+Alt+S` (Visual Studio), `⌘ Comma` (Visual Studio (macOS)), `Ctrl+Alt+S` (Eclipse), `⌘ Comma` (Eclipse (macOS)) . |
| Filter by | | > **Note:** > Server side filtering is only available for the [database objects data](data-editor-and-viewer.html#open_database_object_data), not for the [query results set](data-editor-and-viewer.html#view_query_result_set). Select a filter that you want to a column. |
|  Full-Text Search… | `Ctrl+Alt+Shift+F` (Windows), `⌘ ⌥ ⇧ F` (macOS), `⌘ ⌥ ⇧ F` (IntelliJ IDEA Classic (macOS)), `⌘ ⌥ ⇧ F` (macOS System Shortcuts), `Ctrl+Alt+Shift+F` (XWin), `Ctrl+Alt+Shift+F` (GNOME), `Ctrl+Alt+Shift+F` (KDE), `Ctrl+Alt+Shift+F` (Emacs), `Ctrl+Alt+Shift+F` (Sublime Text), `⌘ ⌥ ⇧ F` (Sublime Text (macOS)), `Ctrl+Alt+Shift+F` (NetBeans), `Ctrl+Alt+Shift+F` (Visual Studio), `⌘ ⌥ ⇧ F` (Visual Studio (macOS)), `Ctrl+Alt+Shift+F` (Eclipse), `⌘ ⌥ ⇧ F` (Eclipse (macOS)) | Open a search window where you can search for data in your database or a group of databases. For more information about full-text search, refer to [Full-text search in databases](full-text-search-for-databases.html). |
|  Export Table to Clipboard | | Copy the whole table to the clipboard. This action does not depend on Limit page size to setting. |
| Switch Session | | Open a window to select another session or create a new one. For more information about sessions, refer to [Sessions](managing-connection-sessions.html). |
| Quick Documentation | `Ctrl+Q` (Windows), `F1` (macOS), `⌃ J` (IntelliJ IDEA Classic (macOS)), `⌘ I` (macOS System Shortcuts), `Ctrl+Q` (XWin), `Ctrl+Q` (GNOME), `Ctrl+Q` (KDE), `Ctrl+Q` (Emacs), `Ctrl+Q` (Sublime Text), `Ctrl+Q` (Sublime Text (macOS)), `Ctrl+Q` (NetBeans), `Ctrl+K, I` (Visual Studio), `⌘ K, I` (Visual Studio (macOS)), `Alt+Middle-Click` (Eclipse), `⌥ Middle-Click` (Eclipse (macOS)) | Show information about selected objects. For different database objects, Quick Documentation shows corresponding information. For example, for a group of cells, you will see a summary for the selection. You can preview it in a regular or in a transposed view and also see the related records by their foreign keys. |
### Query Plan tab
In the Query Plan tab of the Services tool window, IntelliJ IDEA displays the [query execution plan](query-execution-plan.html). You can access details of each plan row in a separate panel on the right-hand side of the tab.
For the cells that contain a table name, [Quick Documentation](viewing-reference-information.html#inline-quick-documentation) is available in a popup when you hover the cursor over it.
#### Left toolbar
| Icon | Action and shortcut | Description |
| --- | --- | --- |
|  | Copy Original Query Plan | Copies the query plan in the database’s native format, for example, JSON or XML. |
|  | Flame Graph | Opens one of the following [graphs](query-execution-plan.html#generate-a-flame-graph-for-explain): * Total Cost: how long it takes to return all the rows. * Startup Cost: how long it takes before the first row can be processed. |
|  | Show Diagram… | Opens a diagram in a separate editor tab. |
|  | Analyze SQL Plan with AI | Ask AI Assistant to [explain your query plan](https://www.jetbrains.com/help/ai-assistant/use-ai-with-databases.html#explanation-for-query-plans). |
## Docker
This type of service is available if you have configured connection settings for at least one Docker instance. For more information, refer to [Connect to the Docker daemon](docker.html#connect_to_docker).
Procedure: Add a Docker connection
1. Click  Add Service and select `Docker | Connection…`.
2. Configure the Docker connection settings and click OK.
For more information, refer to [Docker connection settings](settings-docker.html).
> **Tip:**
> If you have [Docker contexts](https://docs.docker.com/engine/context/working-with-contexts/) configured, you can select `Docker | Connections From Contexts` to add the corresponding connections.
### Main Docker node
These are the main actions for working with the selected Docker connection:
 Connect `Ctrl+Enter` (Windows), `⌘ ⏎` (macOS), `⌘ ⏎` (IntelliJ IDEA Classic (macOS)), `⌘ ⏎` (macOS System Shortcuts), `Ctrl+Enter` (XWin), `Ctrl+Enter` (GNOME), `Ctrl+Enter` (KDE), `Ctrl+Enter` (Emacs), `Ctrl+Enter` (Sublime Text), `⌘ ⏎` (Sublime Text (macOS)), `Ctrl+Enter` (NetBeans), `Ctrl+Enter` (Visual Studio), `⌘ ⏎` (Visual Studio (macOS)), `Ctrl+Enter` (Eclipse), `⌘ ⏎` (Eclipse (macOS))
: Connect to the selected Docker daemon and list all available images and containers.
 Disconnect
: Disconnect the selected Docker daemon.
 Edit Configuration `Shift+F4` (Windows), `⇧ F4` (macOS), `⇧ F4` (IntelliJ IDEA Classic (macOS)), `⇧ F4` (macOS System Shortcuts), `Shift+F4` (XWin), `Shift+F4` (GNOME), `Shift+F4` (KDE), `Shift+F4` (Emacs), `Shift+F4` (Sublime Text), `Shift+F4` (Sublime Text (macOS)), `Shift+F4` (NetBeans), `Shift+F4` (Visual Studio), `⇧ F4` (Visual Studio (macOS)), `Shift+F4` (Eclipse), `⇧ F4` (Eclipse (macOS))
: Edit the selected Docker connection settings.
 Delete Connections
: Delete the connection to the selected Docker daemon.
 Pull Image…
: Pull an image from a Docker registry. For more information, refer to [Pull a public image from Docker Hub](docker-images.html#pull-image).
 Clean Up
: Remove all stopped containers, unused volumes and networks, dangling images, and all build caches.
### Containers
This node lists all containers managed by the corresponding Docker daemon.
 Clean Up
: Remove all stopped containers.
When you select a container, the following actions are available:
 Start
: Run the selected container.
 Open Project
: Open the selected project in a Docker container.
:
:
:
: For more details, refer to [Work with project files in a container](docker-containers.html#manage_projects).
 Restart
: Restart the selected container.
 Stop
: Stop the selected container.
 Terminal
: Open a tab with the Terminal in the selected container.
:
:
:
: You can choose between creating a Terminal with the current container user privileges or log in with `root` user privileges.
More actions are available under the  menu:
Show Files
: Open the Files tab to browse the file system of the container.
:
:
:
: For more information, refer to [Browse files in a container](docker-containers.html#browse_files).
 Inspect
: Open the Inspection tab with detailed information about the container in JSON format.
:
:
:
: For more information, refer to [View detailed information about a running container](docker-containers.html#inspect).
 Copy Image ID
: Copy the ID of the image that was used to run this container.
 Copy Container ID
: Copy the ID of the container.
#### Container dashboard
The Dashboard tab provides important information about the selected container:
* Name and hash ID of the container. You can click the image name to highlight the image that was used to run the selected container.
* Names and values of environment variables defined in the container.
* Ports mappings between the container and the host.
* Volume bindings between the container and the host.
Click Add… to add a new variable, port binding, or volume binding, and recreate the container.
Click  to open a menu with some additional actions:
### Images
This node lists all images managed by the corresponding Docker daemon.
Type the image name in the Image to pull field and click  Pull to pull a new image from a configured Docker registry. For more information, refer to [Pull a public image from Docker Hub](docker-images.html#pull-image).
When you select an image, the following actions are available:
 Create Container
: Create a Docker container from the selected image.
 Show Layers
: Open the Layers tab that shows the layers (intermediate internal untagged images) from which the selected image consists.
 Push Image
: Push an image to a Docker registry. For more information, refer to [Push an image to a Docker registry](docker-images.html#push-image).
More actions are available under the  menu:
 Copy Image ID
: Copy the hash ID of the selected image.
 Inspect
: Open the Inspection tab with detailed information about the image in JSON format.
:
:
:
: For more information, refer to the [docker inspect](https://docs.docker.com/engine/reference/commandline/inspect/) command reference.
 Show Labels
: Open the Labels tab with the image's [labels](https://docs.docker.com/engine/reference/builder/#label).
#### Image dashboard
The Dashboard tab provides important information about the selected image:
* Name, hash ID, date of latest changes, and size of the image.
* List of tags that point to the image.
* List of existing containers created from this image.
### Networks
This node lists all networks managed by the corresponding Docker daemon.
 Create Network
: Create a Docker network for your containers to operate in.
 Clean Up
: Remove all unused networks.
#### Network dashboard
The Dashboard tab provides important information about the selected network:
* Name and hash ID of the network.
* List of containers connected to this network.
* List of labels assigned to this network.
Click Inspect to run `docker inspect` on the selected network and output it to a separate tab.
### Volumes
This node lists all volumes managed by the corresponding Docker daemon.
 Create Volume
: Create a Docker volume for your containers to use.
 Clean Up
: Remove all unused volumes.
When you select a volume, the following actions are available:
 Inspect
: Open the Inspection tab with detailed information about the volume in JSON format.
:
:
:
: For more information, refer to the [docker inspect](https://docs.docker.com/engine/reference/commandline/inspect/) command reference.
 Remove
: Remove the selected volume.
#### Volume dashboard
The Dashboard tab provides important information about the selected volume:
* Name or hash ID of the volume.
* List of containers that use this volume.
* List of this volume's [labels](https://docs.docker.com/engine/reference/builder/#label).
### Docker Compose
 Start All
: Deploy your selected Docker Compose services using the associated run/debug configuration. For more information, refer to [Docker Compose](docker-compose.html).
 Stop
: Stop all containers in the selected Docker Compose services.
 Down
: Stop and remove all containers in the selected Docker Compose services, including all related networks, volumes, and images.
## Kubernetes
This type of service is available if the [Kubernetes plugin](https://plugins.jetbrains.com/plugin/10485-kubernetes) is installed and enabled. For more information about the Kubernetes integration in IntelliJ IDEA, refer to [Kubernetes](kubernetes.html).
 Connect Cluster
: Connect to the selected cluster.
 Disconnect
: Disconnect from the selected cluster.
 Set Cluster as Current
: Set the selected cluster as the current one.
 Open Cluster Logs Tab or Open Logs Tab
: Open cluster or resource logs in a new editor tab. For more details, refer to [View logs](kubernetes.html#view-logs).
 Namespace
: Select a namespace to filter the resources available in the cluster.
 Open Kubeconfig File in Editor
: Open the Kubernetes cluster configuration file. By default, this is a file named `config` in the `$HOME/.kube` directory. For more details, refer to [Edit kubeconfig](kubernetes.html#edit-kubeconfig).
 Add Clusters
: [Add a Kubernetes cluster](kubernetes.html#add-cluster) to the Services tool window.
 Show Cluster Settings
: Navigate to `Settings | Build, Execution, Deployment | Kubernetes`.
 Connect Telepresence
: [Connect to a cluster using Telepresence](debugging-in-kubernetes.html).
 View YAML
: Open a resource YAML file where the following actions are available:
:
:
:
: * : Apply changes to the current context and namespace.
:
: * : Delete the resource from the current context and namespace.
:
: * : Reload the file content from the cluster
:
: * : Show the differences between the opened file and the corresponding cluster resource in the diff viewer.
:
:
:
: For more details, refer to [Resource configuration files](kubernetes.html#resource-config-files).
 Describe Resource
: Displays detailed information about the selected resource, similarly to the `kubectl describe` command.
 Delete Resource
: Remove the selected resource from the cluster.
 Download Log
: Save the selected pod’s container log to a [scratch file](scratches.html) and open it in the editor.
:
:
:
:
:
: Instead of using a scratch file, you can configure the default path for saving logs or choose the location every time. To configure the download location for pod logs, click  or open Settings | Build, Execution, Deployment | Kubernetes.
 Open Console
: Attach to the console of a process running in a container within the selected pod.
 Run Shell
: Run an interactive shell for the container in the selected pod.
:
:
:
:
:
: By default, IntelliJ IDEA runs `/bin/bash`. To run a different shell, open Settings | Build, Execution, Deployment | Kubernetes and specify the shell that your pods use in the Pod shell field.
 Ephemeral Debug Containers
: Attach an ephemeral debug container to the current pod without restarting it. For more details, refer to [Ephemeral containers](debugging-in-kubernetes.html#ephemeral-containers).
 Forward Ports
: Forward one or more local ports to remote ports. For more details, refer to [Forward ports](kubernetes.html#forward-ports).
 Stop Port Forwarding
: Stop the selected port-forwarding session.
 Restart Port Forwarding
: Restart the selected port-forwarding session.
## Dev Containers
This service becomes available when you start a Dev Container from the opened IDE. For more information, refer to [Create Dev Container and mount sources](start-dev-container-inside-ide.html#create-dev-container-from-ide).
Besides the regular Services tool window actions, you can use the Dev Container specific ones to manage your containers.
| Action | Description |
| --- | --- |
| Connect | After your Dev Container is built, you can use this action to connect to your created or existed container. |
| Restart | Use this action to rebuild a Dev Container. |
| Stop | Use this action to stop running the Dev Container. |
Click  to open a menu with some additional actions:
| Action | Description |
| --- | --- |
| Terminal | Use this option to open the terminal session inside the selected Dev Container. |
| Show Files | Use this option to display a list of files and directories located in the selected Dev Container. |
| Inspect | Use this option to display the information of the selected Dev Container. |
| Copy Image ID | This option copies the ID of the selected Dev Container image. |
| Copy Container ID | This option copies the ID of the selected Dev Container. |
## Productivity tips
Use tabs
: The Services tool window can include a lot of services, which you can group according to their type or create separate tabs for your own custom grouping. For example, you can create a tab that will include the following: the run configuration for the application that you are developing, the Docker container that runs the database used as a backend for your application, and a console for accessing the database.
Hide the services tree
: Click  in the right part of the Services tool window toolbar and then click Show Services Tree to remove the checkbox. You can also press `Ctrl+Shift+T` (Windows), `⌘ ⇧ T` (macOS), `⌘ ⇧ T` (IntelliJ IDEA Classic (macOS)), `⌘ ⇧ T` (macOS System Shortcuts), `Ctrl+Shift+T` (XWin), `Ctrl+Shift+T` (GNOME), `Ctrl+Shift+T` (KDE), `Ctrl+Shift+T` (Emacs), `Ctrl+Shift+T` (Sublime Text), `⌘ ⇧ T` (Sublime Text (macOS)), `Ctrl+Shift+T` (NetBeans), `Ctrl+Shift+T` (Visual Studio), `Ctrl+Shift+T` (Visual Studio (macOS)), `Alt+Shift+H` (Eclipse), `⌘ ⌥ H` (Eclipse (macOS)) to toggle the services tree.
:
:
:
:
:
: If you hide the services tree, it is replaced by a services navigation bar. Press `Alt+Home` (Windows), `⌘ ↑` (macOS), `⌥ Home` (IntelliJ IDEA Classic (macOS)), `⌘ ⌃ ↑` (macOS System Shortcuts), `Alt+Home` (XWin), `Alt+Home` (GNOME), `Alt+Home` (KDE), `Alt+Home` (Emacs), `Alt+Home` (Sublime Text), `⌥ Home` (Sublime Text (macOS)), `Alt+Home` (NetBeans), `Ctrl+F2` (Visual Studio), `⌘ F2` (Visual Studio (macOS)), `Alt+Home` (Eclipse), `⌘ ⌥ B` (Eclipse (macOS)) to focus the services navigation bar.
Hide, remove, and delete services
: Right-click any service and select Delete `Delete` (Windows), `⌦` (macOS), `⌦` (IntelliJ IDEA Classic (macOS)), `⌦` (macOS System Shortcuts), `Delete` (XWin), `Delete` (GNOME), `Delete` (KDE), `Delete` (Emacs), `Delete` (Sublime Text), `⌦` (Sublime Text (macOS)), `Delete` (NetBeans), `Delete` (Visual Studio), `⌦` (Visual Studio (macOS)), `Delete` (Eclipse), `⌦` (Eclipse (macOS)) to completely remove the corresponding run configuration, cloud provider, Docker connection, and so on.
:
:
:
:
:
: If you don't want to show run/debug configurations of a certain type in the Services tool window, right-click the corresponding configuration and select Remove Configuration Type from Services. This will not remove the actual configuration.
:
:
:
:
:
: To hide a specific run configuration from the Services tool window, right-click the corresponding configuration and select Hide Configuration. To see all hidden run configurations, click  and select Restore Hidden Configurations.