# Set up a Git repository
> **TL;DR**
> Git Settings: `Settings | Version Control | Git`
>
>
>
> Required plugin: Git (bundled and enabled by default)
When you [clone](#clone-repo) an existing Git repository or [put an existing project under Git version control](#put-existing-project-under-Git), IntelliJ IDEA automatically detects if Git is installed on your computer. If the IDE can't locate a Git executable, it suggests downloading it.
IntelliJ IDEA supports Git from the Windows Subsystem for Linux 2 (WSL2), which is available in [Windows 10 version 2004](https://devblogs.microsoft.com/commandline/wsl2-will-be-generally-available-in-windows-10-version-2004/).
If Git is not installed on Windows, IntelliJ IDEA searches for Git in WSL and uses it from there. Also, IntelliJ IDEA automatically switches to Git from WSL for projects that are opened when you use the `\\wsl$` path.
If you need to manually configure IntelliJ IDEA to use Git from WSL, go to the Version Control | Git settings page `Ctrl+Alt+S` (Windows), `⌘ Comma` (macOS), `⌘ Comma` (IntelliJ IDEA Classic (macOS)), `⌘ Comma` (macOS System Shortcuts), `Ctrl+Alt+S` (XWin), `Ctrl+Alt+S` (GNOME), `Ctrl+Alt+S` (KDE), `Ctrl+Alt+S` (Emacs), `Ctrl+Alt+S` (Sublime Text), `⌘ Comma` (Sublime Text (macOS)), `Ctrl+Alt+S` (NetBeans), `Ctrl+Alt+S` (Visual Studio), `⌘ Comma` (Visual Studio (macOS)), `Ctrl+Alt+S` (Eclipse), `⌘ Comma` (Eclipse (macOS)) , click the Browse icon in the Path to Git executable field, and select Git from WSL via the `\wsl$` path, for example, `\\wsl$\debian\usr\bin\git`.
## Check out a project from a remote host (git clone)
IntelliJ IDEA allows you to check out (in Git terms, clone) an existing repository and create a new project based on the data you've downloaded.
Procedure:
1. To start cloning a Git repository, do one of the following:
* If the version control integration is already enabled, go to `Git | Clone`.
* If the version control integration is not enabled yet, go to `VCS | Get from Version Control`. Alternatively, go to `File | New | Project from Version Control`.
* If no project is currently open, click Clone Repository on the Welcome screen.
2. In the Clone Repository dialog, specify the URL of the remote repository you want to clone or select one of the VCS hosting services on the left.
If you are already logged in to the selected hosting service, completion will suggest the list of available repositories that you can clone.
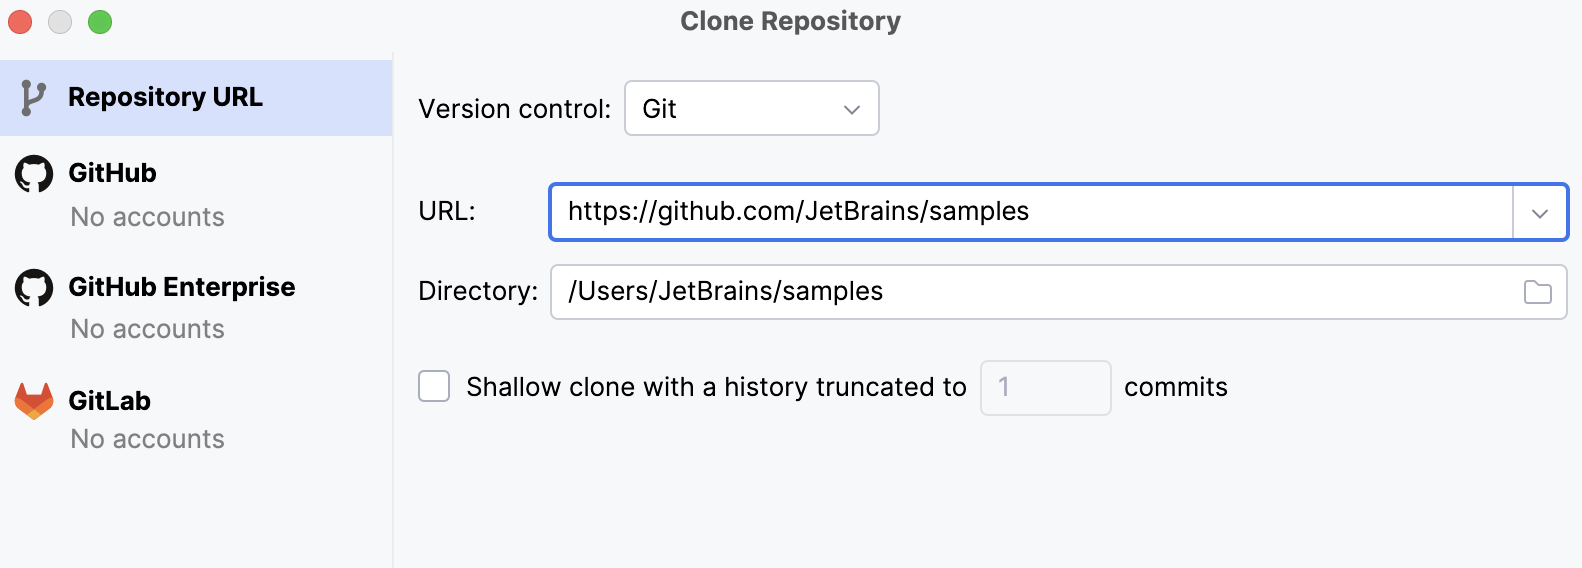
If you want to perform [shallow clone](https://git-scm.com/docs/git-clone#Documentation/git-clone.txt-code--depthcodeemltdepthgtem) with a limited history, select the Shallow clone with a history truncated to checkbox and specify the number of commits that you want to clone.
You can fetch the rest of the history later by selecting Git | Unshallow Repository in the main menu.
3. Click Clone. If you want to create a project based on the sources you have cloned, click Yes in the confirmation dialog. Git root mapping will be automatically set to the project root directory.
If your project contains [submodules](https://git-scm.com/book/en/v2/Git-Tools-Submodules), they will also be cloned and automatically registered as project roots.
4. In the Trust and Open Project ''? [project security dialog](project-security.html), select the way you want to open the project: Trust Project or Preview in Safe Mode.
5. When you import or clone a project for the first time, IntelliJ IDEA analyzes it. If the IDE detects more than one configuration (for example, Eclipse and Gradle), it prompts you to select which configuration you want to use.
> **Note:**
> If the project that you are importing uses a build tool, such as [Maven](maven-support.html) or [Gradle](gradle.html), we recommend that you select the build tool configuration.
Select the necessary configuration and click OK.
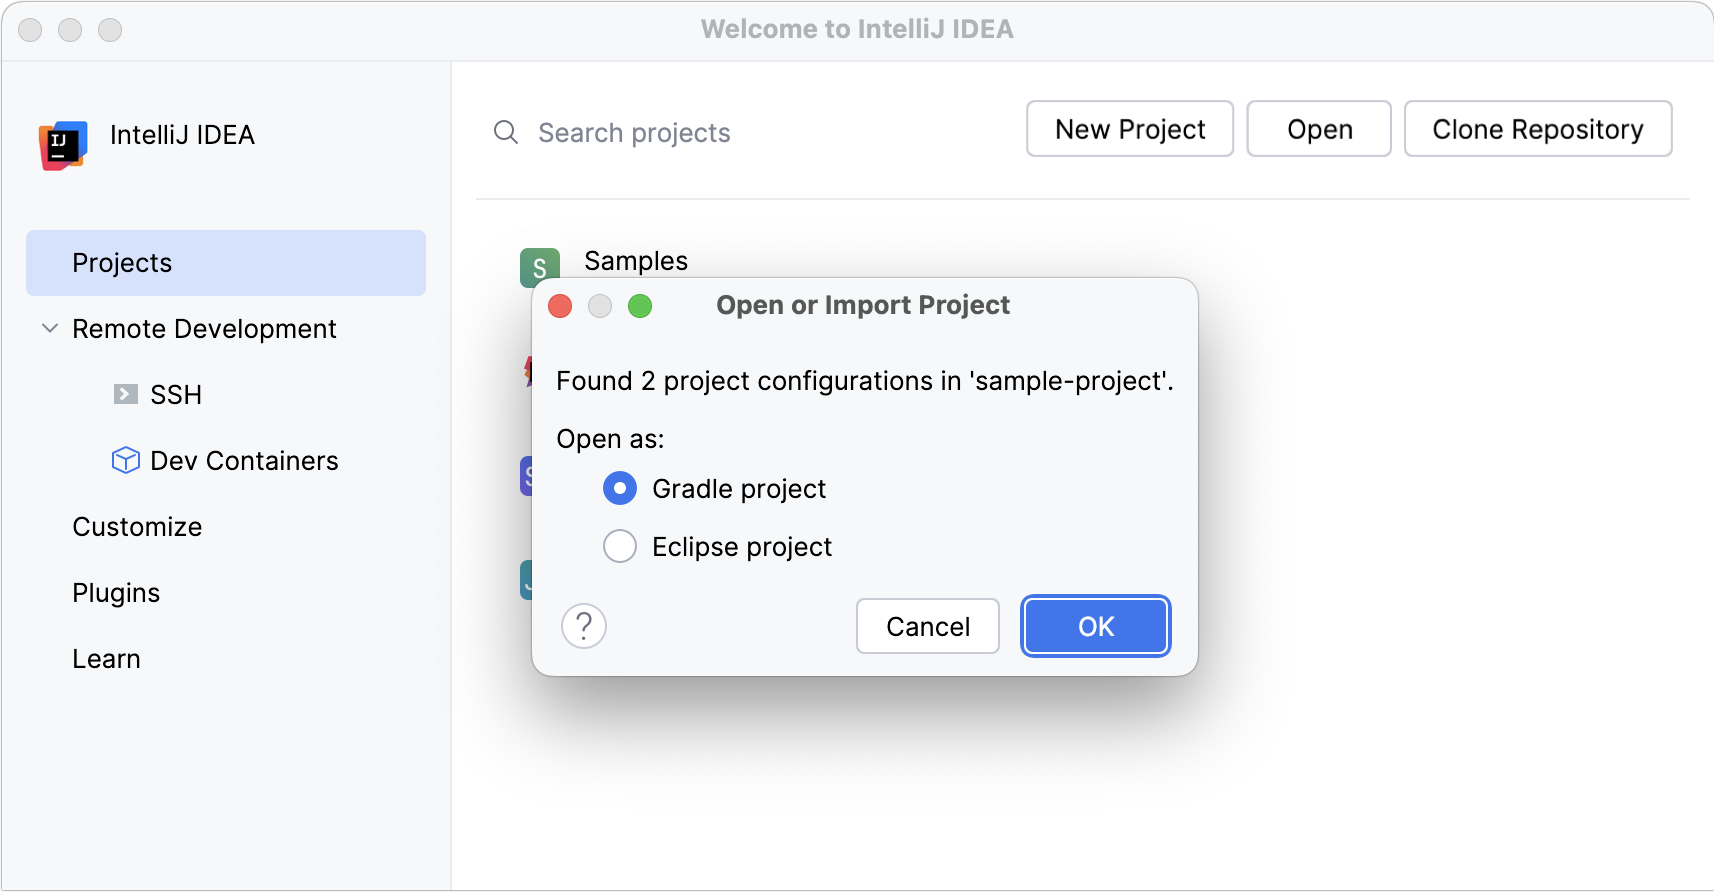
The IDE pre-configures the project according to your choice. For example, if you select Gradle, IntelliJ IDEA executes its build scripts, loads dependencies, and so on.
## Put an existing project under Git version control
You can create a local Git repository based on the existing project sources.
Procedure: Associate the entire project with a single Git repository
1. Open the project that you want to put under Git.
2. Press `Alt+`` (Windows), `⌃ V` (macOS), `⌃ V` (IntelliJ IDEA Classic (macOS)), `⌃ C` (macOS System Shortcuts), `Alt+`` (XWin), `Alt+`` (GNOME), `Alt+`` (KDE), `Alt+`` (Emacs), `Alt+`` (Sublime Text), `Alt+`` (Sublime Text (macOS)), `Alt+`` (NetBeans), `Ctrl+Alt+Q` (Visual Studio), `⌃ V` (Visual Studio (macOS)), `Alt+`` (Eclipse), `⌃ V` (Eclipse (macOS)) to open the VCS Operations Popup and select Enable Version Control Integration.
Alternatively, go to `VCS | Enable Version Control Integration`.
3. Choose Git as the version control system and click OK.
The entire project will then be associated with a single Git directory. After that, [add the files you want to be tracked by Git](#add-new-files) to the local repository.
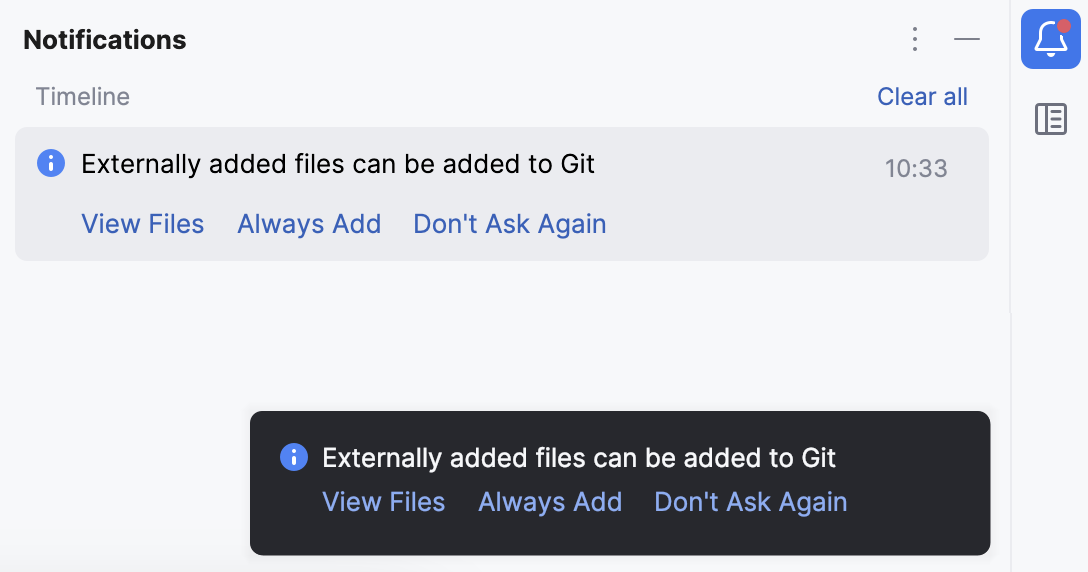
4. After VCS integration is enabled, IntelliJ IDEA will ask you whether you want to share project settings files via VCS. You can choose Always Add to synchronize project settings with other repository users who work with IntelliJ IDEA.
> **Note:**
> If there is no Enable Version Control Integration option available in the VCS Operations Popup, it means that Git version control is already enabled for the project.
Procedure: Associate different directories within the project with different Git repositories
1. Open the directory that you want to put under Git.
2. In the main menu, go to `VCS | Create Git Repository`.
3. In the dialog that opens, specify the directory where a new Git repository will be created.
Git does not support external paths, so if you choose a directory that is outside your project root, make sure that the folder where the repository is going to be created also contains the project root.
4. If you are creating multiple Git repositories inside the project structure, repeat the previous steps for each directory.
After you have [initialized a Git repository](#put-existing-project-under-Git) for your project, you need to add project files to the repository.
Procedure: Add files to the local repository
1. In the Commit tool window (`Alt+0` (Windows), `⌘ 0` (macOS), `⌘ 0` (IntelliJ IDEA Classic (macOS)), `⌘ 0` (macOS System Shortcuts), `Alt+0` (XWin), `Alt+0` (GNOME), `Alt+0` (KDE), `Alt+0` (Emacs), `Alt+0` (Sublime Text), `⌘ 0` (Sublime Text (macOS)), `Alt+0` (NetBeans), `Alt+0` (Visual Studio), `Alt+0` (Visual Studio (macOS)), `Alt+0` (Eclipse), `⌘ 0` (Eclipse (macOS)) ) , expand the Unversioned Files node.
2. Select the files you want to add to Git or the entire changelist and press `Ctrl+Alt+A` (Windows), `⌘ ⌥ A` (macOS), `⌘ ⌥ A` (IntelliJ IDEA Classic (macOS)), `⌘ ⌥ A` (macOS System Shortcuts), `Ctrl+Alt+A` (XWin), `Ctrl+Alt+A` (GNOME), `Ctrl+Alt+A` (KDE), `Ctrl+Alt+A` (Emacs), `Ctrl+Alt+A` (Sublime Text), `⌘ ⌥ A` (Sublime Text (macOS)), `Ctrl+Alt+A` (NetBeans), `Ctrl+Alt+A` (Visual Studio), `⌘ ⌥ A` (Visual Studio (macOS)), `Ctrl+Alt+A` (Eclipse), `⌘ ⌥ A` (Eclipse (macOS)) or choose Add to VCS from the context menu.
You can also add files to your local Git repository from the Project tool window (`Alt+1` (Windows), `⌘ 1` (macOS), `⌘ 1` (IntelliJ IDEA Classic (macOS)), `⌘ 1` (macOS System Shortcuts), `Alt+1` (XWin), `Alt+1` (GNOME), `Alt+1` (KDE), `Alt+1` (Emacs), `Alt+1` (Sublime Text), `⌘ 1` (Sublime Text (macOS)), `Ctrl+1` (NetBeans), `Ctrl+Alt+L` (Visual Studio), `⌘ ⌥ L` (Visual Studio (macOS)), `Alt+1` (Eclipse), `Alt+1` (Eclipse (macOS))) : select the files you want to add, and press `Ctrl+Alt+A` (Windows), `⌘ ⌥ A` (macOS), `⌘ ⌥ A` (IntelliJ IDEA Classic (macOS)), `⌘ ⌥ A` (macOS System Shortcuts), `Ctrl+Alt+A` (XWin), `Ctrl+Alt+A` (GNOME), `Ctrl+Alt+A` (KDE), `Ctrl+Alt+A` (Emacs), `Ctrl+Alt+A` (Sublime Text), `⌘ ⌥ A` (Sublime Text (macOS)), `Ctrl+Alt+A` (NetBeans), `Ctrl+Alt+A` (Visual Studio), `⌘ ⌥ A` (Visual Studio (macOS)), `Ctrl+Alt+A` (Eclipse), `⌘ ⌥ A` (Eclipse (macOS)) or choose Git | Add from the context menu.
When Git integration is enabled in your project, IntelliJ IDEA suggests adding each newly created file under Git, even if it was added from outside IntelliJ IDEA. You can change this behavior in the Version Control | Confirmation settings page `Ctrl+Alt+S` (Windows), `⌘ Comma` (macOS), `⌘ Comma` (IntelliJ IDEA Classic (macOS)), `⌘ Comma` (macOS System Shortcuts), `Ctrl+Alt+S` (XWin), `Ctrl+Alt+S` (GNOME), `Ctrl+Alt+S` (KDE), `Ctrl+Alt+S` (Emacs), `Ctrl+Alt+S` (Sublime Text), `⌘ Comma` (Sublime Text (macOS)), `Ctrl+Alt+S` (NetBeans), `Ctrl+Alt+S` (Visual Studio), `⌘ Comma` (Visual Studio (macOS)), `Ctrl+Alt+S` (Eclipse), `⌘ Comma` (Eclipse (macOS)) . If you want certain files to always remain unversioned, you can [ignore them](#ignore-files).
> **Note:**
> If you attempt to add a file that's on the `.gitignore` list, IntelliJ IDEA will suggest force-adding it. Clicking Cancel in the confirmation dialog only cancels force-adding ignored files – all other files will be added to the Git repository.
## Exclude files from version control (ignore)
Sometimes you may need to leave certain files unversioned. These can be VCS administration files, artifacts of utilities, backup copies, and so on. You can ignore files through IntelliJ IDEA, and the IDE will not suggest adding them to Git and will highlight them as ignored.
You can only ignore unversioned files, that is, files that you see in the Unversioned Files changelist. If a file is [added to Git](#add-new-files) but not [committed](commit-and-push-changes.html), you can right-click it in the Commit window and choose Rollback.
Git lets you list ignored file patterns in two kinds of configuration files:
* `.git/info/exclude` file. Patterns listed in this file only apply to the local copy of the repository. This file is created automatically when you initialize or check out a Git repository.
* One or more `.gitignore` files in the VCS root directory and its subdirectories. These files are checked into the repository so that the ignore patterns in them are available to the entire team. Therefore, it is the most common place to store the ignored file patterns. If there is no `.gitignore` file in the VCS root directory, you can right-click anywhere in the Project tool window, choose `New | File` , and type `.gitignore` in the New File dialog. > **Tip:** > To create a `.gitignore` file in Windows Explorer, create a file named `.gitignore.` and Windows will rename it automatically to `.gitignore`.
Procedure: Add files to .gitignore or .git/info/exclude
1. Decide what [kind of Git configuration file](#add-gitignore) you are going to use to ignore files. If in doubt, use `.gitignore`.
2. Locate the unversioned file or folder you want to ignore in the Commit window or in the Project tool window (`Alt+1` (Windows), `⌘ 1` (macOS), `⌘ 1` (IntelliJ IDEA Classic (macOS)), `⌘ 1` (macOS System Shortcuts), `Alt+1` (XWin), `Alt+1` (GNOME), `Alt+1` (KDE), `Alt+1` (Emacs), `Alt+1` (Sublime Text), `⌘ 1` (Sublime Text (macOS)), `Ctrl+1` (NetBeans), `Ctrl+Alt+L` (Visual Studio), `⌘ ⌥ L` (Visual Studio (macOS)), `Alt+1` (Eclipse), `Alt+1` (Eclipse (macOS))) . [File colors in these views](adding-files-to-version-control.html#file_status) help you identify the status of the file.
3. Right-click the selection and choose Git | Add to .gitignore or Git | Add to .git/info/exclude.
[File colors in these views](adding-files-to-version-control.html#file_status) help you identify the status of the file.
If you need to exclude files by a certain pattern or type, you can edit the `.gitignore` or `.git/info/exclude` file directly. See [.gitignore patterns format](https://git-scm.com/docs/gitignore?origin_team=T0288D531).
> **Tip:**
> If you want [ignored files](#ignore-files) to be also displayed in the Commit window , click  on the toolbar and select Show Ignored Files.
## Add a remote repository
If you [created a Git repository](#put-existing-project-under-Git) based on local sources, you need to add a remote repository to be able to collaborate on your Git project, as well as to eliminate the risks of storing your whole codebase locally. You [push](commit-and-push-changes.html#push) changes to a remote repository when you need to share your work and [pull](sync-with-a-remote-repository.html#pull) data from it to integrate changes made by other contributors into your local repository version.
If you have [cloned a remote Git repository](#clone-repo), for example, from [GitHub](https://github.com/), the remote is configured automatically, and you do not have to specify it when you want to [sync](sync-with-a-remote-repository.html) with it. The default name Git gives to the remote you've cloned from is origin.
For more information about sharing project settings for different project formats, refer to [Share project settings through VCS](configure-project-settings.html#share-project-through-vcs).
Procedure: Define a remote
1. Create an empty repository on any Git hosting, such as [Bitbucket](https://bitbucket.org/), [GitHub](https://github.com/), or [GitLab](https://about.gitlab.com/). You can create a repository on GitHub or GitLab without leaving IntelliJ IDEA: see [Share a project on GitHub](manage-projects-hosted-on-github.html#share-on-GitHub) and [Share a project on GitLab](clone-gitlab-project.html#share-a-project-on-gitlab).
2. Invoke the Push dialog when you are ready to push your commits by selecting `Git | Push` from the main menu, or press `Ctrl+Shift+K` (Windows), `⌘ ⇧ K` (macOS), `⌘ ⇧ K` (IntelliJ IDEA Classic (macOS)), `⌘ ⇧ K` (macOS System Shortcuts), `Ctrl+Shift+K` (XWin), `Ctrl+Shift+K` (GNOME), `Ctrl+Shift+K` (KDE), `Ctrl+Shift+K` (Emacs), `Ctrl+Shift+K` (Sublime Text), `⌘ ⇧ K` (Sublime Text (macOS)), `Ctrl+Shift+K` (NetBeans), `Ctrl+Shift+K` (Visual Studio), `⌘ ⇧ K` (Visual Studio (macOS)), `Ctrl+Shift+K` (Eclipse), `⌘ ⇧ K` (Eclipse (macOS)).
3. If you haven't added any remotes so far, the Define remote link will appear instead of a remote name. Click it to add a remote.
4. In the dialog that opens, specify the remote name and the URL where it will be hosted.
Select the Fetch remote option to also [fetch](sync-with-a-remote-repository.html#fetch) the branch list and commit history right away.
Procedure: Add a second remote
In some cases, you also need to add a second remote repository. This may be useful, for example, if you have cloned a repository that you do not have write access to and are going to push changes to your own [fork](fork-github-projects.html#fork) of the original project. Another common scenario is that you have cloned your own repository, which is somebody else's project fork, and you need to synchronize with the original project and fetch changes from it.
1. In the main menu, go to `Git | Manage Remotes` . The Git Remotes dialog will open.
2. Click the Add  button on the toolbar or press `Alt+Insert` (Windows), `⌘ N` (macOS), `⌃ N` (IntelliJ IDEA Classic (macOS)), `⌘ N` (macOS System Shortcuts), `Alt+Insert` (XWin), `Alt+Insert` (GNOME), `Alt+Insert` (KDE), `Alt+Insert` (Emacs), `Ctrl+N` (Sublime Text), `⌘ N` (Sublime Text (macOS)), `Alt+Insert` (NetBeans), `Ctrl+N` (Visual Studio), `⌘ N` (Visual Studio (macOS)), `Alt+Insert` (Eclipse), `⌘ N` (Eclipse (macOS)).
3. In the dialog that opens, specify the remote name and URL and click OK.
* To edit a remote (for example, to change the name of the original project that you have cloned), right-click the remote branch in the [Branches pane of the Git Log tool window](log-tab.html#BranchesPane) and select Edit Remote from the context menu. You can also edit a remote from the [Push Dialog](commit-and-push-changes.html#push) by clicking its name.
* To remove a repository that is no longer valid, right-click it in the [Branches pane of the Git Log tool window](log-tab.html#BranchesPane), and select Remove Remote from the context menu.
Learn more from this video:
[Video](https://www.youtube.com/v/lyiBnyPPnG4)
## Set passwords for Git remotes
Every time you interact with a remote Git repository (for example, during a [pull](sync-with-a-remote-repository.html#pull), [update](sync-with-a-remote-repository.html#update), or [push](commit-and-push-changes.html) operation), it requires authorization. You can [configure IntelliJ IDEA to remember your passwords](#password-policy) so that you do not have to specify your credentials each time authorization is required.
Procedure: Configure a password policy
1. In the Settings dialog `Ctrl+Alt+S` (Windows), `⌘ Comma` (macOS), `⌘ Comma` (IntelliJ IDEA Classic (macOS)), `⌘ Comma` (macOS System Shortcuts), `Ctrl+Alt+S` (XWin), `Ctrl+Alt+S` (GNOME), `Ctrl+Alt+S` (KDE), `Ctrl+Alt+S` (Emacs), `Ctrl+Alt+S` (Sublime Text), `⌘ Comma` (Sublime Text (macOS)), `Ctrl+Alt+S` (NetBeans), `Ctrl+Alt+S` (Visual Studio), `⌘ Comma` (Visual Studio (macOS)), `Ctrl+Alt+S` (Eclipse), `⌘ Comma` (Eclipse (macOS)), select Appearance and Behavior | System Settings | Passwords on the left.
2. Select how you want IntelliJ IDEA to process passwords for Git remote repositories:
* In native Keychain: select this option to use native Keychain to store your passwords. This setting is only available for macOS and Linux.
* In KeePass: select this option to use the [KeePass password manager](http://keepass.info/) to store your passwords. When you use the KeePass password manager, a master password will be used to access the file that stores individual passwords. Once IntelliJ IDEA remembers your passwords, it will not ask for them unless you need to access the password database. Enter the password that will be used to access the `c.kdbx` file in the MasterPassword field. You can change the default location of the `c.kdbx` file in the Database field. To import a `c.kdbx` file, click  and select Import from the drop-down menu or click  and specify the path to a local file containing your passwords. If you want to remove the existing passwords from the database, select Clear.
* Do not save, forget passwords after restart: select this option if you want your passwords to be reset after you close IntelliJ IDEA.
## See also
### External Links
[Stack Overflow: When would you use .git/info/exclude instead of .gitignore to exclude files?](https://stackoverflow.com/questions/22906851/when-would-you-use-git-info-exclude-instead-of-gitignore-to-exclude-files) [JetBrains.gitignore on GitHub](https://github.com/github/gitignore/blob/master/Global/JetBrains.gitignore)