# Tutorial: Test-driven development
Whether you like to write your tests before writing production code, or like to create the tests afterwards, IntelliJ IDEA makes it easy to create and run unit tests. In this tutorial we’re going to show how to use IntelliJ IDEA to write tests first ([Test Driven Development or TDD](http://martinfowler.com/bliki/TestDrivenDevelopment.html)).
## Create a project
Procedure: Create a new project
1. Launch IntelliJ IDEA.
If the Welcome screen opens, click New Project. Otherwise, go to `File | New | Project` in the main menu.
2. From the list on the left, select Java.
3. Name the new project, for example: `MoodAnalyser` and change its location if necessary.
4. Select Gradle as a build tool and Groovy as a DSL.
5. From the JDK list, select the [JDK](sdk.html#jdk) that you want to use in your project.
* If the JDK is installed on your computer, but not defined in the IDE, select  Add JDK from Disk… and specify the path to the JDK home directory.
* If you don't have the necessary JDK on your computer, select  Download JDK .
6. Click Create.
IntelliJ IDEA creates a project with pre-configured structure and essential libraries. JUnit 5 will be added as a dependency to the `build.gradle` file.
Procedure: Create a new package
1. Right-click the `main | java` folder in the Project tool window and select `New | Package`.
2. Name the new package `com.example.demo` and press `Enter` (Windows), `⏎` (macOS), `⏎` (IntelliJ IDEA Classic (macOS)), `⏎` (macOS System Shortcuts), `Enter` (XWin), `Enter` (GNOME), `Enter` (KDE), `Enter` (Emacs), `Enter` (Sublime Text), `⏎` (Sublime Text (macOS)), `Enter` (NetBeans), `Enter` (Visual Studio), `⏎` (Visual Studio (macOS)), `Enter` (Eclipse), `⏎` (Eclipse (macOS)).
## Write the test body
Procedure: Create your first test
Given that we’re writing our tests first without necessarily having the code we’re testing available to us yet, we’ll create our first test via the project panel and place it in a package.
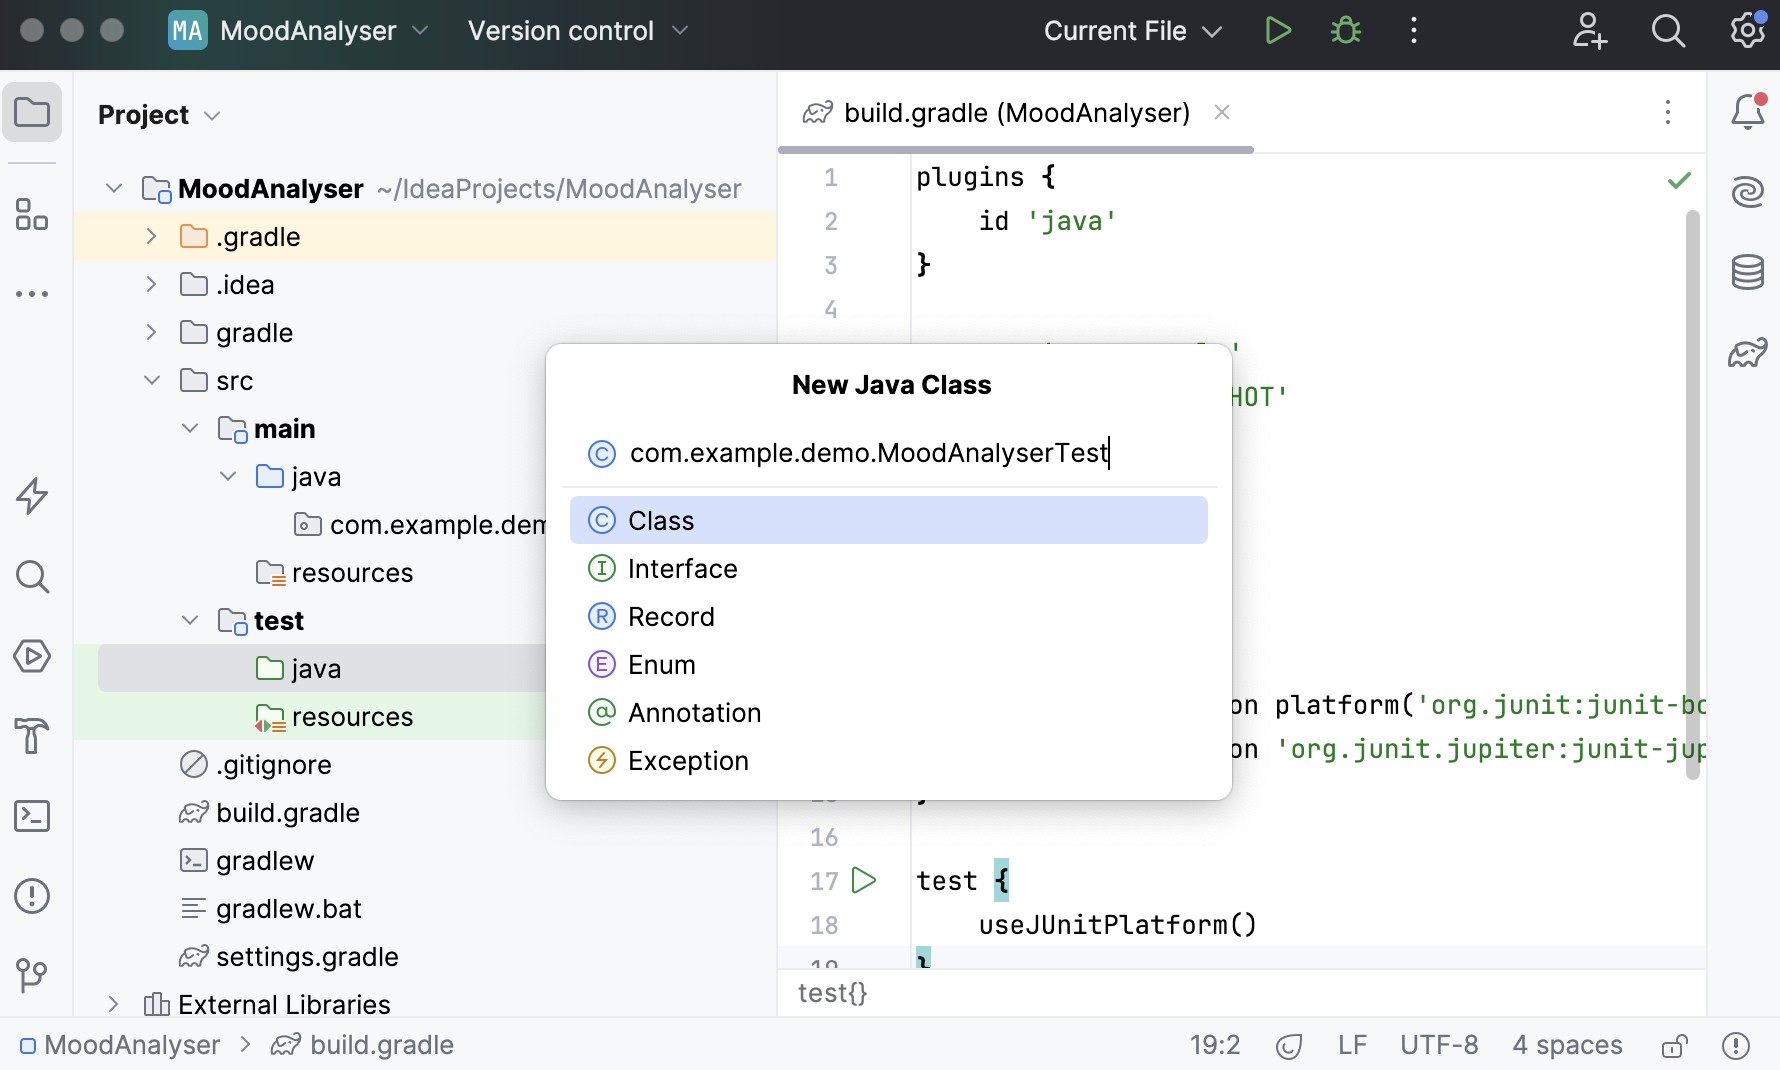
1. Right-click the test root folder  and select `New | Java Class`.
In the popup that opens, name the new package and test class: `com.example.demo.MoodAnalyserTest`.
2. Place the caret inside the curly braces in the class, press `Alt+Insert` (Windows), `⌘ N` (macOS), `⌃ N` (IntelliJ IDEA Classic (macOS)), `⌘ N` (macOS System Shortcuts), `Alt+Insert` (XWin), `Alt+Insert` (GNOME), `Alt+Insert` (KDE), `Alt+Insert` (Emacs), `Alt+Insert` (Sublime Text), `⌘ N` (Sublime Text (macOS)), `Alt+Insert` (NetBeans), `Alt+Insert` (Visual Studio), `⌘ ⌃ N` (Visual Studio (macOS)), `Alt+Insert` (Eclipse), `⌘ N` (Eclipse (macOS)).
3. Select Test Method from the menu to create a test method from the default template.
Name the method `testMoodAnalysis` , press `Enter` (Windows), `⏎` (macOS), `⏎` (IntelliJ IDEA Classic (macOS)), `⏎` (macOS System Shortcuts), `Enter` (XWin), `Enter` (GNOME), `Enter` (KDE), `Enter` (Emacs), `Enter` (Sublime Text), `⏎` (Sublime Text (macOS)), `Enter` (NetBeans), `Enter` (Visual Studio), `⏎` (Visual Studio (macOS)), `Enter` (Eclipse), `⏎` (Eclipse (macOS)), and the caret will end up in the method body.
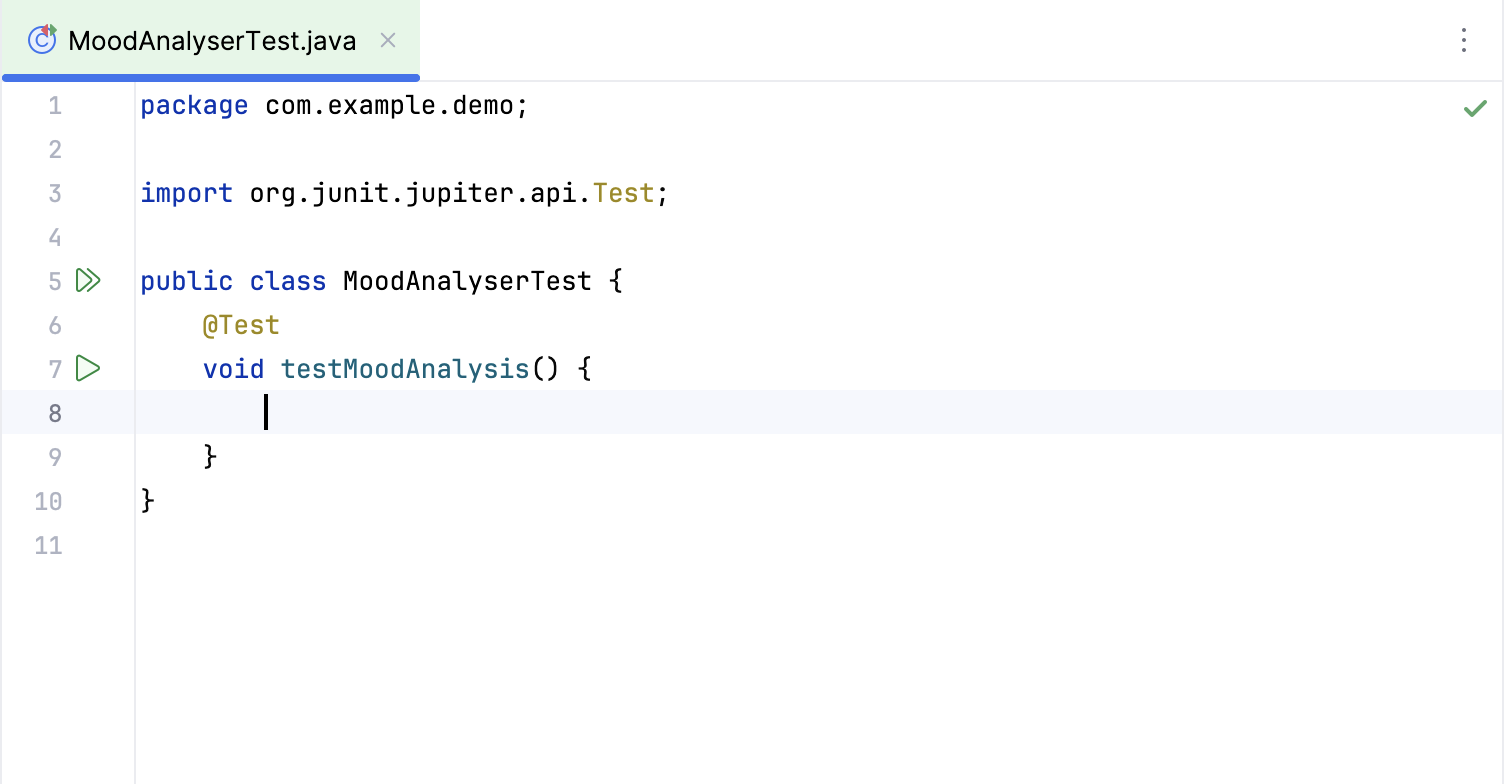
You can alter the [default test method template](using-file-and-code-templates.html) - for example, if you wish to change the start of the method name from `test` to `should`.
Procedure: Create a new class from the test
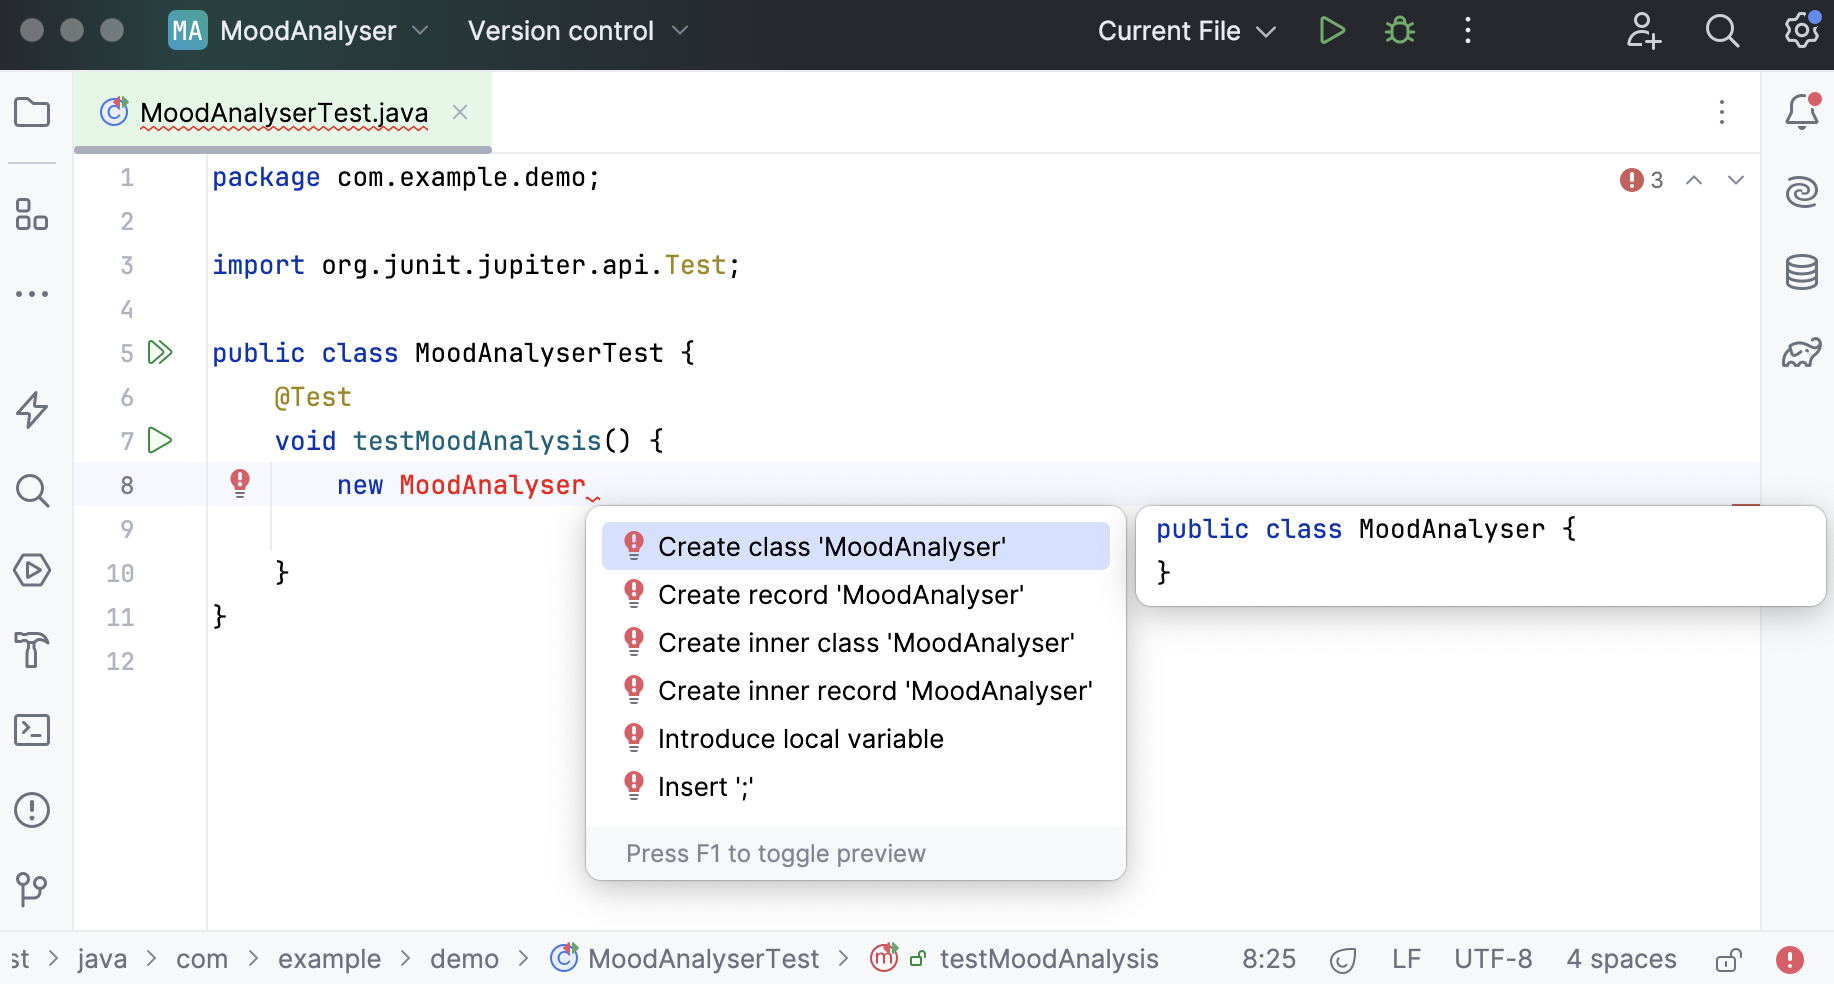
It may seem counter-intuitive to write test code for classes and methods that don’t exist, but IntelliJ IDEA makes this straightforward while keeping the compiler happy. IntelliJ IDEA can create classes and methods for you if they don’t already exist.
1. Type `new MoodAnalyser`, press `Alt+Enter` (Windows), `⌥ ⏎` (macOS), `⌥ ⏎` (IntelliJ IDEA Classic (macOS)), `⌥ ⏎` (macOS System Shortcuts), `Alt+Enter` (XWin), `Alt+Enter` (GNOME), `Alt+Enter` (KDE), `Alt+Enter` (Emacs), `Alt+Enter` (Sublime Text), `⌥ ⏎` (Sublime Text (macOS)), `Alt+Enter` (NetBeans), `Alt+Enter` (Visual Studio), `⌥ ⏎` (Visual Studio (macOS)), `Ctrl+1` (Eclipse), `⌘ 1` (Eclipse (macOS)), and select Create class 'MoodAnalyser'.
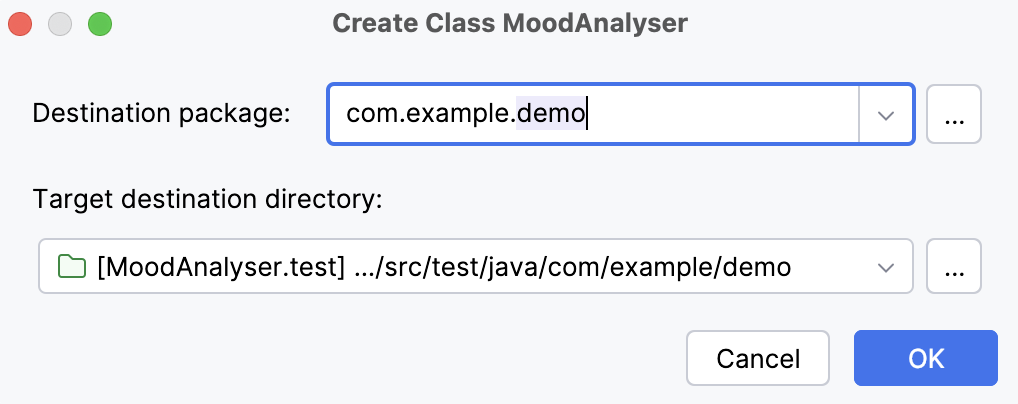
2. In the dialog that opens, select the `com.example.demo` package in the `main | java` folder and click OK.
Procedure: Create variables
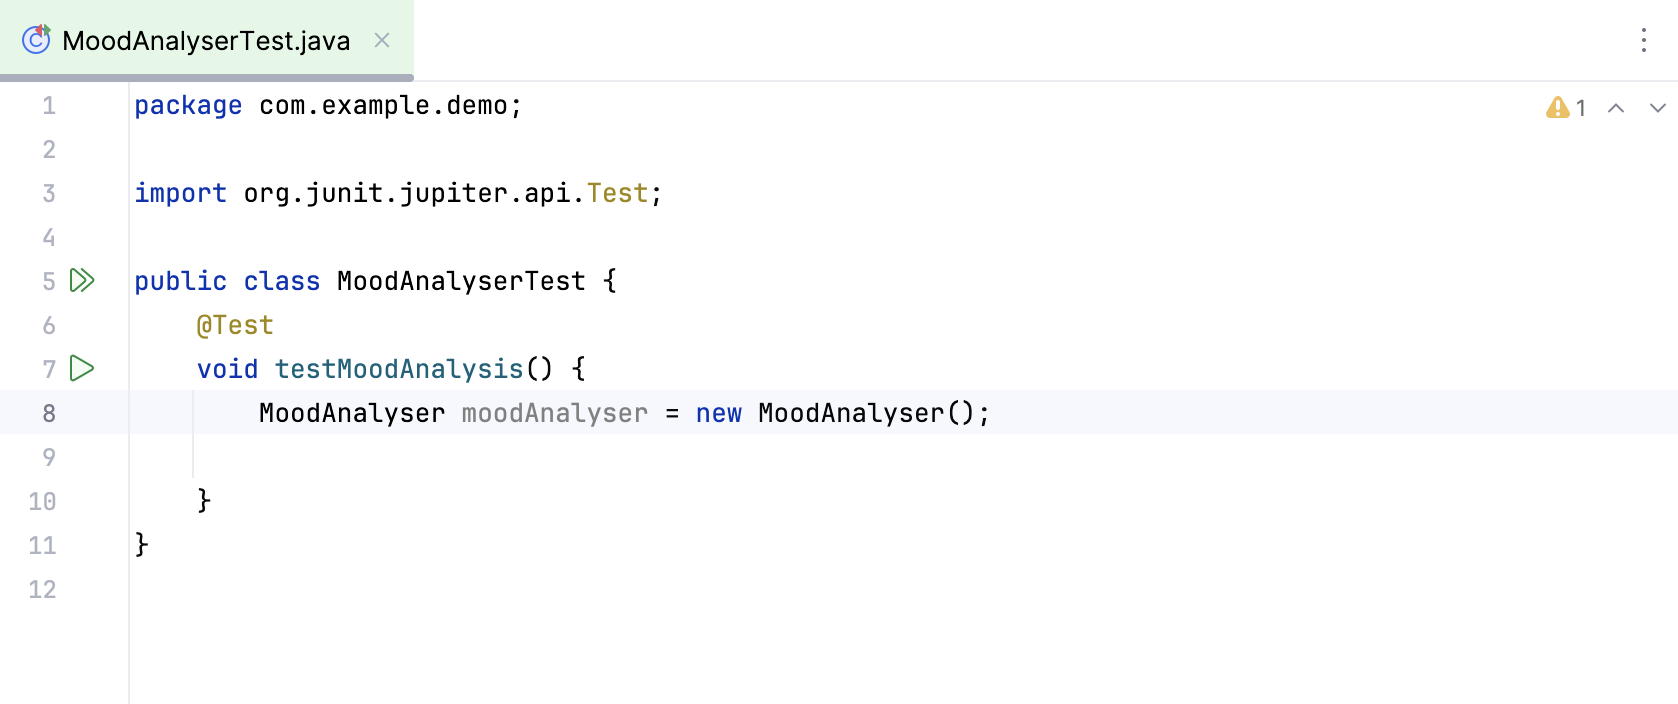
As always, you can use IntelliJ IDEA’s [refactoring tools](refactoring-source-code.html) to create variables to store results in, and IntelliJ IDEA will import the most appropriate classes for you if the correct libraries are on the classpath.
1. Switch back to the test class, place your cursor after `new MoodAnalyser`, type `()` and press `Ctrl+Alt+V` (Windows), `⌘ ⌥ V` (macOS), `⌘ ⌥ V` (IntelliJ IDEA Classic (macOS)), `⌘ ⌥ V` (macOS System Shortcuts), `Ctrl+Alt+V` (XWin), `Ctrl+Alt+V` (GNOME), `Alt+Shift+V` (KDE), `Ctrl+Alt+V` (Emacs), `Ctrl+Alt+V` (Sublime Text), `Ctrl+Alt+V` (Sublime Text (macOS)), `Alt+Shift+V` (NetBeans), `Ctrl+R, V` (Visual Studio), `⌘ R, V` (Visual Studio (macOS)), `Alt+Shift+L` (Eclipse), `⌘ ⌥ L` (Eclipse (macOS)) to invoke the [Extract/Introduce Variable](extract-variable.html) refactoring.
2. Name the new variable `moodAnalyser`.
> **Tip:**
> Place the caret at the test class or at the test subject in the source code and press `Ctrl+Shift+T` (Windows), `⌘ ⇧ T` (macOS), `⌘ ⇧ T` (IntelliJ IDEA Classic (macOS)), `⌃ ⇧ T` (macOS System Shortcuts), `Ctrl+Shift+T` (XWin), `Ctrl+Shift+T` (GNOME), `Ctrl+Shift+T` (KDE), `Ctrl+Shift+T` (Emacs), `Ctrl+Shift+T` (Sublime Text), `Ctrl+Shift+T` (Sublime Text (macOS)), `Ctrl+Shift+T` (NetBeans), `Ctrl+Shift+T` (Visual Studio), `Ctrl+Shift+T` (Visual Studio (macOS)), `Ctrl+Shift+T` (Eclipse), `Ctrl+Shift+T` (Eclipse (macOS)) to quickly navigate between them. Alternatively, use the [Split Screen mode](using-code-editor.html#split_screen) to see both files at the same time.
Procedure: Complete the test body
Continue writing the test body, including names of methods that you need that don’t exist.
1. In the test class, type the following statement:
```JAVA
moodAnalyser.analyseMood("This is a sad message");
```
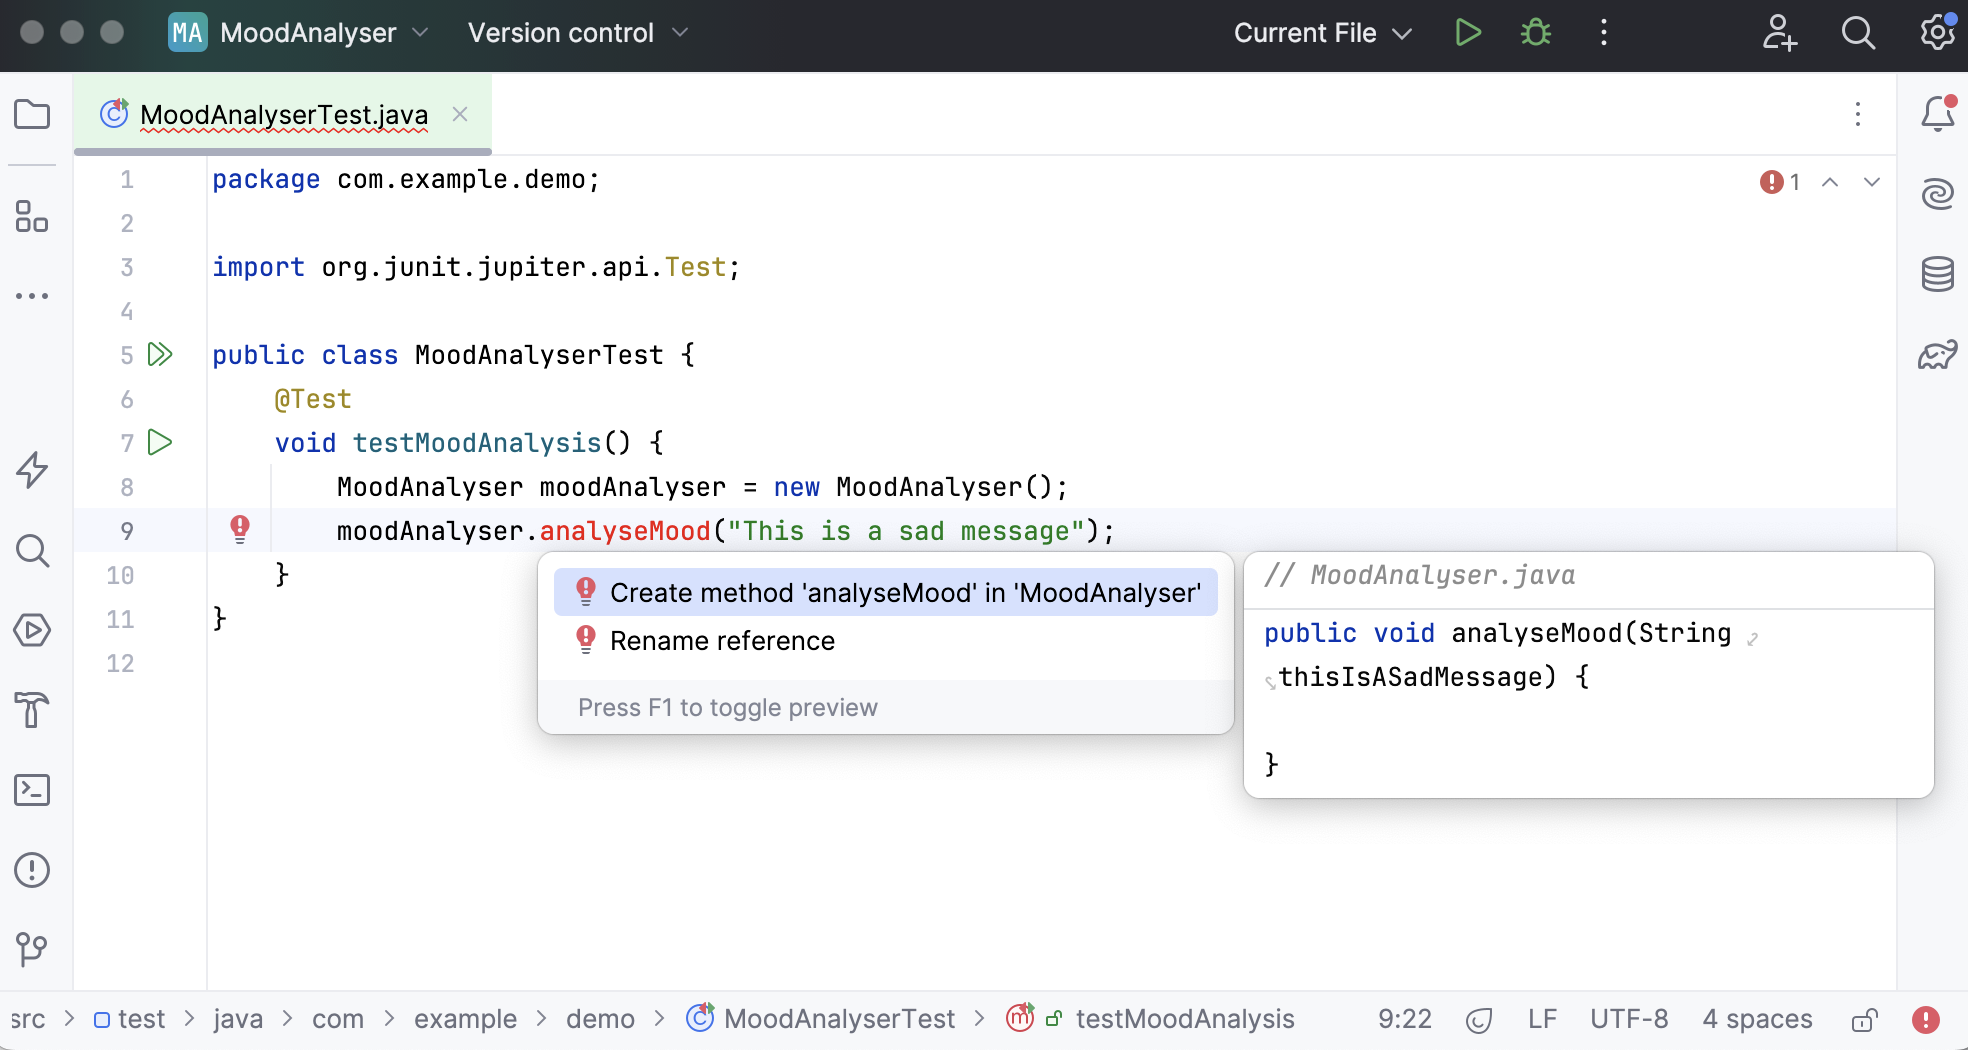
`analyseMood` will be marked as an unresolved reference.
2. Place the caret at `analyseMood`, press `Alt+Enter` (Windows), `⌥ ⏎` (macOS), `⌥ ⏎` (IntelliJ IDEA Classic (macOS)), `⌥ ⏎` (macOS System Shortcuts), `Alt+Enter` (XWin), `Alt+Enter` (GNOME), `Alt+Enter` (KDE), `Alt+Enter` (Emacs), `Alt+Enter` (Sublime Text), `⌥ ⏎` (Sublime Text (macOS)), `Alt+Enter` (NetBeans), `Alt+Enter` (Visual Studio), `⌥ ⏎` (Visual Studio (macOS)), `Ctrl+1` (Eclipse), `⌘ 1` (Eclipse (macOS)), and click Create method 'analyseMood' in 'MoodAnalyser'.
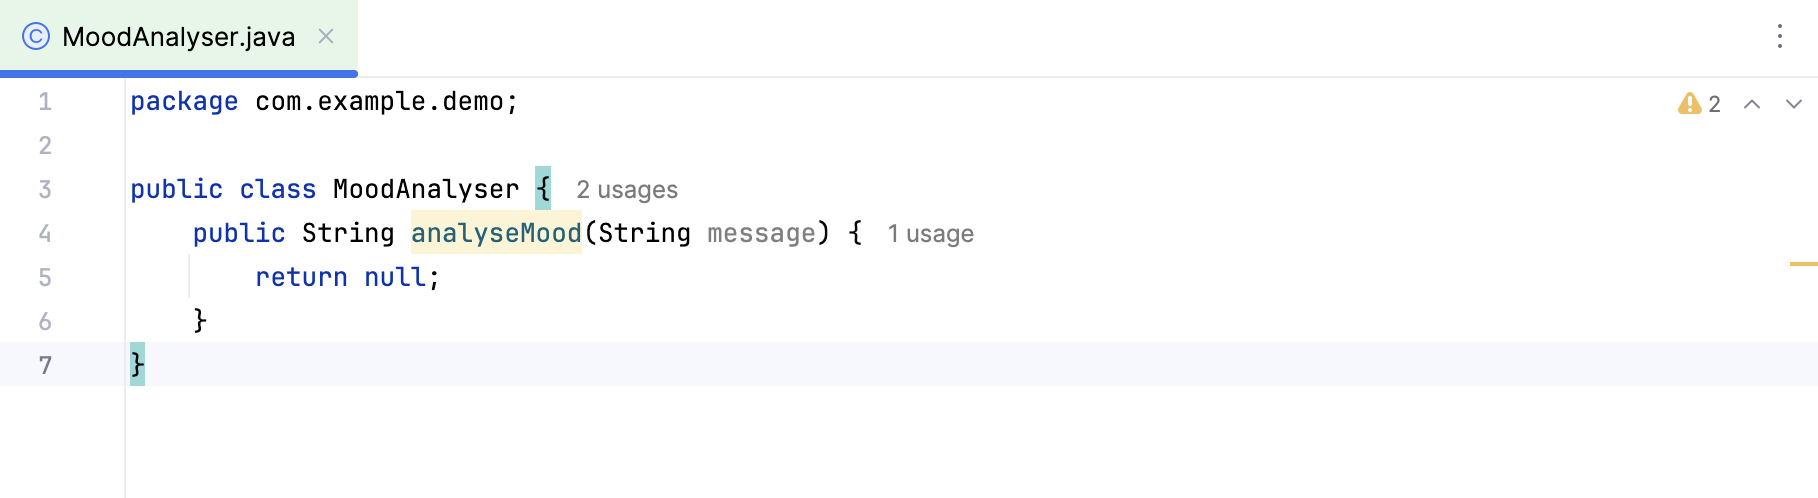
3. Make sure the `MoodAnalyser` class looks as follows:
```JAVA
public class MoodAnalyser {
public String analyseMood(String message) {
return null;
}
}
```
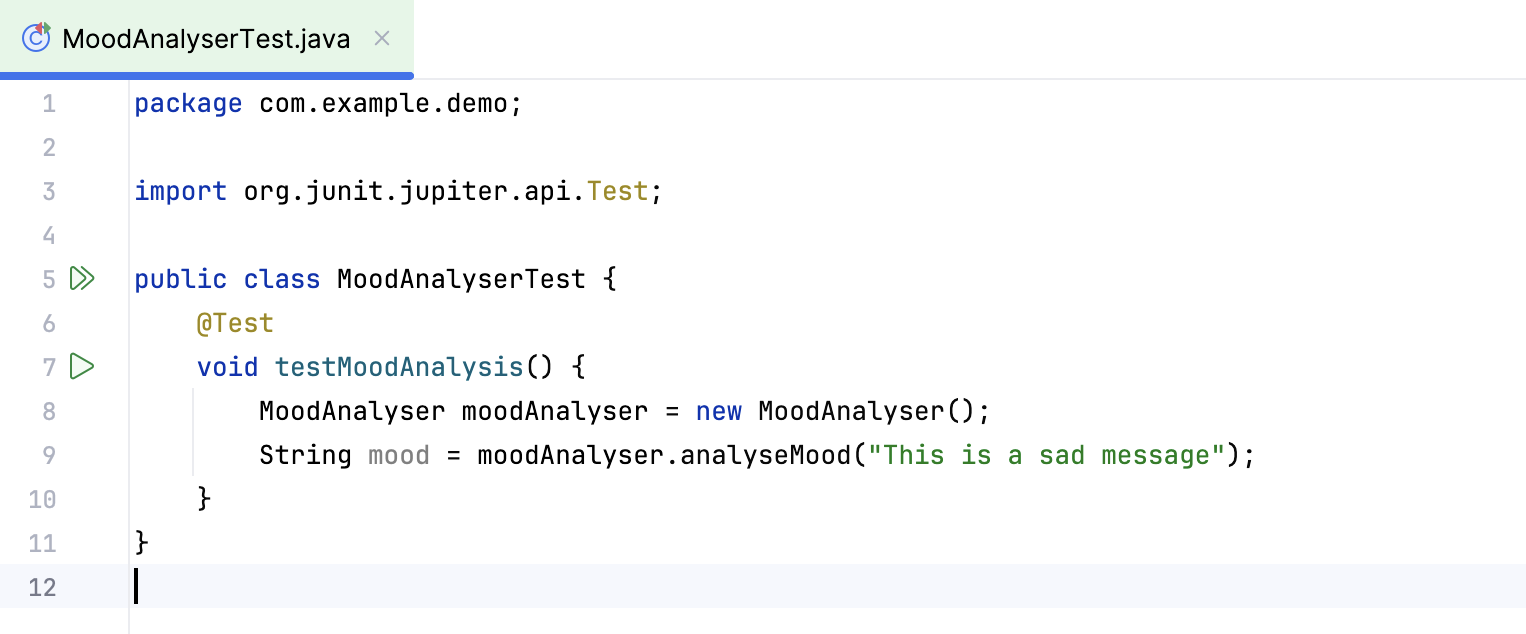
4. In the test class, place the caret at `analyseMood`, press `Ctrl+Alt+V` (Windows), `⌘ ⌥ V` (macOS), `⌘ ⌥ V` (IntelliJ IDEA Classic (macOS)), `⌘ ⌥ V` (macOS System Shortcuts), `Ctrl+Alt+V` (XWin), `Ctrl+Alt+V` (GNOME), `Alt+Shift+V` (KDE), `Ctrl+Alt+V` (Emacs), `Ctrl+Alt+V` (Sublime Text), `Ctrl+Alt+V` (Sublime Text (macOS)), `Alt+Shift+V` (NetBeans), `Ctrl+R, V` (Visual Studio), `⌘ R, V` (Visual Studio (macOS)), `Alt+Shift+L` (Eclipse), `⌘ ⌥ L` (Eclipse (macOS)), and type `mood`.
Procedure: Add an assertion statement
1. Open the `build.gradle` file, add the following dependency and click  to import the changes:
```GENERIC
dependencies {
testImplementation(
'org.hamcrest:hamcrest-library:2.2'
)
}
```
2. In `MoodAnalyserTest`, add the following statement:
```JAVA
assertThat(mood, CoreMatchers.is("SAD"));
```
Import the missing methods and classes by pressing `Alt+Enter` (Windows), `⌥ ⏎` (macOS), `⌥ ⏎` (IntelliJ IDEA Classic (macOS)), `⌥ ⏎` (macOS System Shortcuts), `Alt+Enter` (XWin), `Alt+Enter` (GNOME), `Alt+Enter` (KDE), `Alt+Enter` (Emacs), `Alt+Enter` (Sublime Text), `⌥ ⏎` (Sublime Text (macOS)), `Alt+Enter` (NetBeans), `Alt+Enter` (Visual Studio), `⌥ ⏎` (Visual Studio (macOS)), `Ctrl+1` (Eclipse), `⌘ 1` (Eclipse (macOS)).
### Code
At this point, your test and production classes should look as follows:
MoodAnalyser:
```JAVA
package com.example.demo;
public class MoodAnalyser {
public String analyseMood(String message) {
return null;
}
}
```
MoodAnalyserTest:
```JAVA
package com.example.demo;
import org.hamcrest.CoreMatchers;
import org.junit.jupiter.api.Test;
import static org.hamcrest.MatcherAssert.assertThat;
public class MoodAnalyserTest {
@Test
void testMoodAnalysis() {
MoodAnalyser moodAnalyser = new MoodAnalyser();
String mood = moodAnalyser.analyseMood("This is a sad message");
assertThat(mood, CoreMatchers.is("SAD"));
}
}
```
## Run the tests
When following a TDD approach, typically you go through a cycle of [Red-Green-Refactor](http://martinfowler.com/articles/workflowsOfRefactoring/#tdd). You’ll run a test, see it fail (go red), implement the simplest code to make the test pass (go green), and then refactor the code so your test stays green and your code is sufficiently clean.
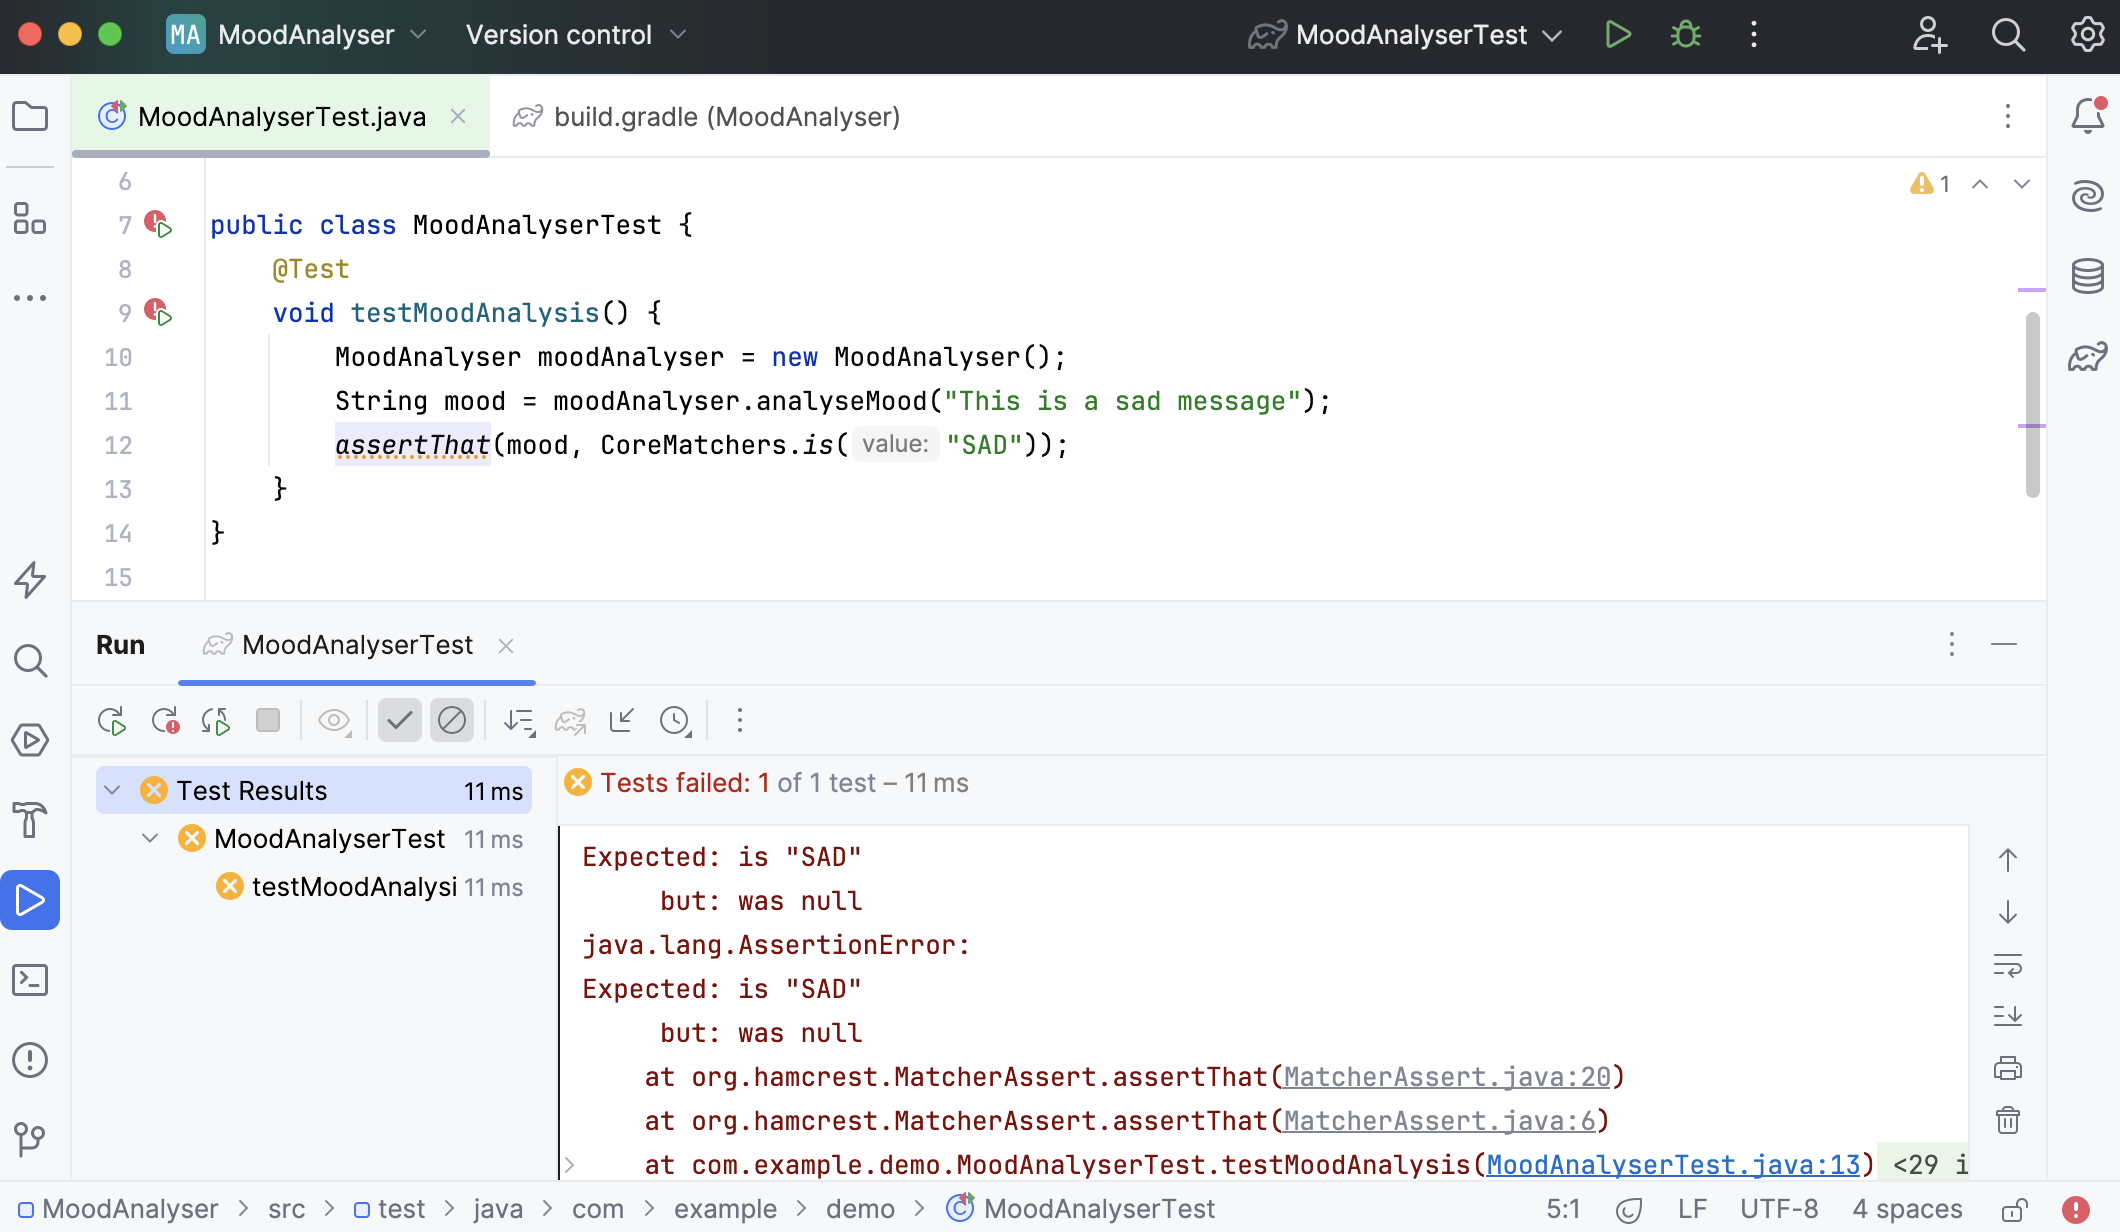
The first step in this cycle is to run the test and see it fail.
Given that we’ve used IntelliJ IDEA features to create the simplest empty implementation of the method we’re testing, we do not expect our test to pass.
Procedure:
* From inside the test, press `Ctrl+Shift+F10` (Windows), `⌃ ⇧ R` (macOS), `⌃ ⇧ F10` (IntelliJ IDEA Classic (macOS)), `⌃ ⇧ R` (macOS System Shortcuts), `Ctrl+Shift+F10` (XWin), `Ctrl+Shift+F10` (GNOME), `Ctrl+Shift+F10` (KDE), `Ctrl+Shift+F10` (Emacs), `Ctrl+Shift+F10` (Sublime Text), `Ctrl+Shift+F10` (Sublime Text (macOS)), `Alt+Shift+F6` (NetBeans), `Ctrl+Alt+F5` (Visual Studio), `⌃ ⌥ F5` (Visual Studio (macOS)), `Ctrl+Shift+F10` (Eclipse), `⌃ ⇧ R` (Eclipse (macOS)) to run this individual test.
The results will be shown in the [Run tool window](viewing-and-exploring-test-results.html). The test name will have an icon next to it — either red for an exception or yellow for an assertion that fails. For either type of failure, a message stating what went wrong is also shown.
## Implement the code
The next step is to make the tests pass, which means implementing the simplest thing that works. Often with TDD, the simplest thing that works might be hard-coding your expected value. We will see later how iterating over this process will lead to more realistic production code.
Procedure: Fix the test
1. In `MoodAnalyser`, replace `null` with the `SAD` return value: `return "SAD";`.
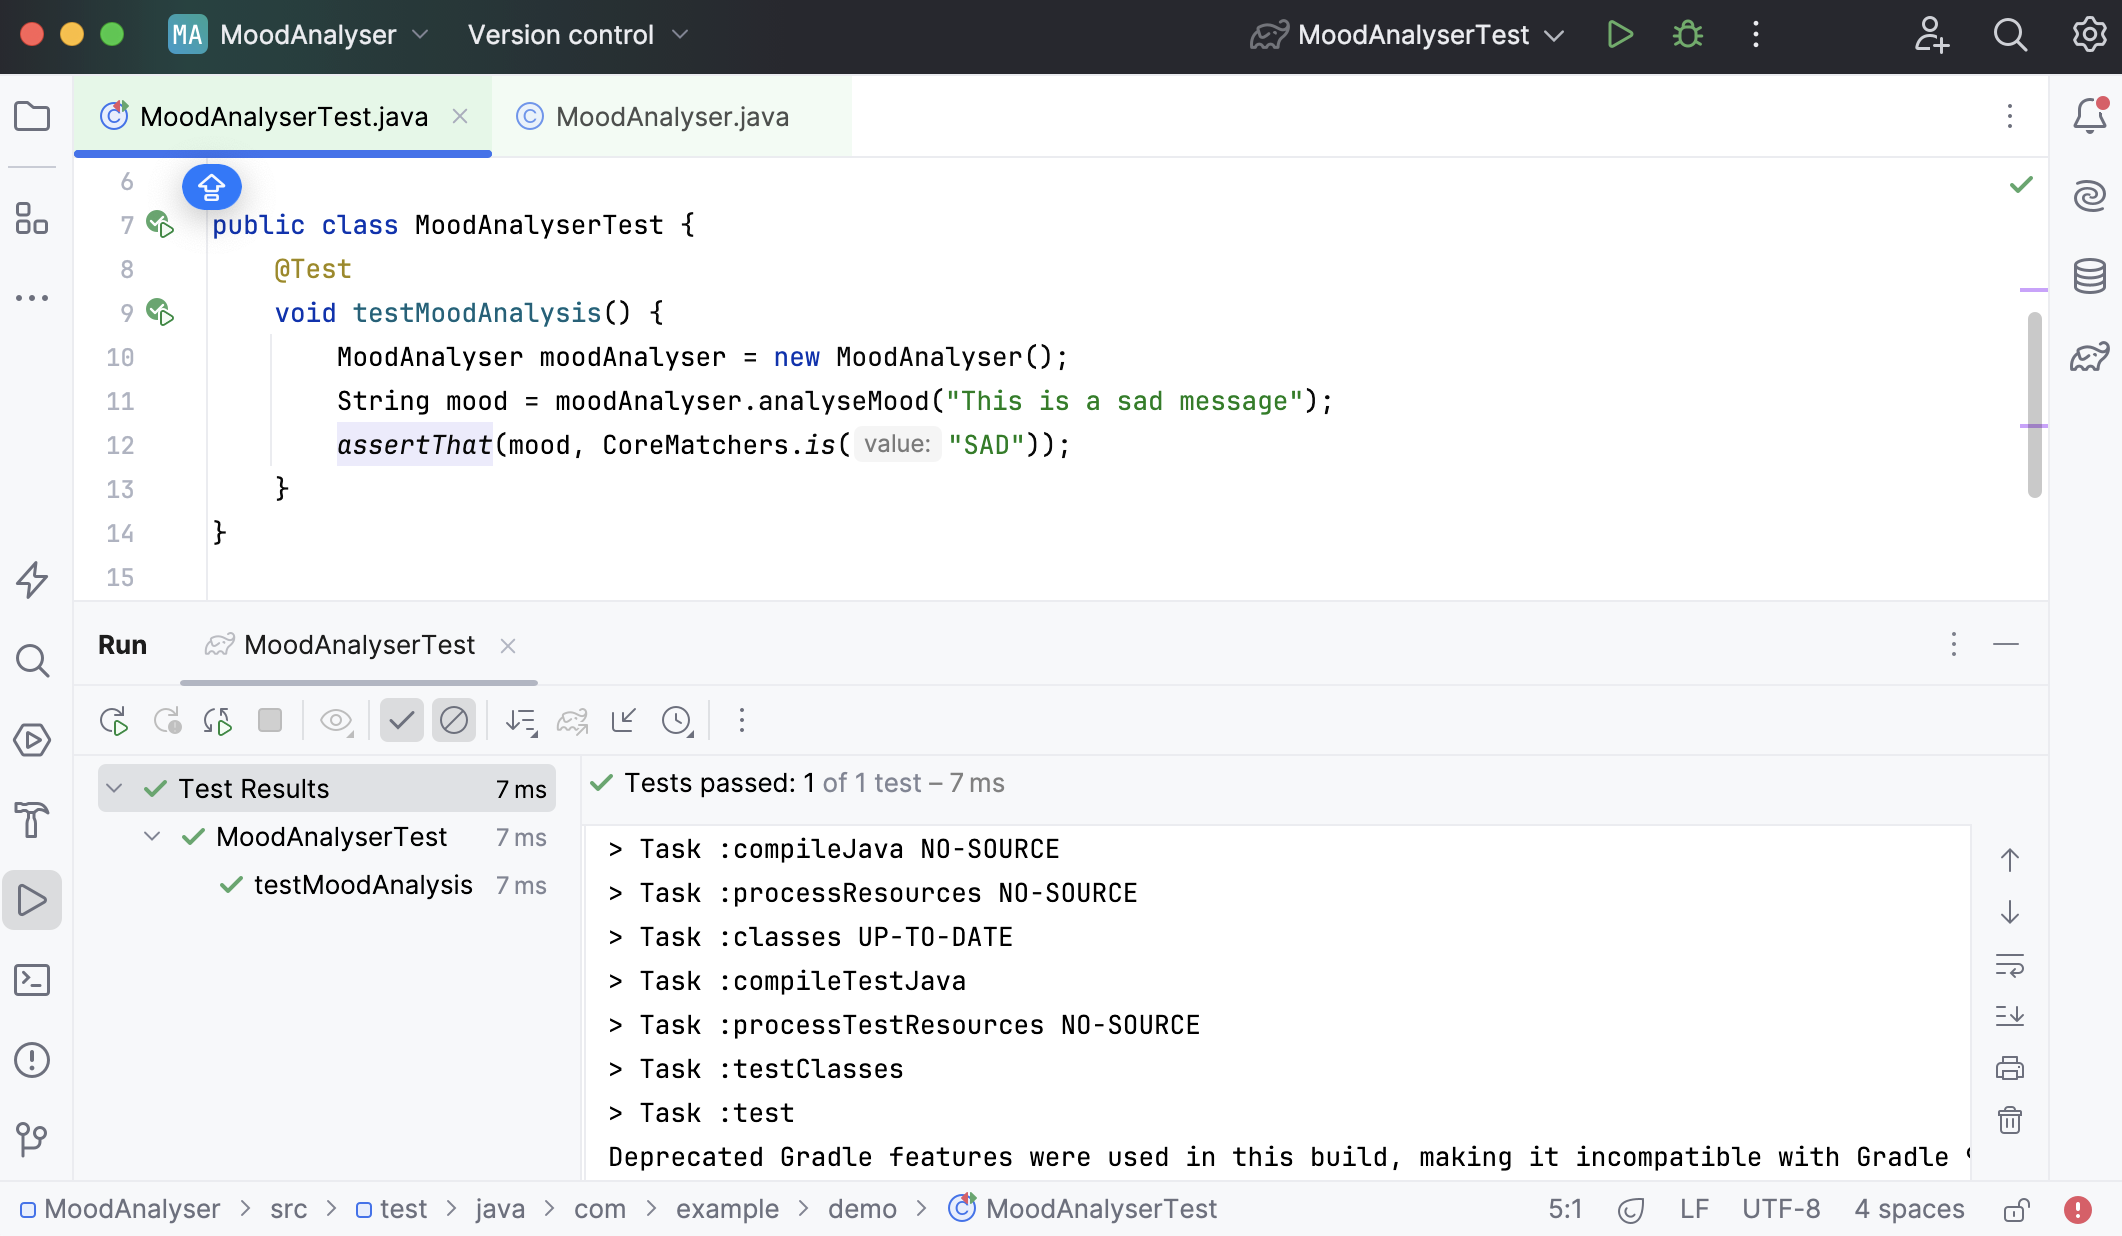
2. Re-run the test, using `Shift+F10` (Windows), `⌃ R` (macOS), `⇧ F10` (IntelliJ IDEA Classic (macOS)), `⌥ ⇧ R` (macOS System Shortcuts), `Shift+F10` (XWin), `Shift+F10` (GNOME), `Shift+F10` (KDE), `Shift+F10` (Emacs), `Shift+F10` (Sublime Text), `Shift+F10` (Sublime Text (macOS)), `F6` (NetBeans), `Ctrl+F5` (Visual Studio), `⌃ F5` (Visual Studio (macOS)), `Alt+Shift+X` (Eclipse), `⌘ ⇧ F11` (Eclipse (macOS)) to re-run the last test.
See the test pass - the icon next to the test method should go green.
## Iterate
Developing code is an iterative process. When following a TDD-style approach, this is even more true. In order to drive out more complex behaviour, we add tests for other cases.
Procedure: Add the second test case
1. In your test class, use `Alt+Insert` (Windows), `⌘ N` (macOS), `⌃ N` (IntelliJ IDEA Classic (macOS)), `⌘ N` (macOS System Shortcuts), `Alt+Insert` (XWin), `Alt+Insert` (GNOME), `Alt+Insert` (KDE), `Alt+Insert` (Emacs), `Alt+Insert` (Sublime Text), `⌘ N` (Sublime Text (macOS)), `Alt+Insert` (NetBeans), `Alt+Insert` (Visual Studio), `⌘ ⌃ N` (Visual Studio (macOS)), `Alt+Insert` (Eclipse), `⌘ N` (Eclipse (macOS)) again to create a new test method. Name it `HappyMoods`.
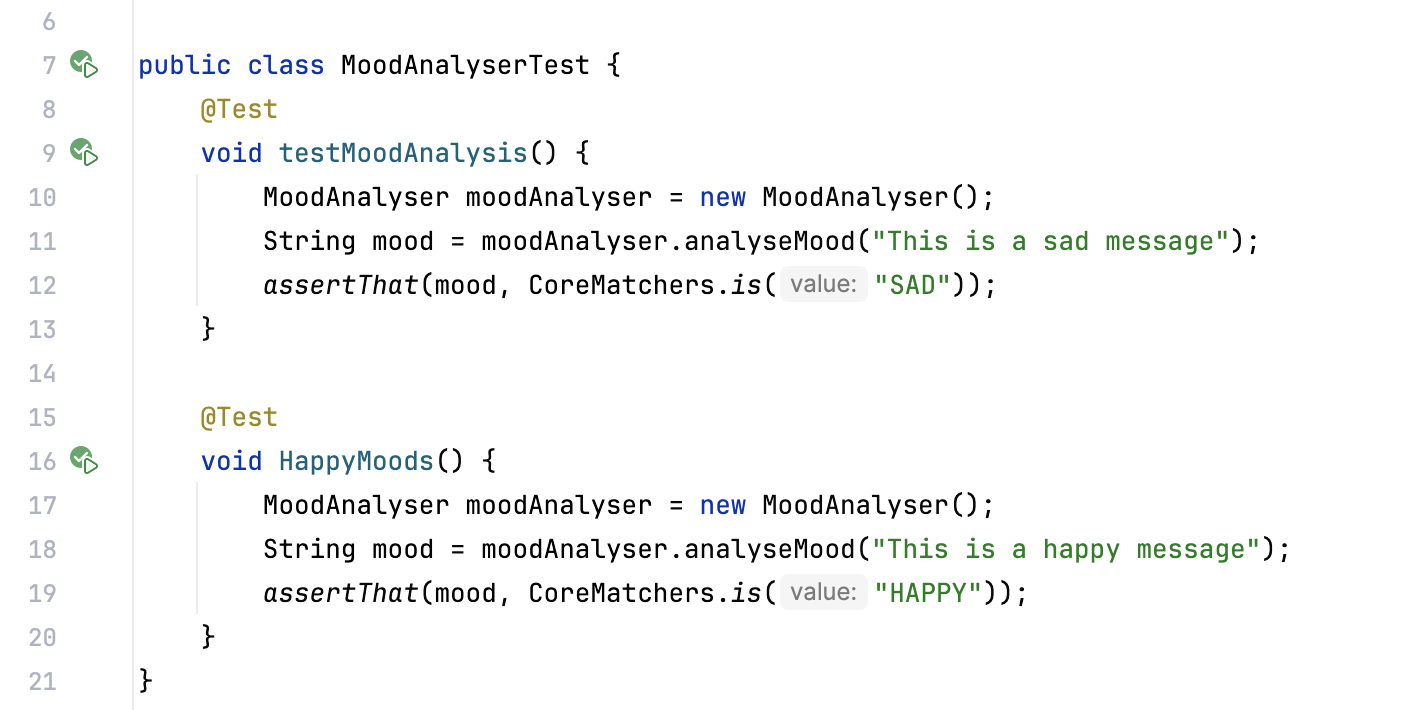
2. Add the following code to your class.
```JAVA
@Test
void HappyMoods() {
MoodAnalyser moodAnalyser = new MoodAnalyser();
String mood = moodAnalyser.analyseMood("This is a happy message");
assertThat(mood, CoreMatchers.is("HAPPY"));
}
```
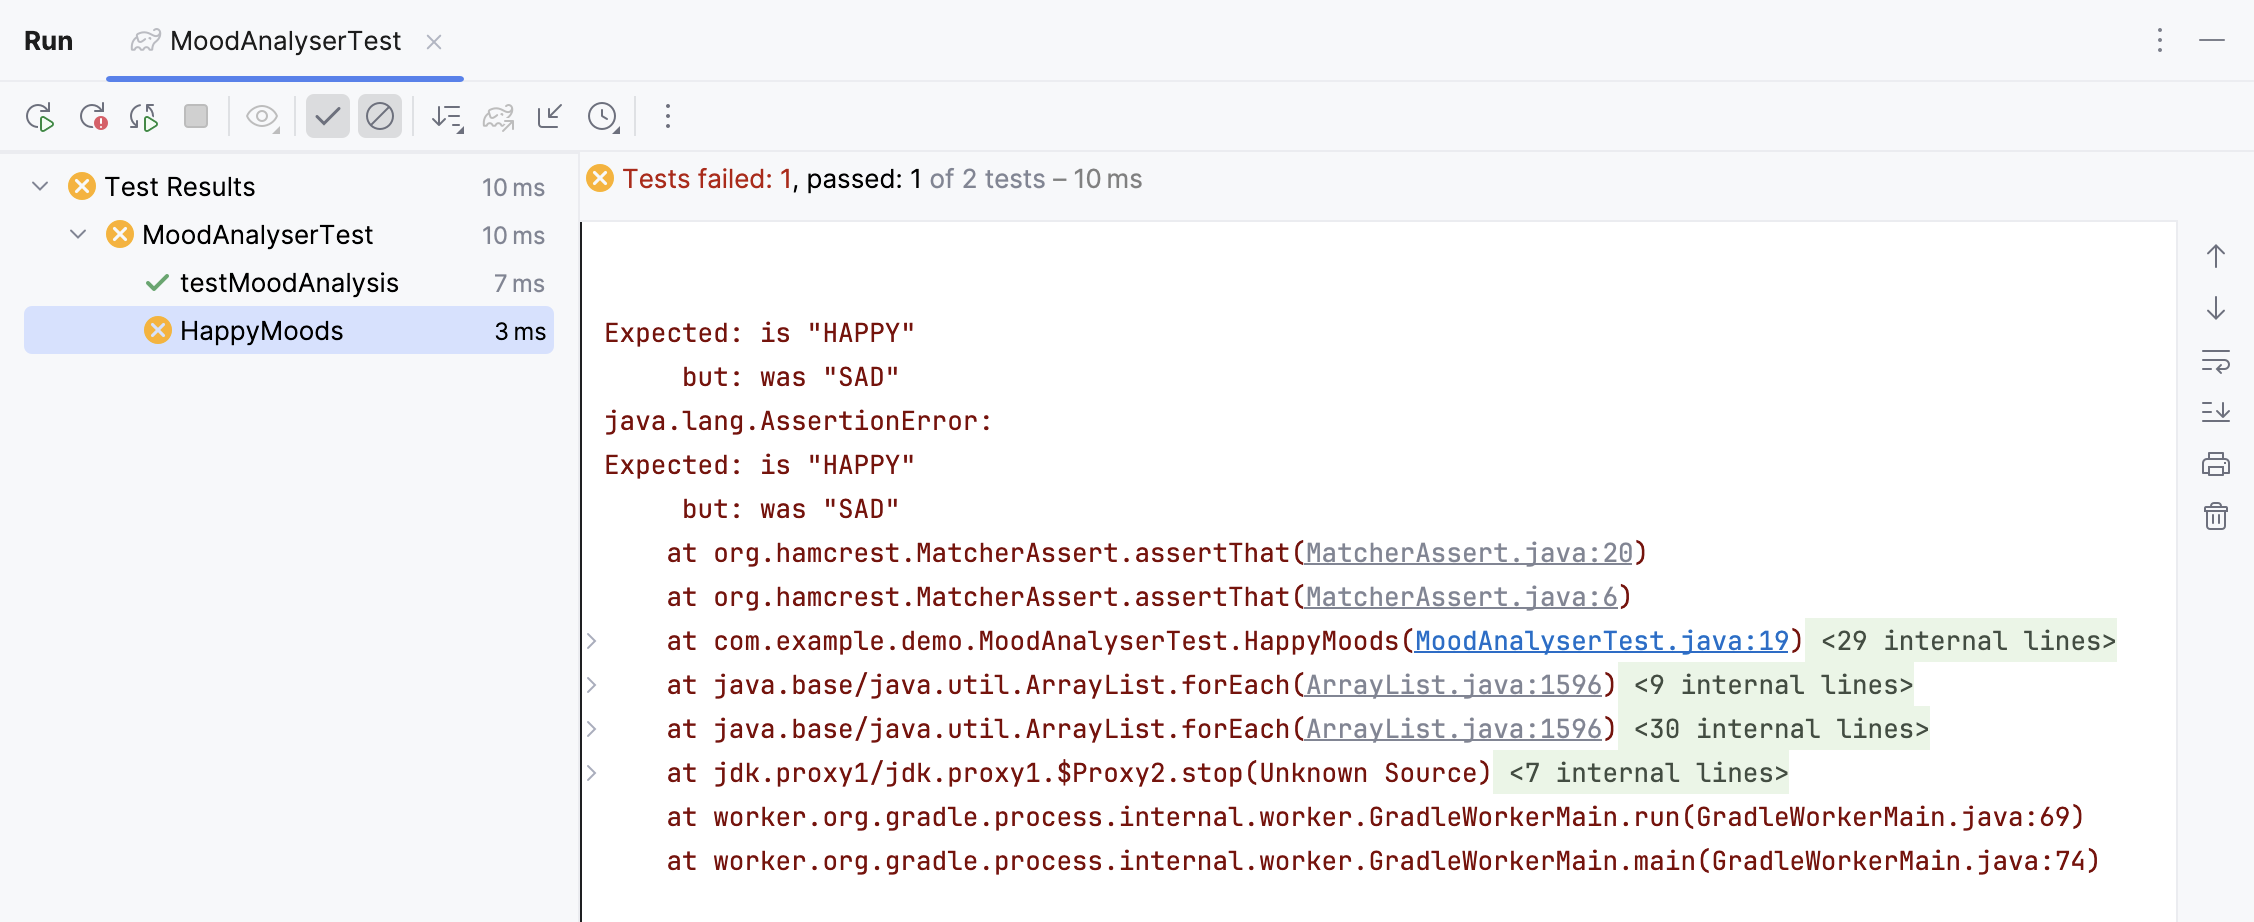
3. Run this second test case by pressing `Alt+Shift+R` (Windows), `⌘ ⌃ R` (macOS), `⌘ ⌃ R` (IntelliJ IDEA Classic (macOS)), `⌘ ⌃ R` (macOS System Shortcuts), `Alt+Shift+R` (XWin), `Alt+Shift+R` (GNOME), `Alt+Shift+R` (KDE), `Alt+Shift+R` (Emacs), `Alt+Shift+R` (Sublime Text), `⌘ ⌃ R` (Sublime Text (macOS)), `Alt+Shift+R` (NetBeans), `Alt+Shift+R` (Visual Studio), `Alt+Shift+R` (Visual Studio (macOS)), `Alt+Shift+G` (Eclipse), `⌘ ⌃ R` (Eclipse (macOS)), you will see that it fails.
Procedure: Fix the second test
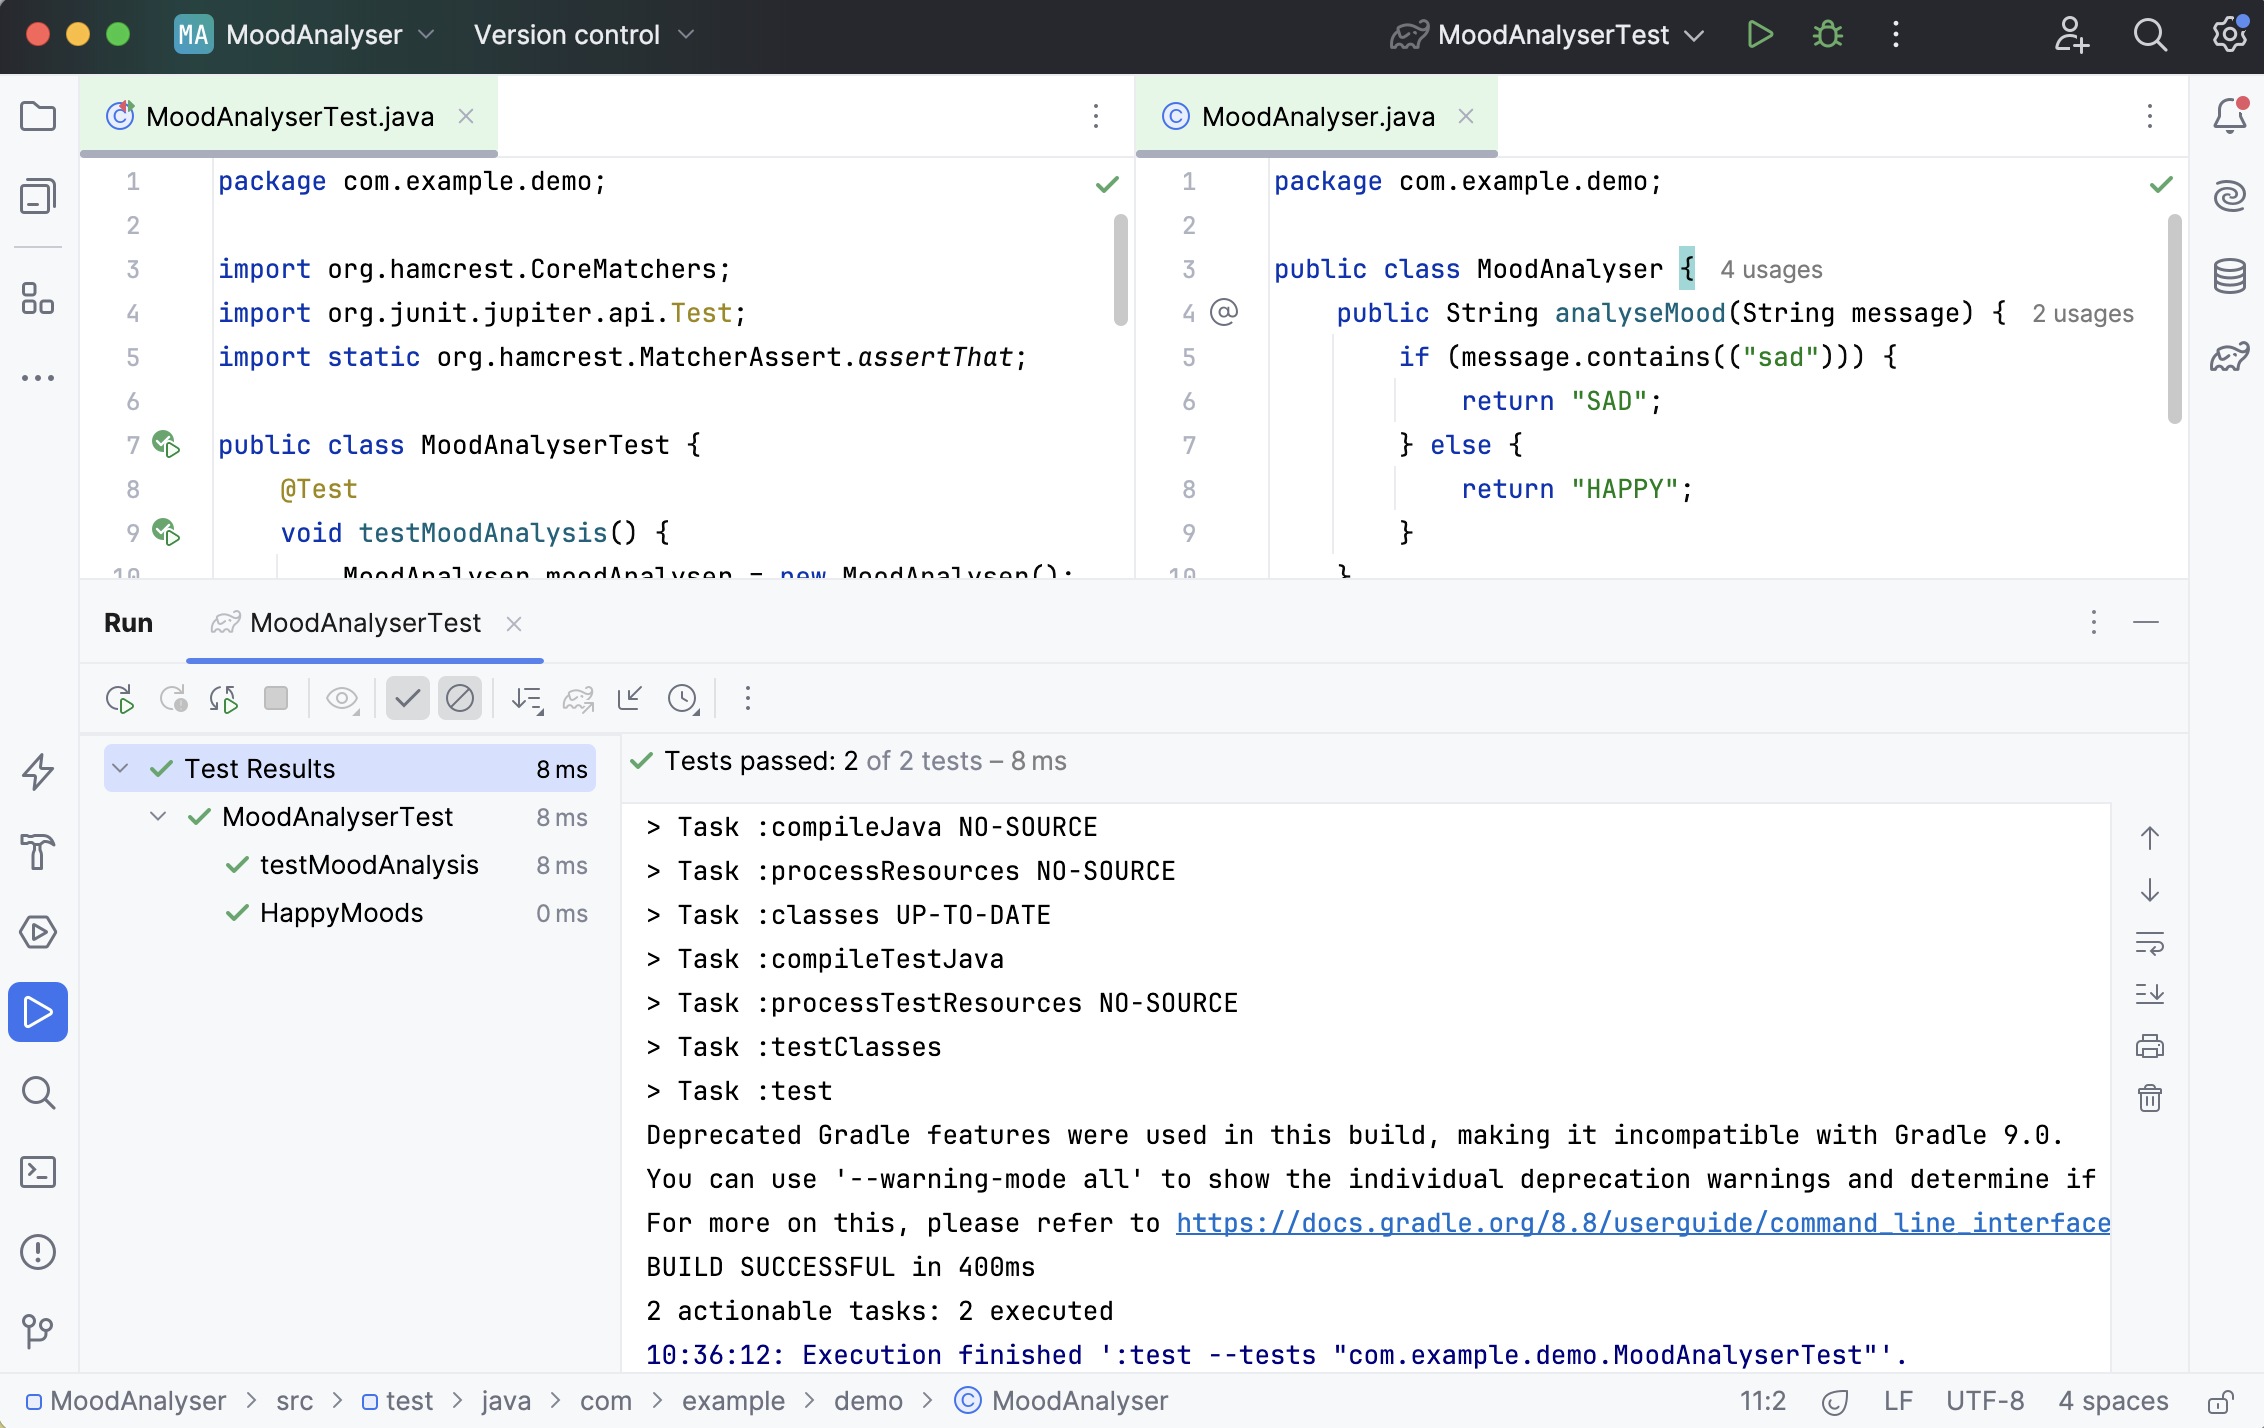
1. Change the code in the method being tested to make this test pass:
```JAVA
package com.example.demo;
public class MoodAnalyser {
public String analyseMood(String message) {
if (message.contains(("sad"))) {
return "SAD";
} else {
return "HAPPY";
}
}
}
```
2. Re-run both the tests by pressing `Ctrl+Shift+F10` (Windows), `⌃ ⇧ R` (macOS), `⌃ ⇧ F10` (IntelliJ IDEA Classic (macOS)), `⌃ ⇧ R` (macOS System Shortcuts), `Ctrl+Shift+F10` (XWin), `Ctrl+Shift+F10` (GNOME), `Ctrl+Shift+F10` (KDE), `Ctrl+Shift+F10` (Emacs), `Ctrl+Shift+F10` (Sublime Text), `Ctrl+Shift+F10` (Sublime Text (macOS)), `Alt+Shift+F6` (NetBeans), `Ctrl+Alt+F5` (Visual Studio), `⌃ ⌥ F5` (Visual Studio (macOS)), `Ctrl+Shift+F10` (Eclipse), `⌃ ⇧ R` (Eclipse (macOS)) inside the test class, not inside a single method, and see that both tests now pass.
## Summary
Writing your first test in a test-first style takes a small amount of setup – creating the test class, creating the test methods, and then creating empty implementations of the code that will eventually become production code. IntelliJ IDEA automates a lot of this initial setup.
As you iterate through the process, creating tests and then making the changes required to get those tests to pass, you build up a comprehensive suite of tests for your required functionality, and the simplest solution that will meet these requirements.
## See also
### External Links
[Statistics and Studies: The Benefits Of Test Driven Development](https://theqalead.com/general/statistics-studies-benefits-test-driven-development/)