# Terminal
> **TL;DR**
> Open: `View | Tool Windows | Terminal` or `Alt+F12` (Windows), `⌥ F12` (macOS), `⌥ F12` (IntelliJ IDEA Classic (macOS)), `⌘ ⌃ T` (macOS System Shortcuts), `Alt+F12` (XWin), `Alt+F12` (GNOME), `Alt+F12` (KDE), `Alt+F12` (Emacs), `Alt+F12` (Sublime Text), `⌥ F12` (Sublime Text (macOS)), `Alt+F12` (NetBeans), `Ctrl+Alt+1` (Visual Studio), `⌘ ⌃ 1` (Visual Studio (macOS)), `Alt+F12` (Eclipse), `⌥ F12` (Eclipse (macOS))
>
>
>
> Configure: `Settings `Ctrl+Alt+S` (Windows), `⌘ Comma` (macOS), `⌘ Comma` (IntelliJ IDEA Classic (macOS)), `⌘ Comma` (macOS System Shortcuts), `Ctrl+Alt+S` (XWin), `Ctrl+Alt+S` (GNOME), `Ctrl+Alt+S` (KDE), `Ctrl+Alt+S` (Emacs), `Ctrl+Alt+S` (Sublime Text), `⌘ Comma` (Sublime Text (macOS)), `Ctrl+Alt+S` (NetBeans), `Ctrl+Alt+S` (Visual Studio), `⌘ Comma` (Visual Studio (macOS)), `Ctrl+Alt+S` (Eclipse), `⌘ Comma` (Eclipse (macOS)) | Tools | Terminal`
IntelliJ IDEA includes an embedded terminal emulator for working with your command-line shell from inside the IDE. Use it to run Java tools, Git commands, set file permissions, and perform other command-line tasks without switching to a dedicated terminal application.
Procedure: Enable the Terminal plugin
This functionality relies on the [Terminal](https://plugins.jetbrains.com/plugin/13123-terminal) plugin, which is bundled and enabled in IntelliJ IDEA by default. If the relevant features are not available, make sure that you did not disable the plugin.
1. Press `Ctrl+Alt+S` (Windows), `⌘ Comma` (macOS), `⌘ Comma` (IntelliJ IDEA Classic (macOS)), `⌘ Comma` (macOS System Shortcuts), `Ctrl+Alt+S` (XWin), `Ctrl+Alt+S` (GNOME), `Ctrl+Alt+S` (KDE), `Ctrl+Alt+S` (Emacs), `Ctrl+Alt+S` (Sublime Text), `⌘ Comma` (Sublime Text (macOS)), `Ctrl+Alt+S` (NetBeans), `Ctrl+Alt+S` (Visual Studio), `⌘ Comma` (Visual Studio (macOS)), `Ctrl+Alt+S` (Eclipse), `⌘ Comma` (Eclipse (macOS)) to open settings and then select `Plugins`.
2. Open the Installed tab, find the Terminal plugin, and select the checkbox next to the plugin name.
Initially, the terminal emulator runs with your default system shell, but it supports many other shells, such as
Windows PowerShell, Command Prompt `cmd.exe`,
`sh`, `bash`, `zsh`, `csh`, and so on. For more information about changing the shell, refer to [Terminal settings](settings-tools-terminal.html). To run another shell in a single tab without changing the default one, refer to [Start a session in another shell](#new_predefined_session).
Procedure: Access the Terminal tool window
* Go to `View | Tool Windows | Terminal` or press `Alt+F12` (Windows), `⌥ F12` (macOS), `⌥ F12` (IntelliJ IDEA Classic (macOS)), `⌘ ⌃ T` (macOS System Shortcuts), `Alt+F12` (XWin), `Alt+F12` (GNOME), `Alt+F12` (KDE), `Alt+F12` (Emacs), `Alt+F12` (Sublime Text), `⌥ F12` (Sublime Text (macOS)), `Alt+F12` (NetBeans), `Ctrl+Alt+1` (Visual Studio), `⌘ ⌃ 1` (Visual Studio (macOS)), `Alt+F12` (Eclipse), `⌥ F12` (Eclipse (macOS)).
By default, the terminal emulator runs with the current directory set to the root directory of the current project. For more information about changing the default start directory, refer to [Terminal settings](settings-tools-terminal.html).
* Right-click any file (for example, in the Project tool window (`Alt+1` (Windows), `⌘ 1` (macOS), `⌘ 1` (IntelliJ IDEA Classic (macOS)), `⌘ 1` (macOS System Shortcuts), `Alt+1` (XWin), `Alt+1` (GNOME), `Alt+1` (KDE), `Alt+1` (Emacs), `Alt+1` (Sublime Text), `⌘ 1` (Sublime Text (macOS)), `Ctrl+1` (NetBeans), `Ctrl+Alt+L` (Visual Studio), `⌘ ⌥ L` (Visual Studio (macOS)), `Alt+1` (Eclipse), `Alt+1` (Eclipse (macOS))) or any open editor tab) and select `Open in | Terminal` to open the Terminal tool window with a new session in the directory of that file.
> **Tip:**
> You can open the terminal as an editor tab: right-click the Terminal tool window header and select Move to Editor.
## Terminal sessions
### Local session
Procedure: Start a new local session
* To start a new session in a separate tab, click  on the toolbar or press `Ctrl+Shift+T` (Windows), `⌘ T` (macOS), `⌘ T` (IntelliJ IDEA Classic (macOS)), `⌘ T` (macOS System Shortcuts), `Ctrl+Shift+T` (XWin), `Ctrl+Shift+T` (GNOME), `Ctrl+Shift+T` (KDE), `Ctrl+Shift+T` (Emacs), `Ctrl+Shift+T` (Sublime Text), `⌘ T` (Sublime Text (macOS)), `Ctrl+Shift+T` (NetBeans), `Ctrl+Shift+T` (Visual Studio), `⌘ T` (Visual Studio (macOS)), `Ctrl+Shift+T` (Eclipse), `⌘ T` (Eclipse (macOS)).
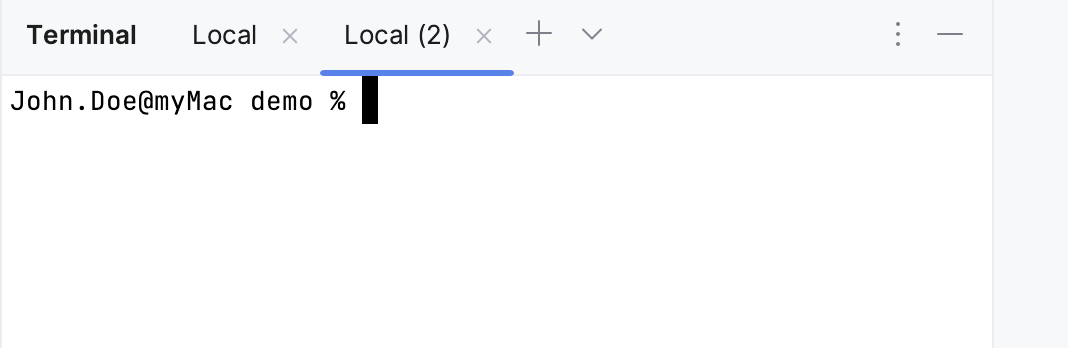
* To run multiple sessions inside a tab, right-click the tab and select Split Right or Split Down in the context menu.
* To close a tab, click  on the terminal toolbar or press `Ctrl+F4` (Windows), `⌘ W` (macOS), `⌘ F4` (IntelliJ IDEA Classic (macOS)), `⌘ W` (macOS System Shortcuts), `Ctrl+F4` (XWin), `Ctrl+F4` (GNOME), `Ctrl+4` (KDE), `Ctrl+F4` (Emacs), `Ctrl+F4` (Sublime Text), `⌘ W` (Sublime Text (macOS)), `Ctrl+F4` (NetBeans), `Ctrl+F4` (Visual Studio), `⌘ F4` (Visual Studio (macOS)), `Ctrl+F4` (Eclipse), `⌘ W` (Eclipse (macOS)).
* To terminate a running session, close the tab by clicking  and confirm the process termination.
* To switch between active tabs, press `Alt+Right` (Windows), `⌘ ⇧ ]` (macOS), `⌃ →` (IntelliJ IDEA Classic (macOS)), `⌘ ⌥ →` (macOS System Shortcuts), `Alt+Right` (XWin), `Alt+Right` (GNOME), `Alt+Right` (KDE), `Alt+Right` (Emacs), `Ctrl+Page Down` (Sublime Text), `⌘ ⇧ ]` (Sublime Text (macOS)), `Ctrl+Page Down` (NetBeans), `Alt+Right` (Visual Studio), `⌘ ⇧ ]` (Visual Studio (macOS)), `Ctrl+F6` (Eclipse), `⌘ F6` (Eclipse (macOS)) and `Alt+Left` (Windows), `⌘ ⇧ [` (macOS), `⌃ ←` (IntelliJ IDEA Classic (macOS)), `⌘ ⌥ ←` (macOS System Shortcuts), `Alt+Left` (XWin), `Alt+Left` (GNOME), `Alt+Left` (KDE), `Alt+Left` (Emacs), `Ctrl+Page Up` (Sublime Text), `⌘ ⇧ [` (Sublime Text (macOS)), `Ctrl+Page Up` (NetBeans), `Alt+Left` (Visual Studio), `⌘ ⇧ [` (Visual Studio (macOS)), `Ctrl+Shift+F6` (Eclipse), `⌘ ⇧ F6` (Eclipse (macOS)). Alternatively, you can press `Alt+Down` (Windows), `⌃ ⇧ ↓` (macOS), `Alt+Down` (IntelliJ IDEA Classic (macOS)), `⌘ ⌥ ⇧ ↓` (macOS System Shortcuts), `Alt+Down` (XWin), `Alt+Down` (GNOME), `Alt+Down` (KDE), `Alt+Down` (Emacs), `Alt+Down` (Sublime Text), `⌃ ⇧ ↓` (Sublime Text (macOS)), `Alt+Down` (NetBeans), `Alt+Down` (Visual Studio), `⌃ ⇧ ↓` (Visual Studio (macOS)), `Alt+Down` (Eclipse), `⌃ ⇧ ↓` (Eclipse (macOS)) to see the list of all terminal tabs.
* To clear the terminal screen, press `⌘ K` (Windows), `⌘ K` (macOS), `⌘ K` (IntelliJ IDEA Classic (macOS)), `⌘ K` (macOS System Shortcuts), `⌘ K` (XWin), `⌘ K` (GNOME), `⌘ K` (KDE), `⌘ K` (Emacs), `⌘ K` (Sublime Text), `⌘ K` (Sublime Text (macOS)), `⌘ K` (NetBeans), `⌘ K` (Visual Studio), `⌘ K` (Visual Studio (macOS)), `⌘ K` (Eclipse), `⌘ K` (Eclipse (macOS)).
The terminal saves tabs and sessions when you close the project or IntelliJ IDEA. It preserves tab names, the current working directory, and even the shell history.
> **Tip:**
> Configure shortcuts for the terminal actions in the IDE settings (`Ctrl+Alt+S` (Windows), `⌘ Comma` (macOS), `⌘ Comma` (IntelliJ IDEA Classic (macOS)), `⌘ Comma` (macOS System Shortcuts), `Ctrl+Alt+S` (XWin), `Ctrl+Alt+S` (GNOME), `Ctrl+Alt+S` (KDE), `Ctrl+Alt+S` (Emacs), `Ctrl+Alt+S` (Sublime Text), `⌘ Comma` (Sublime Text (macOS)), `Ctrl+Alt+S` (NetBeans), `Ctrl+Alt+S` (Visual Studio), `⌘ Comma` (Visual Studio (macOS)), `Ctrl+Alt+S` (Eclipse), `⌘ Comma` (Eclipse (macOS))), under `Keymap | Plugins | Terminal`.
### Predefined session
IntelliJ IDEA automatically detects common shells for predefined sessions and can run any of them in a new tab. The shell that you select applies to the current tab only and does not affect other tabs. Newly created tabs keep using the default shell specified in the [terminal settings](settings-tools-terminal.html).
Procedure: Start a session in a detected shell
1. On the terminal toolbar, click  New Predefined Session.
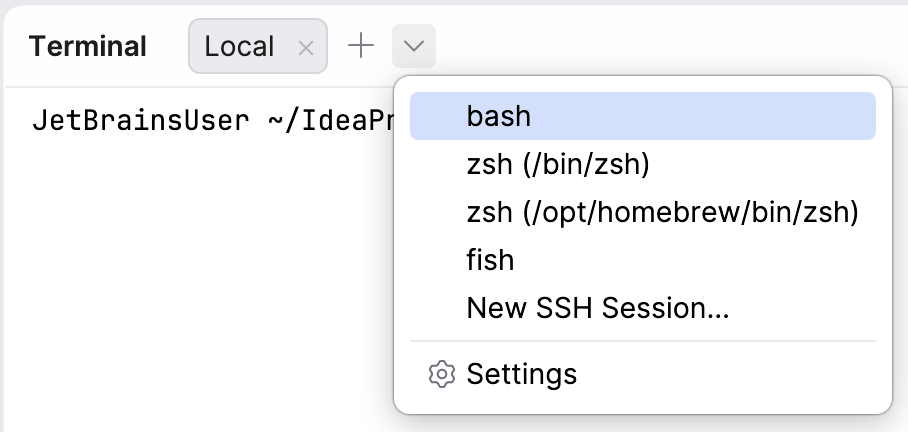
2. Select a shell from the list. IntelliJ IDEA opens a new tab named after the shell and starts the session in it.
The list includes the following shells:
* On Windows: Windows PowerShell, Command Prompt, PowerShell, Git Bash, and the installed WSL distributions.
* On macOS and Linux: `bash`, `zsh`, `fish`, and `pwsh` found in `/bin`, `/usr/bin`, `/usr/local/bin`, and `/opt/homebrew/bin`.
Shells outside these locations, as well as other shell types, are not detected automatically. To use them, specify the path to the executable in the [Shell path](settings-tools-terminal.html#shell-path) option in `Settings | Tools | Terminal`.
If several detected shells have the same name, IntelliJ IDEA appends their paths to the names, for example, `zsh (/bin/zsh)` and `zsh (/opt/homebrew/bin/zsh)`.
If your project is located in WSL or in a Dev Container, the list groups the shells by environment so that you can start a session either in that environment or on the host machine.
### AI agent session
> **Note:**
> The functionality is not supported in non-local environments, such as Docker or WSL.
Procedure: Start a new AI agent session
* On the terminal toolbar, click the AI Agents dropdown and select one of the agents to start a session:
* [Junie](https://junie.jetbrains.com/docs/junie-cli.html)
* [Claude Code](https://code.claude.com/docs/en/overview)
* [Codex](https://openai.com/codex/)
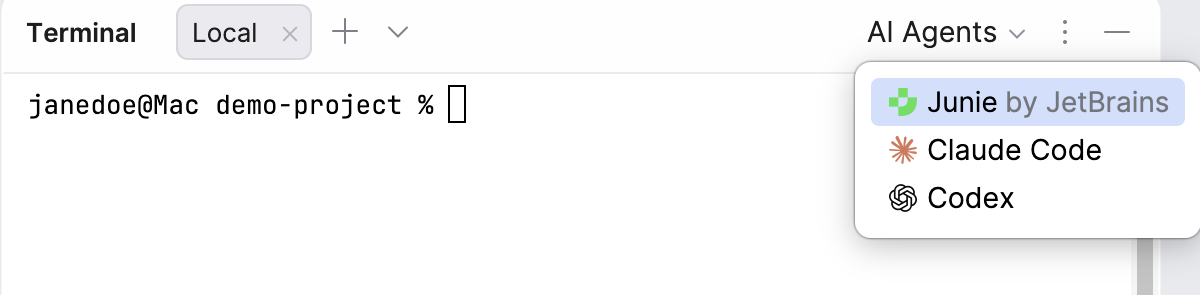
* If Junie CLI is not installed on your machine, you can install it directly from the terminal. On the terminal toolbar, click the AI Agents dropdown and select Install Junie.
After starting a session, the AI Agents caption is replaced with a button showing the selected agent’s name. This lets you start another session with the same agent. You can still open the dropdown to choose a different agent.
If Claude Code or Codex are not installed, IntelliJ IDEA does not display them in the AI Agents dropdown.
### SSH session
> **Note:**
> Currently, IntelliJ IDEA uses the [Classic terminal engine](#terminal-engine) to run SSH sessions.
Procedure: Enable the SSH Remote Run plugin
This functionality relies on the [SSH Remote Run](https://plugins.jetbrains.com/plugin/26511-ssh-remote-run) plugin, which is bundled and enabled in IntelliJ IDEA by default. If the relevant features are not available, make sure that you did not disable the plugin.
1. Press `Ctrl+Alt+S` (Windows), `⌘ Comma` (macOS), `⌘ Comma` (IntelliJ IDEA Classic (macOS)), `⌘ Comma` (macOS System Shortcuts), `Ctrl+Alt+S` (XWin), `Ctrl+Alt+S` (GNOME), `Ctrl+Alt+S` (KDE), `Ctrl+Alt+S` (Emacs), `Ctrl+Alt+S` (Sublime Text), `⌘ Comma` (Sublime Text (macOS)), `Ctrl+Alt+S` (NetBeans), `Ctrl+Alt+S` (Visual Studio), `⌘ Comma` (Visual Studio (macOS)), `Ctrl+Alt+S` (Eclipse), `⌘ Comma` (Eclipse (macOS)) to open settings and then select `Plugins`.
2. Open the Installed tab, find the SSH Remote Run plugin, and select the checkbox next to the plugin name.
Procedure: Start a new SSH session
1. On the terminal toolbar, click  and select New SSH Session.
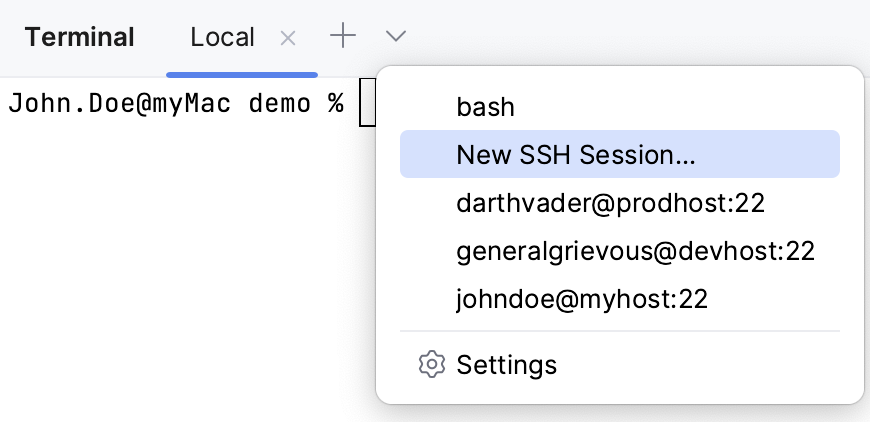
2. Enter the address of the host to which you want to connect and provide authentication data.
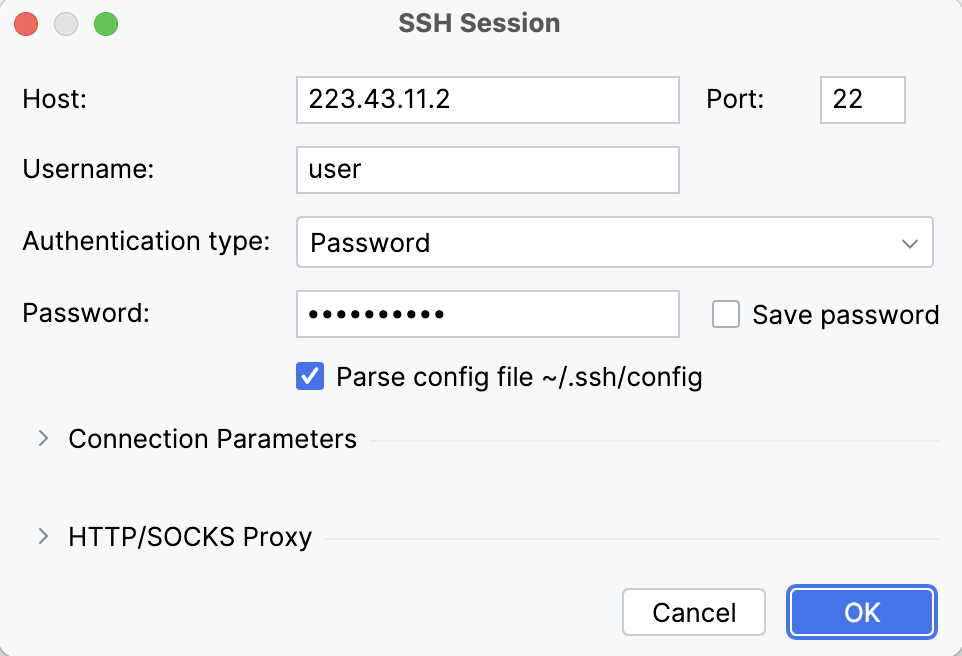
Or, if you have configured [SSH configurations](settings-tools-ssh-configurations.html), you can select one of them from the list.
To terminate the connection, click  in the terminal tab.
## Work in the terminal
Procedure: Search in the terminal
* To search for a certain string in a terminal session, press `Ctrl+F` (Windows), `⌘ F` (macOS), `⌘ F` (IntelliJ IDEA Classic (macOS)), `⌘ F` (macOS System Shortcuts), `Ctrl+F` (XWin), `Ctrl+F` (GNOME), `Ctrl+F` (KDE), `Ctrl+Alt+S` (Emacs), `Ctrl+F` (Sublime Text), `⌘ F` (Sublime Text (macOS)), `Ctrl+F` (NetBeans), `Ctrl+F` (Visual Studio), `⌘ F` (Visual Studio (macOS)), `Ctrl+F` (Eclipse), `Ctrl+F` (Eclipse (macOS)). This searches all text in the session: the prompt, commands, and output.
By default, the search is not case-sensitive. You can click  (Match case) in the search field to make it case-sensitive.
Procedure: Rename a terminal tab
* Right-click the tab and select Rename Session from the context menu.
> **Tip:**
> Just like with system terminal tabs, you can rename IntelliJ IDEA Terminal tabs programmatically. For example, use `title MyTitle` if your interpreter is Windows Command Prompt or `echo -en "\033]0;MyTitle\a"` for bash and zsh.
Procedure: Use completion in the terminal
> **Note:**
> Completion is available for Bash, Zsh, and PowerShell when using the [Reworked 2025 terminal engine](#terminal-engine).
>
>
>
> The functionality is not supported in non-local environments, such as Remote Development, Docker, or WSL.
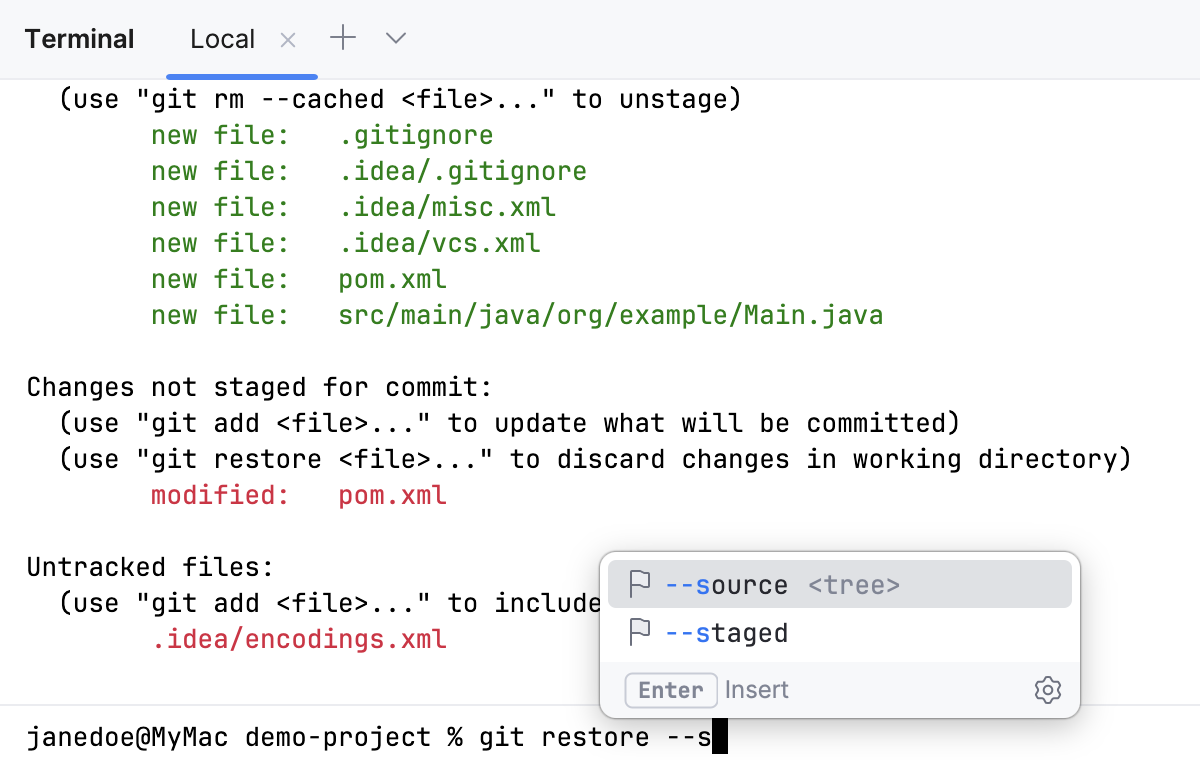
IntelliJ IDEA provides completion for command names, options, and arguments, such as paths, Git branches, flags, and more.
Suggestions automatically appear in the Terminal tool window as you type. By default, IntelliJ IDEA shows suggestions for parameters.
* To enable completion for subcommands, parameters, and arguments, go to `Settings | Tools | Terminal | Command Completion`, and select Always for the [Show a completion popup
as you type](settings-tools-terminal.html#show_completion_popup) option.
* To invoke the completion popup manually, press `Ctrl+Space` (Windows), `⌃ Space` (macOS), `⌃ Space` (IntelliJ IDEA Classic (macOS)), `⌃ Space` (macOS System Shortcuts), `Ctrl+Space` (XWin), `Ctrl+Space` (GNOME), `Ctrl+Space` (KDE), `Alt+/` (Emacs), `Ctrl+Space` (Sublime Text), `⌃ Space` (Sublime Text (macOS)), `Ctrl+Space` (NetBeans), `Ctrl+Space` (Visual Studio), `⌃ Space` (Visual Studio (macOS)), `Ctrl+Space` (Eclipse), `⌃ Space` (Eclipse (macOS)).
> **Tip:**
> You can change the default shortcut using the [Show completion popup
> with](settings-tools-terminal.html#completion-shortcut) option in `Settings | Tools | Terminal | Command Completion`.
* To accept a suggestion, select it in the list and press .
> **Tip:**
> The current shortcut for inserting a suggestion is shown in the hint at the bottom of the completion popup. You can change it using the [Insert suggestion with](settings-tools-terminal.html#insert-suggestion-shortcut) option in `Settings | Tools | Terminal | Command Completion`.
Procedure: Navigate to files and folders from the terminal
The terminal recognizes and highlights absolute and relative paths to files and folders. When you hover over them, they appear as hyperlinks. This allows you to quickly navigate to locations referenced in compilation messages, build errors, or AI coding agent responses.
* Hold `Ctrl` (Windows), `Ctrl` (macOS), `Ctrl` (IntelliJ IDEA Classic (macOS)), `Ctrl` (macOS System Shortcuts), `Ctrl` (XWin), `Ctrl` (GNOME), `Ctrl` (KDE), `Ctrl` (Emacs), `Ctrl` (Sublime Text), `Ctrl` (Sublime Text (macOS)), `Ctrl` (NetBeans), `Ctrl` (Visual Studio), `Ctrl` (Visual Studio (macOS)), `Ctrl` (Eclipse), `Ctrl` (Eclipse (macOS)) and click a file name in the terminal to open it in the editor.
* Hold `Ctrl` (Windows), `Ctrl` (macOS), `Ctrl` (IntelliJ IDEA Classic (macOS)), `Ctrl` (macOS System Shortcuts), `Ctrl` (XWin), `Ctrl` (GNOME), `Ctrl` (KDE), `Ctrl` (Emacs), `Ctrl` (Sublime Text), `Ctrl` (Sublime Text (macOS)), `Ctrl` (NetBeans), `Ctrl` (Visual Studio), `Ctrl` (Visual Studio (macOS)), `Ctrl` (Eclipse), `Ctrl` (Eclipse (macOS)) and click a link with the folder name in the terminal to locate it in the Project tool window. If a folder is outside the current project, IntelliJ IDEA will open the default file system explorer.
* Alternatively, click a file or folder name and use the Open link in the tooltip.
Procedure: Drag and drop files and folders to the terminal
You can drag files and folders into the Terminal tool window from the Project tool window (`Alt+1` (Windows), `⌘ 1` (macOS), `⌘ 1` (IntelliJ IDEA Classic (macOS)), `⌘ 1` (macOS System Shortcuts), `Alt+1` (XWin), `Alt+1` (GNOME), `Alt+1` (KDE), `Alt+1` (Emacs), `Alt+1` (Sublime Text), `⌘ 1` (Sublime Text (macOS)), `Ctrl+1` (NetBeans), `Ctrl+Alt+L` (Visual Studio), `⌘ ⌥ L` (Visual Studio (macOS)), `Alt+1` (Eclipse), `Alt+1` (Eclipse (macOS))) or your system file manager. The result depends on where you drop the item.
> **Note:**
> This functionality is available when using the [Reworked 2025 terminal engine](#terminal-engine).
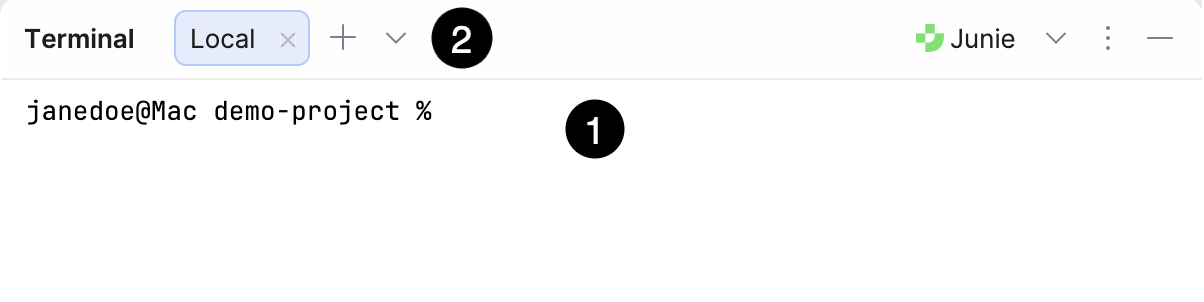
* Drop a file or folder on the terminal output area (1) to paste its path at the prompt of the current session.
This is useful when you [send file context to a CLI coding agent](#start-ai-agent) or run a command that takes a path as an argument.
* Drop a file or folder on the terminal tab area (2) to open a new tab with the working directory set to the dropped folder, or to the parent folder of the dropped file.
## Terminal engine
Currently, the following terminal engines are available in IntelliJ IDEA:
* Reworked 2025 (default). Starting from version 2025.2, this is the default terminal engine in IntelliJ IDEA. It is designed to combine the stability of the Classic emulator with improved performance, compatibility, and modern enhancements.
* Classic. This is a standard terminal emulator of the previous generation, built on the [JediTerm](https://github.com/JetBrains/jediterm) library, with user input (commands and keystrokes) sent directly to the underlying shell.
The Experimental 2024 (deprecated) terminal engine, also known as New Terminal in IntelliJ IDEA 2024.*, has been deprecated due to compatibility challenges. The option to select this terminal engine is available only to users who had enabled it in IntelliJ IDEA 2024.*. You can find the documentation for it in the [earlier version of IntelliJ IDEA Help](https://www.jetbrains.com/help/idea/2024.3/terminal-emulator.html#new-terminal).
> **Tip:**
> Learn more about the terminal engines [from our blog
> post](https://blog.jetbrains.com/idea/2025/04/jetbrains-terminal-a-new-architecture).
Procedure: Select a Terminal engine
1. Open the Terminal tool window: `View | Tool Windows | Terminal`.
2. In the tool window header, click  and select a terminal engine.
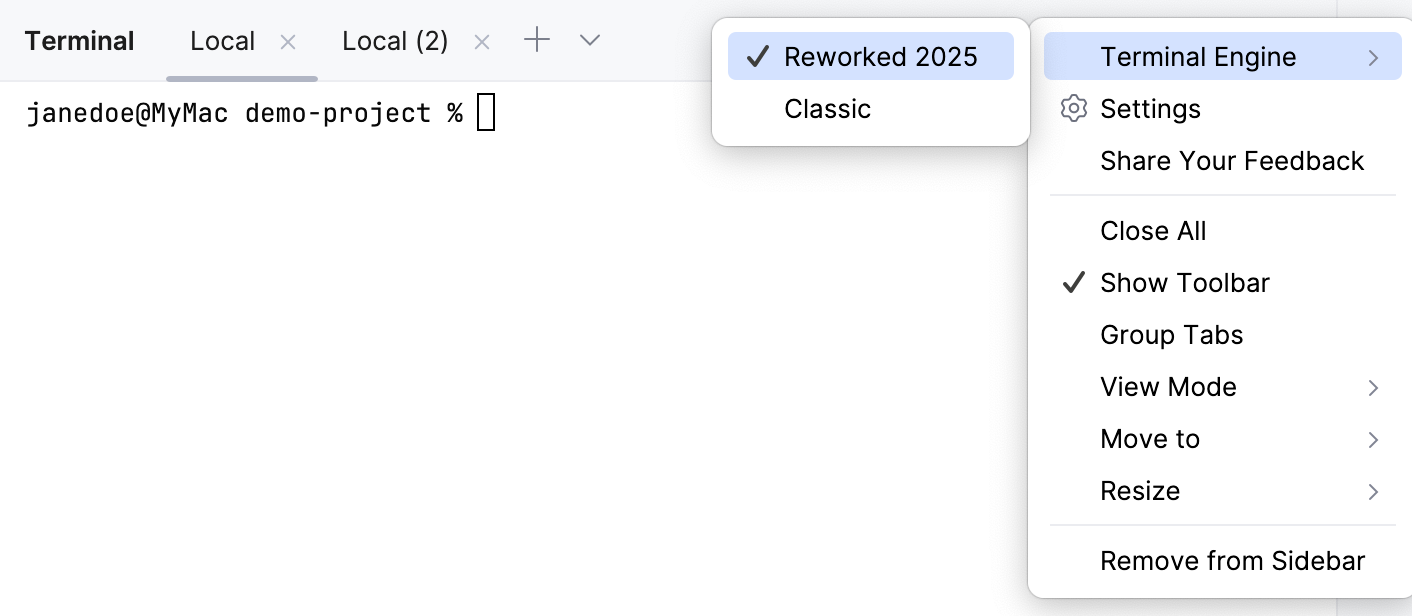
Alternatively, open the IDE settings (`Ctrl+Alt+S` (Windows), `⌘ Comma` (macOS), `⌘ Comma` (IntelliJ IDEA Classic (macOS)), `⌘ Comma` (macOS System Shortcuts), `Ctrl+Alt+S` (XWin), `Ctrl+Alt+S` (GNOME), `Ctrl+Alt+S` (KDE), `Ctrl+Alt+S` (Emacs), `Ctrl+Alt+S` (Sublime Text), `⌘ Comma` (Sublime Text (macOS)), `Ctrl+Alt+S` (NetBeans), `Ctrl+Alt+S` (Visual Studio), `⌘ Comma` (Visual Studio (macOS)), `Ctrl+Alt+S` (Eclipse), `⌘ Comma` (Eclipse (macOS))) and go to `Tools | Terminal | Terminal engine`.
## Configure the terminal
Procedure: Configure the terminal emulator
* Press `Ctrl+Alt+S` (Windows), `⌘ Comma` (macOS), `⌘ Comma` (IntelliJ IDEA Classic (macOS)), `⌘ Comma` (macOS System Shortcuts), `Ctrl+Alt+S` (XWin), `Ctrl+Alt+S` (GNOME), `Ctrl+Alt+S` (KDE), `Ctrl+Alt+S` (Emacs), `Ctrl+Alt+S` (Sublime Text), `⌘ Comma` (Sublime Text (macOS)), `Ctrl+Alt+S` (NetBeans), `Ctrl+Alt+S` (Visual Studio), `⌘ Comma` (Visual Studio (macOS)), `Ctrl+Alt+S` (Eclipse), `⌘ Comma` (Eclipse (macOS)) to open settings and then select `Tools | Terminal`.
* Alternatively, click  on the Terminal toolbar and select Settings.
For more information, refer to [Terminal settings](settings-tools-terminal.html).
> **Tip:**
> For advanced settings, select Advanced Settings and scroll down to the Terminal group. For more information about the available settings, refer to [Advanced Settings: Terminal](advanced-settings.html#advanced_terminal).
Procedure: Configure separators between executed commands
To better distinguish where commands start and end, you can enable separators in the terminal.
> **Note:**
> This option is supported for Bash, Zsh, and PowerShell when using the [Reworked 2025 terminal engine](#terminal-engine).
1. Press `Ctrl+Alt+S` (Windows), `⌘ Comma` (macOS), `⌘ Comma` (IntelliJ IDEA Classic (macOS)), `⌘ Comma` (macOS System Shortcuts), `Ctrl+Alt+S` (XWin), `Ctrl+Alt+S` (GNOME), `Ctrl+Alt+S` (KDE), `Ctrl+Alt+S` (Emacs), `Ctrl+Alt+S` (Sublime Text), `⌘ Comma` (Sublime Text (macOS)), `Ctrl+Alt+S` (NetBeans), `Ctrl+Alt+S` (Visual Studio), `⌘ Comma` (Visual Studio (macOS)), `Ctrl+Alt+S` (Eclipse), `⌘ Comma` (Eclipse (macOS)) to open settings and then select `Tools | Terminal`.
2. Use the Show separators between executed commands option to enable or disable separators.
Separators enabled:
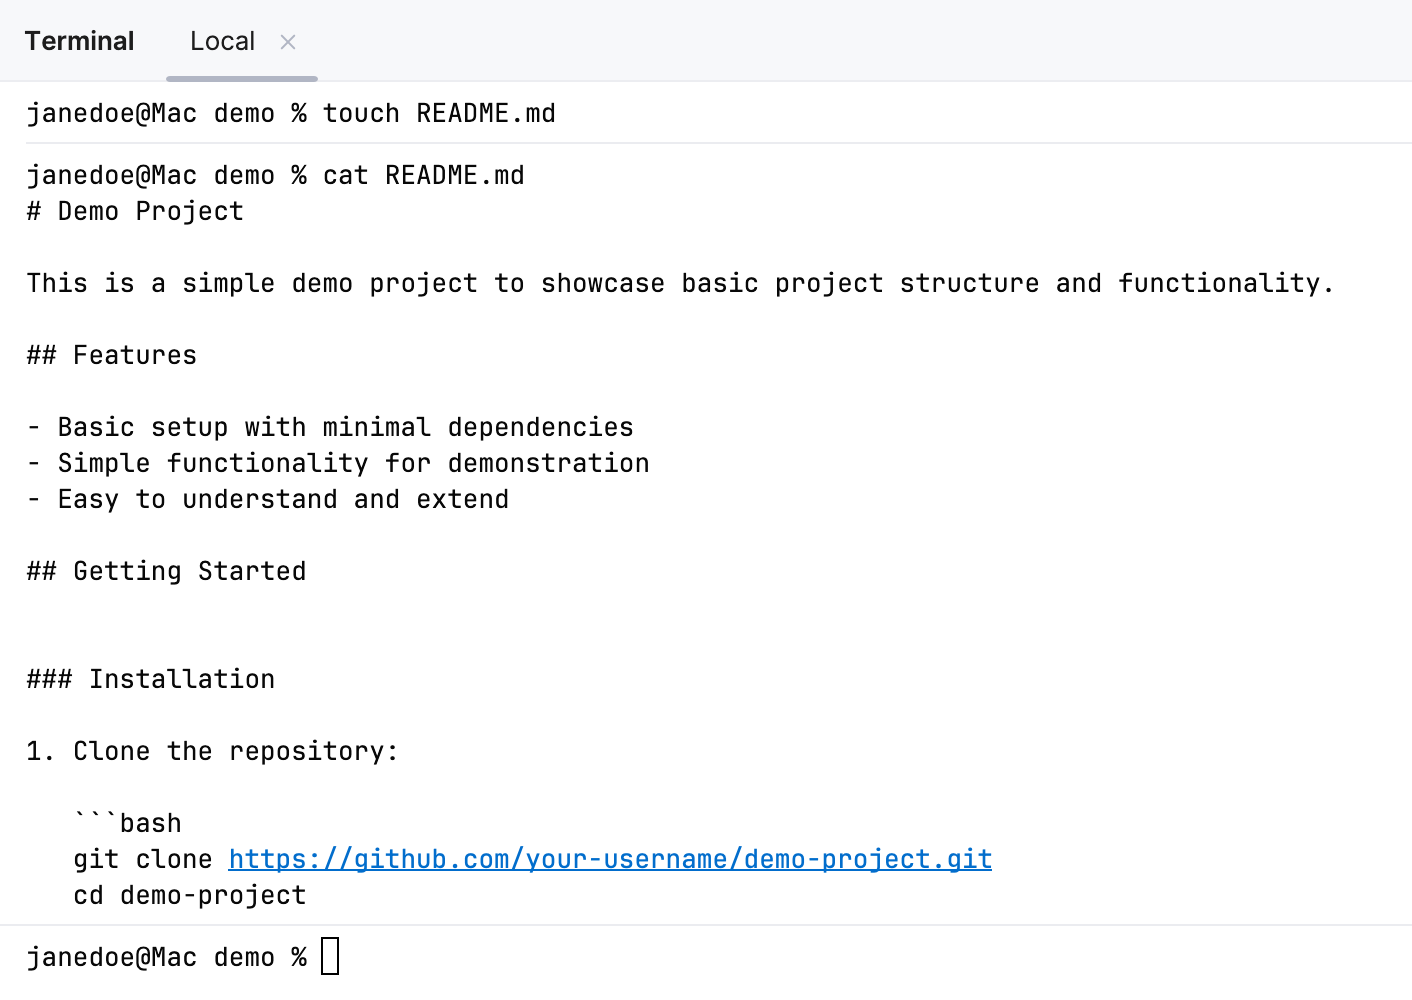
Separators disabled:
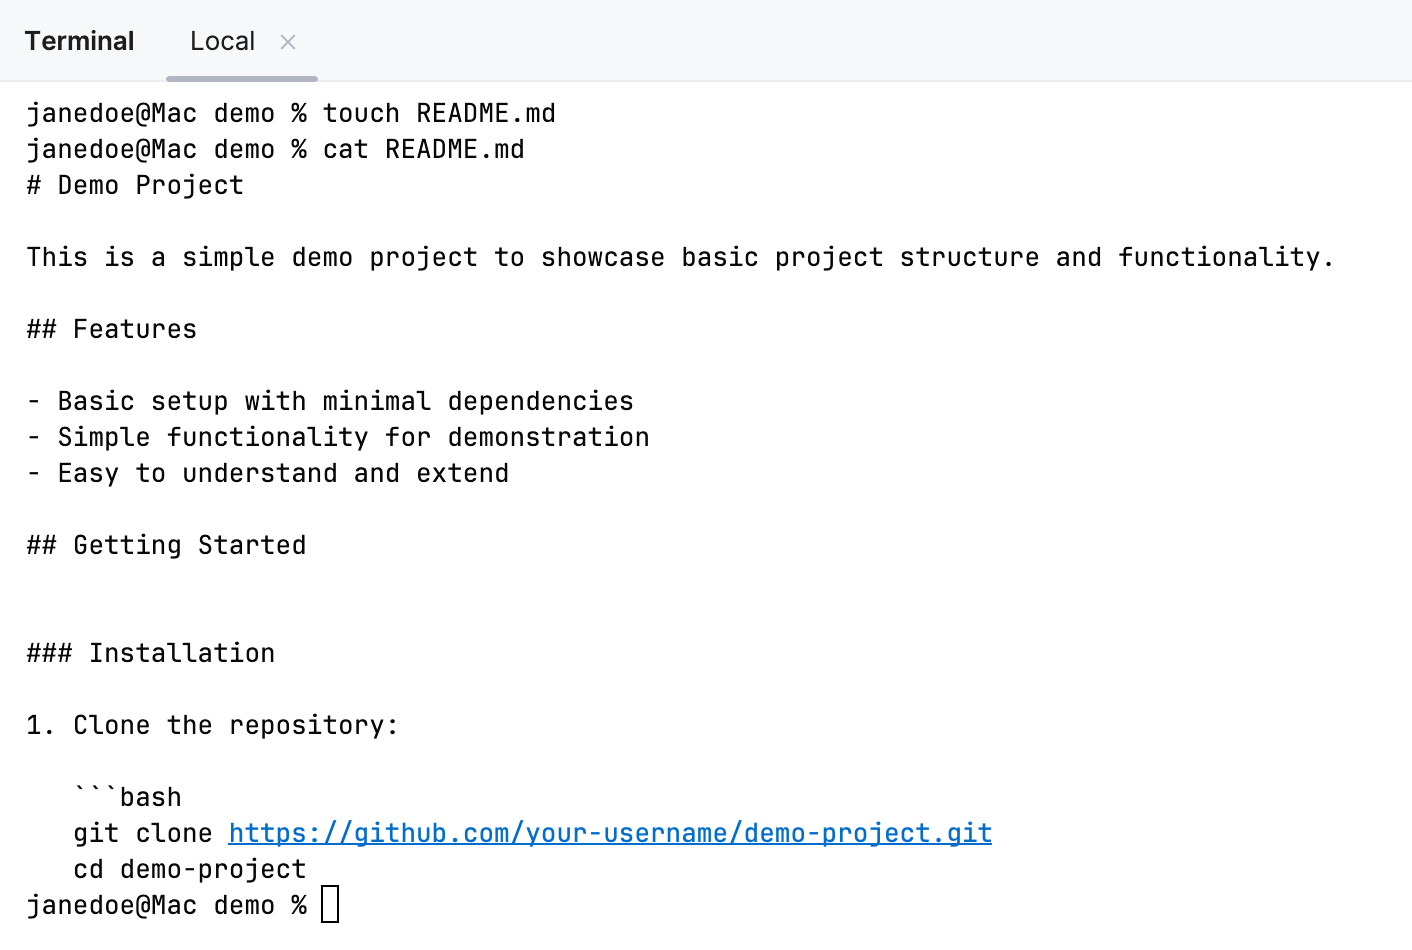
3. Click Apply to save the changes.
## JDK in the Terminal
IntelliJ IDEA makes the JDK configured for your project available in the built-in terminal. When you set up a [project SDK](sdk.html#change-project-sdk), IntelliJ IDEA adds it to the `JAVA_HOME` and `PATH` environment variables of every terminal session. This way, you can run `java`, `javac`, and build tools such as `./gradlew` or `mvn` directly in the terminal without installing or configuring a JDK on your system separately.
The terminal follows the project SDK: when you change it in `File | Project Structure | Project Settings | Project`, IntelliJ IDEA updates the JDK used for new terminal sessions.
This behavior is controlled by the Add project JDK to PATH option in `Settings | Tools | Terminal`, which is enabled by default.
Environment variables for a running shell session cannot be changed retroactively. If the Terminal tool window is open, when you switch a project JDK or toggle the Add project JDK to PATH option, IntelliJ IDEA prompts you to start a new terminal session.
### Configure a JDK from the terminal
If you run a Java command in the terminal and IntelliJ IDEA cannot find a JDK, it shows a Configure JDK link in the terminal output. Click it to open the Project Structure dialog, where you can download and [configure a
JDK](sdk.html#change-project-sdk).
> **Note:**
> On macOS, the Configure JDK link is not yet available. Instead, configure the project JDK in `File | Project Structure | Project Settings | Project`.
## See also
### External Links
[Using the Terminal in IntelliJ IDEA](https://blog.jetbrains.com/idea/2020/09/using-the-terminal-in-intellij-idea/)