# Prepare for testing
IntelliJ IDEA works with multiple Java testing frameworks out of the box, for example, [JUnit](junit.html), [Spock](spock.html), or [TestNG](testng.html) .
In the IDE, you can create a test class directly from the source code together with the necessary test methods. You can switch between test classes and source code with a shortcut, run multiple tests, view statistics for each test, and export test results to a file.
IntelliJ IDEA also features [code coverage](code-coverage.html) that allows you to analyze your code and understand which areas of your code are covered by tests and which areas require more testing.
For more information about testing your code in other languages, refer to:
* [Testing JavaScript](unit-testing-javascript.html)
* [Testing Node.js](unit-testing-node-js.html)
* [Testing PHP](https://www.jetbrains.com/help/phpstorm/testing.html) (PhpStorm documentation)
* [Testing Python](https://www.jetbrains.com/help/pycharm/testing-frameworks.html)
## Add testing libraries
IntelliJ IDEA projects:
IntelliJ IDEA allows you to add missing libraries as you code: once the IDE detects that you're using some code from the library that is not yet added to your project, it will prompt you to download and install it.
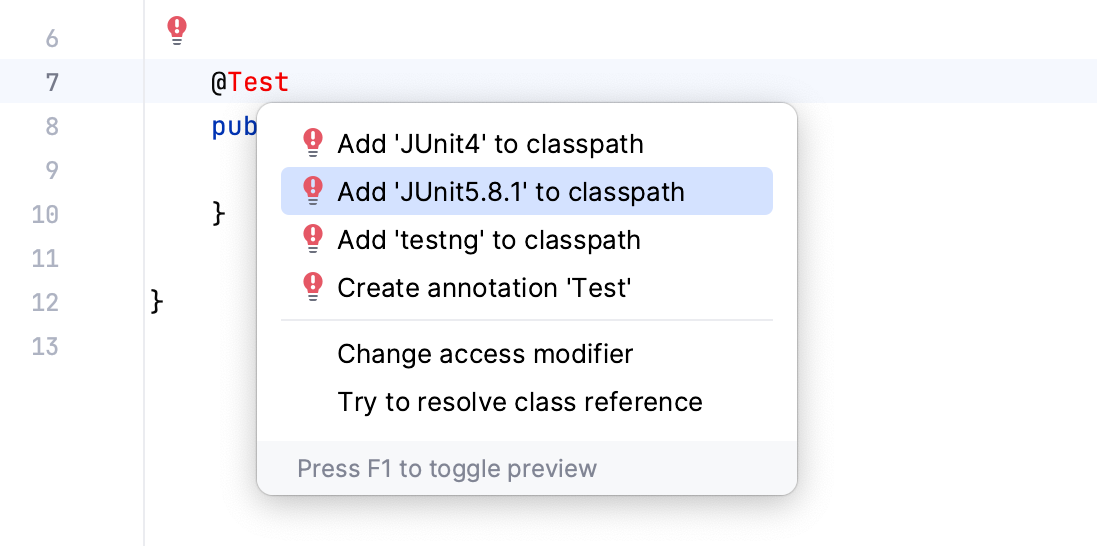
You can also [add libraries to your project manually](https://www.jetbrains.com/help/pycharm/installing-uninstalling-and-upgrading-packages.html). For example, this can be helpful if you need a specific library version or distribution.
Procedure: Manually add a testing library
Follow these steps to add a library if you're building your project with the native IntelliJ IDEA builder:
1. In the main menu, go to `File | Project Structure` (`Ctrl+Alt+Shift+S` (Windows), `⌘ ;` (macOS), `⌘ ;` (IntelliJ IDEA Classic (macOS)), `⌘ ⇧ Comma` (macOS System Shortcuts), `Ctrl+Alt+Shift+S` (XWin), `Ctrl+Alt+Shift+S` (GNOME), `Ctrl+Alt+Shift+S` (KDE), `Ctrl+Alt+Shift+S` (Emacs), `Ctrl+Alt+Shift+S` (Sublime Text), `⌘ ;` (Sublime Text (macOS)), `Ctrl+Alt+Shift+S` (NetBeans), `Ctrl+Alt+Shift+S` (Visual Studio), `⌘ ;` (Visual Studio (macOS)), `Ctrl+Alt+Shift+S` (Eclipse), `⌘ ;` (Eclipse (macOS))).
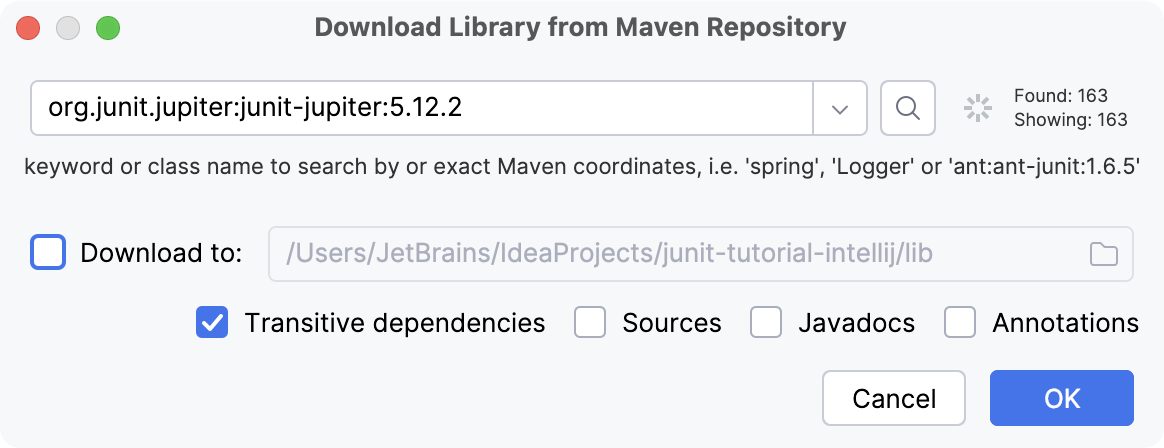
2. Under Project Settings, select Libraries and click  `| From Maven`.
3. In the dialog that opens, specify the necessary library artifact, for example: `org.junit.jupiter:junit-jupiter:5.9.1` .
4. Apply the changes and close the dialog.
Maven projects:
IntelliJ IDEA allows you to add missing libraries as you code: once the IDE detects that you're using some code from the library that is not added to your project yet, it will prompt you to download it. In this case, the IDE automatically adds the necessary dependencies to your `pom.xml`.

You can also add libraries to your project manually. For example, this can be helpful if you need a specific library version or distribution.
Procedure: Add libraries using the Dependencies tool window
Follow these steps if you're using Maven in your project:
1. In your `pom.xml`, press `Alt+Insert` (Windows), `⌘ N` (macOS), `⌃ N` (IntelliJ IDEA Classic (macOS)), `⌘ N` (macOS System Shortcuts), `Alt+Insert` (XWin), `Alt+Insert` (GNOME), `Alt+Insert` (KDE), `Alt+Insert` (Emacs), `Alt+Insert` (Sublime Text), `⌘ N` (Sublime Text (macOS)), `Alt+Insert` (NetBeans), `Alt+Insert` (Visual Studio), `⌘ ⌃ N` (Visual Studio (macOS)), `Alt+Insert` (Eclipse), `⌘ N` (Eclipse (macOS)) and select Dependency.
2. In the Maven Artifact Search tool window, type the name of the required dependency, for example: `org.junit.jupiter:junit-jupiter`. In the list of results, select the one you need and click Add.
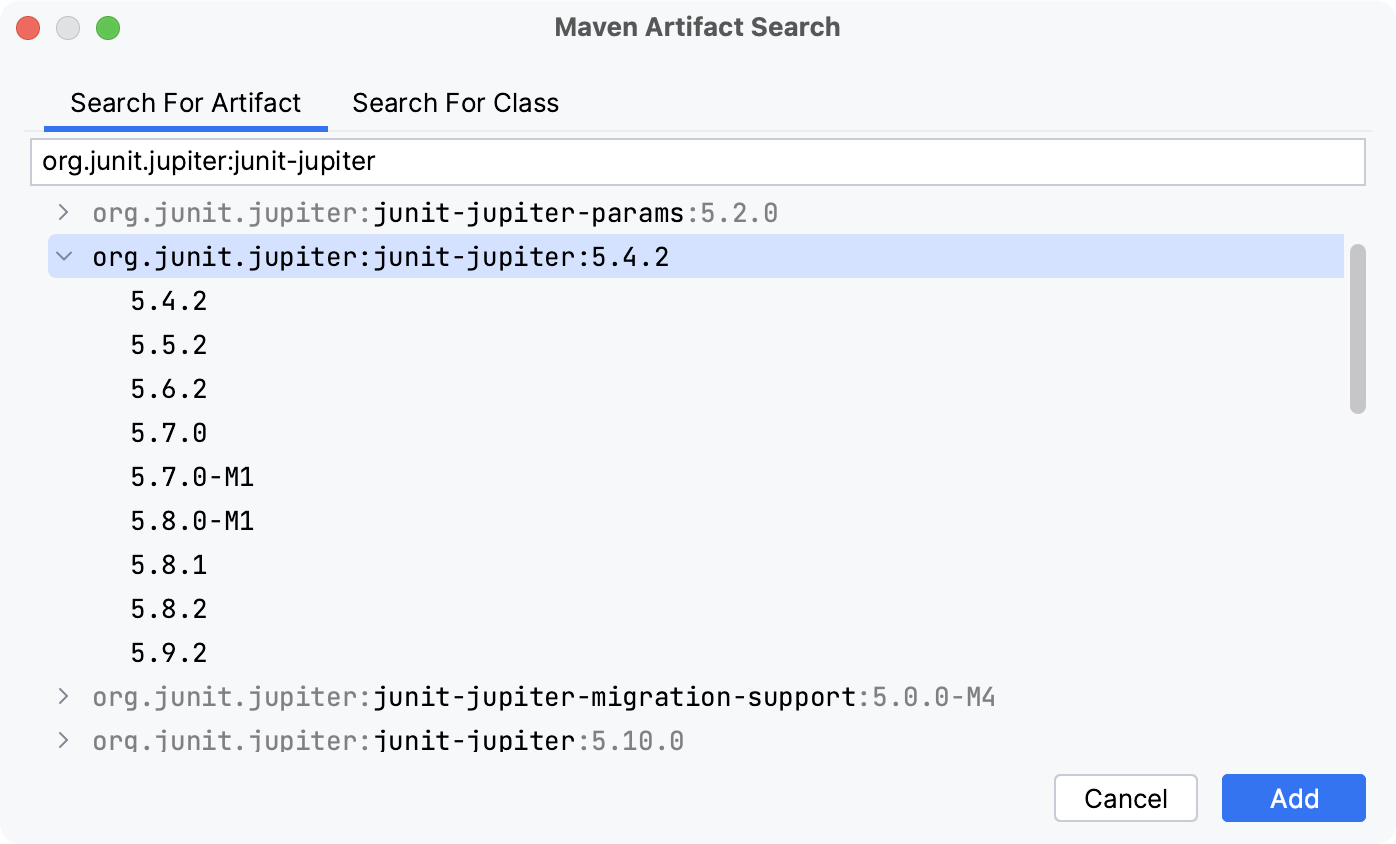
3. When the dependency is added to `pom.xml`, press `Ctrl+Shift+O` (Windows), `Ctrl+Shift+O` (macOS), `Ctrl+Shift+O` (IntelliJ IDEA Classic (macOS)), `Ctrl+Shift+O` (macOS System Shortcuts), `Ctrl+Shift+O` (XWin), `Ctrl+Shift+O` (GNOME), `Ctrl+Shift+O` (KDE), `Ctrl+Shift+O` (Emacs), `Ctrl+Shift+O` (Sublime Text), `Ctrl+Shift+O` (Sublime Text (macOS)), `Ctrl+Shift+O` (NetBeans), `Ctrl+Shift+O` (Visual Studio), `Ctrl+Shift+O` (Visual Studio (macOS)), `Ctrl+Shift+O` (Eclipse), `Ctrl+Shift+O` (Eclipse (macOS)) or click  in the Maven tool window to import the changes.
For more information about working with Maven, refer to [Maven dependencies](work-with-maven-dependencies.html).
Gradle projects:
In Gradle projects, add the necessary dependencies to your build file manually.
Procedure:
1. In your `build.gradle`, press `Alt+Insert` (Windows), `⌘ N` (macOS), `⌃ N` (IntelliJ IDEA Classic (macOS)), `⌘ N` (macOS System Shortcuts), `Alt+Insert` (XWin), `Alt+Insert` (GNOME), `Alt+Insert` (KDE), `Alt+Insert` (Emacs), `Alt+Insert` (Sublime Text), `⌘ N` (Sublime Text (macOS)), `Alt+Insert` (NetBeans), `Alt+Insert` (Visual Studio), `⌘ ⌃ N` (Visual Studio (macOS)), `Alt+Insert` (Eclipse), `⌘ N` (Eclipse (macOS)) and select Add Maven artifact dependency.
2. In the Maven Artifact Search tool window, type the name of the required dependency, for example: `org.junit.jupiter:junit-jupiter`. In the list of results, select the one you need and click Add.

3. When the dependency is added to `build.gradle`, press `Ctrl+Shift+O` (Windows), `Ctrl+Shift+O` (macOS), `Ctrl+Shift+O` (IntelliJ IDEA Classic (macOS)), `Ctrl+Shift+O` (macOS System Shortcuts), `Ctrl+Shift+O` (XWin), `Ctrl+Shift+O` (GNOME), `Ctrl+Shift+O` (KDE), `Ctrl+Shift+O` (Emacs), `Ctrl+Shift+O` (Sublime Text), `Ctrl+Shift+O` (Sublime Text (macOS)), `Ctrl+Shift+O` (NetBeans), `Ctrl+Shift+O` (Visual Studio), `Ctrl+Shift+O` (Visual Studio (macOS)), `Ctrl+Shift+O` (Eclipse), `Ctrl+Shift+O` (Eclipse (macOS)) or click  in the Gradle tool window to import the changes.
## Test Sources Root
Before you start creating tests, make sure that the Test Sources Root is configured for your project. The Test Sources Root is a folder that stores your test code. In the Project tool window, this folder is marked with the  Test Root icon.
The IDE processes the code from different sources differently. For example, compilation results for sources and test sources are normally placed into different folders. That is why, if the test sources root is missing, you need to create one. Otherwise, your code might be processed incorrectly.
IntelliJ IDEA projects:
Procedure: Create a test root for your project
Follow these steps if you're building your project with the native IntelliJ IDEA builder:
1. In the Project tool window (`Alt+1` (Windows), `⌘ 1` (macOS), `⌘ 1` (IntelliJ IDEA Classic (macOS)), `⌘ 1` (macOS System Shortcuts), `Alt+1` (XWin), `Alt+1` (GNOME), `Alt+1` (KDE), `Alt+1` (Emacs), `Alt+1` (Sublime Text), `⌘ 1` (Sublime Text (macOS)), `Ctrl+1` (NetBeans), `Ctrl+Alt+L` (Visual Studio), `⌘ ⌥ L` (Visual Studio (macOS)), `Alt+1` (Eclipse), `Alt+1` (Eclipse (macOS))), [create a new directory](add-items-to-project.html#new-directory) in which you will store your test code.
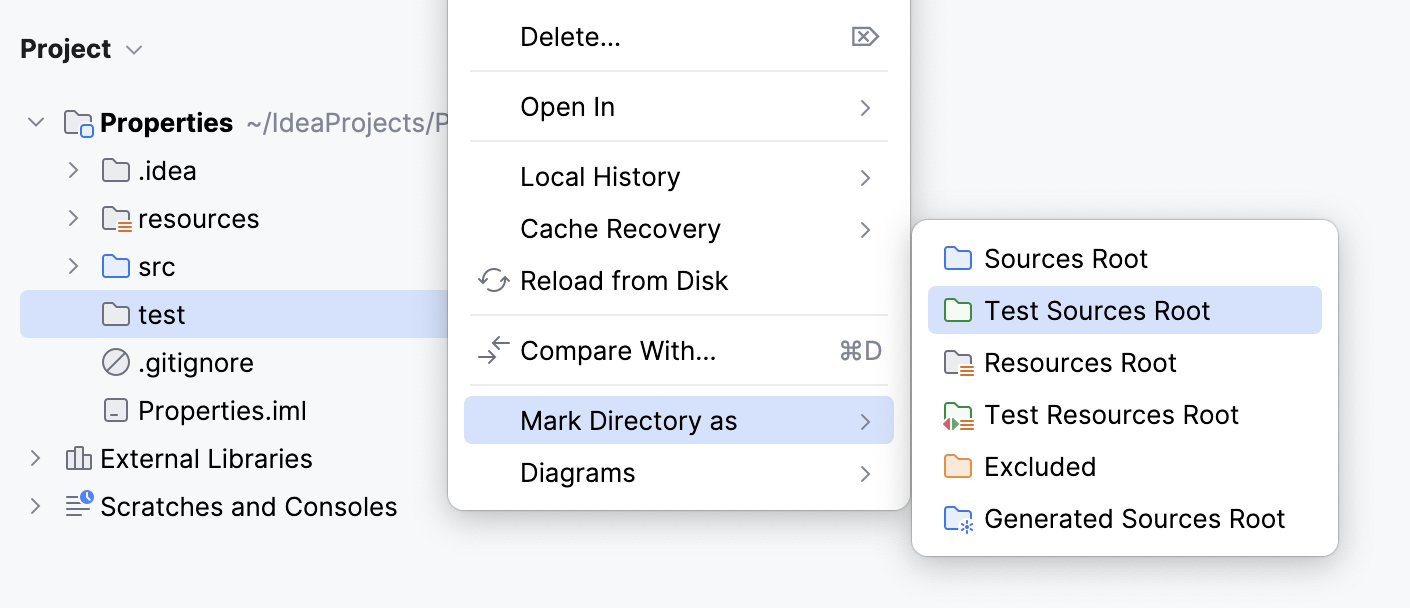
2. Right-click the new directory and select `Mark Directory As | Test Sources Root`.
The tests folder should be marked with the  icon.
Maven projects:
Maven uses a [standard directory layout](https://maven.apache.org/guides/introduction/introduction-to-the-standard-directory-layout.html) for applications. Generally, it's recommended that you conform to this layout in your projects. For example, when you create a test folder in IntelliJ IDEA for a Maven project, the IDE suggests setting the standard name and location for such a folder. In this case, the IDE is also already aware that this test folder is your Test Sources Root.
However, you can override the standard directory layout by modifying the build file.
Procedure: Change the test root
1. In the Project tool window (`Alt+1` (Windows), `⌘ 1` (macOS), `⌘ 1` (IntelliJ IDEA Classic (macOS)), `⌘ 1` (macOS System Shortcuts), `Alt+1` (XWin), `Alt+1` (GNOME), `Alt+1` (KDE), `Alt+1` (Emacs), `Alt+1` (Sublime Text), `⌘ 1` (Sublime Text (macOS)), `Ctrl+1` (NetBeans), `Ctrl+Alt+L` (Visual Studio), `⌘ ⌥ L` (Visual Studio (macOS)), `Alt+1` (Eclipse), `Alt+1` (Eclipse (macOS))), [create a new directory](add-items-to-project.html#new-directory) in which you will store your test code.
2. In your `pom.xml`, change the `testSourceDirectory` element.
Replace `src/new-test/test` with the path to the new folder that you want to use as a test root.
```XML
src/new-test/test
```
3. Press `Ctrl+Shift+O` (Windows), `Ctrl+Shift+O` (macOS), `Ctrl+Shift+O` (IntelliJ IDEA Classic (macOS)), `Ctrl+Shift+O` (macOS System Shortcuts), `Ctrl+Shift+O` (XWin), `Ctrl+Shift+O` (GNOME), `Ctrl+Shift+O` (KDE), `Ctrl+Shift+O` (Emacs), `Ctrl+Shift+O` (Sublime Text), `Ctrl+Shift+O` (Sublime Text (macOS)), `Ctrl+Shift+O` (NetBeans), `Ctrl+Shift+O` (Visual Studio), `Ctrl+Shift+O` (Visual Studio (macOS)), `Ctrl+Shift+O` (Eclipse), `Ctrl+Shift+O` (Eclipse (macOS)) or click  in the Maven tool window to import the changes.
The new test root should be marked with the  icon in the Project tool window.
Gradle projects:
Just like Maven, Gradle also has a strict project [directory layout](https://docs.gradle.org/current/userguide/organizing_gradle_projects.html). When you create a test folder in IntelliJ IDEA for a Gradle project, the IDE suggests setting the standard name and location for such a folder. In this case, the IDE is also already aware that this test folder is your Test Sources Root.
However, you can override the standard directory layout by modifying the build file.
Procedure: Use another test root
1. In the Project tool window (`Alt+1` (Windows), `⌘ 1` (macOS), `⌘ 1` (IntelliJ IDEA Classic (macOS)), `⌘ 1` (macOS System Shortcuts), `Alt+1` (XWin), `Alt+1` (GNOME), `Alt+1` (KDE), `Alt+1` (Emacs), `Alt+1` (Sublime Text), `⌘ 1` (Sublime Text (macOS)), `Ctrl+1` (NetBeans), `Ctrl+Alt+L` (Visual Studio), `⌘ ⌥ L` (Visual Studio (macOS)), `Alt+1` (Eclipse), `Alt+1` (Eclipse (macOS))), [create a new directory](add-items-to-project.html#new-directory) in which you will store your test code.
2. Open your `build.gradle` and add the following code.
Replace `src/new-test/test` with the path to the new folder that you want to use as a test root.
```GENERIC
sourceSets {
test {
java {
srcDirs = ['src/new-test/test']
}
}
}
```
3. Press `Ctrl+Shift+O` (Windows), `Ctrl+Shift+O` (macOS), `Ctrl+Shift+O` (IntelliJ IDEA Classic (macOS)), `Ctrl+Shift+O` (macOS System Shortcuts), `Ctrl+Shift+O` (XWin), `Ctrl+Shift+O` (GNOME), `Ctrl+Shift+O` (KDE), `Ctrl+Shift+O` (Emacs), `Ctrl+Shift+O` (Sublime Text), `Ctrl+Shift+O` (Sublime Text (macOS)), `Ctrl+Shift+O` (NetBeans), `Ctrl+Shift+O` (Visual Studio), `Ctrl+Shift+O` (Visual Studio (macOS)), `Ctrl+Shift+O` (Eclipse), `Ctrl+Shift+O` (Eclipse (macOS)) or click  in the Gradle tool window to import the changes.
Procedure: Add one more test root
1. In the Project tool window (`Alt+1` (Windows), `⌘ 1` (macOS), `⌘ 1` (IntelliJ IDEA Classic (macOS)), `⌘ 1` (macOS System Shortcuts), `Alt+1` (XWin), `Alt+1` (GNOME), `Alt+1` (KDE), `Alt+1` (Emacs), `Alt+1` (Sublime Text), `⌘ 1` (Sublime Text (macOS)), `Ctrl+1` (NetBeans), `Ctrl+Alt+L` (Visual Studio), `⌘ ⌥ L` (Visual Studio (macOS)), `Alt+1` (Eclipse), `Alt+1` (Eclipse (macOS))), [create a new directory](add-items-to-project.html#new-directory) in which you will store your test code.
2. Open your `build.gradle` and add the following code.
Replace `src/new-test/test` with the path to the new folder that you want to use as a test root.
```GENERIC
sourceSets {
test {
java {
srcDir 'src/new-test/test'
}
}
}
```
3. Press `Ctrl+Shift+O` (Windows), `Ctrl+Shift+O` (macOS), `Ctrl+Shift+O` (IntelliJ IDEA Classic (macOS)), `Ctrl+Shift+O` (macOS System Shortcuts), `Ctrl+Shift+O` (XWin), `Ctrl+Shift+O` (GNOME), `Ctrl+Shift+O` (KDE), `Ctrl+Shift+O` (Emacs), `Ctrl+Shift+O` (Sublime Text), `Ctrl+Shift+O` (Sublime Text (macOS)), `Ctrl+Shift+O` (NetBeans), `Ctrl+Shift+O` (Visual Studio), `Ctrl+Shift+O` (Visual Studio (macOS)), `Ctrl+Shift+O` (Eclipse), `Ctrl+Shift+O` (Eclipse (macOS)) or click  in the Gradle tool window to import the changes.
The new test root should be marked with the  icon in the Project tool window.
By creating a dedicated test folder, you separate test code from production code. This helps the IDE recognize tests, apply the right settings, and organize them consistently. It also ensures that tests are compiled and run correctly without interfering with your main source files.
For more information about different types of folders, refer to [Folder categories](content-roots.html#folder-categories).
## Test Resources Root
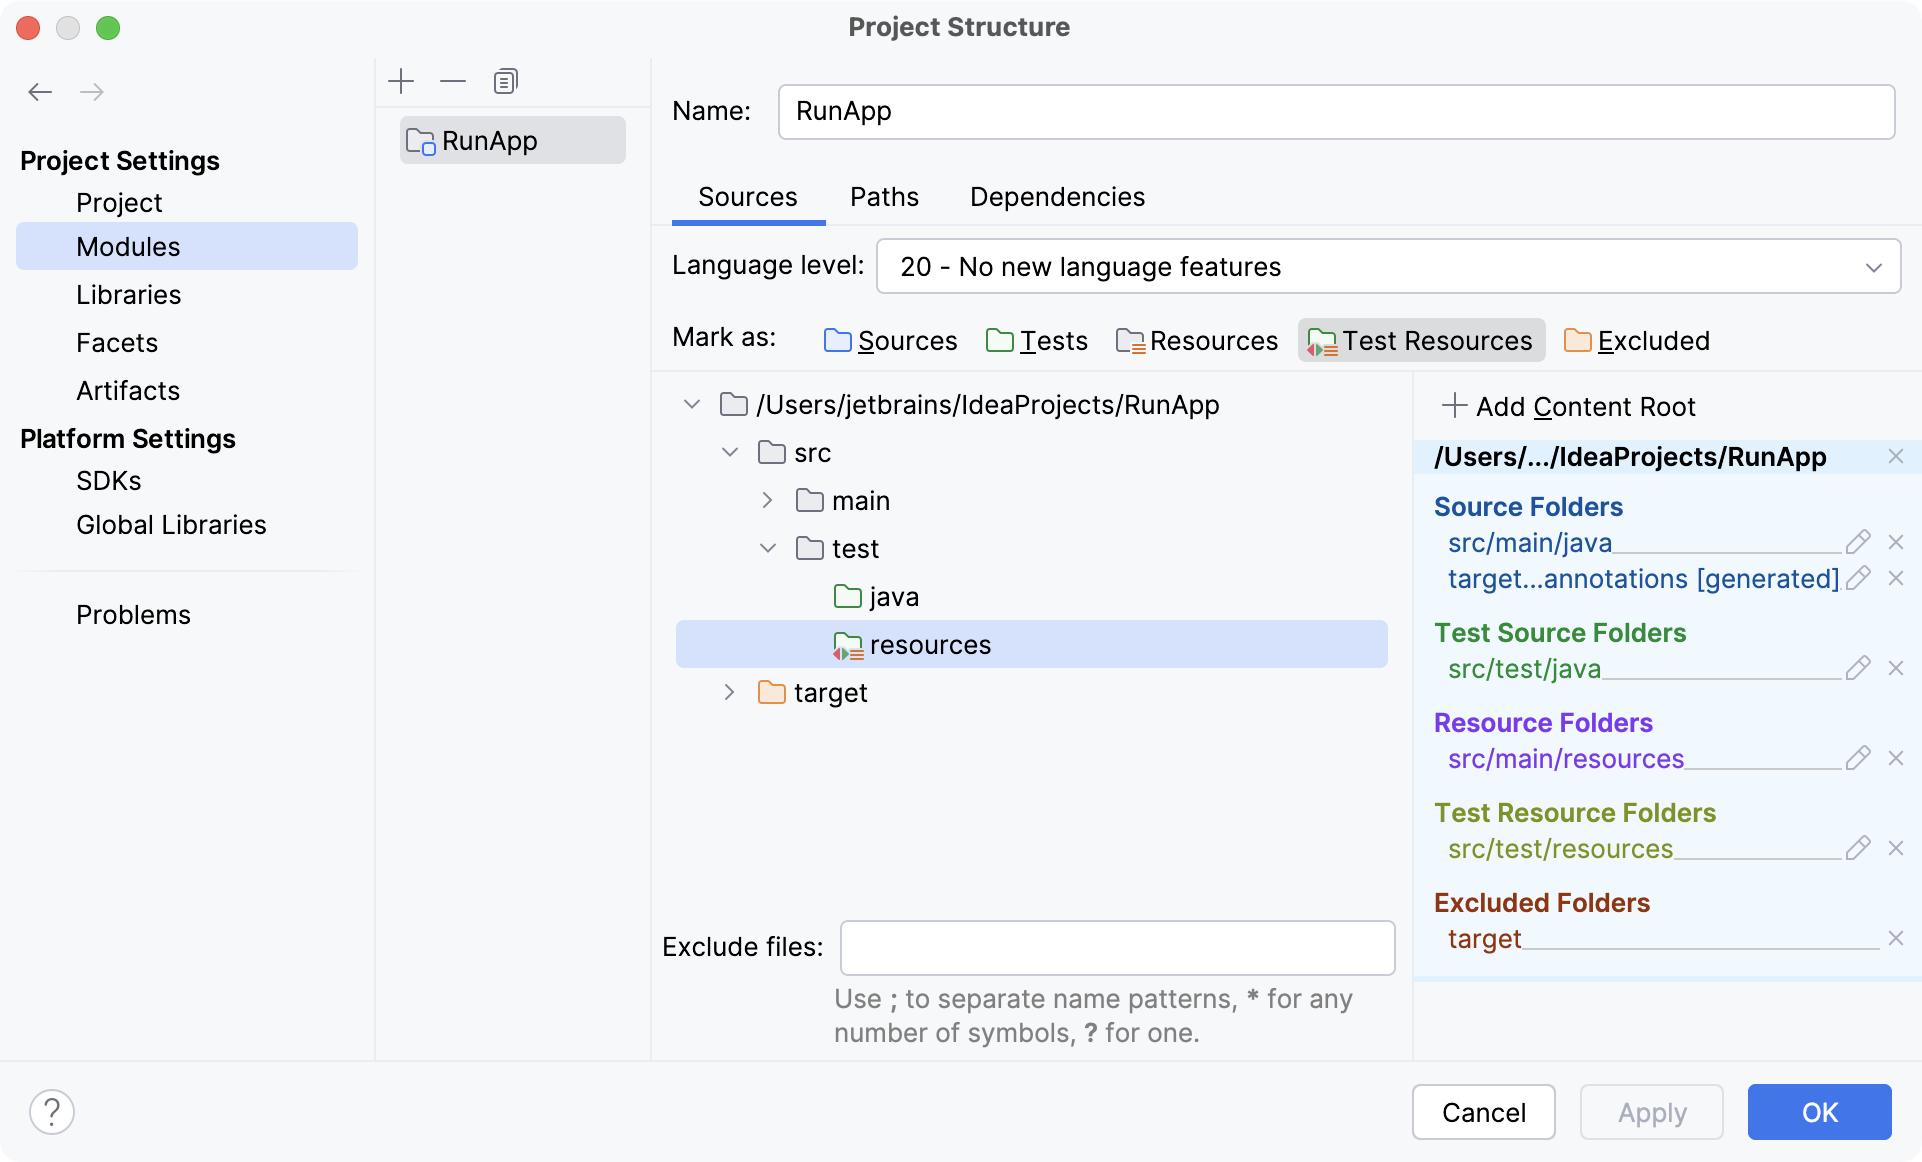
Test Resources Root is a folder that stores files associated with your test sources. In the Project tool window, this folder is located in the test root and is marked with .
For Maven and Gradle projects, the test resources folder is usually created automatically. If you're building your project with the native IntelliJ IDEA builder, you might need to create the resource root manually.
Procedure: Configure the folder for test resources
1. In the main menu, go to `File | Project Structure` (`Ctrl+Alt+Shift+S` (Windows), `⌘ ;` (macOS), `⌘ ;` (IntelliJ IDEA Classic (macOS)), `⌘ ⇧ Comma` (macOS System Shortcuts), `Ctrl+Alt+Shift+S` (XWin), `Ctrl+Alt+Shift+S` (GNOME), `Ctrl+Alt+Shift+S` (KDE), `Ctrl+Alt+Shift+S` (Emacs), `Ctrl+Alt+Shift+S` (Sublime Text), `⌘ ;` (Sublime Text (macOS)), `Ctrl+Alt+Shift+S` (NetBeans), `Ctrl+Alt+Shift+S` (Visual Studio), `⌘ ;` (Visual Studio (macOS)), `Ctrl+Alt+Shift+S` (Eclipse), `⌘ ;` (Eclipse (macOS))).
2. Under Project Settings, click Modules and then open the Sources tab on the right.
3. Right-click the [test folder](#create-test-resources-root) and select New Folder. Name the folder `resources`.
4. Right-click the new folder and select Test Resources. The folder will be marked with the  icon.
5. Apply the changes and close the dialog.
## See also
### Procedures
[Testing in Maven projects](work-with-tests-in-maven.html) [Testing in Gradle projects](work-with-tests-in-gradle.html) [Working with module dependencies](working-with-module-dependencies.html)