# TypeScript
> **TL;DR**
> Required plugin:
>
>
>
> `JavaScript and TypeScript`: the plugin is bundled with IntelliJ IDEA and enabled by default.
IntelliJ IDEA recognizes `.ts` and `.tsx` files and provides coding assistance for editing them without any additional steps from your side. TypeScript files are marked with the  icon.
TypeScript-aware coding assistance includes [completion](auto-completing-code.html) for keywords, labels, variables, parameters, and functions, [error and syntax highlighting](#ws_ts_syntax_highlighting), formatting, [numerous code inspections](code-inspection.html) and [quick-fixes](intention-actions.html), as well as [common and
TypeScript-specific
refactoring](specific-typescript-refactorings.html). IntelliJ IDEA also [verifies TypeScript code](#ws_verify_typescript) on the fly and shows errors in a dedicated [Problems tool window](problems-tool-window.html).
Compilation errors are reported in the [TypeScript tool window](typescript-compiler-tool-window.html). Learn more from [Compiling TypeScript into
JavaScript](running-and-debugging-typescript.html#ws_ts_compile).
## Before you start
Procedure:
* Make sure the JavaScript and TypeScript plugin is enabled in the settings. Press `Ctrl+Alt+S` (Windows), `⌘ Comma` (macOS), `⌘ Comma` (IntelliJ IDEA Classic (macOS)), `⌘ Comma` (macOS System Shortcuts), `Ctrl+Alt+S` (XWin), `Ctrl+Alt+S` (GNOME), `Ctrl+Alt+S` (KDE), `Ctrl+Alt+S` (Emacs), `Ctrl+Alt+S` (Sublime Text), `⌘ Comma` (Sublime Text (macOS)), `Ctrl+Alt+S` (NetBeans), `Ctrl+Alt+S` (Visual Studio), `⌘ Comma` (Visual Studio (macOS)), `Ctrl+Alt+S` (Eclipse), `⌘ Comma` (Eclipse (macOS)) to open settings and then select `Plugins`. Click the Installed tab. In the search field, type JavaScript and TypeScript. For more information about plugins, refer to [Managing plugins](managing-plugins.html).
## Create a new application
Since IntelliJ IDEA version 2024.1, the New Project wizard has no longer an option to create a TypeScript project (or module) with a general static web page structure. Use one of the following options to create a more specific structure: [React](new-project-wizard.html#react), [Angular CLI](new-project-wizard.html#angular), [Vue](new-project-wizard.html#vue_js), or [Vite](new-project-wizard.html#vite).
Alternatively, click New Project on the Welcome screen or select `File | New | Project` from the main menu, and then select Empty Project in the left-hand pane of the [New Project wizard](new-project-wizard.html) that opens.
## Start with an existing TypeScript application
If you are going to continue developing an existing TypeScript application, just open it in IntelliJ IDEA. Optionally [download the required npm dependencies](javascript-specific-guidelines.html#ws_js_download_npm_dependencies).
Procedure: Open the application sources that are already on your machine
* Click Open or Import on the Welcome screen or select `File | Open` from the main menu. In the dialog that opens, select the folder where your sources are stored.
Procedure: Check out the application sources from your version control
1. Click Clone Repository on the Welcome screen.
Alternatively, select `File | New | Project from Version Control…` or `Git | Clone…` or `VCS | Get from Version Control` from the main menu.
Instead of Git in the main menu, you may see any other Version Control System that is associated with your project. For example, Mercurial or Perforce.
2. In the dialog that opens, select your version control system from the list and specify the repository to check out the application sources from. For more information, refer to [Check out a
project (clone)](manage-projects-hosted-on-github.html#clone-from-GitHub).
### Project security
When you open a project that was created outside IntelliJ IDEA and was imported into it, IntelliJ IDEA displays a dialog where you can decide how to handle this project with unfamiliar source code.
Select one of the following options:
* Preview in Safe Mode: in this case, IntelliJ IDEA opens the project in a preview mode. It means that you can browse the project's sources but you cannot run tasks and script or run/debug your project. IntelliJ IDEA displays a notification on top of the editor area, and you can click the Trust project… link and load your project at any time.
* Trust Project: in this case, IntelliJ IDEA opens and loads a project. That means the project is initialized, project's plugins are resolved, dependencies are added, and all IntelliJ IDEA features are available.
* Don't Open: in this case, IntelliJ IDEA doesn't open the project.
Learn more from [Project security](project-security.html).
> **Tip:**
> Projects created from the Welcome screen or via `File | New | Project` as described in are automatically considered trusted.
## Verify TypeScript
IntelliJ IDEA verifies TypeScript code mainly based on the data from the [TypeScript Language
Service](https://github.com/Microsoft/TypeScript/wiki/Using-the-Language-Service-API) which also compiles TypeScript into JavaScript.
Descriptions of the errors detected in the current file and quick-fixes for them are available from the editor and from the File tab of the [Problems](linters.html#ws_js_linters_general_problems_tool_window) tool window.
Errors across the entire project and quick-fixes for them are shown in the Project Errors tab of the Problems tool window. To open the tool window, click the Inspection widget in the upper-right corner of the editor:
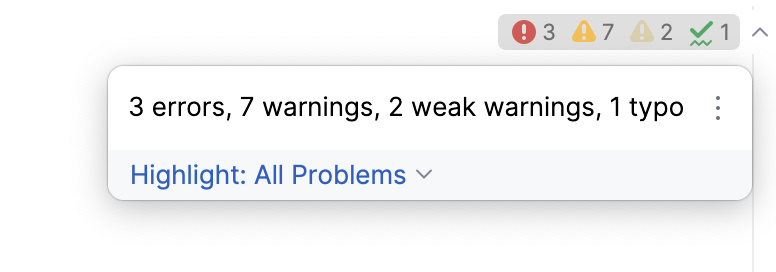
For more information, refer to [View problems and
apply quick-fixes in the editor](linters.html#ws_js_linters_editor) and [Problems tool window](linters.html#ws_js_linters_general_problems_tool_window).
Procedure: Verify TypeScript in the current file
* In the editor, hover over the highlighted problem. IntelliJ IDEA shows a tooltip with a description of the problem.
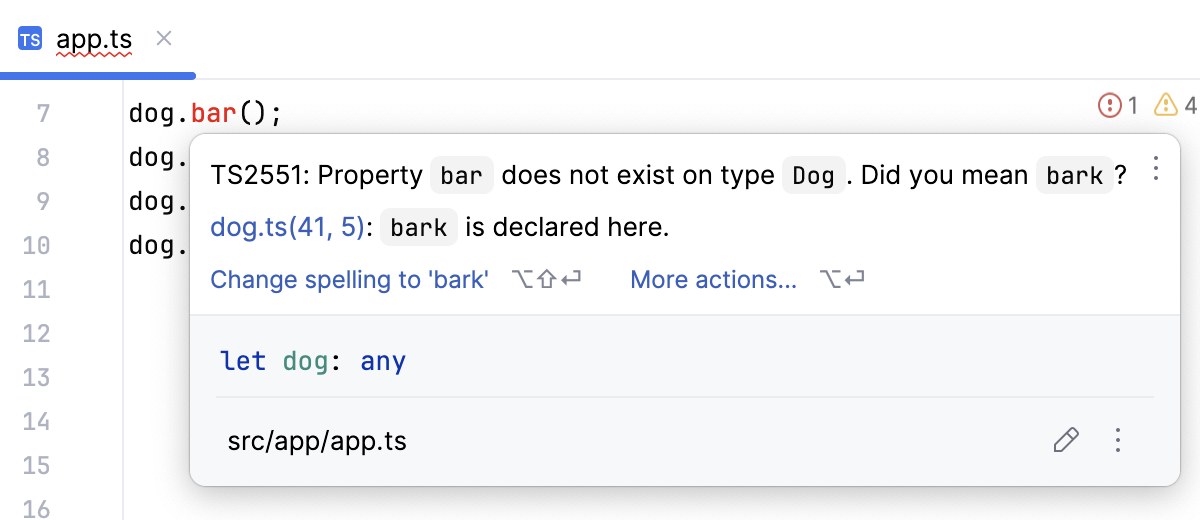
Apply the suggested quick-fix or click More actions… and select the relevant one from the list.
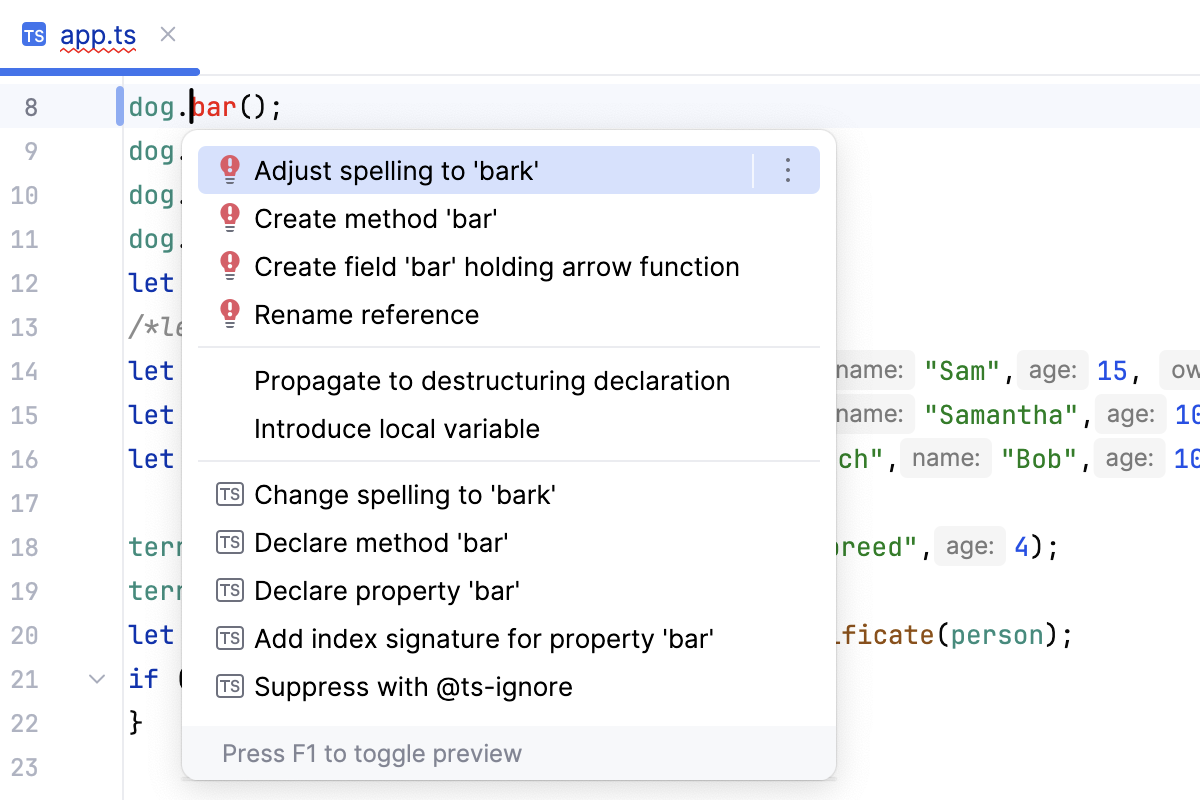
* Alternatively, open the File tab of the Problems tool window `Alt+6` (Windows), `⌘ 6` (macOS), `⌘ 6` (IntelliJ IDEA Classic (macOS)), `⌘ 6` (macOS System Shortcuts), `Alt+6` (XWin), `Alt+6` (GNOME), `Alt+6` (KDE), `Alt+6` (Emacs), `Alt+6` (Sublime Text), `⌘ 6` (Sublime Text (macOS)), `Alt+6` (NetBeans), `Alt+6` (Visual Studio), `⌘ 6` (Visual Studio (macOS)), `Alt+6` (Eclipse), `⌘ 6` (Eclipse (macOS)), where you can view problem descriptions, apply quick-fixes, navigate to the fragments in the source code where errors occurred, as well as fix them in the Editor Preview pane without leaving the tool window. Learn more from [Problems tool window](problems-tool-window.html).
Procedure: Verify TypeScript in the entire project
1. To open the Problems tool window, click the Inspections widget in the upper-right corner of the editor.

Alternatively, select `View | Tool windows | Problems` from the main menu or press `Alt+6` (Windows), `⌘ 6` (macOS), `⌘ 6` (IntelliJ IDEA Classic (macOS)), `⌘ 6` (macOS System Shortcuts), `Alt+6` (XWin), `Alt+6` (GNOME), `Alt+6` (KDE), `Alt+6` (Emacs), `Alt+6` (Sublime Text), `⌘ 6` (Sublime Text (macOS)), `Alt+6` (NetBeans), `Alt+6` (Visual Studio), `⌘ 6` (Visual Studio (macOS)), `Alt+6` (Eclipse), `⌘ 6` (Eclipse (macOS)).
2. Open the Project Errors tab, which shows the errors across the entire project, with error messages grouped by files in which they were detected.
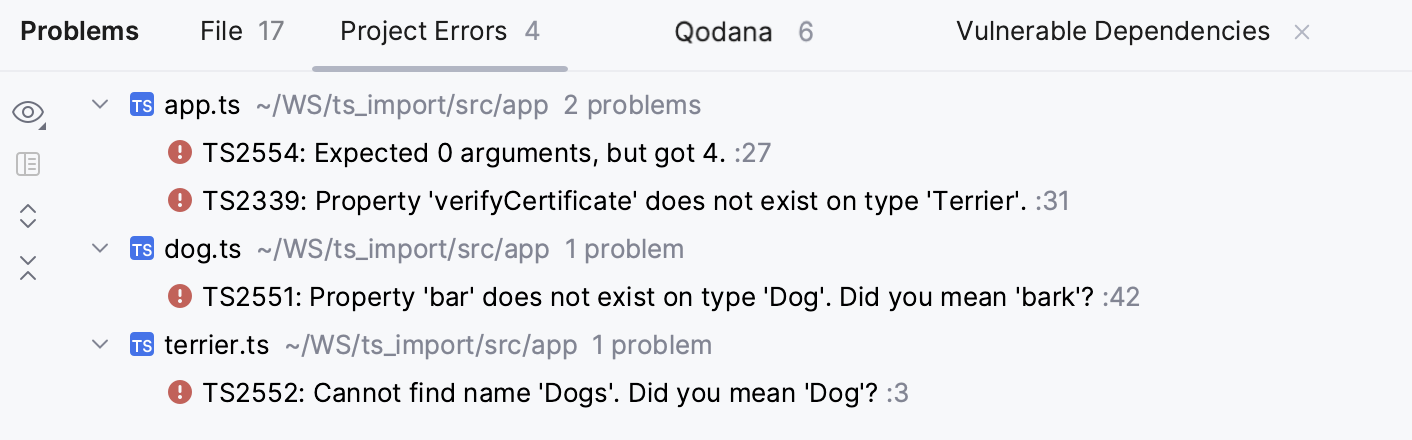
Here you can view problem descriptions, apply quick-fixes, navigate to the fragments in the source code where errors occurred, as well as fix them in the Editor Preview pane without leaving the tool window. Learn more from [Problems tool window](problems-tool-window.html).
> **Note:**
> Checking TypeScript code across the whole project is enabled by default. To turn it off, open the Settings dialog (`Ctrl+Alt+S` (Windows), `⌘ Comma` (macOS), `⌘ Comma` (IntelliJ IDEA Classic (macOS)), `⌘ Comma` (macOS System Shortcuts), `Ctrl+Alt+S` (XWin), `Ctrl+Alt+S` (GNOME), `Ctrl+Alt+S` (KDE), `Ctrl+Alt+S` (Emacs), `Ctrl+Alt+S` (Sublime Text), `⌘ Comma` (Sublime Text (macOS)), `Ctrl+Alt+S` (NetBeans), `Ctrl+Alt+S` (Visual Studio), `⌘ Comma` (Visual Studio (macOS)), `Ctrl+Alt+S` (Eclipse), `⌘ Comma` (Eclipse (macOS))), go to `Languages and Frameworks | TypeScript`, and clear the Show project errors checkbox in the TypeScript language service area.
### Configure integration with the TypeScript language service
In most cases, everything works out of the box and no manual configuration is required. However, if you want to use a custom `typescript` package or pass some [command-line options](http://www.typescriptlang.org/docs/handbook/compiler-options.html) to the TypeScript language service, you can customize the default settings.
Procedure:
1. In the Settings dialog (`Ctrl+Alt+S` (Windows), `⌘ Comma` (macOS), `⌘ Comma` (IntelliJ IDEA Classic (macOS)), `⌘ Comma` (macOS System Shortcuts), `Ctrl+Alt+S` (XWin), `Ctrl+Alt+S` (GNOME), `Ctrl+Alt+S` (KDE), `Ctrl+Alt+S` (Emacs), `Ctrl+Alt+S` (Sublime Text), `⌘ Comma` (Sublime Text (macOS)), `Ctrl+Alt+S` (NetBeans), `Ctrl+Alt+S` (Visual Studio), `⌘ Comma` (Visual Studio (macOS)), `Ctrl+Alt+S` (Eclipse), `⌘ Comma` (Eclipse (macOS))), go to `Languages & Frameworks | TypeScript`.
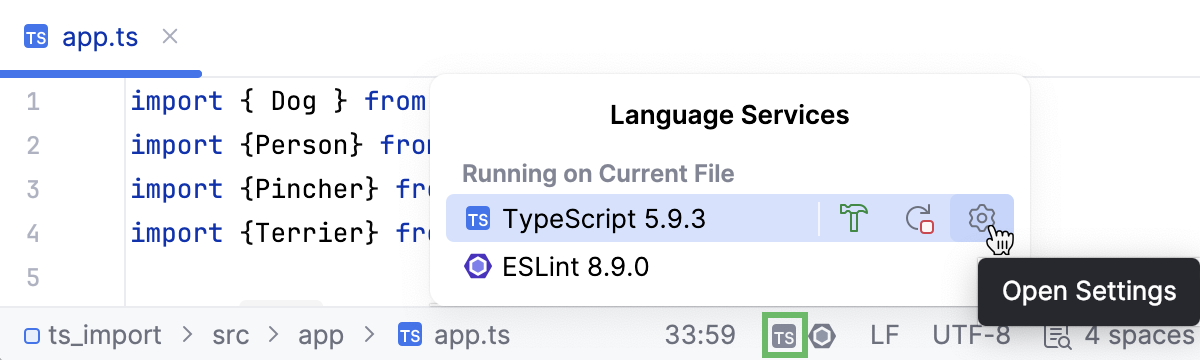
Alternatively, click the Language Services widget on the Status bar and then click .
> **Tip:**
> If no other language services are running against the current file, the title of the widget changes to TypeScriptt.
>
>
>
> The TypeScript widget is shown on the Status bar all the time after you have opened a TypeScript file in the editor.
The [TypeScript page](settings-languages-typescript.html) opens.
2. Specify the Node.js runtime to use.
If you choose the Project alias, IntelliJ IDEA will automatically use the project default interpreter from the Node runtime field on the [JavaScript Runtime](javascript-runtime.html) page . In most cases, IntelliJ IDEA detects the project default runtime and fills in the field itself.
You can also choose another configured local or remote interpreter or click  and configure a new one.
3. In the TypeScript field, specify the version of the TypeScript to use (IntelliJ IDEA displays the currently chosen version).
* By default, the `typescript` package from the project's `node_modules` folder is used.
* Bundled: choose this option to use the `typescript` package that is shipped with IntelliJ IDEA without attempting to find another one.
* Select: choose this option to use a custom `typescript` package instead of the one bundled with IntelliJ IDEA. In the dialog that opens, choose the path to the relevant package.
* If your project package manager is [Yarn 2](https://yarnpkg.com/getting-started), you have to use the `typescript` package installed via Yarn 2. In this case, `yarn:package.json:typescript` is by default selected. Learn more about package managers from [npm and Yarn](installing-and-removing-external-software-using-node-package-manager.html#ws_npm_yarn_configure_package_manager).
4. Make sure the TypeScript Language Service checkbox is selected. As a result:
* Syntax and error highlighting is based on the annotations from the TypeScript language service.
* Completion lists contain both suggestions from the TypeScript language service and suggestions calculated by IntelliJ IDEA.
* TypeScript code is compiled into JavaScript.
5. Use the controls below to configure the behavior of the TypeScript language service.
* Show project errors - By default, this checkbox is selected and the TypeScript language service checks the code across the entire project. The detected errors are listed in the Project Errors tab of the [Problems tool window](problems-tool-window.html) grouped by files where they occurred. To avoid performance issues, clear the Show project errors checkbox so the TypeScript language service checks files only when you open them. The Project Errors tab will then list the errors that are detected only in the files that you have already opened.
* Show suggestions - By default, this checkbox is selected and IntelliJ IDEA shows potential problems that the TypeScript language service detects in your code in addition to actual errors. Show suggestions is on: 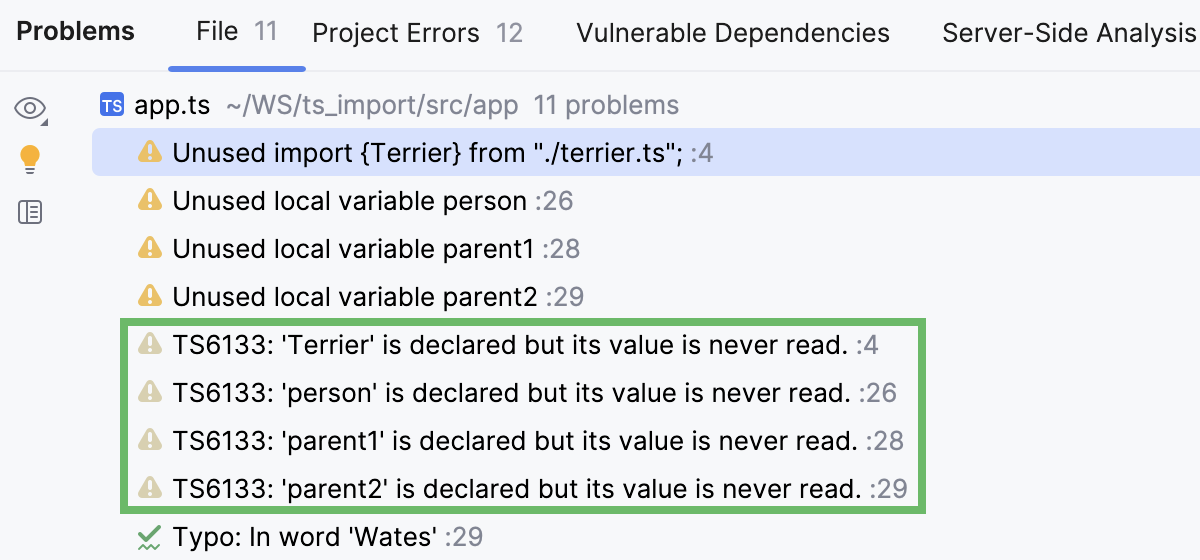 Show suggestions is off: 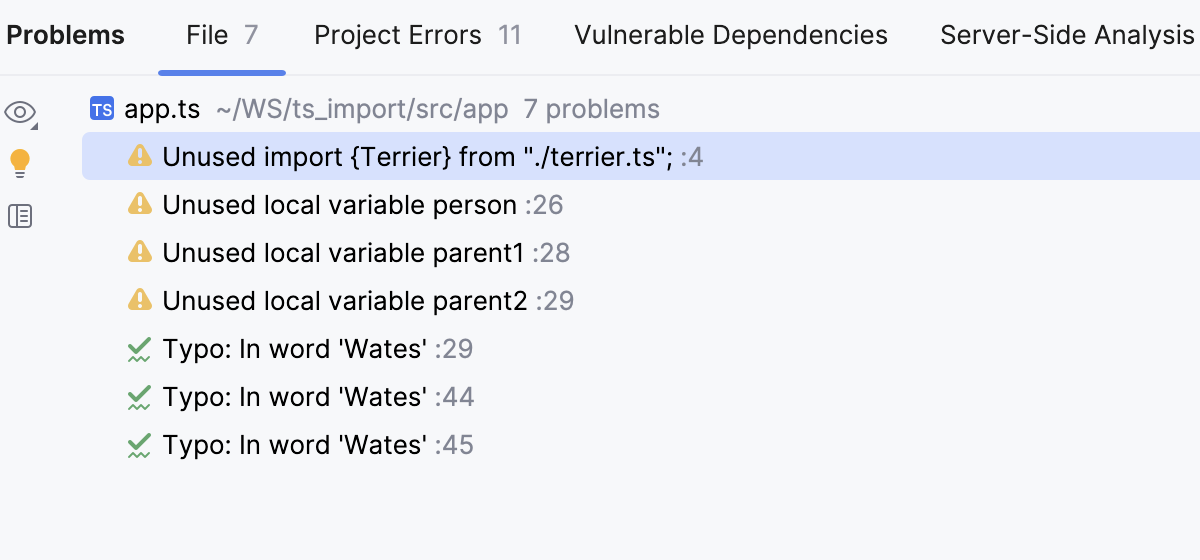
* Enable service-powered type engine - Select this checkbox to evaluate types of symbols based on the data from the TypeScript Compiler. By default, the checkbox is cleared, so type evaluation, resolution, code inspections and refactorings are based on the type information from the IntelliJ IDEA internal TypeScript engine. This default behavior may result in performance issues and in bugs in type resolution because the type evaluation algorithm that the IntelliJ IDEA internal TypeScript engine uses differs from the algorithm of the TypeScript Compiler. Selecting the checkbox may help avoid these problems. > **Note:** > Some of the code highlighting and completion are always retrieved from the TypeScript language service if the TypeScript Language Service checkbox is selected, no matter whether the Enable service-powered type engine checkbox is selected or cleared.
6. In the Options field, specify the command-line options to be passed to the TypeScript language service when the `tsconfig.json` file is not found. See the list of acceptable options at [TSC arguments](http://www.typescriptlang.org/docs/handbook/compiler-options.html). Note that the `-w` or `--watch` (Watch input files) option is irrelevant.
> **Tip:**
> You can enhance completion in JavaScript files with suggestions from the TypeScript language service. To do that, add `'allowJS' : true` to your `jsconfig.json` or `tsconfig.json` file. Learn more from [Code completion](auto-completing-code.html) and [Configure JavaScript libraries](configuring-javascript-libraries.html).
### Restart the TypeScript language service
Procedure:
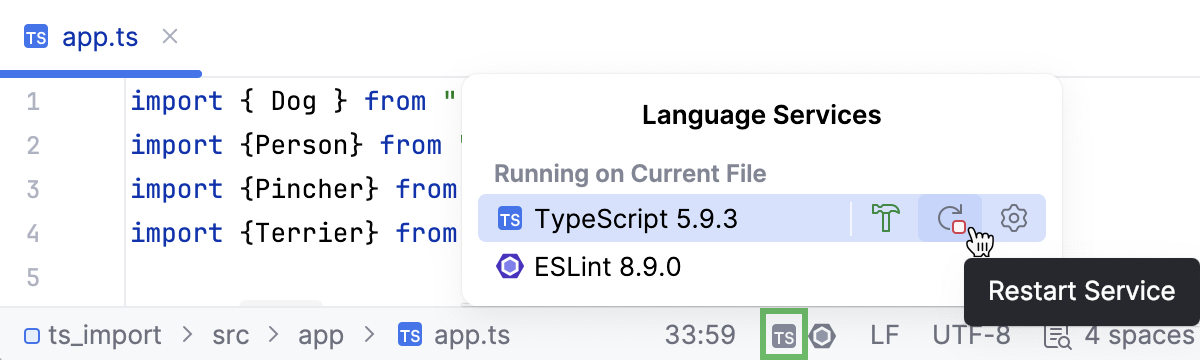
* Click the Language Services widget on the Status bar and then click .
> **Tip:**
> If no other language services are running against the current file, the title of the widget changes to TypeScriptt.
### Localize error messages

Procedure:
1. In the Settings dialog (`Ctrl+Alt+S` (Windows), `⌘ Comma` (macOS), `⌘ Comma` (IntelliJ IDEA Classic (macOS)), `⌘ Comma` (macOS System Shortcuts), `Ctrl+Alt+S` (XWin), `Ctrl+Alt+S` (GNOME), `Ctrl+Alt+S` (KDE), `Ctrl+Alt+S` (Emacs), `Ctrl+Alt+S` (Sublime Text), `⌘ Comma` (Sublime Text (macOS)), `Ctrl+Alt+S` (NetBeans), `Ctrl+Alt+S` (Visual Studio), `⌘ Comma` (Visual Studio (macOS)), `Ctrl+Alt+S` (Eclipse), `⌘ Comma` (Eclipse (macOS))), go to `Languages & Frameworks | TypeScript`.
2. In the TypeScript field, specify a `typescript` package different from Bundled. This may be the `typescript` package from your project `node_modules` folder or from any other location.
3. In the Options field, type `--locale `. Currently, Korean (`ko`) and Japanese (`ja`) are supported.
## Auto import
IntelliJ IDEA can generate import statements for modules, classes, components, and any other symbols that are exported. Import statements can be added on the fly, as you type, paste or complete a symbol, or later, via an import tooltip or using a quick-fix or an intention action.
See [Auto import](creating-and-optimizing-imports.html) to learn how to optimize import statements and configure their style.
Auto-import on the fly:
[Video](https://resources.jetbrains.com/help/img/idea/2026.2/ws_ts_auto_import_on_paste.mp4)
Procedure:
1. In the Settings dialog (`Ctrl+Alt+S` (Windows), `⌘ Comma` (macOS), `⌘ Comma` (IntelliJ IDEA Classic (macOS)), `⌘ Comma` (macOS System Shortcuts), `Ctrl+Alt+S` (XWin), `Ctrl+Alt+S` (GNOME), `Ctrl+Alt+S` (KDE), `Ctrl+Alt+S` (Emacs), `Ctrl+Alt+S` (Sublime Text), `⌘ Comma` (Sublime Text (macOS)), `Ctrl+Alt+S` (NetBeans), `Ctrl+Alt+S` (Visual Studio), `⌘ Comma` (Visual Studio (macOS)), `Ctrl+Alt+S` (Eclipse), `⌘ Comma` (Eclipse (macOS))) , go to `Editor | General | Auto Import`. The [Auto Import](settings-auto-import.html) page opens.
2. In the TypeScript/JavaScript area, make sure the Add TypeScript imports automatically and Unambiguous imports on the fly checkboxes are selected.
Auto-import on completion:

Procedure:
1. In the Settings dialog (`Ctrl+Alt+S` (Windows), `⌘ Comma` (macOS), `⌘ Comma` (IntelliJ IDEA Classic (macOS)), `⌘ Comma` (macOS System Shortcuts), `Ctrl+Alt+S` (XWin), `Ctrl+Alt+S` (GNOME), `Ctrl+Alt+S` (KDE), `Ctrl+Alt+S` (Emacs), `Ctrl+Alt+S` (Sublime Text), `⌘ Comma` (Sublime Text (macOS)), `Ctrl+Alt+S` (NetBeans), `Ctrl+Alt+S` (Visual Studio), `⌘ Comma` (Visual Studio (macOS)), `Ctrl+Alt+S` (Eclipse), `⌘ Comma` (Eclipse (macOS))) , go to `Editor | General | Auto Import`. The [Auto Import](settings-auto-import.html) page opens.
2. In the TypeScript/JavaScript area, make sure the Add TypeScript imports automatically and On code completion checkboxes are selected.
Use import tooltips:
Procedure:
* If an import statement for a TypeScript symbol was not added on completion or editing, IntelliJ IDEA shows you a tooltip that suggests importing the symbol. To accept the suggestion, press `Alt+Enter` (Windows), `⌥ ⏎` (macOS), `⌥ ⏎` (IntelliJ IDEA Classic (macOS)), `⌥ ⏎` (macOS System Shortcuts), `Alt+Enter` (XWin), `Alt+Enter` (GNOME), `Alt+Enter` (KDE), `Alt+Enter` (Emacs), `Alt+Enter` (Sublime Text), `⌥ ⏎` (Sublime Text (macOS)), `Alt+Enter` (NetBeans), `Alt+Enter` (Visual Studio), `⌥ ⏎` (Visual Studio (macOS)), `Ctrl+1` (Eclipse), `⌘ 1` (Eclipse (macOS))
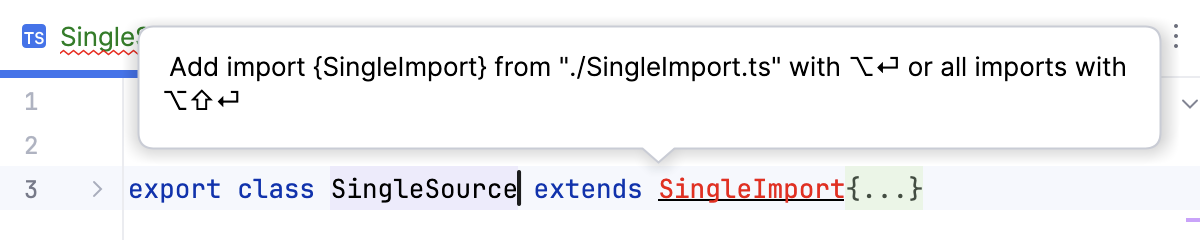
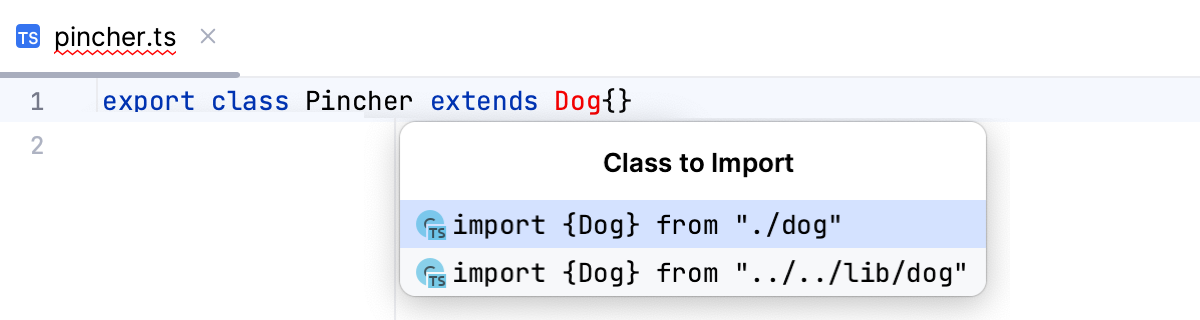
If there's more than one possible source of import, IntelliJ IDEA informs you about that:

Pressing `Alt+Enter` (Windows), `⌥ ⏎` (macOS), `⌥ ⏎` (IntelliJ IDEA Classic (macOS)), `⌥ ⏎` (macOS System Shortcuts), `Alt+Enter` (XWin), `Alt+Enter` (GNOME), `Alt+Enter` (KDE), `Alt+Enter` (Emacs), `Alt+Enter` (Sublime Text), `⌥ ⏎` (Sublime Text (macOS)), `Alt+Enter` (NetBeans), `Alt+Enter` (Visual Studio), `⌥ ⏎` (Visual Studio (macOS)), `Ctrl+1` (Eclipse), `⌘ 1` (Eclipse (macOS)) in this case opens a list of suggestions:
* To hide auto-import tooltips, open the Settings dialog (`Ctrl+Alt+S` (Windows), `⌘ Comma` (macOS), `⌘ Comma` (IntelliJ IDEA Classic (macOS)), `⌘ Comma` (macOS System Shortcuts), `Ctrl+Alt+S` (XWin), `Ctrl+Alt+S` (GNOME), `Ctrl+Alt+S` (KDE), `Ctrl+Alt+S` (Emacs), `Ctrl+Alt+S` (Sublime Text), `⌘ Comma` (Sublime Text (macOS)), `Ctrl+Alt+S` (NetBeans), `Ctrl+Alt+S` (Visual Studio), `⌘ Comma` (Visual Studio (macOS)), `Ctrl+Alt+S` (Eclipse), `⌘ Comma` (Eclipse (macOS))) , go to `Editor | General | Auto Import`, and clear the With auto-import tooltip checkbox.
* To change the background color for auto-import tooltips, press `Ctrl+Alt+S` (Windows), `⌘ Comma` (macOS), `⌘ Comma` (IntelliJ IDEA Classic (macOS)), `⌘ Comma` (macOS System Shortcuts), `Ctrl+Alt+S` (XWin), `Ctrl+Alt+S` (GNOME), `Ctrl+Alt+S` (KDE), `Ctrl+Alt+S` (Emacs), `Ctrl+Alt+S` (Sublime Text), `⌘ Comma` (Sublime Text (macOS)), `Ctrl+Alt+S` (NetBeans), `Ctrl+Alt+S` (Visual Studio), `⌘ Comma` (Visual Studio (macOS)), `Ctrl+Alt+S` (Eclipse), `⌘ Comma` (Eclipse (macOS)) and go to `Editor | Color Scheme | General | Popups and Hints | Question hints`.
Use quick-fix or intention action:
Procedure:
If an auto-import tooltip doesn't show up, you can always press `Alt+Enter` (Windows), `⌥ ⏎` (macOS), `⌥ ⏎` (IntelliJ IDEA Classic (macOS)), `⌥ ⏎` (macOS System Shortcuts), `Alt+Enter` (XWin), `Alt+Enter` (GNOME), `Alt+Enter` (KDE), `Alt+Enter` (Emacs), `Alt+Enter` (Sublime Text), `⌥ ⏎` (Sublime Text (macOS)), `Alt+Enter` (NetBeans), `Alt+Enter` (Visual Studio), `⌥ ⏎` (Visual Studio (macOS)), `Ctrl+1` (Eclipse), `⌘ 1` (Eclipse (macOS)) and add an import statement via a quick-fix.
* To generate an import, select Insert import from:
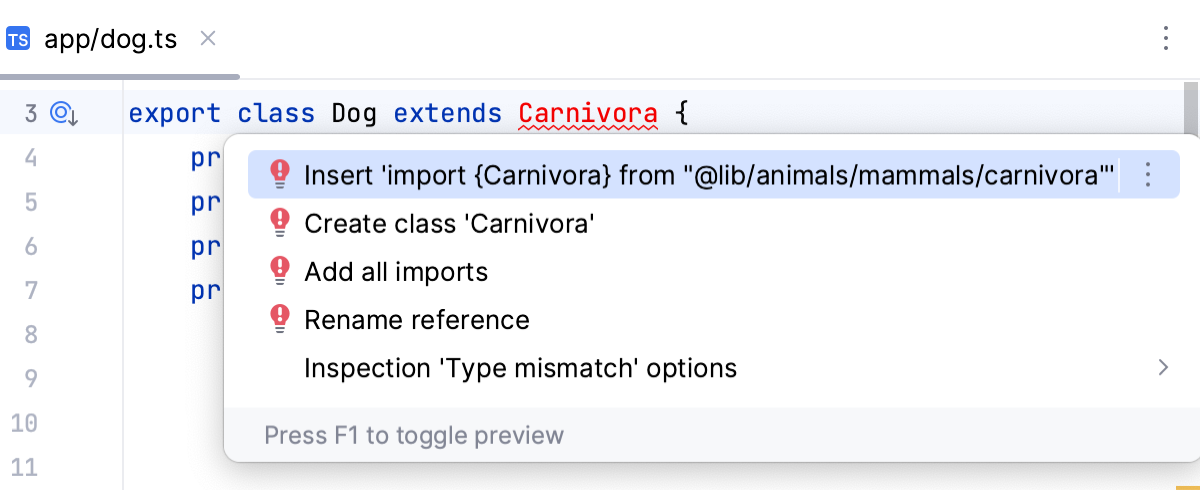
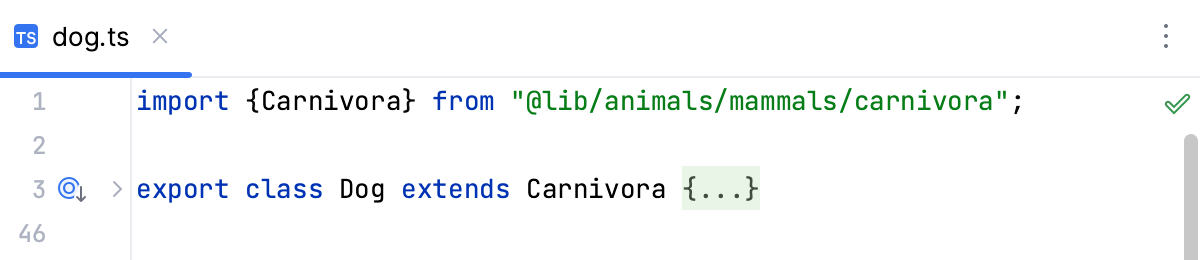
If there is only one source to import a symbol from, IntelliJ IDEA generates an import statement:
* If there are several sources to import a symbol from, select the relevant one from the suggestion list:
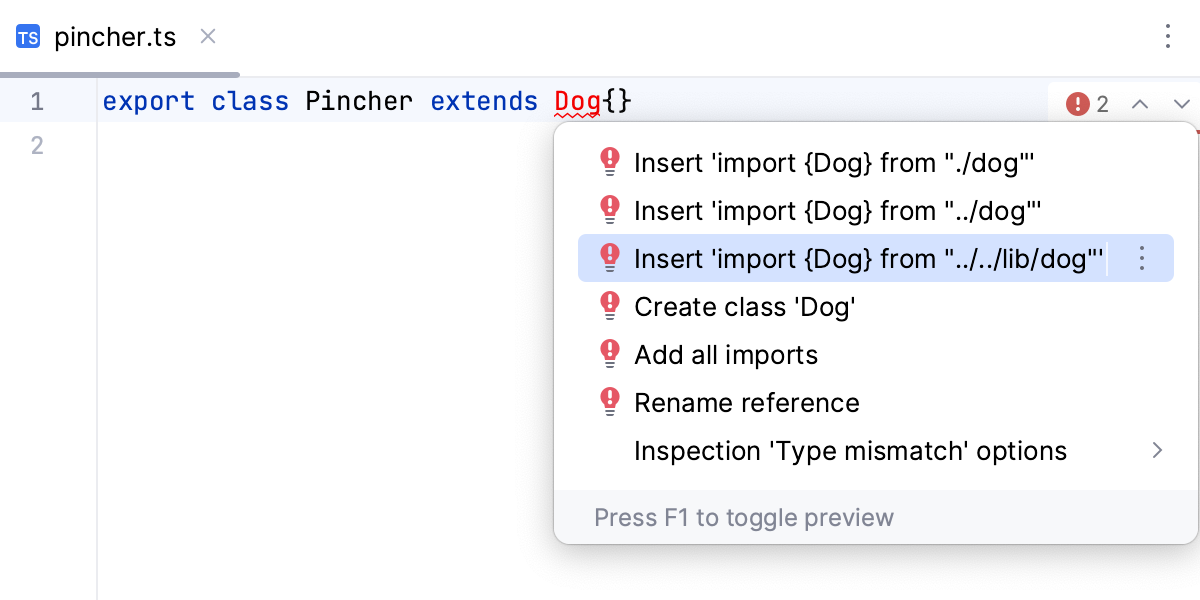
* If the TypeScript language service is enabled in your project, you can also use its suggestion:
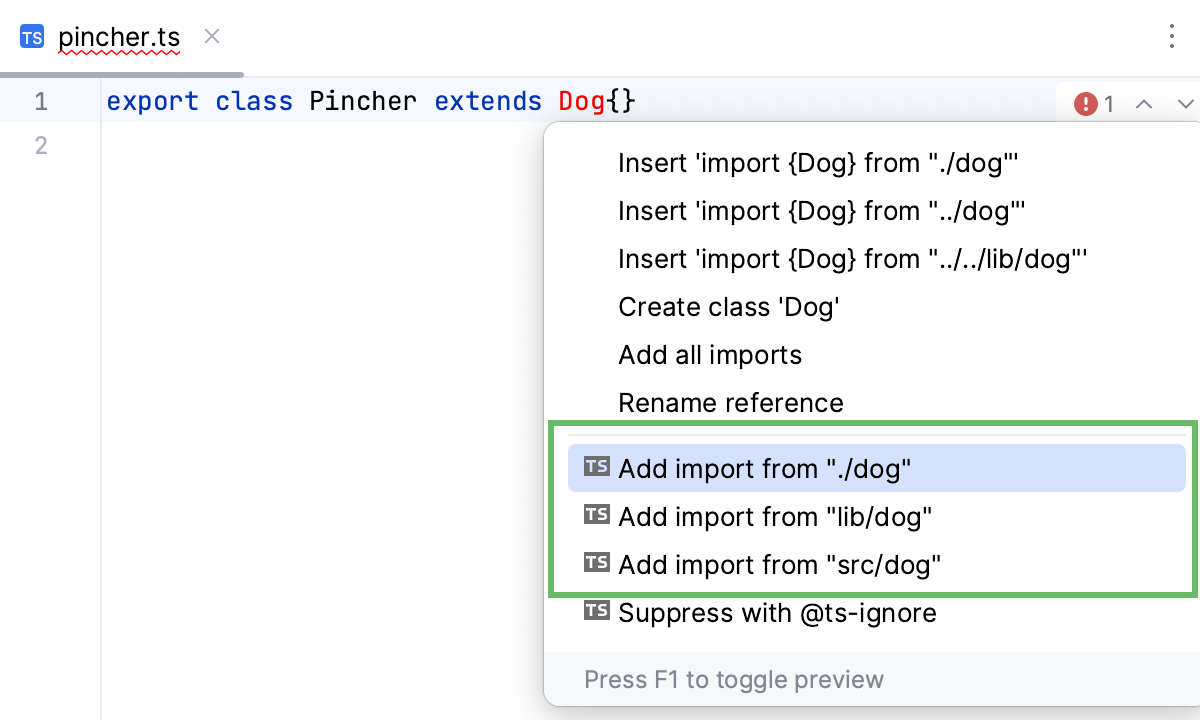
### Configure the use of the type modifier in import statements
Procedure:
1. Press `Ctrl+Alt+S` (Windows), `⌘ Comma` (macOS), `⌘ Comma` (IntelliJ IDEA Classic (macOS)), `⌘ Comma` (macOS System Shortcuts), `Ctrl+Alt+S` (XWin), `Ctrl+Alt+S` (GNOME), `Ctrl+Alt+S` (KDE), `Ctrl+Alt+S` (Emacs), `Ctrl+Alt+S` (Sublime Text), `⌘ Comma` (Sublime Text (macOS)), `Ctrl+Alt+S` (NetBeans), `Ctrl+Alt+S` (Visual Studio), `⌘ Comma` (Visual Studio (macOS)), `Ctrl+Alt+S` (Eclipse), `⌘ Comma` (Eclipse (macOS)) to open settings and then select `Editor | Code Style | TypeScript`.
2. Switch to the Imports tab and in the Use type modifier in imports field configure the use of the `type` modifier in import statements for types. Note that the settings apply only for types, no `type` modifier is inserted for not types, no matter which option you select.
Auto:
With this option, a `type` modifier is added if ["importsNotUsedAsValues": "error"](https://www.typescriptlang.org/tsconfig#importsNotUsedAsValues) or ["verbatimModuleSyntax":
true](https://www.typescriptlang.org/tsconfig#verbatimModuleSyntax) is specified in your `tsconfig.json`.
Otherwise, if no import type is preferred, no `type` modifier is inserted.

Always with type:
With this option, a `type` modifier is always inserted, no matter whether ["importsNotUsedAsValues": "error"](https://www.typescriptlang.org/tsconfig#importsNotUsedAsValues) or ["verbatimModuleSyntax": true](https://www.typescriptlang.org/tsconfig#verbatimModuleSyntax) is specified in your `tsconfig .json`:

Never:
With this option, IntelliJ IDEA never uses the `type` modifier, regardless of the ["importsNotUsedAsValues": "error"](https://www.typescriptlang.org/tsconfig#importsNotUsedAsValues) or ["verbatimModuleSyntax": true](https://www.typescriptlang.org/tsconfig#verbatimModuleSyntax) flags in your `tsconfig.json`:

If there is already an import statement with a `type` modifier, this modifier is always used for further importing types regardless of the selected option and of the settings in your `tsconfig.json`.
For constants, a `{}` specifier is used instead of a `type` modifier. For TypeScript 4.5 and later with Auto or Always selected, all the previous modifiers are converted to `{type}` specifiers. Otherwise, all the existing specifiers remain unchanged.
Learn more from the [TypeScript
official website](https://www.typescriptlang.org/docs/handbook/2/everyday-types.html).
Procedure: Configure the appearance of import statements
* In the Settings dialog (`Ctrl+Alt+S` (Windows), `⌘ Comma` (macOS), `⌘ Comma` (IntelliJ IDEA Classic (macOS)), `⌘ Comma` (macOS System Shortcuts), `Ctrl+Alt+S` (XWin), `Ctrl+Alt+S` (GNOME), `Ctrl+Alt+S` (KDE), `Ctrl+Alt+S` (Emacs), `Ctrl+Alt+S` (Sublime Text), `⌘ Comma` (Sublime Text (macOS)), `Ctrl+Alt+S` (NetBeans), `Ctrl+Alt+S` (Visual Studio), `⌘ Comma` (Visual Studio (macOS)), `Ctrl+Alt+S` (Eclipse), `⌘ Comma` (Eclipse (macOS))) , go to `Editor | Code Style | TypeScript`, and use the controls in the Imports tab.
## Documentation look-up
IntelliJ IDEA lets you get reference for symbols from your project and from its dependencies, for symbols defined in external libraries, and for standard JavaScript APIs because TypeScript implements all of them.
By default, documentation is shown in the Documentation popup but you can always open it in the [Documentation tool window](documentation-tool-window.html) or even configure it to appear in the Documentation tool window by default.
[Video](https://resources.jetbrains.com/help/img/idea/2026.2/ws_ts_quick_doc_popup_and_tw.mp4)
Procedure: View Quick Documentation
* Hover over the necessary symbol in the editor.
Alternatively, place the caret at the symbol and press `Ctrl+Q` (Windows), `F1` (macOS), `⌃ J` (IntelliJ IDEA Classic (macOS)), `⌘ I` (macOS System Shortcuts), `Ctrl+Q` (XWin), `Ctrl+Q` (GNOME), `Ctrl+Q` (KDE), `Ctrl+Q` (Emacs), `Ctrl+Q` (Sublime Text), `Ctrl+Q` (Sublime Text (macOS)), `Ctrl+Q` (NetBeans), `Ctrl+K, I` (Visual Studio), `⌘ K, I` (Visual Studio (macOS)), `Alt+Middle-Click` (Eclipse), `⌥ Middle-Click` (Eclipse (macOS)) or select `View | Quick Documentation` from the main menu.
* To open Quick Documentation in the Documentation tool window by default, click  in the popup or on the toolbar of the tool window and clear the Show Documentation Popup First option.
* Click  in the popup to change the font size, display the quick documentation toolbar, or go to the source code.
For more information, refer to [Quick Documentation in a popup](viewing-reference-information.html#quick_doc_popup_configure) .
You can open a piece of documentation for a specific code element in the tool window and keep viewing documentation for other elements in your current file as described in [Keep documentation in the tool window](viewing-reference-information.html#keep-docs-in-tool-window) .
In the tool window, code documentation is displayed on the unpinned tab (the tab marked with the asterisk symbol (`*`). You can view this documentation by hovering over a symbol or placing the caret at it. For more information, refer to [Quick
Documentation tool window: modes](viewing-reference-information.html#quick_doc_tw_modes).
### View the MDN documentation for a symbol at caret
For standard JavaScript methods available in TypeScript, IntelliJ IDEA also shows a link to the corresponding [MDN
article](https://developer.mozilla.org/en-US/docs/Web/JavaScript).
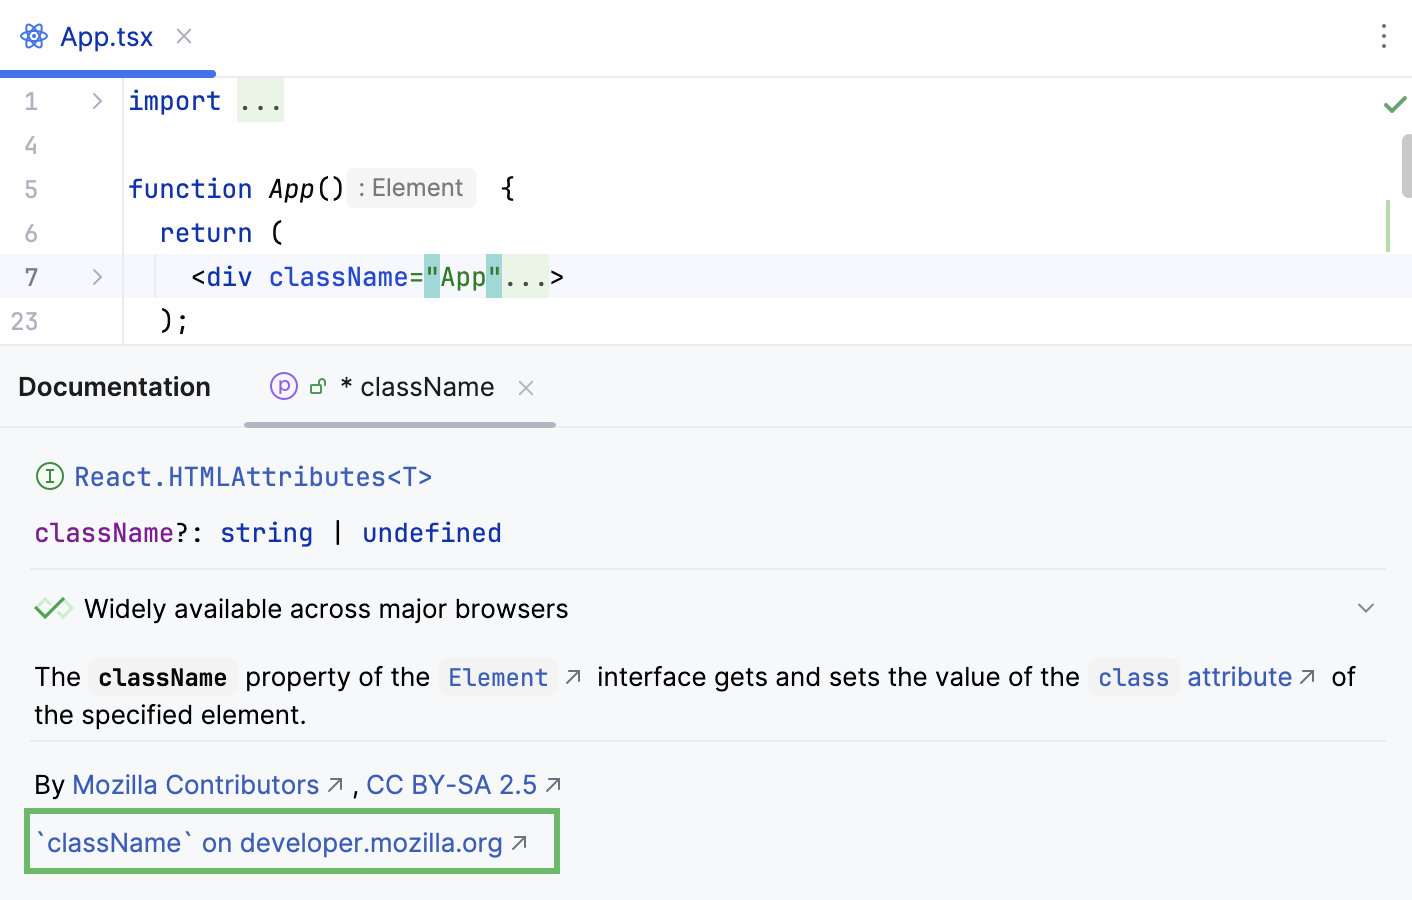
Procedure:
1. In the Documentation window `Ctrl+Q` (Windows), `F1` (macOS), `⌃ J` (IntelliJ IDEA Classic (macOS)), `⌘ I` (macOS System Shortcuts), `Ctrl+Q` (XWin), `Ctrl+Q` (GNOME), `Ctrl+Q` (KDE), `Ctrl+Q` (Emacs), `Ctrl+Q` (Sublime Text), `Ctrl+Q` (Sublime Text (macOS)), `Ctrl+Q` (NetBeans), `Ctrl+K, I` (Visual Studio), `⌘ K, I` (Visual Studio (macOS)), `Alt+Middle-Click` (Eclipse), `⌥ Middle-Click` (Eclipse (macOS)), click the MDN link.
2. Alternatively, press `Shift+F1` (Windows), `⇧ F1` (macOS), `⇧ F1` (IntelliJ IDEA Classic (macOS)), `⇧ F1` (macOS System Shortcuts), `Shift+F1` (XWin), `Shift+F1` (GNOME), `Shift+F1` (KDE), `Shift+F1` (Emacs), `Shift+F1` (Sublime Text), `⇧ F1` (Sublime Text (macOS)), `Shift+F1` (NetBeans), `Shift+F1` (Visual Studio), `⇧ F1` (Visual Studio (macOS)), `Shift+F2` (Eclipse), `⇧ F2` (Eclipse (macOS)) or choose `View | External Documentation` from the main menu.
IntelliJ IDEA opens the MDN article in the [default
IntelliJ IDEA browser](configuring-third-party-tools.html#web-browsers).
## View inlay hints
Inlay hints appear in the editor and provide you with additional information about your code to make it easier to read and navigate.
Inlay hints are available in `.ts` and `.tsx` files.
* If the TypeScript Language service is enabled and TypeScript version is 4.4 or higher, inlay hints are retrieved from the TypeScript language service.
* For earlier TypeScript versions or if the TypeScript language service is disabled, inlay hints are retrieved from the internal IntelliJ IDEA evaluator.
> **Tip:**
> It is strongly recommended that you enable the TypeScript language service [as
> described above](#ws_ts_use_ts_service_checkbox).
Unlike many inspections and highlights, which always analyze the whole file, hints are retrieved only for the currently visible area and are updated on scrolling. This behavior aims at higher performance.
### Parameter hints
Parameter hints show the names of parameters in methods and functions to make your code easier to read.
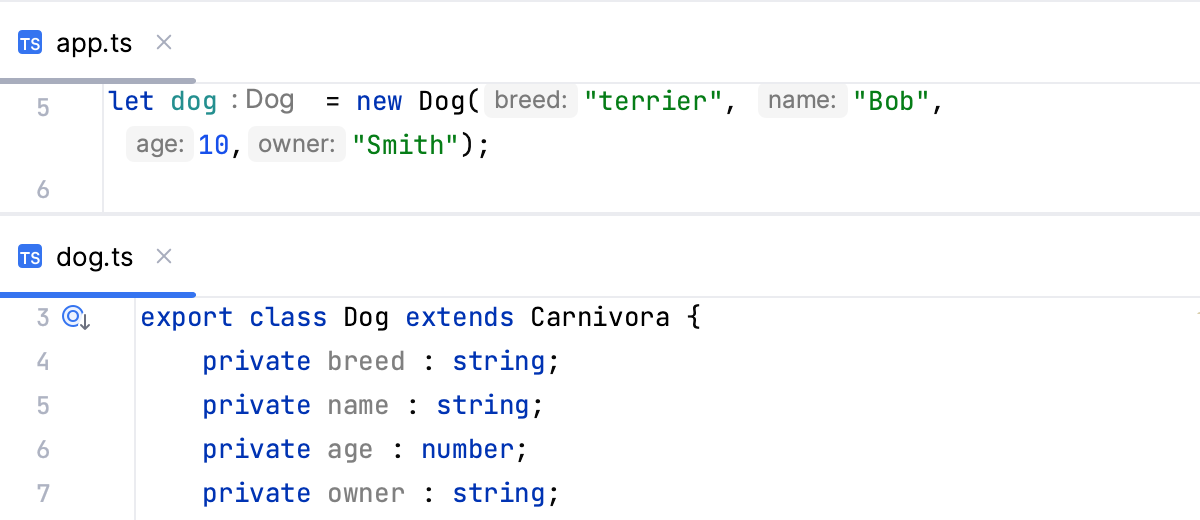
With TypeScript version 5.2 and higher, parameter hints turn into links on hover. Clicking such link with `Ctrl` (Windows), `Ctrl` (macOS), `Ctrl` (IntelliJ IDEA Classic (macOS)), `Ctrl` (macOS System Shortcuts), `Ctrl` (XWin), `Ctrl` (GNOME), `Ctrl` (KDE), `Ctrl` (Emacs), `Ctrl` (Sublime Text), `Ctrl` (Sublime Text (macOS)), `Ctrl` (NetBeans), `Ctrl` (Visual Studio), `Ctrl` (Visual Studio (macOS)), `Ctrl` (Eclipse), `Ctrl` (Eclipse (macOS)) pressed brings you to the method definition.
Procedure: Configure parameter hints
1. Open the Settings dialog (`Ctrl+Alt+S` (Windows), `⌘ Comma` (macOS), `⌘ Comma` (IntelliJ IDEA Classic (macOS)), `⌘ Comma` (macOS System Shortcuts), `Ctrl+Alt+S` (XWin), `Ctrl+Alt+S` (GNOME), `Ctrl+Alt+S` (KDE), `Ctrl+Alt+S` (Emacs), `Ctrl+Alt+S` (Sublime Text), `⌘ Comma` (Sublime Text (macOS)), `Ctrl+Alt+S` (NetBeans), `Ctrl+Alt+S` (Visual Studio), `⌘ Comma` (Visual Studio (macOS)), `Ctrl+Alt+S` (Eclipse), `⌘ Comma` (Eclipse (macOS))) and go to `Editor | Inlay Hints`.
2. Expand TypeScript under Parameter names.
3. Specify the context in which you want parameter hints shown by selecting the corresponding checkboxes.
The preview shows how the changes you make in the settings affect the code appearance.
4. To hide parameter hints for any value type in any context, clear the TypeScript checkbox under Parameter names.
### Return type hints
IntelliJ IDEA can display function return types in function calls and call chains.
* Function return type hints are retrieved from the [TypeScript Language Service](#ws_ts_use_ts_service_checkbox).
* Return type hints in method chains are displayed if the method calls are split between multiple lines and return at least 2 different types. Return type hints in method chains are provided by the internal IntelliJ IDEA evaluator.
Procedure: Configure function return type hints
1. Open the Settings dialog (`Ctrl+Alt+S` (Windows), `⌘ Comma` (macOS), `⌘ Comma` (IntelliJ IDEA Classic (macOS)), `⌘ Comma` (macOS System Shortcuts), `Ctrl+Alt+S` (XWin), `Ctrl+Alt+S` (GNOME), `Ctrl+Alt+S` (KDE), `Ctrl+Alt+S` (Emacs), `Ctrl+Alt+S` (Sublime Text), `⌘ Comma` (Sublime Text (macOS)), `Ctrl+Alt+S` (NetBeans), `Ctrl+Alt+S` (Visual Studio), `⌘ Comma` (Visual Studio (macOS)), `Ctrl+Alt+S` (Eclipse), `⌘ Comma` (Eclipse (macOS))) and go to `Editor | Inlay Hints`.
2. Under Types, expand the TypeScript node, and then select the Function return types checkbox.
3. To show return type hints in method chains, expand the Method chains node and select the TypeScript checkbox.
The preview shows how the changes you make in the settings affect the code appearance.
### Type hints
Type hints show the types of variables, fields, or parameters. The types of variables and fields are displayed next to their definition. Type hints for parameters are shown in function calls. Type hints are inferred from [JSDoc
comments](creating-jsdoc-comments.html) or static analysis of your code.
With TypeScript version 5.3 and higher, type hints turn into links on hover. Clicking such link with `Ctrl` (Windows), `Ctrl` (macOS), `Ctrl` (IntelliJ IDEA Classic (macOS)), `Ctrl` (macOS System Shortcuts), `Ctrl` (XWin), `Ctrl` (GNOME), `Ctrl` (KDE), `Ctrl` (Emacs), `Ctrl` (Sublime Text), `Ctrl` (Sublime Text (macOS)), `Ctrl` (NetBeans), `Ctrl` (Visual Studio), `Ctrl` (Visual Studio (macOS)), `Ctrl` (Eclipse), `Ctrl` (Eclipse (macOS)) pressed brings you to the type definition.
Procedure: Configure type hints
1. Open the Settings dialog (`Ctrl+Alt+S` (Windows), `⌘ Comma` (macOS), `⌘ Comma` (IntelliJ IDEA Classic (macOS)), `⌘ Comma` (macOS System Shortcuts), `Ctrl+Alt+S` (XWin), `Ctrl+Alt+S` (GNOME), `Ctrl+Alt+S` (KDE), `Ctrl+Alt+S` (Emacs), `Ctrl+Alt+S` (Sublime Text), `⌘ Comma` (Sublime Text (macOS)), `Ctrl+Alt+S` (NetBeans), `Ctrl+Alt+S` (Visual Studio), `⌘ Comma` (Visual Studio (macOS)), `Ctrl+Alt+S` (Eclipse), `⌘ Comma` (Eclipse (macOS))) and go to `Editor | Inlay Hints`.
2. Expand `Types | TypeScript`.
3. Specify the context where you want type hints to be shown.
The preview shows how the changes you make in the settings affect the code appearance.
4. To hide parameter type and return type hints for any value type in any context, clear the TypeScript checkbox under Types.
### Numeric enum values
IntelliJ IDEA shows hints for [numeric enums](https://www.typescriptlang.org/docs/handbook/enums.html) to make your code easier to read. These hints are retrieved from the TypeScript language service and are displayed by default.
Procedure: Hide numeric enum values
1. Open the Settings dialog (`Ctrl+Alt+S` (Windows), `⌘ Comma` (macOS), `⌘ Comma` (IntelliJ IDEA Classic (macOS)), `⌘ Comma` (macOS System Shortcuts), `Ctrl+Alt+S` (XWin), `Ctrl+Alt+S` (GNOME), `Ctrl+Alt+S` (KDE), `Ctrl+Alt+S` (Emacs), `Ctrl+Alt+S` (Sublime Text), `⌘ Comma` (Sublime Text (macOS)), `Ctrl+Alt+S` (NetBeans), `Ctrl+Alt+S` (Visual Studio), `⌘ Comma` (Visual Studio (macOS)), `Ctrl+Alt+S` (Eclipse), `⌘ Comma` (Eclipse (macOS))) and go to `Editor | Inlay Hints`.
2. Expand the Values node and select the TypeScript checkbox. IntelliJ IDEA will hide the hints and show only the values of explicitly initialized constants. The preview shows how the changes you make in the settings affect the code appearance.
## JavaScript libraries in TypeScript
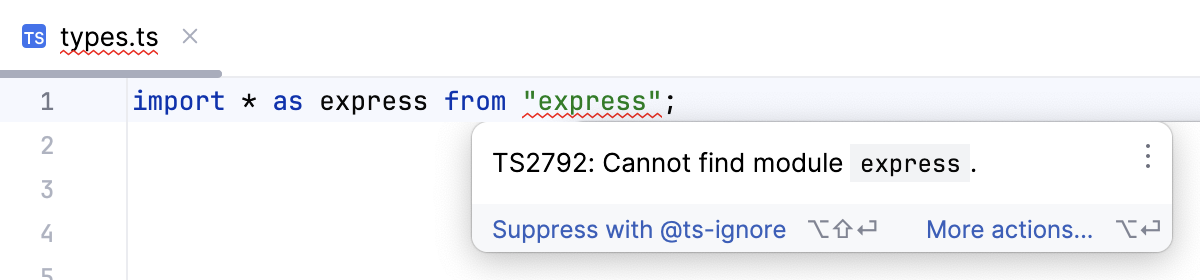
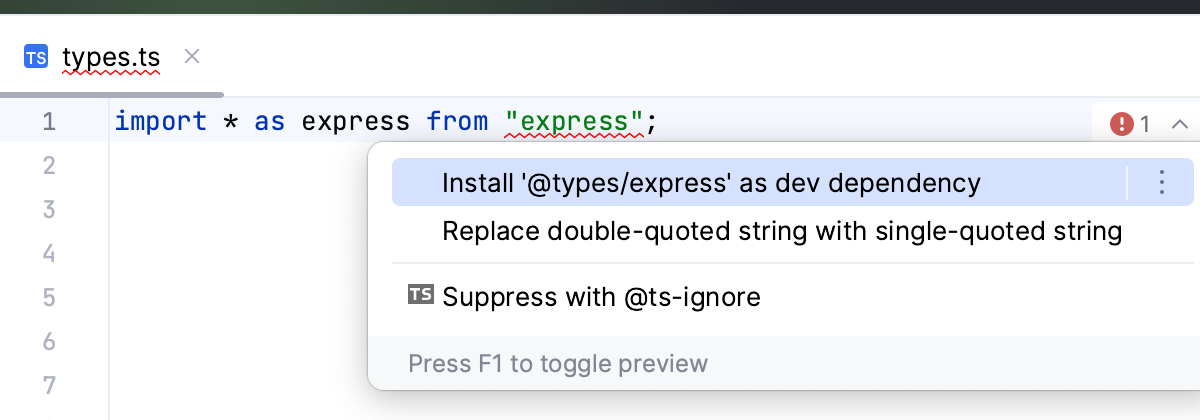
When working with JavaScript libraries in TypeScript, you need to [install type declarations](https://www.typescriptlang.org/docs/handbook/declaration-files/consumption.html) for them. IntelliJ IDEA reminds you to install them via npm or yarn and updates your `package.json` file accordingly.
Procedure: Install the type declarations
1. Place the caret at the warning and press `Alt+Enter` (Windows), `⌥ ⏎` (macOS), `⌥ ⏎` (IntelliJ IDEA Classic (macOS)), `⌥ ⏎` (macOS System Shortcuts), `Alt+Enter` (XWin), `Alt+Enter` (GNOME), `Alt+Enter` (KDE), `Alt+Enter` (Emacs), `Alt+Enter` (Sublime Text), `⌥ ⏎` (Sublime Text (macOS)), `Alt+Enter` (NetBeans), `Alt+Enter` (Visual Studio), `⌥ ⏎` (Visual Studio (macOS)), `Ctrl+1` (Eclipse), `⌘ 1` (Eclipse (macOS)).
2. Select the suggestion and press `Enter` (Windows), `⏎` (macOS), `⏎` (IntelliJ IDEA Classic (macOS)), `⏎` (macOS System Shortcuts), `Enter` (XWin), `Enter` (GNOME), `Enter` (KDE), `Enter` (Emacs), `Enter` (Sublime Text), `⏎` (Sublime Text (macOS)), `Enter` (NetBeans), `Enter` (Visual Studio), `⏎` (Visual Studio (macOS)), `Enter` (Eclipse), `⏎` (Eclipse (macOS)).
## TypeScript Native Previews (TypeScript-Go)
IntelliJ IDEA provides basic TypeScript-Go support via [TypeScript Native Previews](https://devblogs.microsoft.com/typescript/announcing-typescript-native-previews/).
Procedure: Enable TypeScript-Go support
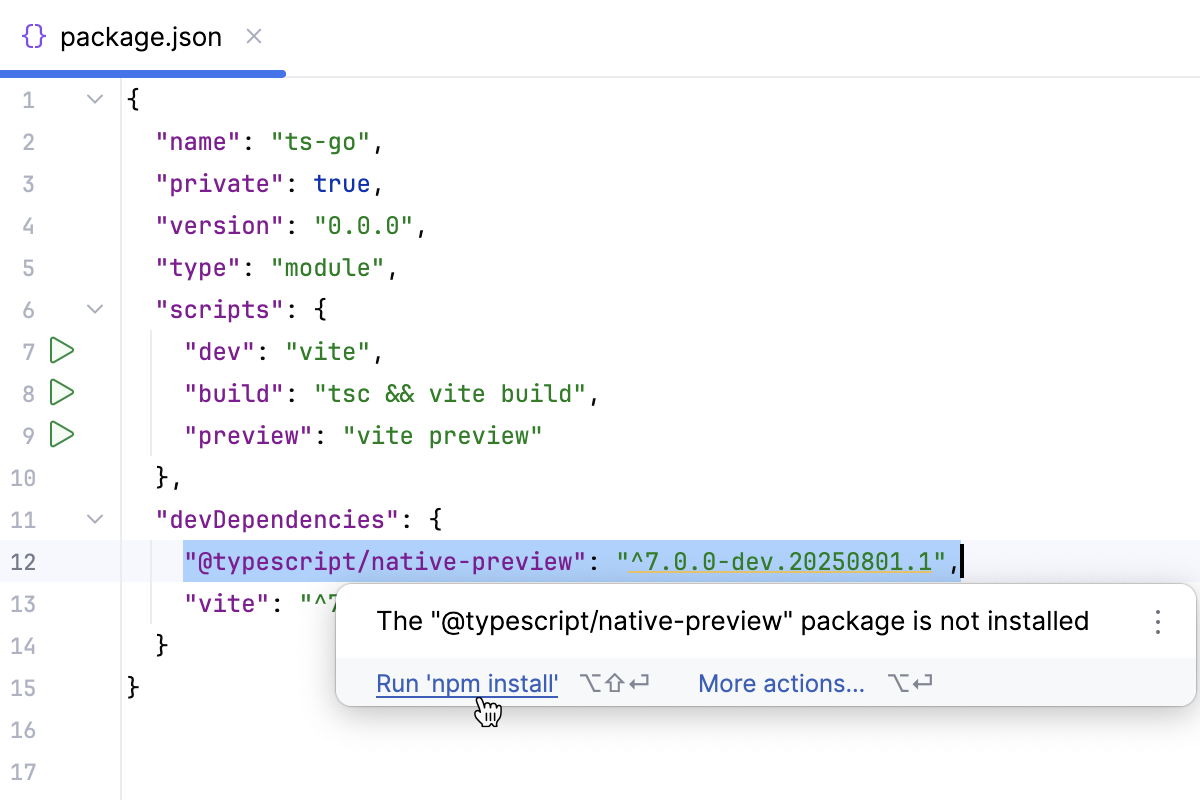
* Install the `@typescript/native-preview` package in your project as a dependency instead of the `typescript` package.
To do that, open your `package.json` and replace `typescript` with `@typescript/native-preview`. When you hover over the `@typescript/native-preview` version, IntelliJ IDEA displays a popup that informs you that the specified package is not installed. Click the Run 'npm install' link.
* Install the `@typescript/native-preview` elsewhere on your computer and specify it as the TypeScript package to use in your project.
To do that:
1.
Install the `@typescript/native-preview` package on your computer, for example, install it globally.
In your command-line shell or in the embedded Terminal (`Alt+F12` (Windows), `⌥ F12` (macOS), `⌥ F12` (IntelliJ IDEA Classic (macOS)), `⌘ ⌃ T` (macOS System Shortcuts), `Alt+F12` (XWin), `Alt+F12` (GNOME), `Alt+F12` (KDE), `Alt+F12` (Emacs), `Alt+F12` (Sublime Text), `⌥ F12` (Sublime Text (macOS)), `Alt+F12` (NetBeans), `Ctrl+Alt+1` (Visual Studio), `⌘ ⌃ 1` (Visual Studio (macOS)), `Alt+F12` (Eclipse), `⌥ F12` (Eclipse (macOS))) , type:
`npm install --g @typescript/native-preview`
2.
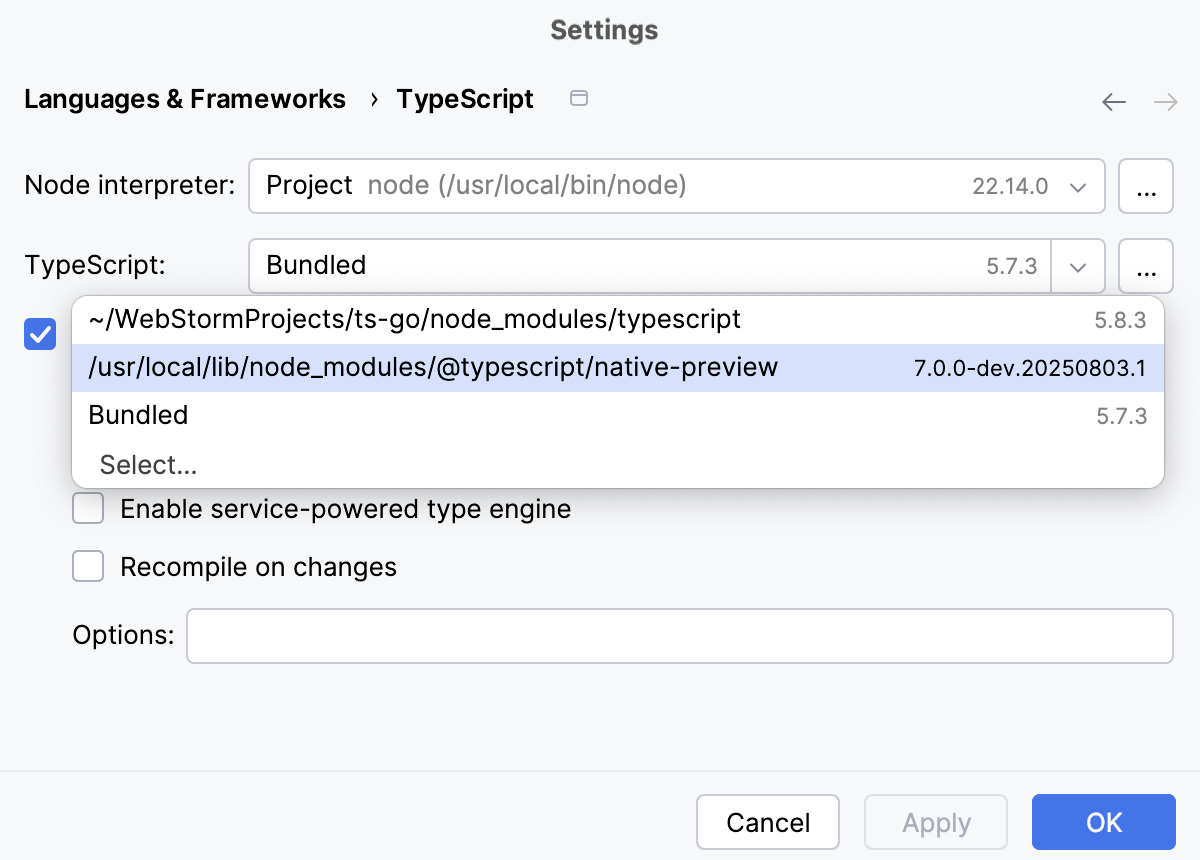
In the Settings dialog (`Ctrl+Alt+S` (Windows), `⌘ Comma` (macOS), `⌘ Comma` (IntelliJ IDEA Classic (macOS)), `⌘ Comma` (macOS System Shortcuts), `Ctrl+Alt+S` (XWin), `Ctrl+Alt+S` (GNOME), `Ctrl+Alt+S` (KDE), `Ctrl+Alt+S` (Emacs), `Ctrl+Alt+S` (Sublime Text), `⌘ Comma` (Sublime Text (macOS)), `Ctrl+Alt+S` (NetBeans), `Ctrl+Alt+S` (Visual Studio), `⌘ Comma` (Visual Studio (macOS)), `Ctrl+Alt+S` (Eclipse), `⌘ Comma` (Eclipse (macOS))), go to `Languages & Frameworks | TypeScript`, and specify the path to the `@typescript/native-preview` package in the TypeScript field. If you followed the standard installation procedure, IntelliJ IDEA shows the `@typescript /native-preview` package in the TypeScript drop-down list.
* Clone and build the [TypeScript-Go
repository](https://github.com/microsoft/typescript-go/) locally and locate it in the TypeScript field of the Settings | Languages & Frameworks | TypeScript dialog [as described above](#ts_native_previews_enable_in_settings_dialog_specify_path).
> **Note:**
> This option is still under development. You may encounter minor issues.
## Reformat code
IntelliJ IDEA lets you reformat your TypeScript code according to your current [code style scheme](configuring-code-style.html#configure-code-style-schemes).
You can also specify formatting settings in [.editorconfig](configuring-code-style.html) or use [Prettier.](prettier.html)
### Decorators
For decorators, it may be important to suppress inserting line breaks after each of them during reformatting.
Procedure: Configure decorators
1. Open the Settings dialog (`Ctrl+Alt+S` (Windows), `⌘ Comma` (macOS), `⌘ Comma` (IntelliJ IDEA Classic (macOS)), `⌘ Comma` (macOS System Shortcuts), `Ctrl+Alt+S` (XWin), `Ctrl+Alt+S` (GNOME), `Ctrl+Alt+S` (KDE), `Ctrl+Alt+S` (Emacs), `Ctrl+Alt+S` (Sublime Text), `⌘ Comma` (Sublime Text (macOS)), `Ctrl+Alt+S` (NetBeans), `Ctrl+Alt+S` (Visual Studio), `⌘ Comma` (Visual Studio (macOS)), `Ctrl+Alt+S` (Eclipse), `⌘ Comma` (Eclipse (macOS))) and go to `Editor | Code Style | TypeScript`.
2. On the Wrapping and Braces tab, select the relevant options for types of decorators.
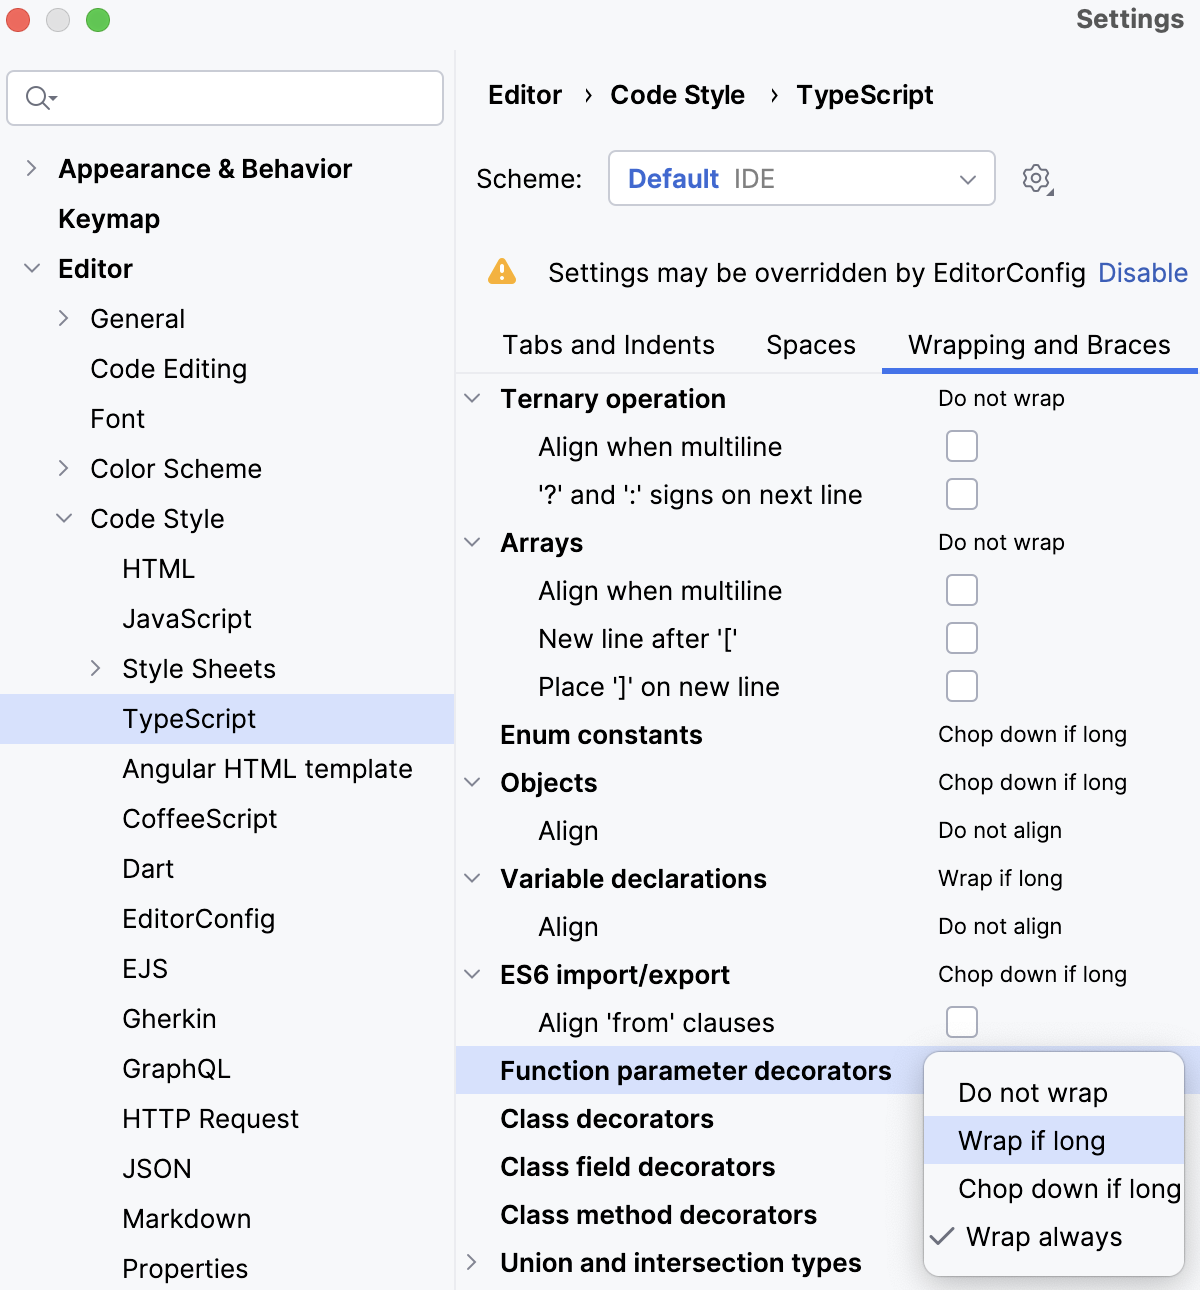
The following formatting options are available for decorators:
#### Do not wrap
With this option selected, no wrapping is applied while reformatting lines with decorators.
Class decorators:
[Video](https://resources.jetbrains.com/help/img/idea/2026.2/ws_ts_reformat_class_decorator_do_not_wrap.mp4)
Method decorators:
[Video](https://resources.jetbrains.com/help/img/idea/2026.2/ws_ts_reformat_code_decorators_do_not_wrap_class_method_decorators.mp4)
Field decorators:
[Video](https://resources.jetbrains.com/help/img/idea/2026.2/ws_ts_reformat_code_decorators_do_not_wrap_class_field_decorators.mp4)
Function parameter decorators:
[Video](https://resources.jetbrains.com/help/img/idea/2026.2/ws_ts_reformat_code_decorators_do_not_wrap_function_parameter_decorators.mp4)
#### Wrap if long
With this option selected, lines are wrapped if they go beyond the right margin.
The right margin is defined in the Hard wrap at field on the [Settings | Editor
| Code Style | JavaScript | Wrapping and Braces](null). If the line goes beyond the specified number, then it will be wrapped.
Class decorators:
[Video](https://resources.jetbrains.com/help/img/idea/2026.2/ws_ts_reformat_code_decorators_wrap_if_long_class_decorators.mp4)
Method decorators:
[Video](https://resources.jetbrains.com/help/img/idea/2026.2/ws_ts_reformat_code_decorators_wrap_if_long_class_method_decorators.mp4)
Field decorators:
[Video](https://resources.jetbrains.com/help/img/idea/2026.2/ws_ts_reformat_code_decorators_wrap_if_long_class_field_decorators.mp4)
Function parameter decorators:
[Video](https://resources.jetbrains.com/help/img/idea/2026.2/ws_ts_reformat_code_decorators_wrap_if_long_function_parameter_decorators.mp4)
#### Chop down if long
With this option selected, decorators will be formatted as one per line if they go beyond the right margin.
#### Wrap always
With this option selected, all decorators will be formatted as one per line.
Class decorators:
[Video](https://resources.jetbrains.com/help/img/idea/2026.2/ws_ts_reformat_code_decorators_wrap_always_class_decorators.mp4)
Method decorators:
[Video](https://resources.jetbrains.com/help/img/idea/2026.2/ws_ts_reformat_code_decorators_wrap_always_class_method_decorators.mp4)
Field decorators:
[Video](https://resources.jetbrains.com/help/img/idea/2026.2/ws_ts_reformat_code_decorators_wrap_always_class_field_decorators.mp4)
Function parameter decorators:
[Video](https://resources.jetbrains.com/help/img/idea/2026.2/ws_ts_reformat_code_decorators_wrap_always_function_parameter_decorators.mp4)
## Syntax highlighting
You can configure TypeScript-aware syntax highlighting according to your preferences and habits.
Procedure:
1. In the Settings dialog (`Ctrl+Alt+S` (Windows), `⌘ Comma` (macOS), `⌘ Comma` (IntelliJ IDEA Classic (macOS)), `⌘ Comma` (macOS System Shortcuts), `Ctrl+Alt+S` (XWin), `Ctrl+Alt+S` (GNOME), `Ctrl+Alt+S` (KDE), `Ctrl+Alt+S` (Emacs), `Ctrl+Alt+S` (Sublime Text), `⌘ Comma` (Sublime Text (macOS)), `Ctrl+Alt+S` (NetBeans), `Ctrl+Alt+S` (Visual Studio), `⌘ Comma` (Visual Studio (macOS)), `Ctrl+Alt+S` (Eclipse), `⌘ Comma` (Eclipse (macOS))), go to `Editor | Color Scheme | TypeScript`.
2. Select the color scheme, accept the highlighting settings inherited from the defaults or customize them as described in [Colors and fonts](configuring-colors-and-fonts.html).
## Code navigation
You can quickly navigate through your TypeScript project in the IntelliJ IDEA editor using different actions and popups.
### Go to declaration of a symbol
You can navigate from a variable, a field, a method, or any other symbol to its declaration or [view
the symbol definition in a popup](#typescript_code_navigation_go_to_declaration_view_definition_in_popup) without jumping anywhere from the code you are editing.
Procedure:
* To jump to the declaration of a symbol, place the caret at a usage of the symbol and press `Ctrl+B` (Windows), `⌘ B` (macOS), `⌘ B` (IntelliJ IDEA Classic (macOS)), `⌘ B` (macOS System Shortcuts), `Ctrl+B` (XWin), `Ctrl+B` (GNOME), `Ctrl+B` (KDE), `Ctrl+Alt+G` (Emacs), `F12` (Sublime Text), `F12` (Sublime Text (macOS)), `Ctrl+B` (NetBeans), `F12` (Visual Studio), `F12` (Visual Studio (macOS)), `F3` (Eclipse), `F3` (Eclipse (macOS)) or select `Navigate | Declaration or Usages` from the main menu.

Alternatively, use `Ctrl+Click` (Windows), `Ctrl+Click` (macOS), `Ctrl+Click` (IntelliJ IDEA Classic (macOS)), `Ctrl+Click` (macOS System Shortcuts), `Ctrl+Click` (XWin), `Ctrl+Click` (GNOME), `Ctrl+Click` (KDE), `Ctrl+Click` (Emacs), `Ctrl+Click` (Sublime Text), `Ctrl+Click` (Sublime Text (macOS)), `Ctrl+Click` (NetBeans), `Ctrl+Click` (Visual Studio), `Ctrl+Click` (Visual Studio (macOS)), `Ctrl+Click` (Eclipse), `Ctrl+Click` (Eclipse (macOS)): keeping `Ctrl` (Windows), `Ctrl` (macOS), `Ctrl` (IntelliJ IDEA Classic (macOS)), `Ctrl` (macOS System Shortcuts), `Ctrl` (XWin), `Ctrl` (GNOME), `Ctrl` (KDE), `Ctrl` (Emacs), `Ctrl` (Sublime Text), `Ctrl` (Sublime Text (macOS)), `Ctrl` (NetBeans), `Ctrl` (Visual Studio), `Ctrl` (Visual Studio (macOS)), `Ctrl` (Eclipse), `Ctrl` (Eclipse (macOS)) pressed, hover over the symbol. When the symbol turns into a hyperlink, click the hyperlink without releasing `Ctrl` (Windows), `Ctrl` (macOS), `Ctrl` (IntelliJ IDEA Classic (macOS)), `Ctrl` (macOS System Shortcuts), `Ctrl` (XWin), `Ctrl` (GNOME), `Ctrl` (KDE), `Ctrl` (Emacs), `Ctrl` (Sublime Text), `Ctrl` (Sublime Text (macOS)), `Ctrl` (NetBeans), `Ctrl` (Visual Studio), `Ctrl` (Visual Studio (macOS)), `Ctrl` (Eclipse), `Ctrl` (Eclipse (macOS)).

*
* To view the definition of a symbol in a popup, place the caret at its usage and press `Ctrl+Shift+I` (Windows), `⌥ Space` (macOS), `⌘ ⇧ I` (IntelliJ IDEA Classic (macOS)), `⌘ Y` (macOS System Shortcuts), `Ctrl+Shift+I` (XWin), `Ctrl+Shift+I` (GNOME), `Ctrl+Shift+I` (KDE), `Ctrl+Shift+I` (Emacs), `Ctrl+Shift+I` (Sublime Text), `⌥ Space` (Sublime Text (macOS)), `Ctrl+Shift+I` (NetBeans), `Alt+F12` (Visual Studio), `⌥ Space` (Visual Studio (macOS)), `Ctrl+Shift+I` (Eclipse), `⌥ Space` (Eclipse (macOS)) or select `View | Quick Definition` from the main menu.
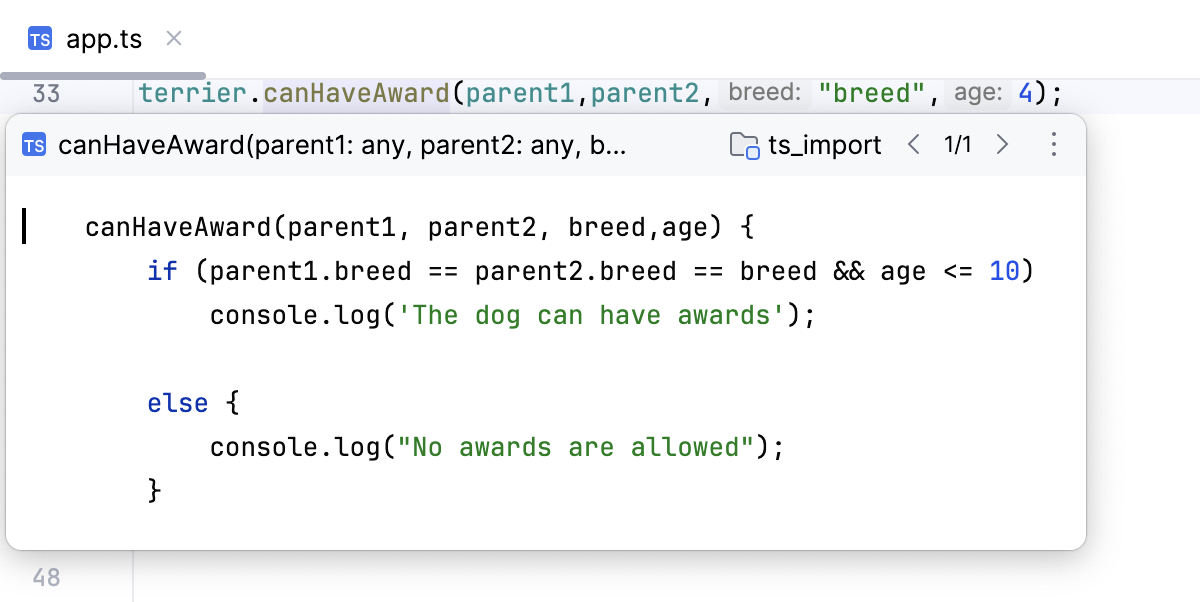
### Go to usages of a symbol
You can view a list of usages of a symbol and select the one to jump to.
Procedure:
1. To get a list of usages of a symbol, place the caret at the declaration of the symbol and do one of the following:
* Press `Ctrl+B` (Windows), `⌘ B` (macOS), `⌘ B` (IntelliJ IDEA Classic (macOS)), `⌘ B` (macOS System Shortcuts), `Ctrl+B` (XWin), `Ctrl+B` (GNOME), `Ctrl+B` (KDE), `Ctrl+Alt+G` (Emacs), `F12` (Sublime Text), `F12` (Sublime Text (macOS)), `Ctrl+B` (NetBeans), `F12` (Visual Studio), `F12` (Visual Studio (macOS)), `F3` (Eclipse), `F3` (Eclipse (macOS)) or select `Navigate | Declaration or Usages` from the main menu.
* Press `Ctrl+Alt+F7` (Windows), `⌘ ⌥ F7` (macOS), `⌘ ⌥ F7` (IntelliJ IDEA Classic (macOS)), `⌃ ⌥ U` (macOS System Shortcuts), `Ctrl+Alt+7` (XWin), `Ctrl+Alt+7` (GNOME), `Ctrl+Alt+7` (KDE), `Ctrl+Alt+F7` (Emacs), `Shift+F12` (Sublime Text), `⇧ F12` (Sublime Text (macOS)), `Ctrl+Alt+F7` (NetBeans), `Alt+Shift+F12` (Visual Studio), `⌥ ⇧ F12` (Visual Studio (macOS)), `Ctrl+Alt+F7` (Eclipse), `⌘ ⌥ F7` (Eclipse (macOS)) or select `Edit | Find Usages | Shows Usages` from the main menu.
2. In the popup, use the icons on the toolbar to configure the appearance of the list and filter out irrelevant usages, for example, in import statements.

3. From the list, select the usage of the symbol where you want to jump and press `Enter` (Windows), `⏎` (macOS), `⏎` (IntelliJ IDEA Classic (macOS)), `⏎` (macOS System Shortcuts), `Enter` (XWin), `Enter` (GNOME), `Enter` (KDE), `Enter` (Emacs), `Enter` (Sublime Text), `⏎` (Sublime Text (macOS)), `Enter` (NetBeans), `Enter` (Visual Studio), `⏎` (Visual Studio (macOS)), `Enter` (Eclipse), `⏎` (Eclipse (macOS)).

### Go to type declaration of a symbol
You can navigate from a variable, a field, a method, or any other symbol to its type declaration. Alternatively, [open the
type
definition in a popup](#ws_quick_type_definition_procedure) without jumping to the type declaration.
IntelliJ IDEA also shows the [inferred type](https://www.typescriptlang.org/docs/handbook/type-inference.html) of an object. You can view the inferred type information in a tooltip or in the documentation popup.
Procedure:
* To jump from a symbol to the declaration of its type, place the caret at a usage of the symbol and press `Ctrl+Shift+B` (Windows), `⌘ ⇧ B` (macOS), `⌃ ⇧ B` (IntelliJ IDEA Classic (macOS)), `⌘ ⇧ B` (macOS System Shortcuts), `Ctrl+Shift+B` (XWin), `Ctrl+Shift+B` (GNOME), `Ctrl+Shift+B` (KDE), `Ctrl+Shift+B` (Emacs), `Ctrl+Shift+B` (Sublime Text), `Ctrl+Shift+B` (Sublime Text (macOS)), `Ctrl+Shift+B` (NetBeans), `Ctrl+Shift+F11` (Visual Studio), `⌘ ⇧ F11` (Visual Studio (macOS)), `Ctrl+Shift+B` (Eclipse), `Ctrl+Shift+B` (Eclipse (macOS)) or select `Navigate | Type Declaration` from the main menu.

* To view the type definition of a symbol in a popup, place the caret at the symbol for which you want to view the type definition and select `View | Quick Type Definition`.
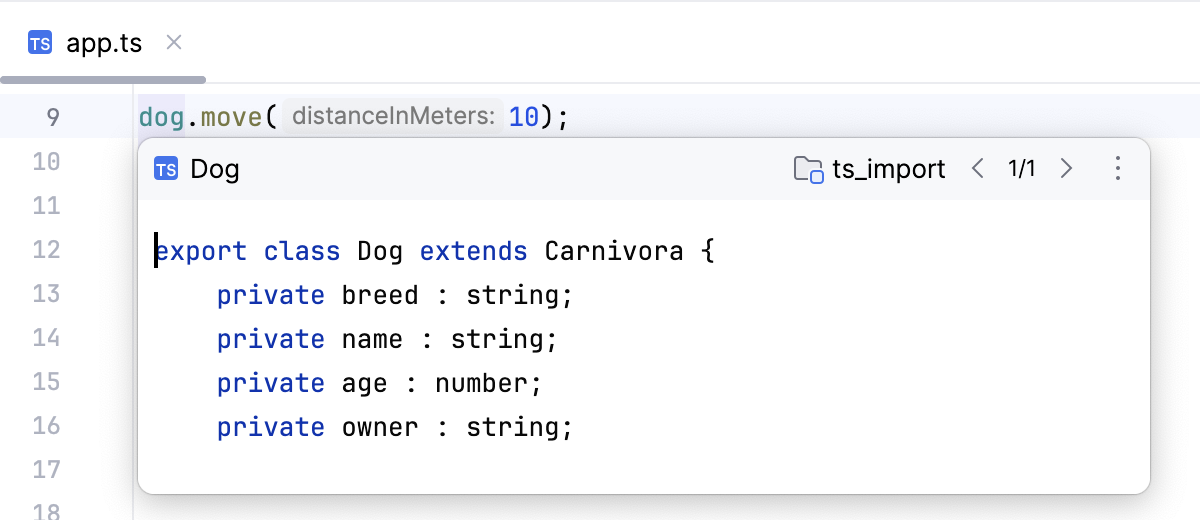
For an instance of a class, this will reveal the class itself instead of where this instance is defined.
> **Tip:**
> IntelliJ IDEA has no default keyboard shortcut for this action, but you can manually configure it as described in [Adding
> keyboard shortcuts](configuring-keyboard-and-mouse-shortcuts.html#add-keyboard-shortcut).
Note the difference between `Go To Declaration` and `Go To Type Declaration`. Suppose you have a file `app.ts` with the following code:
```TYPESCRIPT
import {Dog} from "./dog";
let dog = new Dog();
dog.bark();
```
If you place the caret at `dog` in `dog.bark()`, then `Go To Declaration` brings you to the declaration of the variable in `let dog = new Dog ()`, while `Go To Type Declaration` brings you to the declaration of the class `Dog`.
Procedure: View inferred type information of a symbol
* Hold `Ctrl` (Windows), `Ctrl` (macOS), `Ctrl` (IntelliJ IDEA Classic (macOS)), `Ctrl` (macOS System Shortcuts), `Ctrl` (XWin), `Ctrl` (GNOME), `Ctrl` (KDE), `Ctrl` (Emacs), `Ctrl` (Sublime Text), `Ctrl` (Sublime Text (macOS)), `Ctrl` (NetBeans), `Ctrl` (Visual Studio), `Ctrl` (Visual Studio (macOS)), `Ctrl` (Eclipse), `Ctrl` (Eclipse (macOS)) and hover over the symbol.

* Alternatively, hover over a symbol. IntelliJ IDEA immediately displays the reference for it in the Documentation popup.

Learn more from [Documentation look-up](#ws_ts_documentation_look_up) above.
### Navigate between subclasses, superclasses, overrides, and implementations
You can keep track of class implementations and overriding methods either using the gutter icons in the editor or pressing the appropriate shortcuts.
Procedure: Go to a subclass
* Press `Ctrl+Alt+B` (Windows), `⌘ ⌥ B` (macOS), `⌘ ⌥ B` (IntelliJ IDEA Classic (macOS)), `⌘ ⌥ B` (macOS System Shortcuts), `Ctrl+Alt+B` (XWin), `Ctrl+Alt+B` (GNOME), `Ctrl+Alt+B` (KDE), `Ctrl+Alt+B` (Emacs), `Ctrl+Alt+B` (Sublime Text), `⌘ ⌥ B` (Sublime Text (macOS)), `Ctrl+Alt+B` (NetBeans), `Alt+End` (Visual Studio), `⌘ ⌥ Click` (Visual Studio (macOS)), `Ctrl+T` (Eclipse), `Ctrl+Alt+B` (Eclipse (macOS)) or click  in the gutter and then select the relevant class from the list.
[Video](https://resources.jetbrains.com/help/img/idea/2026.2/ws_ts_go_to_implementation.mp4)
* Alternatively, select `Navigate | Implementation(s)` from the main menu or `Go To | Implementation(s)` from the context menu and then select the relevant class from the list.
Procedure: Go to a superclass or overridden method
* Place the caret at a subclass and press `Ctrl+U` (Windows), `⌘ U` (macOS), `⌘ U` (IntelliJ IDEA Classic (macOS)), `⌘ U` (macOS System Shortcuts), `Ctrl+U` (XWin), `Ctrl+U` (GNOME), `Ctrl+U` (KDE), `Ctrl+U` (Emacs), `Ctrl+U` (Sublime Text), `⌘ U` (Sublime Text (macOS)), `Ctrl+Shift+P` (NetBeans), `Alt+Home` (Visual Studio), `⌃ ⌥ ←` (Visual Studio (macOS)), `Ctrl+U` (Eclipse), `Ctrl+U` (Eclipse (macOS)). IntelliJ IDEA brings you to the declaration of the superclass and places the caret at its name.
* Click  in the gutter next to an overriding method. IntelliJ IDEA brings you to the superclass with the caret at the overridden method.
[Video](https://resources.jetbrains.com/help/img/idea/2026.2/ws_ts_go_to_overridden_method.mp4)
Alternatively, place the caret at the overriding method and press `Ctrl+U` (Windows), `⌘ U` (macOS), `⌘ U` (IntelliJ IDEA Classic (macOS)), `⌘ U` (macOS System Shortcuts), `Ctrl+U` (XWin), `Ctrl+U` (GNOME), `Ctrl+U` (KDE), `Ctrl+U` (Emacs), `Ctrl+U` (Sublime Text), `⌘ U` (Sublime Text (macOS)), `Ctrl+Shift+P` (NetBeans), `Alt+Home` (Visual Studio), `⌃ ⌥ ←` (Visual Studio (macOS)), `Ctrl+U` (Eclipse), `Ctrl+U` (Eclipse (macOS)) or select `Navigate | Super Method` from the main menu or `Go To | Super Method` from the context menu.
Procedure: Go to an interface or implemented method
* Place the caret at an implementation of an interface and press `Ctrl+U` (Windows), `⌘ U` (macOS), `⌘ U` (IntelliJ IDEA Classic (macOS)), `⌘ U` (macOS System Shortcuts), `Ctrl+U` (XWin), `Ctrl+U` (GNOME), `Ctrl+U` (KDE), `Ctrl+U` (Emacs), `Ctrl+U` (Sublime Text), `⌘ U` (Sublime Text (macOS)), `Ctrl+Shift+P` (NetBeans), `Alt+Home` (Visual Studio), `⌃ ⌥ ←` (Visual Studio (macOS)), `Ctrl+U` (Eclipse), `Ctrl+U` (Eclipse (macOS)).

IntelliJ IDEA brings you to the declaration of the interface and places the caret at its name.
* Click  in the gutter next to the implementing method. IntelliJ IDEA brings you to the corresponding interface with the caret at the implemented method.

Alternatively, place the caret at the implementing method and press `Ctrl+U` (Windows), `⌘ U` (macOS), `⌘ U` (IntelliJ IDEA Classic (macOS)), `⌘ U` (macOS System Shortcuts), `Ctrl+U` (XWin), `Ctrl+U` (GNOME), `Ctrl+U` (KDE), `Ctrl+U` (Emacs), `Ctrl+U` (Sublime Text), `⌘ U` (Sublime Text (macOS)), `Ctrl+Shift+P` (NetBeans), `Alt+Home` (Visual Studio), `⌃ ⌥ ←` (Visual Studio (macOS)), `Ctrl+U` (Eclipse), `Ctrl+U` (Eclipse (macOS)) or select `Navigate | Super Method` from the main menu or `Go To | Super Method` from the context menu.
## Refactoring in TypeScript
IntelliJ IDEA provides both common refactoring procedures, such as rename/move, and so on, and TypeScript-specific refactoring procedures, such as change signature, introduce parameter, introduce variable.
For more information, refer to [Rename refactorings](rename-refactorings.html),[Move and copy refactorings](move-refactorings.html), and [Refactoring TypeScript](specific-typescript-refactorings.html).
## Run and debug your application
With IntelliJ IDEA, you can run and debug client-side TypeScript code and TypeScript code running in Node.js. Learn more from [Running and debugging TypeScript](running-and-debugging-typescript.html).
## See also
### External Links
[TypeScript official website](https://github.com/Microsoft/TypeScript)
### Reference
[TypeScript](settings-languages-typescript.html)
### Language and Framework-Specific Guidelines
[JavaScript](javascript-specific-guidelines.html) [Node.js](developing-node-js-applications.html) [React](react.html)