# Gradle projects
IntelliJ IDEA lets you manage [Gradle](http://gradle.org) projects. You can [link](gradle.html#link_gradle_project), ignore projects, [work with profiles](work-with-maven-profiles.html), and synchronize changes in Gradle and IntelliJ IDEA projects. You can also configure a Gradle composite build, Gradle source sets, the build and run actions.
## Navigate to the build.gradle.kts file
Procedure:
1. In the Gradle tool window, right-click a linked project.
2. From the context menu, select Open Gradle config `F4` (Windows), `⌘ ↓` (macOS), `F4` (IntelliJ IDEA Classic (macOS)), `F4` (macOS System Shortcuts), `F4` (XWin), `F4` (GNOME), `F4` (KDE), `F4` (Emacs), `F4` (Sublime Text), `F4` (Sublime Text (macOS)), `F4` (NetBeans), `F4` (Visual Studio), `⌘ ↓` (Visual Studio (macOS)), `F12` (Eclipse), `F3` (Eclipse (macOS)).
IntelliJ IDEA navigates to the appropriate Gradle configuration file and the related `build.gradle.kts` file opens in the editor.
## Navigate inside a multi-module project
IntelliJ IDEA supports a navigation to subprojects inside the parent build script of a multi-module Gradle project.
Procedure: Navigate inside the build script
1. Open `build.gradle.kts` of the parent project.
2. Use the `Ctrl+Click` (Windows), `Ctrl+Click` (macOS), `Ctrl+Click` (IntelliJ IDEA Classic (macOS)), `Ctrl+Click` (macOS System Shortcuts), `Ctrl+Click` (XWin), `Ctrl+Click` (GNOME), `Ctrl+Click` (KDE), `Ctrl+Click` (Emacs), `Ctrl+Click` (Sublime Text), `Ctrl+Click` (Sublime Text (macOS)), `Ctrl+Click` (NetBeans), `Ctrl+Click` (Visual Studio), `Ctrl+Click` (Visual Studio (macOS)), `Ctrl+Click` (Eclipse), `Ctrl+Click` (Eclipse (macOS)) shortcut to navigate to a subproject.
You can also see the usages of a subprojects with `Alt+F7` (Windows), `⌥ F7` (macOS), `⌥ F7` (IntelliJ IDEA Classic (macOS)), `⌃ U` (macOS System Shortcuts), `Alt+F7` (XWin), `Alt+Shift+7` (GNOME), `Alt+Shift+7` (KDE), `Alt+F7` (Emacs), `Alt+F7` (Sublime Text), `⌥ F7` (Sublime Text (macOS)), `Alt+F7` (NetBeans), `Shift+F12` (Visual Studio), `⇧ F12` (Visual Studio (macOS)), `Ctrl+G` (Eclipse), `⌘ ⇧ G` (Eclipse (macOS)) and check the results in the Find tool window.
## Unlink a linked Gradle project
Procedure:
When you unlink a Gradle project, IntelliJ IDEA removes all relevant modules and content roots, removes the Gradle project from the Gradle tool window and stops its synchronization. It might be helpful if you need to fully remove the previously linked Gradle project from the current IntelliJ IDEA project.
1. In the Gradle tool window, right-click a linked project.
2. From the context menu, select Unlink Gradle Project (`Delete` (Windows), `⌦` (macOS), `⌦` (IntelliJ IDEA Classic (macOS)), `⌦` (macOS System Shortcuts), `Delete` (XWin), `Delete` (GNOME), `Delete` (KDE), `Delete` (Emacs), `Delete` (Sublime Text), `⌦` (Sublime Text (macOS)), `Delete` (NetBeans), `Delete` (Visual Studio), `⌦` (Visual Studio (macOS)), `Delete` (Eclipse), `⌦` (Eclipse (macOS)) ). Alternatively, you can select the linked project and click  on the tool window's toolbar.
3. In the Import Gradle Projects popup, clear the checkbox against the modules if you don't want to delete the project from the IntelliJ IDEA Project tool window.
4. Click OK.
If you need to link back the project, in the Project tool window, right-click the project's `build.gradle` file or `build.gradle.kts` if it is a Kotlin project, and select Import Gradle Project.
## Ignore a Gradle project
You can deactivate a Gradle project using the Ignore Gradle Project option. In this case, IntelliJ IDEA keeps the ignored Gradle projects and subprojects in the Gradle tool window, but stops their import (modules, content roots, tasks, and so on) to the project. However, IntelliJ IDEA synchronizes the ignored projects with the current one. It might be helpful if you need to skip an irrelevant subproject such as `buildSrc`.
Procedure:
1. In the Gradle tool window, right-click the project that you want to ignore.
2. From the context menu, select Ignore Gradle Project.
3. In the window that opens, select projects and modules that you want to deactivate and click OK.
If you want to activate your Gradle projects or modules, select Unignore Gradle Projects from the context menu.
## Orphan modules
Orphan modules are the IDE modules that were removed during the import process in the following cases:
* when you manually deleted the modules in the `build.gradle` file and then re-imported your project.
* when you used the [Ignore Project](#ignore_project) action, on a module in the Gradle tool window and then re-imported your project.
In all these cases, IntelliJ IDEA prompts you to restore removed modules.

You can select the ones you want to restore in the Orphan Modules dialog.
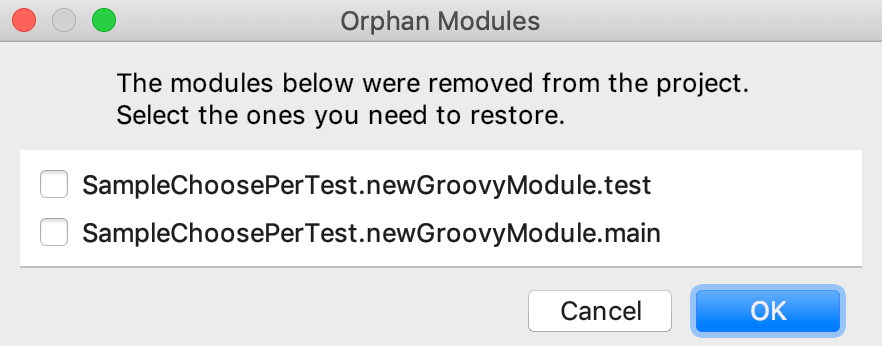
Usually you do not need to restore any modules since these are only the `.iml` files that contain the IDE modules settings. You only might want to restore them if you have some user-defined settings specified inside them.
## Sync a linked Gradle project
When you [open](gradle.html#gradle_import_project_start) a Gradle project the synchronization is done automatically. Also, when IntelliJ IDEA detects any external changes to the build scripts, such as VCS updates or some edits made outside the IDE, the related projects will be reloaded automatically.
If you need, you can manually trigger the synchronization of your project.
Procedure:
1. In the Gradle tool window, right-click a linked project.
2. From the context menu, select Sync Gradle Project .
On invoking this action, IntelliJ IDEA parses the project structure in the Gradle tool window.
IntelliJ IDEA cannot reload only a part of your project, it reloads the whole project including modules and dependencies.
If you configure a dependency through the Project Structure dialog (`Ctrl+Alt+Shift+S` (Windows), `⌘ ;` (macOS), `⌘ ;` (IntelliJ IDEA Classic (macOS)), `⌘ ⇧ Comma` (macOS System Shortcuts), `Ctrl+Alt+Shift+S` (XWin), `Ctrl+Alt+Shift+S` (GNOME), `Ctrl+Alt+Shift+S` (KDE), `Ctrl+Alt+Shift+S` (Emacs), `Ctrl+Alt+Shift+S` (Sublime Text), `⌘ ;` (Sublime Text (macOS)), `Ctrl+Alt+Shift+S` (NetBeans), `Ctrl+Alt+Shift+S` (Visual Studio), `⌘ ;` (Visual Studio (macOS)), `Ctrl+Alt+Shift+S` (Eclipse), `⌘ ;` (Eclipse (macOS))), the dependency will only appear in the IntelliJ IDEA Project tool window, not in the Gradle tool window. Note that the next time you re-import your project, IntelliJ IDEA will remove the added dependency since IntelliJ IDEA considers the Gradle configuration as a single source of truth.
3. Click  on the status bar to view the results of the sync in the [Build](build-sync-tool-window.html) tool window.
If the synchronization of a project is unsuccessful, IntelliJ IDEA will display the detailed list of the occurred problems.
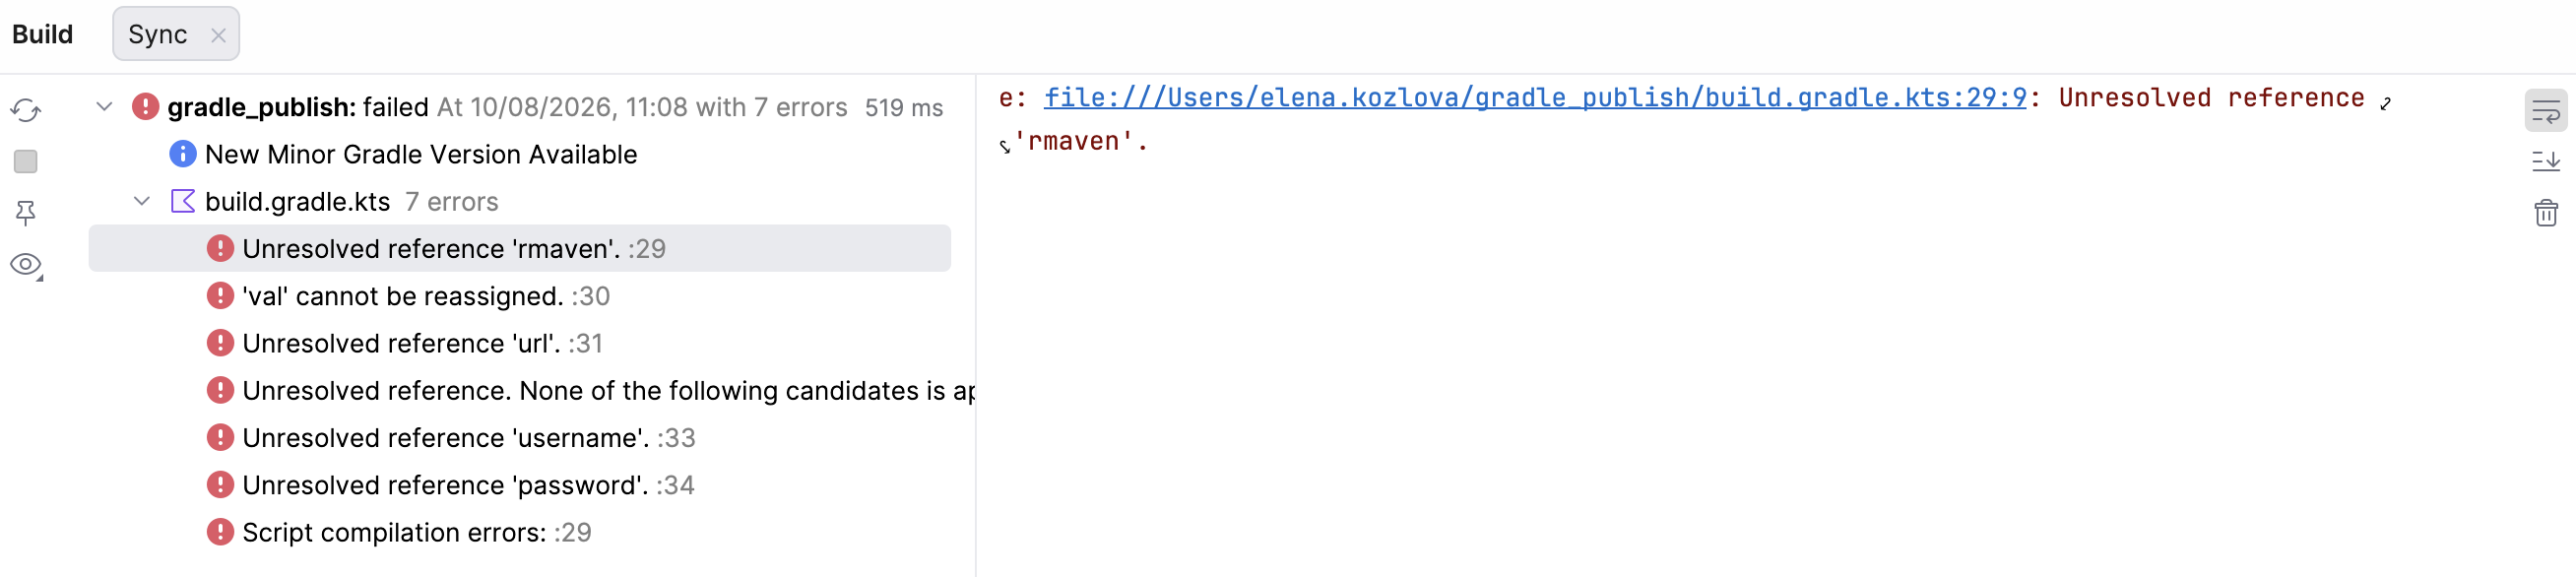
> **Tip:**
> To reload all Gradle projects, click  on the toolbar, in the Gradle tool window.
Procedure: Configure the auto-reload
1. In the Settings dialog (`Ctrl+Alt+S` (Windows), `⌘ Comma` (macOS), `⌘ Comma` (IntelliJ IDEA Classic (macOS)), `⌘ Comma` (macOS System Shortcuts), `Ctrl+Alt+S` (XWin), `Ctrl+Alt+S` (GNOME), `Ctrl+Alt+S` (KDE), `Ctrl+Alt+S` (Emacs), `Ctrl+Alt+S` (Sublime Text), `⌘ Comma` (Sublime Text (macOS)), `Ctrl+Alt+S` (NetBeans), `Ctrl+Alt+S` (Visual Studio), `⌘ Comma` (Visual Studio (macOS)), `Ctrl+Alt+S` (Eclipse), `⌘ Comma` (Eclipse (macOS))) , go to `Build, Execution, Deployment | Build Tools`.
Alternatively, In the Gradle tool window, click  and select the Auto-Sync Settings option.
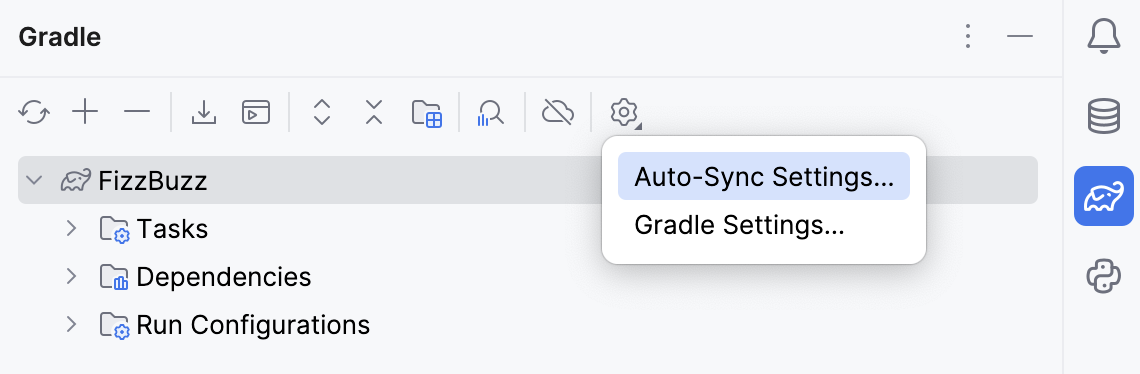
2. In the Build tools settings, specify the following options:
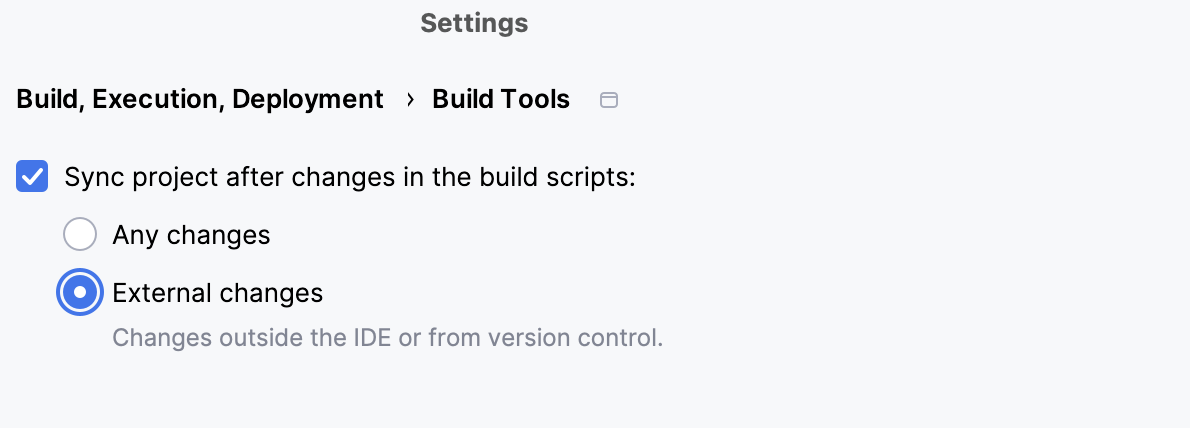
* Sync project after changes in the build scripts: this option is selected by default. If you want to disable the auto-sync and manually control the synchronization process, unselect this checkbox.
* Any changes: select this option if you want to automatically synchronize the project after any changes you make to `build.gradle.kts` or external changes. Every time you manually change the Gradle build script in the editor, you need to sync the changes. IntelliJ IDEA displays a notification icon in the right part of the editor suggesting to Sync Gradle Changes made to the project (`Ctrl+Shift+O` (Windows), `Ctrl+Shift+O` (macOS), `Ctrl+Shift+O` (IntelliJ IDEA Classic (macOS)), `Ctrl+Shift+O` (macOS System Shortcuts), `Ctrl+Shift+O` (XWin), `Ctrl+Shift+O` (GNOME), `Ctrl+Shift+O` (KDE), `Ctrl+Shift+O` (Emacs), `Ctrl+Shift+O` (Sublime Text), `Ctrl+Shift+O` (Sublime Text (macOS)), `Ctrl+Shift+O` (NetBeans), `Ctrl+Shift+O` (Visual Studio), `Ctrl+Shift+O` (Visual Studio (macOS)), `Ctrl+Shift+O` (Eclipse), `Ctrl+Shift+O` (Eclipse (macOS))). With the Any changes option, IntelliJ IDEA synchronizes all the changes automatically.
* External changes: when you select this option, IntelliJ IDEA automatically synchronizes the project only after the VCS changes and changes made to the build files outside the IDE.
## Configure Gradle Composite Build
Before you start configuring your composite build, make sure you have the Gradle version 4.5.1 or later configured for your project.
> **Note:**
> Check the [restrictions on using a Gradle composite build](https://docs.gradle.org/current/userguide/composite_builds.html#current_limitations_and_future_work).
You can use the `settings.gradle` file to include Gradle builds for your [Gradle composite build](https://blog.gradle.org/introducing-composite-builds).
Procedure:
1. Open the `settings.gradle` file in the editor.
2. Using the `includeBuild` command, specify the location of the builds you want to add as dependencies to your project.
You can also use the Gradle tool window to configure the composite build.
Procedure:
1. Open a Gradle project.
2. [Link](gradle.html#link_gradle_project) other Gradle projects that you want to use for the composite build.
3. In the Gradle tool window, right-click your main project and from the context menu select Composite Build Configuration.
4. In the Gradle Project Build Composite dialog, select projects that you want to include in your Gradle composite build.
5. [Re-import](#gradle_refresh_project) your main Gradle project.
IntelliJ IDEA finds the included Gradle projects and treats them as IntelliJ IDEA modules.
## Use Gradle source sets
IntelliJ IDEA lets you use [Gradle source sets](https://docs.gradle.org/current/userguide/java_plugin.html#sec:java_source_sets) in resolving Gradle projects. The source set is treated as a module in an IntelliJ IDEA project. You can declare a custom source set, and IntelliJ IDEA adds it as a module to the project.
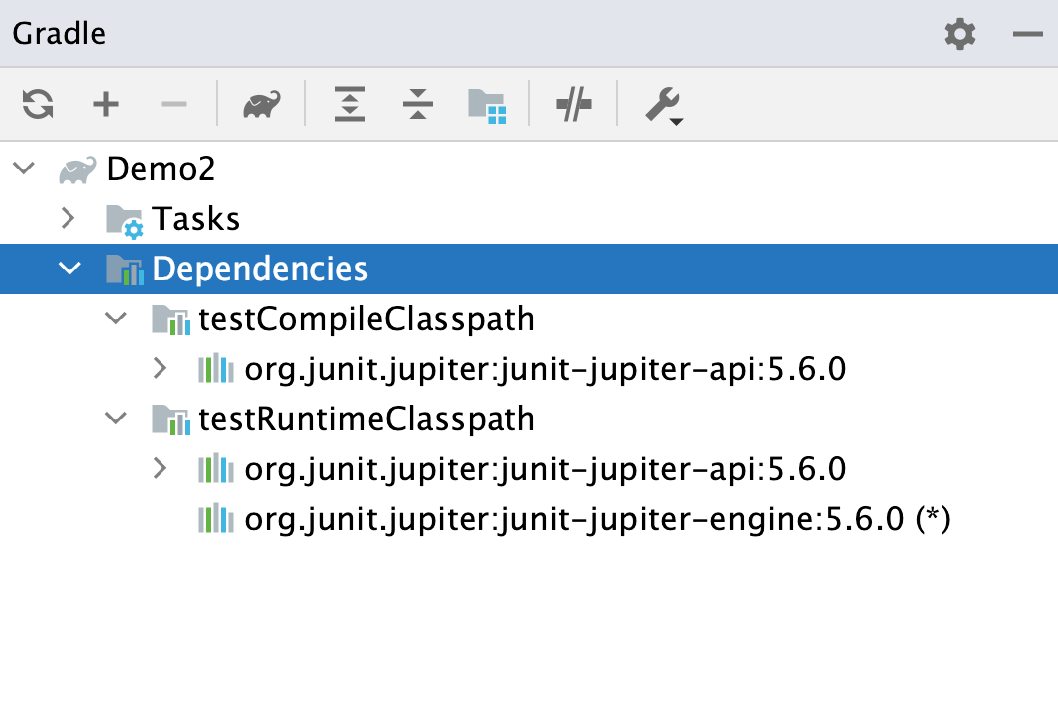
When you create a Gradle project, IntelliJ IDEA automatically creates a main Source Sets directory that contains two source sets - `main` and `test`. IntelliJ IDEA also displays compile and runtime configurations in the Dependencies node in the Gradle tool window.
Procedure: Add a custom source set
1. Open the gradle.build.kts file in the editor.
2. Declare a custom source set (In our example, it's api).
```KOTLIN
sourceSets {
create("api")
}
dependencies {
implementation(sourceSets["api"].output)
}
```
(This source set contains interfaces without implementations. The implementations for the interfaces are in the default `main` source set.)
3. Open the Gradle tool window to see that IntelliJ IDEA added the `api` compile and runtime configurations.
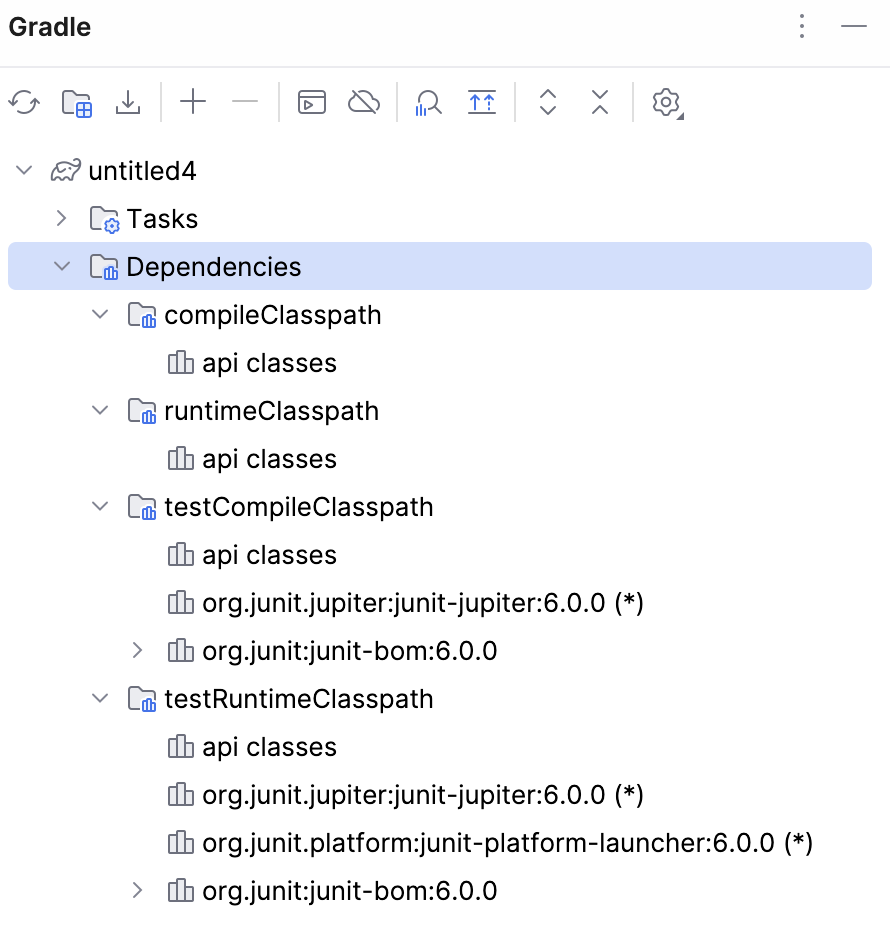 The test source set contains the appropriate dependencies. Note that the default `main` source set has the compile dependency on the output of the `api` source set.
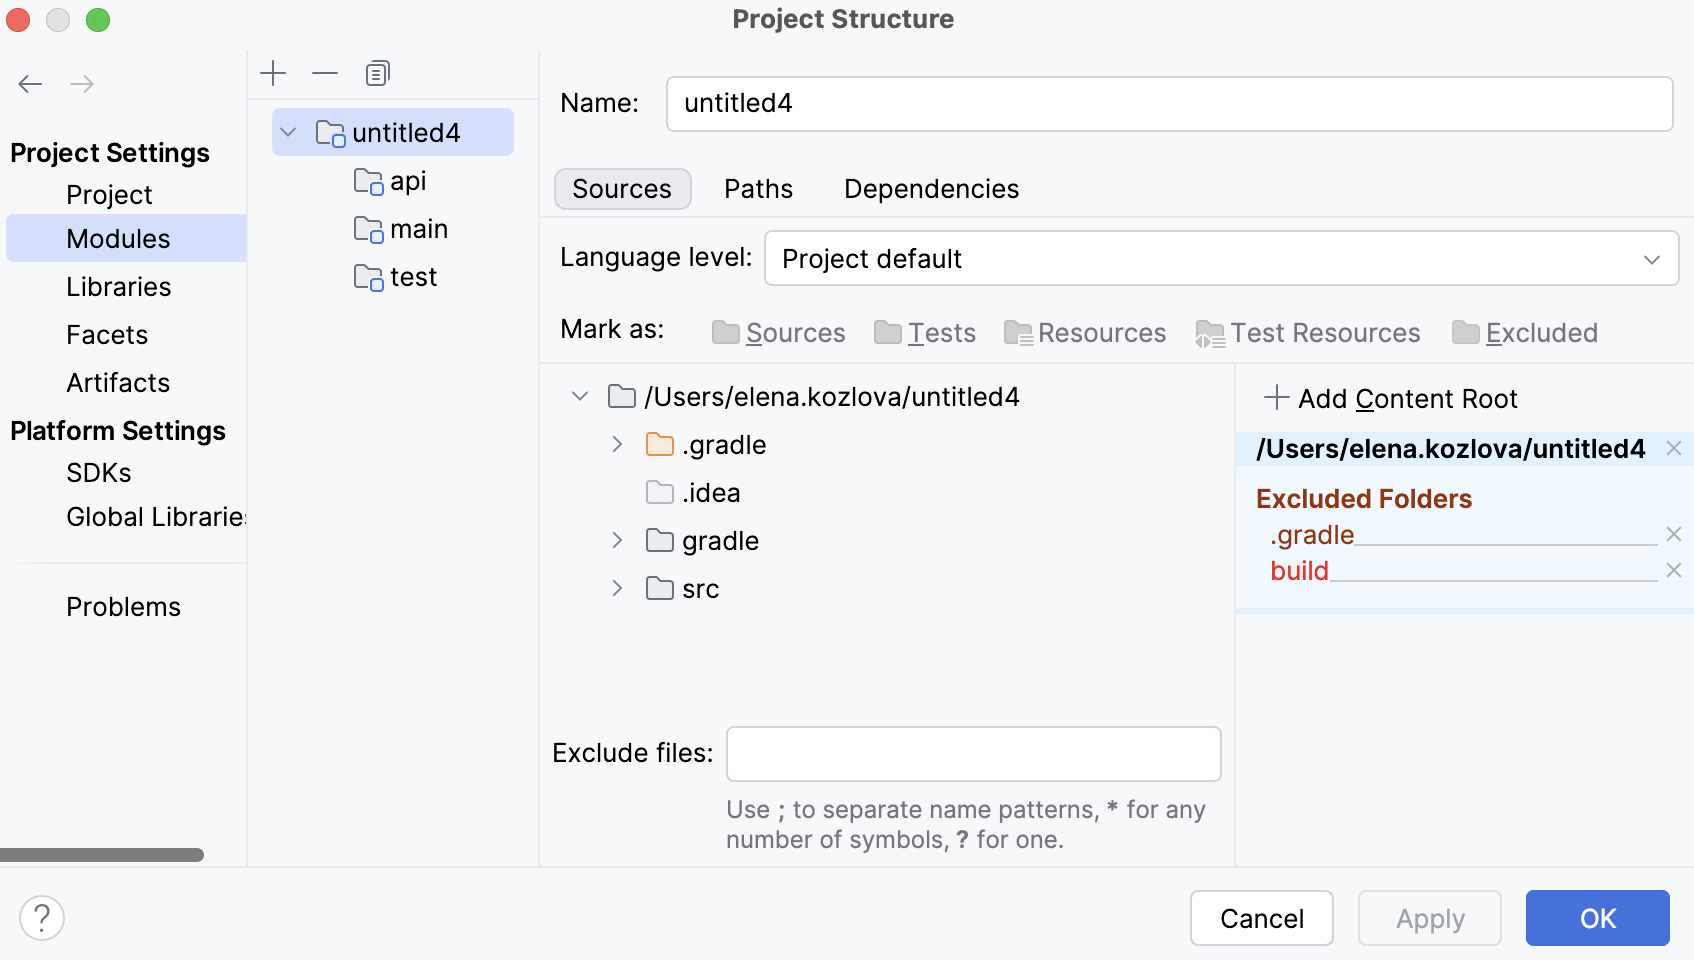
4. In the main menu, go to File | Project Structure `Ctrl+Alt+Shift+S` (Windows), `⌘ ;` (macOS), `⌘ ;` (IntelliJ IDEA Classic (macOS)), `⌘ ⇧ Comma` (macOS System Shortcuts), `Ctrl+Alt+Shift+S` (XWin), `Ctrl+Alt+Shift+S` (GNOME), `Ctrl+Alt+Shift+S` (KDE), `Ctrl+Alt+Shift+S` (Emacs), `Ctrl+Alt+Shift+S` (Sublime Text), `⌘ ;` (Sublime Text (macOS)), `Ctrl+Alt+Shift+S` (NetBeans), `Ctrl+Alt+Shift+S` (Visual Studio), `⌘ ;` (Visual Studio (macOS)), `Ctrl+Alt+Shift+S` (Eclipse), `⌘ ;` (Eclipse (macOS)) to open the project structure. Notice that all source sets are represented as separate modules that are grouped into a single module. If you click the test module and select the Dependencies tab, you will see a list of dependencies for the source set.
Procedure: Use source sets for custom tests
You can add custom tests and run them separately from the main ones using a source set feature.
1. Declare a source set the same way as you would declare the [custom source set](#custom_source_set). Besides the name of your source set, specify an output directory and a task that will run the declared test. For example, declare an integration test `integrationTest`.
```KOTLIN
sourceSets {
create("integrationTest") {
java {
srcDir("src/integrationtest/java")
}
resources {
srcDir("src/integrationtest/resources")
}
compileClasspath += sourceSets["main"].runtimeClasspath
}
}
tasks.register("integrationTest") {
description = "Runs Integration Tests"
testClassesDirs = sourceSets["integrationTest"].output.classesDirs
classpath += sourceSets["integrationTest"].runtimeClasspath
}
```
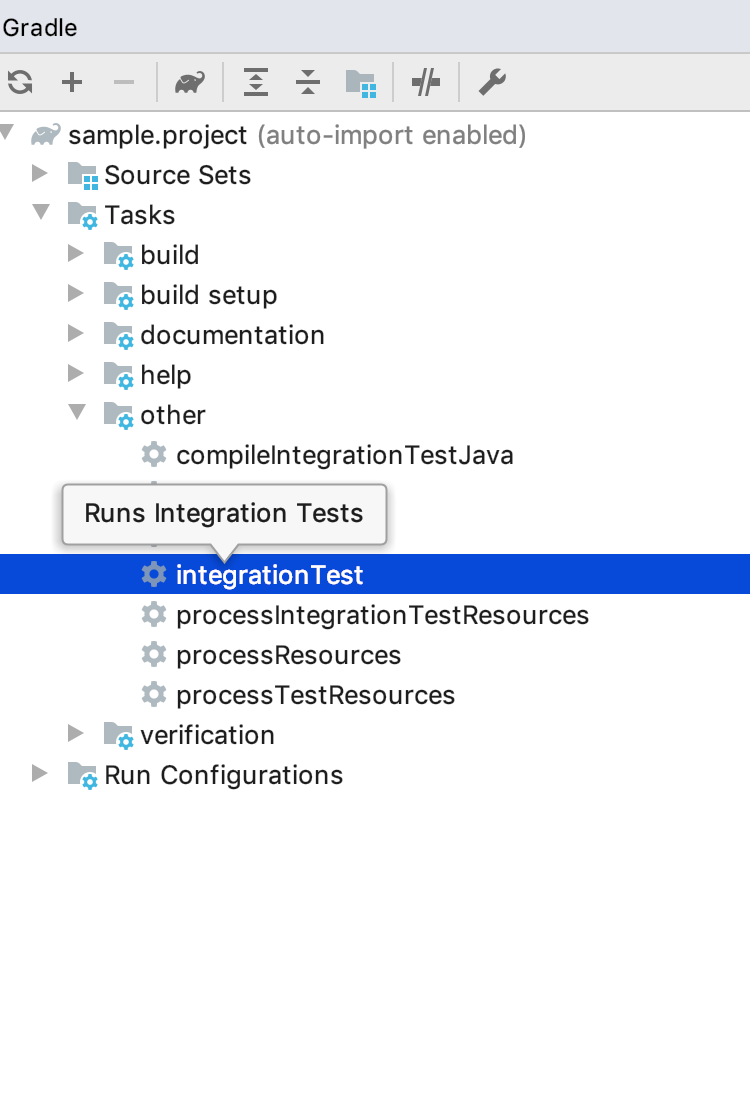
2. In the Gradle tool window, click `Tasks | other`.
3. In the list that opens, double-click the `integrationTest` to run it.
## Add package prefixes in the Gradle project
If you use package prefixes in your Gradle project, specify them in the `build.gradle` file. That way, everything is saved when you reimport your project.
For more information, refer to [https://github.com/JetBrains/gradle-idea-ext-plugin](https://github.com/JetBrains/gradle-idea-ext-plugin).
Procedure:
1. Open the `build.gradle.kts` file.
2. Add the following plugin to support package prefixes:
```KOTLIN
plugins {
id("org.jetbrains.gradle.plugin.idea-ext") version "0.5"
}
```
3. Add the package prefixes. For example, you have the following set of source sets:
```KOTLIN
sourceSets {
main {
java {
setSrcDirs(emptyList())
srcDir("src")
srcDir("src/main/java")
srcDir("../other-root/src/main/java")
}
}
}
```
Add the package prefixes (in our case it is "org.example") to them with the following code:
```KOTLIN
import org.jetbrains.gradle.ext.settings
import org.jetbrains.gradle.ext.packagePrefix
idea {
module {
settings {
packagePrefix["src"] = "org.example"
packagePrefix["src/main/java"] = "org.example"
packagePrefix["../other-root/src/main/java"] = "org.example"
}
}
}
```
4. Reimport your changes or use the [auto-import](#auto-import).
## Specify IDE-specific settings in the build.gradle.kts file
Using the [gradle-idea-ext](https://github.com/JetBrains/gradle-idea-ext-plugin) plugin, you can describe project settings such as project encodings, and the encoding for properties files inside the `build.gradle` file.
Procedure:
1. Open the `build.gradle.kts` file.
2. Add the following plugin to support the encodings configuration:
```KOTLIN
plugins {
id ("org.jetbrains.gradle.plugin.idea-ext") version "0.5"
}
```
3. Describe the project encodings with the following code:
```KOTLIN
import org.jetbrains.gradle.ext.EncodingConfiguration.BomPolicy
import org.jetbrains.gradle.ext.*
idea {
project {
settings {
encodings {
encoding = "windows-1251"
bomPolicy = BomPolicy.WITH_NO_BOM
properties {
encoding = ""
isTransparentNativeToAsciiConversion = false
}
mapping["../sample-gradle-free/module"] = "windows-1251"
mapping["module"] = "windows-1251"
mapping["module2/src/main/java"] = "windows-1251"
}
}
}
}
```
> **Note:**
> is a string constant indicating that system default encoding settings will be used.
4. Reimport your changes or use the [auto-import](#auto-import).
## Use buildSrc
If you have a large Gradle script that includes several Java, Groovy, or Kotlin classes, you can move such classes to the [buildSrc](https://docs.gradle.org/current/userguide/organizing_build_logic.html#sec:build_sources) directory and refer to them from your main Gradle script. In this case you ensure the readability of the `build.gradle` file.
Procedure:
1. If you don't have and existing `buildSrc`, add it as a Gradle [module](gradle.html#gradle_add_module) to your main project.
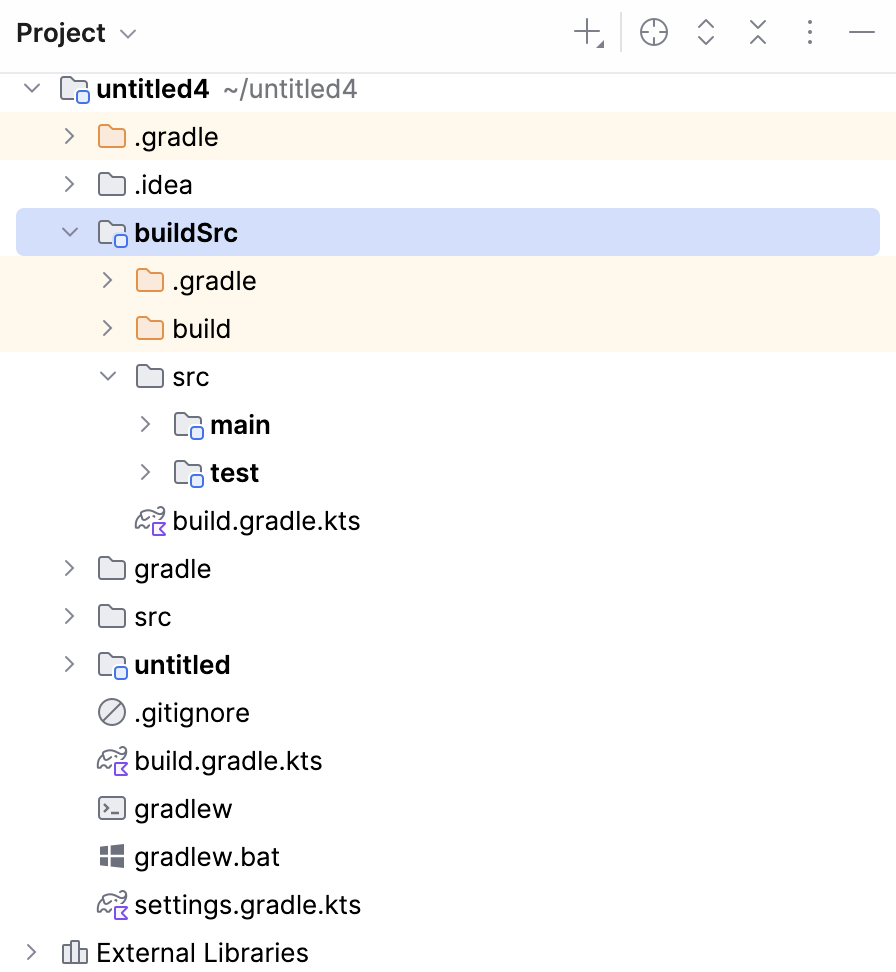
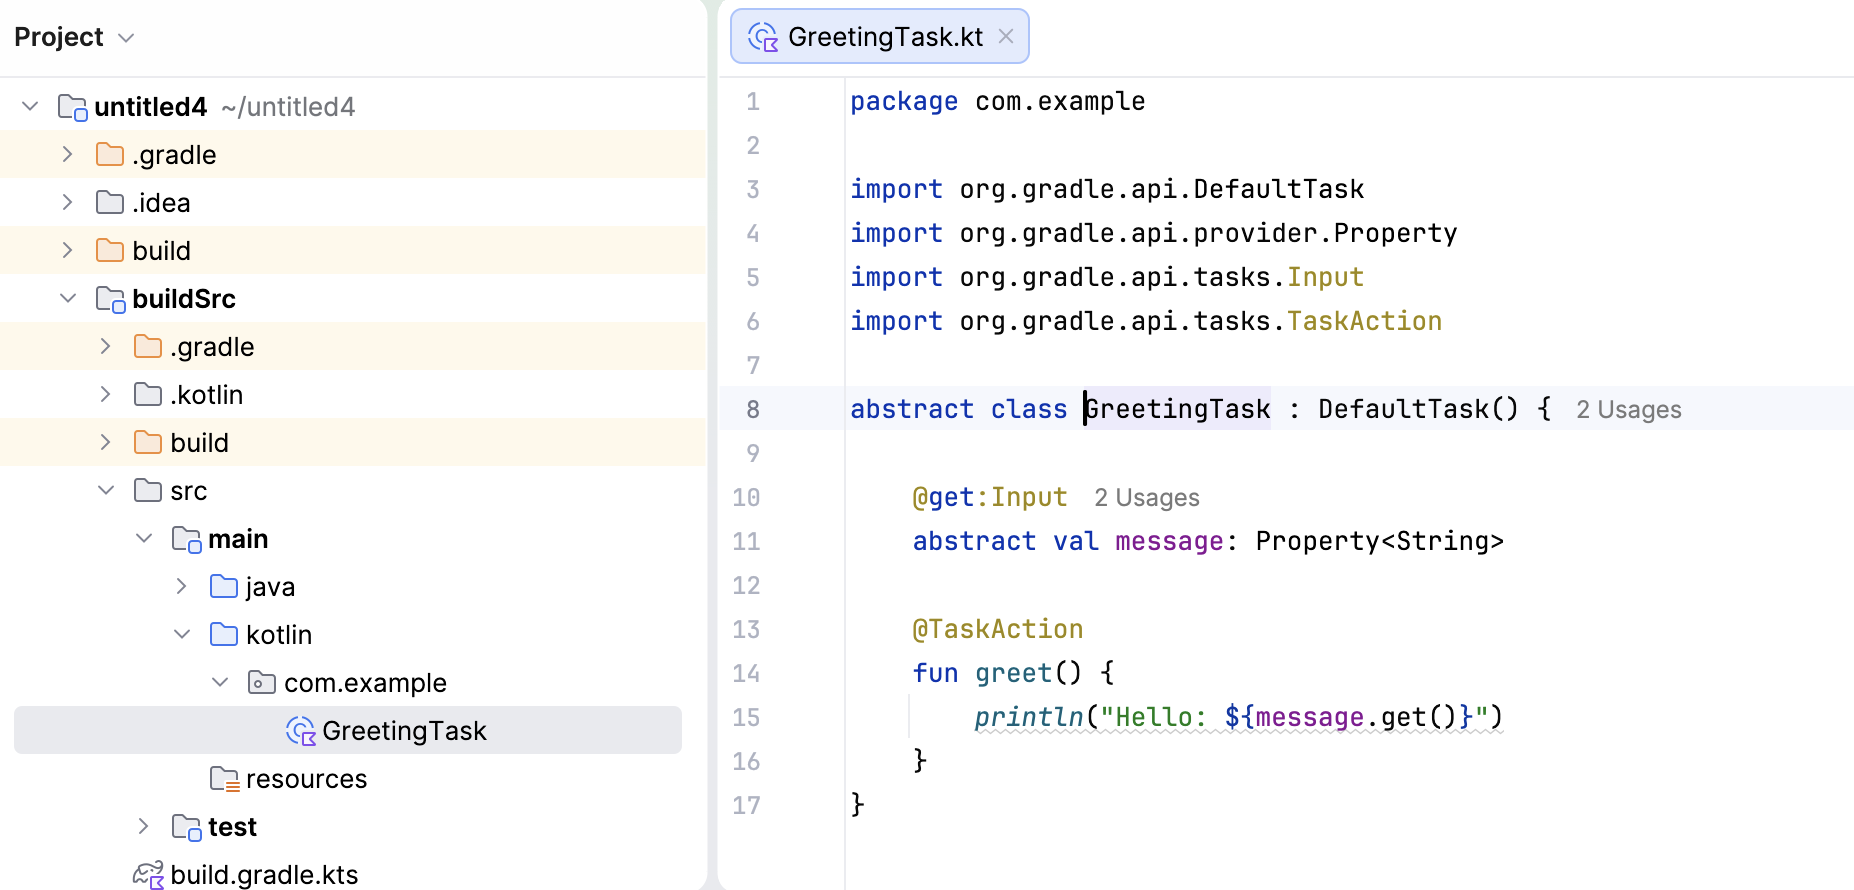
2. Open your main `build.gradle.kts` file in the editor and move the classes you need to the main subdirectory of the buildSrc directory.
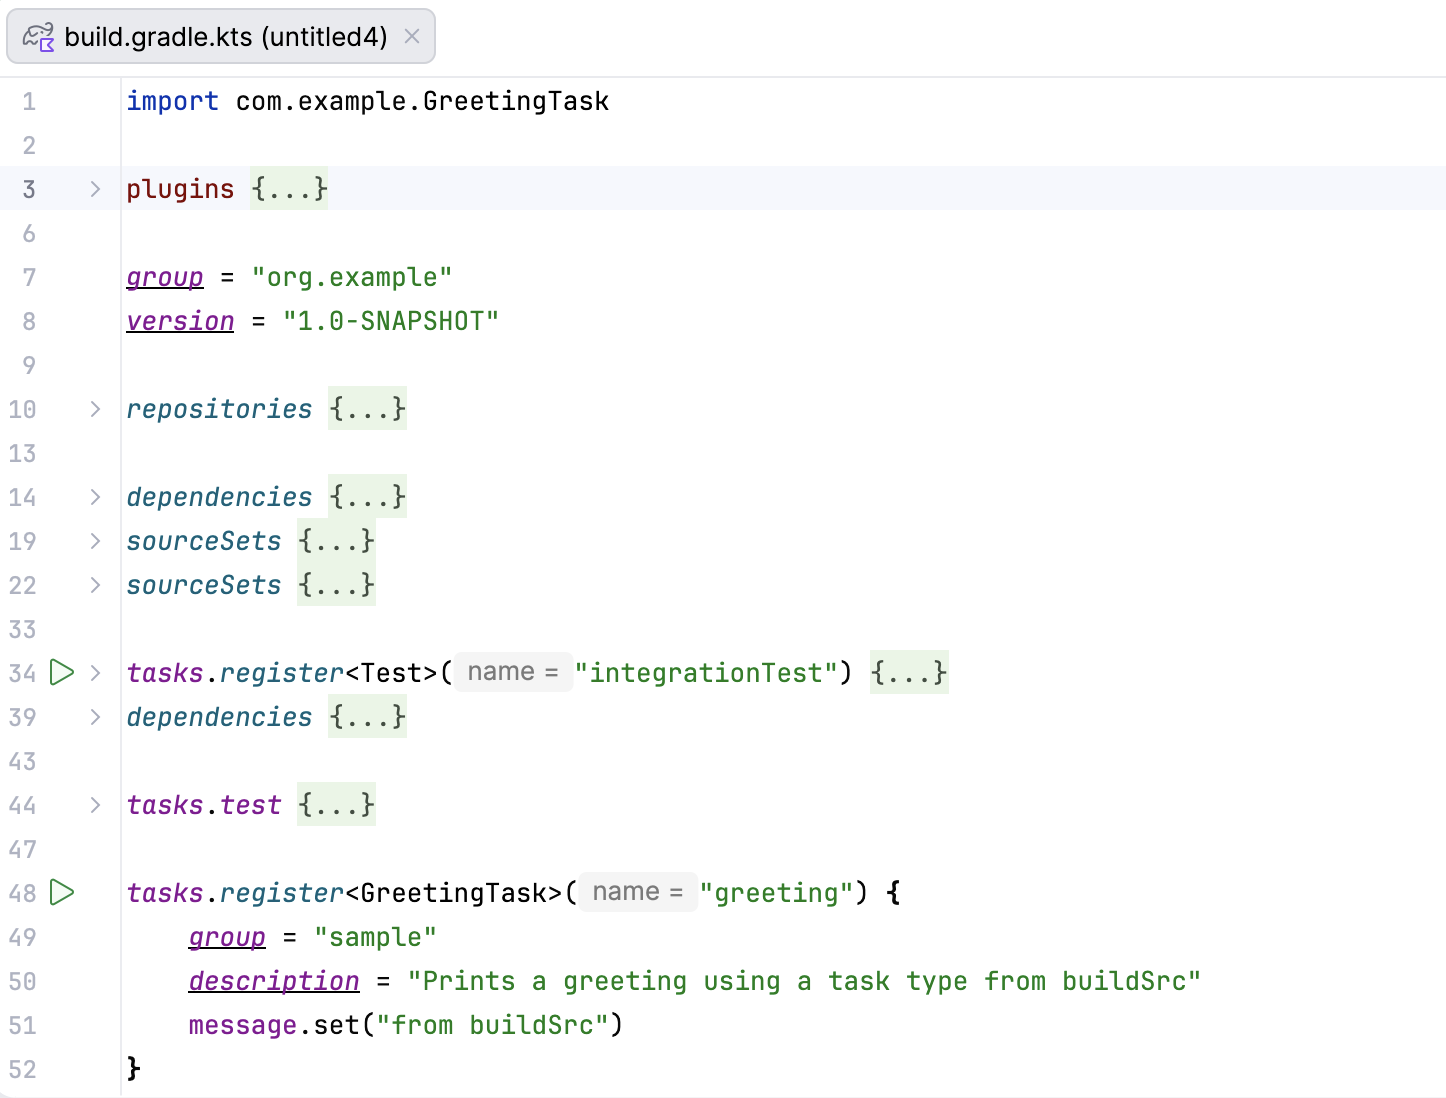
3. Run your task from your project's `build.gradle.kts` file.
> **Tip:**
> You can use the Rename `Shift+F6` (Windows), `⇧ F6` (macOS), `⇧ F6` (IntelliJ IDEA Classic (macOS)), `⌘ ⌥ R` (macOS System Shortcuts), `Shift+F6` (XWin), `Shift+F6` (GNOME), `Shift+F6` (KDE), `Shift+F6` (Emacs), `Shift+F6` (Sublime Text), `⇧ F6` (Sublime Text (macOS)), `Ctrl+R` (NetBeans), `Ctrl+R, R` (Visual Studio), `⌘ R, R` (Visual Studio (macOS)), `Alt+Shift+R` (Eclipse), `⇧ F6` (Eclipse (macOS)) refactoring if you need to change the name of a class to which you refer in the Gradle script. IntelliJ IDEA applies changes to all the references.
## Configure the build and run actions
By default, IntelliJ IDEA uses Gradle for building and running projects.
When you build a project (`Build | Build Project`), IntelliJ IDEA invokes the corresponding tasks using Gradle. Gradle also executes the Run and Debug actions from the `Run` menu. [HotSwap](altering-the-program-s-execution-flow.html) is also gets triggered and the classes are reloaded during a debugging process.
If you have linked projects, you can configure how to build each linked project.
Procedure:
> **Note:**
> If you use the [annotationProcessors](https://github.com/tbroyer/gradle-apt-plugin/blob/v0.21/README.md#do-without-netltgtapt-idea) in your project, we recommend that you delegate run and build actions to Gradle, so the [annotation processor](annotation-processors-support.html#gradle_annotations) will be correctly enabled in your project.
1. In the Settings dialog (`Ctrl+Alt+S` (Windows), `⌘ Comma` (macOS), `⌘ Comma` (IntelliJ IDEA Classic (macOS)), `⌘ Comma` (macOS System Shortcuts), `Ctrl+Alt+S` (XWin), `Ctrl+Alt+S` (GNOME), `Ctrl+Alt+S` (KDE), `Ctrl+Alt+S` (Emacs), `Ctrl+Alt+S` (Sublime Text), `⌘ Comma` (Sublime Text (macOS)), `Ctrl+Alt+S` (NetBeans), `Ctrl+Alt+S` (Visual Studio), `⌘ Comma` (Visual Studio (macOS)), `Ctrl+Alt+S` (Eclipse), `⌘ Comma` (Eclipse (macOS))), go to `Build, Execution, Deployment | Gradle`.
2. On the Gradle settings page, in the Gradle Projects section, select a Gradle project you need.
3. In the [Build and run using](gradle-settings.html#build_run_options) list, select the appropriate option and click OK to save the changes.
If you want to use IntelliJ IDEA for building a Gradle project, you need to explicitly specify so.
Procedure: Delegate a build to IntelliJ IDEA
It might be helpful to use IntelliJ IDEA for building a pure Java or Kotlin project. It could speed up the building process since IntelliJ IDEA supports the incremental build. Yet, keep in mind that the IntelliJ IDEA compiler does not support some parts of the Gradle project build processing and might cause problems in building your project correctly.
1. Click  in the Gradle tool window.
Alternatively, in the Settings dialog (`Ctrl+Alt+S` (Windows), `⌘ Comma` (macOS), `⌘ Comma` (IntelliJ IDEA Classic (macOS)), `⌘ Comma` (macOS System Shortcuts), `Ctrl+Alt+S` (XWin), `Ctrl+Alt+S` (GNOME), `Ctrl+Alt+S` (KDE), `Ctrl+Alt+S` (Emacs), `Ctrl+Alt+S` (Sublime Text), `⌘ Comma` (Sublime Text (macOS)), `Ctrl+Alt+S` (NetBeans), `Ctrl+Alt+S` (Visual Studio), `⌘ Comma` (Visual Studio (macOS)), `Ctrl+Alt+S` (Eclipse), `⌘ Comma` (Eclipse (macOS))) , go to `Build, Execution, Deployment |Build Tools |Gradle`.
2. On the Gradle page, from the Build and run using list, select Intellij IDEA.
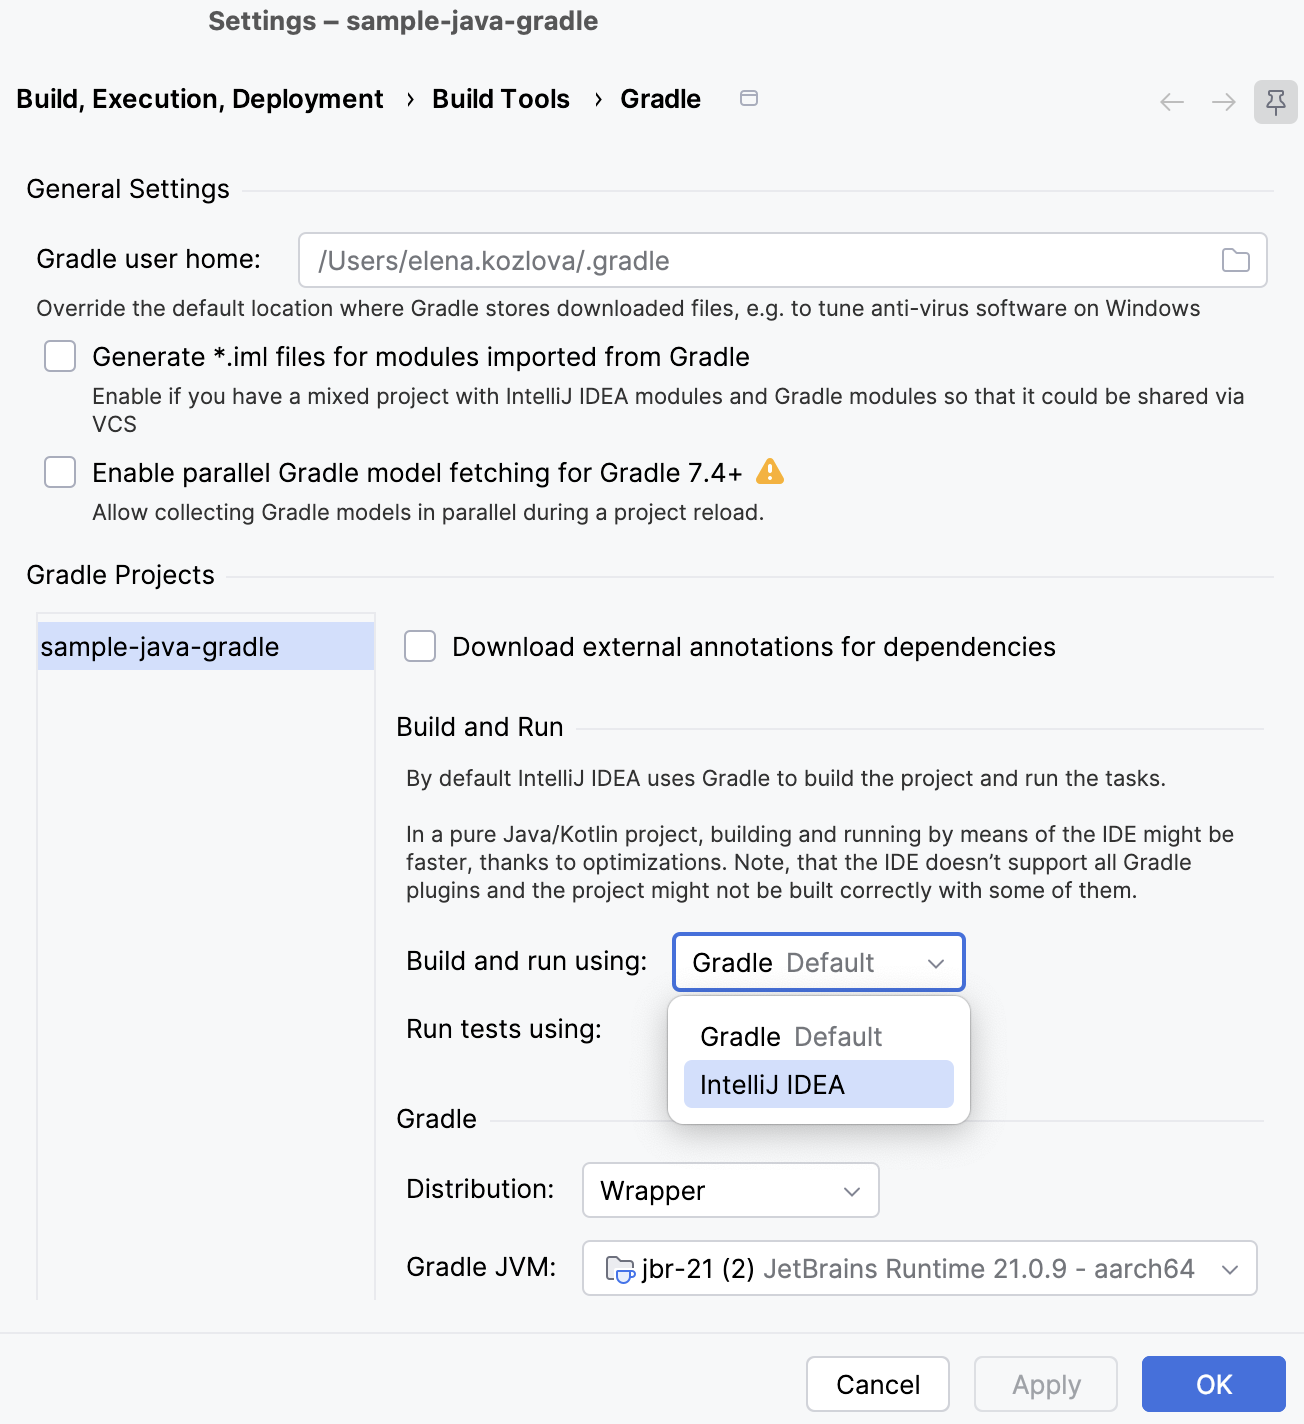 Note that the Run test using option stays active, and you can select how you want to run your tests even if you delegated all build and run actions to IntelliJ IDEA.
3. Click OK.
Now if you build your Gradle project, it will be built with IntelliJ IDEA.