# Maven dependencies
> **TL;DR**
> Required plugins: Maven and Diagrams to work with diagrams in Maven.
>
>
>
> All the required plugins are [bundled](managing-plugins.html) by default.
IntelliJ IDEA lets you manage [Maven](maven-support.html) dependencies in your project. You can add, import Maven dependencies, view them in the diagram, and also analyze them.
## Add a Maven dependency
IntelliJ IDEA lets you add a Maven dependency to your project. We recommend that you specify the dependency inside your POM. Dependencies that you set up manually inside IntelliJ IDEA [module settings](creating-and-managing-modules.html) will be discarded on the next Maven project reload.
Procedure: Generate dependency
1. Open your POM in the editor.
2. Press `Alt+Insert` (Windows), `⌘ N` (macOS), `⌃ N` (IntelliJ IDEA Classic (macOS)), `⌘ N` (macOS System Shortcuts), `Alt+Insert` (XWin), `Alt+Insert` (GNOME), `Alt+Insert` (KDE), `Alt+Insert` (Emacs), `Alt+Insert` (Sublime Text), `⌘ N` (Sublime Text (macOS)), `Alt+Insert` (NetBeans), `Alt+Insert` (Visual Studio), `⌘ ⌃ N` (Visual Studio (macOS)), `Alt+Insert` (Eclipse), `⌘ N` (Eclipse (macOS)) to open the Generate context menu.
3. From the context menu, select Dependency.
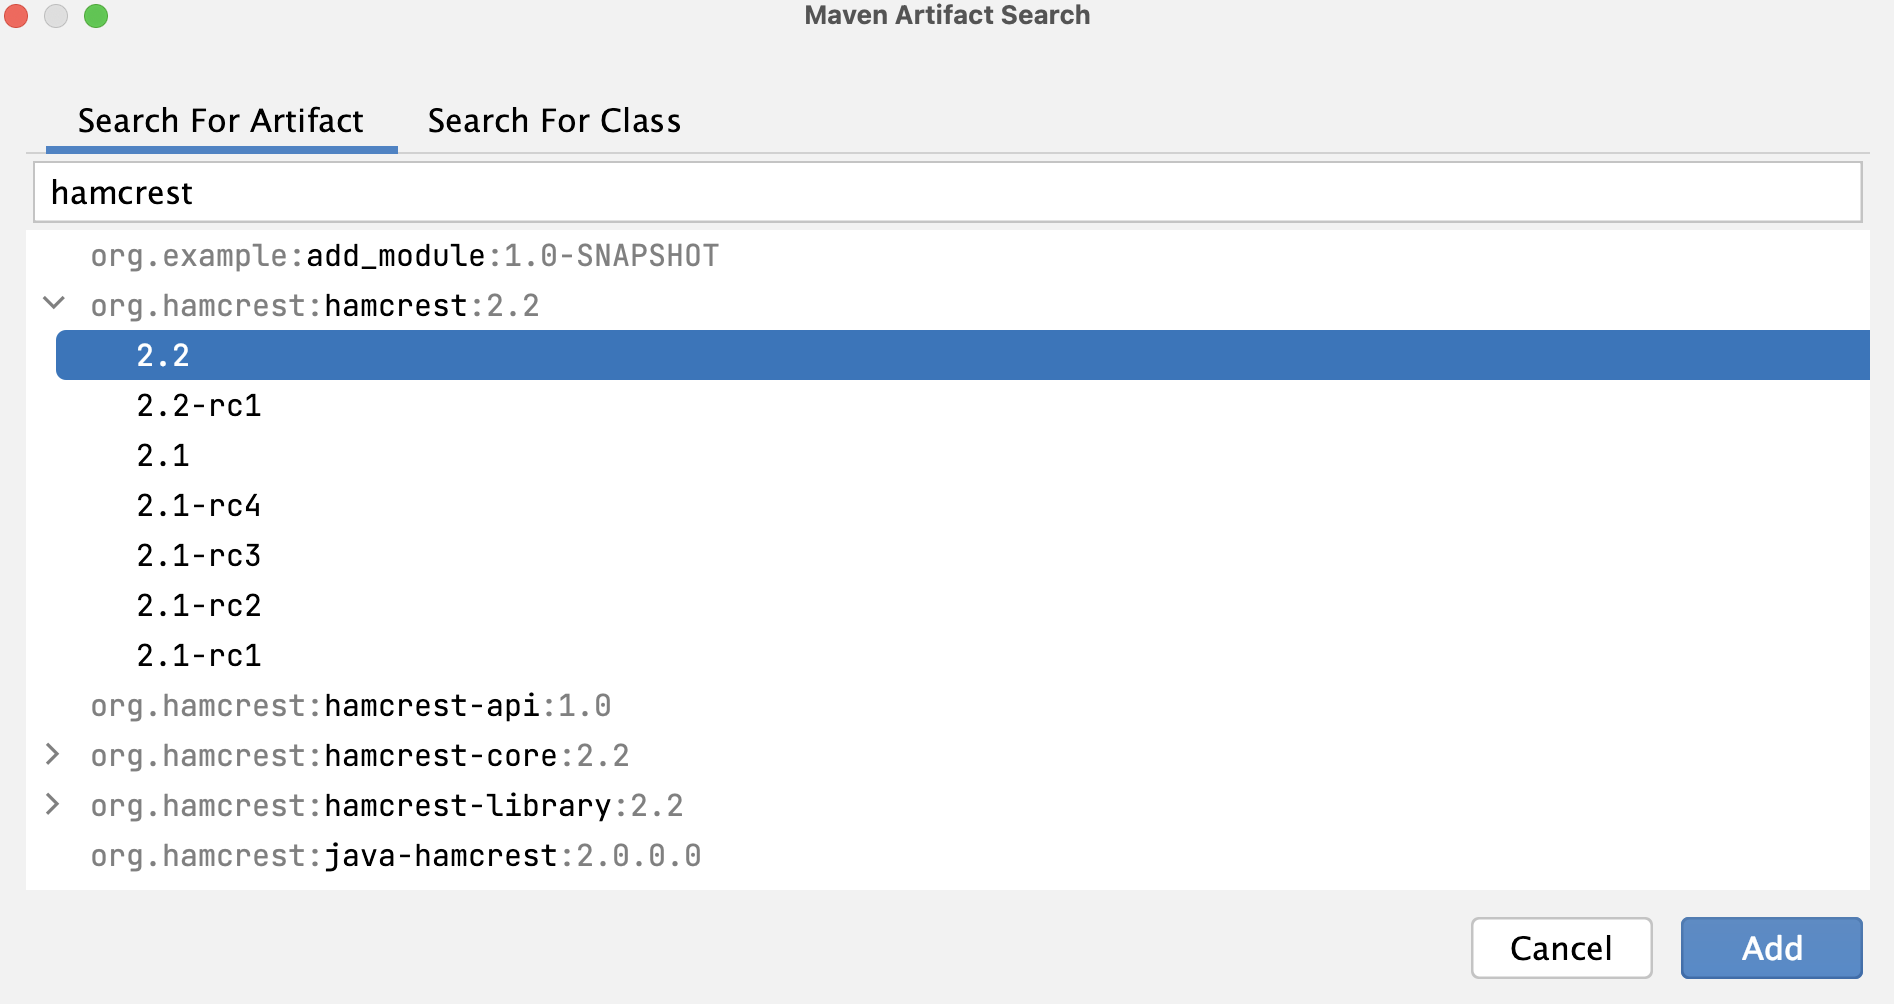
The Maven Artifact Search dialog appears.
4. In the Maven Artifact Search dialog, in the search field, start typing the name of your dependency. In the list of results select the one you need and click Add.
IntelliJ IDEA adds the dependency to your `pom.xml`.
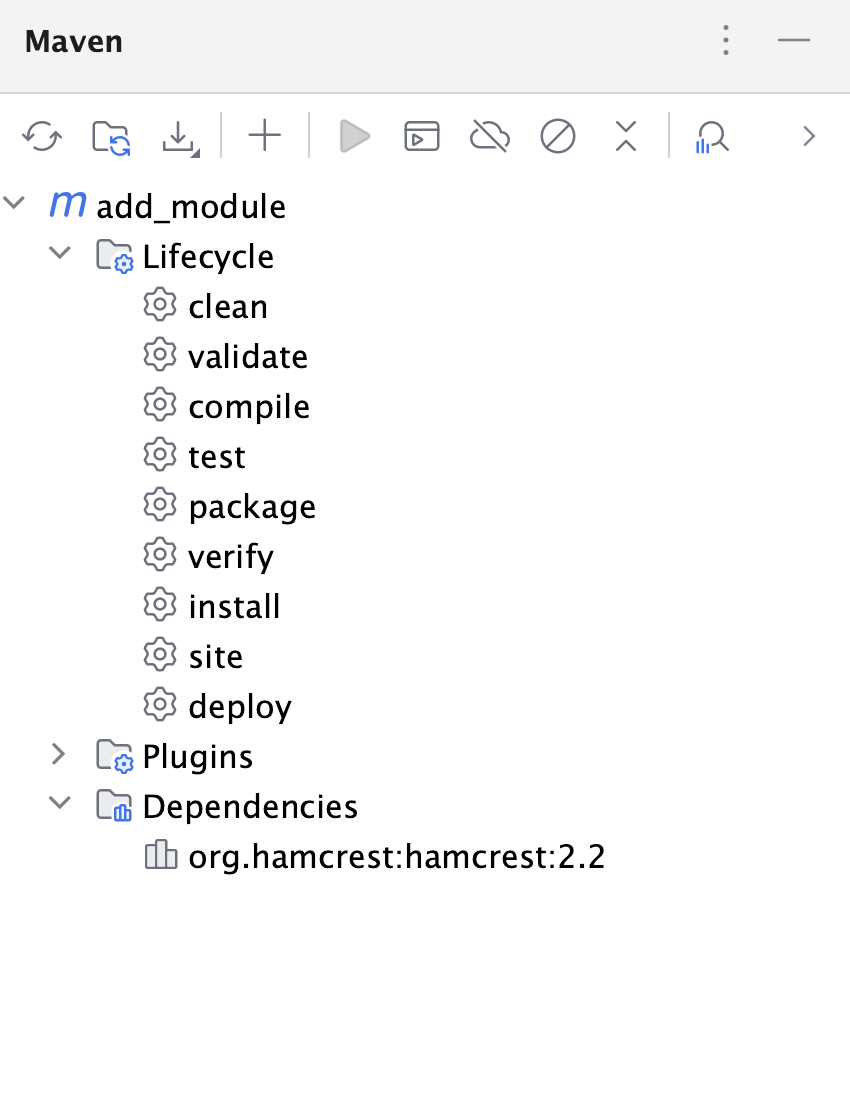
IntelliJ IDEA also adds the dependency to the Dependencies node in the Maven tool window and to the External Libraries in the Project tool window.
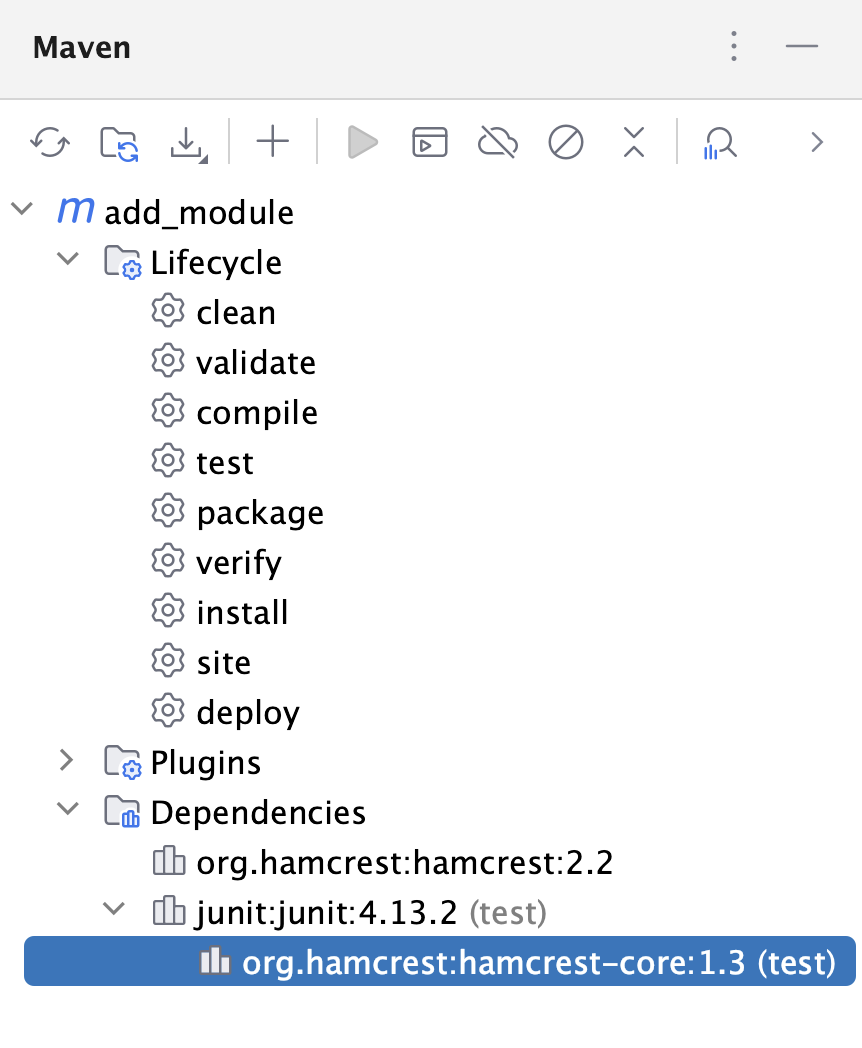
If the added dependency has its own transitive dependencies, IntelliJ IDEA displays them in both tool windows.
Procedure: Use code completion to add a dependency
1. Open your POM in the editor.
2. Start adding a dependency to the `dependencies` section of the POM file.
When you start typing a name of the dependency, IntelliJ IDEA displays a list of relevant search results. Every suggested dependency is marked an icon that indicates from which location it is coming (local or a remote server).
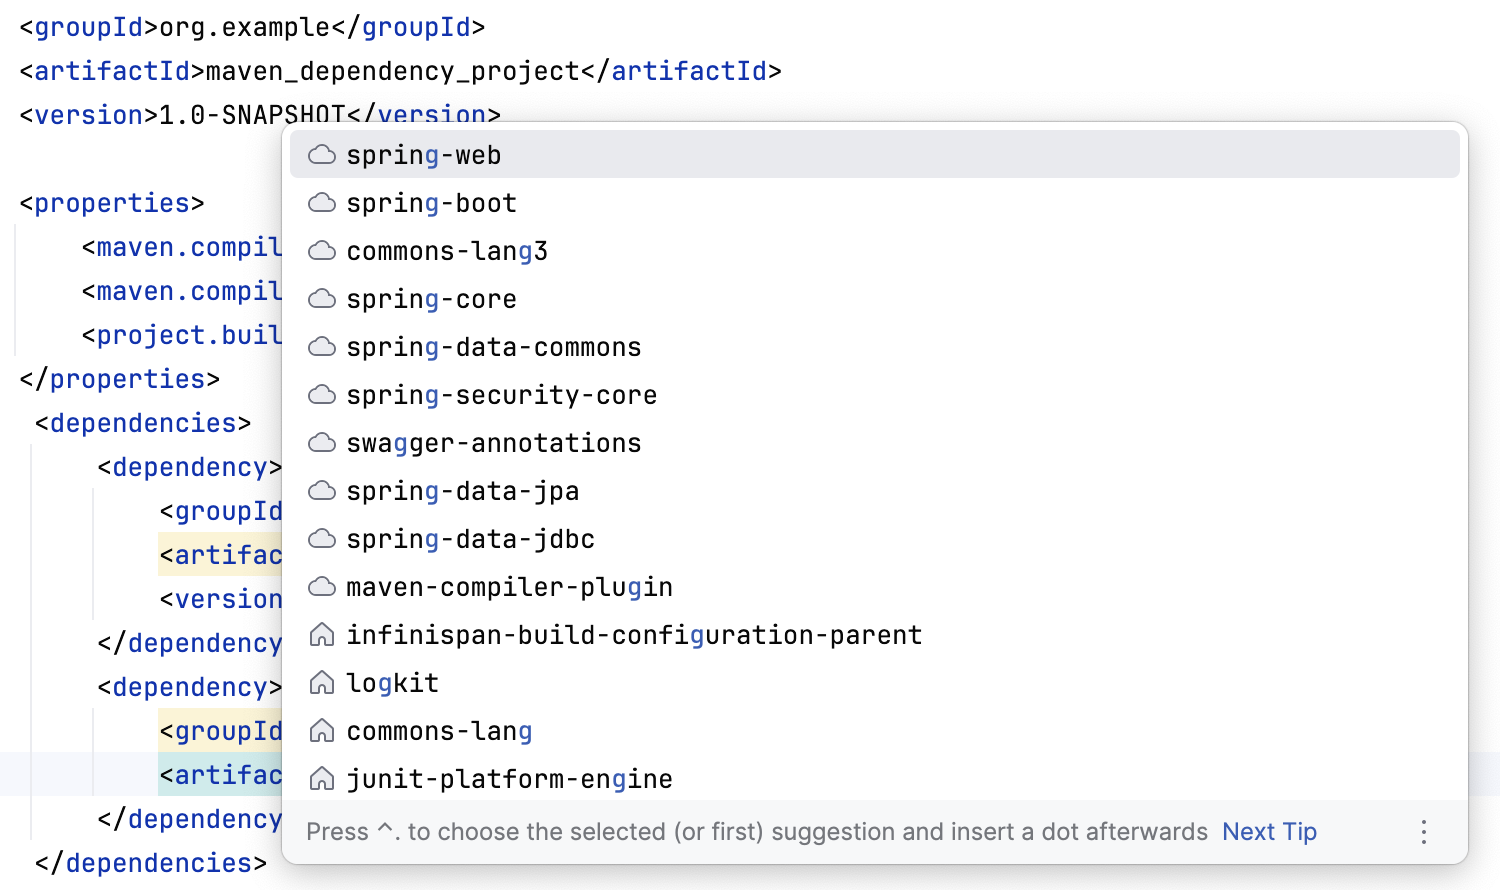
3. Select the dependency and add the rest of its information using code completion.
4. Click  to synchronize your changes in the project.
Procedure: Enable annotation processors
1. Open your POM file.
2. Specify the `annotationProcessors` and `annotationProcessorPaths` options.
For example, check the following code:
```XML
org.apache.maven.plugins
maven-compiler-plugin
3.5.1
org.sample
sample-annotation-processor
1.2.3
```
For more information, refer to [Maven](https://maven.apache.org/plugins/maven-compiler-plugin/compile-mojo.html).
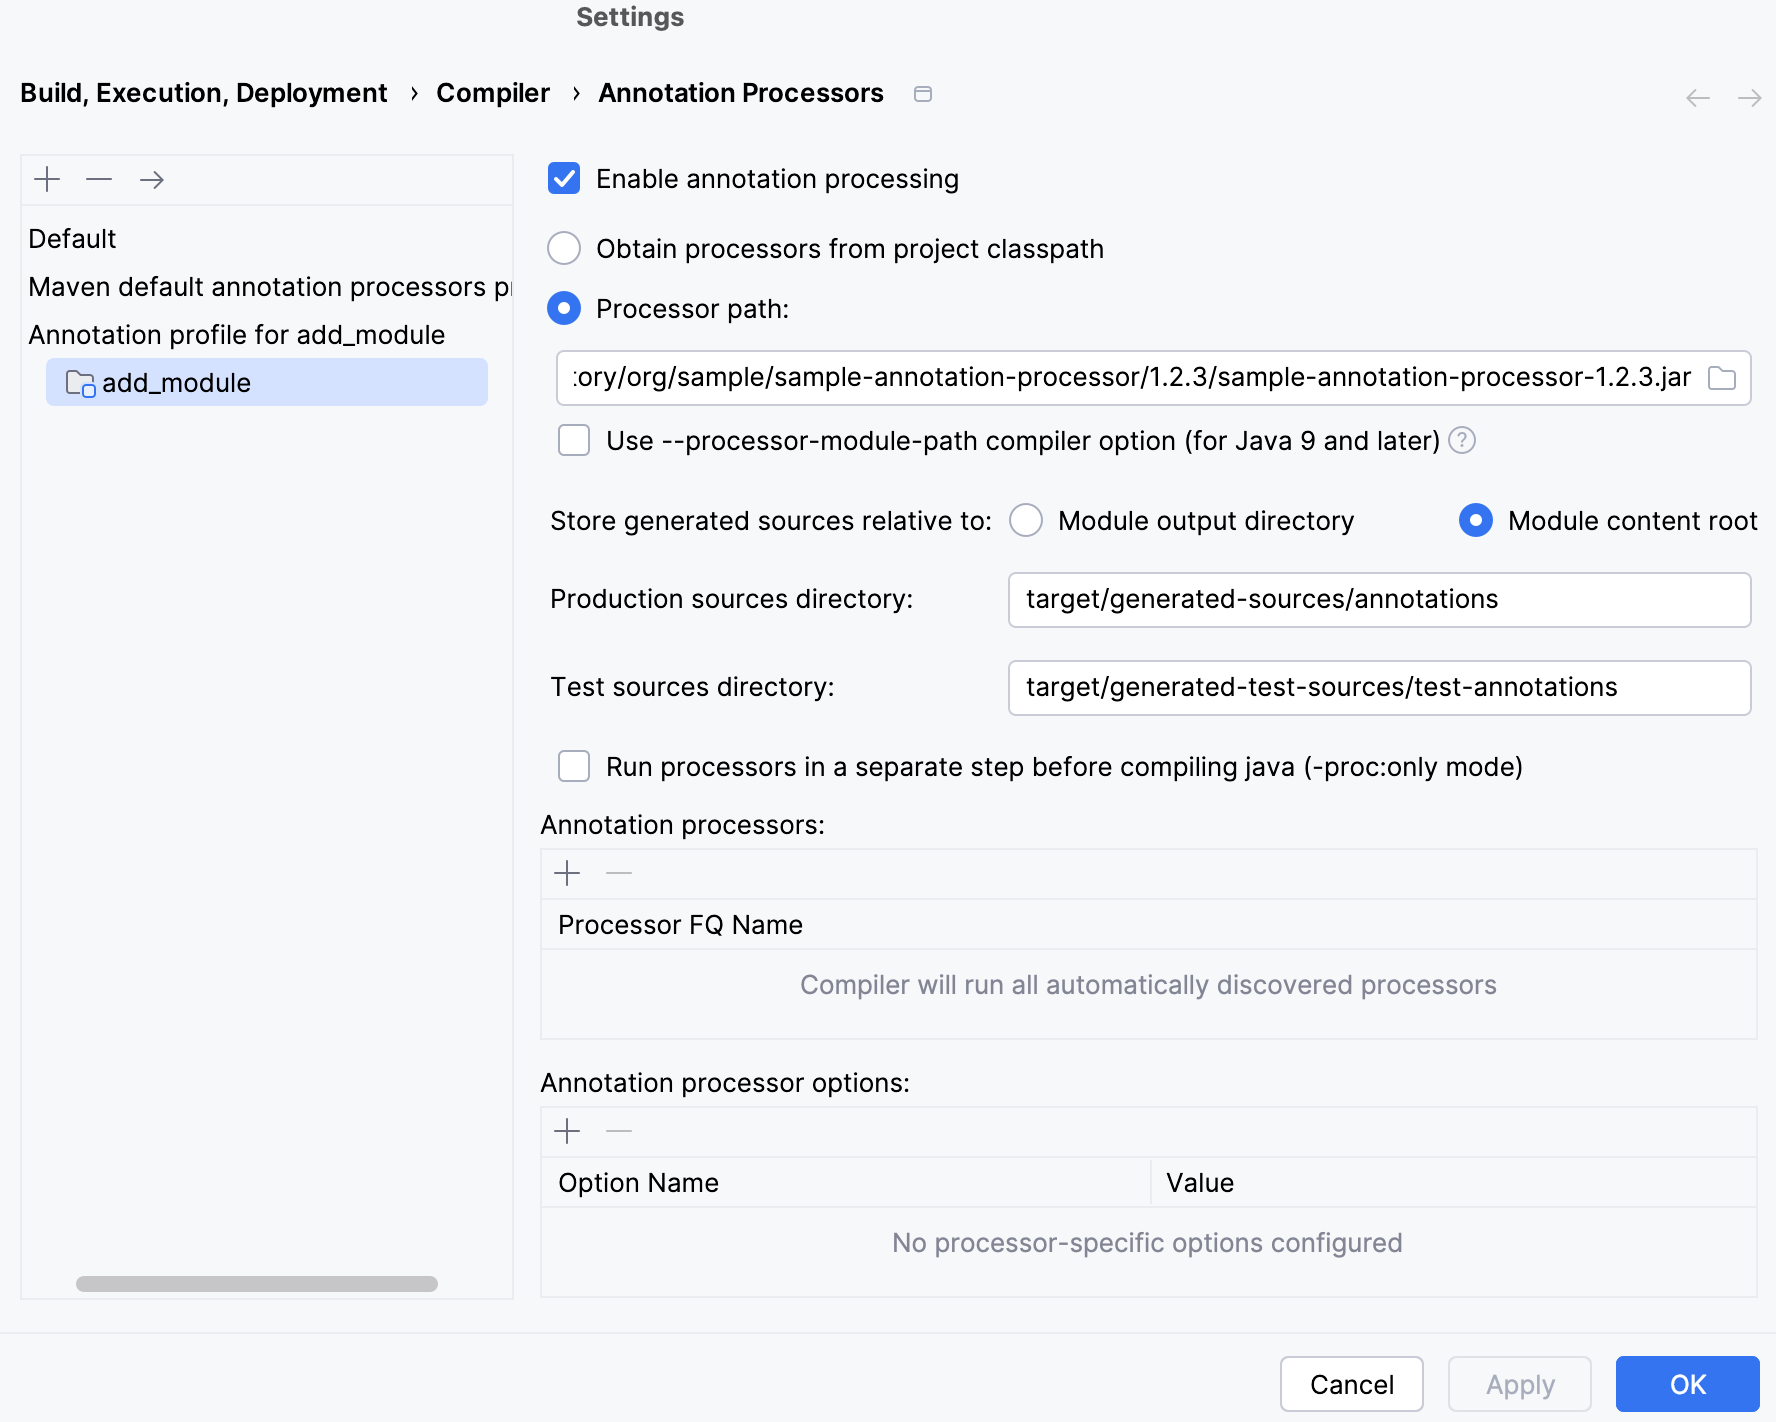
3. Re-import your project. IntelliJ IDEA creates an annotation processors profile, enables the annotation processing and adds the appropriate path to the [Annotation Processor](annotation-processors-support.html#annotation_processing) settings located in `Settings | Build, Execution, Deployment | Compiler`.
## Centralize dependency information
In a multi-module Maven project, the dependency in the parent POM will be inherited by all subprojects. You can use `dependencyManagement` to consolidate and [centralize the management of the
dependencies' versions](https://maven.apache.org/guides/introduction/introduction-to-dependency-mechanism.html#Dependency_Management).
Procedure:
1. Open your POM in the editor.
2. Press `Alt+Insert` (Windows), `⌘ N` (macOS), `⌃ N` (IntelliJ IDEA Classic (macOS)), `⌘ N` (macOS System Shortcuts), `Alt+Insert` (XWin), `Alt+Insert` (GNOME), `Alt+Insert` (KDE), `Alt+Insert` (Emacs), `Alt+Insert` (Sublime Text), `⌘ N` (Sublime Text (macOS)), `Alt+Insert` (NetBeans), `Alt+Insert` (Visual Studio), `⌘ ⌃ N` (Visual Studio (macOS)), `Alt+Insert` (Eclipse), `⌘ N` (Eclipse (macOS)) to open the Generate context menu.
3. From the context menu, select the Managed Dependency option that will show you the list of the dependencies that are defined in the `dependencyManagement` section of your parent POM in a multi-module project. IntelliJ IDEA also shows the list of dependencies from the [BOM files](http://logging.apache.org/log4j/2.x/maven-artifacts.html#Bill_of_Material).
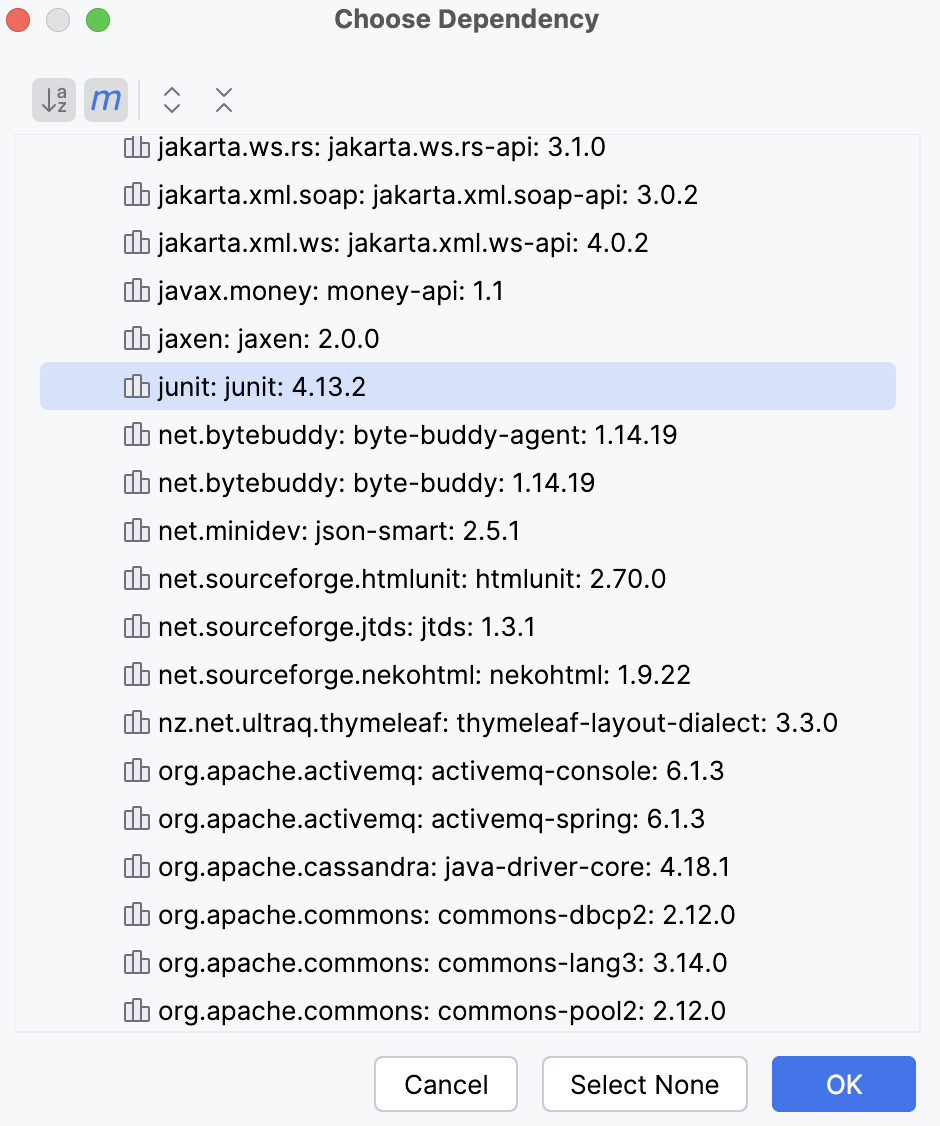
4. Select the required dependency and click OK. The dependency is added to the POM. You do not need to specify the version on the dependency it will be taken from the `DependencyManagement`.
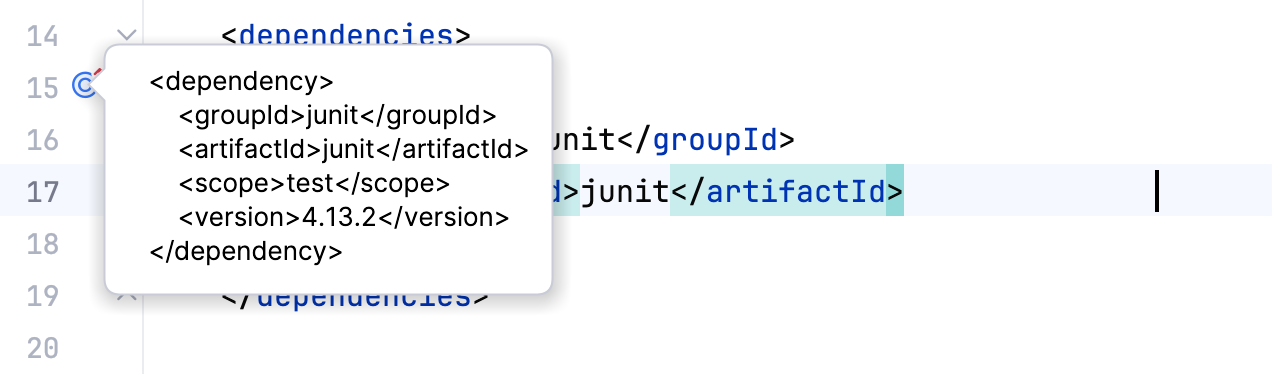 However, if you want to overwrite the defined version, you need to include `version` when you add the managed dependency to the POM.
## Add a scope for the Maven dependency
You can add a [scope](https://maven.apache.org/guides/introduction/introduction-to-dependency-mechanism.html#Dependency_Scope) for your dependency using POM. In this case IntelliJ IDEA will execute the dependency at the specified phase.
Procedure:
1. In your POM, in the dependency description add `scope` and using the code completion, add the name of the scope.
```XML
junit
junit
4.13.2
test
```
2. Import your changes. The name of the scope is displayed in the Maven tool window. In the Project Structure dialog, on the Modules page you can see that the scope of the dependency is also displayed.
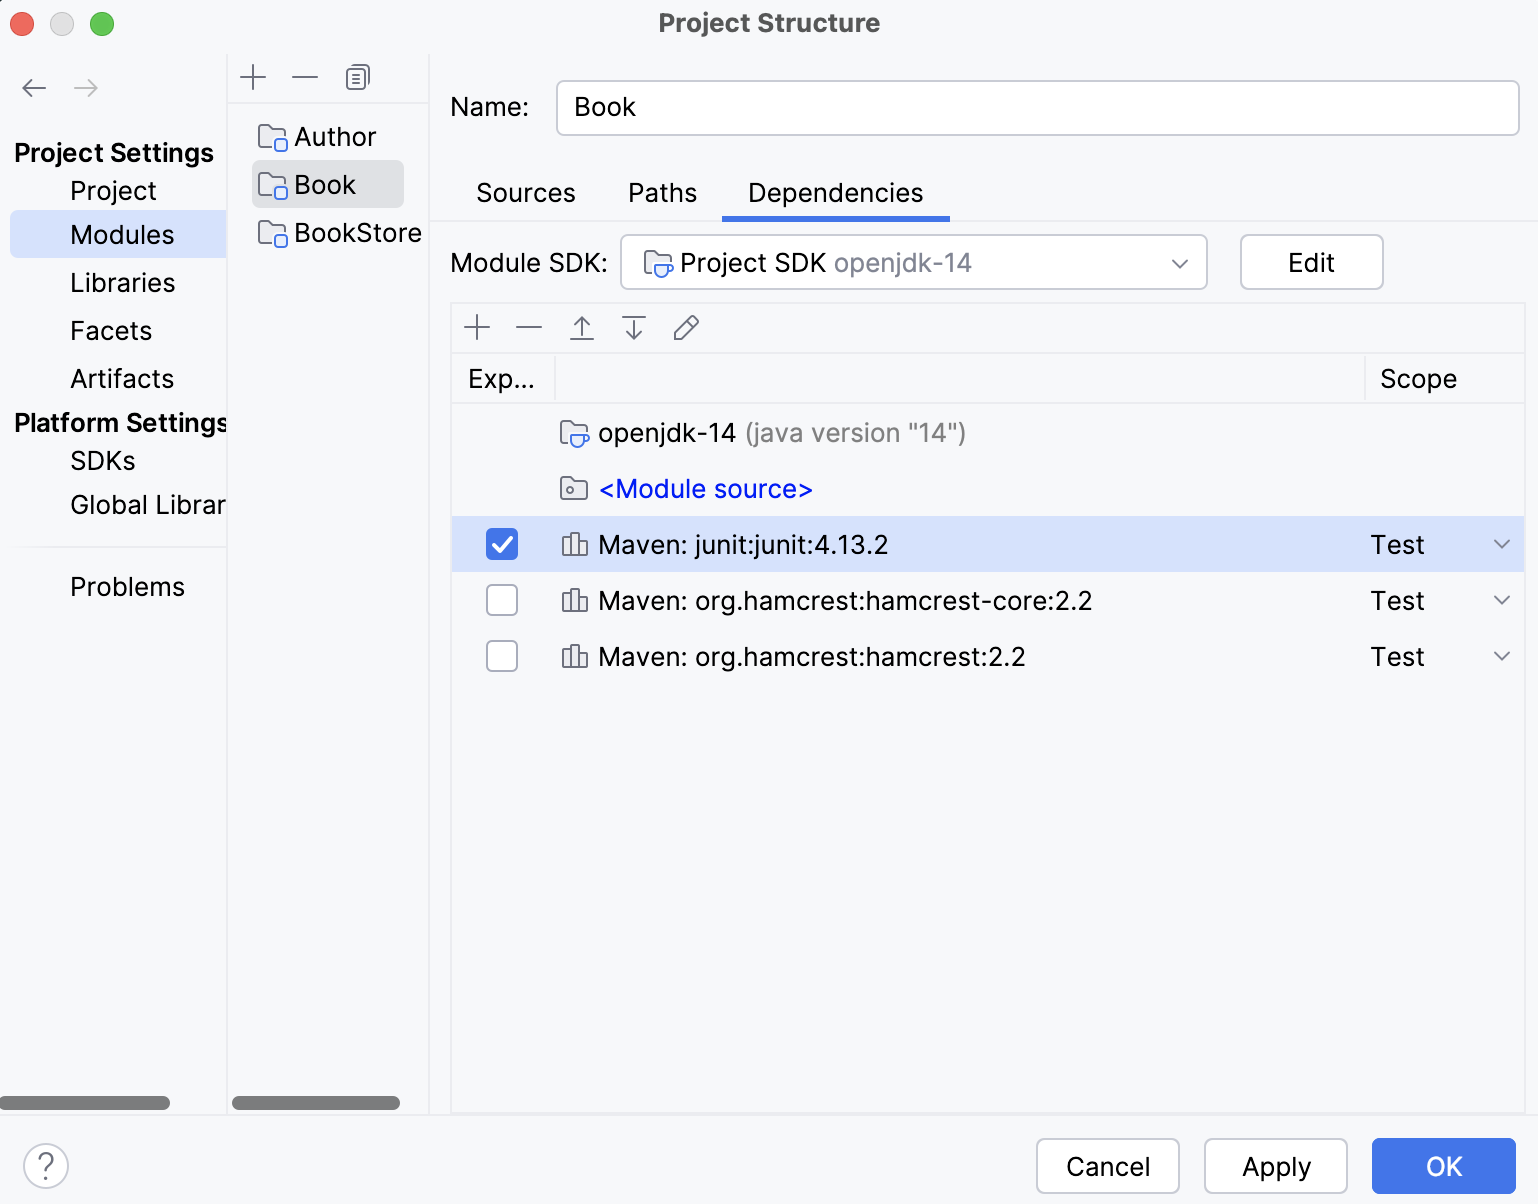 Note that changing dependency's scope in the Project Structure dialog will not affect the `pom.xml` file.
You can also add a custom `jar` file as a dependency using the Maven scope [system](http://maven.apache.org/guides/introduction/introduction-to-dependency-mechanism.html#System_Dependencies) when you define your dependency. However, note that this dependency will only be available on your machine, and you can use it only for the local deployment.
## Work with Maven transitive dependencies
You can view [transitive dependencies](https://maven.apache.org/guides/introduction/introduction-to-dependency-mechanism.html#Transitive_Dependencies) that were pulled in with the added or imported Maven dependency. You can check their versions, change them, or exclude those dependencies altogether.
The Maven tool window displays the direct dependency and all its transitive dependencies that were pulled in.
Procedure: View the transitive dependency
1. In your project's POM, press `Ctrl` and hover over the dependency.
2. Click the dependency to open the dependency's POM.
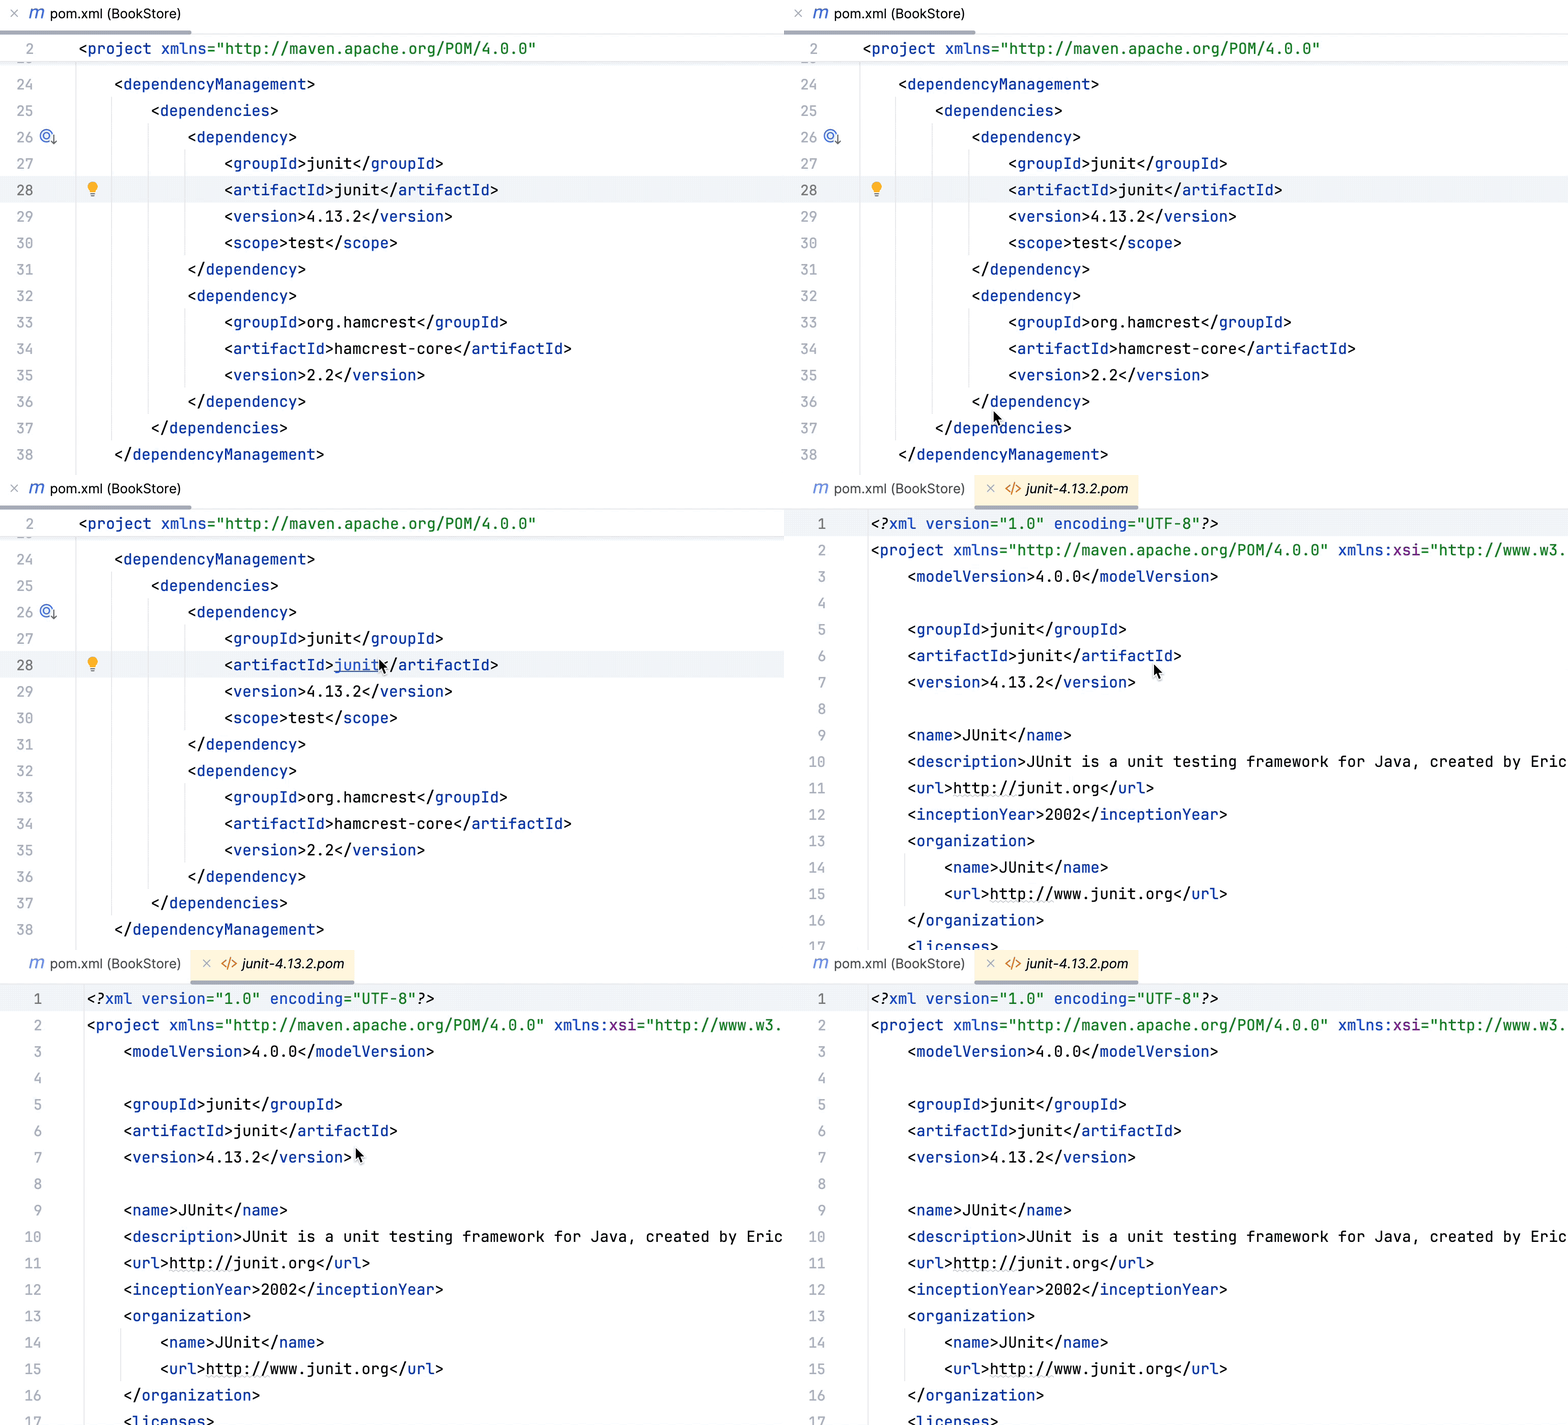
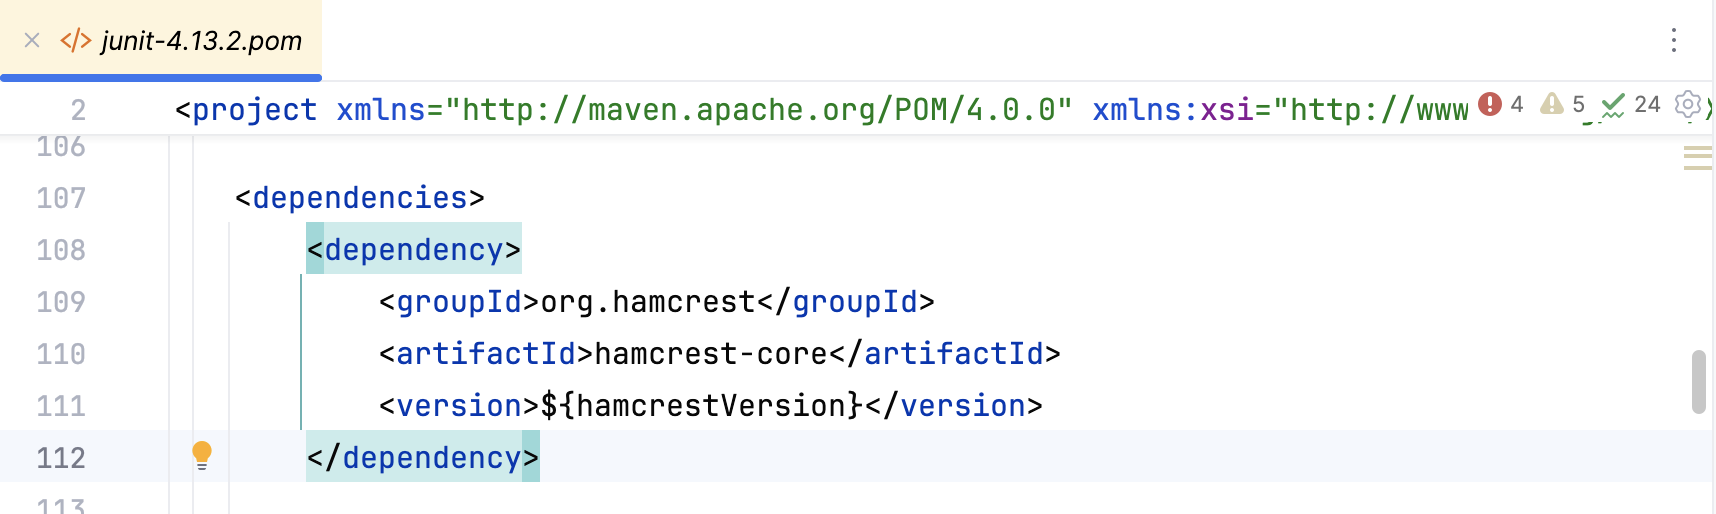
3. In the dependency POM, view the active dependency, its transitive dependencies and their versions.
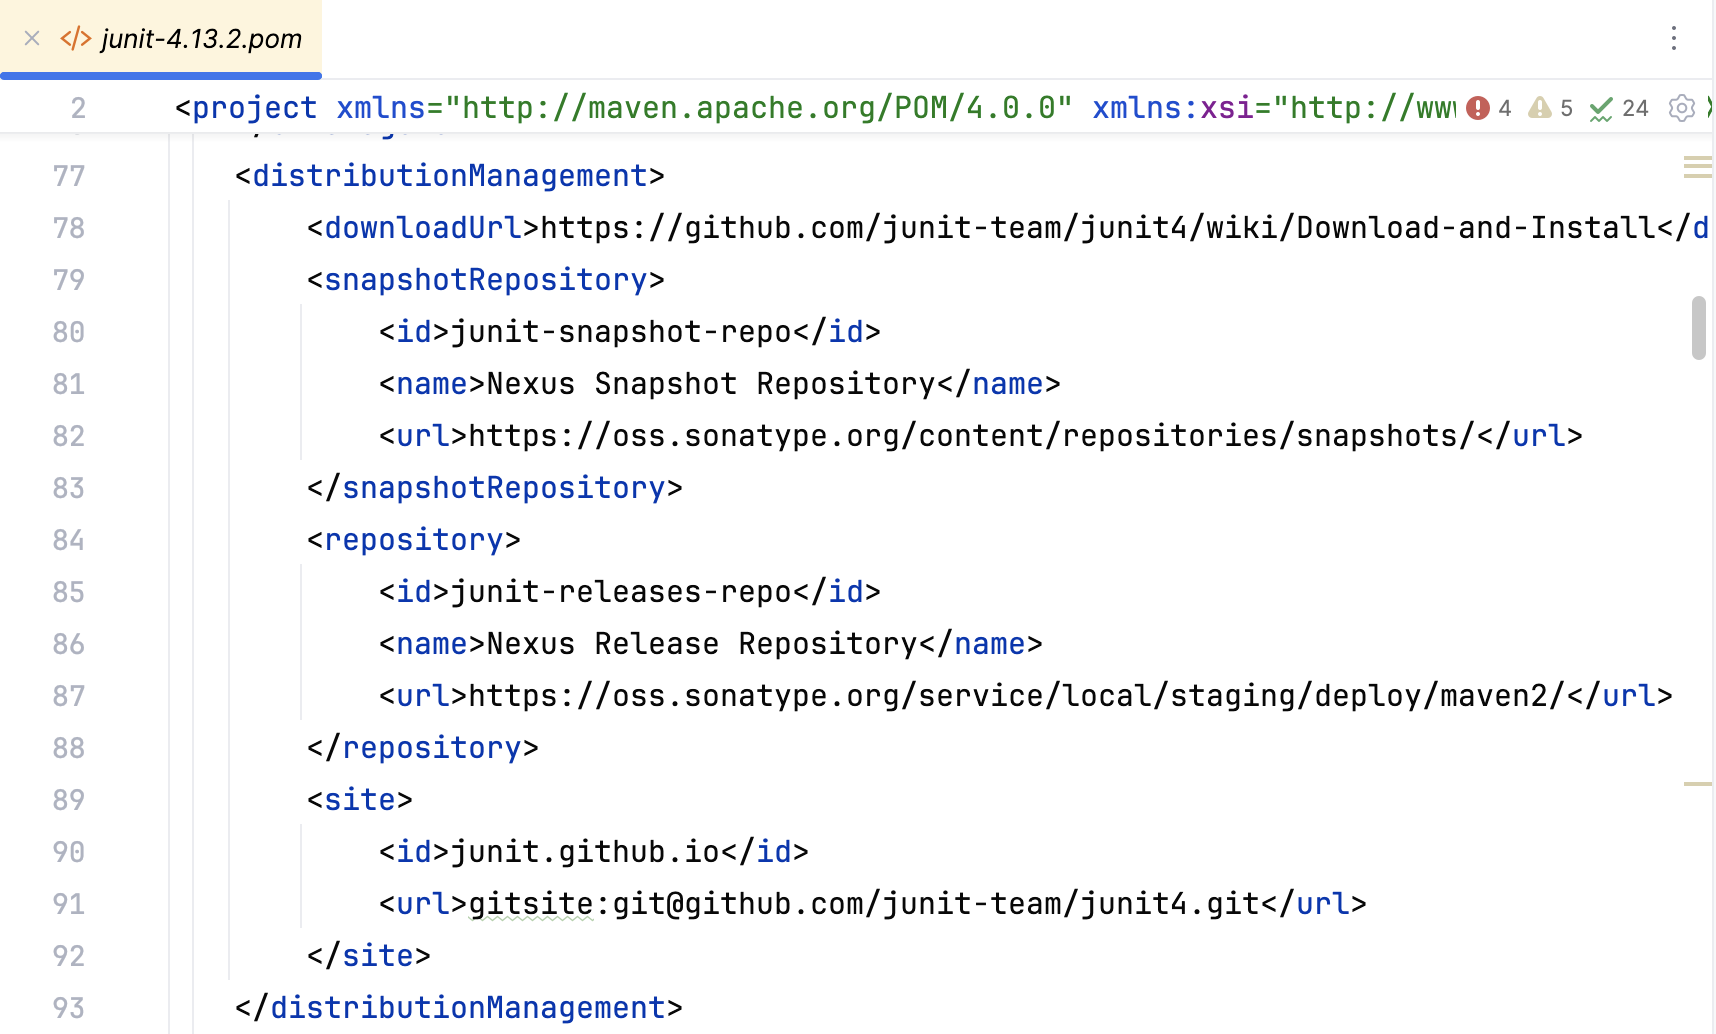
 You can check the origin from which the dependency was pulled in.
Procedure: Exclude the transitive dependency
You can exclude a transitive dependency if you want.
1. Open the dependency POM and find the transitive dependency you want to exclude. Copy `groupId` and `artifactId`.
2. In your project POM, underneath your active dependency, enter `exclusions` and using code completion paste the copied info of the dependency you want to exclude.
> **Tip:**
> You can use the Exclude command from the context menu in the [Maven dependency diagram](#maven_dependency_diagram) to quickly exclude the specified dependency from POM and the respective tool windows.
```XML
junit
junit
4.13.2
test
org.hamcrest
hamcrest-core
```
The dependency is also excluded from the Project and Maven tool windows.
## Import Maven dependencies
You can import dependencies to your Maven project. When IntelliJ IDEA imports the added dependency, it parses the dependency and updates your project.
Procedure:
* In the `pom.xml` file, add a dependency you need. When you change the `pom.xml`, IntelliJ IDEA displays a notification suggesting to load the changes. Click  in the editor to import the dependency and update your project.
* In the [Maven](maven-projects-tool-window.html) tool window, press . In this case, you manually trigger the [re-importing process](delegate-build-and-run-actions-to-maven.html#maven_reimport) of all projects and their dependencies.
## View Maven dependencies as a diagram
> **Warning:**
> Make sure that the Diagrams bundled plugin is [enabled](managing-plugins.html).
IntelliJ IDEA lets you view and work with Maven dependencies in a diagram format.
Procedure: Generate a diagram
1. In the Maven tool window, on the toolbar, click  or select the appropriate option from the context menu.
> **Tip:**
> In the POM, right-click anywhere in the editor to open the context menu and select `Maven | Show Dependencies`. Alternatively, press `Ctrl+Alt+Shift+U` (Windows), `⌘ ⌥ ⇧ U` (macOS), `⌘ ⌥ ⇧ U` (IntelliJ IDEA Classic (macOS)), `⌘ ⌥ ⇧ U` (macOS System Shortcuts), `Ctrl+Alt+Shift+U` (XWin), `Ctrl+Alt+Shift+U` (GNOME), `Ctrl+Alt+Shift+U` (KDE), `Ctrl+Alt+Shift+U` (Emacs), `Ctrl+Alt+Shift+U` (Sublime Text), `⌘ ⌥ ⇧ U` (Sublime Text (macOS)), `Ctrl+Alt+Shift+U` (NetBeans), `Ctrl+Alt+Shift+U` (Visual Studio), `⌘ ⌥ ⇧ U` (Visual Studio (macOS)), `Ctrl+Alt+Shift+U` (Eclipse), `⌘ ⌥ ⇧ U` (Eclipse (macOS)) or `Ctrl+Alt+U` (Windows), `⌘ ⌥ U` (macOS), `⌘ ⌥ U` (IntelliJ IDEA Classic (macOS)), `⌘ ⌥ U` (macOS System Shortcuts), `Ctrl+Alt+U` (XWin), `Ctrl+Alt+U` (GNOME), `Ctrl+Alt+U` (KDE), `Ctrl+Alt+U` (Emacs), `Ctrl+Alt+U` (Sublime Text), `⌘ ⌥ U` (Sublime Text (macOS)), `Ctrl+Alt+U` (NetBeans), `Ctrl+Alt+U` (Visual Studio), `⌘ ⌥ U` (Visual Studio (macOS)), `Ctrl+Alt+U` (Eclipse), `⌘ ⌥ U` (Eclipse (macOS)).
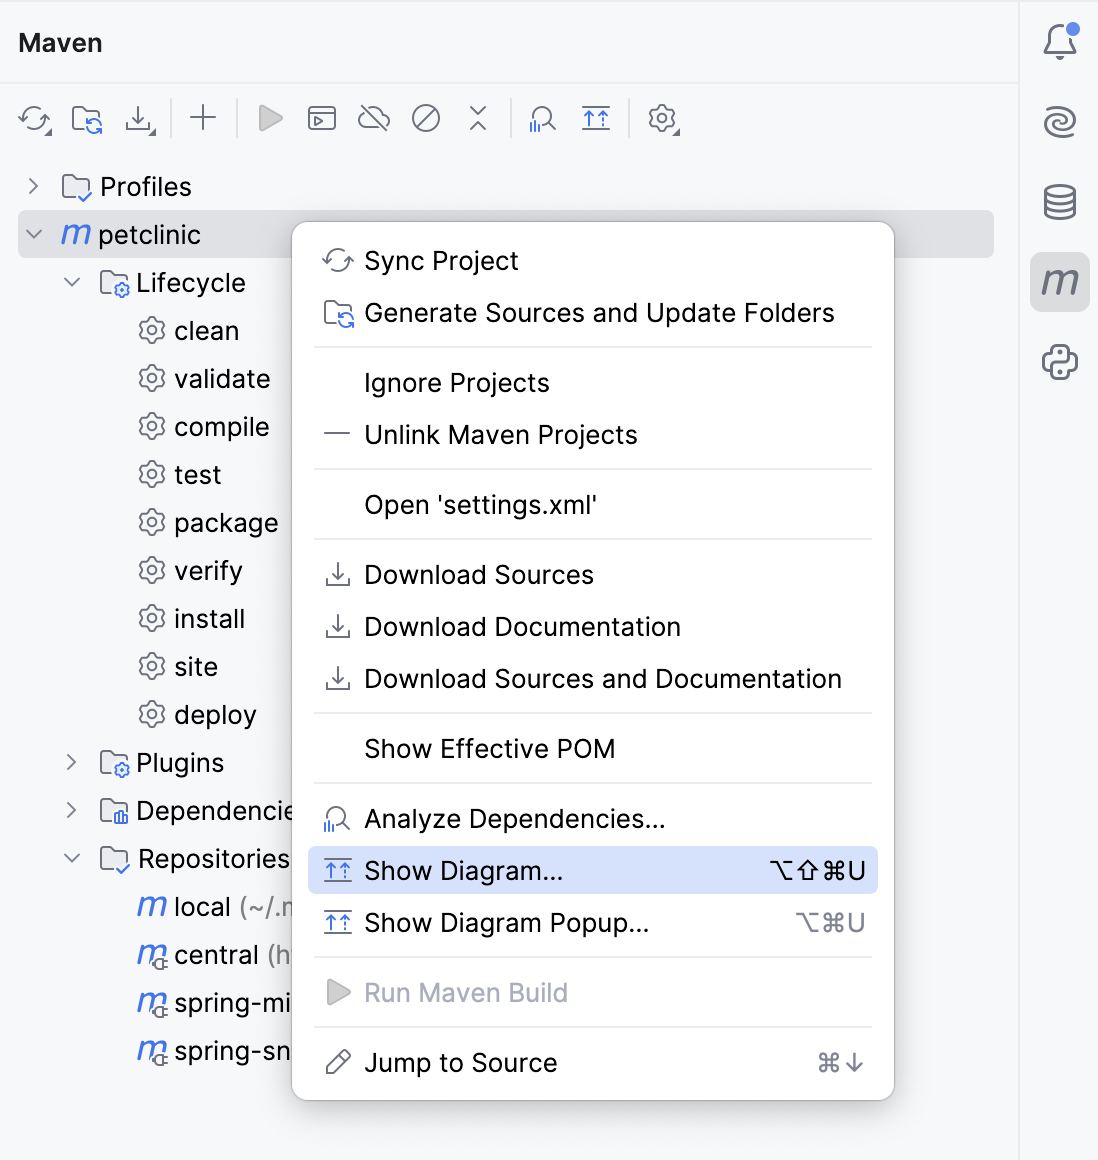
2. In the diagram window, IntelliJ IDEA displays the sub-project and all its dependencies, including the transitive ones.
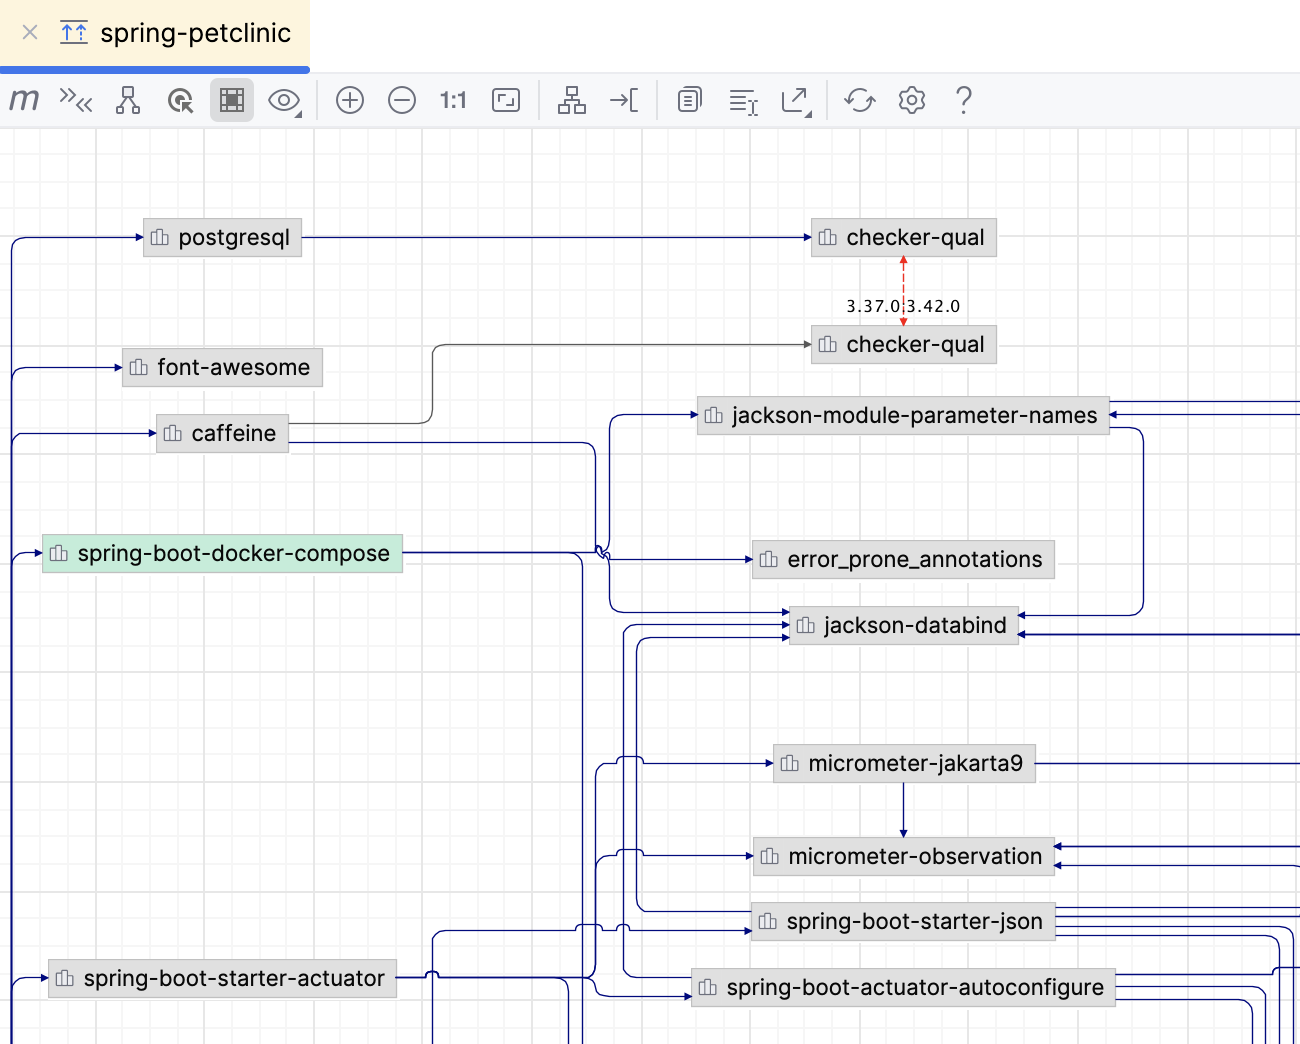
You can perform different actions while in the [diagram window](diagram-toolbar-and-context-menu.html).
Procedure: Change the visibility level
You can change the visibility level and, for example, view dependencies that have a specific scope (compile, test, and so on).
1. In the diagram window, select the subproject and click .
2. From the list, select the dependency scope you want to see. IntelliJ IDEA displays only the specified dependency scope.
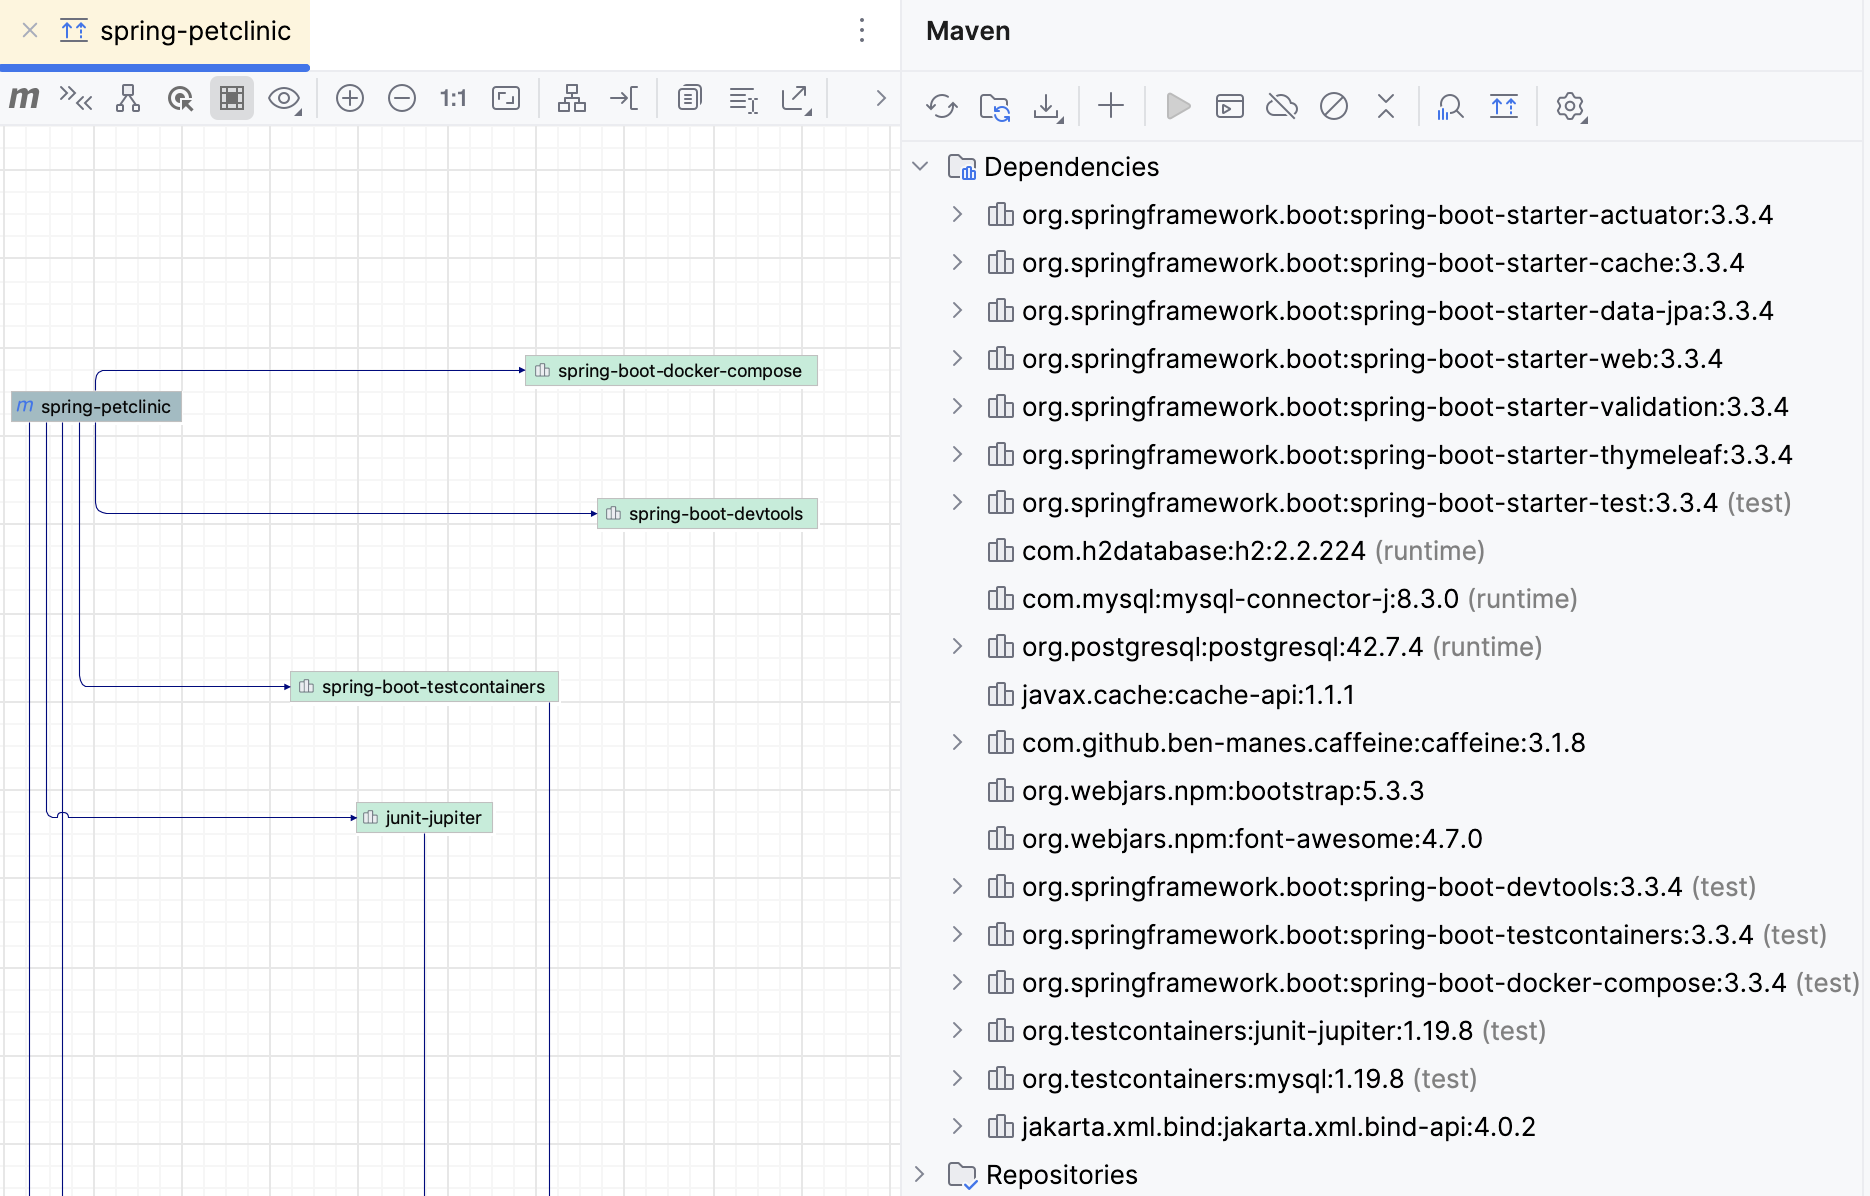
Procedure: Navigate to POM
You can navigate to POM from the diagram window.
* Select the required node and press `F4` (Windows), `⌘ ↓` (macOS), `F4` (IntelliJ IDEA Classic (macOS)), `F4` (macOS System Shortcuts), `F4` (XWin), `F4` (GNOME), `F4` (KDE), `F4` (Emacs), `F4` (Sublime Text), `F4` (Sublime Text (macOS)), `F4` (NetBeans), `F4` (Visual Studio), `⌘ ↓` (Visual Studio (macOS)), `F12` (Eclipse), `F3` (Eclipse (macOS)), or choose `Jump to Source` on its context menu. The corresponding file opens in the editor.
You can check conflicts and duplicates by clicking 
icon in the diagram window.
Procedure: Check conflicts and duplicates
* In the diagram window, click  icon.
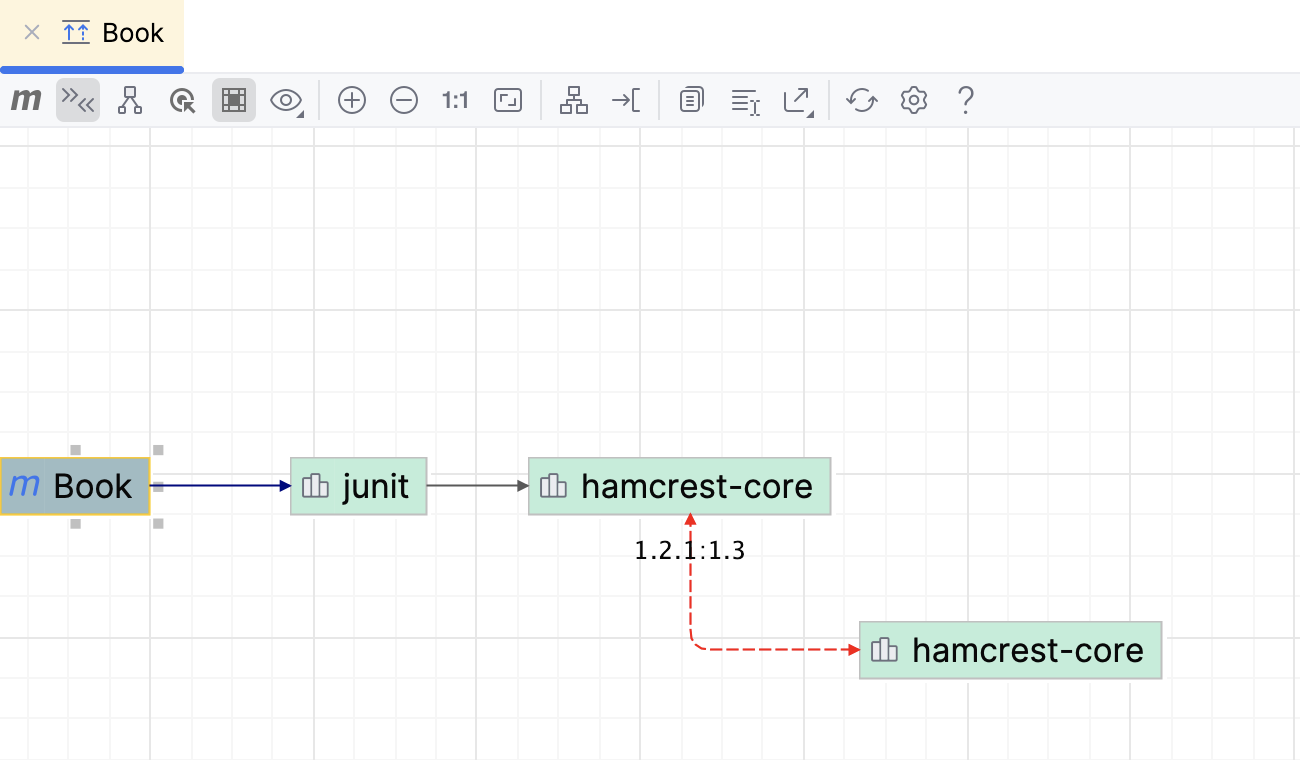
The red arrow points to dependencies that contain duplicates or errors. IntelliJ IDEA also displays dependencies' versions to help you resolve the conflicts. Double-click the dependency to open its POM.
Procedure: Show path from the selection to the root
You can select dependencies and see how they are included in the project.
1. In the diagram window, select a dependency for which you want to see a connection to a project. If you want to select several dependencies at once, hold down `Shift` (Windows), `Shift` (macOS), `Shift` (IntelliJ IDEA Classic (macOS)), `Shift` (macOS System Shortcuts), `Shift` (XWin), `Shift` (GNOME), `Shift` (KDE), `Shift` (Emacs), `Shift` (Sublime Text), `Shift` (Sublime Text (macOS)), `Shift` (NetBeans), `Shift` (Visual Studio), `Shift` (Visual Studio (macOS)), `Shift` (Eclipse), `Shift` (Eclipse (macOS)) and make the selection.
2. Click .

Procedure: Show neighbors of the selected node
You can select dependencies and see what other dependencies are connected to the selected nodes. It might be helpful if you have a large diagram and want to focus on a part of it.
1. In the diagram window, select a dependency you need. If you want to select several dependencies at once, hold down `Shift` (Windows), `Shift` (macOS), `Shift` (IntelliJ IDEA Classic (macOS)), `Shift` (macOS System Shortcuts), `Shift` (XWin), `Shift` (GNOME), `Shift` (KDE), `Shift` (Emacs), `Shift` (Sublime Text), `Shift` (Sublime Text (macOS)), `Shift` (NetBeans), `Shift` (Visual Studio), `Shift` (Visual Studio (macOS)), `Shift` (Eclipse), `Shift` (Eclipse (macOS)) and make the selection.
2. Click .

## Dependency analyzer
Maven dependency analyzer lets you quickly see and analyze resolved dependencies, the unresolved ones, dependencies with conflicts, and transitive dependencies in your project and subprojects.
Procedure: Analyze dependencies
1. On the toolbar in the Maven tool window, click .
Alternatively, in the Maven tool window, right-click the necessary dependency and select Analyze Dependencies from the context menu. You can also right-click a module in the Project view and use the same action.
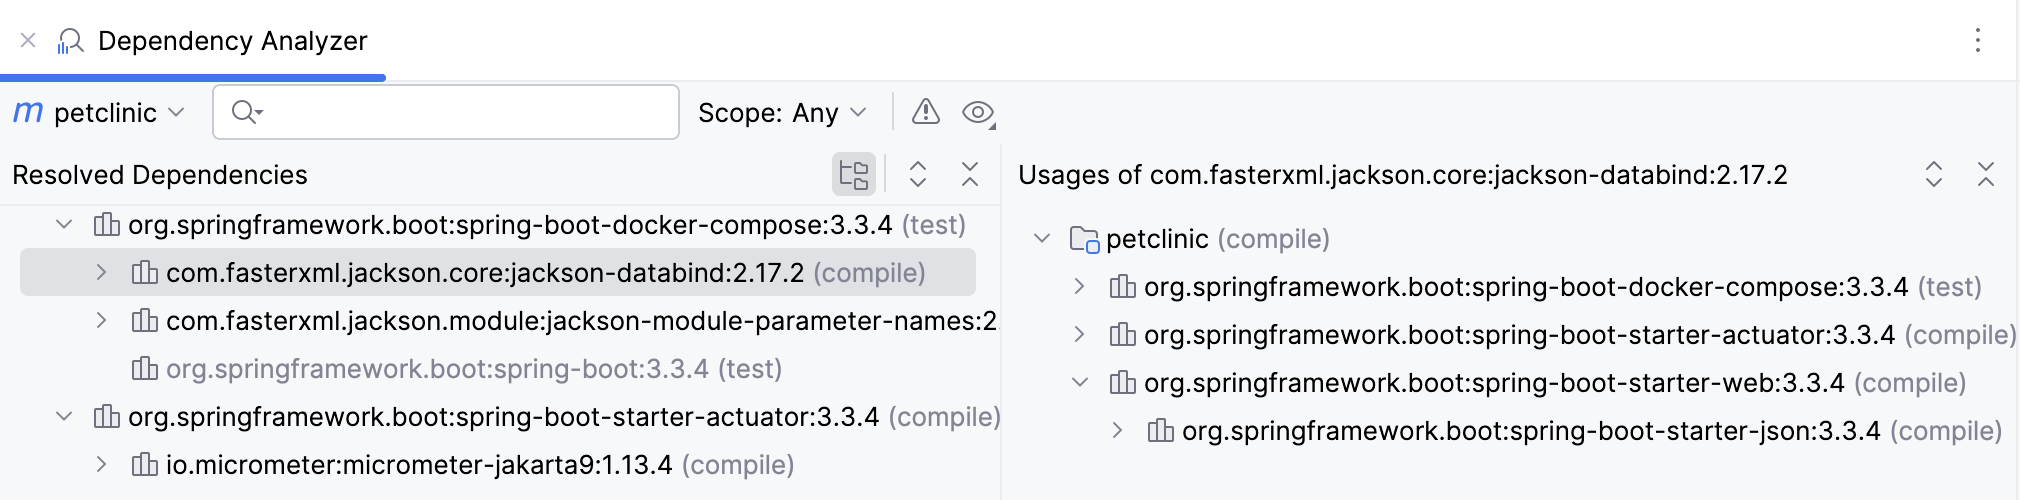
2. In the Dependency Analyzer window, you can narrow down your analysis scope, check only the conflicted dependencies, or check usages.
If you want to see the required dependency in the `pom.xml` file, right-click the dependency and select Go to Maven Dependency. If you click Open Maven Config on the specific dependency, IntelliJ IDEA will open the dependency's POM file.
If the duplicate dependency is found, it will be greyed out.
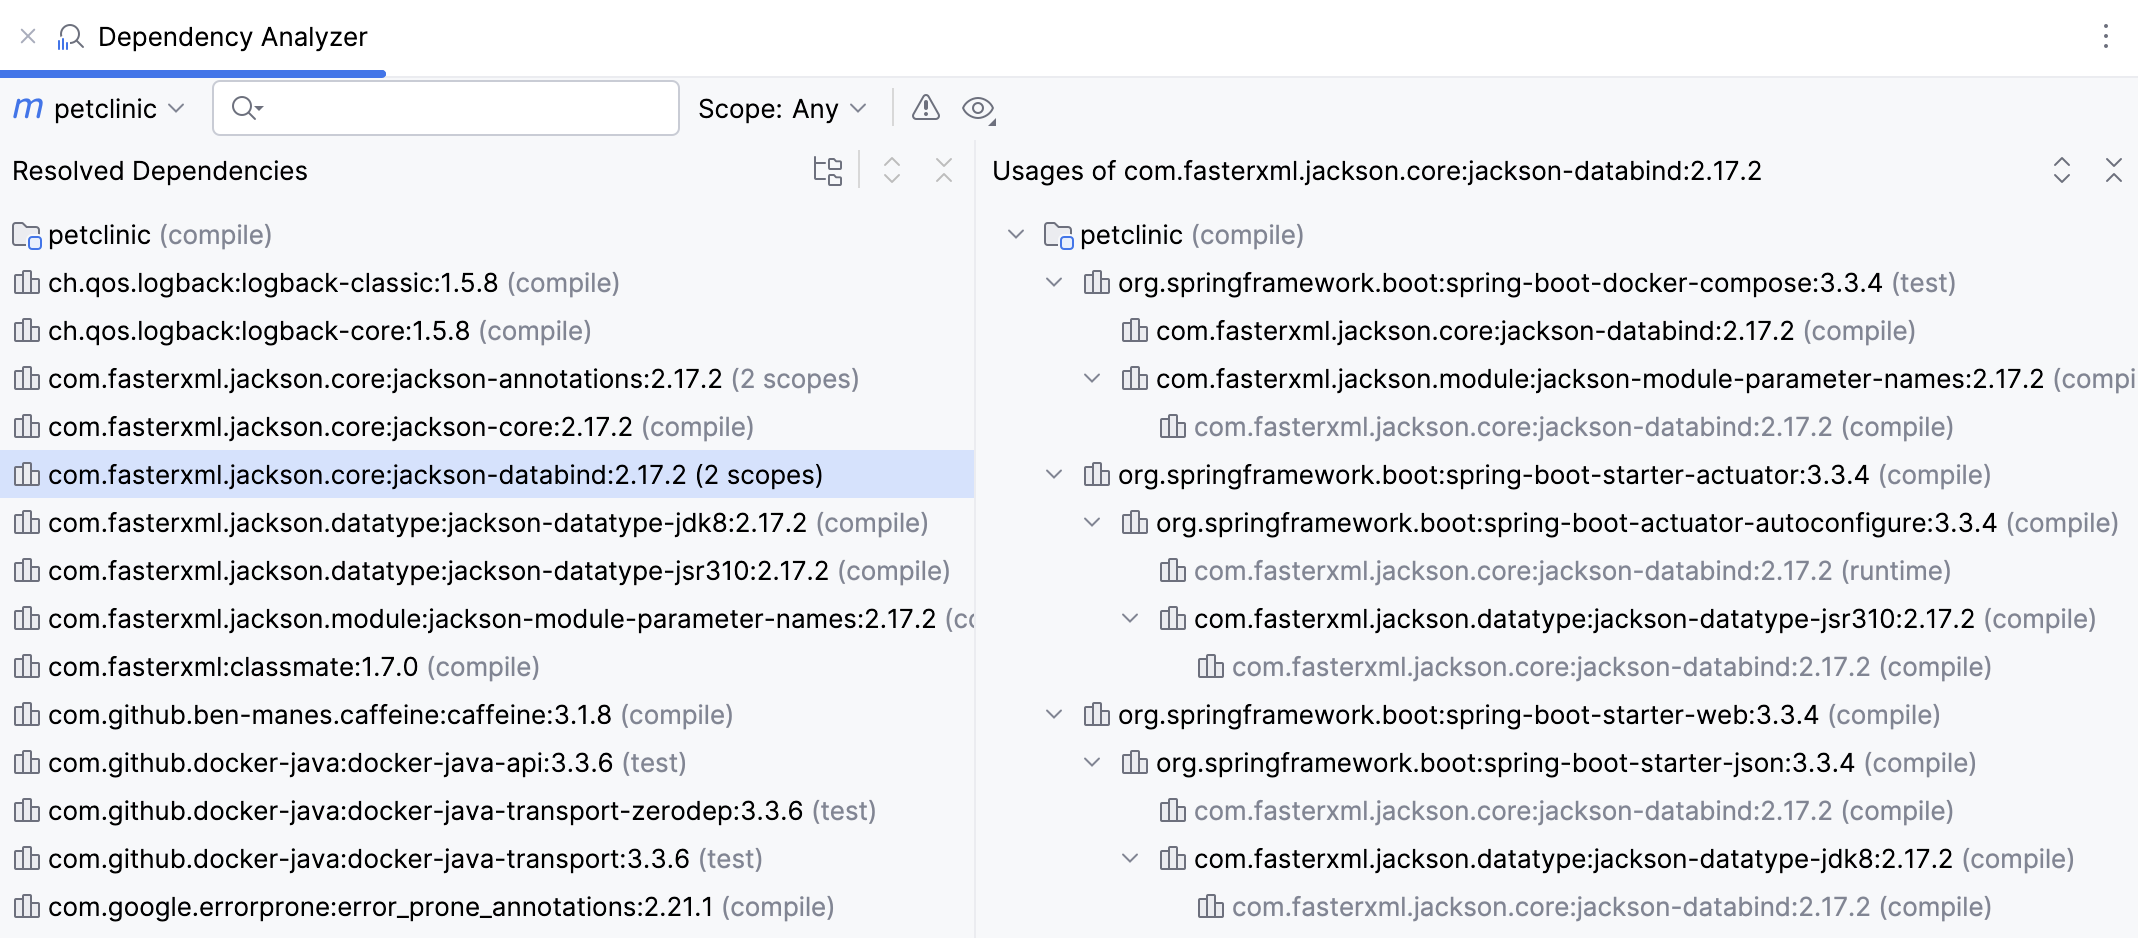
For more information about available options and icons in the Dependency Analyzer window, refer to the [reference](#dependency_analyzer_tool_window) section.
### Dependency analyzer tool window reference
| Item | Description |
| --- | --- |
| Scope | You can see scopes in which every dependency is used in the project. To narrow down the list of the dependencies based on their [scope](https://maven.apache.org/guides/introduction/introduction-to-dependency-mechanism.html#dependency-scope), select the appropriate option from the list of scopes. 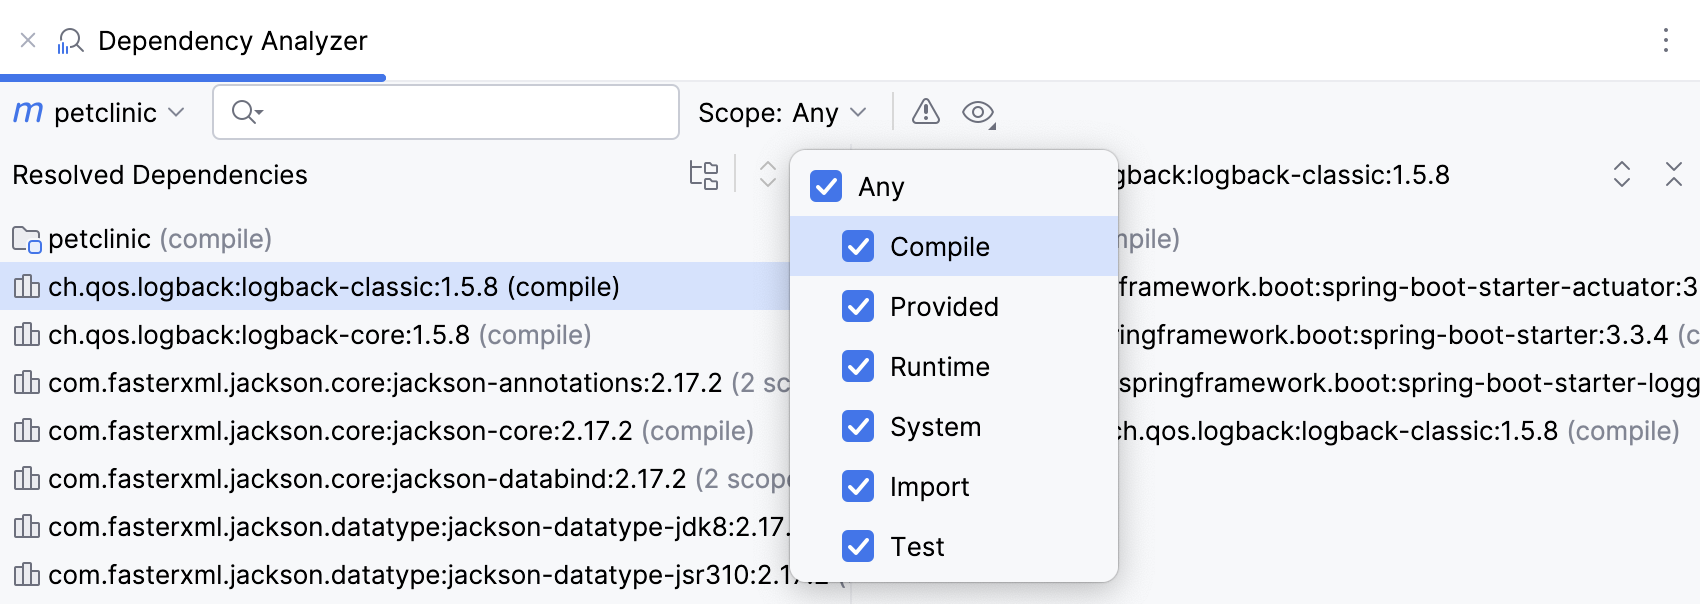 |
| Show Conflicts Only | Click  to see only unresolved or conflicted dependencies. 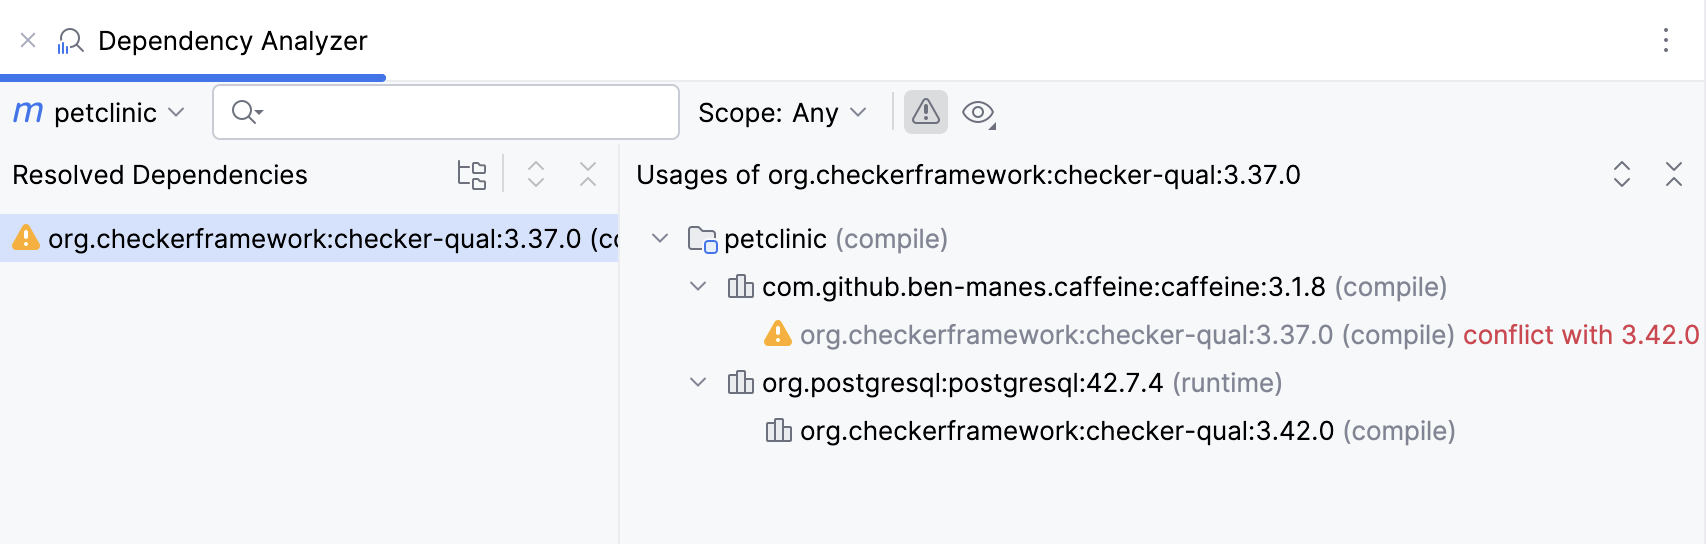 |
| Show GroupId | Click  and select Show GroupId to display [GroupId](https://maven.apache.org/guides/mini/guide-naming-conventions.html) in the list of dependencies. |
| Show as Tree | Toggle  to display the list of dependencies in a form of nodes or in the flat list. The tree view will help you quickly check the transitive dependencies. |
| Expand / Collapse | Use  /  expand or collapse the list of dependencies. |