# Write and edit source code
When you work with code, IntelliJ IDEA ensures that your work is stress-free. It offers various shortcuts and features to help you add, select, copy, move, edit, fold, find occurrences, and save code.
For navigation inside the editor, refer to [Editor basics](using-code-editor.html).
> **Tip:**
> If you do not remember a shortcut for the action you want to use, press `Ctrl+Shift+A` (Windows), `⌘ ⇧ A` (macOS), `⌘ ⇧ A` (IntelliJ IDEA Classic (macOS)), `⌘ ⇧ P` (macOS System Shortcuts), `Ctrl+Shift+A` (XWin), `Ctrl+Shift+A` (GNOME), `Ctrl+Shift+A` (KDE), `Escape, X` (Emacs), `Ctrl+Shift+P` (Sublime Text), `⌘ ⇧ P` (Sublime Text (macOS)), `Ctrl+I` (NetBeans), `Ctrl+Shift+A` (Visual Studio), `⌘ ⇧ A` (Visual Studio (macOS)), `Ctrl+Shift+A` (Eclipse), `⌘ 3` (Eclipse (macOS)) to find any action by name.
>
>
>
> You can use the same dialog to find classes, files, or symbols. For more information, refer to [Search everywhere](searching-everywhere.html).
Procedure: Transpose characters
1. In the editor, place the caret at the characters you want to swap.
2. Go to `Edit | Transpose`.
There is no default shortcut for this action. You can assign a [custom shortcut](configuring-keyboard-and-mouse-shortcuts.html#add-keyboard-shortcut).
## Floating toolbar
The floating toolbar contains various actions for code editing. It appears when you hover over a selected code fragment in Java, Kotlin, JSON, XML, YAML, and SQL files in the editor.
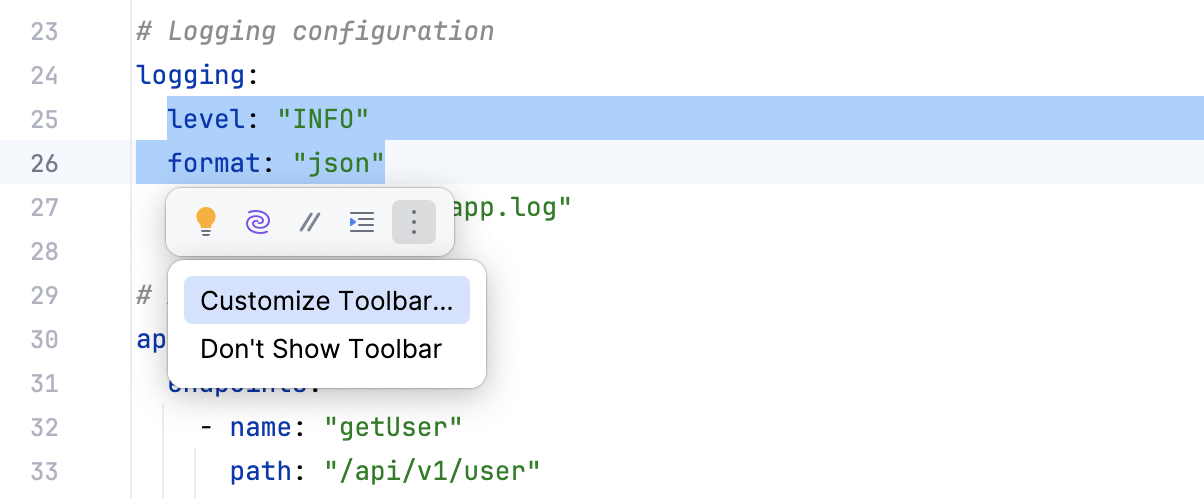
* : View [intention actions](intention-actions.html)
* : AI actions (only if [AI Assistant](https://www.jetbrains.com/help/ai-assistant/getting-started-with-ai-assistant.html) is enabled)
* : [Comment with line comment](#ws_comment_blocks_lines)
* : [Reformat code](reformat-and-rearrange-code.html)
Procedure: Enable the toolbar
1. Press `Ctrl+Alt+S` (Windows), `⌘ Comma` (macOS), `⌘ Comma` (IntelliJ IDEA Classic (macOS)), `⌘ Comma` (macOS System Shortcuts), `Ctrl+Alt+S` (XWin), `Ctrl+Alt+S` (GNOME), `Ctrl+Alt+S` (KDE), `Ctrl+Alt+S` (Emacs), `Ctrl+Alt+S` (Sublime Text), `⌘ Comma` (Sublime Text (macOS)), `Ctrl+Alt+S` (NetBeans), `Ctrl+Alt+S` (Visual Studio), `⌘ Comma` (Visual Studio (macOS)), `Ctrl+Alt+S` (Eclipse), `⌘ Comma` (Eclipse (macOS)) to open settings and then select `Advanced Settings`.
2. In the Editor section, disable the Hide floating toolbar for code editing option.
3. Apply the changes and close the dialog.
Procedure: Customize the toolbar
1. Press `Ctrl+Alt+S` (Windows), `⌘ Comma` (macOS), `⌘ Comma` (IntelliJ IDEA Classic (macOS)), `⌘ Comma` (macOS System Shortcuts), `Ctrl+Alt+S` (XWin), `Ctrl+Alt+S` (GNOME), `Ctrl+Alt+S` (KDE), `Ctrl+Alt+S` (Emacs), `Ctrl+Alt+S` (Sublime Text), `⌘ Comma` (Sublime Text (macOS)), `Ctrl+Alt+S` (NetBeans), `Ctrl+Alt+S` (Visual Studio), `⌘ Comma` (Visual Studio (macOS)), `Ctrl+Alt+S` (Eclipse), `⌘ Comma` (Eclipse (macOS)) to open settings and then select `Appearance & Behavior | Menus and Toolbars`.
Alternatively, click  on the toolbar and select Customize Toolbar .
2. Add or remove actions under Floating Code Toolbar.
For more information, refer to [Menus and toolbars](customize-actions-menus-and-toolbars.html).
3. Apply the changes and close the dialog.
## Lines of code
IntelliJ IDEA offers several useful shortcuts for manipulating code lines.
> **Note:**
> If you need to undo or redo your changes, press `Ctrl+Z` (Windows), `⌘ Z` (macOS), `⌘ Z` (IntelliJ IDEA Classic (macOS)), `⌘ Z` (macOS System Shortcuts), `Ctrl+Z` (XWin), `Ctrl+Z` (GNOME), `Ctrl+Z` (KDE), `Ctrl+Shift+Minus` (Emacs), `Ctrl+Z` (Sublime Text), `⌘ Z` (Sublime Text (macOS)), `Ctrl+Z` (NetBeans), `Ctrl+Z` (Visual Studio), `⌘ Z` (Visual Studio (macOS)), `Ctrl+Z` (Eclipse), `⌘ Z` (Eclipse (macOS))/`Ctrl+Shift+Z` (Windows), `⌘ ⇧ Z` (macOS), `⌘ ⇧ Z` (IntelliJ IDEA Classic (macOS)), `⌘ ⇧ Z` (macOS System Shortcuts), `Ctrl+Shift+Z` (XWin), `Ctrl+Shift+Z` (GNOME), `Ctrl+Shift+Z` (KDE), `Ctrl+Shift+Z` (Emacs), `Ctrl+Shift+Z` (Sublime Text), `⌘ Y` (Sublime Text (macOS)), `Ctrl+Shift+Z` (NetBeans), `Ctrl+Y` (Visual Studio), `⌘ Y` (Visual Studio (macOS)), `Ctrl+Y` (Eclipse), `⌘ ⇧ Z` (Eclipse (macOS)) respectively.
Procedure:
* To add a line after the current one, press `Shift+Enter` (Windows), `⇧ ⏎` (macOS), `⇧ ⏎` (IntelliJ IDEA Classic (macOS)), `⇧ ⏎` (macOS System Shortcuts), `Shift+Enter` (XWin), `Shift+Enter` (GNOME), `Shift+Enter` (KDE), `Shift+Enter` (Emacs), `Ctrl+Enter` (Sublime Text), `⌘ ⏎` (Sublime Text (macOS)), `Shift+Enter` (NetBeans), `Shift+Enter` (Visual Studio), `⇧ ⏎` (Visual Studio (macOS)), `Shift+Enter` (Eclipse), `⇧ ⏎` (Eclipse (macOS)) . IntelliJ IDEA moves the caret to the next line.
* To add a line before the current one, press `Ctrl+Alt+Enter` (Windows), `⌘ ⌥ ⏎` (macOS), `⌘ ⌥ ⏎` (IntelliJ IDEA Classic (macOS)), `⌘ ⌥ ⏎` (macOS System Shortcuts), `Ctrl+Alt+Enter` (XWin), `Ctrl+Alt+Enter` (GNOME), `Ctrl+Alt+Enter` (KDE), `Ctrl+Alt+Enter` (Emacs), `Ctrl+Alt+Enter` (Sublime Text), `⌘ ⌥ ⏎` (Sublime Text (macOS)), `Ctrl+Alt+Enter` (NetBeans), `Ctrl+Alt+Enter` (Visual Studio), `⌘ ⌥ ⏎` (Visual Studio (macOS)), `Ctrl+Alt+Enter` (Eclipse), `⌘ ⌥ ⏎` (Eclipse (macOS)). IntelliJ IDEA moves the caret to the previous line.
* To duplicate a line, press `Ctrl+D` (Windows), `⌘ D` (macOS), `⌘ D` (IntelliJ IDEA Classic (macOS)), `⌘ D` (macOS System Shortcuts), `Ctrl+D` (XWin), `Ctrl+D` (GNOME), `Ctrl+D` (KDE), `Meta+D` (Emacs), `Ctrl+Shift+D` (Sublime Text), `⌘ ⇧ D` (Sublime Text (macOS)), `Ctrl+D` (NetBeans), `Ctrl+D` (Visual Studio), `⌘ D` (Visual Studio (macOS)), `Ctrl+D` (Eclipse), `Ctrl+D` (Eclipse (macOS)).
* To sort lines alphabetically in the whole file or in a code selection, go to `Edit | Sort Lines` or `Edit | Reverse Lines`. These actions might be helpful when you work with property files, data sets, text files, log files, and so on. If you need to assign shortcuts to those actions, refer to [Configure keyboard shortcuts](configuring-keyboard-and-mouse-shortcuts.html) for more information.
* To delete a line, place the caret at the line you need and press `Ctrl+Y` (Windows), `⌘ ⌫` (macOS), `⌘ Y` (IntelliJ IDEA Classic (macOS)), `⌘ ⌫` (macOS System Shortcuts), `Ctrl+Y` (XWin), `Ctrl+Y` (GNOME), `Ctrl+Y` (KDE), `Ctrl+Y` (Emacs), `Ctrl+Shift+K` (Sublime Text), `⌃ ⇧ K` (Sublime Text (macOS)), `Ctrl+E` (NetBeans), `Ctrl+L` (Visual Studio), `⌘ ⇧ L` (Visual Studio (macOS)), `Ctrl+D` (Eclipse), `⌘ D` (Eclipse (macOS)).
> **Note:**
> Note that when you install IntelliJ IDEA with Windows default keymap for the first time, a dialog appears offering you to map this shortcut to either the Redo or Delete Line action.
>
>
>
> To adjust your keymap after the installation, refer to [Choose the right keymap](mastering-keyboard-shortcuts.html#choose-keymap).
* To join lines, place the caret at the line to which you want to join the other lines and press `Ctrl+Shift+J` (Windows), `⌃ ⇧ J` (macOS), `⌃ ⇧ J` (IntelliJ IDEA Classic (macOS)), `⌃ ⇧ J` (macOS System Shortcuts), `Ctrl+Shift+J` (XWin), `Ctrl+Shift+J` (GNOME), `Ctrl+Shift+J` (KDE), `Ctrl+Shift+J` (Emacs), `Ctrl+J` (Sublime Text), `⌘ J` (Sublime Text (macOS)), `Ctrl+Shift+J` (NetBeans), `Ctrl+Shift+J` (Visual Studio), `⌃ ⇧ J` (Visual Studio (macOS)), `Ctrl+Shift+J` (Eclipse), `⌃ ⇧ J` (Eclipse (macOS)). Keep pressing the keys until all the needed elements are joined.
You can also join string literals, a field or variable declaration, and a statement. Note that IntelliJ IDEA checks the code style settings and eliminates unwanted spaces and redundant characters.
* To split string literals into two parts, press `Enter` (Windows), `⏎` (macOS), `⏎` (IntelliJ IDEA Classic (macOS)), `⏎` (macOS System Shortcuts), `Enter` (XWin), `Enter` (GNOME), `Enter` (KDE), `Enter` (Emacs), `Enter` (Sublime Text), `⏎` (Sublime Text (macOS)), `Enter` (NetBeans), `Enter` (Visual Studio), `⏎` (Visual Studio (macOS)), `Enter` (Eclipse), `⏎` (Eclipse (macOS)).
IntelliJ IDEA splits the string and provides the correct syntax. You can also use the Break string on '\n' intention to split string literals. Press `Alt+Enter` (Windows), `⌥ ⏎` (macOS), `⌥ ⏎` (IntelliJ IDEA Classic (macOS)), `⌥ ⏎` (macOS System Shortcuts), `Alt+Enter` (XWin), `Alt+Enter` (GNOME), `Alt+Enter` (KDE), `Alt+Enter` (Emacs), `Alt+Enter` (Sublime Text), `⌥ ⏎` (Sublime Text (macOS)), `Alt+Enter` (NetBeans), `Alt+Enter` (Visual Studio), `⌥ ⏎` (Visual Studio (macOS)), `Ctrl+1` (Eclipse), `⌘ 1` (Eclipse (macOS)) or click  to select this intention.
* To comment a line of code, place the caret at the appropriate line and press `Ctrl+/` (Windows), `⌘ /` (macOS), `⌘ /` (IntelliJ IDEA Classic (macOS)), `⌘ /` (macOS System Shortcuts), `Ctrl+/` (XWin), `Ctrl+/` (GNOME), `Ctrl+/` (KDE), `Alt+;` (Emacs), `Ctrl+/` (Sublime Text), `⌘ /` (Sublime Text (macOS)), `Ctrl+/` (NetBeans), `Ctrl+Alt+/` (Visual Studio), `⌘ ⌥ /` (Visual Studio (macOS)), `Ctrl+/` (Eclipse), `⌘ /` (Eclipse (macOS)). Press `Ctrl+/` (Windows), `⌘ /` (macOS), `⌘ /` (IntelliJ IDEA Classic (macOS)), `⌘ /` (macOS System Shortcuts), `Ctrl+/` (XWin), `Ctrl+/` (GNOME), `Ctrl+/` (KDE), `Alt+;` (Emacs), `Ctrl+/` (Sublime Text), `⌘ /` (Sublime Text (macOS)), `Ctrl+/` (NetBeans), `Ctrl+Alt+/` (Visual Studio), `⌘ ⌥ /` (Visual Studio (macOS)), `Ctrl+/` (Eclipse), `⌘ /` (Eclipse (macOS)) again on the same line to uncomment it.
* To move a line up or down, press `Alt+Shift+Up` (Windows), `⌥ ⇧ ↑` (macOS), `⌥ ⇧ ↑` (IntelliJ IDEA Classic (macOS)), `⌥ ⇧ ↑` (macOS System Shortcuts), `Alt+Shift+Up` (XWin), `Alt+Shift+Up` (GNOME), `Alt+Shift+Up` (KDE), `Alt+Shift+Up` (Emacs), `Ctrl+Shift+Up` (Sublime Text), `⌘ ⌃ ↑` (Sublime Text (macOS)), `Alt+Shift+Up` (NetBeans), `Alt+Shift+Up` (Visual Studio), `Alt+Shift+Up` (Visual Studio (macOS)), `Alt+Shift+Up` (Eclipse), `Alt+Shift+Up` (Eclipse (macOS)) or `Alt+Shift+Down` (Windows), `⌥ ⇧ ↓` (macOS), `⌥ ⇧ ↓` (IntelliJ IDEA Classic (macOS)), `⌥ ⇧ ↓` (macOS System Shortcuts), `Alt+Shift+Down` (XWin), `Alt+Shift+Down` (GNOME), `Alt+Shift+Down` (KDE), `Alt+Shift+Down` (Emacs), `Ctrl+Shift+Down` (Sublime Text), `⌘ ⌃ ↓` (Sublime Text (macOS)), `Alt+Shift+Down` (NetBeans), `Alt+Shift+Down` (Visual Studio), `Alt+Shift+Down` (Visual Studio (macOS)), `Alt+Shift+Down` (Eclipse), `Alt+Shift+Down` (Eclipse (macOS)) respectively.
* To move (swap) a code element to the left or to the right, place the caret at it, or select it and press `Ctrl+Alt+Shift+Left` (Windows), `⌘ ⌥ ⇧ ←` (macOS), `⌘ ⌥ ⇧ ←` (IntelliJ IDEA Classic (macOS)), `⌘ ⌥ ⇧ ←` (macOS System Shortcuts), `Ctrl+Alt+Shift+Left` (XWin), `Ctrl+Alt+Shift+Left` (GNOME), `Ctrl+Alt+Shift+Left` (KDE), `Ctrl+Alt+Shift+Left` (Emacs), `Ctrl+Alt+Shift+Left` (Sublime Text), `⌘ ⌥ ⇧ ←` (Sublime Text (macOS)), `Ctrl+Alt+Shift+Left` (NetBeans), `Ctrl+Alt+Shift+Left` (Visual Studio), `⌘ ⌥ ⇧ ←` (Visual Studio (macOS)), `Alt+Shift+Left` (Eclipse), `⌘ ⌥ ⇧ ←` (Eclipse (macOS)) for left or `Ctrl+Alt+Shift+Right` (Windows), `⌘ ⌥ ⇧ →` (macOS), `⌘ ⌥ ⇧ →` (IntelliJ IDEA Classic (macOS)), `⌘ ⌥ ⇧ →` (macOS System Shortcuts), `Ctrl+Alt+Shift+Right` (XWin), `Ctrl+Alt+Shift+Right` (GNOME), `Ctrl+Alt+Shift+Right` (KDE), `Ctrl+Alt+Shift+Right` (Emacs), `Ctrl+Alt+Shift+Right` (Sublime Text), `⌘ ⌥ ⇧ →` (Sublime Text (macOS)), `Ctrl+Alt+Shift+Right` (NetBeans), `Ctrl+Alt+Shift+Right` (Visual Studio), `⌘ ⌥ ⇧ →` (Visual Studio (macOS)), `Alt+Shift+Right` (Eclipse), `⌘ ⌥ ⇧ →` (Eclipse (macOS)) for right.
For example, for Java you can use these actions for method invocation or method declaration arguments, enum constants, array initializer expressions. For XML or HTML, use these actions for tag attributes.

> **Note:**
> If you have the GNOME keymap selected, you might have conflicts with system shortcuts. We recommend creating [custom shortcuts](configuring-keyboard-and-mouse-shortcuts.html#add-keyboard-shortcut) in this case.
## Copy and paste code
You can use the standard shortcuts to copy `Ctrl+C` (Windows), `⌘ C` (macOS), `⌘ C` (IntelliJ IDEA Classic (macOS)), `⌘ C` (macOS System Shortcuts), `Ctrl+C` (XWin), `Ctrl+C` (GNOME), `Ctrl+C` (KDE), `Ctrl+Insert` (Emacs), `Ctrl+C` (Sublime Text), `⌘ C` (Sublime Text (macOS)), `Ctrl+C` (NetBeans), `Ctrl+C` (Visual Studio), `⌘ C` (Visual Studio (macOS)), `Ctrl+C` (Eclipse), `⌘ C` (Eclipse (macOS)) and paste `Ctrl+V` (Windows), `⌘ V` (macOS), `⌘ V` (IntelliJ IDEA Classic (macOS)), `⌘ V` (macOS System Shortcuts), `Ctrl+V` (XWin), `Ctrl+V` (GNOME), `Ctrl+V` (KDE), `Shift+Insert` (Emacs), `Ctrl+Shift+V` (Sublime Text), `⌘ ⇧ V` (Sublime Text (macOS)), `Ctrl+V` (NetBeans), `Ctrl+V` (Visual Studio), `⌘ V` (Visual Studio (macOS)), `Ctrl+V` (Eclipse), `⌘ V` (Eclipse (macOS)) any selected code fragment. If nothing is selected, IntelliJ IDEA automatically copies as is the whole line where the caret is located.
By default, when you paste anything in the editor, IntelliJ IDEA performs "smart" paste, for example, pasting multiple lines in comments will automatically add the appropriate markers to the lines you are pasting. If you need to paste just plain text, press `Ctrl+Alt+Shift+V` (Windows), `⌘ ⌥ ⇧ V` (macOS), `⌘ ⌥ ⇧ V` (IntelliJ IDEA Classic (macOS)), `⌘ ⌥ ⇧ V` (macOS System Shortcuts), `Ctrl+Alt+Shift+V` (XWin), `Ctrl+Alt+Shift+V` (GNOME), `Ctrl+Alt+Shift+V` (KDE), `Ctrl+Alt+Shift+V` (Emacs), `Ctrl+V` (Sublime Text), `⌘ V` (Sublime Text (macOS)), `Ctrl+Alt+Shift+V` (NetBeans), `Ctrl+Alt+Shift+V` (Visual Studio), `⌘ ⌥ ⇧ V` (Visual Studio (macOS)), `Ctrl+Alt+Shift+V` (Eclipse), `⌘ ⌥ ⇧ V` (Eclipse (macOS)).
Procedure:
* When you copy (`Ctrl+C` (Windows), `⌘ C` (macOS), `⌘ C` (IntelliJ IDEA Classic (macOS)), `⌘ C` (macOS System Shortcuts), `Ctrl+C` (XWin), `Ctrl+C` (GNOME), `Ctrl+C` (KDE), `Ctrl+Insert` (Emacs), `Ctrl+C` (Sublime Text), `⌘ C` (Sublime Text (macOS)), `Ctrl+C` (NetBeans), `Ctrl+C` (Visual Studio), `⌘ C` (Visual Studio (macOS)), `Ctrl+C` (Eclipse), `⌘ C` (Eclipse (macOS))) or cut (`Ctrl+X` (Windows), `⌘ X` (macOS), `⌘ X` (IntelliJ IDEA Classic (macOS)), `⌘ X` (macOS System Shortcuts), `Ctrl+X` (XWin), `Ctrl+X` (GNOME), `Ctrl+X` (KDE), `Shift+Delete` (Emacs), `Ctrl+X` (Sublime Text), `⌘ X` (Sublime Text (macOS)), `Ctrl+X` (NetBeans), `Ctrl+X` (Visual Studio), `⌘ X` (Visual Studio (macOS)), `Ctrl+X` (Eclipse), `⌘ X` (Eclipse (macOS))) a line without any code selected, the paste action will add the contents of the clipboard to above the current line, not at your caret.
If you want to paste your copied code at the caret, select the Paste at the caret position option in the [advanced settings](advanced-settings.html#advanced_editor).
* Place the caret at a line or a symbol, right-click to open the context menu, select `Copy/Paste Special | Copy Reference`. When you select the Copy Reference (`Ctrl+Alt+Shift+C` (Windows), `⌘ ⌥ ⇧ C` (macOS), `⌘ ⌥ ⇧ C` (IntelliJ IDEA Classic (macOS)), `⌘ ⌥ ⇧ C` (macOS System Shortcuts), `Ctrl+Alt+Shift+C` (XWin), `Ctrl+Alt+Shift+C` (GNOME), `Ctrl+Alt+Shift+C` (KDE), `Ctrl+Alt+Shift+C` (Emacs), `Ctrl+Alt+Shift+C` (Sublime Text), `⌘ ⌥ ⇧ C` (Sublime Text (macOS)), `Ctrl+Alt+Shift+C` (NetBeans), `Ctrl+Alt+Shift+C` (Visual Studio), `⌘ ⌥ ⇧ C` (Visual Studio (macOS)), `Ctrl+Alt+Shift+C` (Eclipse), `⌘ ⌥ ⇧ C` (Eclipse (macOS))) option, IntelliJ IDEA creates a reference string that includes the line number of the selected line or symbol. You can press `Ctrl+V` (Windows), `⌘ V` (macOS), `⌘ V` (IntelliJ IDEA Classic (macOS)), `⌘ V` (macOS System Shortcuts), `Ctrl+V` (XWin), `Ctrl+V` (GNOME), `Ctrl+V` (KDE), `Shift+Insert` (Emacs), `Ctrl+Shift+V` (Sublime Text), `⌘ ⇧ V` (Sublime Text (macOS)), `Ctrl+V` (NetBeans), `Ctrl+V` (Visual Studio), `⌘ V` (Visual Studio (macOS)), `Ctrl+V` (Eclipse), `⌘ V` (Eclipse (macOS)) to paste the copied reference anywhere.
* IntelliJ IDEA keeps track of everything you copy to the clipboard. To paste from history, in the editor, from the context menu, select `Copy/Paste Special | Paste from History` (`Ctrl+Shift+V` (Windows), `⌘ ⇧ V` (macOS), `⌘ ⇧ V` (IntelliJ IDEA Classic (macOS)), `⌘ ⇧ V` (macOS System Shortcuts), `Ctrl+Shift+V` (XWin), `Ctrl+Shift+V` (GNOME), `Ctrl+Shift+V` (KDE), `Alt+Y` (Emacs), `Ctrl+K, Ctrl+V` (Sublime Text), `⌘ K, ⌘ V` (Sublime Text (macOS)), `Ctrl+Shift+V` (NetBeans), `Ctrl+Shift+V` (Visual Studio), `⌘ ⇧ V` (Visual Studio (macOS)), `Ctrl+Shift+V` (Eclipse), `⌘ ⇧ V` (Eclipse (macOS))). In the dialog that opens, select your entry and click Paste.
> **Tip:**
> The default number of items stored in the clipboard history is 100.
* When you copy and paste code to the editor, IntelliJ IDEA displays the hidden (special) characters represented by their Unicode name abbreviation.

## Code selection
Procedure: Select code constructs
* In the editor, place the caret at the item you want to select and press `Ctrl+W` (Windows), `⌥ ↑` (macOS), `⌘ W` (IntelliJ IDEA Classic (macOS)), `⌥ ↑` (macOS System Shortcuts), `Ctrl+W` (XWin), `Ctrl+W` (GNOME), `Ctrl+W` (KDE), `Ctrl+Alt+W` (Emacs), `Ctrl+Shift+Space` (Sublime Text), `⌘ ⇧ A` (Sublime Text (macOS)), `Alt+Shift+.` (NetBeans), `Alt+Shift+=` (Visual Studio), `⌘ ⌥ →` (Visual Studio (macOS)), `Alt+Shift+Up` (Eclipse), `⌃ ⇧ ↑` (Eclipse (macOS))/ `Ctrl+Shift+W` (Windows), `⌥ ↓` (macOS), `⌘ ⇧ W` (IntelliJ IDEA Classic (macOS)), `⌥ ↓` (macOS System Shortcuts), `Ctrl+Shift+W` (XWin), `Ctrl+Shift+W` (GNOME), `Ctrl+Shift+W` (KDE), `Ctrl+Shift+W` (Emacs), `Ctrl+Shift+W` (Sublime Text), `Ctrl+Shift+W` (Sublime Text (macOS)), `Alt+Shift+Comma` (NetBeans), `Alt+Shift+Minus` (Visual Studio), `⌘ ⌥ ←` (Visual Studio (macOS)), `Alt+Shift+Down` (Eclipse), `⌃ ⇧ ↓` (Eclipse (macOS)) to extend or shrink your selection.
For example, in a plain text file, the selection starts within the whole word then extends to the sentence, paragraph, and so on.
In a Java file, if you start by selecting an argument in a method call, it will extend to all arguments, then to the whole method, then to the expression containing this method, then to a larger block of expressions, and so on.

* If you need to highlight your braces, place the caret immediately after the block closing brace/bracket or before the block opening brace/bracket.
Procedure: Select code according to capitalization
1. In the Settings dialog (`Ctrl+Alt+S` (Windows), `⌘ Comma` (macOS), `⌘ Comma` (IntelliJ IDEA Classic (macOS)), `⌘ Comma` (macOS System Shortcuts), `Ctrl+Alt+S` (XWin), `Ctrl+Alt+S` (GNOME), `Ctrl+Alt+S` (KDE), `Ctrl+Alt+S` (Emacs), `Ctrl+Alt+S` (Sublime Text), `⌘ Comma` (Sublime Text (macOS)), `Ctrl+Alt+S` (NetBeans), `Ctrl+Alt+S` (Visual Studio), `⌘ Comma` (Visual Studio (macOS)), `Ctrl+Alt+S` (Eclipse), `⌘ Comma` (Eclipse (macOS))), go to `Editor | General | Smart Keys`.
2. Select the Use "CamelHumps" words checkbox.
If you want to select words with a double click according to capitalization, make sure that the Honor "CamelHumps" words settings when selecting on double click checkbox right below is also selected.
[Video](https://resources.jetbrains.com/help/img/idea/2026.2/camelHumpsOption.mp4)
## Code statements
Procedure: Move statements
* In the editor, place the caret at the needed statement and press `Ctrl+Shift+Up` (Windows), `⌘ ⇧ ↑` (macOS), `⌘ ⇧ ↑` (IntelliJ IDEA Classic (macOS)), `⌃ ⇧ ↑` (macOS System Shortcuts), `Ctrl+Shift+Up` (XWin), `Ctrl+Shift+Up` (GNOME), `Ctrl+Shift+Up` (KDE), `Ctrl+Shift+Up` (Emacs), `Ctrl+Shift+Up` (Sublime Text), `⌘ ⇧ ↑` (Sublime Text (macOS)), `Alt+Shift+Page Up` (NetBeans), `Ctrl+Alt+Shift+Up` (Visual Studio), `⌃ ⌥ ⇧ ↑` (Visual Studio (macOS)), `Alt+Up` (Eclipse), `⌥ ↑` (Eclipse (macOS)) to move a statement up or `Ctrl+Shift+Down` (Windows), `⌘ ⇧ ↓` (macOS), `⌘ ⇧ ↓` (IntelliJ IDEA Classic (macOS)), `⌃ ⇧ ↓` (macOS System Shortcuts), `Ctrl+Shift+Down` (XWin), `Ctrl+Shift+Down` (GNOME), `Ctrl+Shift+Down` (KDE), `Ctrl+Shift+Down` (Emacs), `Ctrl+Shift+Down` (Sublime Text), `⌘ ⇧ ↓` (Sublime Text (macOS)), `Alt+Shift+Page Down` (NetBeans), `Ctrl+Alt+Shift+Down` (Visual Studio), `⌃ ⌥ ⇧ ↓` (Visual Studio (macOS)), `Alt+Down` (Eclipse), `⌥ ↓` (Eclipse (macOS)) to move a statement down. IntelliJ IDEA moves the selected statement performing a syntax check.
> **Note:**
> If moving of the statement is not allowed in the current context, the actions will be disabled.
Procedure: Complete current statement
* In the editor, press `Ctrl+Shift+Enter` (Windows), `⌘ ⇧ ⏎` (macOS), `⌘ ⇧ ⏎` (IntelliJ IDEA Classic (macOS)), `⌘ ⇧ ⏎` (macOS System Shortcuts), `Ctrl+Shift+Enter` (XWin), `Ctrl+Shift+Enter` (GNOME), `Ctrl+Shift+Enter` (KDE), `Ctrl+Shift+Enter` (Emacs), `Ctrl+Shift+Enter` (Sublime Text), `Ctrl+Shift+Enter` (Sublime Text (macOS)), `Ctrl+Shift+Enter` (NetBeans), `Ctrl+Shift+Enter` (Visual Studio), `⌘ ⇧ ⏎` (Visual Studio (macOS)), `Ctrl+Shift+Enter` (Eclipse), `⌘ ⇧ ⏎` (Eclipse (macOS)) or from the main menu select `Code | Complete Current Statement`. IntelliJ IDEA inserts the required trailing comma automatically in structs, slices, and other composite literals. The caret is moved to the position where you can start typing the next statement.
Procedure: Unwrap or remove statement
1. Place the caret at the expression you want to remove or unwrap.
2. Press `Ctrl+Shift+Delete` (Windows), `⌘ ⇧ ⌦` (macOS), `⌘ ⇧ ⌦` (IntelliJ IDEA Classic (macOS)), `⌘ ⇧ ⌦` (macOS System Shortcuts), `Ctrl+Shift+Delete` (XWin), `Ctrl+Shift+Delete` (GNOME), `Ctrl+Shift+Delete` (KDE), `Ctrl+Shift+Delete` (Emacs), `Ctrl+Shift+Delete` (Sublime Text), `⌘ ⇧ ⌦` (Sublime Text (macOS)), `Ctrl+Shift+Delete` (NetBeans), `Ctrl+Shift+Delete` (Visual Studio), `⌘ ⇧ ⌦` (Visual Studio (macOS)), `Alt+R` (Eclipse), `Ctrl+Shift+Delete` (Eclipse (macOS)) or select Code | Unwrap/Remove from the main menu.
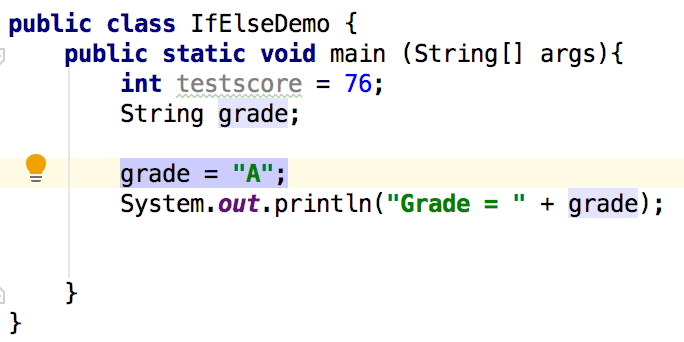
IntelliJ IDEA shows a popup with all actions available in the current context. To make it easier to distinguish between statements to be extracted and statements to be removed, IntelliJ IDEA uses different background colors.
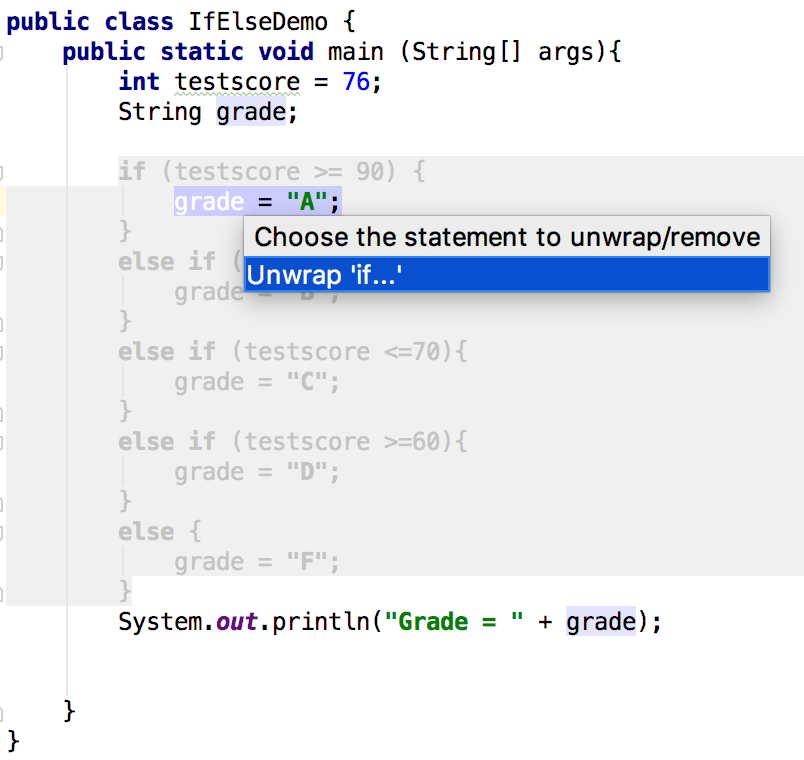
3. Select an action and press `Enter` (Windows), `⏎` (macOS), `⏎` (IntelliJ IDEA Classic (macOS)), `⏎` (macOS System Shortcuts), `Enter` (XWin), `Enter` (GNOME), `Enter` (KDE), `Enter` (Emacs), `Enter` (Sublime Text), `⏎` (Sublime Text (macOS)), `Enter` (NetBeans), `Enter` (Visual Studio), `⏎` (Visual Studio (macOS)), `Enter` (Eclipse), `⏎` (Eclipse (macOS)).
## Code fragments
Procedure:
* Move and copy code fragments by dragging them in the editor.
* To move a code fragment, select it and drag the selection to the target location.
* To copy a code selection, keeping `Ctrl` (Windows), `Ctrl` (macOS), `Ctrl` (IntelliJ IDEA Classic (macOS)), `Ctrl` (macOS System Shortcuts), `Ctrl` (XWin), `Ctrl` (GNOME), `Ctrl` (KDE), `Ctrl` (Emacs), `Ctrl` (Sublime Text), `Ctrl` (Sublime Text (macOS)), `Ctrl` (NetBeans), `Ctrl` (Visual Studio), `Ctrl` (Visual Studio (macOS)), `Ctrl` (Eclipse), `Ctrl` (Eclipse (macOS)) pressed, drag it to the target location. > **Note:** > The copy action might not be available in macOS since it can [conflict with global OS shortcuts](configuring-keyboard-and-mouse-shortcuts.html#conflicts).
The drag functionality is enabled by default. To disable it, in the Settings dialog (`Ctrl+Alt+S` (Windows), `⌘ Comma` (macOS), `⌘ Comma` (IntelliJ IDEA Classic (macOS)), `⌘ Comma` (macOS System Shortcuts), `Ctrl+Alt+S` (XWin), `Ctrl+Alt+S` (GNOME), `Ctrl+Alt+S` (KDE), `Ctrl+Alt+S` (Emacs), `Ctrl+Alt+S` (Sublime Text), `⌘ Comma` (Sublime Text (macOS)), `Ctrl+Alt+S` (NetBeans), `Ctrl+Alt+S` (Visual Studio), `⌘ Comma` (Visual Studio (macOS)), `Ctrl+Alt+S` (Eclipse), `⌘ Comma` (Eclipse (macOS))), go to `Editor | General` and clear the Move code fragments with drag-and-drop checkbox in the Mouse Control section.
* To toggle between the upper and lower case for the selected code fragment, press `Ctrl+Shift+U` (Windows), `⌘ ⇧ U` (macOS), `⌘ ⇧ U` (IntelliJ IDEA Classic (macOS)), `⌘ ⇧ U` (macOS System Shortcuts), `Ctrl+Shift+U` (XWin), `Ctrl+Shift+U` (GNOME), `Ctrl+Shift+U` (KDE), `Ctrl+Shift+U` (Emacs), `Ctrl+K, Ctrl+U` (Sublime Text), `⌘ K, ⌘ U` (Sublime Text (macOS)), `Ctrl+U, S` (NetBeans), `Ctrl+Shift+U` (Visual Studio), `⌘ ⇧ U` (Visual Studio (macOS)), `Ctrl+Shift+U` (Eclipse), `⌘ ⇧ X` (Eclipse (macOS)).
Note that when you apply the toggle case action to the CamelCase name format, IntelliJ IDEA converts the name to the lower case.
* To comment or uncomment a code fragment, select it and press `Ctrl+Shift+/` (Windows), `⌘ ⌥ /` (macOS), `⌃ ⇧ /` (IntelliJ IDEA Classic (macOS)), `⌘ ⌥ /` (macOS System Shortcuts), `Ctrl+Shift+/` (XWin), `Ctrl+Shift+/` (GNOME), `Ctrl+Shift+/` (KDE), `Ctrl+Shift+/` (Emacs), `Ctrl+Shift+/` (Sublime Text), `⌘ ⌥ /` (Sublime Text (macOS)), `Ctrl+Shift+/` (NetBeans), `Ctrl+Shift+/` (Visual Studio), `⌘ ⌃ /` (Visual Studio (macOS)), `Ctrl+Shift+/` (Eclipse), `⌘ ⇧ /` (Eclipse (macOS)).
To configure settings for where the generated line or block comments should be placed in Java, in the Settings dialog (`Ctrl+Alt+S` (Windows), `⌘ Comma` (macOS), `⌘ Comma` (IntelliJ IDEA Classic (macOS)), `⌘ Comma` (macOS System Shortcuts), `Ctrl+Alt+S` (XWin), `Ctrl+Alt+S` (GNOME), `Ctrl+Alt+S` (KDE), `Ctrl+Alt+S` (Emacs), `Ctrl+Alt+S` (Sublime Text), `⌘ Comma` (Sublime Text (macOS)), `Ctrl+Alt+S` (NetBeans), `Ctrl+Alt+S` (Visual Studio), `⌘ Comma` (Visual Studio (macOS)), `Ctrl+Alt+S` (Eclipse), `⌘ Comma` (Eclipse (macOS))), go to `Editor | Code Style | Java` and on the Code Generation tab use options in the Comment Code section.
## Code folding
IntelliJ IDEA automatically recognizes certain code structures and makes them foldable. You can also define custom folding regions.
Folded code fragments are shown as shaded ellipses ( ). If a folded code fragment has errors, IntelliJ IDEA highlights the fragment in red.
[Video](https://resources.jetbrains.com/help/img/idea/2026.2/ij_fold_code.mp4)
By default, folding icons in the gutter show up on hover. You can change this and configure other code folding settings in `Settings | Editor | General | Code Folding`. For example, you can disable the default folding for one-line Rust methods:
Go to `Help | Find Action` in the main menu (`Ctrl+Shift+A` (Windows), `⌘ ⇧ A` (macOS), `⌘ ⇧ A` (IntelliJ IDEA Classic (macOS)), `⌘ ⇧ P` (macOS System Shortcuts), `Ctrl+Shift+A` (XWin), `Ctrl+Shift+A` (GNOME), `Ctrl+Shift+A` (KDE), `Escape, X` (Emacs), `Ctrl+Shift+P` (Sublime Text), `⌘ ⇧ P` (Sublime Text (macOS)), `Ctrl+I` (NetBeans), `Ctrl+Shift+A` (Visual Studio), `⌘ ⇧ A` (Visual Studio (macOS)), `Ctrl+Shift+A` (Eclipse), `⌘ 3` (Eclipse (macOS))) and search for `folding`. IntelliJ IDEA will show a popup with all folding actions with their shortcuts:
Procedure: Expand or collapse code elements
* To fold or unfold a code fragment, press `Ctrl+NumPad -` (Windows), `⌘ NumPad -` (macOS), `⌘ NumPad -` (IntelliJ IDEA Classic (macOS)), `⌘ NumPad -` (macOS System Shortcuts), `Ctrl+NumPad -` (XWin), `Ctrl+NumPad -` (GNOME), `Ctrl+NumPad -` (KDE), `Ctrl+NumPad -` (Emacs), `Ctrl+Shift+[` (Sublime Text), `⌘ ⌥ [` (Sublime Text (macOS)), `Ctrl+NumPad -` (NetBeans), `Ctrl+M, S` (Visual Studio), `⌃ M, S` (Visual Studio (macOS)), `Ctrl+NumPad -` (Eclipse), `⌘ NumPad -` (Eclipse (macOS))/`Ctrl+NumPad +` (Windows), `⌘ NumPad +` (macOS), `⌘ NumPad +` (IntelliJ IDEA Classic (macOS)), `⌘ NumPad +` (macOS System Shortcuts), `Ctrl+NumPad +` (XWin), `Ctrl+NumPad +` (GNOME), `Ctrl+NumPad +` (KDE), `Ctrl+NumPad +` (Emacs), `Ctrl+Shift+]` (Sublime Text), `⌘ ⌥ ]` (Sublime Text (macOS)), `Ctrl+NumPad +` (NetBeans), `Ctrl+M, E` (Visual Studio), `⌃ M, E` (Visual Studio (macOS)), `Ctrl+NumPad +` (Eclipse), `⌘ NumPad +` (Eclipse (macOS)). IntelliJ IDEA folds or unfolds the current code fragment, for example, a single method.
* To collapse or expand all code fragments, press `Ctrl+Shift+NumPad -` (Windows), `⌘ ⇧ NumPad -` (macOS), `⌘ ⇧ NumPad -` (IntelliJ IDEA Classic (macOS)), `⌥ ⇧ Minus` (macOS System Shortcuts), `Ctrl+Shift+NumPad -` (XWin), `Ctrl+Shift+NumPad -` (GNOME), `Ctrl+Shift+NumPad -` (KDE), `Ctrl+Shift+NumPad -` (Emacs), `Ctrl+K, Ctrl+1` (Sublime Text), `⌘ K, ⌘ 1` (Sublime Text (macOS)), `Ctrl+Shift+NumPad -` (NetBeans), `Ctrl+M, A` (Visual Studio), `⌃ M, A` (Visual Studio (macOS)), `Ctrl+Shift+NumPad /` (Eclipse), `⌘ ⇧ NumPad /` (Eclipse (macOS))/`Ctrl+Shift+NumPad +` (Windows), `⌘ ⇧ NumPad +` (macOS), `⌘ ⇧ NumPad +` (IntelliJ IDEA Classic (macOS)), `⌥ ⇧ Plus` (macOS System Shortcuts), `Ctrl+Shift+NumPad +` (XWin), `Ctrl+Shift+NumPad +` (GNOME), `Ctrl+Shift+NumPad +` (KDE), `Ctrl+Shift+NumPad +` (Emacs), `Ctrl+K, Ctrl+J` (Sublime Text), `⌘ K, ⌘ J` (Sublime Text (macOS)), `Ctrl+Shift+NumPad +` (NetBeans), `Ctrl+M, X` (Visual Studio), `⌃ M, X` (Visual Studio (macOS)), `Ctrl+NumPad *` (Eclipse), `⌘ NumPad *` (Eclipse (macOS)).
IntelliJ IDEA collapses or expands all fragments within the selection, or, if nothing is selected, all fragments in the current file, for example, all methods in a file.
* To collapse or expand code recursively, press `Ctrl+Alt+NumPad -` (Windows), `⌘ ⌥ NumPad -` (macOS), `⌘ ⌥ NumPad -` (IntelliJ IDEA Classic (macOS)), `⌘ ⌥ NumPad -` (macOS System Shortcuts), `Ctrl+Alt+NumPad -` (XWin), `Ctrl+Alt+NumPad -` (GNOME), `Ctrl+Alt+NumPad -` (KDE), `Ctrl+Alt+NumPad -` (Emacs), `Ctrl+Alt+NumPad -` (Sublime Text), `⌘ ⌥ NumPad -` (Sublime Text (macOS)), `Ctrl+NumPad /` (NetBeans), `Ctrl+Alt+NumPad -` (Visual Studio), `⌘ ⌥ NumPad -` (Visual Studio (macOS)), `Ctrl+Alt+NumPad -` (Eclipse), `⌘ ⌥ NumPad -` (Eclipse (macOS))/`Ctrl+Alt+NumPad +` (Windows), `⌘ ⌥ NumPad +` (macOS), `⌘ ⌥ NumPad +` (IntelliJ IDEA Classic (macOS)), `⌘ ⌥ NumPad +` (macOS System Shortcuts), `Ctrl+Alt+NumPad +` (XWin), `Ctrl+Alt+NumPad +` (GNOME), `Ctrl+Alt+NumPad +` (KDE), `Ctrl+Alt+NumPad +` (Emacs), `Ctrl+Alt+NumPad +` (Sublime Text), `⌘ ⌥ NumPad +` (Sublime Text (macOS)), `Ctrl+NumPad *` (NetBeans), `Ctrl+Alt+NumPad +` (Visual Studio), `⌘ ⌥ NumPad +` (Visual Studio (macOS)), `Ctrl+Alt+NumPad +` (Eclipse), `⌘ ⌥ NumPad +` (Eclipse (macOS)). IntelliJ IDEA collapses or expands the current fragment and all its subordinate regions within that fragment.
* To fold a block of code inside a pair of matching curly braces `{}`, press `Ctrl+NumPad -` (Windows), `⌘ NumPad -` (macOS), `⌘ NumPad -` (IntelliJ IDEA Classic (macOS)), `⌘ NumPad -` (macOS System Shortcuts), `Ctrl+NumPad -` (XWin), `Ctrl+NumPad -` (GNOME), `Ctrl+NumPad -` (KDE), `Ctrl+NumPad -` (Emacs), `Ctrl+Shift+[` (Sublime Text), `⌘ ⌥ [` (Sublime Text (macOS)), `Ctrl+NumPad -` (NetBeans), `Ctrl+M, S` (Visual Studio), `⌃ M, S` (Visual Studio (macOS)), `Ctrl+NumPad -` (Eclipse), `⌘ NumPad -` (Eclipse (macOS)). To expand the block, press `Ctrl+NumPad +` (Windows), `⌘ NumPad +` (macOS), `⌘ NumPad +` (IntelliJ IDEA Classic (macOS)), `⌘ NumPad +` (macOS System Shortcuts), `Ctrl+NumPad +` (XWin), `Ctrl+NumPad +` (GNOME), `Ctrl+NumPad +` (KDE), `Ctrl+NumPad +` (Emacs), `Ctrl+Shift+]` (Sublime Text), `⌘ ⌥ ]` (Sublime Text (macOS)), `Ctrl+NumPad +` (NetBeans), `Ctrl+M, E` (Visual Studio), `⌃ M, E` (Visual Studio (macOS)), `Ctrl+NumPad +` (Eclipse), `⌘ NumPad +` (Eclipse (macOS)).
* To collapse or expand doc comments in the current file, in the main menu select `Code | Folding | Expand Doc Comments` or Collapse Doc Comments.
* To collapse or expand a custom code fragment, select it and press `Ctrl+.` (Windows), `⌘ .` (macOS), `⌘ .` (IntelliJ IDEA Classic (macOS)), `⌘ .` (macOS System Shortcuts), `Ctrl+.` (XWin), `Ctrl+.` (GNOME), `Ctrl+.` (KDE), `Ctrl+.` (Emacs), `Ctrl+.` (Sublime Text), `⌘ .` (Sublime Text (macOS)), `Ctrl+.` (NetBeans), `Ctrl+M, H` (Visual Studio), `⌘ .` (Visual Studio (macOS)), `Ctrl+.` (Eclipse), `Ctrl+.` (Eclipse (macOS)). Alternatively, mark the code fragment as [Custom folding region](#custom_folding_regions).
You can fold or unfold any manually selected regions in code.
> **Note:**
> If code in a folded fragment is changed during reformatting or refactoring, IntelliJ IDEA automatically expands the folded fragment.
Procedure: Fold or unfold nested fragments
* To expand the current fragment and all the nested fragments, press `Ctrl+NumPad *, 1` (Windows), `⌘ NumPad *, 1` (macOS), `⌘ NumPad *, 1` (IntelliJ IDEA Classic (macOS)), `⌘ NumPad *, 1` (macOS System Shortcuts), `Ctrl+NumPad *, 1` (XWin), `Ctrl+NumPad *, 1` (GNOME), `Ctrl+NumPad *, 1` (KDE), `Ctrl+NumPad *, 1` (Emacs), `Ctrl+NumPad *, 1` (Sublime Text), `⌘ NumPad *, 1` (Sublime Text (macOS)), `Ctrl+NumPad *, 1` (NetBeans), `Ctrl+NumPad *, 1` (Visual Studio), `⌘ NumPad *, 1` (Visual Studio (macOS)), `Ctrl+NumPad *, 1` (Eclipse), `Ctrl+NumPad *, 1` (Eclipse (macOS)). You can expand the current fragment up to the specified nesting level (from 1 to 5).
* To expand all the collapsed fragments in the file, press `Ctrl+Shift+NumPad *, 1` (Windows), `⌘ ⌥ NumPad *, 1` (macOS), `⌘ ⌥ NumPad *, 1` (IntelliJ IDEA Classic (macOS)), `⌘ ⌥ NumPad *, 1` (macOS System Shortcuts), `Ctrl+Shift+NumPad *, 1` (XWin), `Ctrl+Shift+NumPad *, 1` (GNOME), `Ctrl+Shift+NumPad *, 1` (KDE), `Ctrl+Shift+NumPad *, 1` (Emacs), `Ctrl+Shift+NumPad *, 1` (Sublime Text), `⌘ ⌥ NumPad *, 1` (Sublime Text (macOS)), `Ctrl+Shift+NumPad *, 1` (NetBeans), `Ctrl+Shift+NumPad *, 1` (Visual Studio), `⌘ ⌥ NumPad *, 1` (Visual Studio (macOS)), `Ctrl+Shift+NumPad *, 1` (Eclipse), `Ctrl+Shift+NumPad *, 1` (Eclipse (macOS)). You can expand the collapsed fragments up to the specified nesting level (from 1 to 5).
Procedure: Custom folding regions
You can make any code fragment foldable by marking it as a custom folding region with dedicated comments. After that, you can expand and collapse the fragment with `Ctrl+.` (Windows), `⌘ .` (macOS), `⌘ .` (IntelliJ IDEA Classic (macOS)), `⌘ .` (macOS System Shortcuts), `Ctrl+.` (XWin), `Ctrl+.` (GNOME), `Ctrl+.` (KDE), `Ctrl+.` (Emacs), `Ctrl+.` (Sublime Text), `⌘ .` (Sublime Text (macOS)), `Ctrl+.` (NetBeans), `Ctrl+M, H` (Visual Studio), `⌘ .` (Visual Studio (macOS)), `Ctrl+.` (Eclipse), `Ctrl+.` (Eclipse (macOS)) or have it collapsed automatically on opening the file.
1. In the editor, select a code fragment and press `Ctrl+Alt+T` (Windows), `⌘ ⌥ T` (macOS), `⌘ ⌥ T` (IntelliJ IDEA Classic (macOS)), `⌘ ⌥ T` (macOS System Shortcuts), `Ctrl+Alt+Shift+B` (XWin), `Ctrl+Alt+Shift+B` (GNOME), `Ctrl+Alt+Shift+B` (KDE), `Ctrl+Alt+T` (Emacs), `Ctrl+Alt+T` (Sublime Text), `⌘ ⌥ T` (Sublime Text (macOS)), `Ctrl+Alt+T` (NetBeans), `Ctrl+Alt+T` (Visual Studio), `Ctrl+Alt+T` (Visual Studio (macOS)), `Alt+Shift+Z` (Eclipse), `⌘ ⌥ Z` (Eclipse (macOS)).
2. From the popup menu, select Comments or region...endregion Comments.
3. Optionally, specify a description under which the collapsed fragment will be hidden.
4. To collapse or expand the created region, press `Ctrl+.` (Windows), `⌘ .` (macOS), `⌘ .` (IntelliJ IDEA Classic (macOS)), `⌘ .` (macOS System Shortcuts), `Ctrl+.` (XWin), `Ctrl+.` (GNOME), `Ctrl+.` (KDE), `Ctrl+.` (Emacs), `Ctrl+.` (Sublime Text), `⌘ .` (Sublime Text (macOS)), `Ctrl+.` (NetBeans), `Ctrl+M, H` (Visual Studio), `⌘ .` (Visual Studio (macOS)), `Ctrl+.` (Eclipse), `Ctrl+.` (Eclipse (macOS)).
5. To navigate to the created custom region, press `Ctrl+Alt+.` (Windows), `⌘ ⌥ .` (macOS), `⌘ ⌥ .` (IntelliJ IDEA Classic (macOS)), `⌘ ⌥ .` (macOS System Shortcuts), `Ctrl+Alt+.` (XWin), `Ctrl+Alt+.` (GNOME), `Ctrl+Alt+.` (KDE), `Ctrl+Alt+.` (Emacs), `Ctrl+Alt+.` (Sublime Text), `⌘ ⌥ .` (Sublime Text (macOS)), `Ctrl+Alt+.` (NetBeans), `Ctrl+Alt+.` (Visual Studio), `⌘ ⌥ .` (Visual Studio (macOS)), `Ctrl+Alt+.` (Eclipse), `⌘ ⌥ .` (Eclipse (macOS)).
[Video](https://resources.jetbrains.com/help/img/idea/2026.2/db_use_custom_folding_by_using_regions.mp4)
Procedure: Configure code folding icons
You can select how to display folding icons that appear in the gutter or disable them completely.
1. Press `Ctrl+Alt+S` (Windows), `⌘ Comma` (macOS), `⌘ Comma` (IntelliJ IDEA Classic (macOS)), `⌘ Comma` (macOS System Shortcuts), `Ctrl+Alt+S` (XWin), `Ctrl+Alt+S` (GNOME), `Ctrl+Alt+S` (KDE), `Ctrl+Alt+S` (Emacs), `Ctrl+Alt+S` (Sublime Text), `⌘ Comma` (Sublime Text (macOS)), `Ctrl+Alt+S` (NetBeans), `Ctrl+Alt+S` (Visual Studio), `⌘ Comma` (Visual Studio (macOS)), `Ctrl+Alt+S` (Eclipse), `⌘ Comma` (Eclipse (macOS)) to open settings and then select `Editor | General | Code Folding`.
2. From the Show code folding arrows list, select Always or On mouse hover.
Clear the checkbox to disable the icons.