GitLab Self-Managed
GitLab Self-Managed is a GitLab deployment that your organization installs and runs on its own infrastructure. For more information, see the GitLab documentation.
A connection to a GitLab Self-Managed instance is established and maintained through a GitLab OAuth application that you create on the instance. JetBrains Central Console shows the redirect URL and the scopes that the application requires, and you provide the application ID and secret in return. Access is delegated per user: each user authorizes the application with their own GitLab account, so in JetBrains Air and other services based on JetBrains Central Console they see only the projects that their GitLab permissions allow.
Prerequisites
Before you start, make sure that:
Your GitLab Self-Managed instance is reachable from JetBrains Central Console. Instances that are only available inside a private network cannot be connected.
You have permission to create a GitLab OAuth application. Alternatively, you can ask a GitLab administrator to create one for you and provide its details.
Connect a GitLab Self-Managed instance
The process of connecting a GitLab Self-Managed instance consists of the following steps:
Start the connection in JetBrains Central Console to get the redirect URL and scopes.
Create the application on your GitLab Self-Managed instance.
Provide the credentials in JetBrains Central Console and authorize the application.
Create a connection
Creating a connection means moving values in both directions: you start the connection in JetBrains Central Console to get the values that GitLab needs, create the application on your GitLab Self-Managed instance, and then bring its credentials back to JetBrains Central Console.
Start the connection in JetBrains Central Console
In the sidebar, under Integrations, select Hosted VCS.
If you don't see this page, or the controls on this page are inactive, make sure your role has the necessary permissions.
Click Connect VCS and select GitLab Self-Managed.
A connection card appears on the page.
In the GitLab server URL field, specify the host of your GitLab Self-Managed instance. For example,
gitlab.jetbrains.com.
Create the application in GitLab
Navigate to your GitLab Self-Managed instance and log in.
Open the applications page:
For group-level applications, navigate to your group, then select .
For instance-level applications, navigate to . This requires administrator access to your GitLab Self-Managed instance.
Enter the following details:
Redirect URI: The redirect URL shown in the connection card:
https://api.jetbrains.cloud/repo-connections/auth/callbackTo copy it, click the copy icon next to the value.
Confidential: Select this checkbox. JetBrains Central Console stores the application secret.
Trusted (Applies only to instance-level applications): Mark the application as trusted. The user authorization step is automatically skipped for the application.
Scopes:
api,read_user,read_repository, andwrite_repository.
Save the application in GitLab and copy the generated application ID and secret. GitLab shows the secret only once, so copy it before you leave the page.
Provide the credentials in JetBrains Central Console
Back in JetBrains Central Console, enter the following values:
Application ID: The ID of the GitLab application that you created.
Secret: The secret of the application that you created.
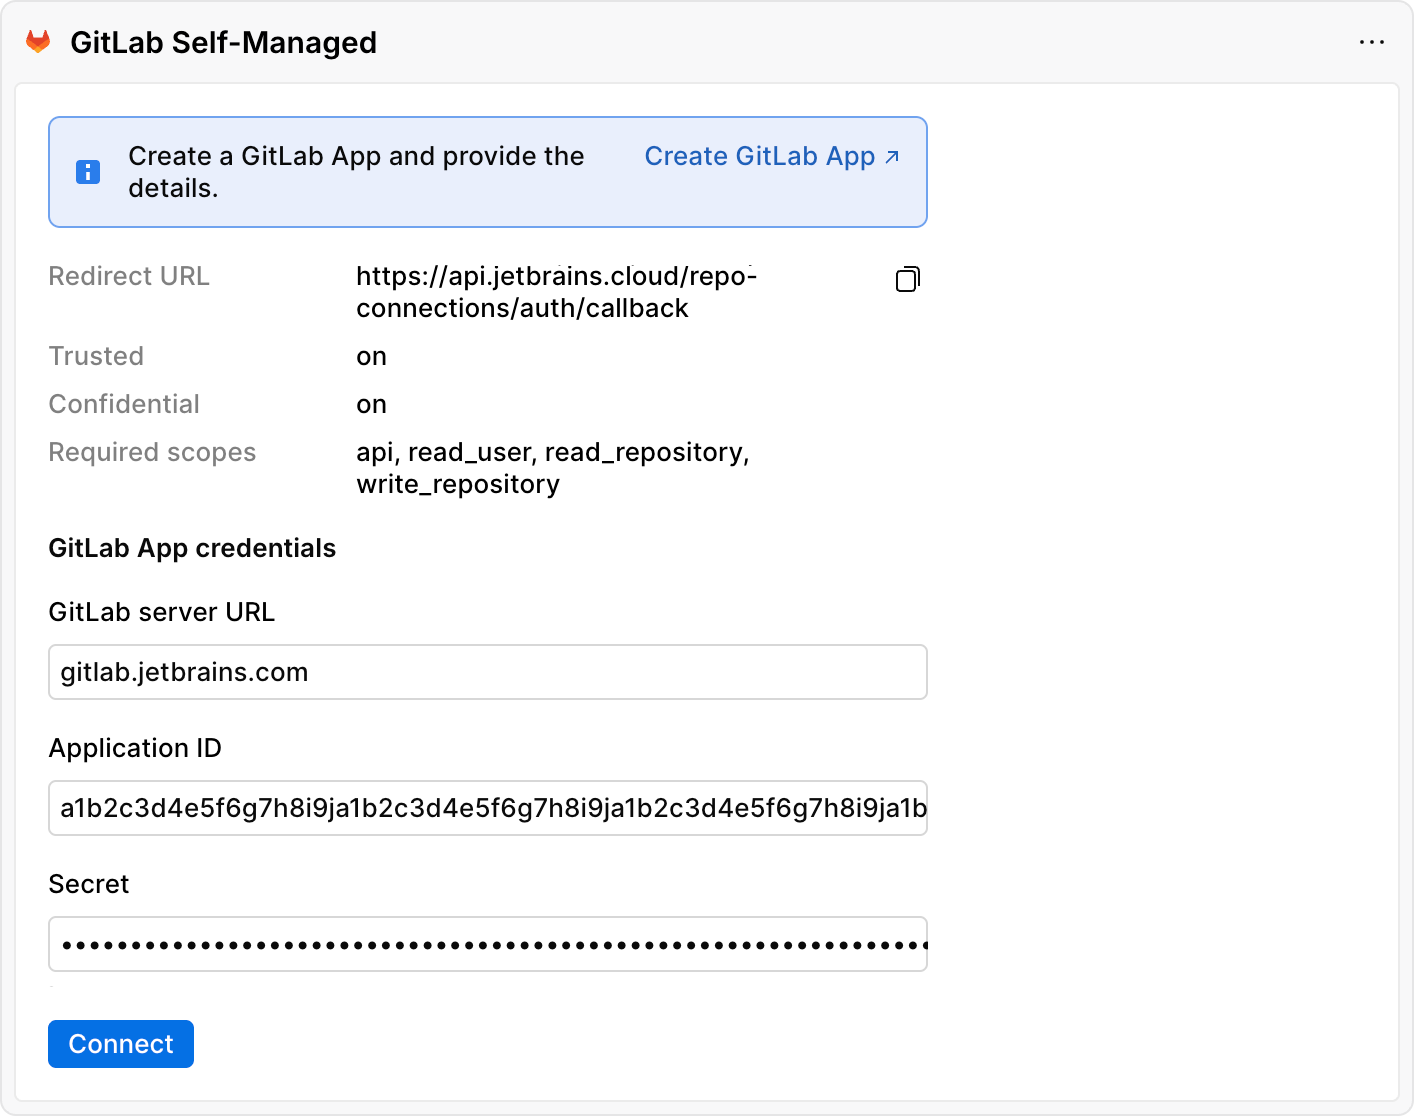
Click Connect.
The connection is created, but its status is Not connected. To establish a working connection, follow the instructions to authorize the GitLab application.
Authorize the GitLab application
Authorization is the final step of the connection process. You authorize the application once to finalize the connection for your organization. Each user then authorizes the application with their own GitLab account the first time they use the connection, so everyone sees only the projects that their GitLab permissions allow. For an instance-level application, individual user authorization won't be needed if Trusted was selected during creation of the application.
In the sidebar, under Integrations, select Hosted VCS.
If you don't see this page, or the controls on this page are inactive, make sure your role has the necessary permissions.
Click Authorize next to the connection you created, which has the Not connected status.
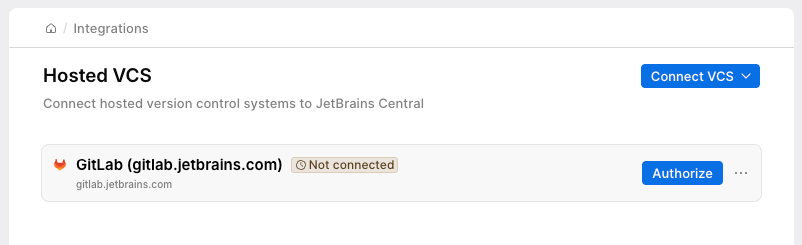
You are redirected to your GitLab Self-Managed instance.
Click Authorize <application-name>.
You are redirected back to JetBrains Central Console. The connection status changes to Connected.
Manage connections
Edit a connection
If the secret of the GitLab application is rotated, revoked, or otherwise changed in GitLab, provide the new secret in JetBrains Central Console to keep the connection working.
In the sidebar, under Integrations, select Hosted VCS.
If you don't see this page, or the controls on this page are inactive, make sure your role has the necessary permissions.
Click
 next to the connection you want to edit and select Edit connection.
Update as needed:
Secret: The new secret for the GitLab application.
Click Save.
You have updated the connection details.
Remove a connection
In the sidebar, under Integrations, select Hosted VCS.
If you don't see this page, or the controls on this page are inactive, make sure your role has the necessary permissions.
Click
next to the connection you want to remove and select Remove connection.Click Remove to confirm the action.
The connection card is removed from the page.