Move and Copy refactorings
Basics
Move refactorings allow you to move packages and classes between the source roots of a project, class members to other classes and inner classes to upper hierarchy levels. The move refactorings automatically correct all references to the moved packages, classes and members in the source code.
The following move refactorings are available:
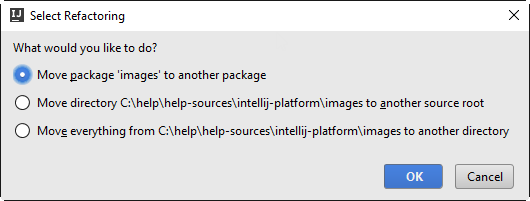
- Move Package moves a package and its contents to another package or directory under the specified source root. When you move a package, you can choose between the following refactorings: F6
Move package to another package.
Move directory to another source root.
Move directory to another directory.
- Move Class refactoring enables you to:
Move a class to a package under the specified source root.
Make a class an inner class.
Move Static Members moves a static field, method or inner class to another class.
- Move Inner to Upper Level:
In Java, this refactoring moves an inner class to a higher level.
In ActionScript, this refactoring moves out-of-package classes, functions, variables, constants and namespaces into a package. (In this case the word inner is used to refer to entities (classes, functions, etc.) that are declared outside of packages. The upper level means a package.)
Move Instance Method refactoring moves an instance method to another class.
Move File refactoring moves a file to another directory.
The Move refactorings allow you to move classes, protocols, methods, functions, files, and directories within a project. So doing, AppCode tracks these movements and automatically corrects all references to the moved symbols in the source code.
Moving a package
To move a package:
Select the package in the Project tool window, and press F6, or just drag the selected package.
- In the Select Refactoring dialog box, click one of the options to specify which refactoring should be performed.

To move the directory to another source root, select the second option, click OK, and specify the destination source root.
To move the directory to another directory, select the third option, click OK, and specify the destination directory.
Moving a file or a directory to another directory
Select the file or directory in the Project tool window.
- Do one of the following:
On the main menu, choose .
On the context menu of the selection, choose
Press F6.
The dialog that opens depends on the type of the selected symbol.
In the To directory field, specify the folder to move the selected file or folder to. Choose an existing folder from the drop-down list or type the full path to the parent folder to be created.
To have the references to the selected file or folder updated according to the refactoring result, select the Search for references checkbox.
Moving declarations or members
To move declarations or members:
In the editor, place the caret at the class, protocol or the member you want to move.
- Do one of the following:
On the main menu, choose .
On the context menu of the selection, choose
Press F6.
In the dialog box that appears, select declarations/members you want to move.
Select the target file/class or specify a name if you want to create a new file/class.
- Do one of the following:
Click Move to finish the refactoring.
Click Preview to see the changes that will be performed. All the usages of the moved element are grouped by type and location. To exclude a usage you don’t want to modify, right-click on it and choose Exclude from the drop-down menu. AppCode will search all references of these members and make sure they are updated. The IDE will notify you about potential problems and suggest to look through the conflicts in the separate Find Conflicts window. You can still proceed with refactoring or cancel it by clicking the corresponding buttons.
Copy refactoring
The Copy refactoring lets you create a copy of a class, file or directory in a different or the same directory.
To perform the Copy refactoring:
Select the item of interest in a tool window (e.g. the Project tool window). Alternatively, open the necessary class or file in the editor.
- Do one of the following:
Choose on the main menu or the context menu.
Press F5.
In the Copy dialog that opens, specify the name and location for the copy that you are creating, and click OK.