Composer dependency manager
PhpStorm integrates with the Composer dependency manager, which allows you to declare packages from Packagist or a custom repository as your project's dependencies and manage them from the IDE. PhpStorm provides:
A dedicated user interface for running the common Composer commands: init, install, update, and a number of additional Composer commands.

The command output is displayed in the Composer Log console.
If you wish to use the full range of Composer commands in a PhpStorm project, you can configure and run Composer as an external command-line tool.
Comprehensive coding assistance for working with composer.json.
Synchronization of the project's roots structure and PHP language level with configuration in composer.json.
PhpStorm is aware of PSR-0/PSR-4 source roots and their namespace prefixes. It sets the Source root
 based on the
 autoloadsection, and the Tests root based on the
 autoload-devsection. PhpStorm also detects the PHP language level based on thephpsetting in therequiresection.
Download and install Composer
For more information about installing Composer, refer to the Composer official documentation.
If you work in a local environment, Composer commands in PhpStorm are run via the configured local PHP interpreter. You can download and install Composer manually as a system-wide standalone tool, or have PhpStorm download it automatically when you create a new Composer project, initialize Composer, or invoke other Composer commands in an existing project.
Additionally, PhpStorm enables you run Composer commands via any configured remote PHP interpreter.
Set up Composer commands execution
Open the Composer dialog by either of the following:
In the Settings dialog (Ctrl+Alt+S) , go to .
If you have a single composer.json file in your project, select from the main menu to open the Composer Settings dialog.

Choose how the Composer commands will be executed:
To run commands via a globally installed composer executable, choose 'composer' executable and specify its location in the field.
To run commands via the local composer.phar archive, choose composer.phar. Then, either specify the location of the existing composer.phar file in the field or select the Download composer.phar from getcomposer.org checkbox to download a new instance of the file. The downloaded composer.phar file will be saved under the project root folder.
Then, choose one of the configured local PHP interpreters from the PHP interpreter list. For more information, refer to Configure local PHP interpreters.
To run commands via a remote interpreter, choose Remote interpreter.
From the CLI Interpreter list, select a remote interpreter to use, or click
 and configure a new one as described in Configure remote PHP interpreters.
In most cases, PhpStorm detects path mappings automatically. If necessary, you can click
 in the Path mappings field and specify them manually in the Edit Project Path Mappings that opens.
In the Composer executable field, provide the name of the Composer executable. You can click
, and locate the executable in the Select Path On The Server dialog that opens.
Set up a project with Composer
In PhpStorm, you can work with existing Composer projects, create new projects based on the Composer package of your choice, or initialize Composer in an existing project. PhpStorm resolves dependencies and uses the information from composer.json to automatically apply certain configuration options.
Open a Composer-managed project in PhpStorm
When you open an existing Composer-managed project, PhpStorm uses the information contained in the composer.json file to automatically apply the project's content roots and PHP language level.
Click Open on the Welcome screen or go to in the main menu, then choose the folder where your Composer project is stored.
PhpStorm opens the project and shows a notification:

Click to open the Composer dialog and configure the project settings if required:

: PhpStorm detects the composer.json file in the project root automatically. Click
 to specify the path to another composer.json file in the project.
: clear the checkbox to disable adding packages under the vendor/*/* directory as write-protected third-party libraries and PHP include paths.
: clear the checkbox to turn off automatic synchronization of the project's PHP language level and Source and Test roots with the settings in composer.json.
Check for available package updates: clear the checkbox to disable running the
update --dry-run command.To retrieve the available package updates and provide better coding assistance in composer.json, PhpStorm runs the update --dry-run command in the background every time you open a project or modify composer.json.
: clear the checkbox to hide the quick actions panel on top of the composer.json file in the editor.
: clear the checkbox to turn off notifications about missing vendor directory in a project.
: select the checkbox to install or update the dependencies specified in composer.json even if your PhpStorm project has an invalid PHP interpreter version or is missing a PHP extension or library.
Click OK to apply the specified project settings and close the dialog.
Install project dependencies from composer.json by one of the following:
Click Run 'composer install' on the balloon notification that pops up when PhpStorm opens a project and detects that the vendor directory is missing from it.

Open composer.json in the editor and click the Install shortcut link on top of the editor panel.

Select from the main menu or from the context menu of the composer.json file in the Project tools window.
The third-party libraries declared as dependencies in composer.json are installed in the vendor directory inside your project.
Create a project from Composer package
When you create a new Composer project, PhpStorm creates a project based on the Composer package of your choice, resolves the dependencies and installs them under the project's vendor directory.
Choose or click Create New Project on the PhpStorm Welcome screen.
The New Project dialog opens:

In the dialog, specify the project's parameters:
Select the project type and location:
In the left-hand pane, select Composer Package Project.
In the Location field on the right-hand pane, specify the folder where the project will be created.
Choose how the Composer commands will be executed:
To run commands via a globally installed composer executable, choose 'composer' executable and specify its location in the field.
To run commands via the local composer.phar archive, choose composer.phar. Then, either specify the location of the existing composer.phar file in the field or select the Download composer.phar from getcomposer.org checkbox to download a new instance of the file. The downloaded composer.phar file will be saved under the project root folder.
Then, choose one of the configured local PHP interpreters from the PHP interpreter list. For more information, refer to Configure local PHP interpreters.
Optionally, in the Command line parameters field, type the additional command line parameters.
In the Package area, type the name of the desired package in the Package field. To use code completion, press Ctrl+Space. Then choose the relevant version from the Version to install list.
Click Create. The create-project Composer command will be invoked with the selected package. As a result, a Composer project whose configuration and structure depend on the selected package will be created and opened.
Initialize Composer in an existing project
When you initialize Composer in a project, a composer.json file is created. This file lists the project dependencies and other metadata and is automatically set as the project's default Composer file.
Go to .
The Composer Settings dialog opens:

Choose how the Composer commands will be executed:
To run commands via a globally installed composer executable, choose 'composer' executable and specify its location in the field.
To run commands via the local composer.phar archive, choose composer.phar. Then, either specify the location of the existing composer.phar file in the field or select the Download composer.phar from getcomposer.org checkbox to download a new instance of the file. The downloaded composer.phar file will be saved under the project root folder.
Then, choose one of the configured local PHP interpreters from the PHP interpreter list. For more information, refer to Configure local PHP interpreters.
To run commands via a remote interpreter, choose Remote interpreter.
From the CLI Interpreter list, select a remote interpreter to use, or click
and configure a new one as described in Configure remote PHP interpreters.In most cases, PhpStorm detects path mappings automatically. If necessary, you can click
in the Path mappings field and specify them manually in the Edit Project Path Mappings that opens.In the Composer executable field, provide the name of the Composer executable. You can click
, and locate the executable in the Select Path On The Server dialog that opens.
Click OK to close the Composer Settings dialog. PhpStorm creates a composer.json stub file and opens it in the editor:

Complete the code or accept the generated values. For more information about working with the composer.json file, refer to Composer.json: Project Setup.
Manage multiple composer.json files
You can have several composer.json files in one PhpStorm project, and invoke Composer actions and commands for each of them.
If a project contains subdirectories with dedicated composer.json files, PhpStorm handles Composer-managed dependencies and settings for each of such modules independently. Every subdirectory with composer.json installed in it will have its own PSR-0/PSR-4 roots settings, configurations for test frameworks, and a vendor directory with External Libraries.
To manage composer.json files in your project:
In the Settings dialog (Ctrl+Alt+S) , go to and select the Composer Files tab.
A list of composer.json files detected by the IDE opens. PhpStorm marks the composer.json file from the project root directory as the project's Main by default.

Use the icons on the tab's toolbar (
 ,
,  ,
,  ) to:
) to:Appoint the project's main composer.json file other than that located in the project root.
Select the Main item, click
, and specify the path to the required composer.json file in the finder that opens.Configure multiple composer.json files per project.
Use the
and icons to add or delete Composer configuration files per subdirectories.
Work with composer.json
The composer.json file describes the dependencies of your project and may also contain other metadata. PhpStorm provides comprehensive coding assistance for working with composer.json and lets you perform many Composer-related tasks directly from the code editor.
Create a composer.json file
You can create composer.json files manually. If Composer hasn't yet been initialized in the project, a newly created composer.json will be automatically set as the project's main Composer file.
Do one of the following:
In the Project tool window (Alt+1), select the directory in which you want to create a new file, and then choose from the main menu.
Right-click the directory and select New from the context menu.
Select the directory and press Alt+Insert.
In the popup menu, select composer.json File. PhpStorm creates a stub of the composer.json file and opens it in the editor.
Use code completion in composer.json
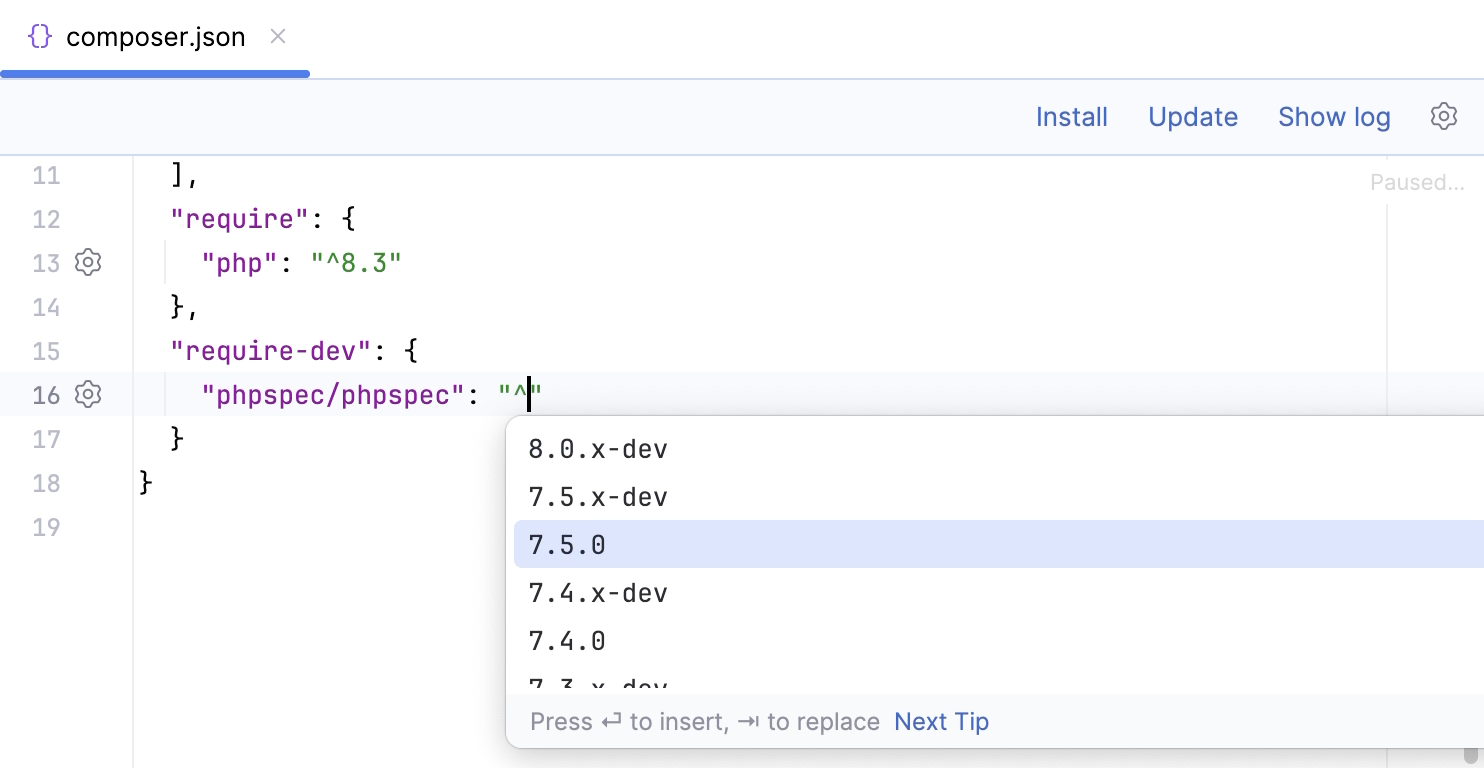
Inside composer.json, press Ctrl+Space to use code completion when providing both the names of the sections and their content, for example:
License type and minimum-stability version,
Namespaces and paths in the
autoloadandautoload-devsections,Required PHP version and extensions as well as packages' names and versions in the
requireandrequire-devsections.
Use quick documentation in composer.json
Inside composer.json, press Ctrl+Q to view quick documentation for the element at caret.

Navigate from a composer.json record to the project entity or setting
Inside composer.json, place the caret at an entity such as an installed package, a class or a method within a script, a file path, or a URL. Then do any of the following:
From the main menu, select
Press Ctrl+B
Alternatively, Ctrl+Click the record.
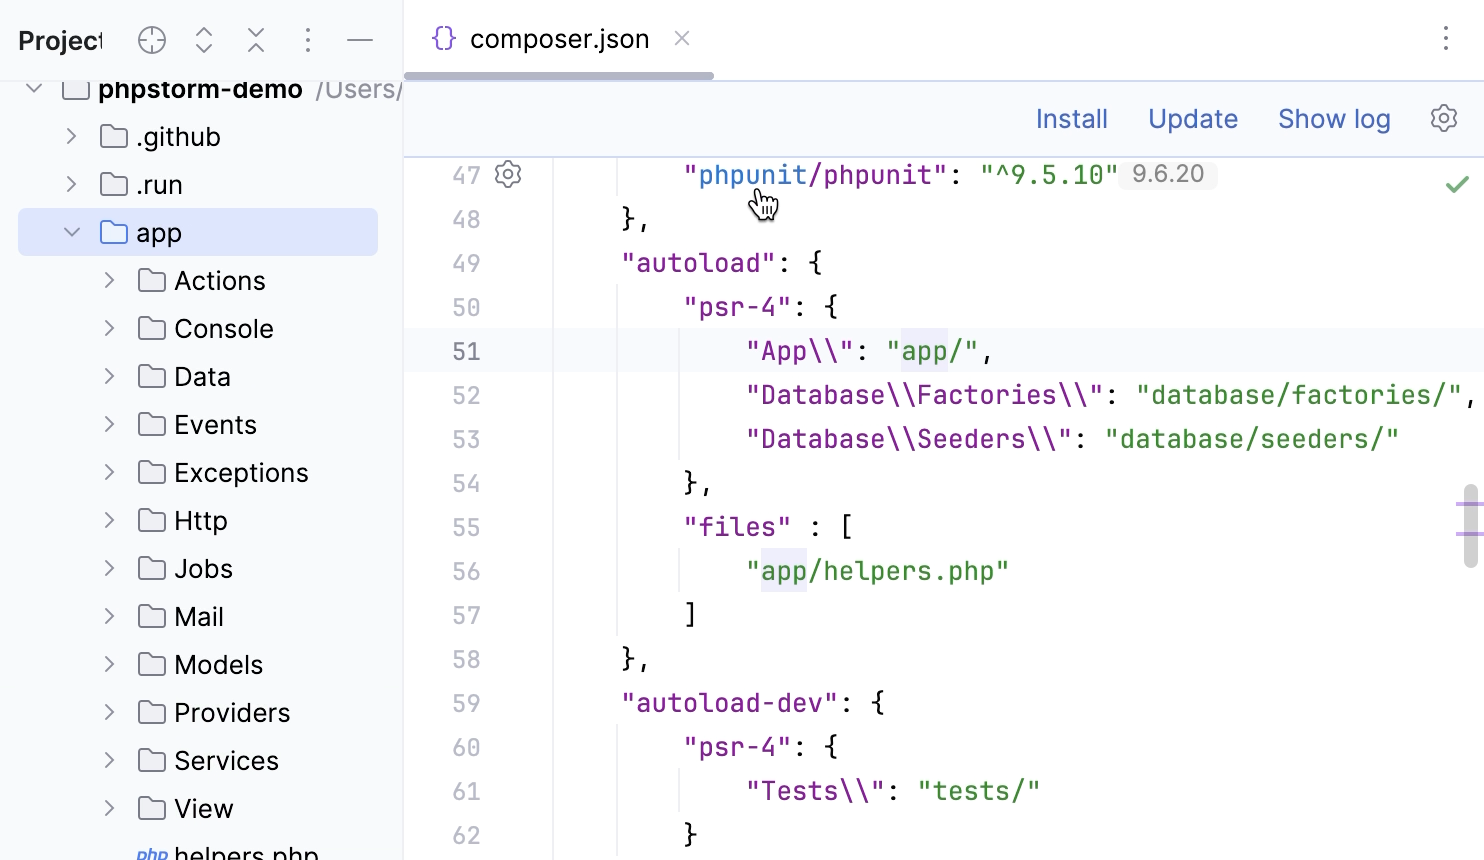
If you have a test framework or code quality tool installed as a project dependency, PhpStorm displays
 next to the corresponding dependency record. Click it to jump directly to the corresponding Settings page.
For more information about using test frameworks and code quality tools, refer to Testing and PHP code quality tools.
Manage dependencies
To install, update, or uninstall project dependencies, you need to update the records in the require or require-dev sections in composer.json and then run the corresponding Composer command.
To retrieve the available package updates and provide better coding assistance in composer.json, PhpStorm runs the update --dry-run command in the background every time you open a project or modify composer.json. If necessary, you can disable running the command. In the Settings dialog (Ctrl+Alt+S) , go to and clear the Check for available package updates checkbox.
When you open a project or modify composer.json, PhpStorm checks whether the vendor directory is present. If it is missing, PhpStorm displays the notification message.
Click the Run 'composer install' shortcut link in the notification message to quickly install the project dependencies. If necessary, you can disable this notifcation by clearing the Notify about missing 'vendor' directory checkbox on the page of the Settings dialog (Ctrl+Alt+S) .
Install dependencies
Inside composer.json, add the desired dependency record to the
requireorrequire-devsection. Press Ctrl+Space to get code completion both for the package name and version.
Do one of the following:
Click the Install shortcut link on top of the editor panel.
If the Non-installed Composer packages inspection is enabled, PhpStorm will highlight the declared dependencies that are not currently installed. Press Alt+Enter and select whether you want to install a specific dependency or all dependencies at once.

When a new package is installed, PhpStorm creates a new subfolder under vendor and stores the package inside. If the composer.lock file is present in the current directory, the exact packages versions listed in it are installed. Otherwise, if the composer.lock file is missing, Composer will create it after installing the packages, thus locking your project to their specific versions.
Update dependencies
You can update packages to their latest versions individually, or update all the packages listed in the require and require-dev sections of composer.json at once.
When a new package version is available or the package versions requirements change, PhpStorm indicates this via the
 icon in the editor gutter. It also provides the hint on the currently installed version and the version the package can be updated to.
Click
to update the package.
To update all packages, click the Update shortcut link on top of the composer.json editor panel.
Install/update dependencies with options
When installing or updating dependencies, PhpStorm can run the respective Composer commands with the --ignore-platform-reqs option.
The --ignore-platform-reqs option enables installation or update of dependencies even if your PhpStorm project has an invalid PHP interpreter version or is missing a PHP extension or library.
To run the install/update commands with an option, configure Composer in PhpStorm settings:
In the Settings dialog (Ctrl+Alt+S) , go to and select the Run install/update with --ignore-platform-reqs checkbox.

Uninstall dependencies
Remove the package record from the
requireorrequire-devsection of composer.json.Click the Update shortcut link on top of the composer.json editor panel.
Use a custom package repository
Besides Packagist, you can use a custom package repository.
Inside composer.json, create a repositories section for your repository:
{ "name": "vendor_name/package_name", "repositories": [ { "type": "composer", "url": "https://packages.example.com" } ] }After PhpStorm retrieves the packages information, you can install, update, and uninstall packages as usual.
Create and run Composer scripts
With Composer, you can create and run scripts, which are used for executing some custom code or package-specific commands during the Composer execution process.
Define a Composer script
Inside the
scriptssection of composer.json, create an event property, and list the desired scripts inside it. Each script can be a PHP callback defined as a static method, a command-line executable command, or a reference to an existing script.Use code completion Ctrl+Space to get suggestions for event names, classes' and static methods' names, and binaries installed under vendor/bin. To add a reference to an existing script, prepend it with the
@symbol.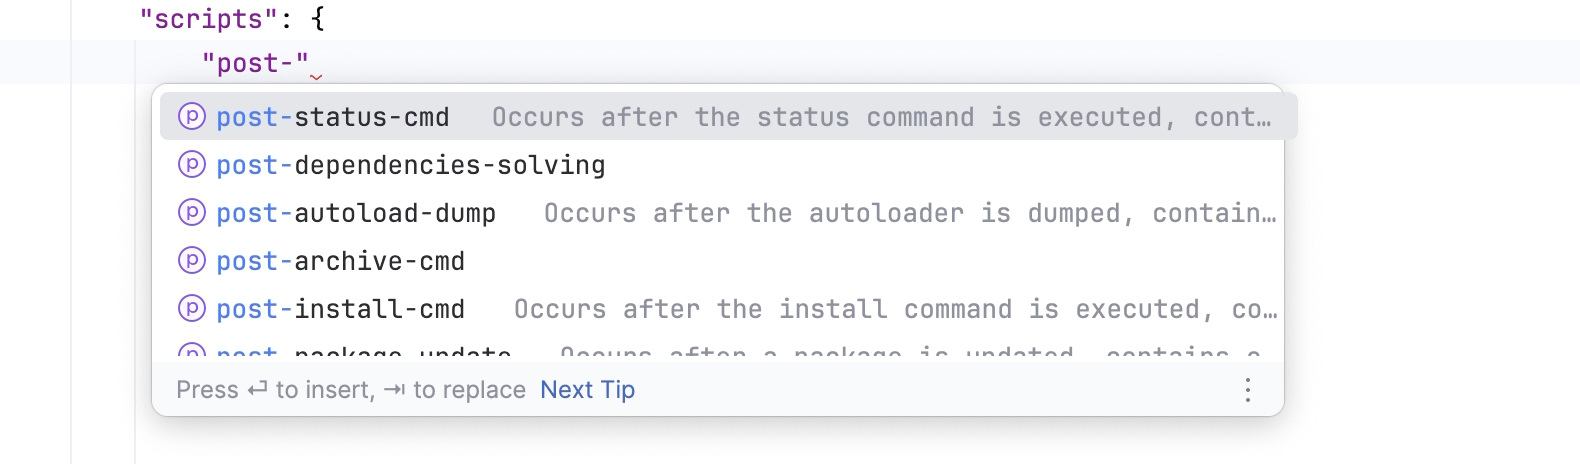
Rename a Composer script
Place the caret at a script's definition or usage.
Invoke the Rename refactoring by selecting from the main menu or from the context menu, or press Shift+F6.
In the Rename dialog that opens, provide the desired name for a script.

Click Preview to observe possible changes in the Find tool window. Click Refactor to proceed.
Run a composer script
Click
 in the gutter next to the script you want to execute. From the list, select Run <script name>.
Right-click inside the script you want to run and select Run <script name> from the context menu.
Place the caret at the script you want to execute, press Alt+Enter and select the Run <script name> intention action.

When the script is executed, PhpStorm automatically creates a dedicated temporary Composer Script run/debug configuration for it. You can save it as a permanent run/debug configuration if necessary.
Create a Composer script run/debug configuration
You can execute Composer scripts by using run configurations of the Composer Script type. With the run configuration, you can execute a script at any point, add it to the Services tool window, or a compound configuration. For more information about Working with Run/Debug Configurations.
Do any of the following:
In the editor, right-click inside the desired script record and select from the context menu.

Alternatively, choose from the main menu, then click
and choose Composer Script from the list.
Provide the run/debug configuration parameters:
Path to composer.json: in this field, provide the path to composer.json that contains the desired script's definition.
Script: from this list, select one of the defined Composer scripts to execute.
Command line parameters: in this field, type the additional command line parameters. These parameters will be passed as CLI arguments to the CLI handlers; inside PHP handlers, they can be retrieved as an array via
$event->getArguments()calls.
Save a temporary Composer Script run/debug configuration
When you execute a Composer script from the editor, PhpStorm automatically creates a temporary run/debug configuration with the script parameters. A temporary run/debug configuration works the same way as a permanent run/debug configuration. You can change its settings using the Run/Debug Configuration dialog and optionally save it as permanent.
In the Run/Debug Configuration selector, choose .

In the Run/Debug Configuration dialog, select the configuration and click
 .
.
Execute a Composer script using a run/debug configuration
In the Run/Debug Configuration selector, select the desired run configuration. Then click
on the main toolbar or press Shift+F10.Press Alt+Shift+F10, select the desired run configuration from the list, and press Enter.

View the Composer log
When you execute a Composer-related command via the PhpStorm interface, the command's output is displayed in the dedicated Composer Log console:

Open Composer log
Having executed any Composer command for the first time, click the Show in log shortcut link in the Notifications tool window notification message:

Open composer.json in the editor and click the Show Log shortcut link on top of the editor panel.
View the folded Composer Log message
If a Composer command has been executed successfully, Composer Log will fold its execution details.
Click
 in the gutter to unfold the message.
Hover over the ellipsis to view the message in a tooltip:

When appointing the main composer.json file in a project, you can enable PhpStorm's settings synchronization with it. Composer Log will highlight such a change in the settings as it occurs. Click ![]() in the gutter to quickly navigate to the corresponding Directories, PHP, Test Frameworks, or PHP command line tools settings pages.
in the gutter to quickly navigate to the corresponding Directories, PHP, Test Frameworks, or PHP command line tools settings pages.
Run additional Composer commands
PhpStorm provides the user interface for a set of additional Composer commands.
From the composer.json context menu, select .
Open composer.json in the editor, click
on top of the composer.json editor panel, and choose the desired command from the list.To run a command for the main composer.json file, select from the main menu.
If Composer execution is not set up, the Composer Settings dialog will open, prompting you to choose how the Composer commands will be executed:
To run commands via a globally installed composer executable, choose 'composer' executable and specify its location in the field.
To run commands via the local composer.phar archive, choose composer.phar. Then, either specify the location of the existing composer.phar file in the field or select the Download composer.phar from getcomposer.org checkbox to download a new instance of the file. The downloaded composer.phar file will be saved under the project root folder.
Then, choose one of the configured local PHP interpreters from the PHP interpreter list. For more information, refer to Configure local PHP interpreters.
To run commands via a remote interpreter, choose Remote interpreter.
From the CLI Interpreter list, select a remote interpreter to use, or click
and configure a new one as described in Configure remote PHP interpreters.In most cases, PhpStorm detects path mappings automatically. If necessary, you can click
in the Path mappings field and specify them manually in the Edit Project Path Mappings that opens.In the Composer executable field, provide the name of the Composer executable. You can click
, and locate the executable in the Select Path On The Server dialog that opens.
Validate
Run this command to perform several validity checks against the composer.json file, which is recommended before committing composer.json to a VCS. Validation results are displayed in the Composer Log console.
The equivalent Composer CLI command is validate.
Before executing the command, choose the desired options in the Validation Settings dialog:
Allow unbound version constrains: If selected, version constraints without an upper bound (for example
*,>3.1) will be permitted. Note that this will allow updates to any future version of a dependency, which may cause backward compatibility issues in the case of unexpected changes in dependencies.The equivalent option of the Composer CLI command is
--no-check-all.Check if composer.lock is up-to-date: If selected, the version constraints listed in composer.lock will be checked against the ones listed in composer.json. If the version constraints do not match, it is recommended to fix this by updating packages. After the packages are updated to the required versions, the composer.lock and the composer.json files will be synchronized.
The equivalent option of the Composer CLI command is
--no-check-lock.Check if the package is Packagist-ready: If selected, the package's composer.json will be checked against the Packagist publishing requirements. Generally, for a package to be Packagist-ready, the
name,description, andrequiresections in its composer.json file must be specified. For more information about publishing packages, refer to the Packagist documentation.The equivalent option of the Composer CLI command is
--no-check-publish.Validate package dependencies: If selected, the composer.json files of all installed dependencies of the current package will also be validated.
The equivalent option of the Composer CLI command is
--with-dependencies.
Dump Autoloader
Run this command to generate the list of autoloaded classes. If the list already exists, it will be generated anew. This can be useful in situations when you introduce a new class in a project and need to include it to the list of autoloaded classes. For more information about autoloading classes with Composer, refer to the Composer documentation.
The equivalent Composer CLI command is dump-autoload.
Before executing the command, choose the desired options in the Autoloader Generation Settings dialog:
Skip scripts execution: If selected, the scripts defined in the
scriptssection of the composer.json file are not executed.The equivalent option of the Composer CLI command is
--no-scripts.Optimize autoloader (Convert PSR-0/4 rules to a classmap): If selected, Composer will scan the given PSR-0/4 autoloading directories/files for the php and inc files and generate a single
autoload_classmapkey-value array to speed up autoloading. Note that if the number of classes is large, running this command can be time-consuming.The equivalent option of the Composer CLI command is
--optimize.Autoload classes from the classmap only: If selected, only the classes listed in the class map will be autoloaded. Composer will not search for fallback PSR-4 directories for classes not listed in the class map. Since this naturally requires an existing class map, Composer will also execute the Optimize autoloader (Convert PSR-0/4 rules to a classmap) command to generate one, which can be a time-consuming process.
The equivalent option of the Composer CLI command is
--classmap-authoritative.Use APCu for caching found/not-found classes: If selected, caching via APCu will be enabled. When a class is found (or not found) in the class map, the corresponding record will be cached in APCu, so that it can be quickly retrieved on the next request.
The equivalent option of the Composer CLI command is
--apcu.Disable autoload-dev dependencies: If selected, the autoloaded namespaces and files listed in the
autoload-devsection are not included in the list of autoloaded classes.The equivalent option of the Composer CLI command is
--no-dev.
Check for Changes in Dependencies
Run this command to check if you have any local changes in the code of the package dependencies.
The equivalent Composer CLI command is status.
Clear Cache
Run this command to delete the Composer's cache directory, which contains the downloaded packages. By default, the cache directory is set to C:\Users\<user>\AppData\Local\Composer on Windows, and to ~/.composer/cache on Linux and macOS. For more information, refer to Composer documentation.
The equivalent Composer CLI command is clear-cache.
List Licenses
Run this command to view the name, version, and license type of every installed package.
The equivalent Composer CLI command is licenses.
Diagnose
Run this command to perform automated checks for the most common Composer problems (for example, connectivity issues, Composer/PHP version used, disk space available, composer.json validity). If the problem is not identified, refer to the Composer troubleshooting guide.
The equivalent Composer CLI command is diagnose.
Simulate Update
Run this command to simulate updating the dependencies without actually running composer update. In doing so, you can verify whether all dependencies are resolved successfully and preview the changes while keeping everything intact.
The equivalent Composer CLI command is update --dry-run.
To retrieve the available package updates and provide better coding assistance in composer.json, PhpStorm runs the update --dry-run command in the background every time you open a project or modify composer.json. If necessary, you can disable running the command. In the Settings dialog (Ctrl+Alt+S) , go to and clear the Check for available package updates checkbox.
Self-Update
Run this command to update Composer itself (that is, the composer.phar file) to the latest version.
The equivalent Composer CLI command is self-update.
Run Composer from the command line
Command-line mode provides you with the full range of Composer commands. To use Composer in this mode, you need to configure it as an external command-line tool. For more information about working with command-line tools, refer to PHP command line tools.
You can have several instances of Composer configured and switch between them from one project to another by specifying the relevant one during Composer initialization.
Configure Composer as a command line tool
In the Settings dialog (Ctrl+Alt+S) , go to .
Click
on the toolbar.In the Command Line Tools dialog, choose Composer from the list, and specify its visibility level (Project or Global).

When you click OK, the dialog opens.
Specify how you want to launch Composer by choosing one of the options: composer.phar or php script or composer executable. Depending on your choice, specify the paths to the PHP installation folder and composer.phar or to the composer executable file.
PhpStorm parses the contents of the specified .phar archive or executable file for Composer commands. When the file analysis is completed, PhpStorm returns to the PHP Command Line Tool Support page where the specified file is added to the list of command line tools available in PhpStorm.
Click OK to apply changes and return to the PHP Command Line Tool Support page. Optionally, click
 to edit the tool properties, or
  to customize the commands set. For more information, refer to Customize a tool.
Run a Composer command
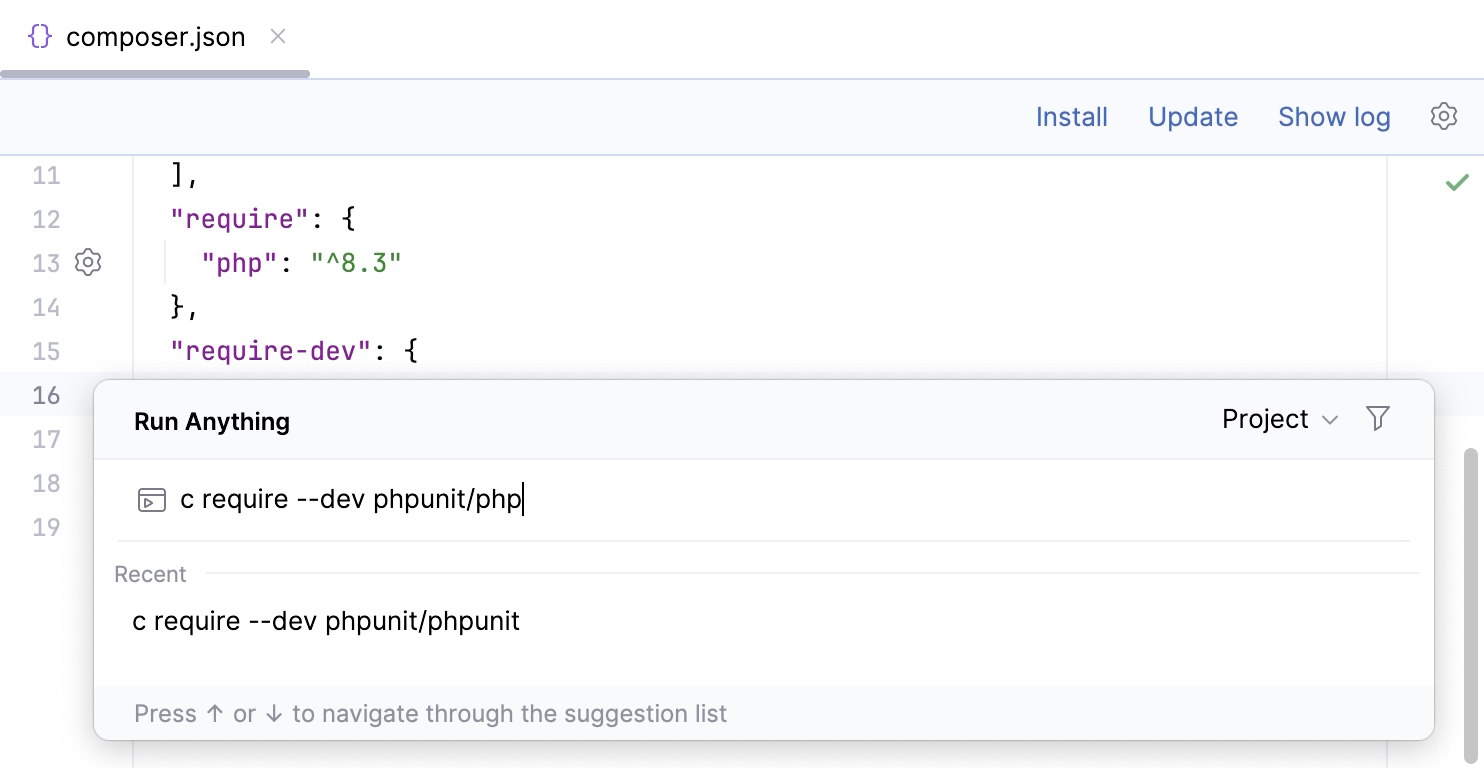
Go to or press Ctrl twice.
In the Run Anything window that opens, type the call of the command in the
<c> <command>format.The command execution result is displayed in the Run tool window.
Terminate a command
Click
 on the Run tool window toolbar.