Tutorial: Creating Live templates
When developing PHP applications, a commonly repeated task is creating Controller classes and actions in them. In this tutorial, we'll create several Live Templates to automate this.
Creating a Controller Class live template
Let's start with a Controller class. Controller classes are typically named like BlogController, and extend some basic Controller class.
In the Settings/Preferences dialog Ctrl+Alt+S, select .
Click the
 to create a new Live Template. Provide it with an abbreviation, for example,
 sc(standing for Sample Controller ), a description, the context in which the template applies, in this case, PHP, and the following text:class $Name$Controller extends Controller { $END$ }
The resulting template should look as follows:

We can now open a php file (or create a new one) and use the created sc Live Template. Once the template code is expanded, we can provide the controller's class name and press Tab to move the caret to the $END$ variable's position.
Since each controller class typically resides in its own file, this Sample Controller template could also be implemented as a File Template.
Variables and Expressions
So far, we've used a single $Name$ variable of our own and the special $END$ variable provided by PhpStorm. Controller classes are commonly named exactly like the php files they reside in: for example, the MyController.php file will contain the MyController controller class. With Live Templates, it is possible to have PhpStorm pre-populate the controller name based on the file name.
In the Settings/Preferences dialog Ctrl+Alt+S, select . Then, select the sc template that we've created earlier.
Change the sc template's text to the following:
class $Name$ extends Controller { $END$ }Click Edit variables and see that the IDE has recognized
$Name$as a variable.
Configure the
$Name$variable as follows:Provide a default value and the expression. For our case, we'll use the
fileNameWithoutExtension()expression, which will return the name of our file without the .php extension.Select the Skip if defined checkbox so that when the expression provides a value, we don't have to provide it ourselves when we use the live template in the editor.
When we apply the Live Template, the class will now inherit the filename, and the caret will be positioned inside the class body immediately.
Creating a Controller Action live template
The sc template was simple enough to be created directly from the Settings/Preferences dialog. In more complex cases, however, it's probably easier to write code in the editor and then make a template out of it.
Let's create a template for a basic controller action.
In the code editor, write some code just as we you do when writing an application.
class SampleController extends Controller { public function indexAction() { return $this->render(''); } }Select the created
indexActionfunction in the editor and invoke the command from the main menu.In the Save as Live Template... dialog that opens, notice that the context for this template is automatically set based on the type of file we were working with in the editor.

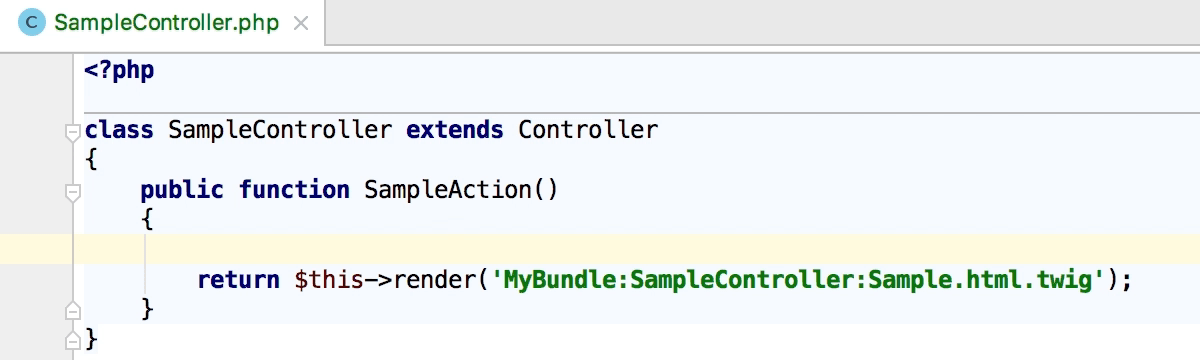
Configure the template and add variables by changing the template's text to the following:
public function $Action$Action() { $END$ return $this->render('$Bundle$:$Folder$:$Action$.html.twig'); }Click Edit variables and specify the expression for the
$Folder$variable and the default value for the$Bundle$variable.
Having applied the changes, we can use our sa template to generate a controller action.
Creating a Surround Template
In some cases, it may be useful to "surround" the existing code with a template. As the name implies, Surround Templates let you do just that. They can be created in the exact same way as Live Templates but additionally involve using of the $SELECTION$ variable.
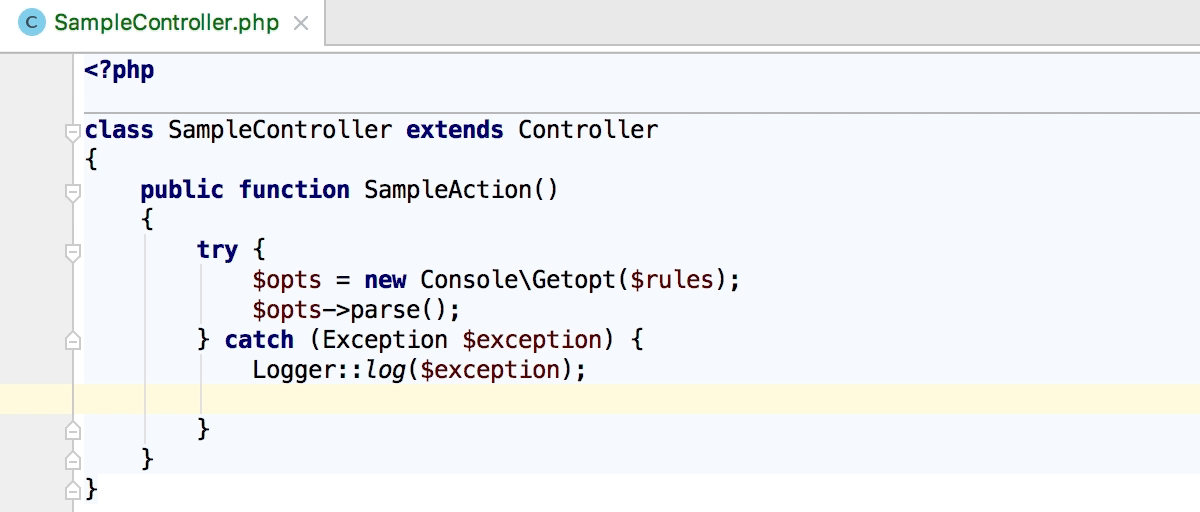
As an example, let's create a Surround Template that wraps the selected code in a try/catch block and logs the exception.
Create a live template containing the following text (notice that we use
$$to escape the PHP's$dollar sign):try { $SELECTION$ } catch ($TYPE$ $$$VARIABLENAME$) { Logger::log($$$VARIABLENAME$); $END$ }The following variables are used in the template:
$SELECTION$Denotes the code we select in the editor. $TYPE$Serves as is a placeholder for the exception type. $VARIABLENAME$Serves as a placeholder for the exception variable name. $END$Indicates the caret position after the template is expanded. In the Edit variables dialog, provide
$TYPE$with thecomplete()expression, so that when we expand the template, completion will be triggered. Additionally, provide the default values for$TYPE$and$VARIABLENAME$.
Having applied the changes, we can use our surround template as follows: select some code, press Ctrl+Alt+J, and select the newly created template.
As a result, the code is wrapped in the template, completion is triggered on the exception type, and the exception variable is named $exception by default. We can pick the correct type and press Tab to end up in the catch body, right underneath the logging statement.