Connecting to a database
To issue a query to a database, you must connect to a data source. The data source is a location of your data (it can be a server, CSV, or a DDL file). The data source connection includes a name and connection settings that are dependent on the data source type. In PyCharm, you can manage these connections in the Data Sources and Drivers dialog ().
Amazon Redshift
In your Redshift dashboard, create a Redshift cluster.
In settings of the Redshift cluster, copy the JDBC URL.
Open the Database tool window () and click the Data Source Properties icon (
 ).
). In the Data Sources and Drivers dialog, click the Add icon (
 ) and select Amazon Redshift.
At the bottom of the data source settings area, click the Download missing driver files link.
From the default drop-down list, select URL only.
Paste the JDBC URL from the Redshift cluster settings to the URL field in PyCharm.
In User and Password fields, specify your Redshift credentials.
To ensure that the connection to the data source is successful, click Test Connection.

Apache Derby
Open the Database tool window () and click the Data Source Properties icon (
). In the Data Sources and Drivers dialog, click the Add icon (
) and select Apache Derby.At the bottom of the data source settings area, click the Download missing driver files link. Alternatively, you can specify user drivers for the data source. For more information about user drivers, see Add a user driver to an existing connection.
In the URL field, enter the JDBC URL for the connection. Alternatively, select default in the URL only drop-down list, and specify your connection details.
To ensure that the connection to the data source is successful, click Test Connection.

Azure SQL Database
In your Microsoft Azure account, create an SQL data source.
Open the Database tool window () and click the Data Source Properties icon (
). In the Data Sources and Drivers dialog, click the Add icon (
) and select Azure SQL Database.At the bottom of the data source settings area, click the Download missing driver files link.
To use Azure Active Directory Authentication, select Use Windows domain authentication. To use SQL Authentication, clear the checkbox, and specify your Microsoft Azure credentials in User and Password fields.
Note : The Use Windows domain authentication checkbox is available only on Windows.
To ensure that the connection to the data source is successful, click Test Connection.

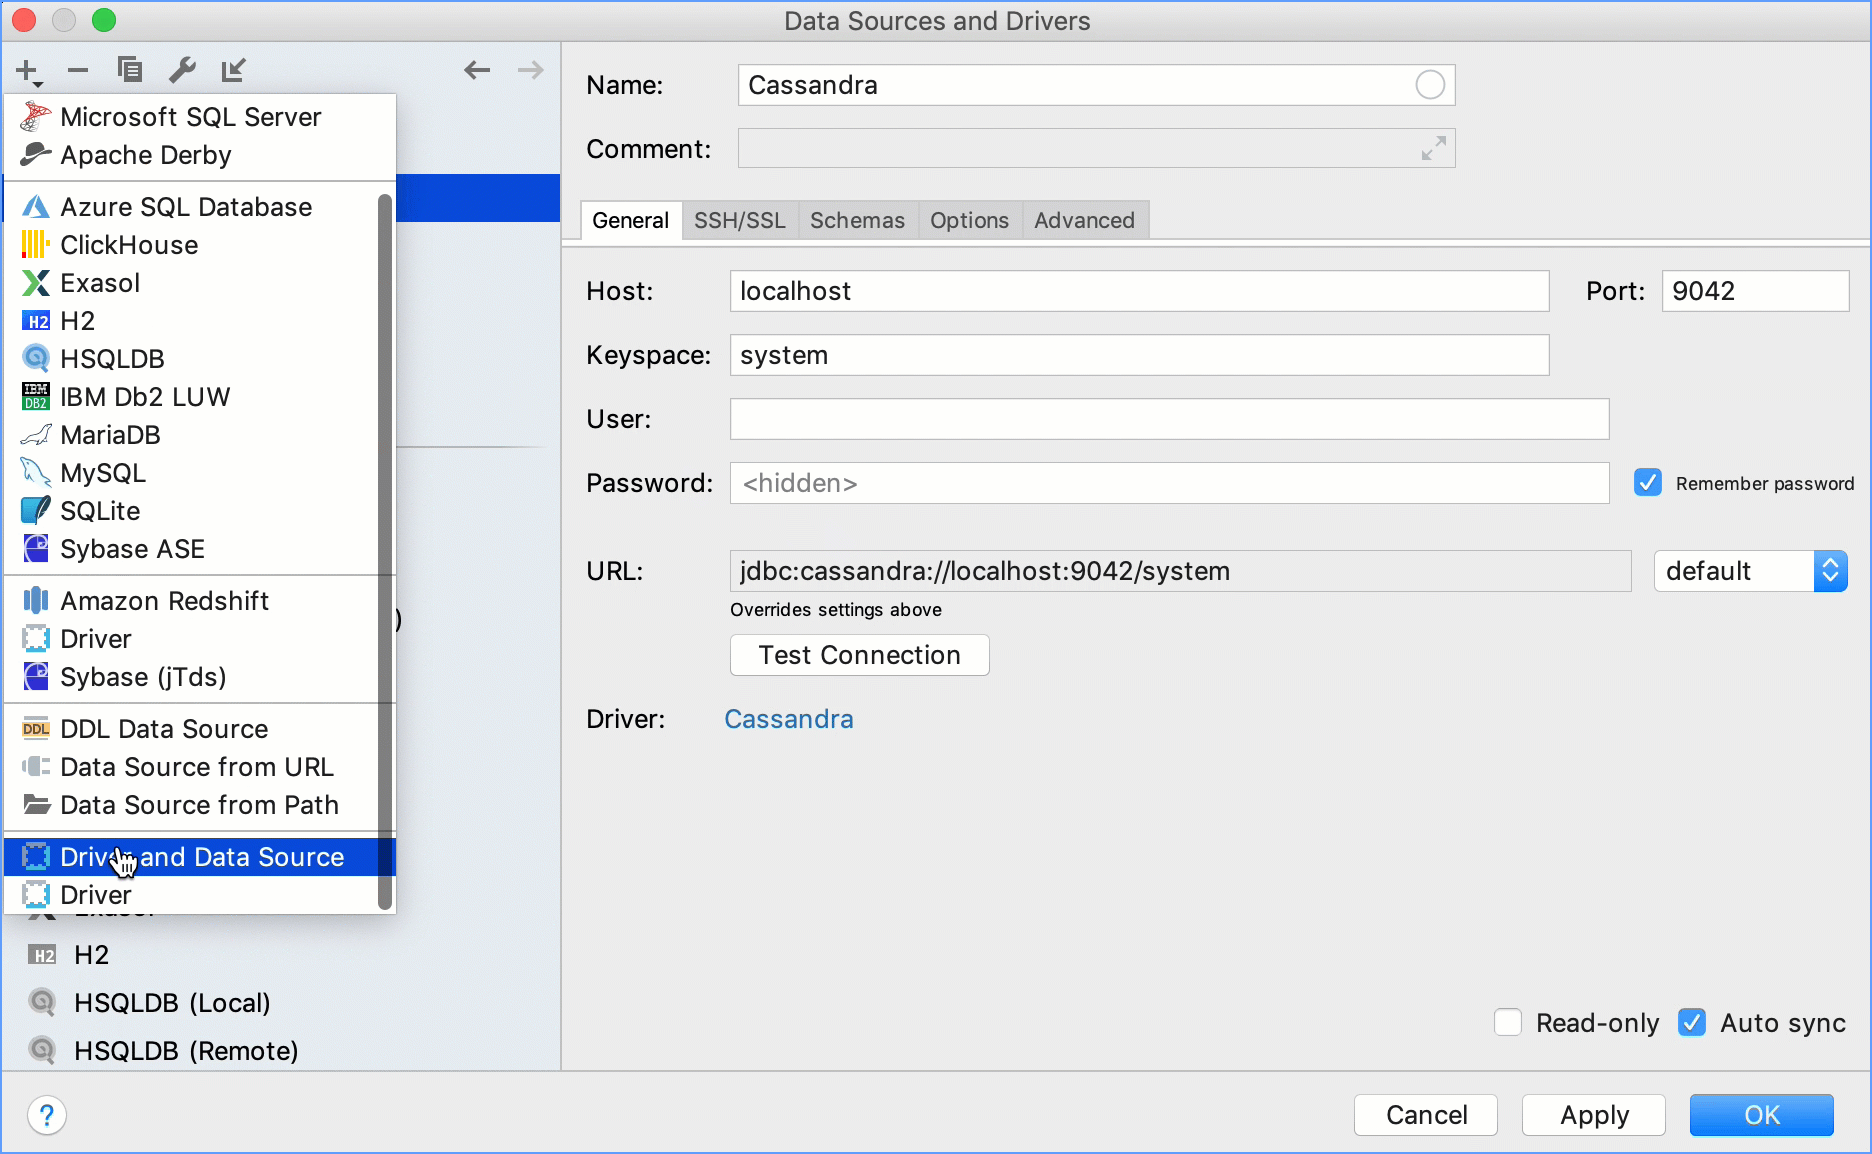
Cassandra
Open the Database tool window () and click the Data Source Properties icon (
). In the Data Sources and Drivers dialog, click the Add icon (
) and select Cassandra.At the bottom of the data source settings area, click the Download missing driver files link. Alternatively, you can specify user drivers for the data source. For more information about user drivers, see Add a user driver to an existing connection.
In Host, Keyspace, User, Password, and Port fields, specify connection details.
To ensure that the connection to the data source is successful, click Test Connection.

ClickHouse
Open the Database tool window () and click the Data Source Properties icon (
). In the Data Sources and Drivers dialog, click the Add icon (
) and select ClickHouse.At the bottom of the data source settings area, click the Download missing driver files link. Alternatively, you can specify user drivers for the data source. For more information about user drivers, see Add a user driver to an existing connection.
In Host, Database, User, Password, and Port fields, specify connection details.
To ensure that the connection to the data source is successful, click Test Connection.

Exasol
Open the Database tool window () and click the Data Source Properties icon (
). In the Data Sources and Drivers dialog, click the Add icon (
) and select Exasol.At the bottom of the data source settings area, click the Download missing driver files link. Alternatively, you can specify user drivers for the data source. For more information about user drivers, see Add a user driver to an existing connection.
In the URL field, enter the JDBC URL for the connection. Alternatively, select default in the URL only drop-down list, and specify your connection details.
To ensure that the connection to the data source is successful, click Test Connection.

H2
Open the Database tool window () and click the Data Source Properties icon (
). In the Data Sources and Drivers dialog, click the Add icon (
) and select H2.At the bottom of the data source settings area, click the Download missing driver files link. Alternatively, you can specify user drivers for the data source. For more information about user drivers, see Add a user driver to an existing connection.
In Host, Database, User, Password, and Port fields, specify connection details.
To ensure that the connection to the data source is successful, click Test Connection.

HSQLDB
Open the Database tool window () and click the Data Source Properties icon (
). In the Data Sources and Drivers dialog, click the Add icon (
) and select HSQLDB.At the bottom of the data source settings area, click the Download missing driver files link. Alternatively, you can specify user drivers for the data source. For more information about user drivers, see Add a user driver to an existing connection.
In Host, Database, User, Password, and Port fields, specify connection details.
To ensure that the connection to the data source is successful, click Test Connection.

IBM Db2
Open the Database tool window () and click the Data Source Properties icon (
). In the Data Sources and Drivers dialog, click the Add icon (
) and select Db2.At the bottom of the data source settings area, click the Download missing driver files link. Alternatively, you can specify user drivers for the data source. For more information about user drivers, see Add a user driver to an existing connection.
In Host, Database, User, Password, and Port fields, specify connection details.
To ensure that the connection to the data source is successful, click Test Connection.

MariaDB
Open the Database tool window () and click the Data Source Properties icon (
). In the Data Sources and Drivers dialog, click the Add icon (
) and select MariaDB.At the bottom of the data source settings area, click the Download missing driver files link. Alternatively, you can specify user drivers for the data source. For more information about user drivers, see Add a user driver to an existing connection.
In Host, Database, User, Password, and Port fields, specify connection details.
To ensure that the connection to the data source is successful, click Test Connection.

Microsoft SQL Server
Open the Database tool window () and click the Data Source Properties icon (
). In the Data Sources and Drivers dialog, click the Add icon (
) and select Microsoft SQL Server.At the bottom of the data source settings area, click the Download missing driver files link. Alternatively, you can specify user drivers for the data source. For more information about user drivers, see Add a user driver to an existing connection.
In Host, Database, User, Password, and Port fields, specify connection details. The Instance field is optional.
To ensure that the connection to the data source is successful, click Test Connection.

MySQL
Open the Database tool window () and click the Data Source Properties icon (
). In the Data Sources and Drivers dialog, click the Add icon (
) and select MySQL.At the bottom of the data source settings area, click the Download missing driver files link. Alternatively, you can specify user drivers for the data source. For more information about user drivers, see Add a user driver to an existing connection.
In Host, Database, User, Password, and Port fields, specify connection details.
To ensure that the connection to the data source is successful, click Test Connection.

Oracle
Open the Database tool window () and click the Data Source Properties icon (
). In the Data Sources and Drivers dialog, click the Add icon (
) and select Oracle.At the bottom of the data source settings area, click the Download missing driver files link.
From the SID drop-down list, select a connection type:
SID: to use a unique name of an Oracle instance (a process that runs on the workstation).
Service name: to use an alias to an Oracle instance (or many instances).
TNS: to use
tnsnames.oraconfiguration file. In TNSADMIN field, specify a path to thetnsnames.orafile. In TNS name, specify what service name to use (see a value ofnet_service_nameintnsnames.ora) if you have more than one service.URL only: to use the JDBC URL.
From the Driver drop-down list, specify the driver type. For more information about driver types, see Oracle JDBC FAQ.
To ensure that the connection to the data source is successful, click Test Connection.

PostgreSQL
Open the Database tool window () and click the Data Source Properties icon (
). In the Data Sources and Drivers dialog, click the Add icon (
) and select PostgreSQL.At the bottom of the data source settings area, click the Download missing driver files link. Alternatively, you can specify user drivers for the data source. For more information about user drivers, see Add a user driver to an existing connection.
In Host, Database, User, Password, and Port fields, specify connection details.
To ensure that the connection to the data source is successful, click Test Connection.

SQLite
Open the Database tool window () and click the Data Source Properties icon (
). In the Data Sources and Drivers dialog, click the Add icon (
) and select SQLite.At the bottom of the data source settings area, click the Download missing driver files link.
To connect to an existing SQLite database, specify a file path to the database file in the File field.
To ensure that the connection to the data source is successful, click Test Connection.

Sybase
Open the Database tool window () and click the Data Source Properties icon (
). In the Data Sources and Drivers dialog, click the Add icon (
) and select Sybase.At the bottom of the data source settings area, click the Download missing driver files link. Alternatively, you can specify user drivers for the data source. For more information about user drivers, see Add a user driver to an existing connection.
In Host, Database, User, Password, and Port fields, specify connection details.
To ensure that the connection to the data source is successful, click Test Connection.

Configuring data source connections
Create a connection to any database with a JDBC driver
If you cannot find a name of a database vendor in the list of data sources, download a JDBC driver for the database management system (DBMS), and create a connection in PyCharm. With the JDBC driver, you can connect to DBMS and start working.
Open the Database tool window () and click the Data Source Properties icon (
). In the Data Sources and Drivers dialog, click the Add icon (
) and select Driver and Data Source.Click the Driver link and select Go to driver.
In the Driver files pane, click the Add icon and select Custom JARs.
Navigate to the JAR file of the JDBC driver, select it, and click OK.
In Class and Dialect fields, specify values that you want to use for the driver.
Click Apply.
Return to the created data source connection.
In User, Password, and URL fields, specify your connection details.
To ensure that the connection to the data source is successful, click Test Connection.
Enable the single connection mode
Single connection mode means that the data source and all consoles use one and the same connection. This mode allows you to see the temporary objects in the database tree, or use the same transaction in different consoles. For more information about consoles, read Database Console.
Open the Database tool window () and click the Data Source Properties icon (
). Select the data source where you want to enable the single connection mode.
Click the Options tab.
Select Single connection mode.
Click Apply.

Assign a color to a data source
You can assign a color to a data source (for example, for better differentiation between production and test databases).
Open the Database tool window () and click the Data Source Properties icon (
). Select the data source for which you want to assign a color.
Click the Choose color icon (
 ) and select a color.
Click OK.

Connect to a database with SSL
Open the Database tool window () and click the Data Source Properties icon (
). -
Select a data source profile where you want to change connection settings.
-
Click the SSH/SSL tab and select the Use SSL checkbox.
-
In the CA file field, navigate to the CA certificate file (for example,
ca.pem). -
In the Client certificate file field, navigate to the client certificate file (for example,
client-cert.pem). -
In the Client key file field, navigate to the client key file (for example,
client-key.pem). -
To ensure that the connection to the data source is successful, click Test Connection.

Connect to a database with SSH
Open the Database tool window () and click the Data Source Properties icon (
). Select a data source profile where you want to change connection settings.
Click the SSH/SSL tab and select the Use SSH tunnel checkbox.
In Proxy host, Proxy user, Proxy password, and Port fields, specify connection details.
From the Auth type drop-down list, select an authentication method:
Password: to access the host with a password. Specify the password, and select the Save password checkbox to save the password in PyCharm.
-
Key pair (OpenSSH or PuTTY): to use SSH authentication with a key pair. To apply this authentication method, you must have a private key on the client machine and a public key on the remote server. PyCharm supports private keys that are generated with the OpenSSH utility.
Specify the path to the file where your private key is stored and type the passphrase (if any) in the corresponding fields. To have PyCharm remember the passphrase, select the Save passphrase checkbox.
OpenSSH config and authentication agent: to use SSH keys that are managed by a credentials helper application (for example, Pageant on Windows or ssh-agent on Mac and Linux).
To ensure that the connection to the data source is successful, click Test Connection.

Add a JDBC driver to an existing connection
Open the Database tool window () and click the Data Source Properties icon (
). In the Data Sources and Drivers dialog, select a data source where you want to change a driver, and click the Driver link in data source settings.
In the Driver files pane, click the Add icon (
) and select Custom JARs.Navigate to the JAR file of the JDBC driver, select it, and click OK.
In Class and Dialect fields, specify values that you want to use for the driver.
Click Apply.
