Query results
When you run a query in the console, you receive results in the table format. Each statement appears in a separate tab in the Database Console tool window. For example, if you have two SELECT statements in the query, you will see two tabs in the tool window.
Open a new tab for each query
By default, PyCharm updates the same tab with results each time you run a query. You can change this behavior and create a tab each time you run a query.
In the IDE settings (Ctrl+Alt+S), go to .
Select the Open results in new tab checkbox and click OK.
Edit values in the result set
In the result set, click a cell value that you want to edit.
Specify a new value and press Enter.
To submit changes to a database, click the Submit icon (
 ), or press Ctrl+Enter.

Export to a file
Right-click a, select .
Right-click a query, click Execute to File and select the file type that you want to use for export (for example, Comma-separated (CSV)).
On the toolbar, click the Dump Data icon (
 ) and select To File.

Export to a clipboard
Select data in the result set or in the editor and press Ctrl+C.
On the toolbar, click the Dump Data icon (
) and select To Clipboard.

Compare two result sets
Select a result set.
Click the Compare with icon (
 ), and select another result set.
If needed, change a value of the Tolerance parameter in the comparison dialog. The Tolerance parameter defines a maximum number of differences that are allowed between two result sets. For example, if you want to consider two rows as equal if their data differs in a single column, enter
1in the Tolerance field.

Pin the tab with query results
If one and the same tab is used to show your query results, and you get the result that you want to keep, you can pin the tab to the tool window. Do one of the following:
Right-click the tab and select Pin Active Tab.
Click
 on the toolbar.
Navigate between subsets of rows
Depending on the value of the Limit page size to parameter, the result set might be divided into several pages. For example, you set the Limit page size to parameter to 100, but your query returned 200 rows. You will have two pages of rows, with 100 rows on each page. To navigate between pages, use the following controls:
 : Navigates to the first page of the result set.
  : Navigates to the previous page of the result set. ( Ctrl+Alt+Up )
  : Navigates to the next page of the result set. ( Ctrl+Alt+Down )
  : Navigates to the last page of the result set.
Set a number of rows in the result set
By default, when you issue a query, the number of returned rows is limited to 500. This limitation is introduced to avoid an overload (for example, when your SELECT statement returns one million rows).
Go to Settings/Preferences (Ctrl+Alt+S) and navigate to .
Specify a new number in the Limit page size to field. To disable the limitation, clear the Limit page size to checkbox.
Go to the specified row
To navigate to a row with a specified number, right-click the table and select (Ctrl+G). In the Go to row dialog, specify the row number and click OK.

Navigate to a related object
You can retrieve rows from the table for the selected object, and move the focus to the object. For example, select a field in the project tree and press Ctrl+Alt+B. The focus moves to the corresponding column in the new tab.
To navigate to the object in the result set, select an object and go to Navigate | Related Symbol (Ctrl+Alt+B).
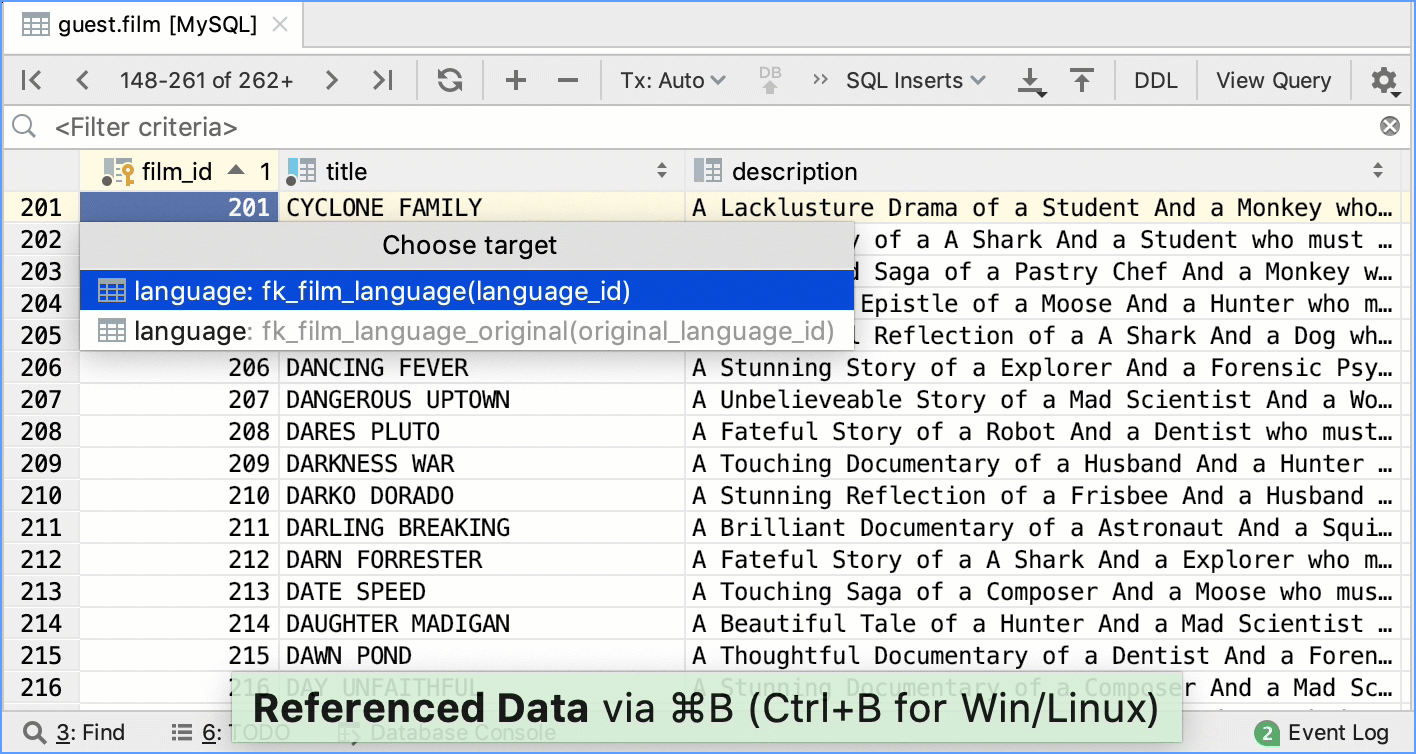
Navigate between related data
You can navigate between different types of related data:
-
Referenced data: data that is referenced by the current object.
-
Referencing data: data that is referencing the current object.

Right-click the column in the table and navigate to Go To | Referenced Data (Ctrl+B) or (Ctrl+Alt+B).
-
If the Choose target popup appears, select the table and what rows to show:
-
First Referencing Row: all rows in the table. The first row that references the current row is selected.
-
Referencing Rows Only: only rows that reference the current row.
-
Press Enter
Sort data
To sort table data in a column, click the cell in the header row.
State | Description |
|---|---|
 | Indicates that the data is not sorted in this column. The initial state of the sorting marker. |
 | The data is sorted in the ascending order. The number to the right of the marker (1 on the picture) is the sorting level. You can sort by more than one column. In such cases, different columns will have different sorting levels. |
 | The data is sorted in the descending order. |
Reorder columns
To reorder columns, use drag-and-drop for the corresponding cells in the header row.

Hide columns
To hide a column, right-click the corresponding header cell and select Hide column.
Alternatively, you can right-click any of the cells in the header row and select Column List (Ctrl+F12). In the Column List window, select a column name and press Space. You can hide all columns. To search through the column list, just start typing a column name in the Column List window.

Show columns
Select the hidden column (a strikethrough column name) and press Space.

Reset the initial table view
Click the settings icon (![]() ) and select Reset View. As a result, the data becomes unsorted, the columns appear in the order they were defined initially, and all the columns are shown.
) and select Reset View. As a result, the data becomes unsorted, the columns appear in the order they were defined initially, and all the columns are shown.
Operations with columns in the structure view
The structure view displays you a list of all the columns in the selected table. The structure view is available in the Structure tool window () or in the popup window (Ctrl+F12).
Sort the data in the ascending (Shift+Alt+Up) or the descending order (Shift+Alt+Down).
Reset the state of sorting (Ctrl+Shift+Alt+Backspace )
Hide a column or show a hidden column (Space). The names of hidden columns are shown struck-through.

Using the quick documentation view
The quick documentation view provides details about values in the selected cell or cells. For example, if a cell contains long text, you will see the whole text. If a cell contains an image, you will see a preview of the image. Also, you can see records that are referenced in the current record as well as the records that reference the current one.
Object | Documentation view |
|---|---|
Long text | If a cell contains long text, you will see the whole text. |
Image | If a cell contains an image, you will see a preview of the image. |
Records | The quick documentation view for records displays records that are referenced in the current record and records that reference the current one.  You can switch to the transposed view. In the transposed view, rows and columns are interchanged. To switch to the transposed view, click Transposed View. For more information about the transposed view in tables, see Transpose a table. § |


Transpose a table
You can rotate the table data from rows to columns and from columns to rows. In the transposed view, the rows and columns are interchanged.
To transpose a table, click the settings icon (![]() ) and select Transpose.
) and select Transpose.
Inject a language for a column
You can assign a formal language (such as HTML, CSS, XML, RegExp, etc.) for the whole column. So, when you have a piece of code inside the cell that belongs to the column, you can use code generation, code completion, and other features IDE features.
To inject a language for the whole column, right-click the corresponding header cell, and select Edit As. In the list of supported languages, select the language that you want to inject.

Basic operations with cells
You can modify values in the table cells and, if appropriate, upload files.
Action | Shortcut | Description |
|---|---|---|
Edit | F2 | Edit a cell value. Alternatively, select a cell and start typing a new value. To confirm your changes, press Enter. |
Edit Maximized | Shift+Enter | Expands a cell for editing. To confirm your changes, press Ctrl+Enter. |
Add a new line | Ctrl+Enter | Adds a new line in the regular editing mode (F2). |
Revert selected | Ctrl+Alt+Z | Restores the previous cell value. |
Maximize | Ctrl+Shift+Alt+M | Expands the selected cell. |
Add a new line in a maximized cell | Enter | Adds a new line in the maximized editing mode (Shift+Enter). To confirm your changes, press Ctrl+Enter. |
Set the default value | Ctrl+Alt+D | Sets the current cell value to the default value. For more information about how to set a default value, see Set default values for a cell.  |
Set the NULL value | Ctrl+Alt+N | Sets the current cell value to the NULL value. For more information about how to set a default value, see Set default values for a cell.  |
Load file | Uploads a file into the field. Right-click a cell and select Load File. | |
Edit as | F2 or Shift+Enter | Edit a value in the cell as a fragment of SQL, HTML, XML, or any other supported language. |
Value completion | Ctrl+Space | Opens the suggestion list. To invoke value completion, start editing the cell and press Ctrl+Space. The list contains values from the current column that match your input. |
Adding cells with the same contents to the selection | Alt+J | Adds the nearest cell with the same contents to the selection. To remove a cell from the selection, press Shift+Alt+J. |
Expand a selection from a cell to a table | Ctrl+W | Expands a selection from a cell to a table.
|
Compare cells | Ctrl+Shift+D | Compares the contents of two or three cells within one table. Select up to three cells and press Ctrl+Shift+D. Alternatively, right-click the selection and select Compare Cells.  |

Edit multiple cell values simultaneously
Select a range of cells that you want to edit.
Start typing a new value. The changes are applied to all the selected cells.
To confirm the value, press Enter. To cancel editing, press Escape.
Add a row
Click the Add New Row icon (
 ) on the toolbar. Alternatively, right-click the table and select Add New Row from the context menu.
Press Alt+Insert.
Delete a row
-
Select the row or rows that you want to delete.
Rows are selected by clicking the cells in the column where the row numbers are shown. To select more than one row, use mouse clicks in combination with the Ctrl key.
Click the Delete Row icon (
 ) on the toolbar. Alternatively, press Ctrl+Y or Delete.
Submit changes manually
By default, changes in tables are not submitted automatically. At first, you make changes in your local copy of the table, then you need to submit all changes to a database.
To submit changes to a database, click the Submit icon (![]() ), or press Ctrl+Enter.
), or press Ctrl+Enter.
Submit changes automatically
By default, changes are not submitted to a database unless you press the Submit icon (![]() ), or press Ctrl+Enter. You can enable the Submit changes immediately option to submit your changes automatically.
), or press Ctrl+Enter. You can enable the Submit changes immediately option to submit your changes automatically.
In settings (Ctrl+Alt+S), navigate to .
Select Submit changes immediately.
Click OK.
Submit changes by using database transactions
You can select to commit transactions automatically or manually. To change the commit mode, use the Tx drop-down menu on the toolbar.

If you submit a change to the database server and the commit mode is set to Auto, each change of values, rows, or columns is implicitly committed and cannot be rolled back.
If the commit mode is set to Manual, you can explicitly commit or roll back submitted changes by means of the Commit icon (![]() ) or the Rollback icon (
) or the Rollback icon (![]() ). Otherwise, select Commit (Ctrl+Shift+Alt+Enter) or Rollback commands from the context menu.
). Otherwise, select Commit (Ctrl+Shift+Alt+Enter) or Rollback commands from the context menu.
The Tx switch can also be used for selecting the isolation level for the transactions.
Revert changes
Before you submit the changes, you can revert them.
The scope of the revert command is defined by the current selection in a table: the command is applied only to the changes within the selection. So you can revert an individual change, a group of changes or all the changes. If nothing is currently selected, the revert command is applied to the whole table.
To revert non-submitted changes, select and right-click a cell or a number of cells. Select Revert Selected (Ctrl+Alt+Z).
Compare tables
You can compare the current table with any other table that is open in a data editor or shown in the Database Console tool window.
Select a table.
Click the Compare with icon (
), and select another table or a result set.If needed, change the value of the Tolerance parameter in the comparison dialog. The Tolerance parameter defines a maximum number of differences that are allowed between two result sets. For example, if you want to consider two rows as equal if their data differs in a single column, enter
1in the Tolerance field.
Export a table to a file
When you copy table data to the clipboard or save it in a file, the data is converted into one of the available output formats. As an output format, you can select SQL INSERT or UPDATE statements, TSV or CSV, an HTML table or JSON data.
Open a table or a result set, click the Dump Data icon (![]() ) and select To File.
) and select To File.

Export a table to a clipboard
On the toolbar, click the Dump Data icon (![]() ) and select To Clipboard.
) and select To Clipboard.
Copy and paste cells between tables
You can copy (Ctrl+C) and paste (Ctrl+V) selected cells and ranges of cells - within the same table or from one table to another one. When pasting, PyCharm converts data types automatically if and as necessary.
Configure data output format and options
You can configure how extracted data is converted into text using predefined output formats, customized formats, and scripts. To configure the output for extracted data, right-click any cell in the table and point to Data Extractor.

In this menu, you can select the output format (for example, as SQL INSERT statements, HTML table, or in CSV format) or a script that converts data into a specific format. The following additional options are also available:
- Skip Computed Columns (SQL)
- Enable to exclude columns with calculated values (affects SQL output formats).
- Skip Generated Columns (SQL)
- Enable to exclude columns with auto-increment values (affects SQL output formats).
- Add Table Definition (SQL)
- Enable to include the
CREATE TABLEstatement (affects SQL output formats).
Additionally, you can configure the following parameters:
Configure CSV Formats. Opens the CSV Formats dialog that you can use to manage your delimiter-separated values formats (for example, CSV or TSV).
Go to Scripts Directory. Opens a directory with the scripts that convert table data into various output formats.
Export data to a database
Make sure that the database is added as a data source in the Database tool window.
Right-click any cell in the table and then click Export to Database.
Specify the database, target schema (to create a new table with the exported data) or table (to add exported data to an existing table).
Configure the data mapping and settings for the target table.
Saving a LOB in a file
You can save a binary large object (BLOB or LOB) from a cell into a file.
Right-click the cell that contains the LOB and select Save LOB.
In the save dialog, specify the name and location of the file and click OK.
Update the table view
You need to update the table view if you want to synchronize the data that you see in the editor with the contents of the database. Or, when you want to apply the page size limit setting after its change.
To refresh the table view, consider the following actions:
Click the Synchronize icon (
 ) on the toolbar.
 Right-click the table and select Reload Page from the context menu.
Press Ctrl+F5.
View the query that generated the table
To see the query that was used to generate the table, click View Query on the toolbar. If necessary, you can select the query text and copy it to the clipboard (Ctrl+C).
To close the pane where the query is shown, press Escape.