Create a file template
File templates are used to create one or more new files with predefined code, such as a type declaration, unit test, and so on. File templates have no shortcuts, they are identified by their descriptions. For more information, refer to Create files from templates and Create multi-file templates.
The body of a file template consists of plain text, which will appear as is, and parameters. The idea is to combine these to maximize efficiency when invoking the template.
Create a new File template
From the main menu, choose .
In the Templates Explorer window that appears, click the File Templates tab.
Optionally, if you want to create your template in a specific settings layer, choose the desired layer in the Layer list. For more information, refer to Storage of templates.
Click New Template
.png) . The newly created template is opened in the Template editor.
. The newly created template is opened in the Template editor. Specify template name in the Description field.
Optionally, in the Default file name specify a name that ReSharper suggests when applying the template. You can also tick the File name must be a valid identifier checkbox to make ReSharper check if the filename specified when applying the template is valid as a type identifier. This option is helpful if your template creates a file for a new type and the type name is initialized from the provided filename with the Current file name without extension macro. You can check the predefined file templates to see how it is implemented.
To change the default scope of the template, click the Availability hyperlink. In the dialog that appears, use checkboxes to define where the new template can be applied. You can expand some scopes to specify details (for example, file masks or language versions).
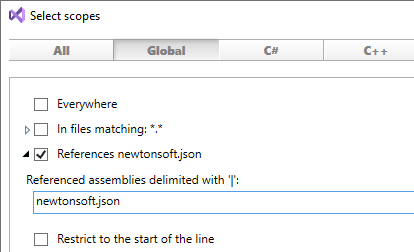
If the template uses classes and methods from non-system assemblies, you can make the template available only in projects that reference these assemblies — in the Global category, select References and specify assembly names without the .dll extension:

Create the body of the template by typing or pasting the desired code.
The template code can contain plain text and parameters. As soon as you type a parameter (prefixed and suffixed with
$), it becomes available in the Parameters section to the right of the text area . Configure all defined parameters as described in the Declare template parameters section.Configure template formatting options:
Select the Reformat checkbox to make ReSharper automatically reformats the expanded code fragment according to your formatting preferences.
Select the Shorten qualified references checkbox to make ReSharper automatically insert namespace import directives or remove qualifiers that become redundant after the template is applied. If this checkbox is not selected, ReSharper will not insert any namespace import directives.
To save the template, choose on the Visual Studio menu or press Ctrl+S.
When you invoke a command to apply a file template, the list of available templates is shown to you. We call it 'quick access list' or just 'quicklist'. You can edit this list to add your favorite templates there and/or rearrange their order.
Edit the quick access list
From the main menu, choose .
In the Templates Explorer window that appears, click the File Templates tab.
Choose a scope to see the list of templates for this scope.
The templates included in the quick access list are shown in the In quicklist section; other templates available for the selected scope are shown in the Not in quicklist section.
Optionally, use template categories to narrow down the list of available templates that are not in the quick access list.
Use drag-and-drop to add templates to or remove them from the quick access list and/or rearrange their order.