Manage and share ReSharper settings
ReSharper saves your preferences using the mechanism of layered settings, which provides the following benefits:
You can have different settings in different solutions.
You can keep different subsets of the preferences in different places and combine them when you work on a specific solution. For example, you can keep your personal preferences for symbol icons and your team preferences for code formatting in different setting files and combine these preferences automatically.
You can synchronize preferences within your team by keeping a specific subset of settings under a VCS. ReSharper provides a default option of keeping team preferences in a separate file, which is saved in the solution folder and can be easily added to your VCS. If other team members use ReSharper , settings from this file will be applied automatically as soon as they pull the changes from the VCS — no Visual Studio restart or solution reload is needed.
As any subset of settings can be saved in a file and updated dynamically, you can share your ReSharper preferences in many other ways. For example, you can keep your personal preferences in Dropbox and use them on different machines.
Preferences from different setting files are applied as layers so that if the same setting has different values in different setting files the value from the 'upper' layer is used. This allows you to override settings defined in a specific setting file instead of changing them in this file.
Consider the following example:
Suppose you prefer to use BSD style brackets, and keep this formatting preference in your personal settings. But then you start working on a specific solution where GNU style brackets are used by a convention — ReSharper allows you to change the corresponding formatting preference and save it in a solution-specific setting layer so that it overrides your personal preference and applied as long as you work on this solution. When you open another solution, you personal preference is applied again.
Default settings and setting layers
Out of the box, ReSharper comes with the default set of preferences, which are based on conventions and best practices in the .NET world. These default settings are hard-coded in the product and you can always reset to the defaults if necessary. If you change any settings, your change is saved in a settings layer and ReSharper applies it overriding the corresponding default setting. Initially, ReSharper suggests three layers, in which you can save your preferences: This computer, Solution team-shared, and Solution personal.
'This computer' layer
This settings layer is designated for your personal global settings and applies for all solutions on your local machine.
The corresponding settings file is saved as: %APPDATA%\JetBrains\Shared\vAny\GlobalSettingsStorage.DotSettings
'Solution team-shared' layer
This layer is designated for common settings that enforce your team preferences for the current solution , for example naming style, formatting rules, etc . Settings in this layer override settings in This computer layer.
The corresponding settings file <SolutionName>.sln.DotSettings is saved in the solution folder.
As soon as this file is added to your VCS and the team members get it, they will have settings from this file applied automatically without reloading the solution.
'Solution personal' layer
This layer allows you to override team-shared settings without changing them. You may find this helpful if you need to have some settings applied only in this solution and independently of your team.
The corresponding settings file <SolutionName>.sln.DotSettings.user is saved in the solution folder. You should not add it to your VCS.
Consider the illustration below. You can see that initially all setting layers are empty and therefore ReSharper can 'see through them' and apply the default settings:
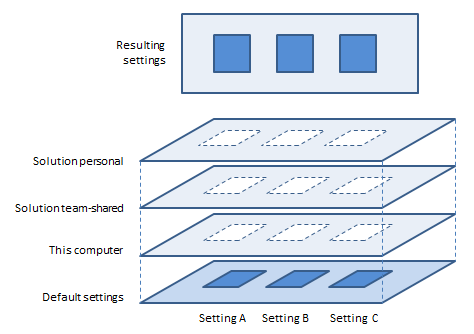
In fact, initially the settings-layer files do not exist, they are first created when you modify and save some setting. But if a setting file exists, it is still 'transparent' for all setting that are not defined in it.
Save and override settings
Each time you change some setting in the ReSharper options dialog, a message with the number of unsaved setting appear at the bottom of the dialog.

To apply the changes, you should save them using one of the buttons:
Save (Smart Save)
This applies the 'smart save' logic.
Use it to save your modifications and keep team-shared and/or custom layers (if any) intact. In other words, use Save if you just want to save your changes without bothering about setting layers.
Save will save your changes to 'This computer' setting layer, then — if there are other values for the modified settings in the 'Solution team-shared' and/or custom layers — the changes will also be saved to the 'Solution personal' layer to override values in other layers.
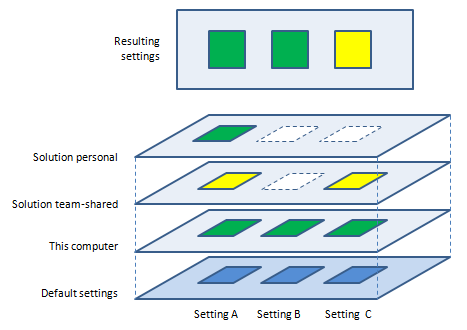
Consider the example in the illustration below. Suppose you changed three settings and had 'green' instead of ‘blue’ values; these changes were saved in 'This computer' layer. Then, your team has decided to have settings A and C ‘yellow’ within your team-shared solution, so these values were saved by a team-lead in the 'Solution team-shared' layer, ReSharper applied them as soon as you pulled changes from your VCS. Finally, you realized that you felt more comfortable with the ‘green’ value for setting A, and you changed and saved it again, this time it was also saved in the 'Solution personal' layer, which allowed you to have the desired value applied without changing the team-shared layer:
Save To (Save to Specific Layer)
You will need to use these commands to save modified settings to the 'Solution team-shared' layer or to a custom layer. You can also save the modifications to any other layer if you need it for some purpose.
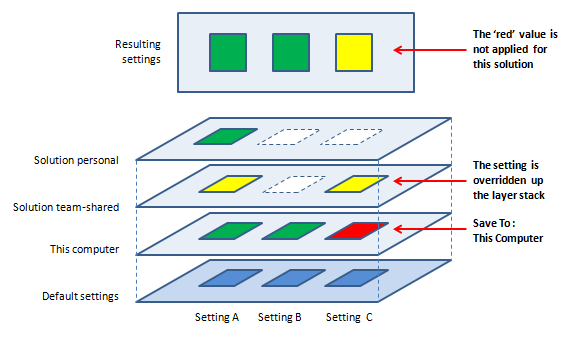
The only catch with saving a setting to a specific layer is that it may NOT be applied if the same setting is defined with another value anywhere in other layers above in the stack of layers. The illustration below shows how we tried to change setting C to ‘red' in 'This computer' layer and why the resulting setting failed to be changed.
Manage setting layers
By default, you can share ReSharper settings per solution using the 'Solution team shared' layer — the only thing you need to do is to put the *.dotSettings file under version control.
If you want to share settings in other ways, you would need to learn how to create new setting layers, import and export them. For these purposes, ReSharper provides the Settings Layers dialog, available in the Visual Studio menu () and in the ReSharper options dialog (by clicking the Manage button).
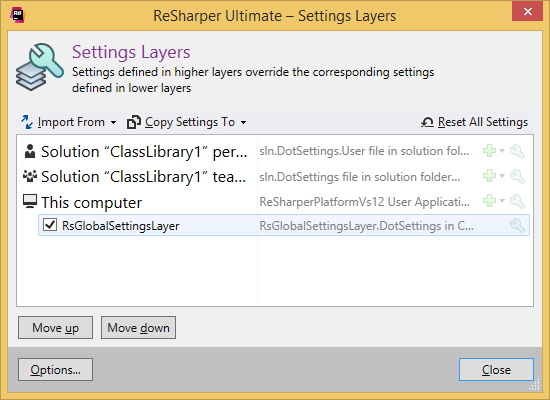
Custom setting layers are added under existing default layers. For example, if you want the settings from the custom layer to be applied for all solutions, add it under 'This computer' layer; otherwise add it under one of the solution-specific layers depending on whether you want it to override the team-shared settings or not.
As soon as a custom setting layer is added, it appears in the Save To selector in the ReSharper options dialog, using which you can save modified settings to the custom layer. You can also modify settings in this layer by editing this layer.
Add a custom setting layer
In the Settings Layers dialog, select one of the default layers, under which you would like to add a layer.
Do one of the following:
Click Add Layer
.png) , then click Create Settings File to create a new empty setting layer or Open Settings File to include an existing setting layer either from your filesystem or from any URI.
, then click Create Settings File to create a new empty setting layer or Open Settings File to include an existing setting layer either from your filesystem or from any URI.Right-click and choose one of the corresponding commands in the Add Layer selector.
Depending on the selected command, either specify a name and location for the new setting layer file, or select an existing setting layer file with .DotSettings extension.
Settings from the added layer are applied according to its position in the stack of layers, which you can see in the Settings Layers dialog, that is if some setting is defined in the upper layer, the value from the upper layer is used in the resulting settings. If necessary, you can rearrange custom setting layers within the group with the Move up and Move down buttons that become available when you select the layer.
As an alternative to saving modified settings to a specific layer using the Save To button in the ReSharper options dialog, you can open a specific setting layer for editing.
Edit a specific setting layer
In the Settings Layers dialog, select a setting layer that you want to edit.
Do one of the following:
Click Edit Layer
.png) .
.Right-click and select Edit in the context menu.
Double-click the desired layer.
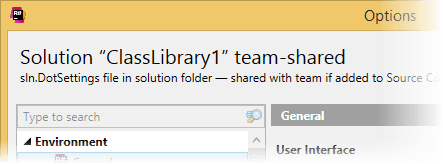
The Options dialog opens, where the name of the layer and its location are displayed at the top of the dialog:
Note that the values of the settings that you see in this mode are either taken from the default values or from values defined in the edited layer. If a setting is not defined in the edited layer, the value from the default settings is shown (for example the value 'blue' for 'Setting B' in the illustration below).
If in this case, you need to save the value 'blue' in the 'Setting B' of the edited layer, you need to save the setting first with some other value, and then edit it again and save with the desired value.
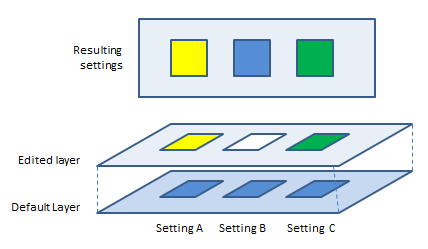
Edit the settings in the layer as necessary and click Save to save the changes.
You can export a specific subset of settings from any setting layer to a new settings file. This file can be then used on another instance of ReSharper to apply these settings.
Export settings from a setting layer to file
In the Settings Layers dialog, select a setting layer from which settings should be exported.
Do one of the following:
On the toolbar, click Import/Export From
.png) , then click Export to File.
, then click Export to File.Right-click the layer and choose Export to File in the context menu.
In the Export to File dialog that opens, specify group(s) of settings to be exported and click OK, then specify the name and location for the setting layer file.
As an alternative to adding a custom setting layer, you can copy a subset of settings from this custom layer to one of the existing default or custom layers.
Import settings from a setting layer file to a setting layer
In the Settings Layers dialog, select a setting layer where you want to import settings.
Do one of the following:
On the toolbar, click Import/Export Settings
.png) . Depending on the location of the file to be imported, click Import from File or Import from URL.
. Depending on the location of the file to be imported, click Import from File or Import from URL.Right-click the layer. Click Import from in the context menu, then click Import from File or Import from URL.
Specify location of the file to be imported. Pay attention, that if you have chosen to import from URL, the path to the file should be specified in the UNC format.
In the Import from File dialog that opens, specify group(s) of settings to be imported and click OK.
ReSharper also allows you to copy a subset of settings from one mounted setting layer to another.
Copy settings from one layer to another
In the Settings Layers dialog, select a setting layer from which you want to copy settings.
Do one of the following:
On the toolbar, click Copy Settings To
.png) , then select the target setting layer.
, then select the target setting layer.Right-click the layer, select Copy Settings To in the context menu, and then select the target setting layer.
In the Copy To dialog that opens, specify group(s) of settings to be copied and click OK.
If necessary, you can clear all settings saved in a specific layer. To do so, right-click the layer and click Reset in the context menu.
Moreover, you can reset all settings in all predefined layers and unmount all custom setting layers, thus returning all settings to their default values. To do so, click Reset All Settings ![]() on the toolbar.
on the toolbar.
You can also disable custom setting layers temporarily by clearing checkboxes next to them or unmount a specific custom setting layer by right-clicking on it and selecting Remove in the context menu.
Upgrade settings to newer versions
Sometimes a newer version of ReSharper may introduce modifications to the storage format of settings. In such cases, the affected settings files are upgraded automatically on the first start of the new version — ReSharper just adds settings with modified format to the settings file. It also adds an entry, which says what was upgraded to prevent further upgrades. For example:
However, even if a settings file was upgraded, it can still be used with older ReSharper versions (for example, if you share this file with your teammates who didn't upgrade), because the deprecated settings are neither changed nor removed. Among other things, this means that you can safely commit changes in automatically upgraded .dotSettings files to your VCS.
It is important to note here that when you go back to an older version after an update, then change some settings using this older version, and then return to the newer version — ReSharper will not upgrade the settings for the second time. Therefore, some settings that you changed might be saved in the old format and not read by the newer version.
So if you (or your team) are using two different versions of ReSharper simultaneously, you may want to check whether the preferences modified in one version are read correctly in another version, and if not, just make the same modification once again in the other version.