Naming Style
ReSharper helps you define, control, and apply naming style for symbols in your code. Naming style is implemented as a set of rules, each of which targets specific identifiers with the set of constraints (for example, a rule can target static private readonly fields) . Each rule can have one or more associated styles that define suffixes, prefixes, capitalization of compound words, and so on.
These rules are taken into account when ReSharper produces new code with code completion and code generation features, applies code templates and performs refactorings. ReSharper also helps you detect and fix violations of naming rules. If necessary, the automatic checkup of naming rules can be configured or disabled.
Configure naming rules
Out of the box, ReSharper provides a naming rule for each type of identifier. These rules are based on the Microsoft Naming Guidelines, .NET Platform Coding Style, and various best practices.
Note that there is no strict correspondence between ReSharper naming-rule defaults and any of the above mentioned guidelines.
If your personal preferences or company standards differ from ReSharper defaults, you can configure the naming style in a flexible way: for each type of identifier you can choose capitalization rules, prefixes and suffixes, variations for different access rights, abbreviations to preserve, and more.
Modify a default naming rule
Do one of the following:
Press Alt+Enter on a highlighted symbol with inconsistent naming, then choose Inspection 'Inconsistent Naming' | Change settings for naming rule '[rule name]' .
In the main menu, choose , select the desired rule, and click Edit
 or just double-click it.
In the Edit Rule Settings dialog that opens, check the existing style for the rule.
If the existing style is acceptable, but you would like to allow other styles for this rule, click Add
 . When there are several styles for a single rule, ReSharper does not detect code style violation if a corresponding symbol name matches at least one of these styles. Otherwise ReSharper detects a code style violation and suggests renaming the symbol according to the default style (the first style in the list). To change the default style, use Move Up
  and Move Down
  buttons.
 To configure a specific style, select it in the list and configure prefix, suffix, and choose a naming style.
To remove an unnecessary style, select it in the list and click Remove
 .
. If necessary, you can disable detection of code style violations associated with this rule, allowing ReSharper to detect other code style violations. To do so, clear the Enable inspections checkbox.
Click Set to close the Edit Rule Settings dialog.
Click Save in the Options dialog to apply the modifications and let ReSharper choose where to save them, or save the modifications to a specific settings layer using the Save To list. For more information, see Manage and Share ReSharper Settings.
If the existing rules do not cover all aspects of your naming convention, you can create custom rules. For example, you may want that enums had upper camel case capitalization and the 'E' prefix.
Create a custom naming rule
In the main menu, choose and click Advanced settings.
In the Advanced Naming Settings dialog that opens, click Add
 to create a custom naming rule.
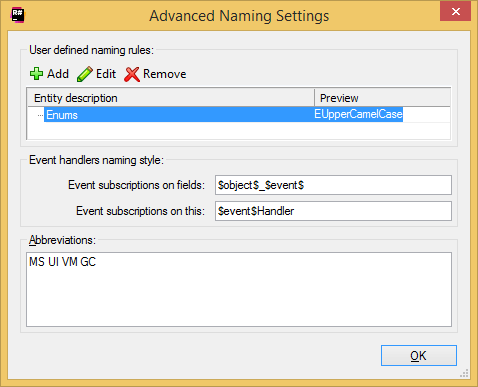
In the Edit Extended Naming Rule dialog that appears, configure the new rule: specify a name for the new rule in the Rule Description field, select the target identifiers in the Affected entities area, use Access rights and Static/non-static areas to further constrain the scope of the rule.
In the Naming style section, configure one or more styles for the rule as described in the procedure above.
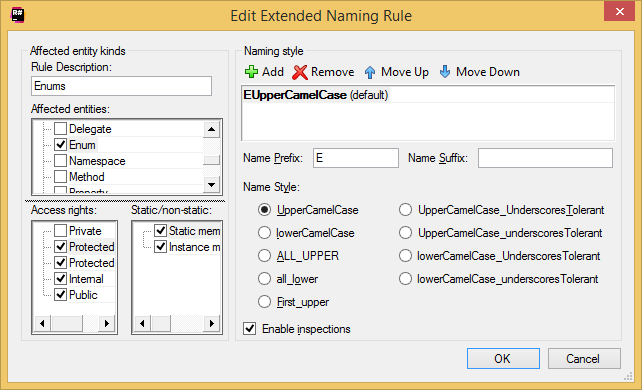
Click OK to close the Edit Extended Naming Rule dialog, and then again OK to close the Advanced Naming Settings dialog.
Click Save in the Options dialog to apply the modifications and let ReSharper choose where to save them, or save the modifications to a specific settings layer using the Save To list. For more information, see Manage and Share ReSharper Settings.
Use EditorConfig to configure naming rules
If you use EditorConfig to maintain code styles for your project, you can also configure naming rules from .editorconfig files.
To configure naming rules from EditorConfig, you have to select the Read settings from editorconfig and project settings checkbox on the page of ReSharper options (Alt+R O).
You can also export naming styles that you already configured in ReSharper settings to an .editorconfig file.
Naming style settings in .editorconfig files are configured using the properties of .NET naming conventions for EditorConfig: dotnet_naming_rule.*, dotnet_naming_style.*, dotnet_naming_symbols.*— will work if the specified kinds of symbols can be matched by kinds of symbols available in ReSharper naming settings.
As EditorConfig convention suggests, ReSharper will apply naming rules defined in files named .editorconfig in the directory of the current file and in all its parent directories until it reaches the root filepath or finds an EditorConfig file with root=true. File masks specified in .editorconfig files, for example *Test.cs are also taken into account.
Ignore uppercase abbreviations that conflict with a CamelCase naming style
Sometimes you may want to use uppercase abbreviations (acronyms) in CamelCase symbol names. By default, ReSharper detects it as inconsistent camel casing and reports a problem:
In this case, you can configure the list of abbreviations to be ignored by the naming style inspection.
It is important to note that uppercase abbreviations should not contradict the naming style defined for specific kind of identifier.
For example, if you added MS to the ignored abbreviations, MSBuilder will be an acceptable name for identifiers with the UpperCamelCase style, but not for identifiers with lowerCamelCase or all_lower naming styles.
Similarly, myMSBuilder will be OK for lowerCamelCase- but not for UpperCamelCase-styled identifiers.
Add an abbreviation to the ignore list
In the editor, set the caret at a highlighted symbol that uses the abbreviation in its name.
Press Alt+Enter or click the action indicator to the left of the caret to open the action list.
Choose Inspection 'Inconsistent Naming' | Add [abbreviation] to the abbreviations list
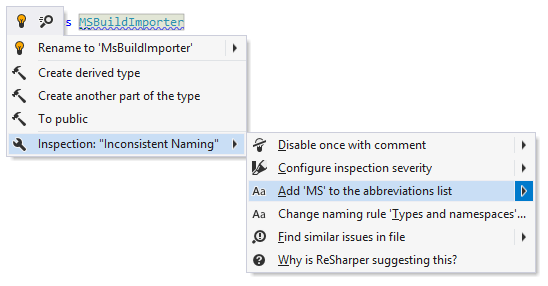
if necessary, you can select where to save this preference. For more information, see Manage and Share ReSharper Settings
If you have many abbreviations that could be used in symbol names, you can edit the list of ignored abbreviations.
Edit the list of ignored abbreviations
In the main menu, choose and click Advanced settings.
Add abbreviations that ReSharper should ignore to the Abbreviations field using spaces as delimiters.
Click OK to close the Advanced Naming Settings dialog.
Click Save in the Options dialog to apply the modifications and let ReSharper choose where to save them, or save the modifications to a specific settings layer using the Save To list. For more information, see Manage and Share ReSharper Settings.
Detect and fix violations of naming rules
ReSharper uses the 'Inconsistent Naming' code inspection to detect violations of naming rules in your code. By default, this inspection is always applied during the design-time code inspection and highlights the detected violations as warnings in the editor. For example, according to the default style, names of interfaces should have 'I' prefix. If an interface name does not match this rule, ReSharper highlights this name and informs you about the problem when you hover the mouse over it:

If you want to find naming style violations beyond the current file, you can run the 'Inconsistent Naming' inspection in the project or in the entire solution.
Find naming style violations in a specific scope
In the editor, set the caret at a highlighted symbol that has inconsistent naming.
Press Alt+Enter or click the action indicator to the left of the caret to open the action list.
Choose Inspection 'Inconsistent Naming' | Find similar issues in file and then select the desired scope.
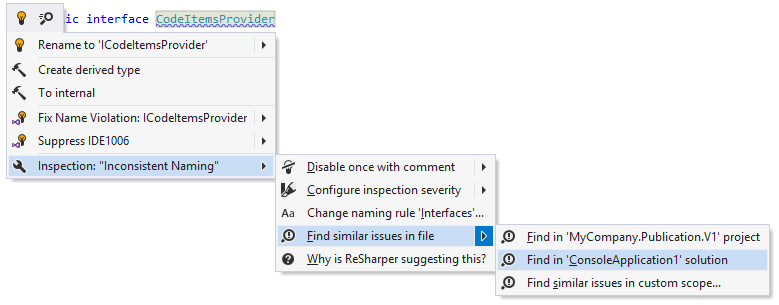
All found naming style violations will be displayed in the Inspection Results window.
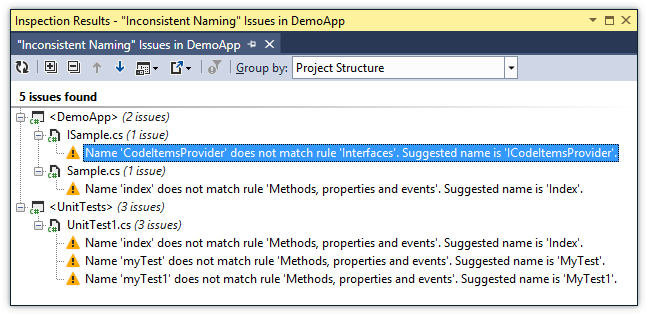
You can double-click the detected problems to navigate to the code of the corresponding symbols.
For most of the naming style violations highlighted in the editor, ReSharper suggests a quick-fix with a conforming name. You can press Alt+Enter and choose Rename to [conforming name] in the action list.
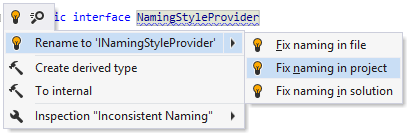
Automatic correction of naming style violations can also be performed in the current file, project or solution using the fix in scope feature.
However, if the symbol with the calculated conforming name already exists in the same namespace, the quick-fix is not suggested. You can fix the naming of such symbol with the Rename refactoring.
Configure and disable automatic naming rules checkup
If you do not want ReSharper to check naming style in the existing codebase, you can either disable the code inspection that is responsible for it, or disable the automatic checkup of a specific rule. However, even if the automatic checkup is disabled, all naming rules will be respected when ReSharper helps you produce new code with code completion, generation, refactorings, and templates.
Disable automatic checkup of naming style
Press Alt+Enter on a highlighted symbol with inconsistent naming, then choose Inspection 'Inconsistent Naming' | Configure inspection severity | Do not show.
On the page of ReSharper options (Alt+R O), start typing 'Inconsistent Naming', and then clear the checkbox next to the corresponding code inspection.
Disable automatic checkup of a specific naming rule
Do one of the following:
Press Alt+Enter on a highlighted symbol with inconsistent naming, then choose Inspection 'Inconsistent Naming' | Change settings for naming rule '[rule name]' .
In the main menu, choose , select the desired rule, and click Edit
 or just double-click it.
In the Edit Rule Settings dialog that opens, clear the Enable inspections checkbox.
Click Set to close the Edit Rule Settings dialog.
Click Save in the Options dialog to apply the modifications and let ReSharper choose where to save them, or save the modifications to a specific settings layer using the Save To list. For more information, see Manage and Share ReSharper Settings.
Use C# naming rules from existing code
If you check out a solution from a public repo or temporarily join a team where a different code naming style is established, you will probably want to follow naming rules in this solution but in ths same time not to change your globally configured naming rules.
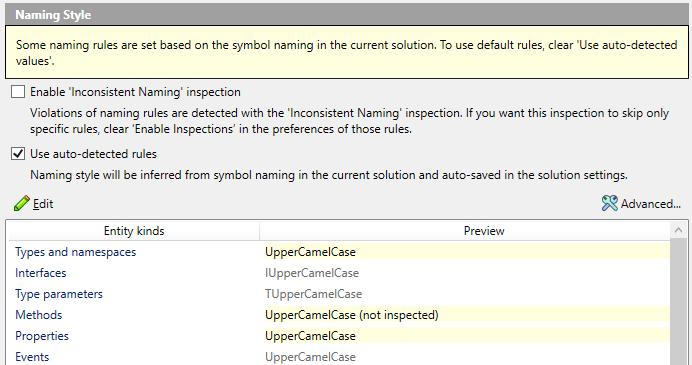
ReSharper will handle such situations automatically — when you open a new solution where symbol naming differs from your global settings, it will detect the naming rules that diverge from your global settings, modify these rules accordingly, and then save the modified rules to the 'Solution personal' settings layer (.sln.DotSettings.user file next to the solution).
If this happens when you open a new solution, ReSharper will show a notification in the editor:

You can click Configure to open the corresponding settings page (). On this settings page, the rules that were changed based on the solution code are highlighted with yellow. If you want to use ReSharper's default naming rules or configure naming style in your own way, clear the Use auto-detected rules checkbox.
Applicability in different languages
This feature is supported in the following languages and technologies:
The instructions and examples given here address the use of the feature in C#. For details specific to other languages, see corresponding topics in the ReSharper by Language section.