Localization refactorings
ReSharper provides a set of resource-related refactorings that greatly simplify internationalizing your projects.
Move to Resource
It is a common practice to store localizable strings in resource files when working on project internalization. ReSharper detects strings to be localized and highlights them, so you can easily find and move such strings from your source code to resource files. ReSharper will declare the corresponding resource entry and replace the string in the code with a resource usage.
Place the caret at the string that should be localized.
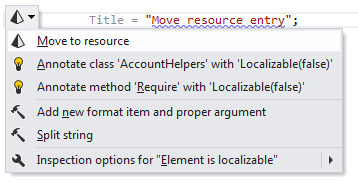
If the string is highlighted by the 'Element is localizable' inspection use the corresponding quick-fix (Alt+Enter)

Otherwise, press F6 or choose from the main menu.
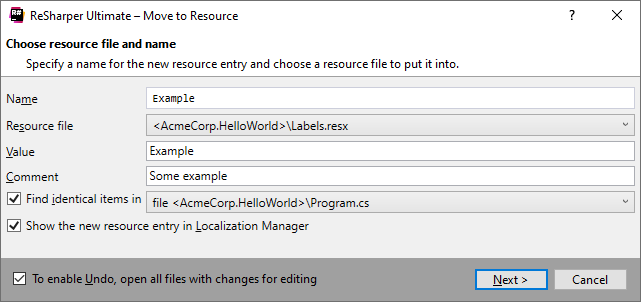
In the Move to resource dialog that appears, ReSharper automatically generates the name for the resource entry and proposes a resource file. If necessary, you can change the name in the Name field and choose other resource file in the Resource File list.

Optionally, you can change the resource string value in the Value text area and add a comment in the Comment text area.
Optionally, you can specify whether to search for identical strings and the search scope by selecting the value in the Find identical items in list.
By default, when the new resource is created the Localization Manager will open and display the resource.
To disable this behavior, clear the Show the new resource entry in Localization Manager checkbox.
Click Next to apply the refactoring.
If you selected the Find identical items in option and ReSharper finds any matching strings defined within the specified scope, you will be able to choose which of these strings should be replaced with usages of the new resource.
After applying the refactoring, specified occurrences of the string are replaced with corresponding resource usages and the new resource declaration appears in the specified .resx file.
After the new resource is created you can override its value for other cultures.
Move Resource
If your project contains multiple resource .resx files, this refactoring will help you move existing resources from one resource file to another. If there is only one .resx file in the current project, this refactoring is unavailable.
Place the caret at the resource usage in a code file:
 or at the resource name in a .resx file:
Press F6 or choose from the main menu. Alternatively, you can press Control+Shift+A, start typing the command name in the popup, and then choose it there.
In the Move resource dialog that appears, specify a target resource file where you want to move the resource.

Optionally, you can change the resource name.
Click Next to apply the refactoring.
Rename Resource
You can use the Rename refactoring to quickly rename existing resources. After applying the refactoring, all resource declarations in resource files and all resource usages in code files are updated according to the new name.
Place the caret at the resource usage in a code file:
 or at the resource name in a .resx file:
Press F2 or choose from the main menu. Alternatively, you can press Control+Shift+A, start typing the command name in the popup, and then choose it there.
In the Rename Resource dialog that appears, specify a new name for the resource.
Click Next to apply the refactoring.
Inline Resource
The Inline Resource refactoring substitutes resource usages with the original string and optionally deletes the corresponding resource entries from resource files.
Place the caret at the resource usage in a code file:
 or at the resource name in a .resx file:
Press Control+Alt+N or choose from the main menu. Alternatively, you can press Control+Shift+A, start typing the command name in the popup, and then choose it there.
In the Inline Resource dialog that appears, specify refactoring options:
Inline all usages: if selected, replaces all resource usages in the project with the original string. If deselected, replaces only the resource usage where you invoked this refactoring. Note that this option works only if you invoked the refactoring from the code file.
Remove inlined resource declaration: if selected, removes resource declaration from all related resource files. If deselected, leaves declarations intact.
Click Next to apply the refactoring.
Safe Delete Resource
If you are going to delete a resource, use the Safe Delete refactoring to ensure that the delete operation is safe. If there are no resource usages found, the resource will be deleted right away. Otherwise, ReSharper will show all resource usages, allowing you to edit the corresponding code. Removing usages marked with the ![]() icon, will lead to compilation errors.
icon, will lead to compilation errors.
Place the caret at the resource usage in a code file:
 or at the resource name in a .resx file:
Press Alt+Delete or choose from the main menu. Alternatively, you can press Control+Shift+A, start typing the command name in the popup, and then choose it there.
If there are no usages of this resource in code files, the refactoring is applied and resource declarations are removed from all .resx files.
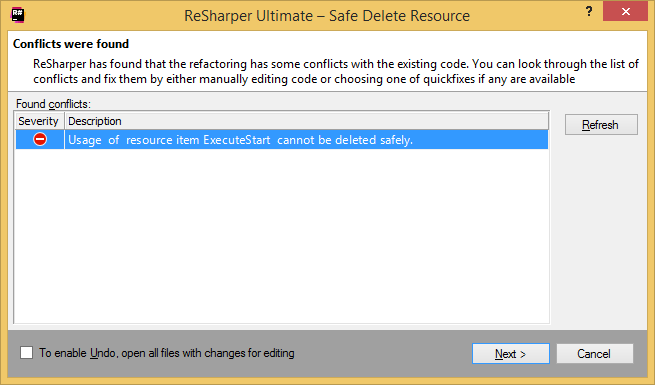
If there are usages of this resource in code files, the Safe Delete Resource dialog opens showing all conflicts.

If you have conflicts trying to safe-delete a resource, resolve them manually and click Refresh.
When all conflicts are resolved and disappear from the dialog, click Next to apply the refactoring.