Directory-Based Settings
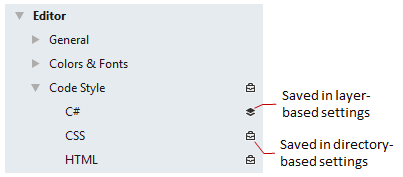
In the Rider settings dialog (Ctrl+Alt+S), you can look at page icons to see which setting-management mechanism is used for specific pages:

Pages that are not marked with any icon host environment settings, which are saved in your user profile.
Preferences for Rider's front-end features, which are based on IntelliJ Platform, are saved in a directory-based format — in XML files in two specific places:
- Your environment settings — such as IDE layout, preferred keymap, editor settings — are saved in your user profile (%USERPROFILE%\.RiderXX\config on Windows, ~/.RiderXX/config on Linux, and ~/Library/Preferences/RiderXX on macOS).
- Your solution-specific settings — for example, Version Control integration, code style preferences — are saved under .idea\.idea.[Solution_Name]\.idea (hidden on macOS) in the solution directory.
If your solution is under a version control, it is recommended to store XML files with solution-specific settings (the .idea folder inside the solution folder) under version control, the exception being workspace.xml and tasks.xml, which store user-specific settings.
Sharing directory-based settings
Introduction
JetBrains Rider allows you to share your IDE settings between different instances of JetBrains Rider (or other IntelliJ platform-based products) installed on different computers.
This is useful if you are using several JetBrains Rider installations, or want to implement the same settings among your team members or company-wide.
Prerequisites
Before you start working with Settings Repository, make sure that the Settings Repository plugin is enabled. The plugin is bundled with JetBrains Rider and is activated by default. If the plugin is not activated, enable it on the Plugins page of the Settings/Preferences as described in Enabling and Disabling Plugins.
Configuring settings repository
If you want to share your IDE settings, perform the following steps:
- Create a Git repository on any hosting service, such as Bitbucket or GitHub.
- On the computer where the JetBrains Rider instance whose settings you want to share is installed, navigate to File | Settings Repository. Specify the URL of the repository you've created and click Overwrite Remote.
- On each computer where you want your settings to be applied, in the Settings/Preferences dialog, expand the node and choose Settings Repository, specify the URL of the repository you've created, and click Overwrite Local.
You can click Merge if you want the repository to keep a combination of the remote settings and your local settings. If any conflicts are detected, a dialog will be displayed where you can resolve these conflicts.
If you want to overwrite the remote settings with your local settings, click Overwrite Remote.
Your local settings will be automatically synchronized with the settings stored in the repository each time you perform an Update Project or a Push operation, or when you close your project or exit JetBrains Rider.
If you want to disable automatic settings synchronization, navigate to File | Settings | Tools | Settings Repository and disable the Auto Sync option. You will be able to update your settings manually by choosing VCS | Sync Settings from the main menu.
Authentication
On the first sync, you will be prompted to specify a username and password.
It is recommended to use an access token for GitHub authentication. If, for some reason, you want to use a username and password instead of an access token, or your Git hosting provider doesn't support it, it is recommended to configure the Git credentials helper.
Note that the macOS Keychain is supported, which means you can share your credentials between all IntelliJ Platform-based products (you will be prompted to grant access if the original IDE is different from the requestor IDE).
Configuring a read-only source
Apart from the Settings Repository, you can configure any number of additional repositories containing any types of settings you want to share, including live templates, file templates, schemes, deployment options, etc.
These repositories are referred to as Read-only sources, as they cannot be overwritten or merged, just used as a source of settings as is.
To configure such repositories, do the following:
- In the Settings/Preferences dialog, expand the node and choose Settings Repository.
- Click
 and add the URL of the GitHub repository that contains the settings you want to share.
Synchronization with the settings from read-only sources is performed in the same way as for the Settings Repository.